|
|||||||
| Tech Talk Technical Discussion About The Nissan 240SX and Nissan Z Cars |
 |
|
|
Thread Tools | Display Modes |
 01-31-2007, 07:28 AM
|
#91 |
|
Zilvia Junkie
 
Join Date: Apr 2004
Location: buffalo,ny
Age: 42
Posts: 541
Trader Rating: (0)
  Feedback Score: 0 reviews
 |
Pretty simple yet a bit time consuming.
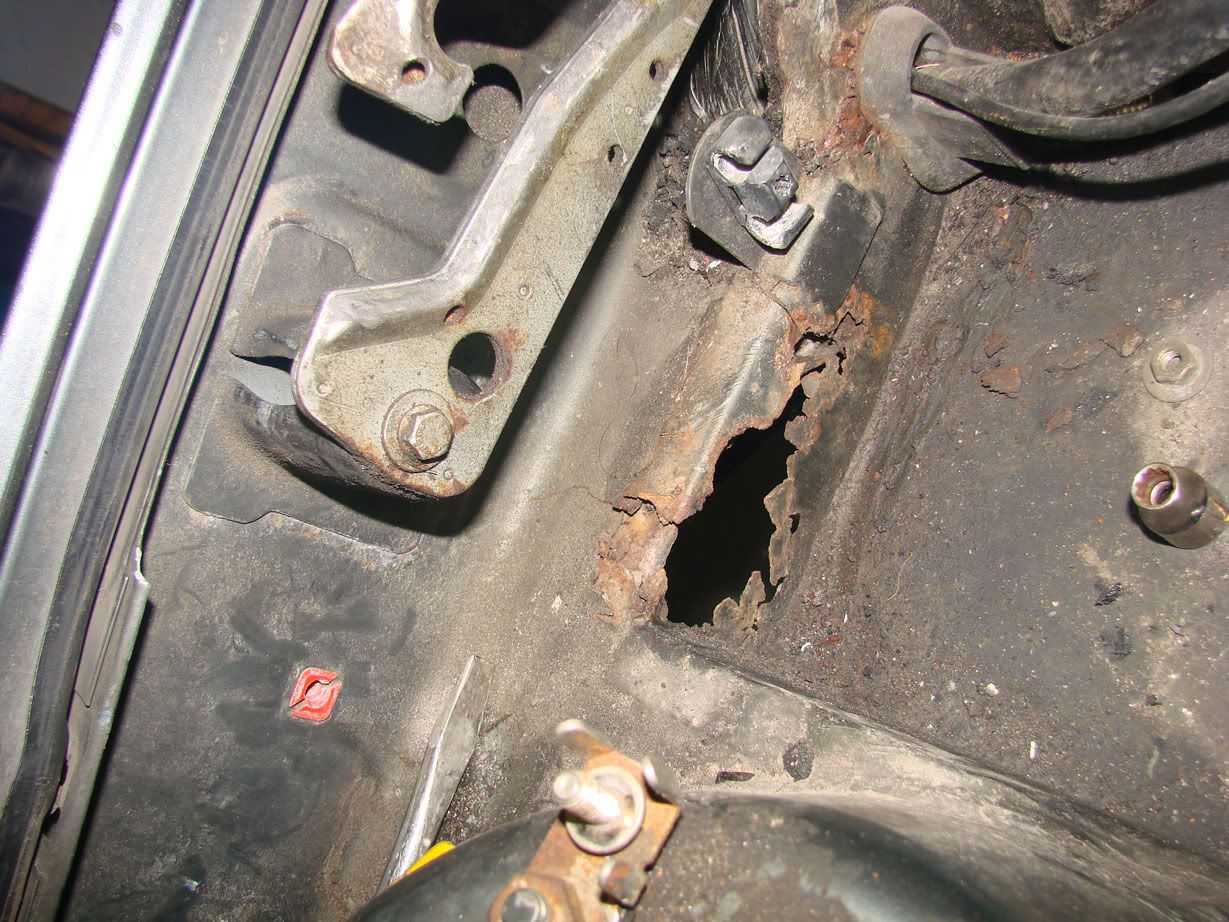
Yesterday I wire wheeled and sanded the driver's side floor pan making sure to get all of the rust off. Most of it was actually just rust dust from a few problem spots: 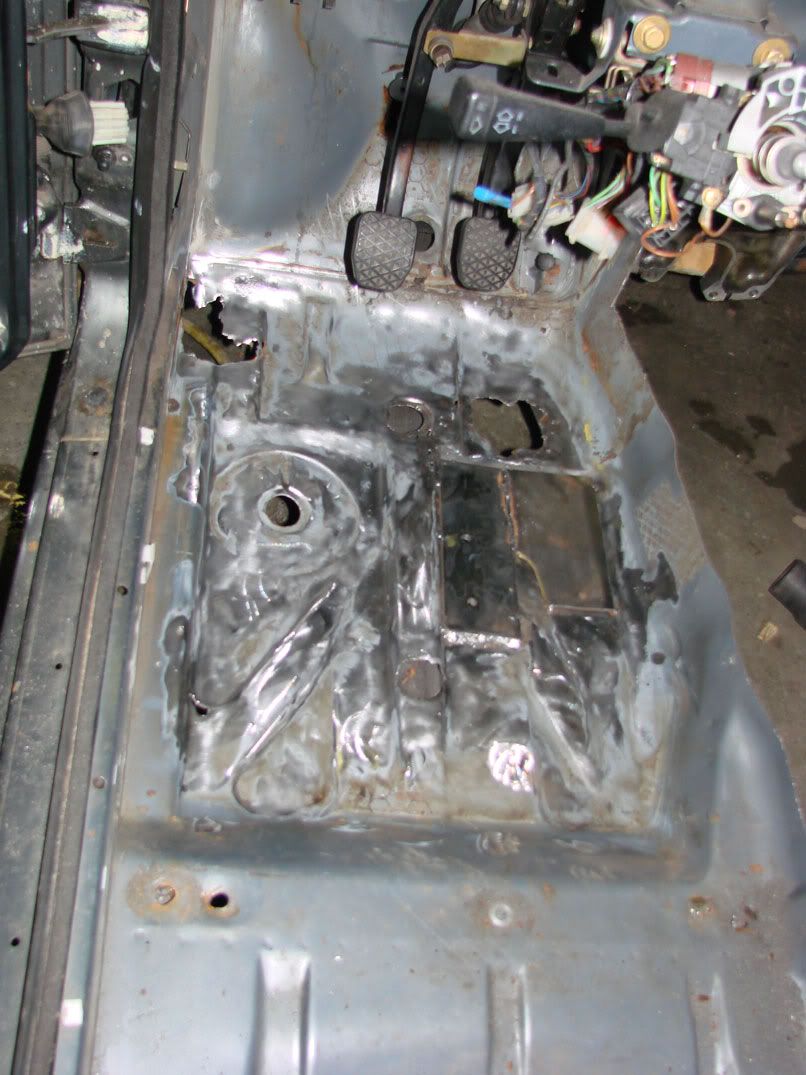 Then, using some 16GA plates, I tacked the plates over the rust from the inside: 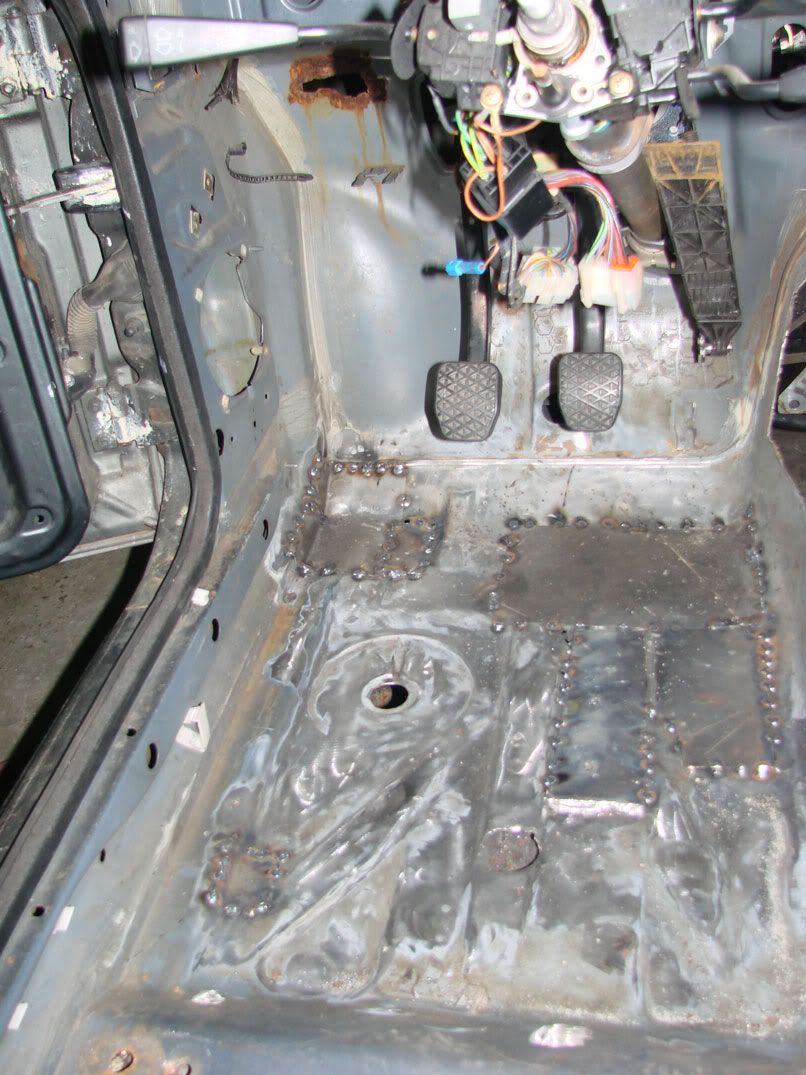 Next, I will fill in the seams with seam sealant and then paint the floorpan with rust inhibiting paint. This is a lot easier than I thought it was going to be. |

|

|
| Sponsored Links |
|
01-31-2007, 10:33 PM
|
#93 | |
|
Leaky Injector
 Join Date: Sep 2006
Location: norcal
Age: 37
Posts: 110
Trader Rating: (0)
Feedback Score: 0 reviews
|
Quote:
 WTF X1000000 WTF X1000000 |
|
|
|
|
|
02-01-2007, 02:09 PM
|
#96 |
|
Zilvia Junkie
Join Date: Apr 2004
Location: buffalo,ny
Age: 42
Posts: 541
Trader Rating: (0)
Feedback Score: 0 reviews
|
yesterday, tonight, and tomorrow all look like they will be spent grinding rust and welding. Not a lot to report on that front.
However... 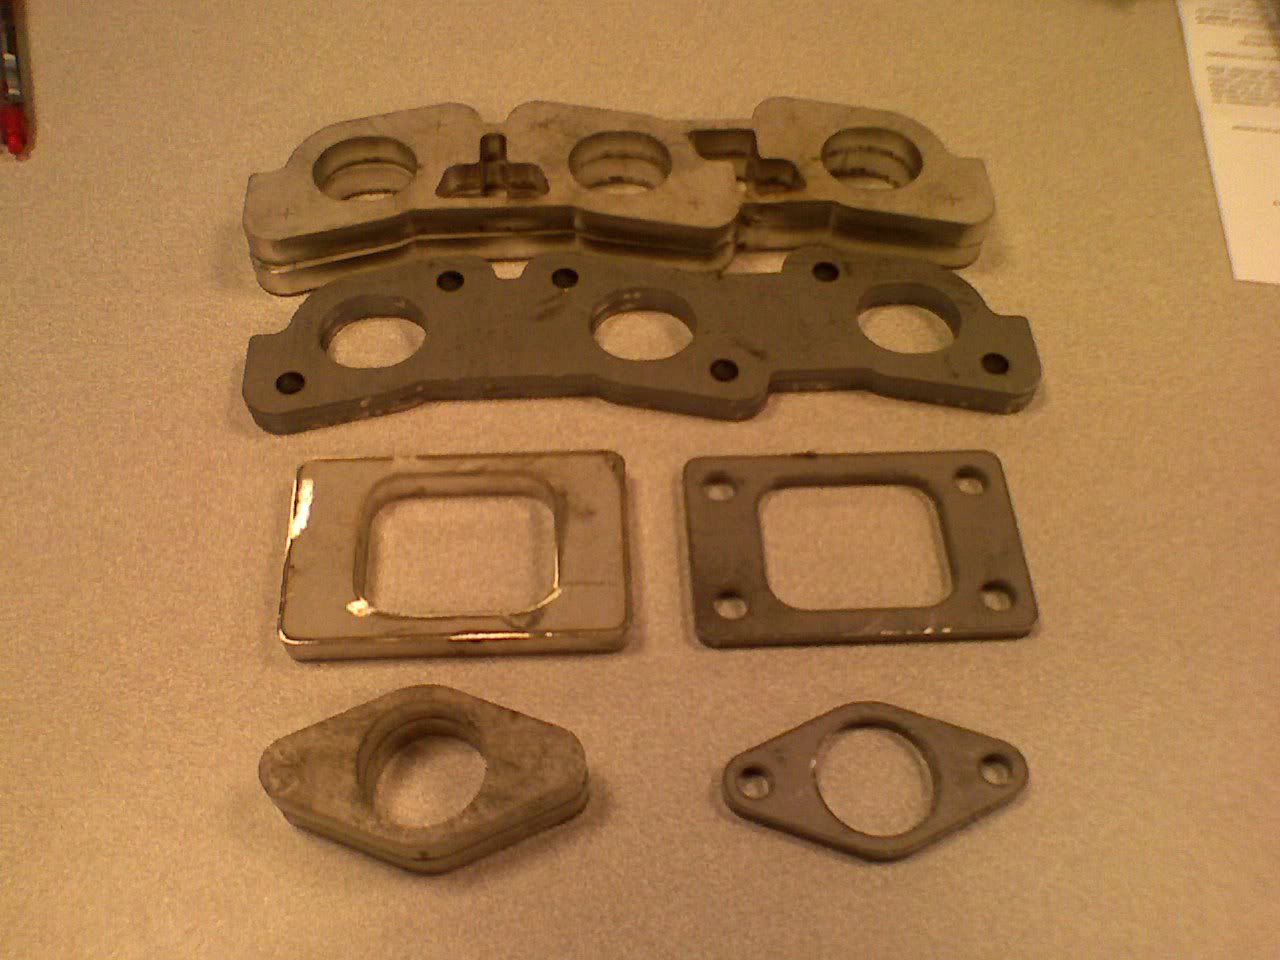 2 sets one for mockup/jig one for the final product. 1/4 Mild steel 1/2" 304SS Compliments of Derrick Corporation. Holla. |
|
|
|
|
02-04-2007, 02:49 AM
|
#97 |
|
Zilvia Junkie
Join Date: Apr 2004
Location: buffalo,ny
Age: 42
Posts: 541
Trader Rating: (0)
Feedback Score: 0 reviews
|
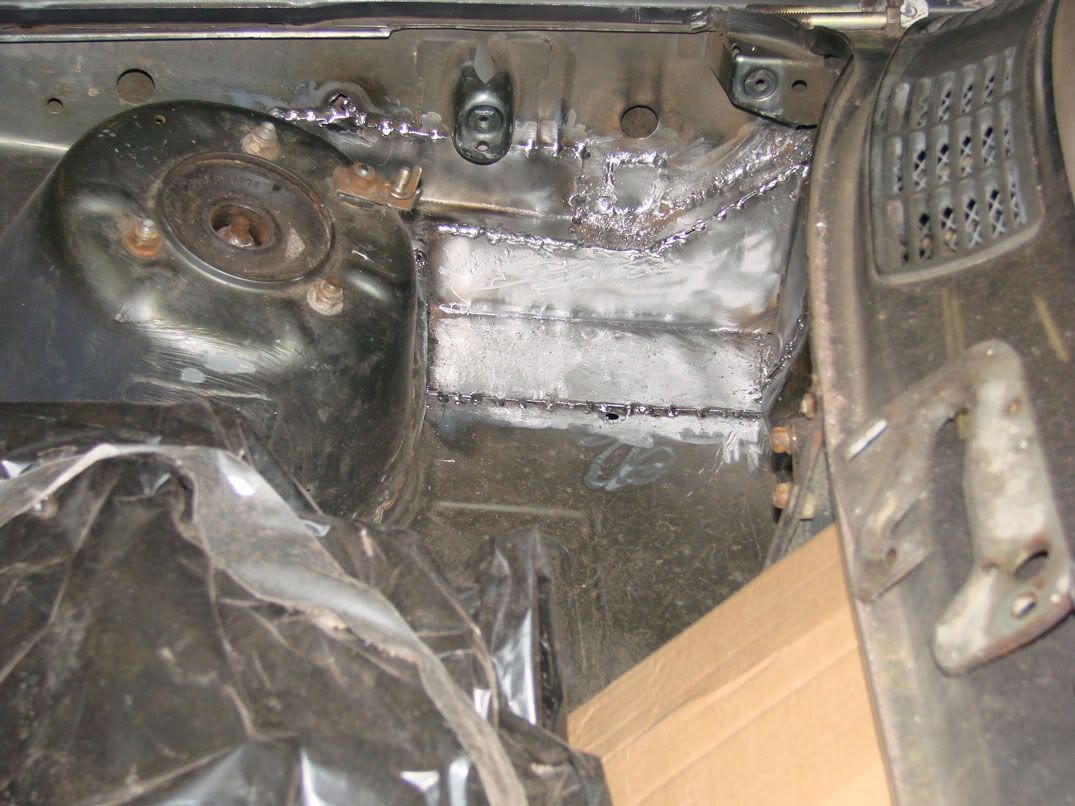
Ok, here's some body shots...
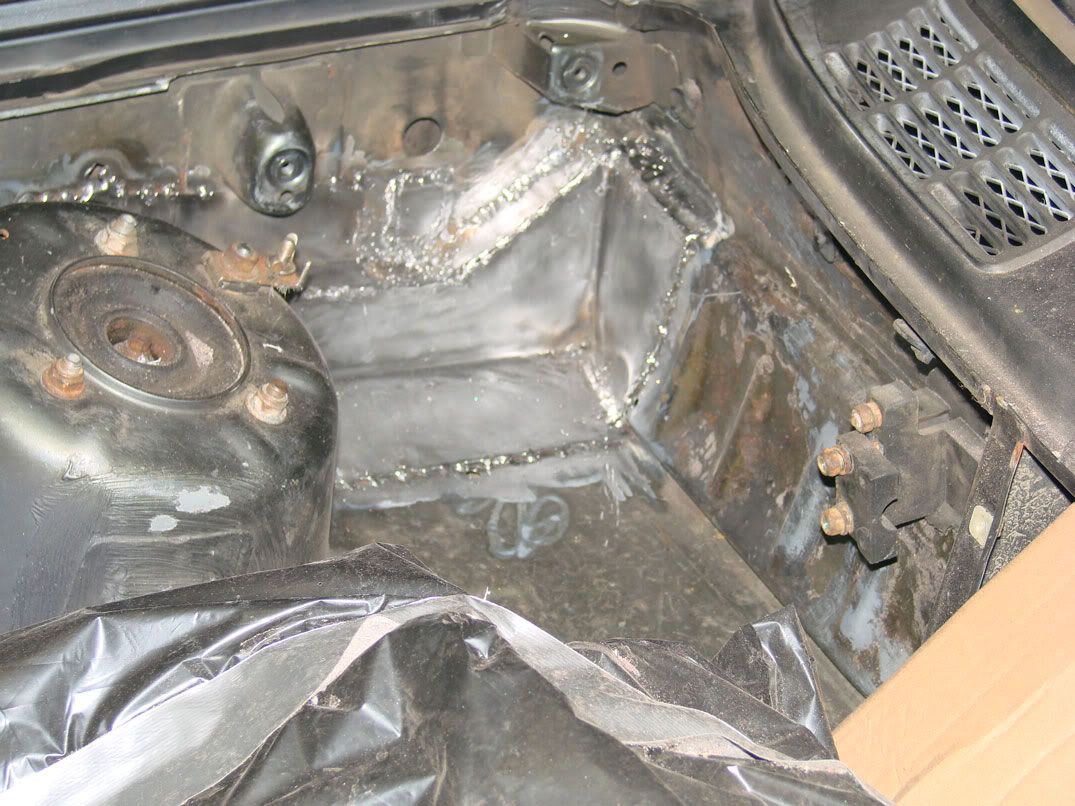
Before:   After: 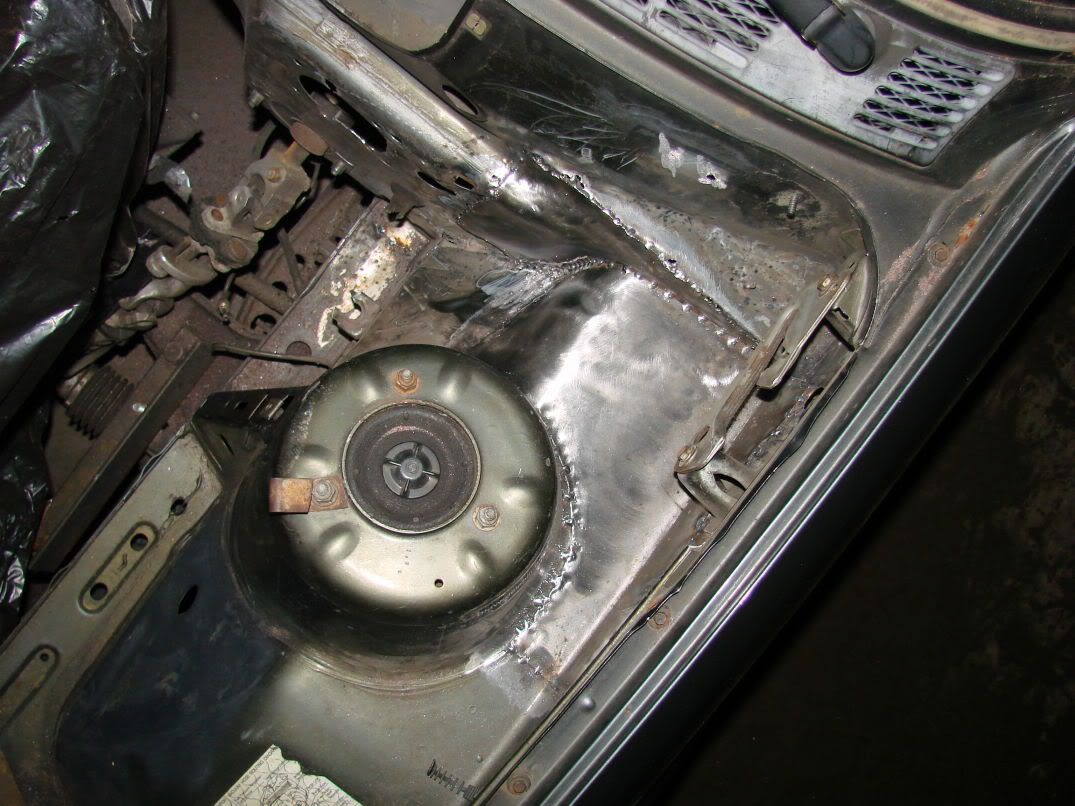 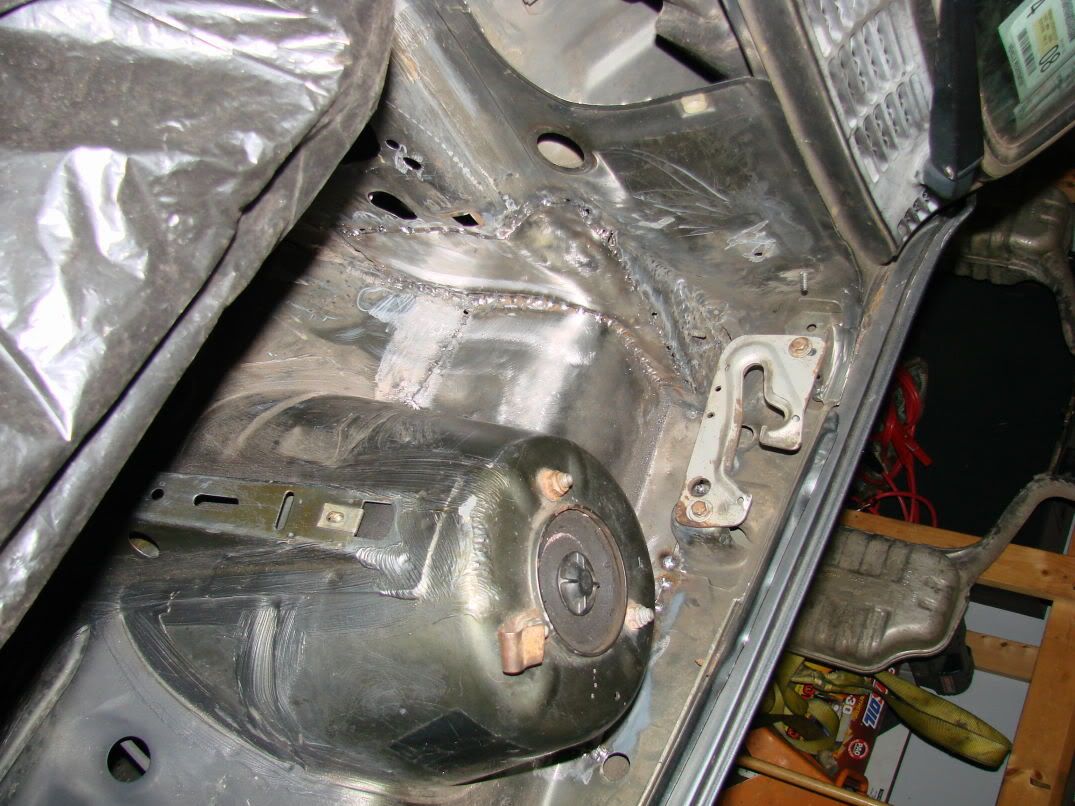  A few blow holes, nothing that won't be taken care of with seam sealer, but all in all a good solid repair. The last shot is a good comparison for everyone who thinks the shell is beat... See the rust at the bottom? That's one day of surface rust on 100% new metal... The camera REALLY makes it apparent... It's almost invisible to the naked eye... Same goes for a lot of the "rust" on the car... |
|
|
|
|
02-04-2007, 07:37 AM
|
#98 |
|
Post Whore!
 
Join Date: Jul 2005
Location: Ottawa, Ontario
Age: 35
Posts: 3,492
Trader Rating: (2)
Feedback Score: 2 reviews
 |
You should really hit it down with some rustoleum primer so it doesn't start rusting like that.
Nice work though, I'm gonna have to fix the floors in my 240 up (although they are not as bad) and this gave me a good idea of how to go about it. Just a quick question... did you make the replacement sheet of metal fit INTO the hole, then spot welded it, or did you make it bigger than the hole?
__________________
613DriftWerks.ca |
|
|
|
|
02-04-2007, 10:03 AM
|
#99 | |
|
Zilvia Junkie
Join Date: Apr 2004
Location: buffalo,ny
Age: 42
Posts: 541
Trader Rating: (0)
Feedback Score: 0 reviews
|
Quote:
it's bigger than the hole. I am holding off on primer because i am waiting to get seam sealant first. I can just knock all that surface rust out with a wire wheel or sandblaster in a few minutes... |
|
|
|
|
|
02-05-2007, 10:03 AM
|
#102 |
|
Post Whore!
 
Join Date: May 2006
Location: San Diego, CA
Posts: 9,135
Trader Rating: (19)
Feedback Score: 19 reviews
|
Beautiful job getting the rust out. Definitely want to get some seam sealer since you're tacking those plates on, but that's no big deal - seems like you're making great time on it!
__________________
 Jordan Innovations has a new web site! www.JordanInnovations.com -- All your favorite FD Pro Drifters love it, trust me -- www.JordanInnovations.com |
|
|
|
|
02-05-2007, 10:05 AM
|
#103 | |
|
Post Whore!

Join Date: Jan 2005
Location: Virginia Beach, Va
Age: 36
Posts: 5,730
Trader Rating: (31)
Feedback Score: 31 reviews
|
damn man keep up the good work on this unique swap bro
__________________
Slip Gypsies Blog Quote:

|
|
|
|
|
|
02-07-2007, 06:39 AM
|
#105 | |
|
Zilvia Junkie
Join Date: Apr 2004
Location: buffalo,ny
Age: 42
Posts: 541
Trader Rating: (0)
Feedback Score: 0 reviews
|
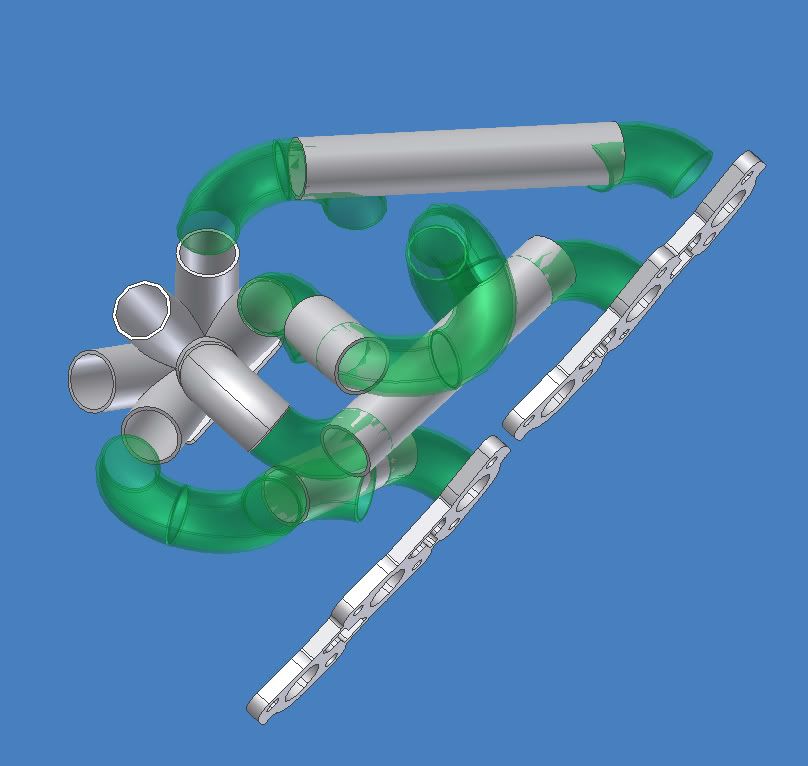
just dicking around, not the actual dimensions... yet:
  Quote:
That part actually only took about 20 minutes. It took me an hour or so to figure out the best way to constrain the elbows... The way i set it up, I can simply enter a few constraints to my browser bar to adjust the runner length, until they are all equal, then I can actually drag the tubing around on the screen until it is packaged properly, all the while maintaining 100% tangential fitment.  |
|
|
|
|
|
02-07-2007, 11:16 AM
|
#107 | |
|
Zilvia Junkie
Join Date: Apr 2004
Location: buffalo,ny
Age: 42
Posts: 541
Trader Rating: (0)
Feedback Score: 0 reviews
|
Quote:
it's just autocad inventor. You can DL it anywhere... But learning to use it well... another story... |
|
|
|
|
|
02-07-2007, 11:21 AM
|
#108 |
|
Zilvia Addict
 |
yea autocad. i remember helping my friend in highskool with that. your design reminds me of that old skool game pipedreams. haha. your build is looking good so far. keep it up. can't wait for the end result.
__________________

|
|
|
|
|
02-08-2007, 10:49 PM
|
#109 |
|
Zilvia Junkie
Join Date: Apr 2004
Location: buffalo,ny
Age: 42
Posts: 541
Trader Rating: (0)
Feedback Score: 0 reviews
|
Ok, so... I finished all the tack welding on the floor... I received an offer from a guy at work to do the whole car, so as soon as i have it soda blasted, he is going to seam weld the chassis...
So, in the meantime, i picked up a can of this (ted nugent approved!):  It was 30 bucks a quart, I hope it works well... 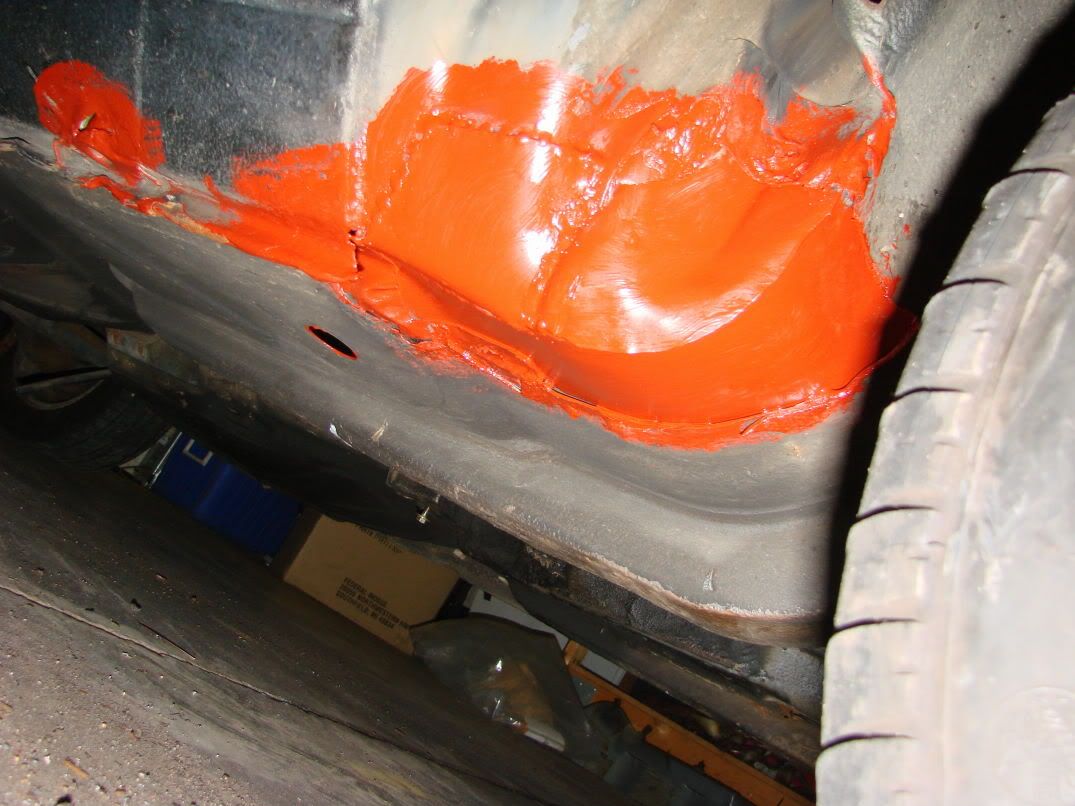 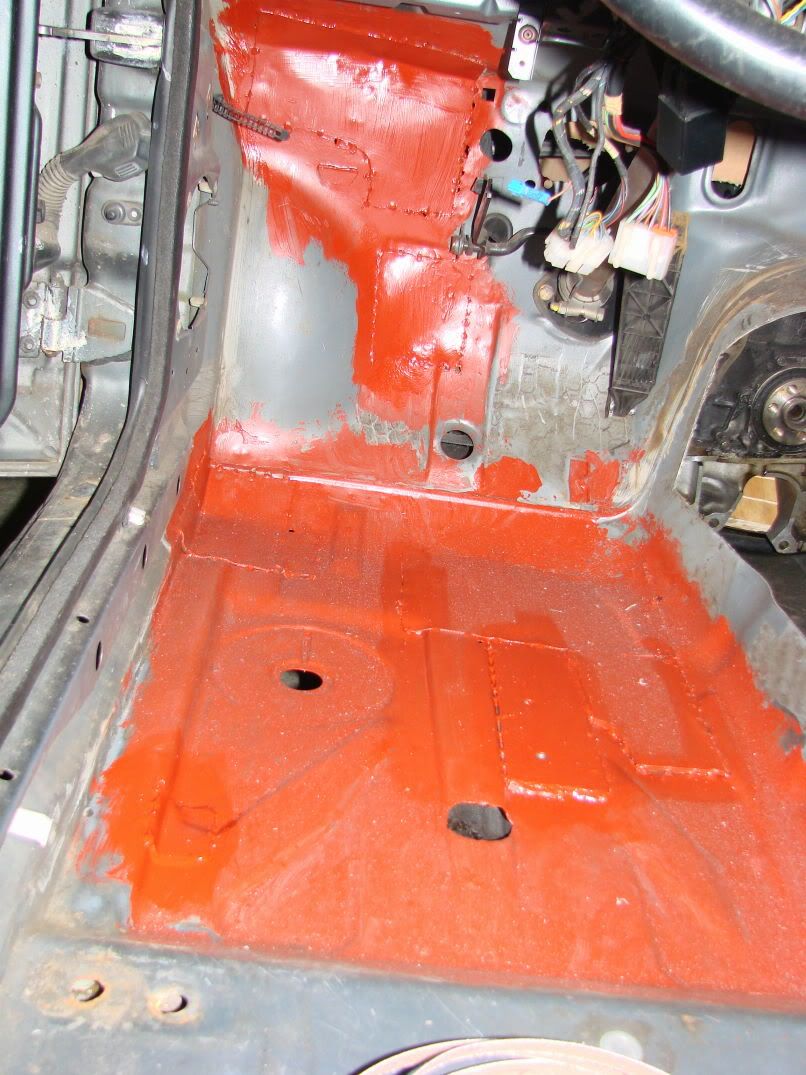 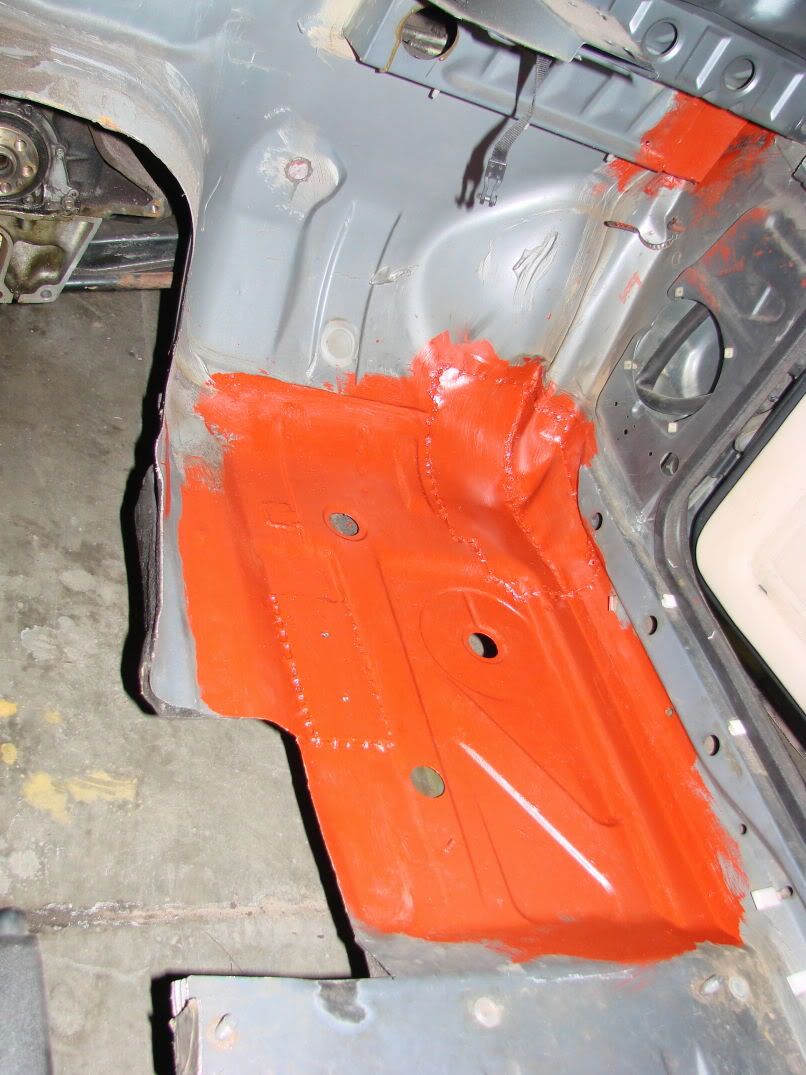 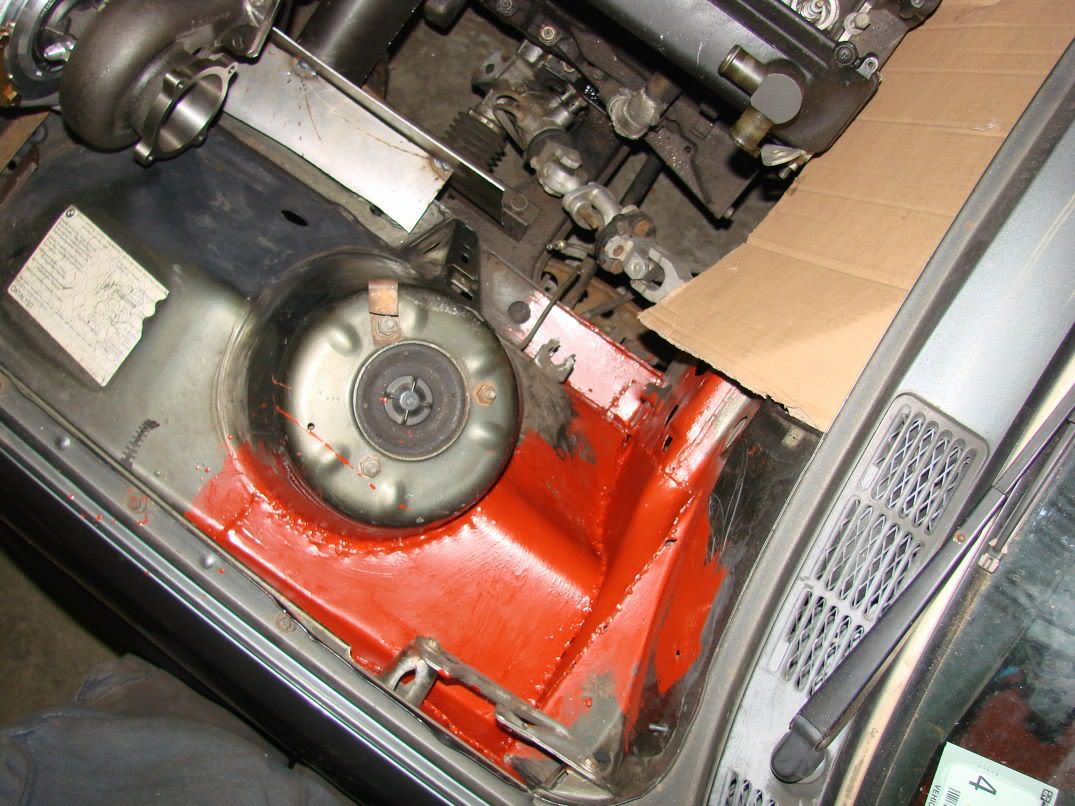 I am just going to leave it like this until the underbody/bay/interior has been blasted... Next, I built a jig to mount the turbo... Yes, i know what you are thinking about turbo inlets... the answer is MAYBE... 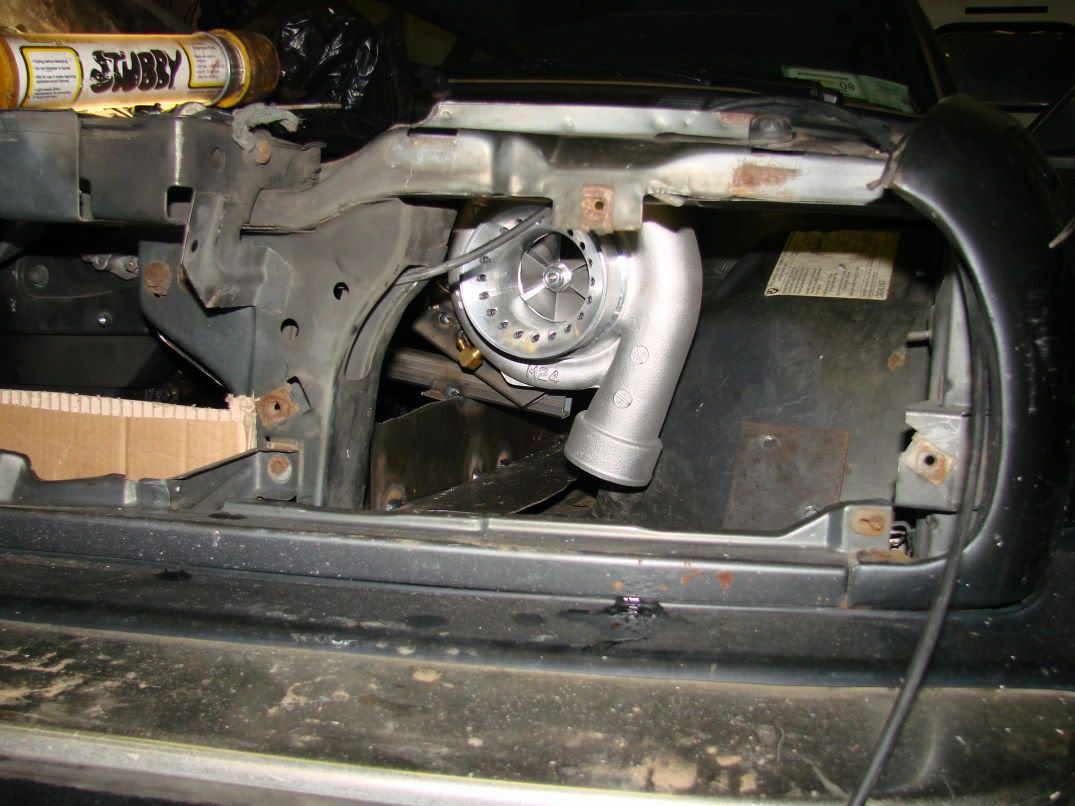 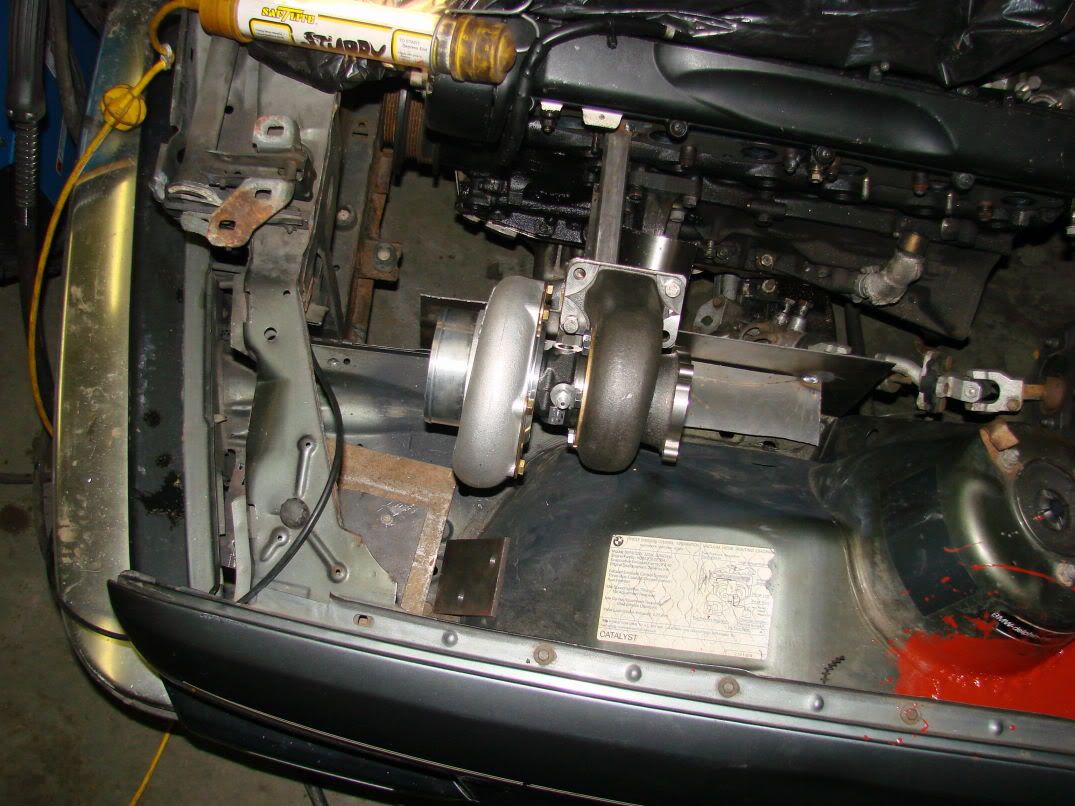 I included some frame reference planes and a motor mount clearance simulator, so that When i start drawing this in CAD, I will know what i need to avoid, without having to keep taking measurements on the car... 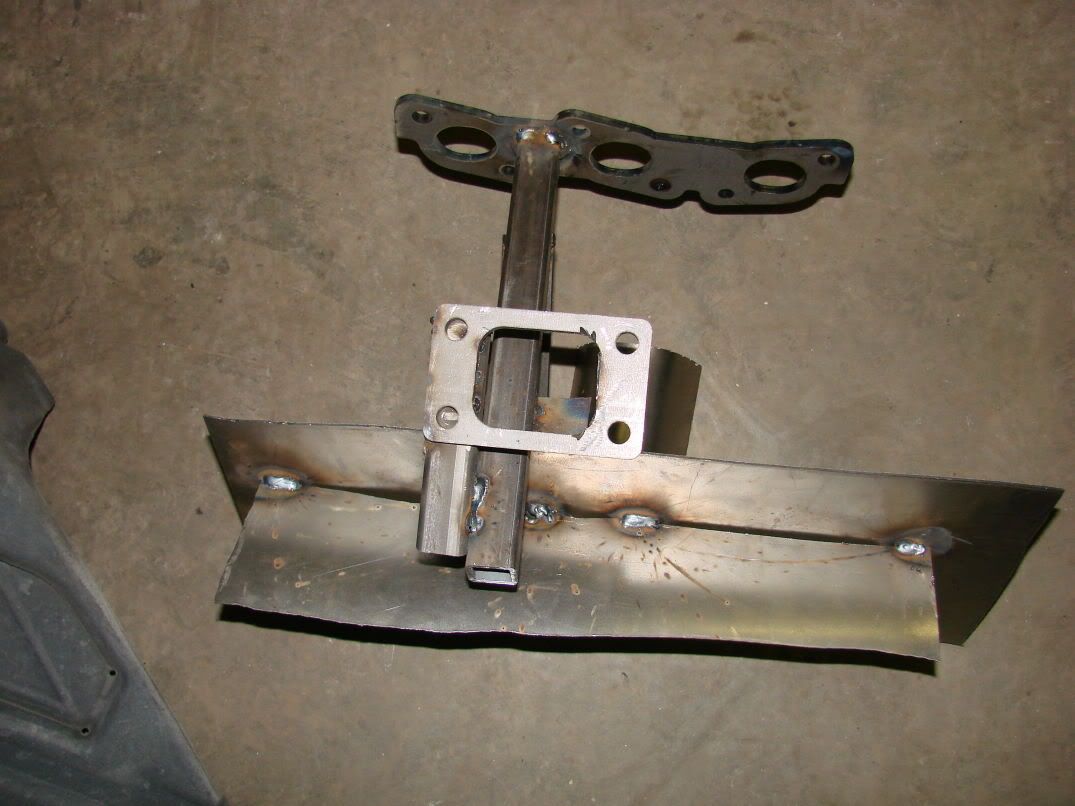 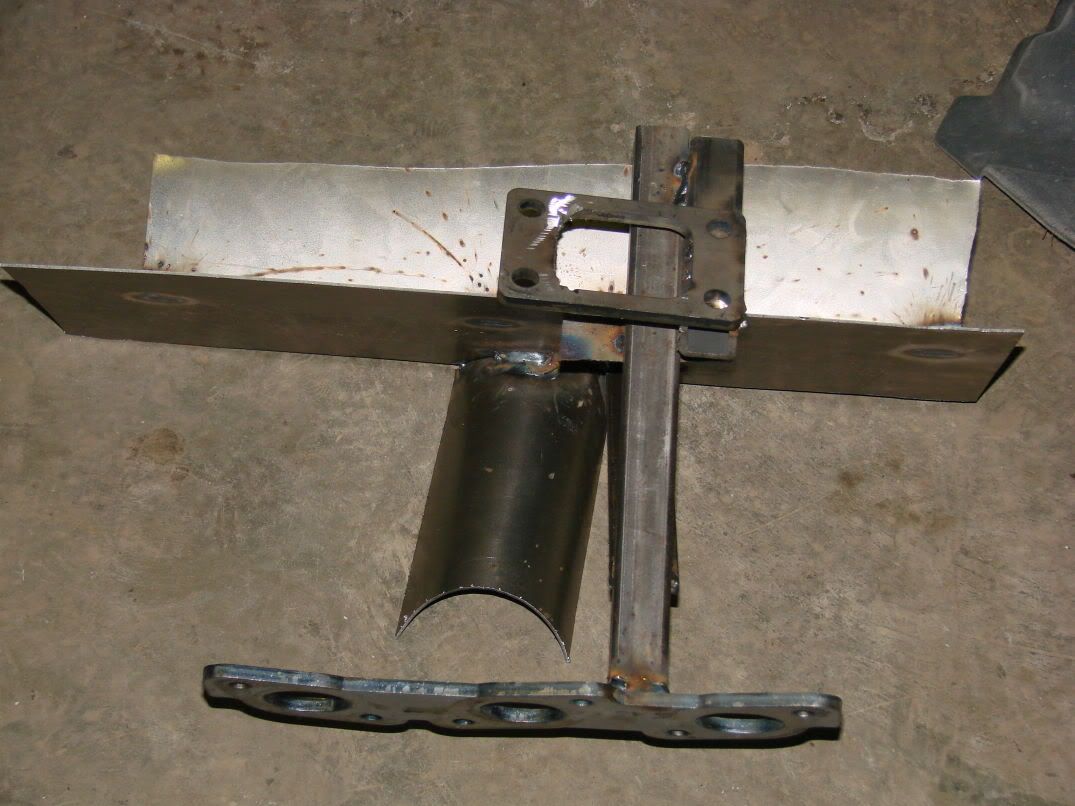 |
|
|
|
|
02-08-2007, 11:09 PM
|
#111 | |
|
Zilvia FREAK!
 
Join Date: Sep 2005
Location: Tempe and Scottsdale, Arizona
Age: 36
Posts: 1,425
Trader Rating: (0)
Feedback Score: 0 reviews
|
Quote:
http://www.sodaworks.com/ God, still following this thing
__________________
 1989 S13  | 1996 S14 | 2001 E46 | 2009 ZX6R | 1996 S14 | 2001 E46 | 2009 ZX6R
|
|
|
|
|
|
02-09-2007, 09:05 PM
|
#114 |
|
Zilvia Junkie
Join Date: Apr 2004
Location: buffalo,ny
Age: 42
Posts: 541
Trader Rating: (0)
Feedback Score: 0 reviews
|
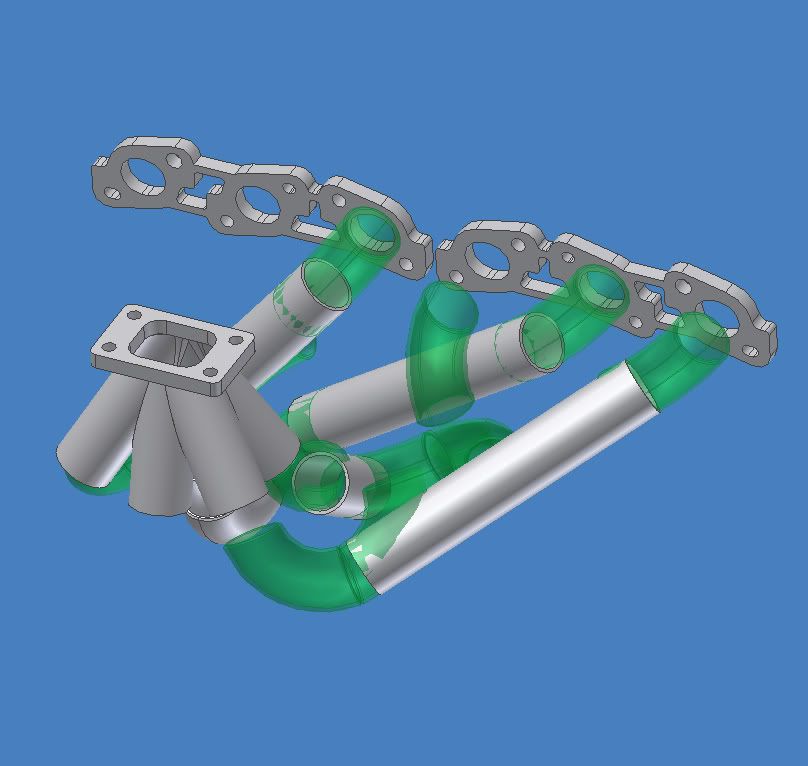
HOW DID YOU SPEND YOUR FRIDAY NIGHT? (5 hours work)
Schedule 10 304 SS. Weight = 30.74 LBS... Too bad I'm not baller enough to afford 321 thin wall... At 80 dollars for 180*, that's $1040 in tubing alone!!!! Yikes. 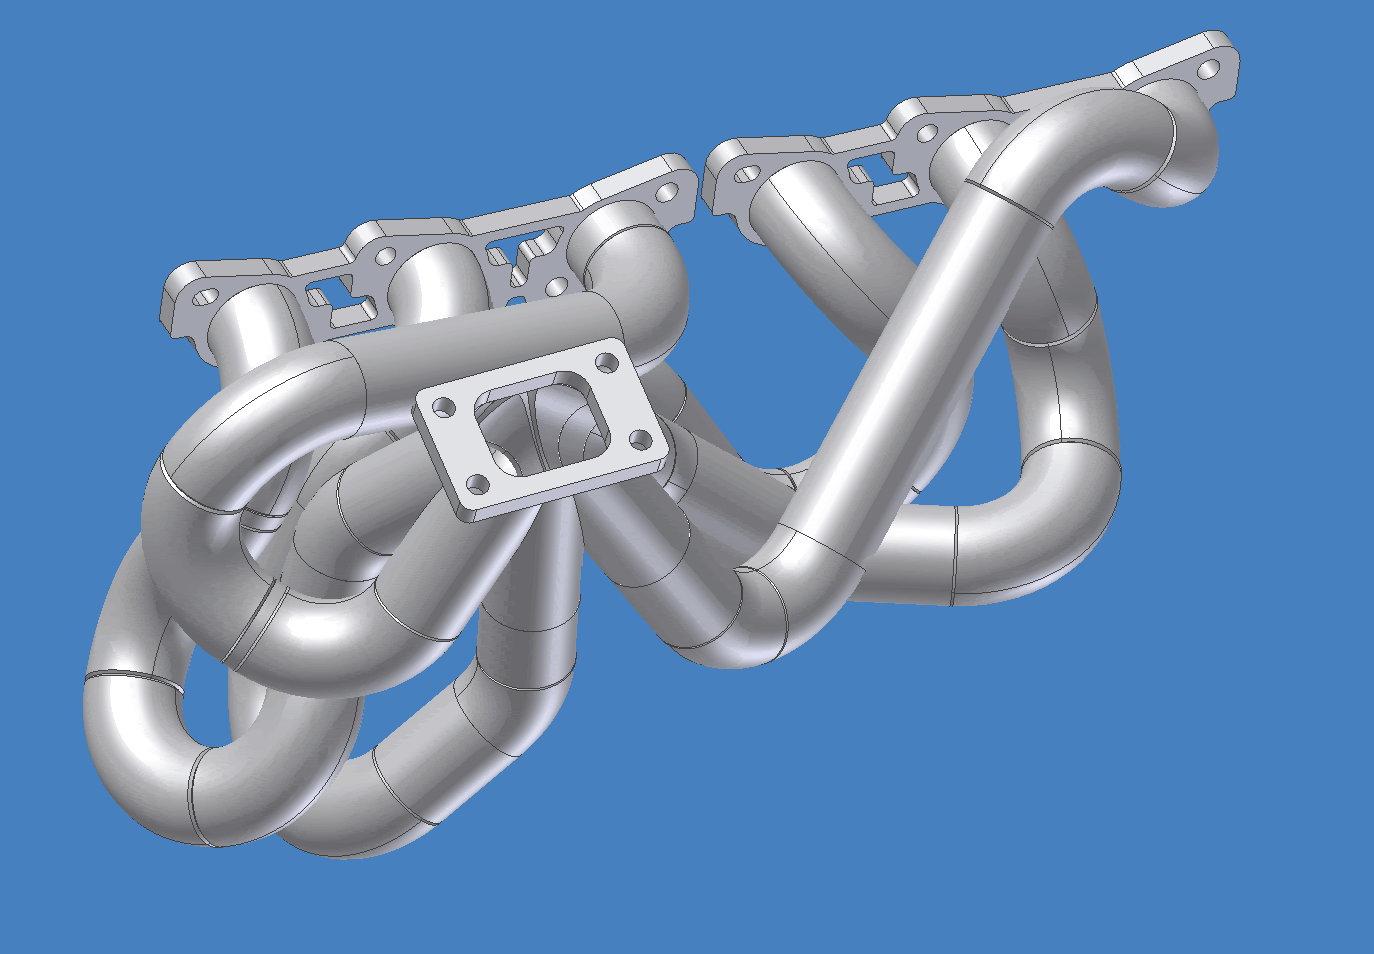 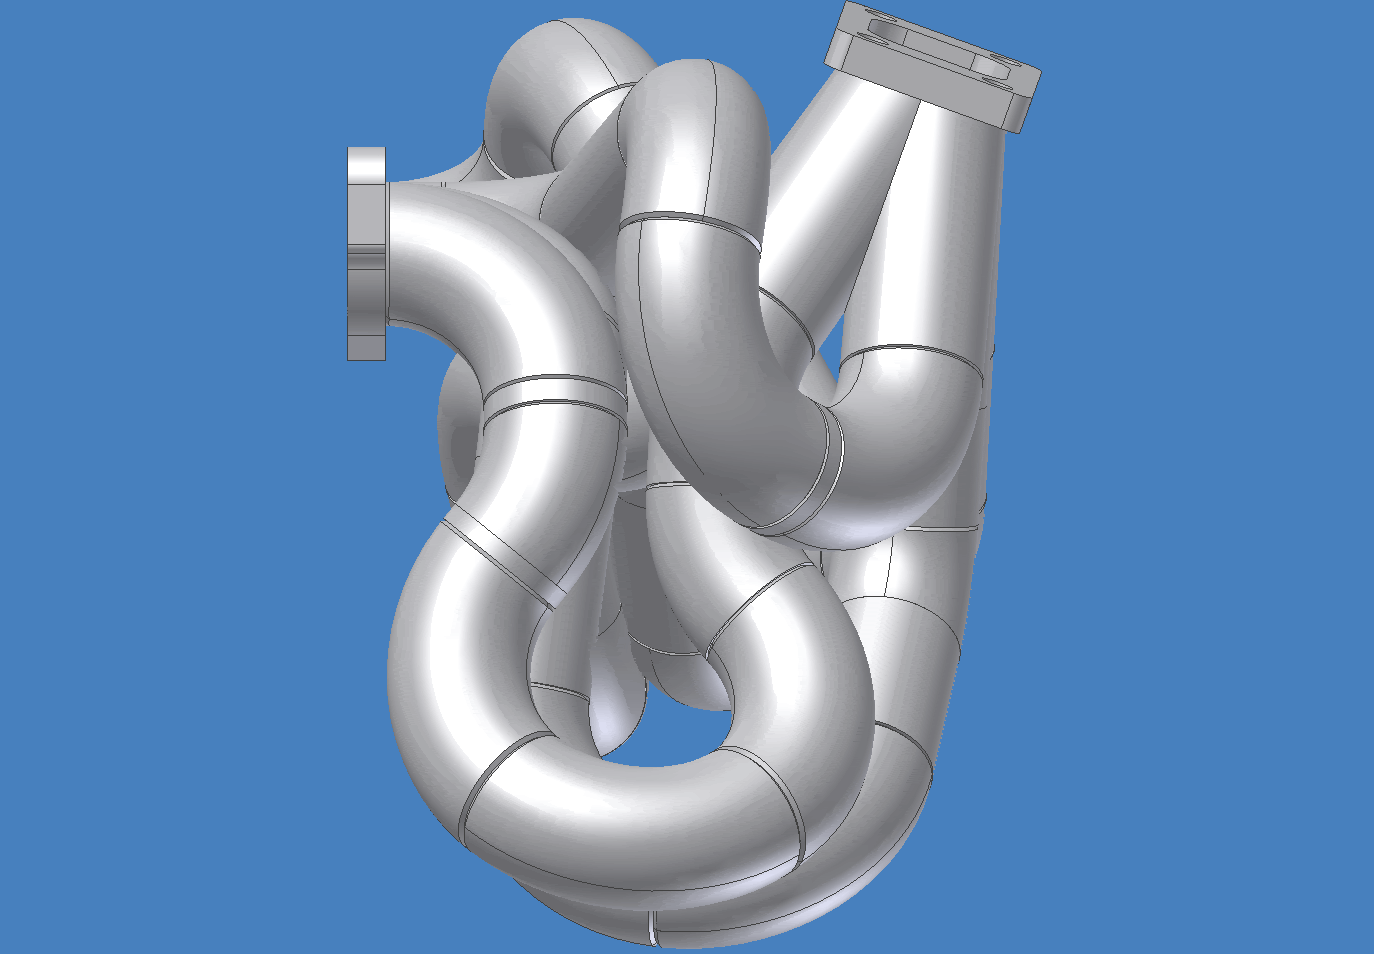 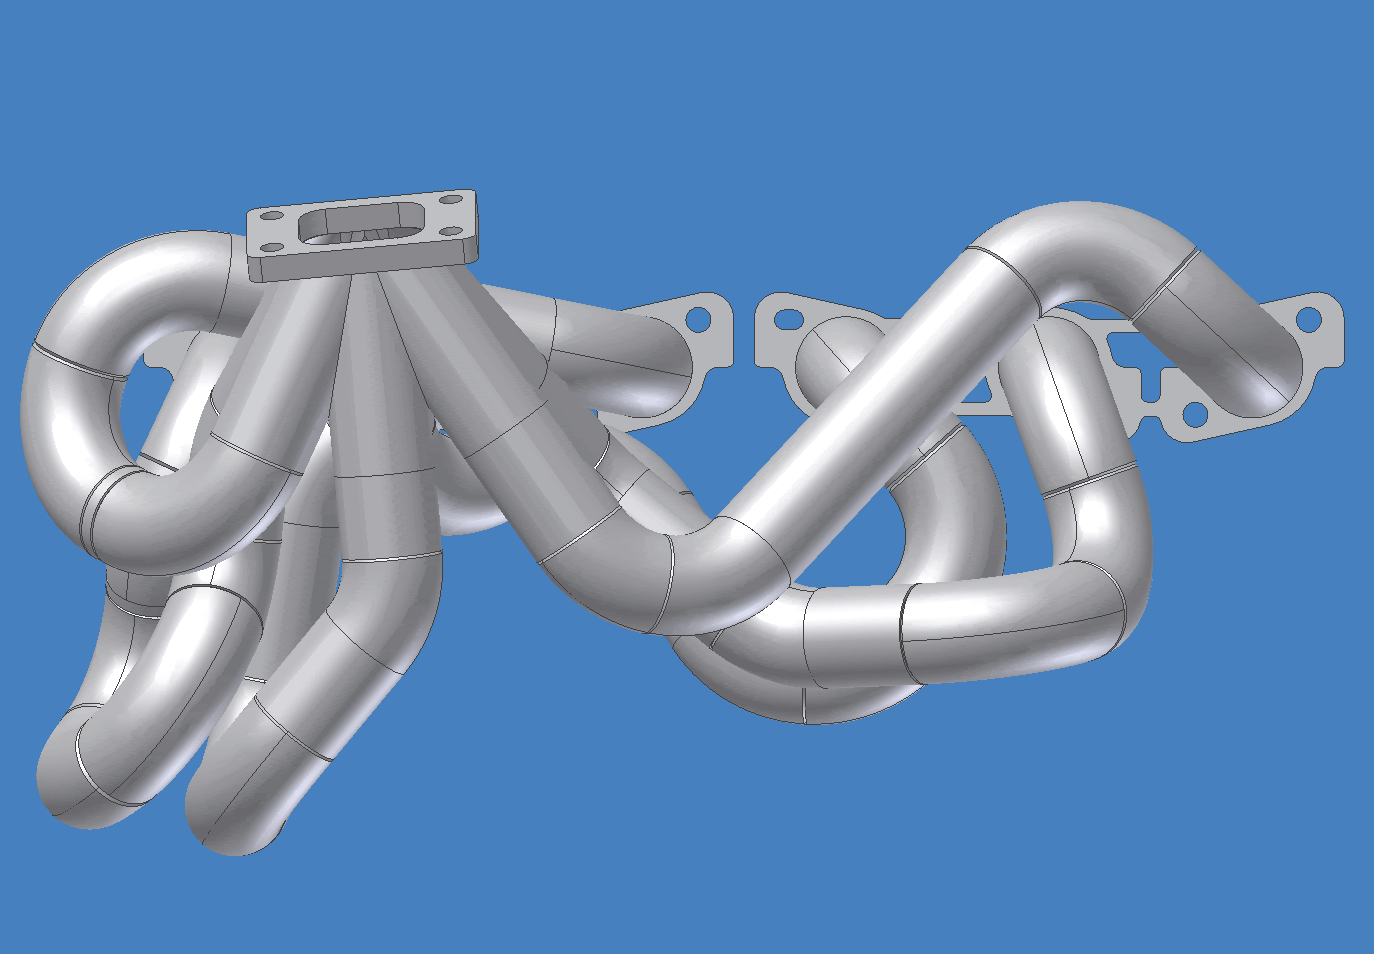 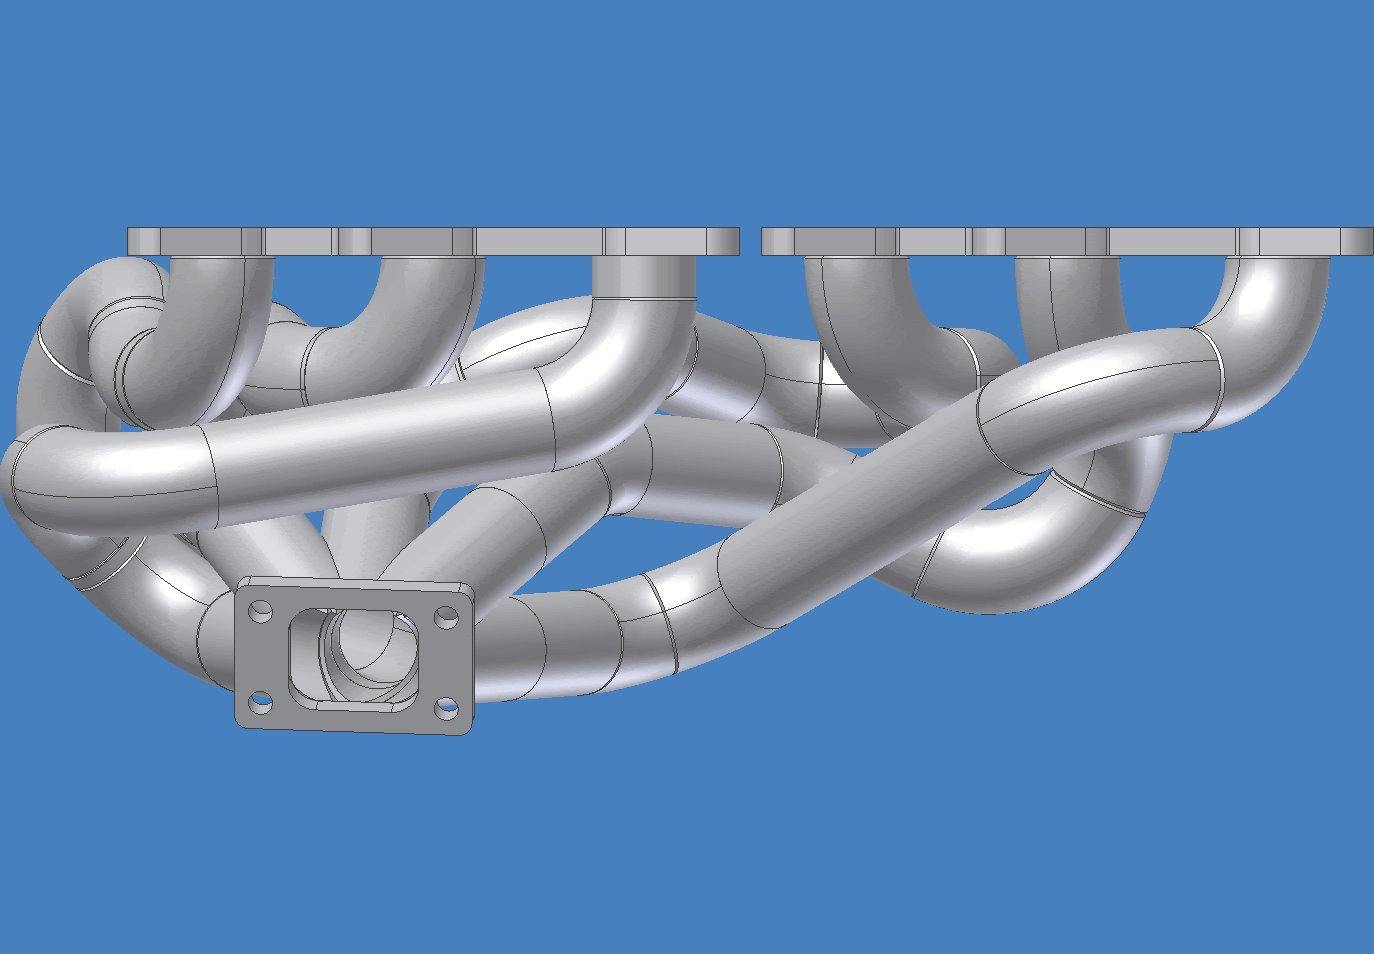  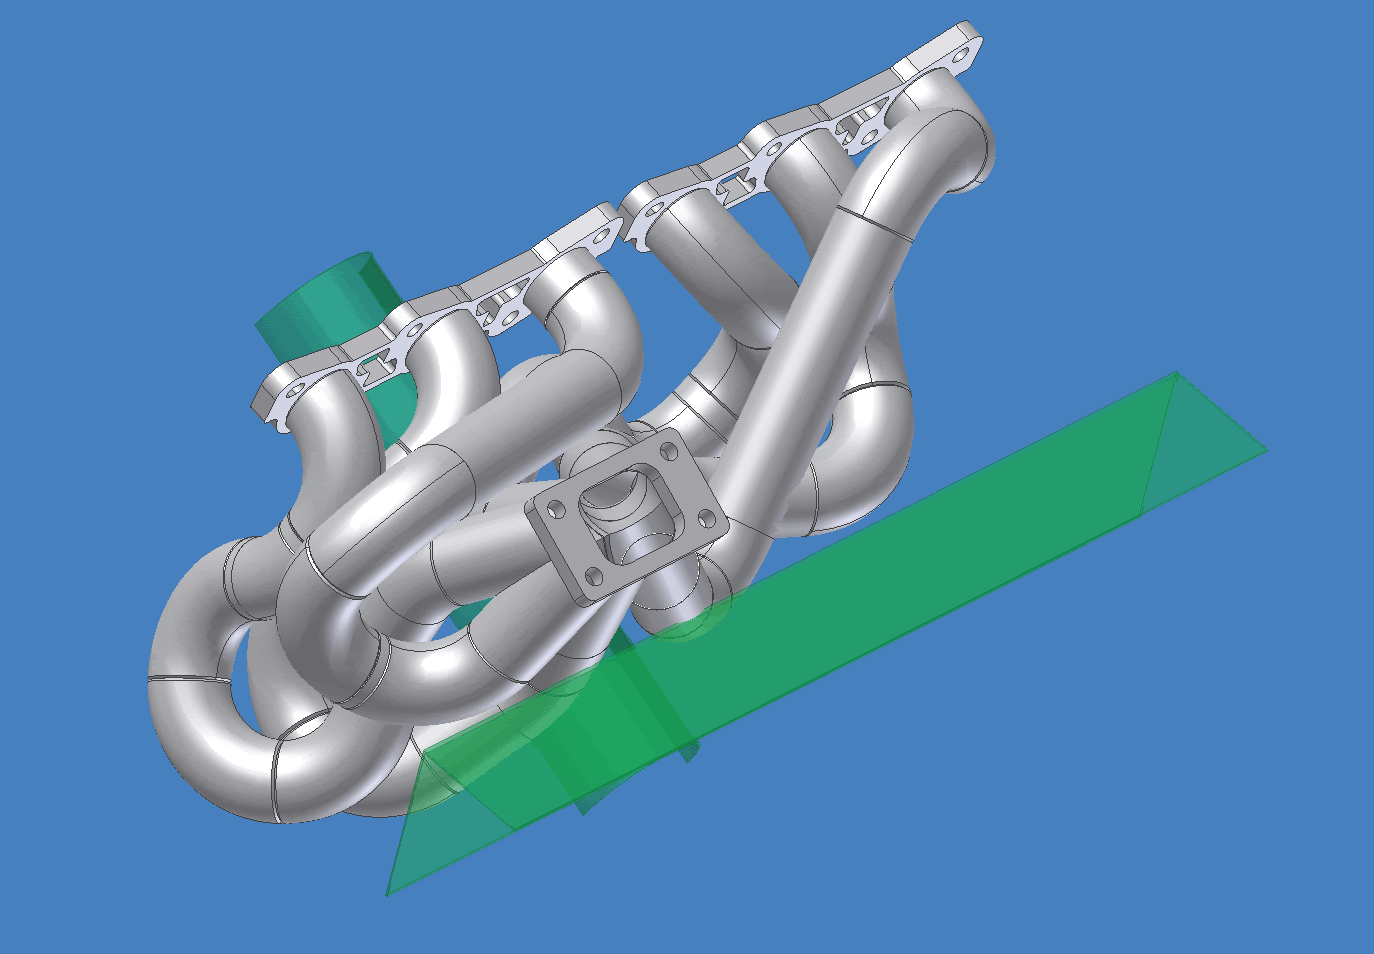 The green parts are constraints from the car itself. Here are the listings of the length of the runners: Runner 1: 20.790 Runner 2: 20.861 Runner 3: 20.794 Runner 4: 20.759 Runner 5: 20.801 Runner 6: 20.786 Standard deviation: .033 (1/32) Wastegate will probably be added after the fact... Last edited by ctnewman; 02-09-2007 at 09:31 PM.. |
|
|
|
|
02-09-2007, 10:53 PM
|
#118 | |
|
Zilvia Junkie
Join Date: Apr 2004
Location: buffalo,ny
Age: 42
Posts: 541
Trader Rating: (0)
Feedback Score: 0 reviews
|
Quote:
it's autodesk inventor. It actually went very smoothly. About 50% of the time was spent adjusting the runner length... As long as everything is well constrained, it's not bad... I learned a lot of tricks, i could probably do another in about half the time... |
|
|
|
|
|
02-10-2007, 09:15 AM
|
#120 | |
|
Zilvia Junkie
Join Date: Apr 2004
Location: buffalo,ny
Age: 42
Posts: 541
Trader Rating: (0)
Feedback Score: 0 reviews
|
Quote:
yeah, but that's what ratcheting wrenches are for... I took a few minutes and made the collector pipes into flat patterns which i can print out on paper, wrap around a piece of straight pipe, then cut and grind: QTY 2 up, QTY 2 down  QTY 2  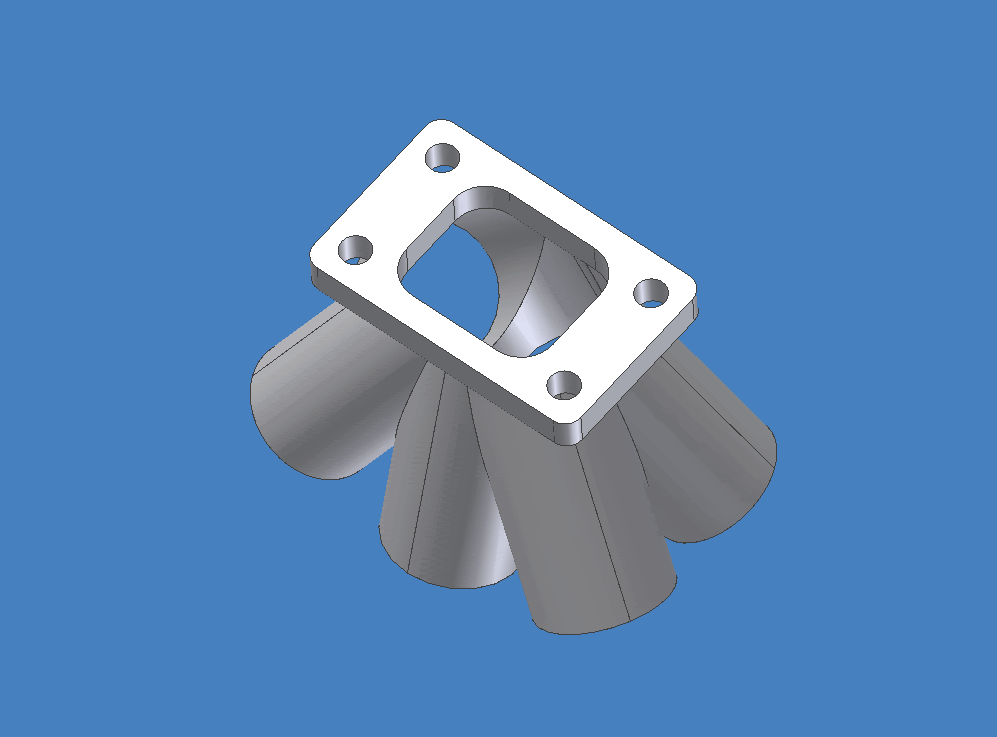 |
|
|
|
|
|
| Bookmarks |
|
|


 Linear Mode

