|
|||||||
| Chat General Discussion About The Nissan 240SX and Nissan Z Cars |
 |
|
|
Thread Tools | Display Modes |
|
|
 05-20-2008, 09:18 PM
|
#1 |
|
Zilvia Junkie
 
Join Date: Mar 2008
Location: Central PA
Age: 35
Posts: 475
Trader Rating: (23)
  Feedback Score: 23 reviews
|
Love the GReddy lip on the S15 bumper! Nice build as well
__________________
DD: '05 Saabaru with full JDM STi 6spd swap Project: '91 S13 Hatch SR20 |

|
| Sponsored Links |
|
09-27-2008, 12:08 PM
|
#2 |

Join Date: Mar 2008
Location: Santa Clara, CA
Posts: 39
Trader Rating: (0)
Feedback Score: 0 reviews
|
nice progress! keep us updated!

__________________
  [WEKSOS.INDUSTRIES] NARDI-MOMO-PERSONAL-NRG-TODA-WORK-FUNCTION/FORM-VERTEX-ARC 408.988.WEAK - KENNETH AIM:weksos2 |
|
|
|
08-22-2009, 05:42 PM
|
#4 | |
|
Zilvia FREAK!
 
Join Date: Jul 2008
Location: on an island, NY
Age: 38
Posts: 1,375
Trader Rating: (11)
Feedback Score: 11 reviews
|
yea i was thinking with all the electronics and all the piping n stuff and the seats and bodykit and all that nonsense ya know like how it could perform in the end...its def gonna be amazing looking tho
__________________
 Quote:
|
|
|
|
|
05-05-2008, 06:31 PM
|
#5 |
|
Zilvia Junkie

Join Date: Jul 2007
Location: Cincinnati, Ohio
Age: 39
Posts: 544
Trader Rating: (3)
Feedback Score: 3 reviews
|
Got my under dash support bar back from the blaster, primed and ready for paint:
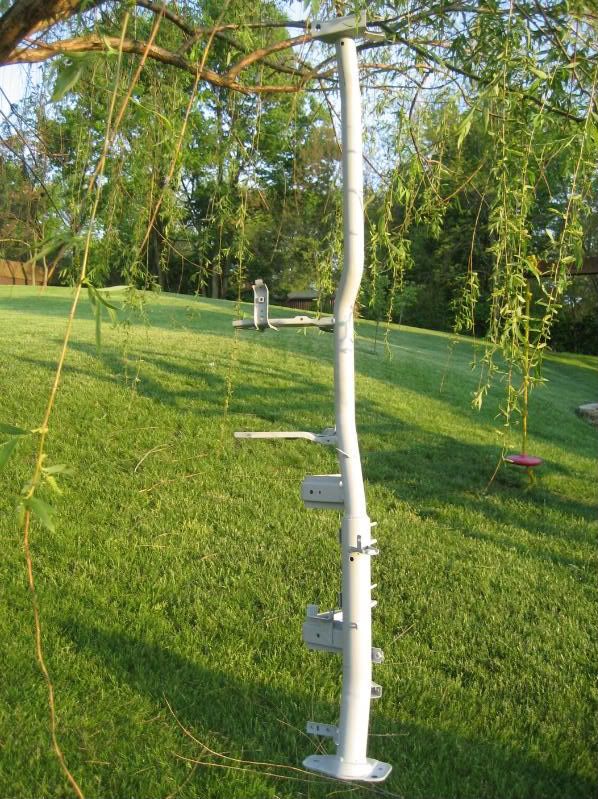 And the paint to be used...Truck bed liner ftw! 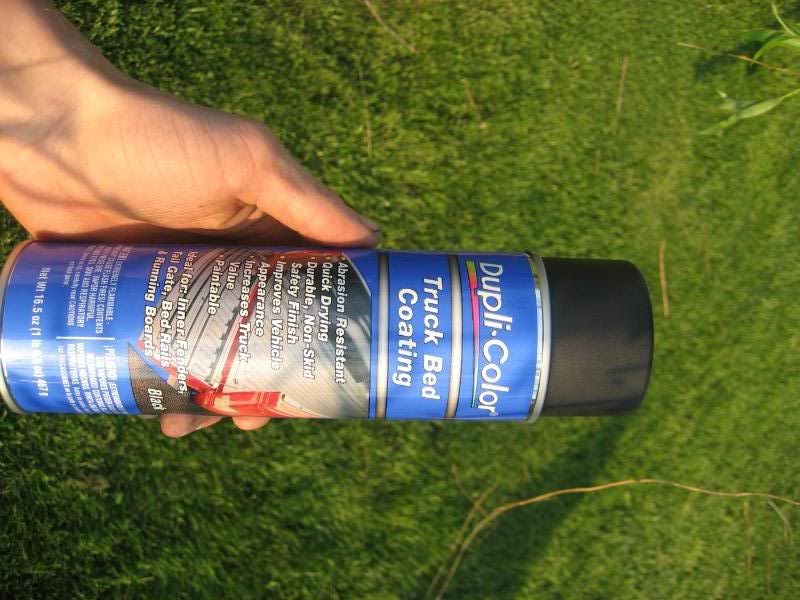 And the final product: 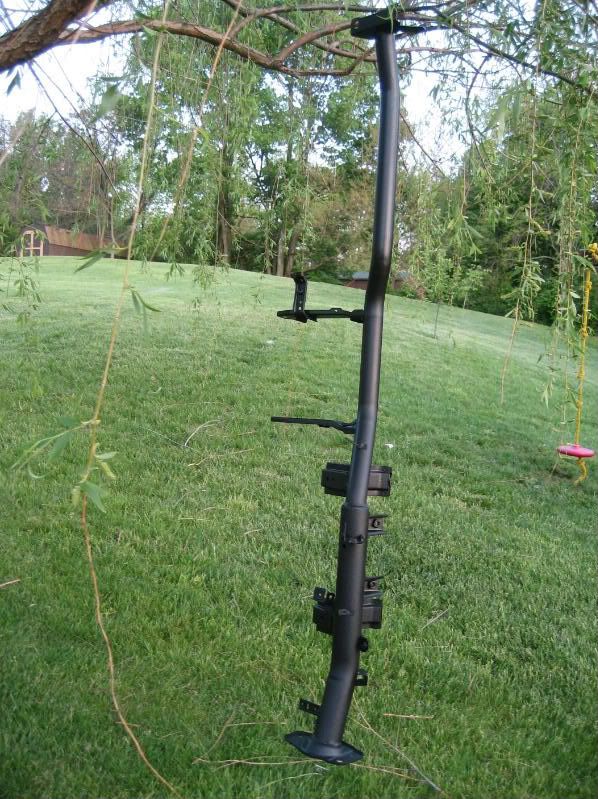 Just the start of the mission: No More Rust Ever Again! |
|
|
|
05-12-2008, 06:27 PM
|
#6 |
|
Zilvia Junkie
Join Date: Jul 2007
Location: Cincinnati, Ohio
Age: 39
Posts: 544
Trader Rating: (3)
Feedback Score: 3 reviews
|
I finished my 350z climate control mold today to replace the old style lever controls, I was going to use the S14 digital climate controls but the complexity of the 350z wiring and incompatibility of the controls forces me to use these. I could probably get the S14 controls to work, but this is just plain easier and I like how the 350z controls look.
Started out with the two trim pieces, obviously the S14 trim on the left and the 350z on the right. 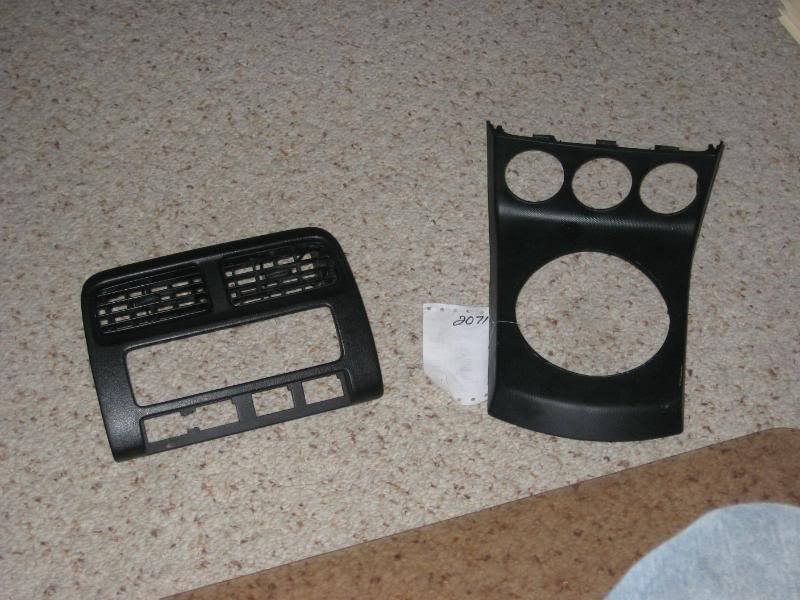 Roughly cut to fit and glued into place, all the while being careful to keep all mounting tabs in place. 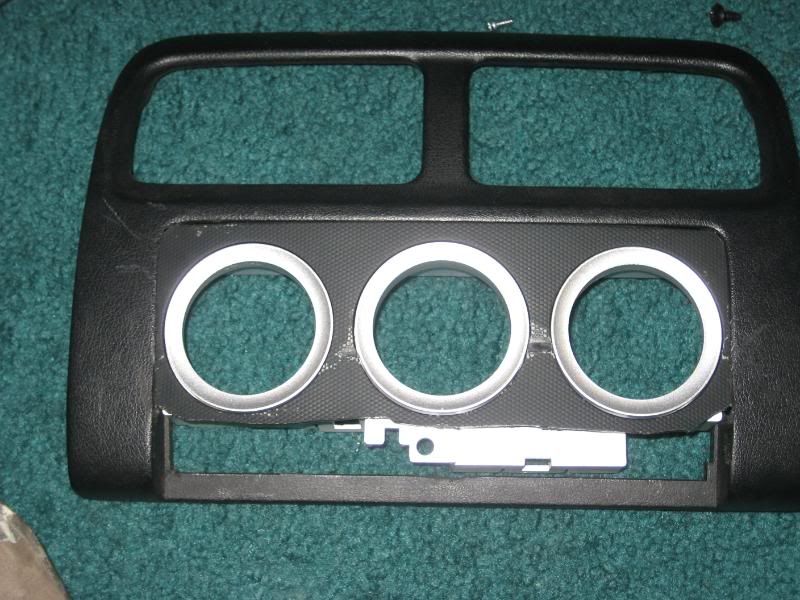 Molded and sanded smooth ready for paint: 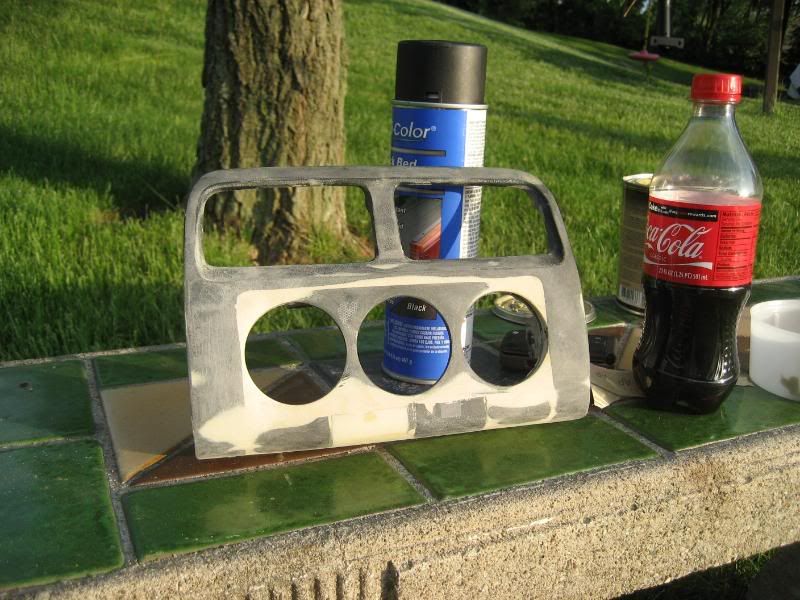 Painted with the texture back on, truck bed liner ftw! 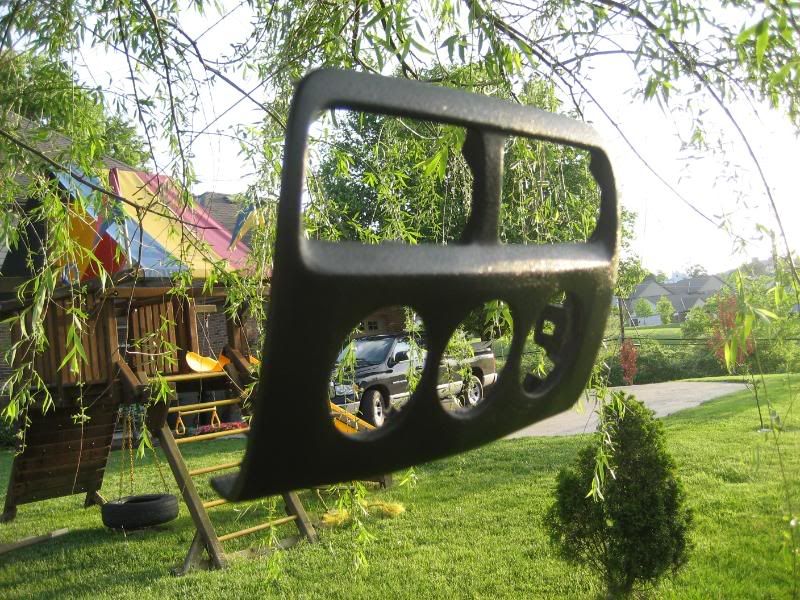 The final product  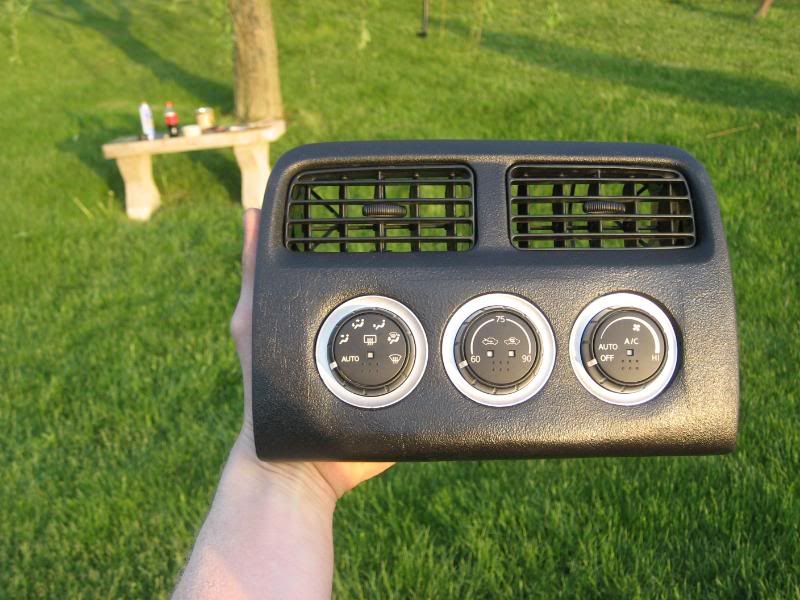 |
|
|
|
05-12-2008, 08:57 PM
|
#8 | |
|
Zilvia Junkie
Join Date: Jul 2007
Location: Cincinnati, Ohio
Age: 39
Posts: 544
Trader Rating: (3)
Feedback Score: 3 reviews
|
Quote:
 |
|
|
|
|
05-14-2008, 09:04 PM
|
#9 |
|
Zilvia Junkie
Join Date: Jul 2007
Location: Cincinnati, Ohio
Age: 39
Posts: 544
Trader Rating: (3)
Feedback Score: 3 reviews
|
Finished my 350z/240sx hybrid column today. I landed a new used column off ebay for $15! I opted to combine the two columns because I needed to change out the lock cylinders for the nats security and I wanted the look and the feel of the newer multi controls and the newer keys lol.
Columns side by side (S14 up top 350z on bottom obviously): 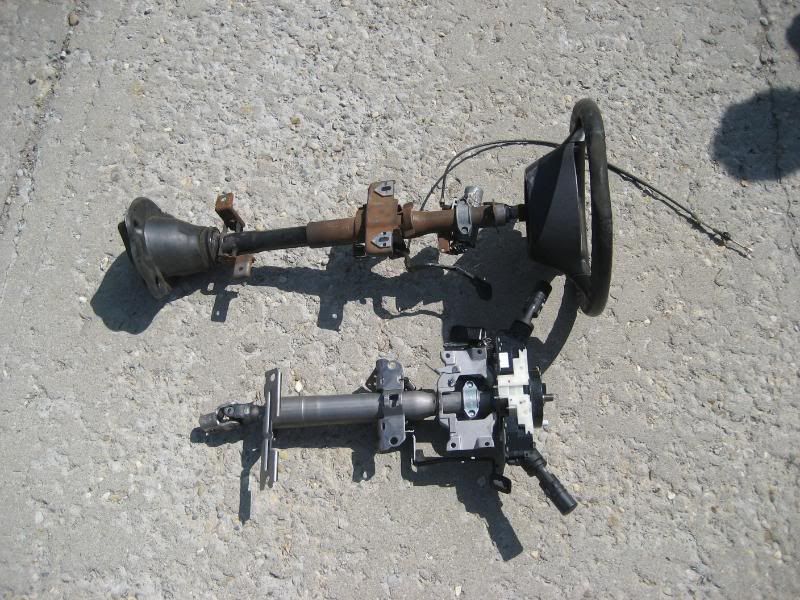 Columns would have swapped out almost perfectly if it wasnt for the ends being way different: 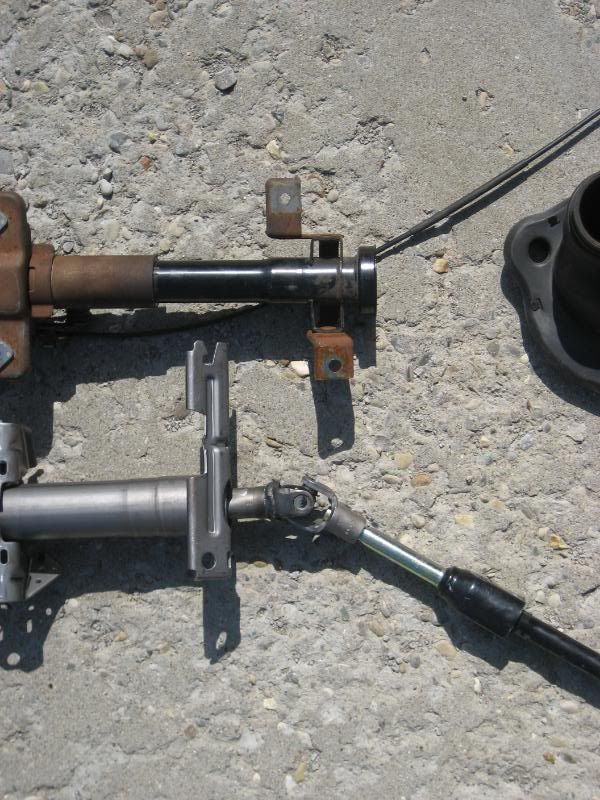 So after comparing and planning I decided to combine the two to make one... Removed the locks for comparison: 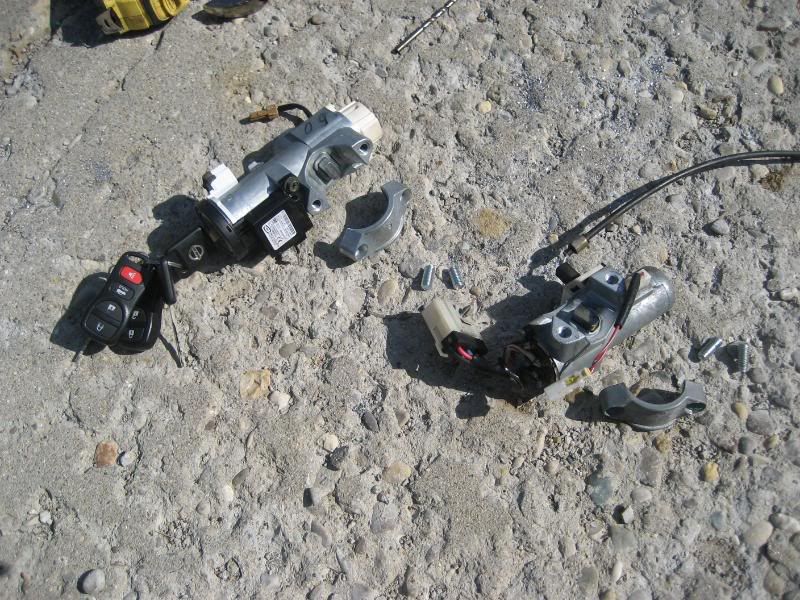 Test fit of the 350z lock on the 240sx column: 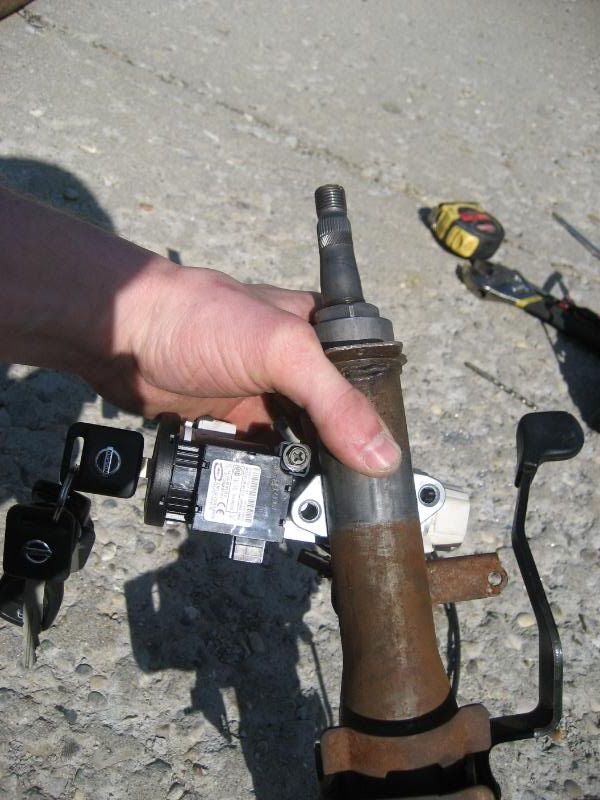 Found out that due to the different shapes of the slots the locks fit into the 350z lock did not sit flush into the 240sx slot. 240sx one is round like so: 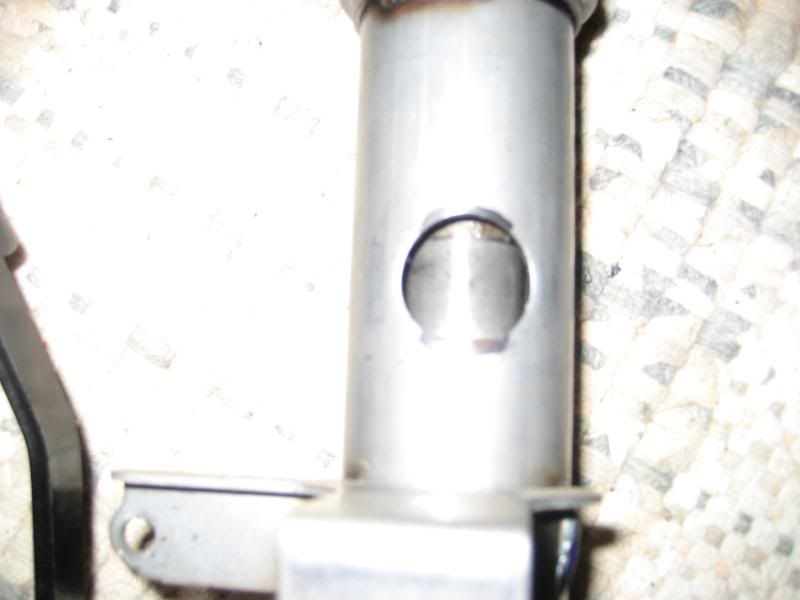 350z is oblonged like so:  But no problem, got out the drill with a metal file bit and went to town and got the lock to seat right: 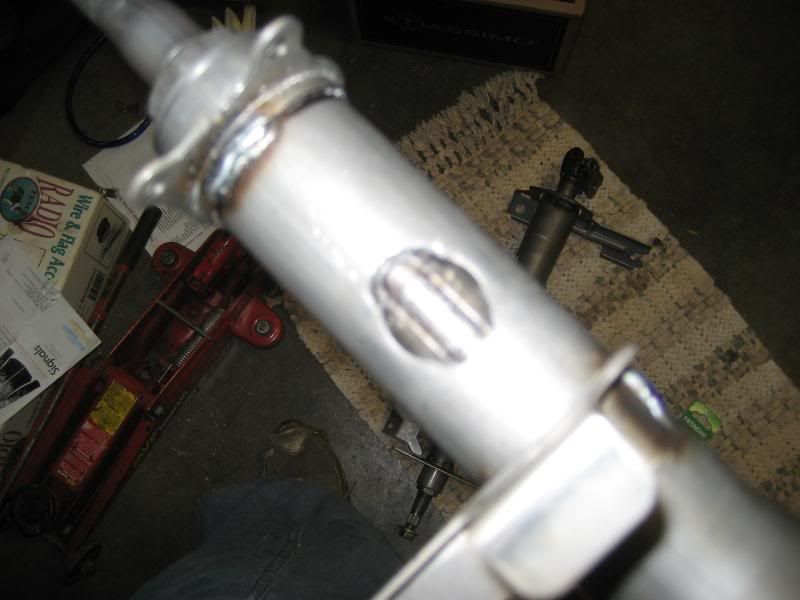 Now I needed to change the mounting plates for the multi controls in order to use the newer 350z type controls, these are actually controls out of an altima, the reason I used them is because they have a switch for the fog lights that I will hook up to control my factory S15 fogs. Here is a picture of them to compare (S14 left 350z right): 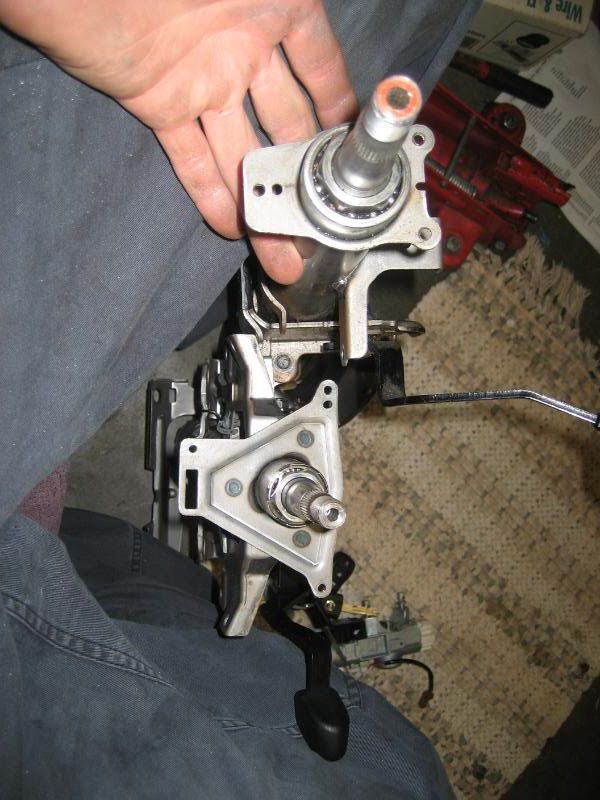 As you can see the 350z plate is alot larger, but the S14 steering shaft is fatter, so I busted out the grinder took some measurements, made my marks and went to work grinding the welds off to free the plate. End result: 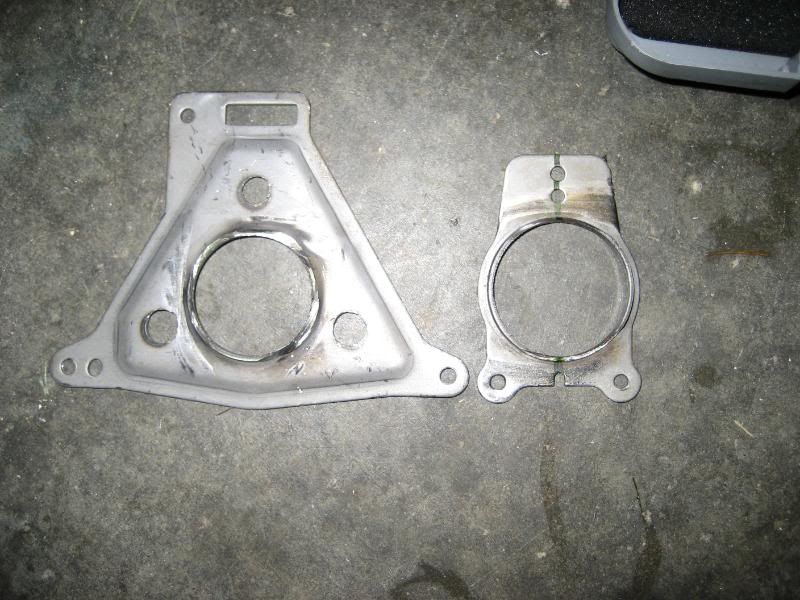 In order to get the 350z plate to fit onto the S14 column the hole in the center needed to be bigger, no sweat. I got out a hole saw some screws and a piece of wood to do the deed. My trick, anytime I want to widen a hole in metal, either to make the circular hole bigger or just to turn a hole that is not circular into a clean circle, is to screw a piece of wood to the back side of the metal and use the wood to keep my drill straight to make a nice clean, circular hole. I did this like so: 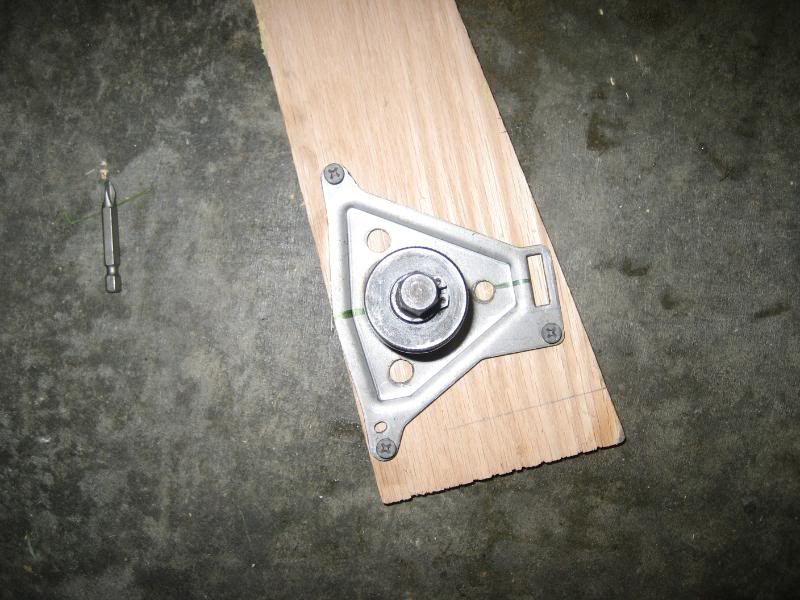 After the hole was drilled I lined my bracket up with my marks I put on the column, went down to my buddies house and had him weld it back into place for me. Re-installed the lock cylinder with new shear screws from the $tealer$hip and here is the final product: 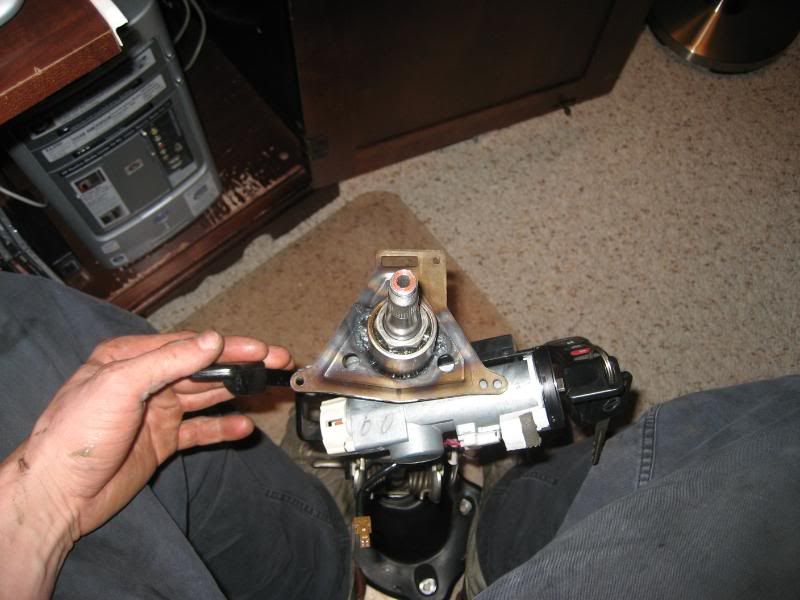 And the test fit with the new multi controls: 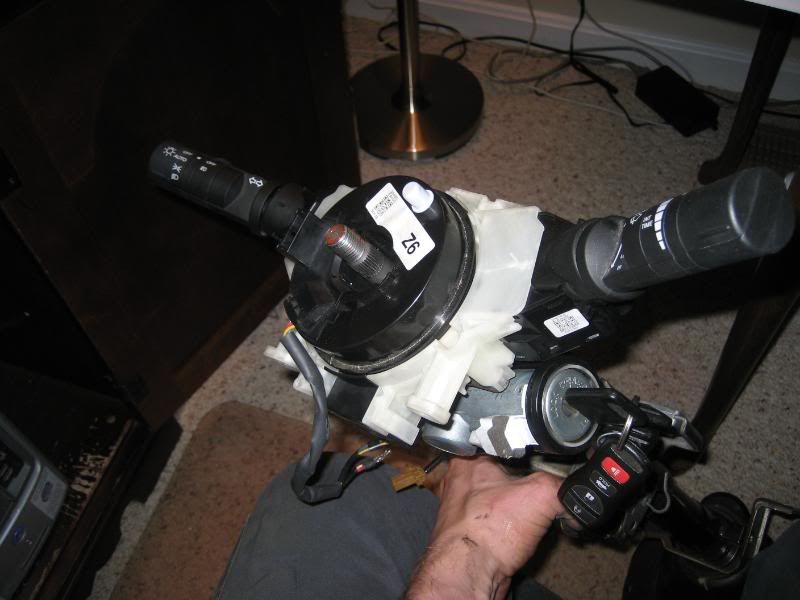 Steering column.............CHECK! |
|
|
|
05-15-2008, 03:11 AM
|
#11 |
|
Post Whore!
 
Join Date: May 2006
Location: San Diego, CA
Posts: 9,135
Trader Rating: (19)
Feedback Score: 19 reviews
 |
Dude this thread looked a lot like my S14 build, minus the S15 front and VQ nonsense, but you're doing a much better job documenting everything. Are you going to keep your fuse box? If so, did you take any notes on which wires out of the body harness to keep?
__________________
 Jordan Innovations has a new web site! www.JordanInnovations.com -- All your favorite FD Pro Drifters love it, trust me -- www.JordanInnovations.com |
|
|
|
05-15-2008, 03:21 PM
|
#12 | |
|
Zilvia Junkie
Join Date: Jul 2007
Location: Cincinnati, Ohio
Age: 39
Posts: 544
Trader Rating: (3)
Feedback Score: 3 reviews
|
Quote:
Thanks for all the compliments guys! |
|
|
|
|
05-15-2008, 06:53 PM
|
#17 |
|
Zilvia Member
 
Join Date: Jan 2008
Location: NJ central
Age: 34
Posts: 154
Trader Rating: (0)
Feedback Score: 0 reviews
|
very nice project i wouldent have the patience to do such a build and document it all like you are oustanding.
again i wish you the best of luck and hopefully you have no Problems or setbacks in the future! Franco |
|
|
|
05-16-2008, 09:54 AM
|
#20 |
|
Zilvia Junkie

|
This is the most refreshing thread that I have opened in months in the chat section. Congratulations on actually making a worthwhile build thread that is breaking newish ground and has inspired custom work. Thank you sir
|
|
|
|
05-16-2008, 10:40 AM
|
#21 |
|
Zilvia Addict
 
Join Date: Apr 2003
Location: Nashville TN
Age: 42
Posts: 899
Trader Rating: (3)
Feedback Score: 3 reviews
|
I totally agree with midnight zenki this is one of the best build threads so far that I have read. Just for the sheer fact that you stepping into uncharted territories with combining different nissan model components into your interior. I really like the altima controls and the 350Z HVAC controls. Makes me wonder wahts next! +349573495743 To you my friend for being so adventurous.
__________________
 UGR.....SOMETHING WICKED THIS WAY COMES.... |
|
|
|
05-16-2008, 09:36 PM
|
#22 | ||
|
Zilvia Junkie
Join Date: Jul 2007
Location: Cincinnati, Ohio
Age: 39
Posts: 544
Trader Rating: (3)
Feedback Score: 3 reviews
|
Quote:
Quote:
|
||
|
|
|
05-17-2008, 05:34 PM
|
#25 |
|
Zilvia Junkie
Join Date: Jul 2007
Location: Cincinnati, Ohio
Age: 39
Posts: 544
Trader Rating: (3)
Feedback Score: 3 reviews
|
Ok so I bought this black leather covered steering wheel from a 05 Maxima off ebay for $25.00, to go along with my newer theme, going to make all the controls on the wheel work too.
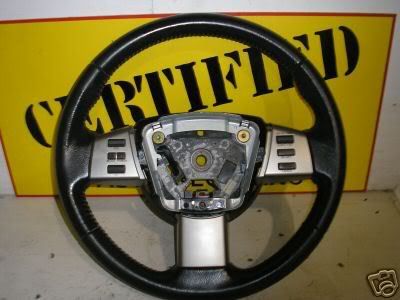 As you can see it comes with no air bag, well I looked up pricing for a used, unactivated air bag and the price starts around $400. So I was like hell-to-the-NO! Especially since I am not putting air bags in this car and I was planning to gut the air bag out. So I went to the local bone yard and got a deployed air bag center for free and went to work. Here is how it looked when I got it:  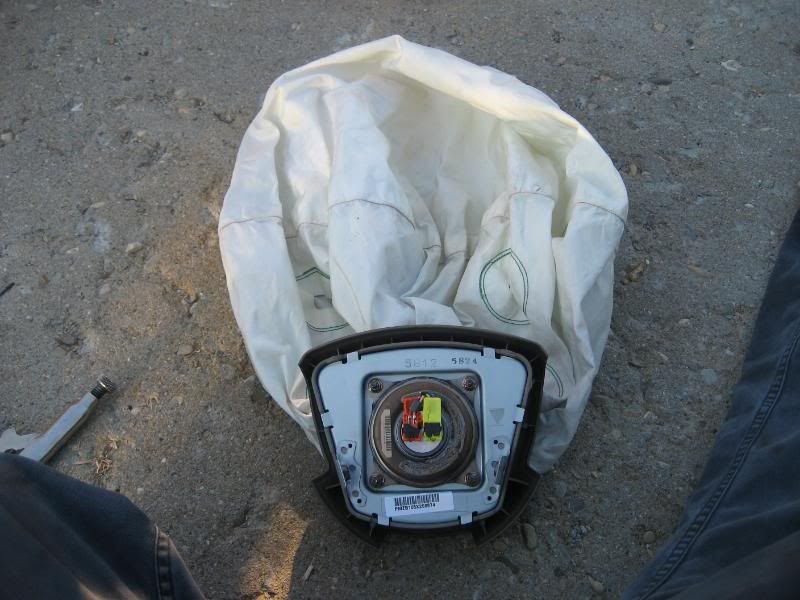 Removed the air bag and the exploeded device thing: 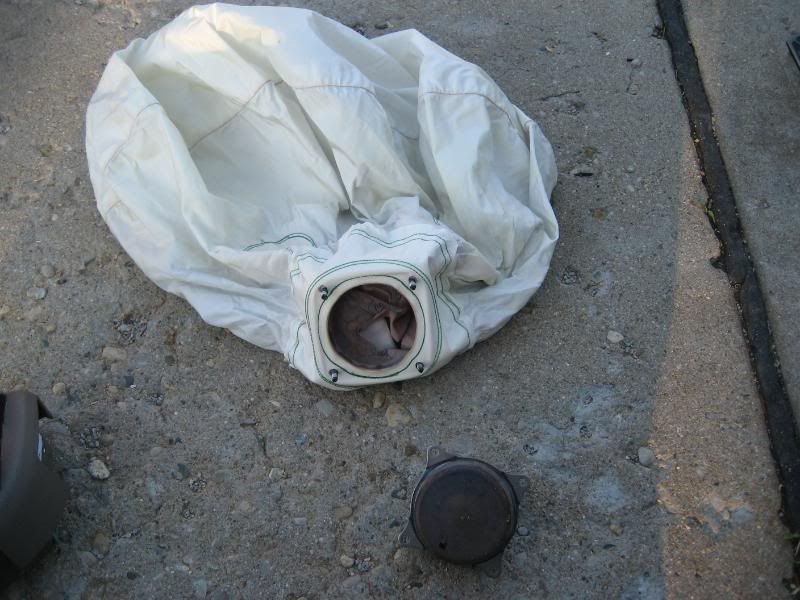 What was left: 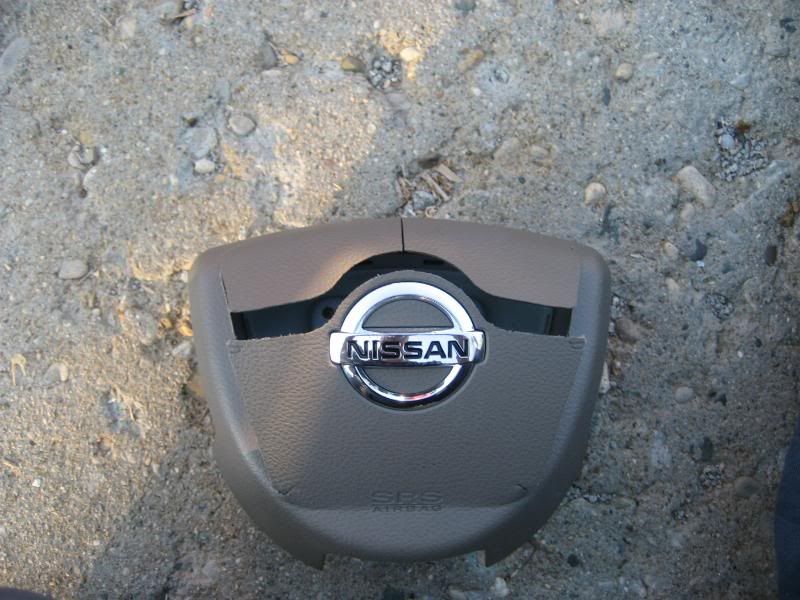 Used super glue to temporarly hold everything back in place while the good stuff ( gorilla glue ) did the permanent bonding and held it all in place with tape for the facial reconstruction: 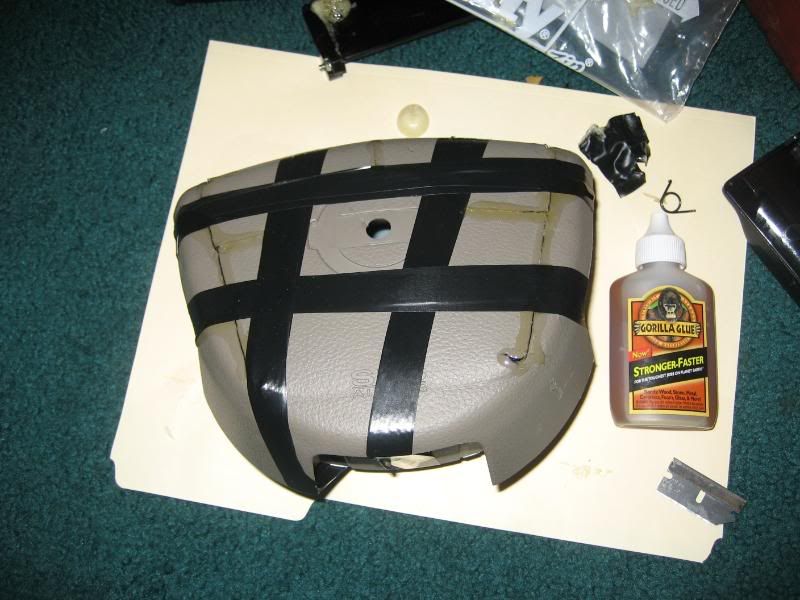 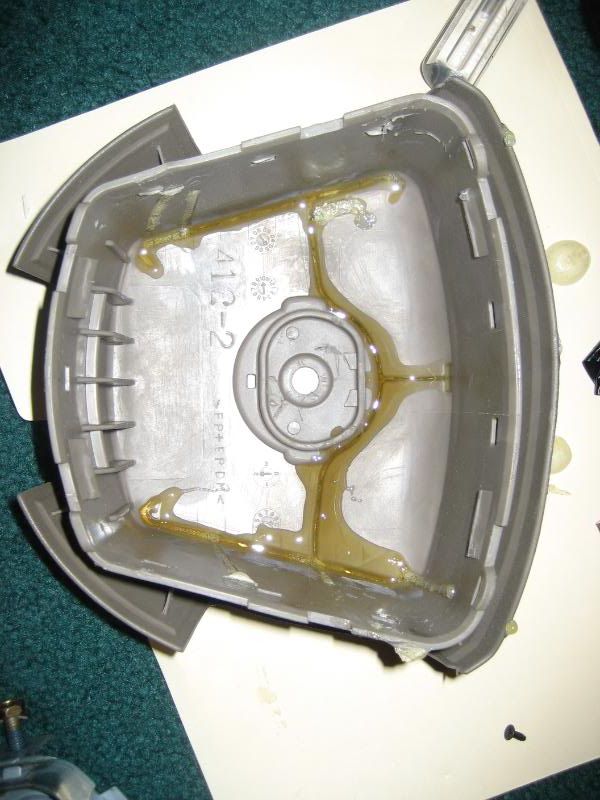 The result: 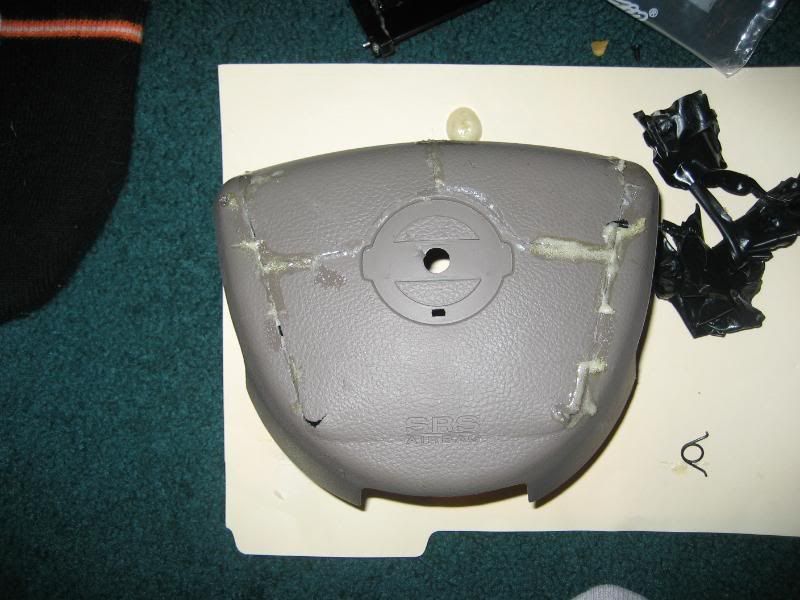 Put the metal frame back in for the next step: 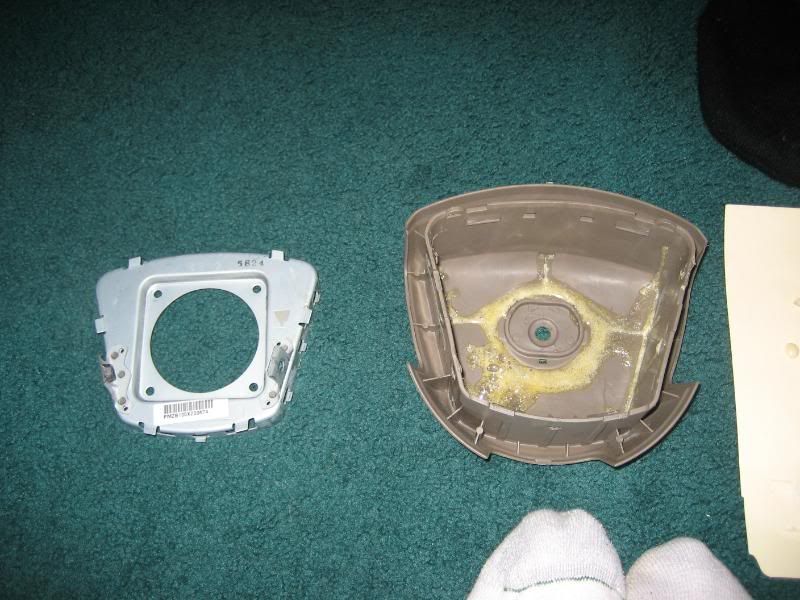 Filled her up with light weight expanding great stuff to support it (god I love that stuff) 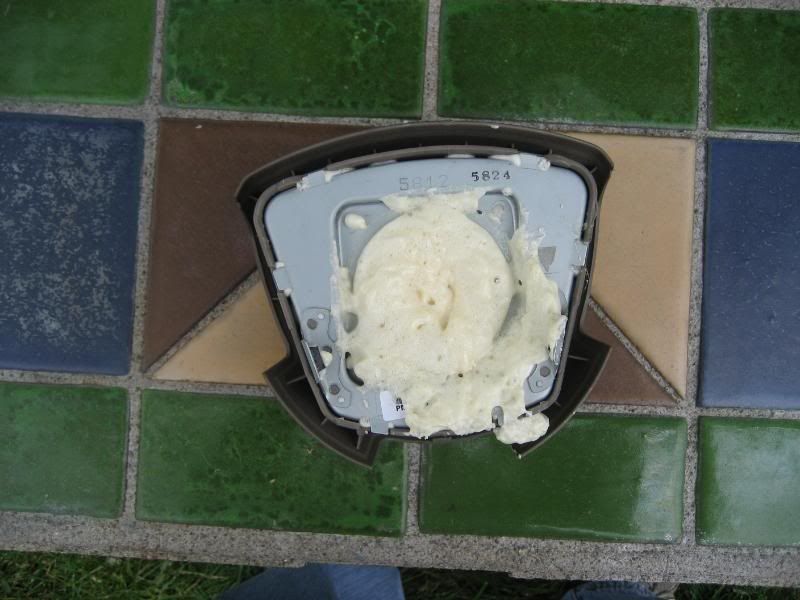 Prepped for some filling and smoothing: 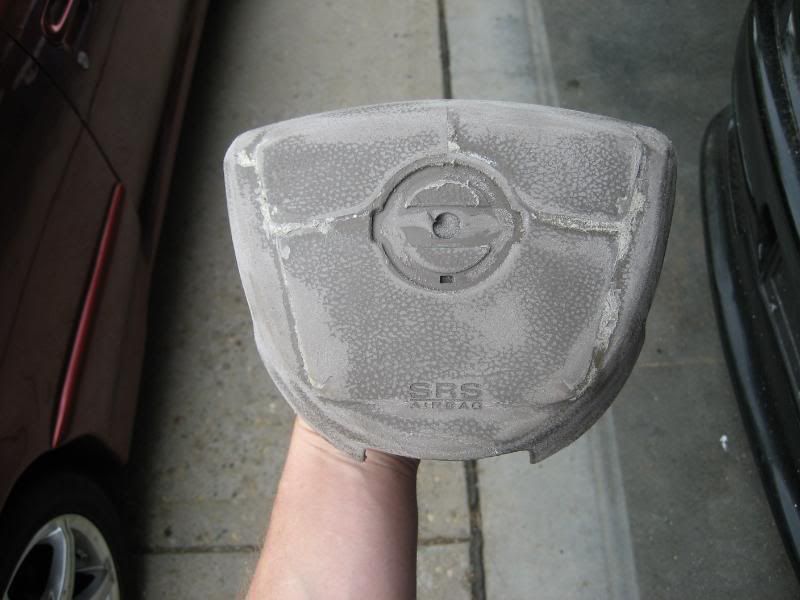 Smoothing it over to hide the creases and cracks from the air bag deployment: 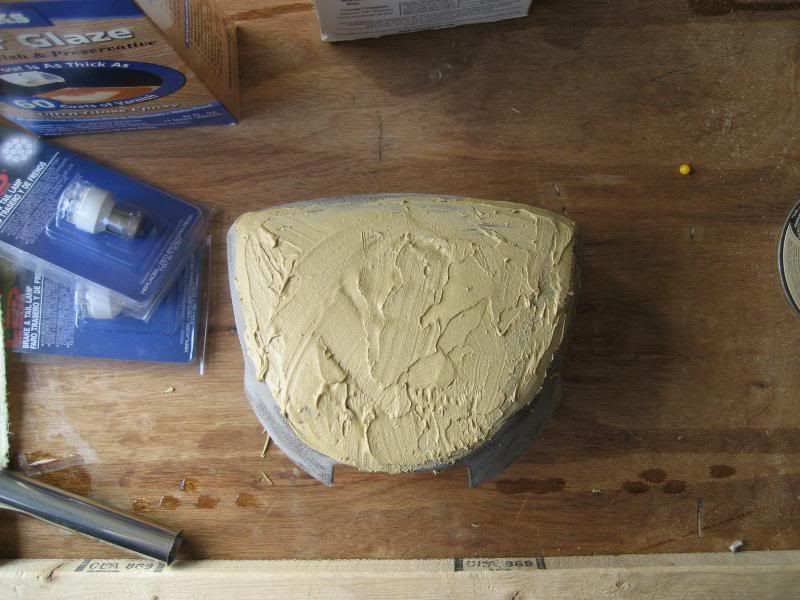 All sanded and ready for final covering: 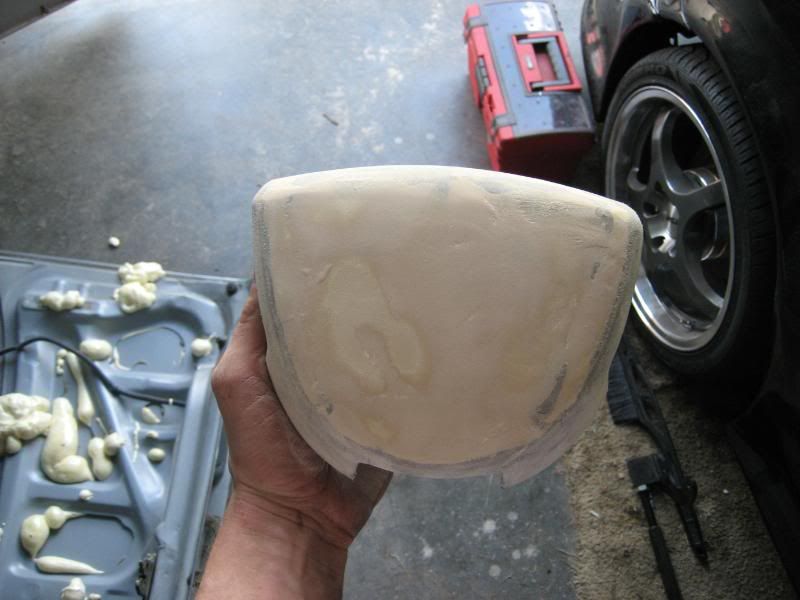 Black leather to do the deed and match the steering wheel: 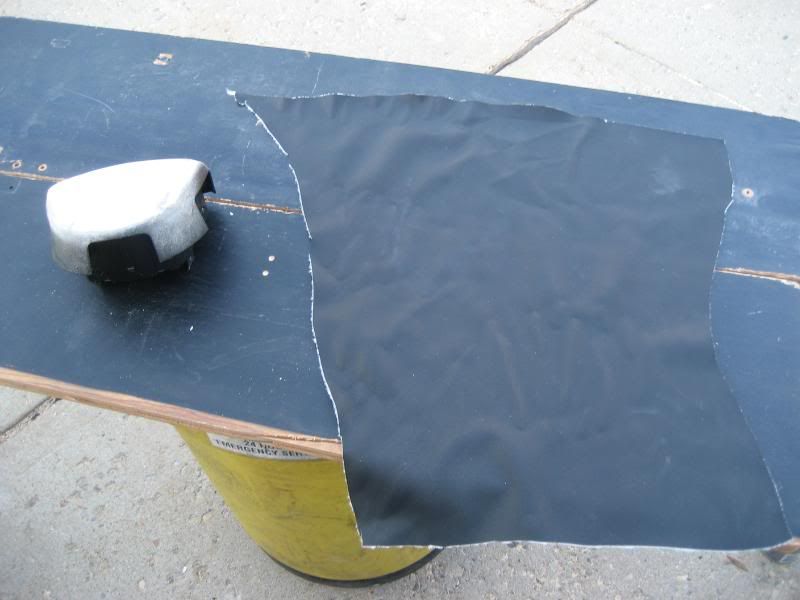 Stretching the leather for the clean look: 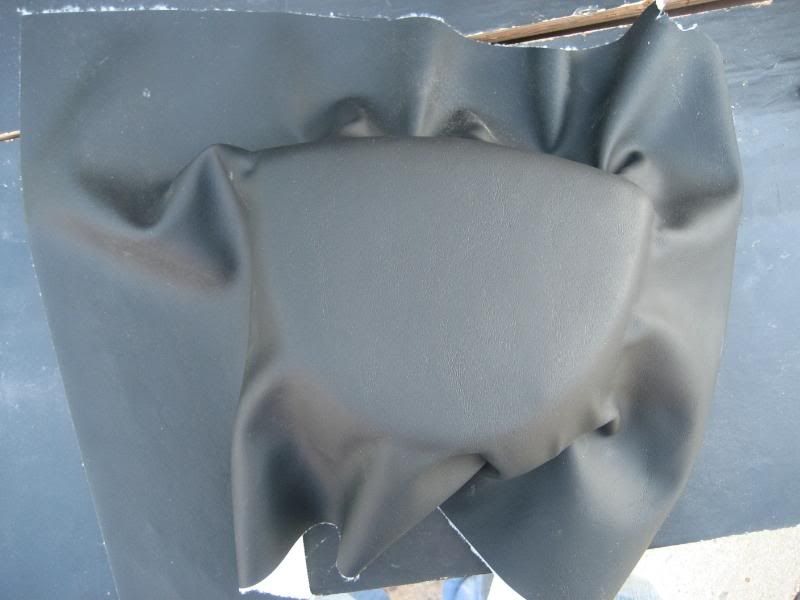 The result: 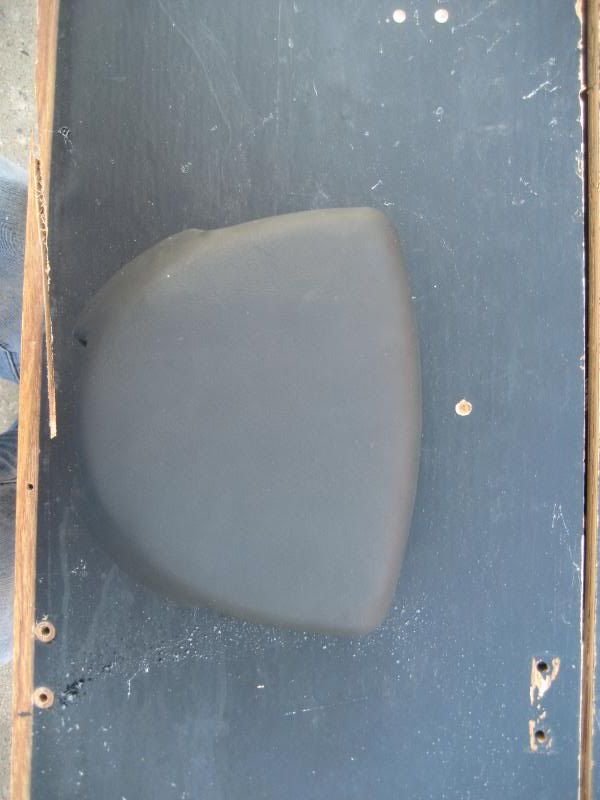 And the final touch to complete the new silvia feel: 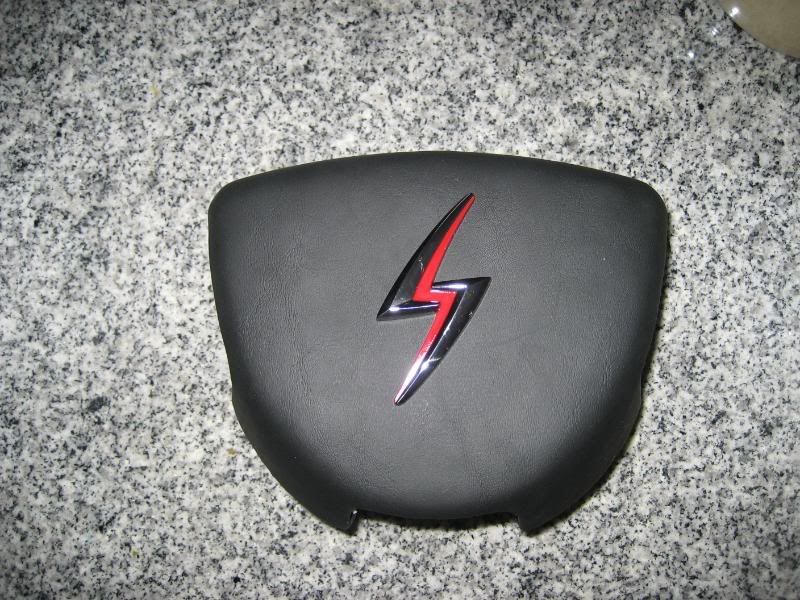 Lots more to come! |
|
|
|
05-17-2008, 09:03 PM
|
#28 |
|
Zilvia Member
Join Date: Mar 2008
Location: Your mom's basement
Posts: 263
Trader Rating: (0)
Feedback Score: 0 reviews
|
Nice fabrication very creative
 How much did it run you to have the dash support blasted? Mine is rusted as hell too it would probably take me hours to do it myself |
|
|
|
05-18-2008, 09:10 AM
|
#29 | ||
|
Zilvia Junkie
Join Date: Jul 2007
Location: Cincinnati, Ohio
Age: 39
Posts: 544
Trader Rating: (3)
Feedback Score: 3 reviews
|
Quote:
Quote:
Thanks for all the compliments guys. |
||
|
|
|
05-17-2008, 09:14 PM
|
#30 |
|
Zilvia Member

Join Date: Oct 2007
Location: Vermont
Age: 33
Posts: 287
Trader Rating: (0)
Feedback Score: 0 reviews
|
Great work bro, very creative work! Keep it up. + 1 for you
__________________
www.tannermunsondrifting.com |
|
|
|
| Bookmarks |
|
|


 Hybrid Mode
