|
|||||||
| Tech Talk Technical Discussion About The Nissan 240SX and Nissan Z Cars |
 |
|
|
Thread Tools | Display Modes |
 01-20-2010, 04:51 PM
|
#121 |
|
Zilvia Member
 Join Date: Jul 2008
Location: Los Angeles-->Long Island
Age: 37
Posts: 206
Trader Rating: (5)
 Feedback Score: 5 reviews
|
What sensors did you use? Since yours are good, I'm thinking maybe the ones that I used may not be compatible. (I've used sensors from the J30, Q45, and M30 for the ambient) Also, if you were to unplug a sensor, (ambient, sunload, or in cabin) do you get 12V or 5V? With the key to "ON". Reason I ask, is all the FSM's say that I should get 5V but I always get 12V.
Is your heat just not getting hot enough like it used to, or is it not blowing enough hot air like it used to? Also, is your AC working? |

|

|
| Sponsored Links |
|
01-20-2010, 10:17 PM
|
#122 |
|
Zilvia Member
Join Date: Oct 2009
Location: Fort Worth
Age: 40
Posts: 240
Trader Rating: (6)
Feedback Score: 6 reviews
|
Dcc pics
I bought my stuff from a guy in Japan. It all came together with complete harness (i posted a pic of it a couple of pages back). Ive heard you can use other sensors but never tried them. You may have a point on that.
About the Heat issue. It blows as great. As hard as it used too with analog contros. Just doesnt get as hot. Kindo luke warm really. Still havent hooked wire 33 to blend door. Only thing i havent done yet. Hopeing that will help. Here are pics of sensors i used: Ambient Sensor(mounted in hole, secured for good measure with zip tie)  In cabin sensor w/tube, Sunload Sensor, Amp, Ambient Sensor:  I used an S13 housing with my JDM Amp(pic is before i loomed the wires and permenately mounted it)  |
|
|
|
|
01-20-2010, 10:34 PM
|
#123 |
|
Zilvia Member
Join Date: Jul 2008
Location: Los Angeles-->Long Island
Age: 37
Posts: 206
Trader Rating: (5)
Feedback Score: 5 reviews
|
Yeah, those sensors are identical to mine! except the in cabin one.
I'm almost positive that if your PBR isn't hooked up, you won't get any hot air. I misread the guide and repined the air mix dorr motor plug (only need to repin if you use JDM harness) and I wasn't getting hot air at all. I put the wires back in their OG position and everything was good, besides my sensors! When I hit AUTO on my DCC, fan blows at full speed to my feet and defroster, and the AC is on. What does yours do? |
|
|
|
|
01-21-2010, 12:27 AM
|
#124 | |
|
Post Whore!
 
Join Date: Sep 2004
Location: Granada Hills, CA
Age: 43
Posts: 6,990
Trader Rating: (15)
 Feedback Score: 15 reviews
|
Quote:
Also if you turn the car off or the dcc off and then turn it back on, it should be in auto still at whatever setting you left it at. so if it's cold I set it to 32c fan blows at full speed until it feels the car is at temp. I have a nismo thermostat and operating temp for an sr20 is about 200 degree tops. If it's running at a temp lower than that, it's good for the motor but your in cabin heat obviously will suffer. in my experience. |
|
|
|
|
|
01-21-2010, 01:55 AM
|
#125 |
|
Zilvia Member
|
Hey guys, I know I haven't been keeping up with helping you guys with the installs but I'm glad to see so many people tackling it.
I just wanted to make a quick comment about the heat issue that I thought I had mentioned but I don't see it anywhere so I guess I didn't. Anyway, when I first wired everything up, I had the same issue! I was sad that it wasn't that hot. But I took a look at the air mix door motor and watched it as I changed the temperatures. It looked like it was getting stuck or something. There is a cover over the motor, the black thing in this pic: http://www.chuonthis.com/cars/s14-dc...ng-air-mix.jpg I took it off to see if I could see what was blocking it. With the cover off, I changed from full cold to full hot and the temps got hot! So I put the cover back on and everything worked as expected now. This is all from memory 3 years ago but I'm pretty sure that's what happened. Try it out and let me know if that fixes the issue. If it does, I'll add it to the write up when I have some time. |
|
|
|
|
01-21-2010, 10:12 PM
|
#126 |
|
Zilvia Member
Join Date: Oct 2009
Location: Fort Worth
Age: 40
Posts: 240
Trader Rating: (6)
Feedback Score: 6 reviews
|
Done!Finally!!!!!!!!!!!!!!!!!!!!!!!!!!!!!!
Finally Done!!!!!!!!!!!!!!!!!
Got my heat working. It was the wire going to the Air Mix Motor(33 P)PBR. I didnt connect that one yet. Misread the instructions. Thought it was used for a power source and didnt think i needed it since everything seemed to power up fine. Thanks everyone for the help in here. Zilvia for the win! For real.  |
|
|
|
|
01-22-2010, 01:31 AM
|
#127 |
|
Post Whore!
Join Date: Sep 2004
Location: Granada Hills, CA
Age: 43
Posts: 6,990
Trader Rating: (15)
Feedback Score: 15 reviews
|
 I actually just took my dash off tonight, the refurbished motor I had on there for the mode door finally took a shit, luckily I got a newer one off of a salvage 240 a while back.  My window defroster and side glass vents haven't been working at all, so hopefully this resolves that issue. It literally took me about 35 minutes to pop my dash off. Scary, imagine how fast car thieves can get these things off.  also for any reason if you remove this tube when messing with your dashboard, please reinstall it before putting your dash back in. I didn't when I did this last year and ended up taking off two of the metal brackets that hold this in place. It's now being held in place by the center of things with two zipties. I have no idea what i did with those brackets or screws. |
|
|
|
|
01-22-2010, 09:34 PM
|
#128 |
|
Post Whore!
Join Date: Sep 2004
Location: Granada Hills, CA
Age: 43
Posts: 6,990
Trader Rating: (15)
Feedback Score: 15 reviews
|
alright so my wiring is giving me a headache... on the mode door motor I get 31 and 35, according to the auto wiring info on the uk fsm... 1 and 4 on that plug (l/r and l) the l/r seems to be a dud. If I swap the wiring around and put l in slot 4 and run the test again I only get error 35...
31 is Vent 35 is Defrost I NEED the defroster to work, so I need slot 1 on that plug to go to it's retrospective spot on the dcc. So now it's playing the where the fuck is that r/w wire going. 4/1 are supposed to be jumped according to the wiring i'm reading... I'm going to try a jumper wire right now and see if that fixes it. |
|
|
|
|
01-22-2010, 10:25 PM
|
#129 |
|
Zilvia Member
Join Date: Jul 2008
Location: Los Angeles-->Long Island
Age: 37
Posts: 206
Trader Rating: (5)
Feedback Score: 5 reviews
|
Hmmm. Never heard of a UK FSM. Can you link me to it?
I'm looking at the JDM FSM and the pins and color don't match up to what you speak of. Did you ever switch those wires that I posted a couple pages back? One of the symptoms of having those wires switched was that I could only get air out of my defrost vents, and nowhere else. |
|
|
|
|
01-23-2010, 12:09 AM
|
#130 |
|
Post Whore!
Join Date: Sep 2004
Location: Granada Hills, CA
Age: 43
Posts: 6,990
Trader Rating: (15)
Feedback Score: 15 reviews
|
there is an fsm sport compact car put together for people that needed info on how to work on an sr20 in english... it also happens to have the information for the digital climate control in english...
the wire colors of course dont match. because the manual and auto climate controls are wired up differently. also in the instructions in the write up tells you 2 of the wires on the back plug of the dcc will have to be split so all of the positions switch correctly. I've done a continuity test on all of my stuff, i tried re-pinning it to it's manual configuration. having the pictures side by side. you can tell which wires you needed to cross. Because i don't have my multimeter here, i cant tell which is which right now and have to go plug and play. the document name is s14_sr20det_fsm.pdf UPDATE Alright, I unloomed the harness... and after double checking and triple checking, quadruple testing, 2 things were swapped around... at the dcc end. w/o either of these items it would not move into any other mode. After checking and checking, and testing and testing. and even verifying all wiring is spot on. It's safe to say there is a break in the wire for defrost. i get 35 no matter which configuration pin 1 and 4 are in. there is either a break in the wire leading up to the mode door motor, or something else is mixed in there that shouldn't (like a ground.) so I'm just going to pull the wire and re-do it. FINAL UPDATE Until I have a voltmeter in hands to measure, I will safely assume the dcc will never go to defrost mode because the unit itself is defective, there is no way or reason why it is not going into defrost mode. It's 1 wire that splits into two. (l/w to l/o&l/w) no other flash necessary. every other mode works 31,32,33,34,36,37,38,39 ALL GOLD... I'm going to try swapping the green wires right now, and i got errors 31,32,33,35.... put em back, just 35... if i swap around 2 and 5. defrost works, and every other mode doesn't. another note I would like to add. none of these wires are crossed, everything is spot on with the guide. when you change it to blow air in your face... that door stays shut (big front flap) defroster opens at about 2 percent. put air on your feet, that works just fine. hit the defrost button, full on air blast to your face. fml. Last edited by Om1kron; 01-23-2010 at 06:00 AM.. |
|
|
|
|
01-24-2010, 10:58 AM
|
#131 | |
|
Quote:
|
||
|
|
|
|
01-26-2010, 03:29 AM
|
#132 |
|
Post Whore!
Join Date: Sep 2004
Location: Granada Hills, CA
Age: 43
Posts: 6,990
Trader Rating: (15)
Feedback Score: 15 reviews
|
|
|
|
|
|
02-17-2010, 10:06 PM
|
#134 |
|
Zilvia Member
|
so i went through this whole wiring diagram and fixed the few flaws in the original wiring. no offense to the OP b/c he did a great job and spent alot of time on it. as i said there were a few flaws (most minor and have been covered)...a couple work...but aren't how it was intended to be wired. here is what i've typed out. you will only need to solder a few wires. the rest just depin the JDM harness and then one by one pull the pins from the USDM harness and repin them into the proper position in the JDM harness.
i am about to do this next week and hope i don't run into issues. the ONLY thing i have setup different is the thermo. i am not sure where to source a Thermo control amp as the original writeup didn't say much about this. i bypassed this in the wiring but would like to put it back in as it would make the wiring absolutely 100%. i assume that this just means whenever the a/c button is on the a/c compressor is on? here is my wiring. Hope this helps someone. M76 & M77 Climate Control Plugs Move USDM To JDM USDM Color 1 - 22 L/OR (blue w/ orange stripe) 2 - 31 L/Y (blue w/ yellow stripe) 3 - 30 L/R (blue w/ red stripe) 4 - 22 L/W (blue w/ white stripe) * 5 - 21 L/B (blue w/ black stripe) 6 - 30 L (blue) ** 7 - 6 G/OR (green w/ orange stripe) 8 - 5 G/Y (green w/ yellow stripe) 9 - N/A N/A 10 - N/A N/A 11 - 4 G/W (green w/ white stripe) 12 - N/A N/A 13 - 19 OR/L (orange w/ blue stripe) (95-96 Y/B) 14 - 12 L/OR (blue w/ orange stripe) 15 - 13 R/L (red w/ blue stripe) 16 - 14 R/Y (red w/ yellow stripe) 17 - 20 B (black) 18 - 2 LG/W (light green w/ white stripe) 19 - 1 PU (purple) 20 - 3 G/B (green w/ black stripe) 21 - 28 Y/B (yellow w/ blue stripe) 22 - 8 B/R (blue w/ red stripe) 23 - 7 R/W (red w/ white stripe) 24 - 32 Y (yellow) 25 - N/A N/A 26 - 27 P/L (pink w/ blue stripe) 27 - N/A N/A * solder this wire to the L/OR wire that you inserted into pin 22 of the JDM DCC plug ** solder this wire to the L/R wire that you inserted into pin 30 of the JDM DCC plug M31 JDM DCC Plug Extra Wiring Pin JDM Color 11 OR/G (orange w/ green stripe) Connect this wire to a constant 12 volt source. You can find one at your radio. 16 L/W (blue w/ white stripe) Run a wire down to the blower motor plug and connect to M54 pin #2 L/W (blue w/ white stripe) 17 Y (yellow) Run a wire down to the M63 main ECU connector and connect to pin #28 Y (yellow) (If you have a swapped motor this will change. refer to your individual wiring for this. It should be the one wire water temp sensor) 19 L/B MA26 Engine Temp. Sensor 23 G/Y (green w/ yellow stripe) Run this wire to the M51 Intake Door Motor Plug and pin into pin #23 (there is no wire here so you will need to pinn it yourself) 24 Y (yellow) Run this wire to the M51 Intake Door Motor Plug and pin into pin #22 (there is no wire here so you will need to pinn it yourself) 25 OR/L (orange w/ blue stripe) This is connected to the OR/L wire on the in cabin temp sensor 26 OR (orange) This is connected to the orange wire on the sunload sensor 29 B/Y (black w/ yellow stripe) Connect this wire to pin #2 on M26, M46 and E46. All three wires are B/Y (black w/ yellow stripe) you will also be connecting the black wire from the air mix door motor plug M33 as noted below. 34 OR/B (orange w/ black stripe) This is connected to the OR/B wire on the ambient temp sensor M35 Fan Switch Plug Move USDM To JDM USDM Color 1 - 9 L (blue) - (you will need to solder this connection to the existing blue wire in pin 9 of the JDM M31 plug.) This also needs to be connected to pin #1 of the Fan Control Amp. (it's either blue ot blue w/ white stripe depending on the year of the FCA) Run a heavy gauge wire down to where you mounted the Fan Control Amp. M50 Fan Control Amp Plug From Pin To JDM USDM Color 1 L (blue or blue w/ white stripe) Run Heavy Gauge Wire Up To DCC & Connect To Pin #1 Of M35 Fan Switch Plug 2 10 L/Y (blue w/ yellow stripe) Run wire to JDM DCC and connect to pin 10 of JDM DCC plug 3 B (black) Ground To Chasis M33 Air Mix Door Plug From Pin To JDM USDM Color + 33 L/OR (blue w/ orange stripe) Run a wire from the + pin on the m33 connector to pin #33 P (pink) on the JDM DCC G 29 B (black) Run a wire from the G pin on the M33 connector to pin #29 B/Y (black w/ yellow stripe) on the JDM DCC 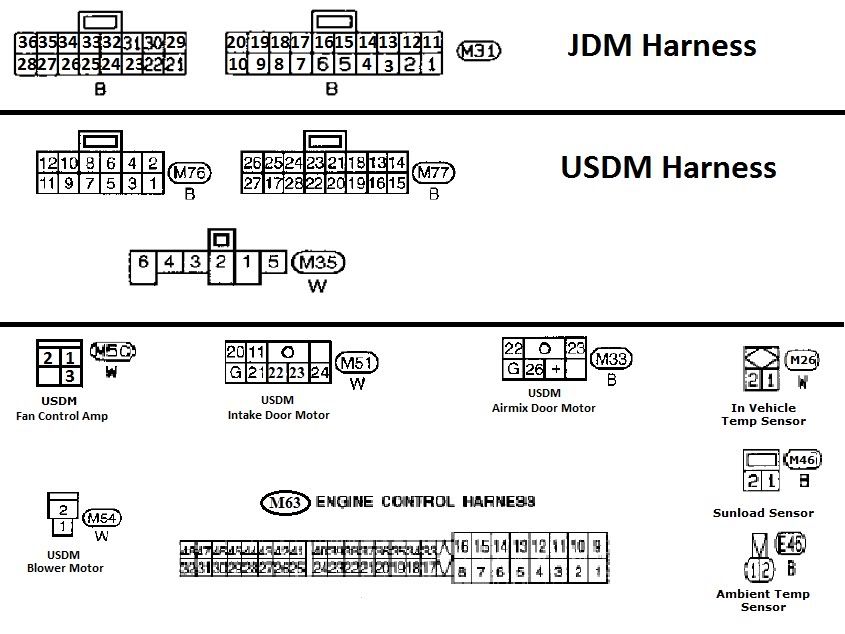 Last edited by robbie2883; 02-17-2010 at 11:41 PM.. |
|
|
|
|
02-17-2010, 11:31 PM
|
#135 |
|
Zilvia Member
|
just for the record two big errors i found that i think might have alot to do with peoples issues of temps and so forth both involve the PBR on the air mix door motor. pin 33 needs to be wired TOO the pbr NOT TAPPED INTO...but cut that wire and wire the pbr to the dcc and cap of the wire leading into the car. also the ground side of the PBR needs to be tapped into pin 29. you need to have all sensors and the PBR share the same ground for accuracy. i also separated the ground for the fan amp control and the dcc as these can interfere with each other.
|
|
|
|
|
02-18-2010, 12:10 AM
|
#136 |
|
Zilvia Member
|
*edit
so i just answered my own question about the thermo control amp. 97-98 do not use this. 95-96 have one already stock. this explains the different colors on that one wire for pin #13 so with that said i can personally guaranty that this wiring is a 100% OEM wiring setup |
|
|
|
|
02-28-2010, 07:38 PM
|
#137 |
|
Leaky Injector
Join Date: Jan 2010
Location: South Florida, Broward
Posts: 106
Trader Rating: (9)
Feedback Score: 9 reviews
|
i am trying to install my dcc and have all the sensors with pigtail but the fan control amp doesnt have a pigtail. do i need one or is there one you use of the usdm harness?
thanks in advance!! this thread is hella useful. |
|
|
|
|
03-16-2010, 10:03 PM
|
#139 |
|
Zilvia Junkie
 Join Date: Mar 2009
Location: Los Angeles, CA
Posts: 367
Trader Rating: (5)
Feedback Score: 5 reviews
|
Anyone in Los Angeles area have time to help me with my S14 Digital Climate Control install??
I recently bought mine with all the harness's intact, but I lack of lazyness when it comes to wiring... I'll buy you a nice dinner =)
__________________
Super-Made Instant Gentleman Zenki S14 VIP itzjOw3.com Phen Club |
|
|
|
|
03-19-2010, 01:07 AM
|
#141 | |
|
Post Whore!
Join Date: Sep 2004
Location: Granada Hills, CA
Age: 43
Posts: 6,990
Trader Rating: (15)
Feedback Score: 15 reviews
|
Quote:
|
|
|
|
|
|
05-28-2010, 09:55 PM
|
#142 |
|
Leaky Injector
Join Date: Jan 2010
Location: South Florida, Broward
Posts: 106
Trader Rating: (9)
Feedback Score: 9 reviews
|
hey i installed the DCC and everything works but is it normal that the display dims when i turn on the headligts? is that a factory setting or did i wire up the power wrong?
thanks |
|
|
|
|
05-28-2010, 10:11 PM
|
#143 |
|
Post Whore!
Join Date: Sep 2004
Location: Granada Hills, CA
Age: 43
Posts: 6,990
Trader Rating: (15)
Feedback Score: 15 reviews
|
Nothing is wrong, it's normal power draw, mine does the same thing... or did until I upgraded my alternator to the 130amp goodness of a quest alternator.
|
|
|
|
|
05-31-2010, 04:27 PM
|
#144 |
|
Zilvia Junkie
Join Date: Mar 2009
Location: Los Angeles, CA
Posts: 367
Trader Rating: (5)
Feedback Score: 5 reviews
|
If anyone is interested in my digital climate control let me know bc this shit is def. not worth it for me hahaha
I need my dam AC everyday... Hit me up a PM I have all the wires attached to it as well ~
__________________
Super-Made Instant Gentleman Zenki S14 VIP itzjOw3.com Phen Club |
|
|
|
|
09-15-2010, 06:49 PM
|
#145 |
|
Nissanaholic!
 
|
Sup br0s, just started on mine. Does anyone have that altima piece?
im about to go to the dealship and buy it. this shit is a headache for me
__________________
@pwrmves14 |
|
|
|
|
09-18-2010, 04:35 PM
|
#150 |
|
Nissanaholic!
|
alright so got it all done pretty much. i followed the OPs guide.
only thing im confused about is the 3 yellow wires and one green that control the motor speeds. on his guide it was wires 23, 24, 28, and 32. any help on what to do is greatly appreciated. and also i cant get my screen to illuminate so i believe the display unit to be bad as well.
__________________
@pwrmves14 Last edited by icedsole; 09-18-2010 at 05:09 PM.. |
|
|
|
|
| Bookmarks |
|
|


 Linear Mode

