|
|||||||
| Engine Tech Technical discussion related to all relevant engines such as KA, SR, RB, CA, 2JZ , L24/26/28, VG, VQ, and LSx series. |
 |
|
|
Thread Tools | Display Modes |
 12-29-2013, 12:29 AM
|
#1 |
|
Zilvia Junkie
 
Join Date: Jun 2010
Location: Arizona/LA, California
Posts: 476
Trader Rating: (3)
 Feedback Score: 3 reviews
|
Hello all,
So I usually don’t post tutorials and all but thought I would take the time to make this one as well. Even though it will be completely ignored just like the “How to upload and post photos” thread I made on some other forum. Anyhow, this will just cover the basics of trouble shooting your problems with your engine. This will work with about any gas engine/car mostly. Three simple rules makes any gas engine run, fuel, spark and compression. This is how you trouble shoot them all and pretty simple. This is how I will categorize everything. Also since I am posting this on Zilvia, I am going to use a 240SX in the example but works similar to the other cars. Lets start with the simplest. (To me) Fuel: Fuel is pretty simple, since it’s just a loop from the gas tank and back to the gas tank, I find it simple. The main parts of fuel that can go wrong and to look at are the fuel lines, fuel rail, fuel injectors, fuel pressure regulator, fuel pump, fuel filter, and obviously the fuel tank… For those who are visual, you have to figure out how fuel gets to the engine. In its route, the fuel gets pushed into the lines from the fuel pump, down the line and in between the line and the fuel rail is the fuel filter. Fuel filters are so if any particles or dirt is in the fuel tank that gets past the fuel pump, will be stopped before making it to the injectors and clog them. From the filter, it goes into the fuel rail which connects to the injectors. The injectors, the way I see it, are just valves that open at specific times to spray fuel into the cylinders to be ignited. Now the fuel pump will continue pushing fuel into the engine so there is the fuel pressure regulator at the end of the fuel rail that allows all the pressure to be released into the return lines which go all the way back to the gas tank. This photo is missing the fuel filter, sorry. 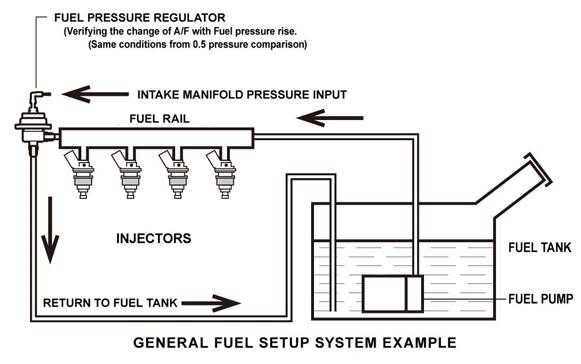 This is how you trouble shoot the fuel itself. You can rent a fuel pressure tester and depending on the pressure ratings, depends on what it could be. If the pressure reads high, your fuel regulator is most likely not releasing the pressure but if it is low, possibly the fuel filter is clogged or the fuel pump is dying/dead. Another way to test if the fuel pump is dead is to remove the fuel line and have someone turn the key on but not to try to start the car. Fuel should shoot out of the fuel line as the pump pushes the fuel out (if fuel is in the tank in the first place)  To see if the fuel filter is clogged, you can remove the filter and try to blow through it, if you can blow through it like a regular straw, than it is not clogged but if it is like a coffee straw and super difficult to blow through, than it means the filter is clogged.  That should cover about all of fuel. Compression: Compression is the pressure in the chamber when the piston pushes up, this compresses the air inside the block and the exhaust valves will open to allow the pressure to release.  says the KA says the KA This one normally is what causes people to replace engines or mechanics to make a good amount of rape to the wallet. Compression is pretty simple as well though as its mainly the long block. In order to test this, you will need a compression tester (cheapest way). The compression tester screws into the spark plug threads and seal the chamber so all the compression in the engine goes to the gauge. This reading will tell you if there is good compression or bad compression and also will help you figure out possibly what part it is that is causing the issues. For a 240sx KA24DE the compression runs about 160-180psi. Higher psi (which doesn’t really happen often) but if so, normally means something is in the chamber or a large amount of carbon build up; and if the pressure is low, than it may be piston rings allowing blow by or a bent/open valve in the head. Another cause could be a head gasket being blown. To trouble shoot these issues, doesn’t exactly require many tools. Though they make some badass tools that could tell you specifically what is wrong but for cheap fools like myself, here are some ways. To check and see if the piston rings are bad, take a small water bottle cap and put some oil in it. Very small, and pour it into the open hole where the spark plug goes and into the cylinder that has the low compression. The oil will fill the small gap of the piston ring and will seal it for a very small amount of time. Once the oil is in the chamber, quickly put the compression tester back into that cylinder and test it again. If the compression came up, then it’s the ring, make sure to watch the gauge as if the compression comes up, but slowly goes down without releasing the pressure from the gauge, than that is also another indication that the piston ring is bad. To test the head gasket to make sure it is blown or not; remove the spark plugs and turn over the engine. If fluid shoots out of the spark plug holes, then the gasket is leaking into the chambers. Also if a spark plug is extremely clean on the chambers side, normally that is a good indication on where the gasket is cracked or leaking through as the water will “clean” the spark plug. If this is neither issue, than it is most likely a valve in which you could bore out and drill a spark plug, JBweld or solder in a air compressor fitting and then install this ghetto leak down tester into the spark plug slot, connect the air compressor and feel the end of the header to see if you can feel any air coming out of it. These are ways to test the compression. Spark: Spark is a fun pain in the ass that everyone loves working with… pfff that’s a big joke… Spark ignites the fuel mist that is in the chambers. They are very difficult to trace down on the issue but after some time, you can track it down. Again for those visual peeps, the battery provides power, the alternator provides power as well when the power leaves the battery, it goes to the ECU which is a computer that uses sensors to controls when to open/close fuel injectors, spark and not spark (not in the 240sx case though) and spreads out the power throughout the engine/car. The power goes from the ECU to the coil which a manual sensor to the crank signals when to send power to the distributor (dizzy.) This power is then transferred to the end of a fan like blade that slightly touches 4 metal posts in a circle. These posts go to the spark plug wires which connect to the spark plugs that ignite the fuel in the chambers.  The fan-like blade (best way I can explain it at 2am… sorry) is connected to a sprocket which is connected to the cams. This makes sure to spin the blade at the same RPM as the engine. A lot of issues come from distributor timing. What this is, is that though the blade spins and is only able to be adjusted per tooth. The surroundings of the blades that hold the posts and wires is able to spin on its own. Turning it one way or another will either advance the timing which will make the spark plugs spark too early, or it will be retarded (dert da derpa) which means the spark will be late and cause a backfire (normally.) Another common issue in the spark area is that there will be no spark either in a specific cylinder or the distributor, etc BUT; that is when it is even easier to source the issue down as you just need to have a probe tester (that random sharp screwdriver that has that light bulb in it which you thought was some weird tool… yeah, that one…) and probe the spark plug wires first, if those don’t get power when you turn the key or the engine over, than move back to the coil wire that connects the dizzy to the coil. If not there, then probe before that. It gets that simple. After resolving a few issues, you will be able to tell where the issue is from listening to how the car runs or sounds. Trouble shooting sometimes is not quick but it’s the process of elimination that allows you to find the actual cause of the issue. Electrical Electrical is pretty simple but takes a lot of time. With electrical, it is about finding the beginning and the end of the problem. When there is an electrical issue, it normally starts off from the battery to the component that is corrupted or having the issue. That's how you have to think of it when troubleshooting the issue. To start out, what is not working? In this example, we will use a tail light issue since it is common on missiles/daily's.  With the tail lights, you have to find how the wire leads back to the battery or power source. In diagrams, you will see the wire lead to the switch, which is in the foot pedal. This switch only has power going through it when pressed in. When troubleshooting the issue, you will want to make sure to allow power to flow as far as it could go, with the tail lights, you would have the pedal pressed in the whole time or the button pressed the entire time. To find the main issue, the tool that will be used is a 12V test light. 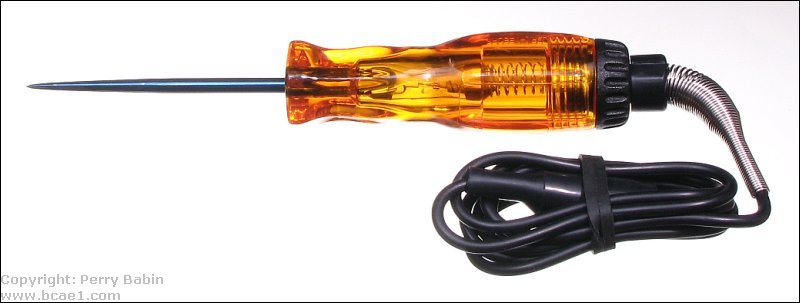 Yeah, the tool normally everyone throws away because we don't know what it is used for. For the extremely cheap folks (Cheapest version of the tool I have seen was $3) You can use a wire with a light in the line. Just have one side ground and the other side as the tester. When troubleshooting the tail lights, you will want to find some sort of diagram to figure out which wire goes to the lights specifically. If you don't want to search for a diagram, than you can go to the fuse box'es. The cover of the fuse box'es should have a diagram or writing that states what fuse/relay is for what. For the tail lights, it is normally part of the chassis fuse box. You would use the tester to make sure the fuse is getting power on both sides. This will tell you if the issue is before or after the fuse and if the fuse itself is blown or not. If the fuse is not getting power at all, you will need to look on the back of the fuse box to see which wire goes to that fuse. Then follow the wire to see where the next main fuse is for all external lighting (normally you will have more than just the tail lights not working at this point. If the fuse has power on one end and not the other, that would mean it is blown. With this, normally you would just replace it and call it good but in this case, you will want to check all the wiring after it to make sure the wire is not open and grounding or any loose ends that will cause the fuse to blow. Once checked, make sure to have the correct amp fuse and replace it. The tail lights should work after that. If the fuse has power on both sides, you will need to following the wire after it to see if it is grounding out, cut or broke loose. Follow the wire to the next part, i.e. sensor, relay, the lights, etc. Make sure power makes it that far in the wire. If not, than possibly (rare cause) the wire snapped within the wire cover. If it makes it, than check what the next part is and make sure power goes through it. If it is a relay, make sure power goes to the wire after the relay as well. If power makes it to all of these and the sensors and everything are working, you may have a bad bulb or ground. For the grounds, just follow the ground wire (normally only black) and make sure where ever it mounts too is tight, and grinded down to bare metal. Once all these steps are completed, your lights should work again. These steps should be able to work with all parts of the car regarding electrical issues. With relays, there needs to be multiple live wires and multiple grounds. For a relay, it works similar to a magnet and a switch. Actually... exactly what it is.  So going to talk about a simple relay, many are different and they all should have the diagram of what pin goes to where, on them. For this example: The common terminal should go to constant power. Will always be live. This is the power that will go to the subject that needs to be turned on. Like headlights. The power goes across the bridge (Armature) and continues to the subject it is needed to power. The coil terminals will go to a switch or sensor that when power is applied, that it will engage the electromagnet and close the bridge so the power go move across the Armature. This is why relays are so useful as they can be turned on and off multiple times, quickly and accurately. These are used for things like the turn signals or fuse relays that need to turn off after a sensor reading or switch is turned off. Normally Open Terminal goes to the subject you are trying to power. So if its turn signals, than it would go to the turn signals or if there is a fuse in between, than it would go to the fuse. This is what you want to turn on and off. Normally Closed Terminal goes to a ground. This is so when the relay is off, it will not short or go to nothing. Sometimes this connector is cut off and taped off for the same reason. It isn't exactly needed, just needs to stop the bridge when opening. I hope this helps many with electrical issues and setups. This is all used when doing anything with electrical. Off subject I do sincerely apologize that this tutorial is half ass'ed or crappy in any way and most likely garbled from me being tired, hungry, and cannot fully think to myself as so many people are talking to me and a movie is playing... -_-  As time goes on and people complain that I tried helping, I will eventually get bored of masturbating and fixing my car so it can break the next day, to sit down and modify this “tutorial”.  I hope this helps some of you at least and if anyone has stuff to add to it, please by all means, do so. This is just the simple basics but doesn’t mean I know everything, just a way I think of things to start with. Thank you for reading if you get here. 
__________________
S14 KA NA two cylinders, 75whp limper Last edited by tauntdevil; 01-29-2014 at 08:23 AM.. |

|

|
| Sponsored Links |
|
12-30-2013, 03:20 PM
|
#2 |
|
Zilvia Addict
 
Join Date: Jul 2013
Location: Georgia
Age: 34
Posts: 880
Trader Rating: (3)
 Feedback Score: 3 reviews
|
this can help super doopa noobs who are just getting into their first s chassis or any vehicle for that matter.
I think a basic steering/suspension noise bit should be added(seperate from this thread)to help those who are confused about noisy or banging suspension pieces. And i am not referring to the suspension,roll center etc thread, that thread is for those who really already understand it all or atleast somewhat lol.
__________________
95 S14 se RB25DET 348whp 
|
|
|
|
|
12-30-2013, 05:04 PM
|
#3 |
|
Zilvia Junkie
Join Date: Jun 2010
Location: Arizona/LA, California
Posts: 476
Trader Rating: (3)
Feedback Score: 3 reviews
|
I dont have a lot of knowledge on the suspension side of things but you do make a good point. Eventually when I have time I will add to this with other issues like oil starvation, starter issues, etc. Just takes time for me to get motivated to sit done for awhile and type it all up. Itll eventually happen xD
__________________
S14 KA NA two cylinders, 75whp limper |
|
|
|
|
12-30-2013, 05:29 PM
|
#4 |
|
Zilvia Addict
Join Date: Jul 2013
Location: Georgia
Age: 34
Posts: 880
Trader Rating: (3)
Feedback Score: 3 reviews
|
a lot of questions pop up regarding smoking/overheating.
Lisle part # 75500 ^ can be used to show results regarding a blown head gasket or not.
__________________
95 S14 se RB25DET 348whp
|
|
|
|
|
01-17-2014, 10:24 AM
|
#5 |
|
Zilvia Junkie
Join Date: Jun 2010
Location: Arizona/LA, California
Posts: 476
Trader Rating: (3)
Feedback Score: 3 reviews
|
Would anyone like to include a list that may need to be covered to help out others out?
Mechanical wise, not like body exterior parts but like engines, differential questions, anything like that that is not covered yet? I get ideas but by the time I get home, have only an hour to do anything so totally forget what the idea was for. Let me know.
__________________
S14 KA NA two cylinders, 75whp limper |
|
|
|
|
01-28-2014, 01:49 PM
|
#6 |
|
Zilvia Junkie
Join Date: Jun 2010
Location: Arizona/LA, California
Posts: 476
Trader Rating: (3)
Feedback Score: 3 reviews
|
Added electrical. If anyone wants to correct me with relays, would be great. Been a long time since I have wired a relay. Not something I have to work on often.
__________________
S14 KA NA two cylinders, 75whp limper |
|
|
|
|
01-28-2014, 03:20 PM
|
#7 |
|
Zilvia FREAK!
 
Join Date: Nov 2010
Location: arizona
Age: 36
Posts: 1,521
Trader Rating: (1)
Feedback Score: 1 reviews
|
Awesome right up taunt. �� good for noobs or anyone who's stuck as really this is a great back to basics.
__________________
Z32 with lq4 swap Desert Street Scene || Dssevents.com |
|
|
|
|
01-29-2014, 08:25 AM
|
#8 | |
|
Zilvia Junkie
Join Date: Jun 2010
Location: Arizona/LA, California
Posts: 476
Trader Rating: (3)
Feedback Score: 3 reviews
|
Quote:
__________________
S14 KA NA two cylinders, 75whp limper |
|
|
|
|
|
01-30-2014, 11:11 AM
|
#10 |
|
Zilvia Junkie
Join Date: Jun 2010
Location: Arizona/LA, California
Posts: 476
Trader Rating: (3)
Feedback Score: 3 reviews
|
Looks more like a 4 pin. Though I probably should have put a 5 pin in there with the optional accessory pin but normally its pretty useless unless you have an alarm or something similar.
__________________
S14 KA NA two cylinders, 75whp limper |
|
|
|
|
| Bookmarks |
| Tags |
| engine, fix, help resolve, ka24de engine, troubleshooting |
|
|


 Linear Mode

