|
|||||||
| Media Forum / Pictures / Videos Forum dedicated to media, such as pictures and videos. |
|
|
Thread Tools | Display Modes |
 10-29-2009, 10:07 PM
|
#1 |
|
Premium Member
 
Join Date: Jul 2003
Location: Downtown LA
Age: 38
Posts: 2,549
Trader Rating: (13)
  Feedback Score: 13 reviews
 |
My Pedobear Costume Build
Somehow i lost all the beginning stages pictures so all i have is towards the end lol.
First off: I bought hella materials from JoAnns fabric and craft store and some misc stuff from kmart and other random places Materials: -phone book -elmers glue -big 36"+ balloon -fabric (dark brown, light brown, black, and pink) -sewing machine -helmet -hot glue gun -cotton fill (poly fill) -zipper -shoes Started off by blowing up a huge balloon then paper mache it with the phonebook. Did about 7-10 layers to make it sturdy. Heres a picture of the inside  I let it dry for about 2-3 days since its pretty cold outside and stuff. Afterwards i popped the balloon and peeled off the inside latex so i could check it out and stuff. Next I worked on the body, legs and arms. I about 3 yards of suede fabric in a coffee color that would match the original pedobear color. Measured from my midneck to the bottom of my foot because i wanted it a little baggy so that it wouldnt be too tight and to cover the feet. Next i checked my shoulder size and added a few more inches to make the whole outfit a little baggy and not give it a tight fit. After doing this, i had a big rectangle which is sewed to make a tube shaped. about 1/4 - 1/3 up from the bottom i justed sewed 2 seams in the middle about 3" apart from eachother to make the legs. Cut the area in between so u can walk freely lol. Sewed horizontally at the top for the crotch area and by then its a full body suit minus the arms. Do the same thing to the arms as previously with the torso and arms are done.  Next are the feet, measured out the distance from the heel to the toes plus 6" for extra room. Do the same tube process to make the feet. By the heel, sewing only the top half of the 2 sides together. Then press that top half with the bottom of the fabric to make this shape  Kinda hard to explain lol. For the toes, i just did the tube process again and sewed the shaped off the nails on one end and flipped it inside out to get it a smooth clean look so ppl cant see the seams (should be done for all sewing areas). Now with the 2 seperate pieces, I took the dark brown piece (foot) and made a slit at the top, just enough for a shoe to fit in. After i make that slit, i flipped both pieces of the fabric (foot and nails) inside out so i could sew them together. Once done flip it back through the slit and u should have the foot done. Fill with cotton and add shoe and done. Now comes the head. Making a sphere out of fabric is ridiculously hard and took me about a week just to do. The method I used was the 6 orange slices method. similar to this 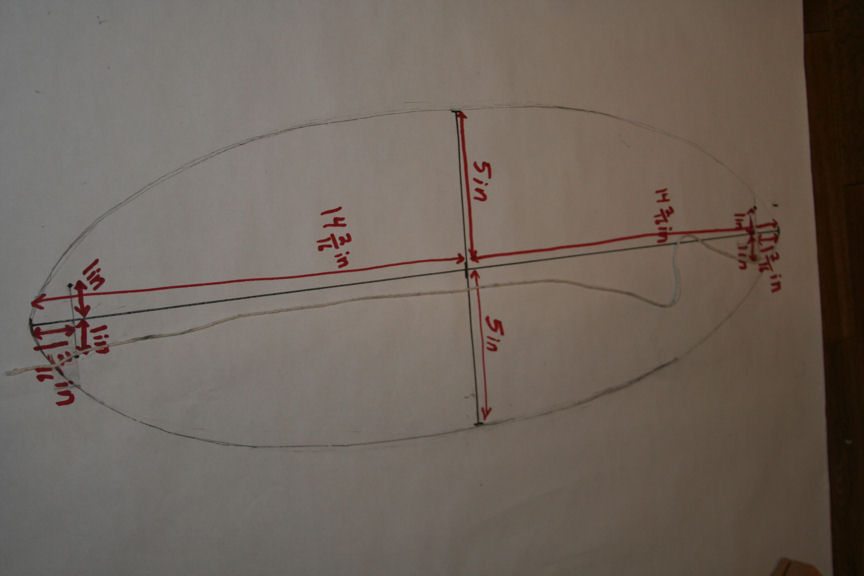 Instead of 6, i made 4 large slices because i didnt want so many seams showing. Now to make it easier, i decided to do each half separately since i could stretch the fabric onto the head. Measure out the half the circum of the head and thats the width and length if ur head is round. Make a template of that width and length. Now u should have a template of (ill use my numbers to make it easier to see) 36 x 36. (72 is my circumference and 36 is half). On each side border, i made a mark at every 1/4 mark (9",18",27"), do this for every edge of the square. The reason y its at the 18" is so i can draw a line from one edge to the opposing end and find the center point of the fabric. The reason for the 9" and the 27" is because in between is 18". This 18" will cover 1/4 of the hemisphere, multiply by 4 for all sides of the hemisphere and u get 72". Now this is where u can do it more professionally but i just winged it, draw a bell curve (parabola) from the 9" to the center of the fabric and 27" to the center. from each side it should look like a bell with all the lines connecting at the very middle of the fabric. Sorry its kinda hard to vision without pics since i lost them. Now the lines u drew are the sewing lines so cut out the piece leaving room for u the sew the sides together. The 9" point should be sewn to the 27" point of the left side. For example, if ur holding the 9" point side of the lower left, u should sew that to the 27" point of the lower left side too. Do that for all sides and u should get a hemisphere or close enough. Stretch it onto the head and hot glue it on. Pull hard to get out all the wrinkles. Instead of 6, i made 4 large slices because i didnt want so many seams showing. Now to make it easier, i decided to do each half separately since i could stretch the fabric onto the head. Measure out the half the circum of the head and thats the width and length if ur head is round. Make a template of that width and length. Now u should have a template of (ill use my numbers to make it easier to see) 36 x 36. (72 is my circumference and 36 is half). On each side border, i made a mark at every 1/4 mark (9",18",27"), do this for every edge of the square. The reason y its at the 18" is so i can draw a line from one edge to the opposing end and find the center point of the fabric. The reason for the 9" and the 27" is because in between is 18". This 18" will cover 1/4 of the hemisphere, multiply by 4 for all sides of the hemisphere and u get 72". Now this is where u can do it more professionally but i just winged it, draw a bell curve (parabola) from the 9" to the center of the fabric and 27" to the center. from each side it should look like a bell with all the lines connecting at the very middle of the fabric. Sorry its kinda hard to vision without pics since i lost them. Now the lines u drew are the sewing lines so cut out the piece leaving room for u the sew the sides together. The 9" point should be sewn to the 27" point of the left side. For example, if ur holding the 9" point side of the lower left, u should sew that to the 27" point of the lower left side too. Do that for all sides and u should get a hemisphere or close enough. Stretch it onto the head and hot glue it on. Pull hard to get out all the wrinkles. The rest ill write up later but yea, sorry for all the typing but its hard to type it up without pictures to show u guys. Here are some pics of the end result    
__________________
IM JON WAYNE ESQ.... bitch 
|

|

|
| Sponsored Links |
| Bookmarks |
|
|


 Threaded Mode