|
|||||||
| Builds (and builds only) Got a build thread? It goes here, build threads anywhere else on the forum will be locked and never moved. |
 |
|
|
Thread Tools | Display Modes |
 10-08-2013, 10:37 AM
|
#1 |
|
Leaky Injector
 Join Date: Nov 2009
Location: Scotland, UK
Age: 34
Posts: 130
Trader Rating: (0)
 Feedback Score: 0 reviews
|
Silvia 1jz Build
hello from the uk! i'm currently building a 1jz silvia and thought i'd share my progress.
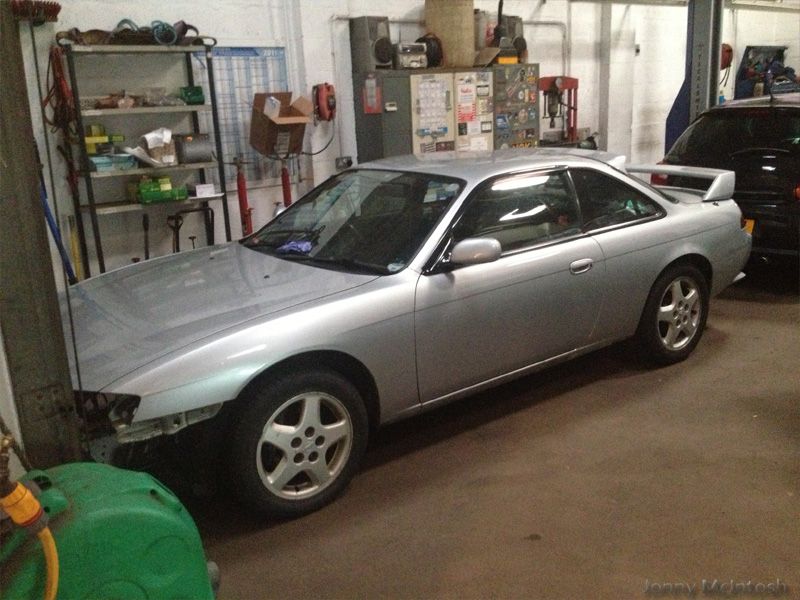
I have a huge build thread to show but unfortunately photobucket may go over it's limit so please bear with me as it resets every month  and this will take me a good while to write up/post so may take a few evenings of posting haha and this will take me a good while to write up/post so may take a few evenings of posting hahawill start off with a few pics of my first s14 I build from a stock/standard car into a stage 3, 360bhp road car 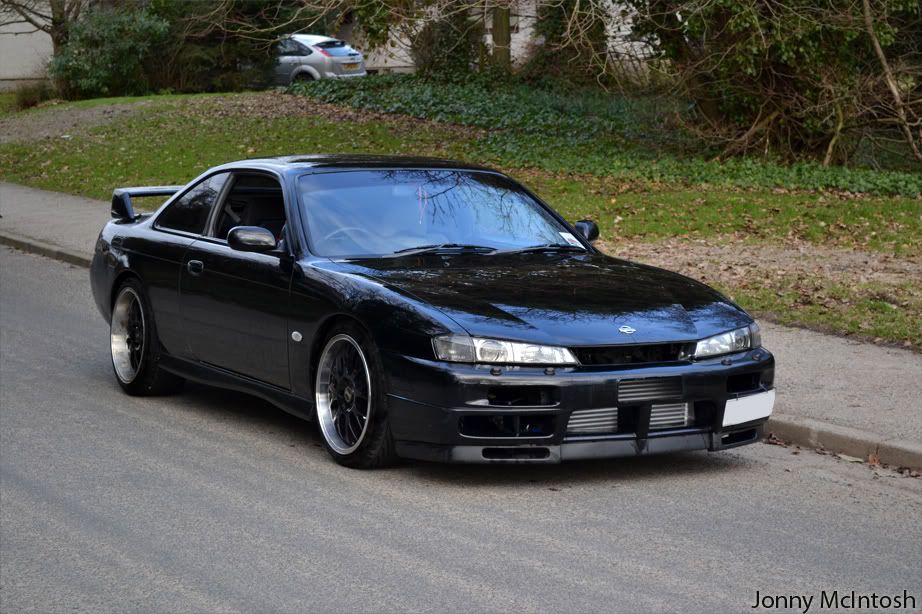 was running nistune, big 2871r turbo, 740cc nismo injectors, z32 afm etc 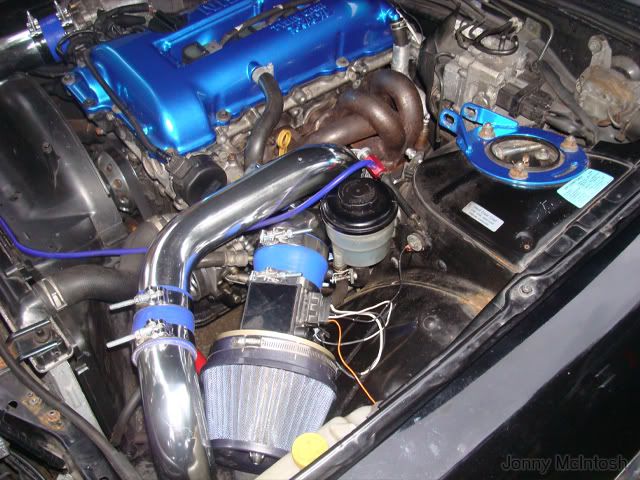 then had a bodykit and some other parts like a roll cage, recaro seats, big brakes etc 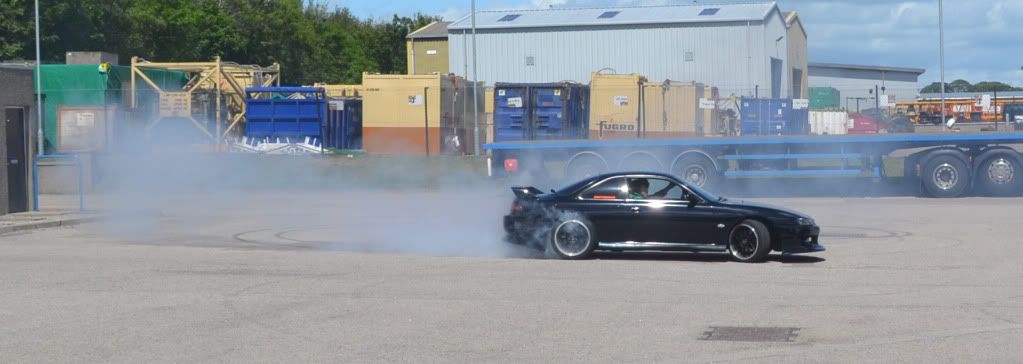 I've had a few s14's now and decided that Nissan build the best chassis, yet Toyota build the best engines so why not mix the two. started off with buying a soarer that had been rear ended 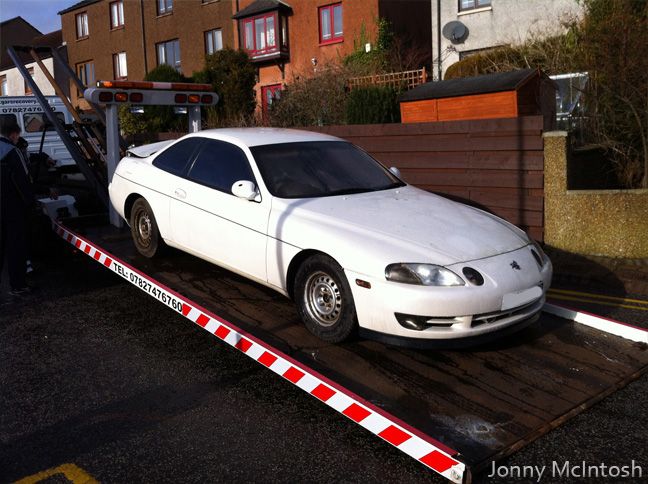 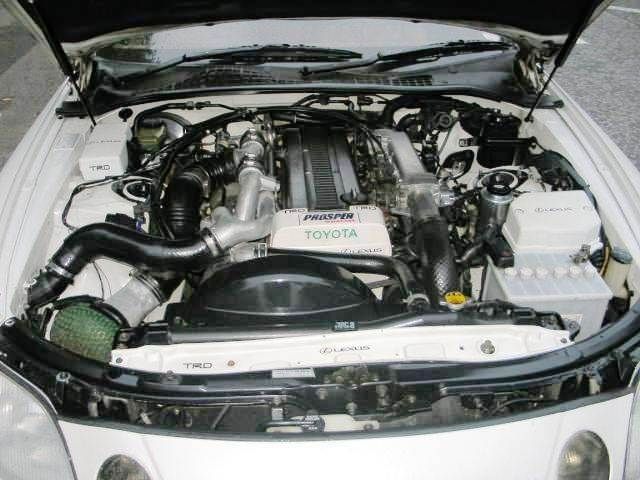 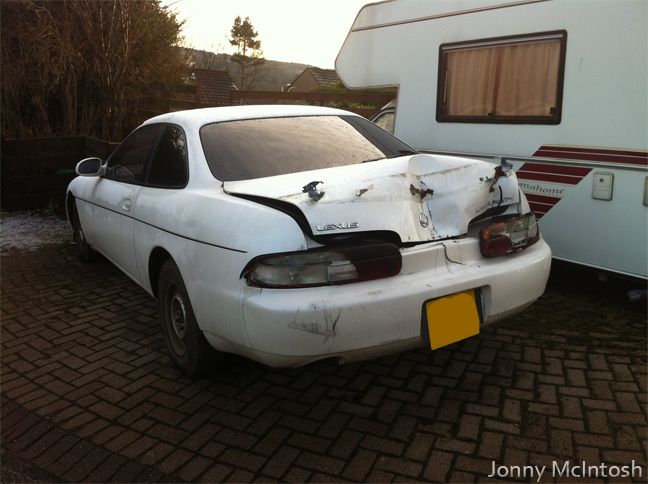 which at the time I had been driving/building this s14 sr20det after breaking/selling my black one 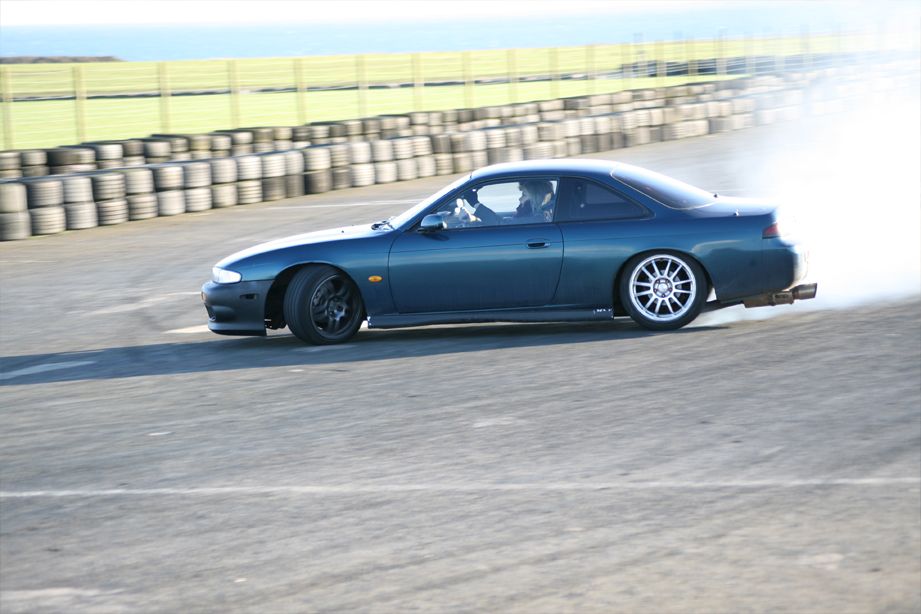 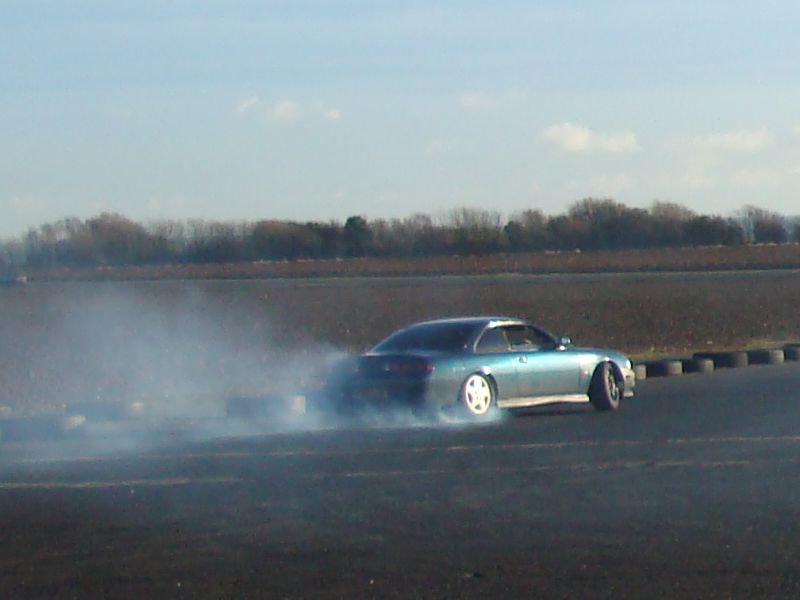 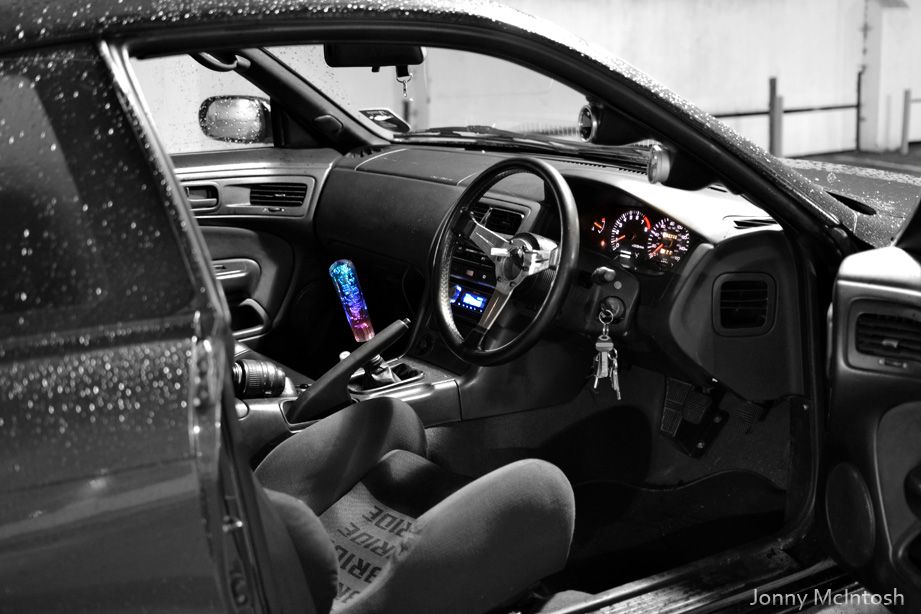 |

|

|
| Sponsored Links |
|
10-14-2013, 02:06 PM
|
#3 |
|
Leaky Injector
Join Date: Nov 2009
Location: Scotland, UK
Age: 34
Posts: 130
Trader Rating: (0)
Feedback Score: 0 reviews
|
massive appologies for that! i'm actually just finding out about the fee for photobucket to stop this happening as it's annoying! looks like it's only $3 a month so i'll go with that and then upload the rest of this build to the forum
|
|
|
|
|
10-14-2013, 02:14 PM
|
#4 |
|
Leaky Injector
Join Date: Nov 2009
Location: Scotland, UK
Age: 34
Posts: 130
Trader Rating: (0)
Feedback Score: 0 reviews
|
boom! photobucket account upgraded, time to smash some updates
 so I sold the green s14 and finally got the silvia of my 'dreams' a genuine jdm kouki import s14a silvia 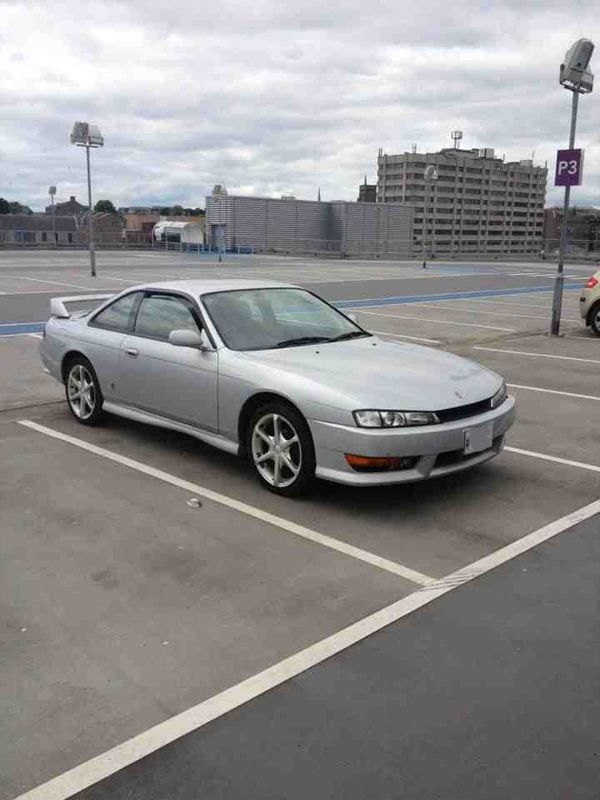 the car had some hsd coilovers so I threw on some wheels and lowered it a little bit, went out and met my friend john with his s15 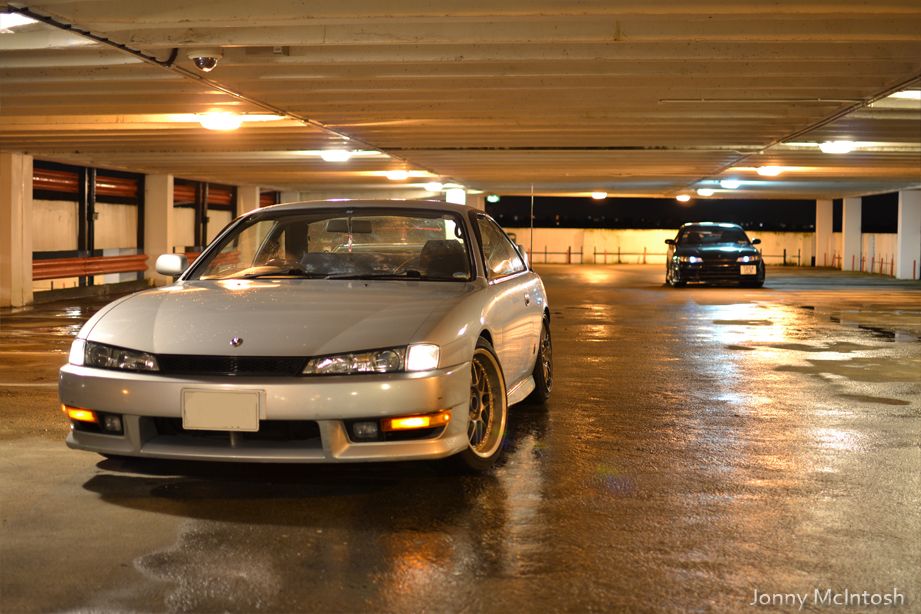  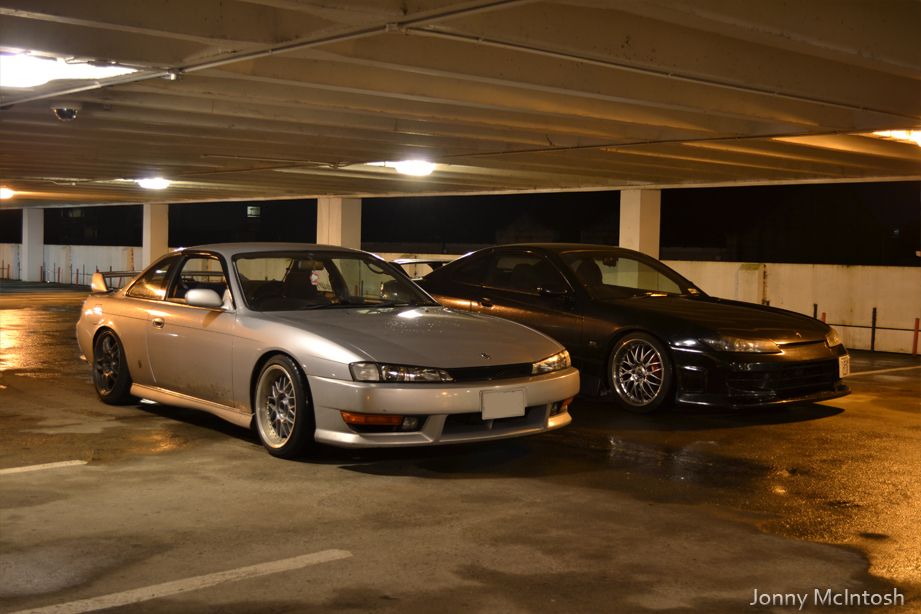 put the car up on the lift at my work and all I can say is WOW.... jdm imports are so clean! 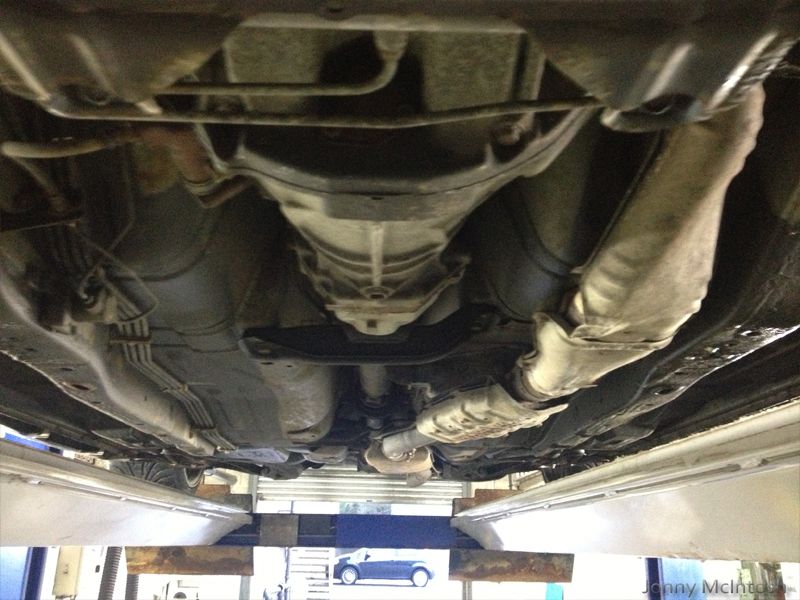 threw on a set of the subframe locking collars, adjusted the camber the back as it was excessive, went over all the fluids and so on can anyone explain what this sticker means? 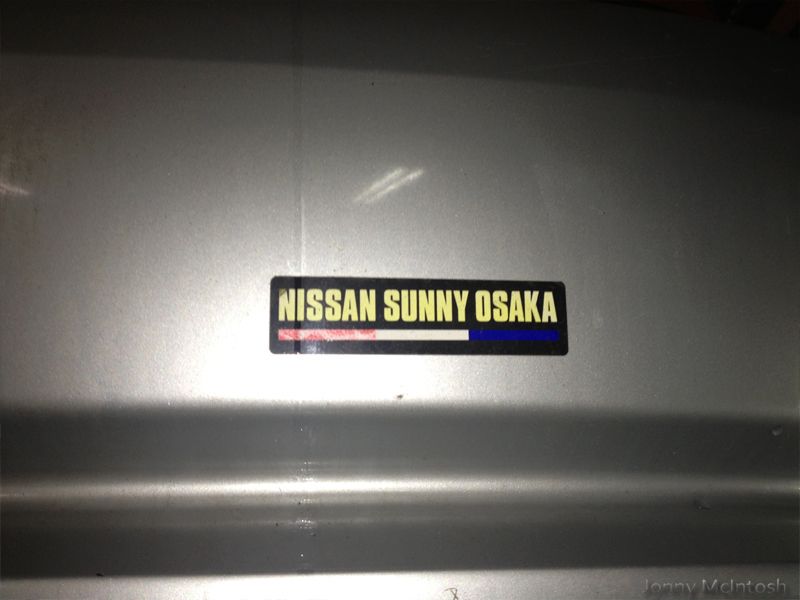 |
|
|
|
|
10-14-2013, 02:24 PM
|
#5 |
|
Leaky Injector
Join Date: Nov 2009
Location: Scotland, UK
Age: 34
Posts: 130
Trader Rating: (0)
Feedback Score: 0 reviews
|
soo....haha...unfortunately it's an N/A sr20de which sucks....not for long though!
 jetwashed! 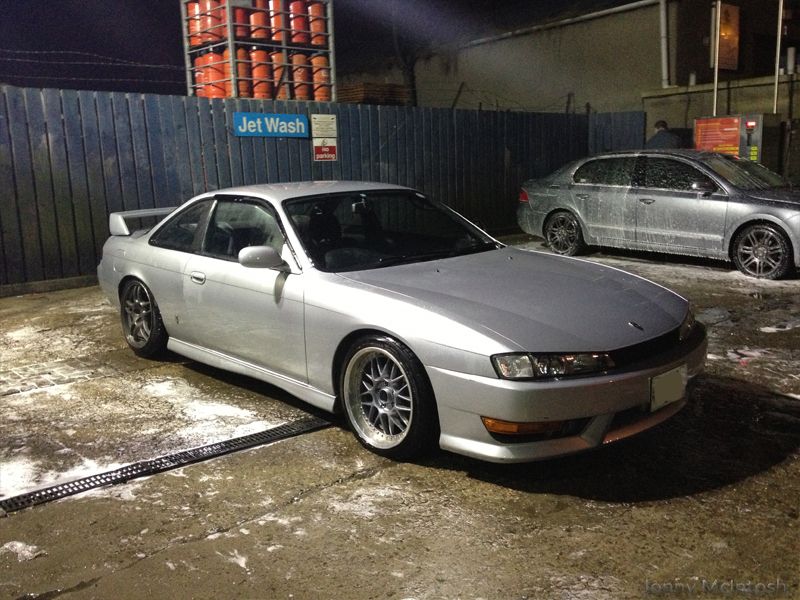 put this on 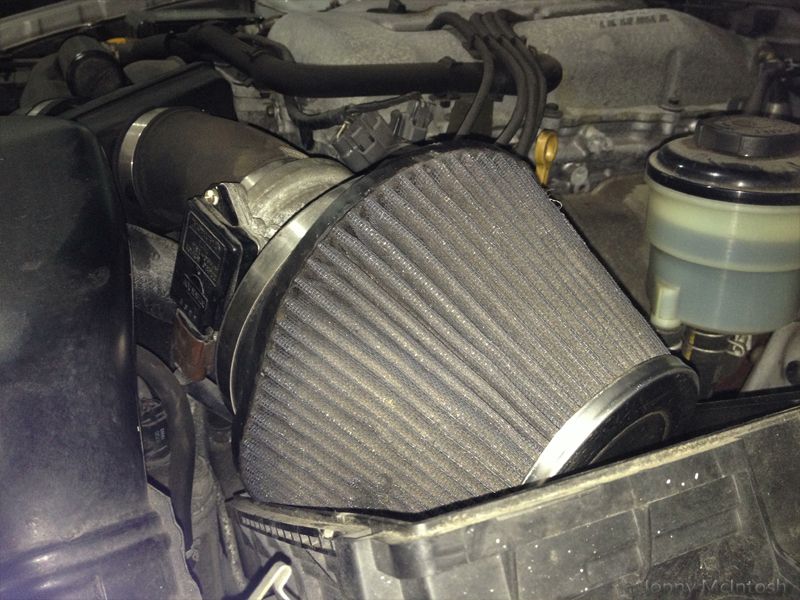 made a temp decat pipe also  just messing around with the sr20 motor until the 1j is ready |
|
|
|
|
10-14-2013, 02:27 PM
|
#6 |
|
Leaky Injector
Join Date: Nov 2009
Location: Scotland, UK
Age: 34
Posts: 130
Trader Rating: (0)
Feedback Score: 0 reviews
|
I've made it my goal to buy nothing but the best for this car, no corners cut with cheap parts
driftworks in the uk offer cs2 coilovers, one of the best on the market, I bought a set of those and i'm extremely impressed might also note the skyline brakes and 5stud hub swap that was done 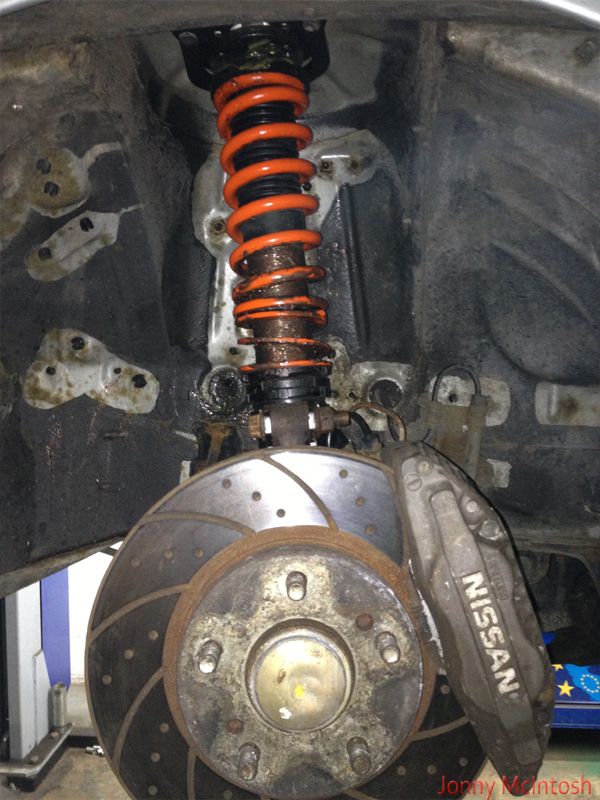 dualtechs removed 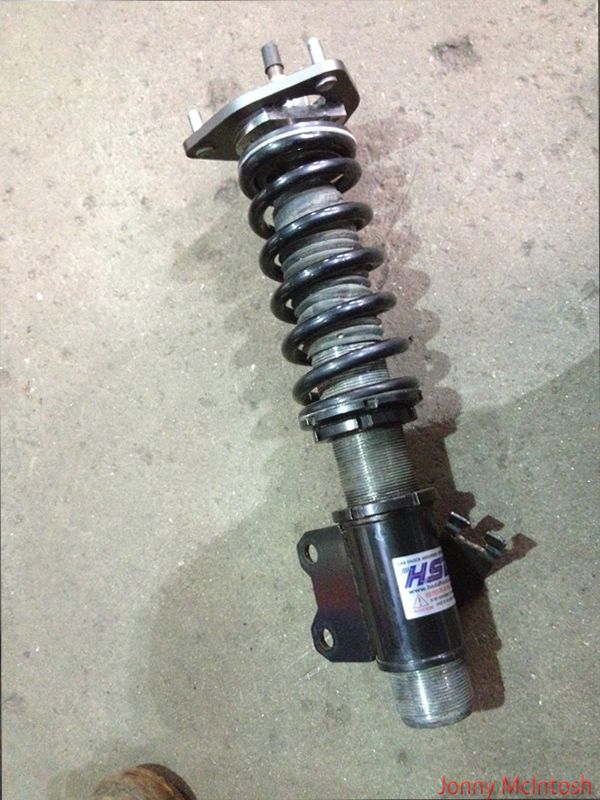 rears 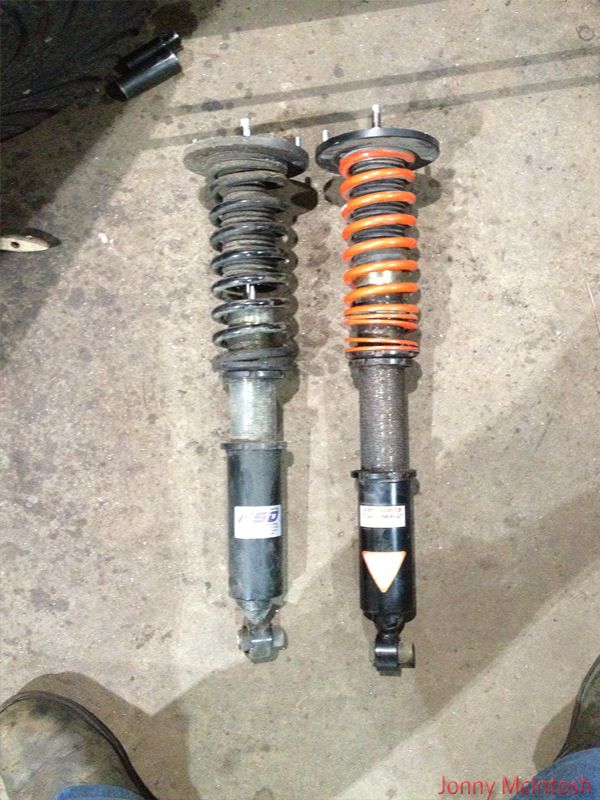 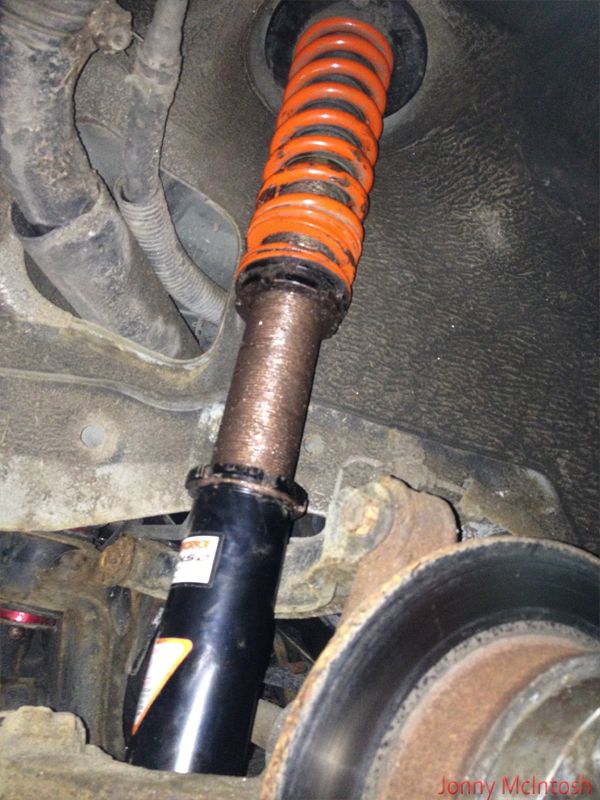 low 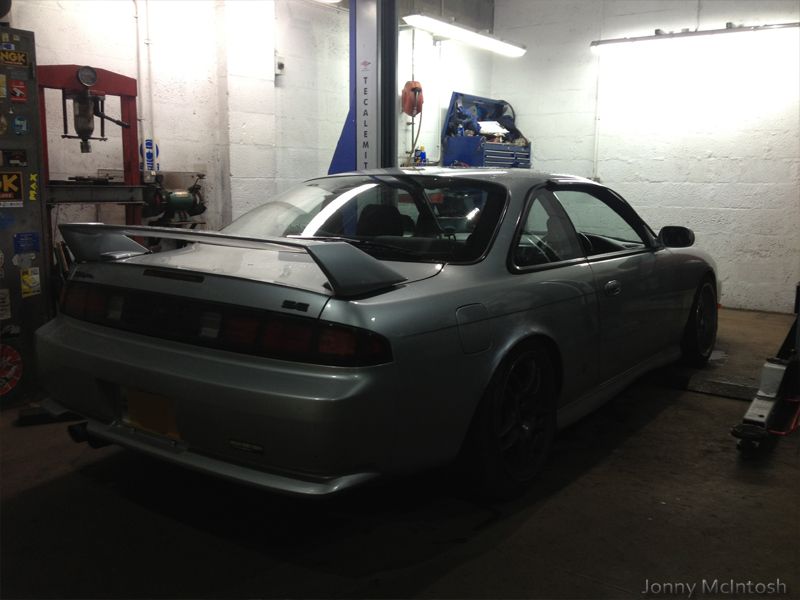 i'd also bought a set of equips 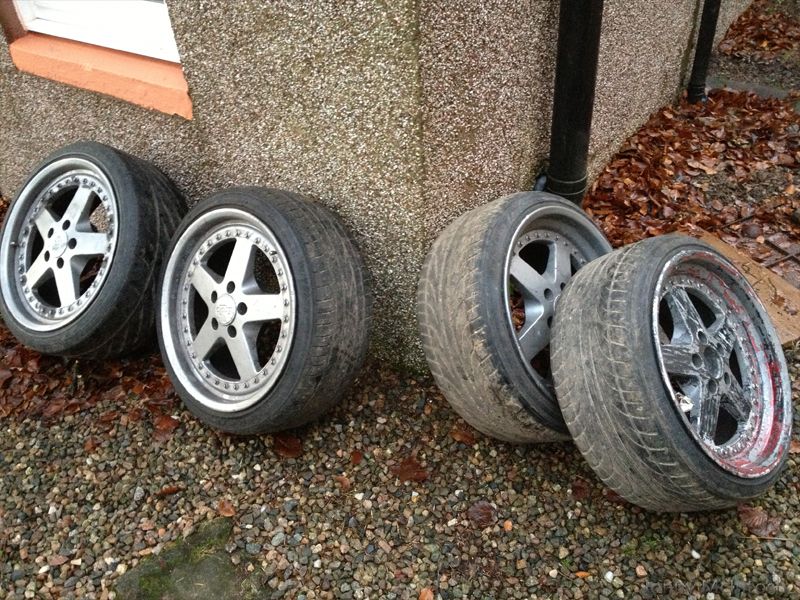 |
|
|
|
|
10-14-2013, 02:32 PM
|
#7 |
|
Leaky Injector
Join Date: Nov 2009
Location: Scotland, UK
Age: 34
Posts: 130
Trader Rating: (0)
Feedback Score: 0 reviews
|
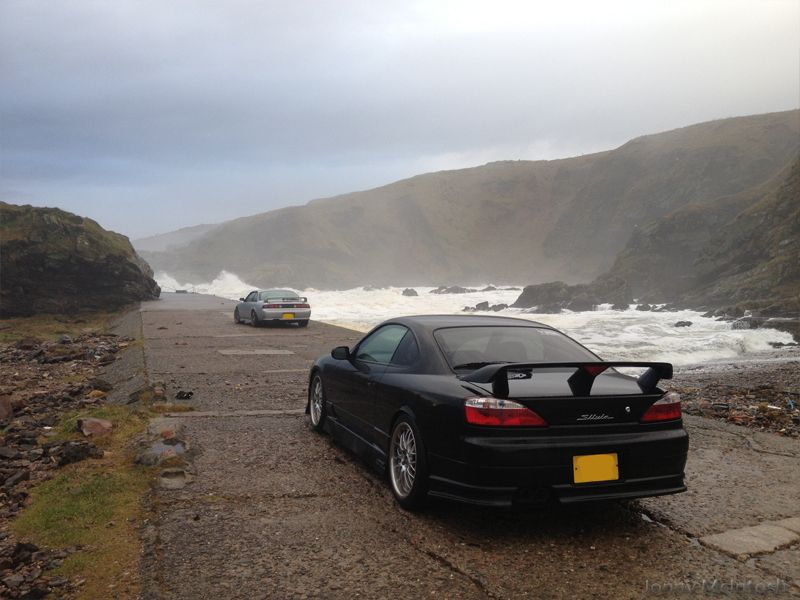 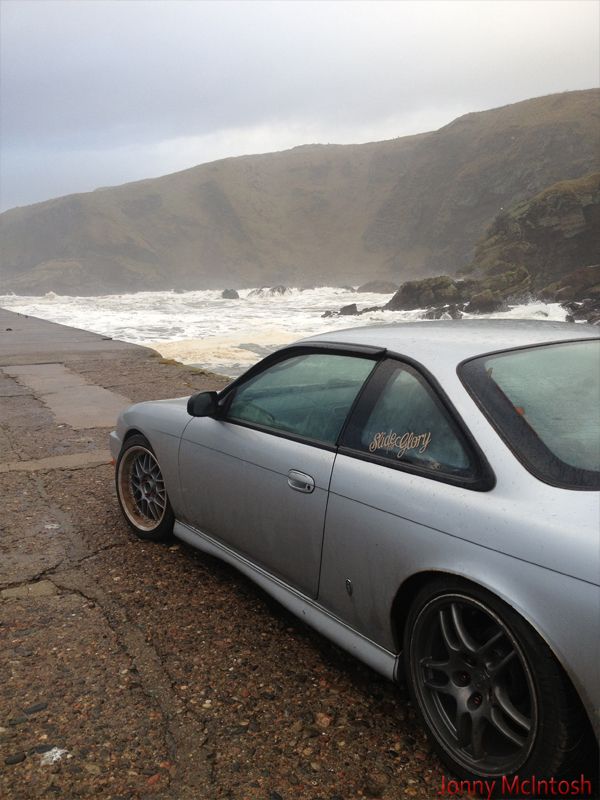 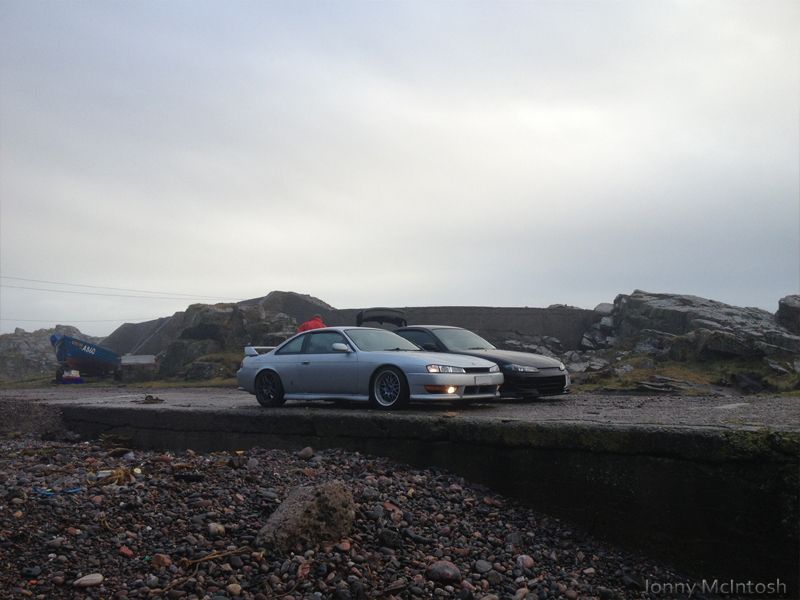 some pics down by the water managed to get a cheap exhaust from a turbo s14, this will be loud! also have a new front hub since one has noisey bearings 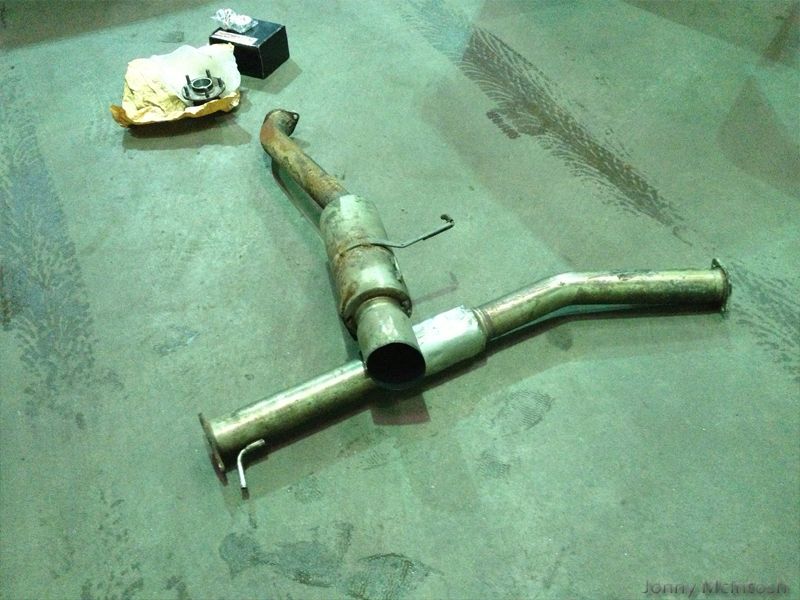  i'm refurbishing a rear subframe for swapping onto my car, it is from a UK turbo s14 which means it has r200 diff mounts rather than the small r180 from the n/a silvia I've had the subframe powdercoated black gloss just fitted the solid driftworks bushes for the mounts and diff    |
|
|
|
|
10-14-2013, 02:34 PM
|
#8 |
|
Leaky Injector
Join Date: Nov 2009
Location: Scotland, UK
Age: 34
Posts: 130
Trader Rating: (0)
Feedback Score: 0 reviews
|
fitted some HID's
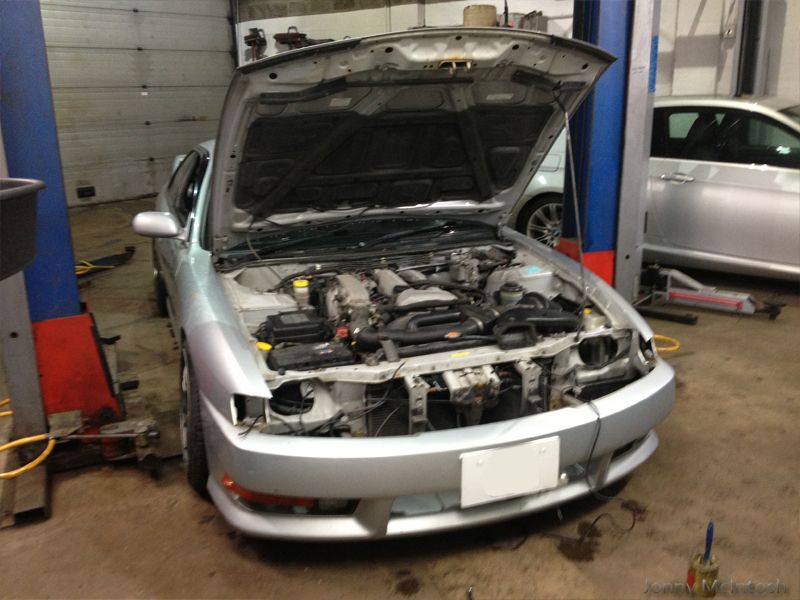 nice and tidy 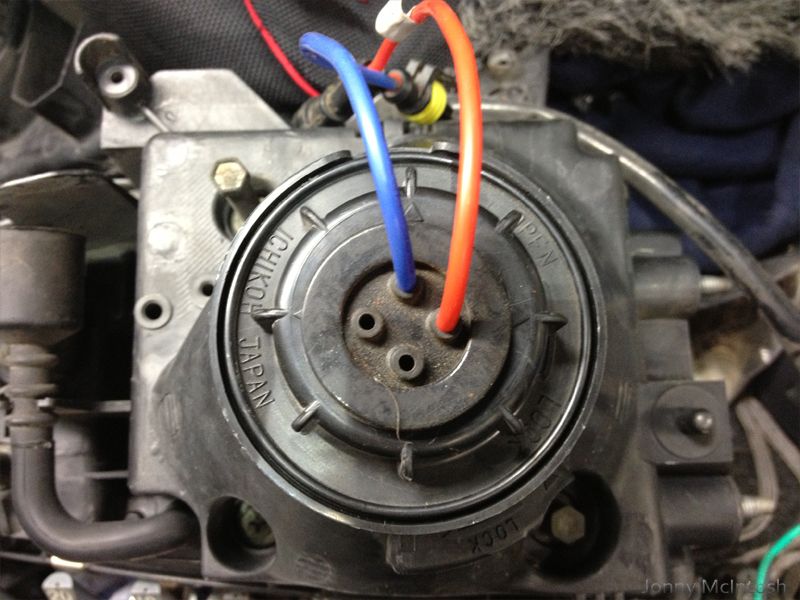 IMG]http://i283.photobucket.com/albums/kk282/jdm-997/Silvia%20S14a/44_zpsebe3db75.jpg[/IMG] set the headlamp allignment  crappy night pic, i've left the yellow standard side lights in over led's as i wanted them to look like they were on the car from the factory 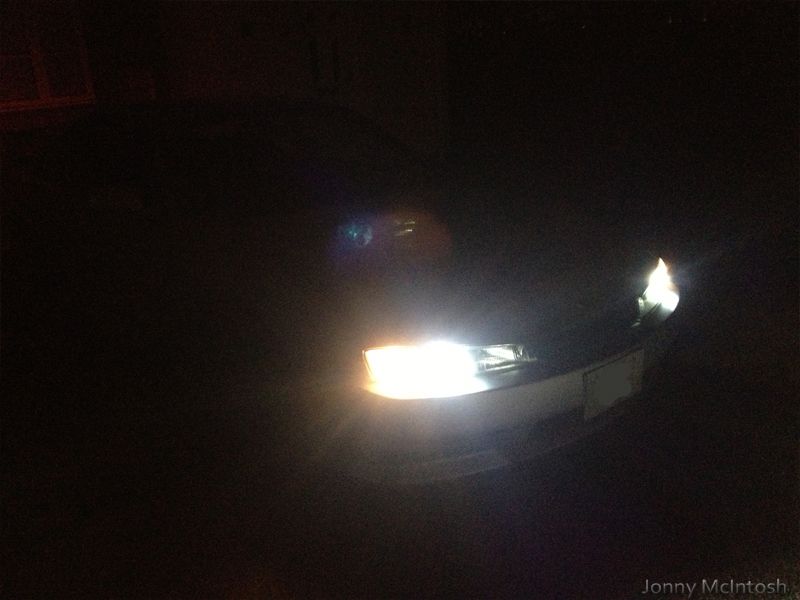 bought some strut braces 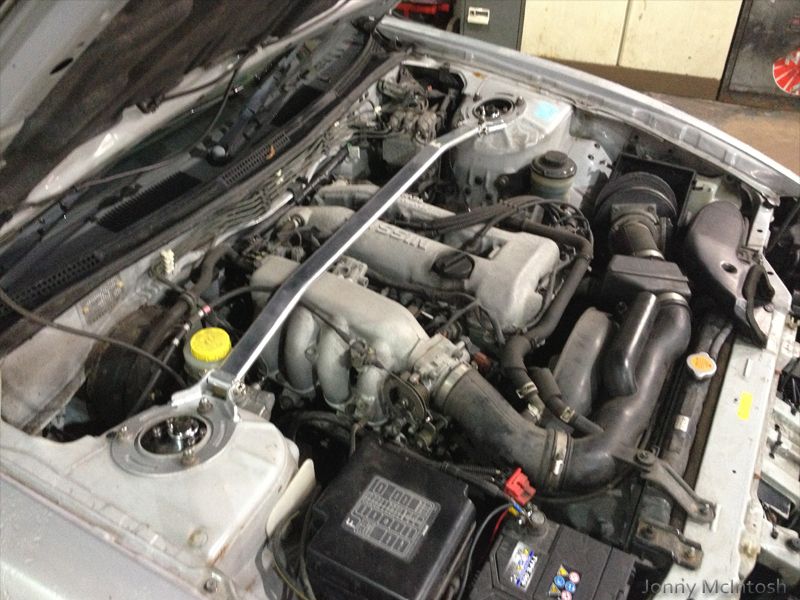 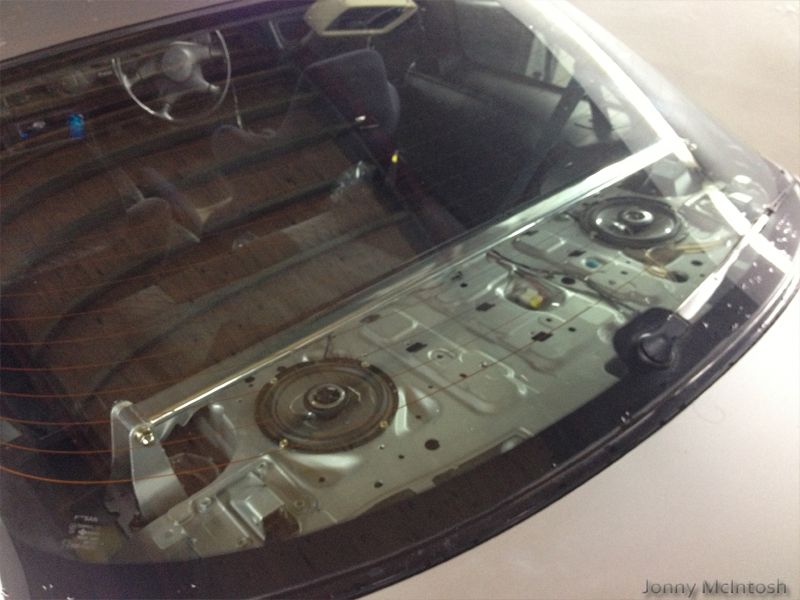 had the car over to my work for some adjustments before the rolling road day set the timing as it was quite retarded cleaned afm again resealed an exhaust joint removed a buzzing heat sheild from the exhaust however i did notice something missing: 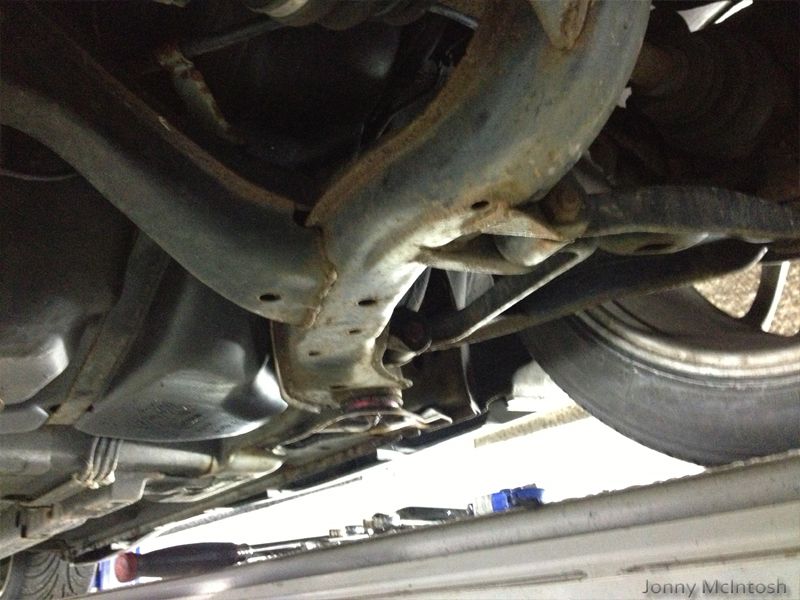 rear arb? looked up online and some of the 2.0 N/A models don't have one from the factory :S nevermind just an excuse to buy big ones john came over aswell for a yap  |
|
|
|
|
10-14-2013, 02:38 PM
|
#9 |
|
Leaky Injector
Join Date: Nov 2009
Location: Scotland, UK
Age: 34
Posts: 130
Trader Rating: (0)
Feedback Score: 0 reviews
|
R/R Day
for fun we decided to put the n/a silvia on, will be good to compare power when the 1jz is finished and fitted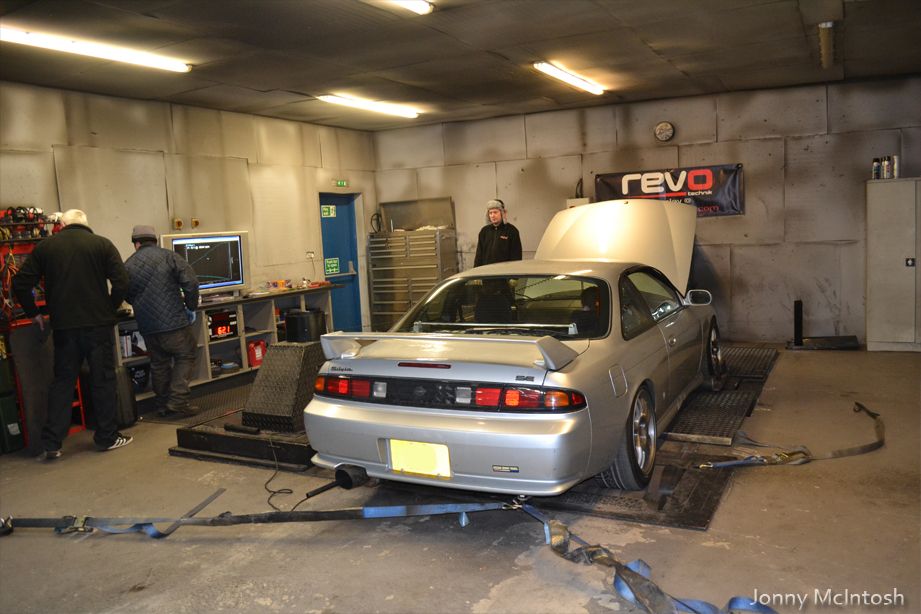 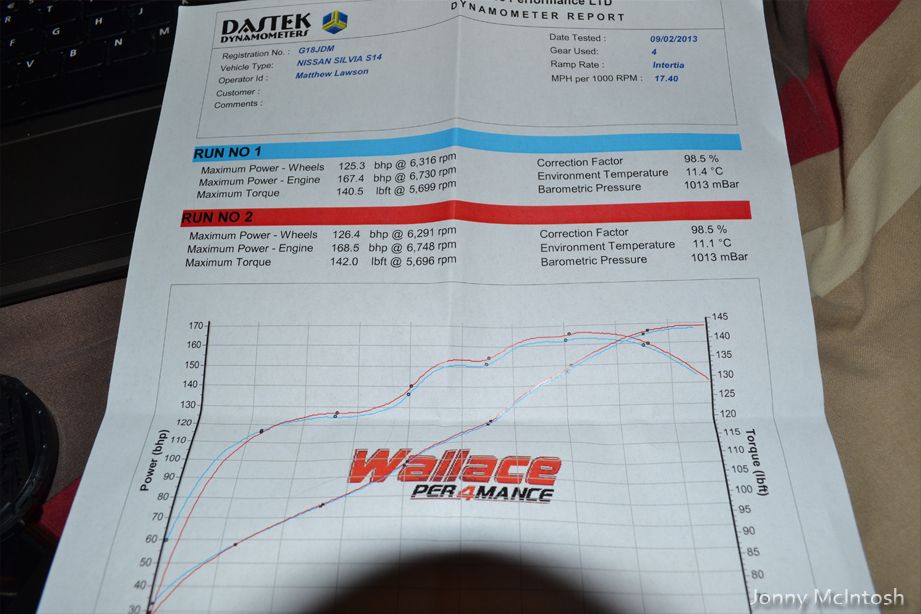 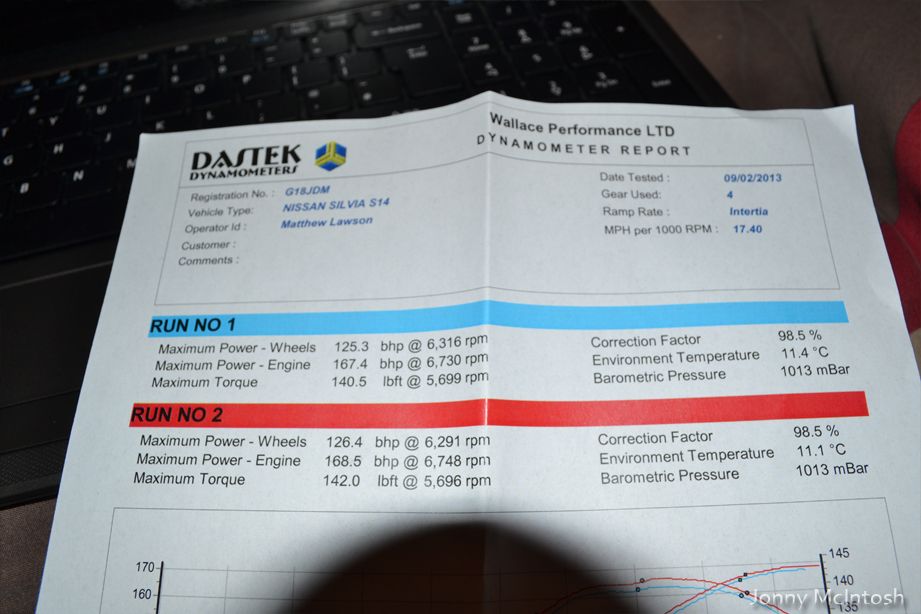  couldn't say no to the exhaust i was offered though since my old one was falling to bits new one on the right 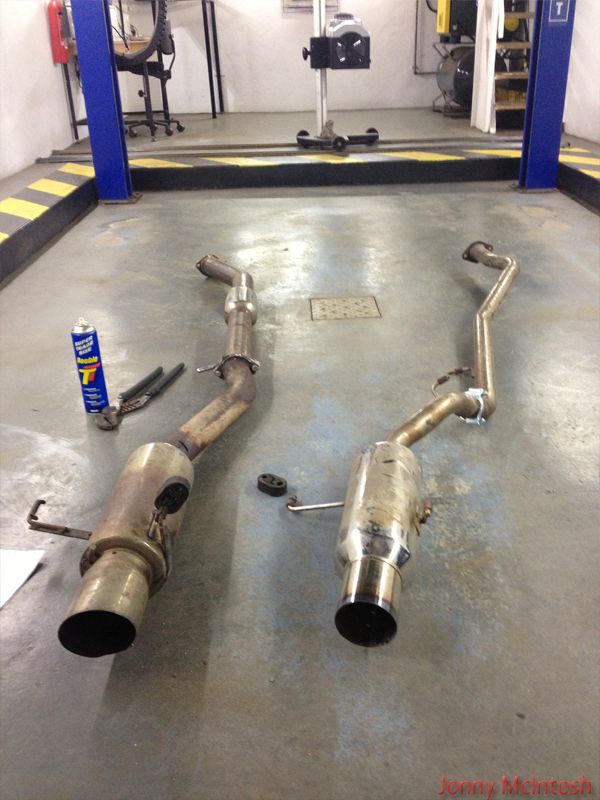 as you can see my exhaust has had many challenges with the speed bumps outside my house 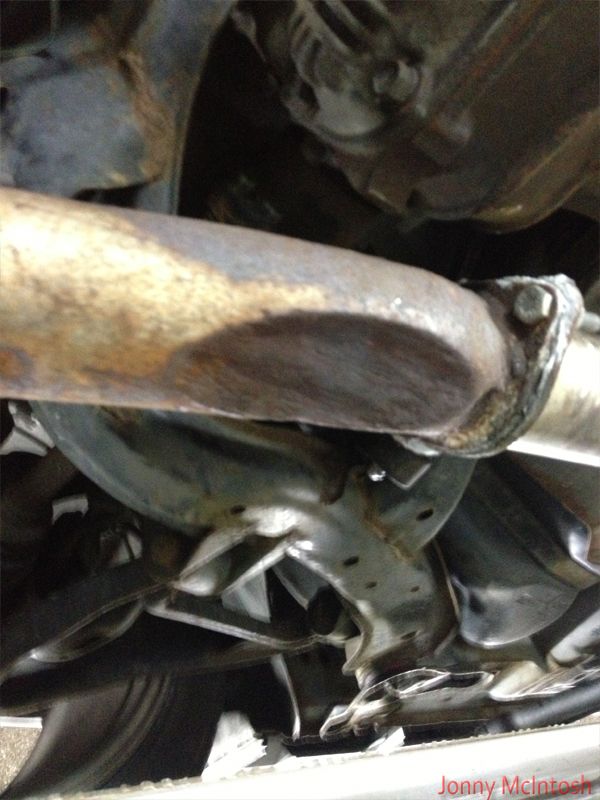 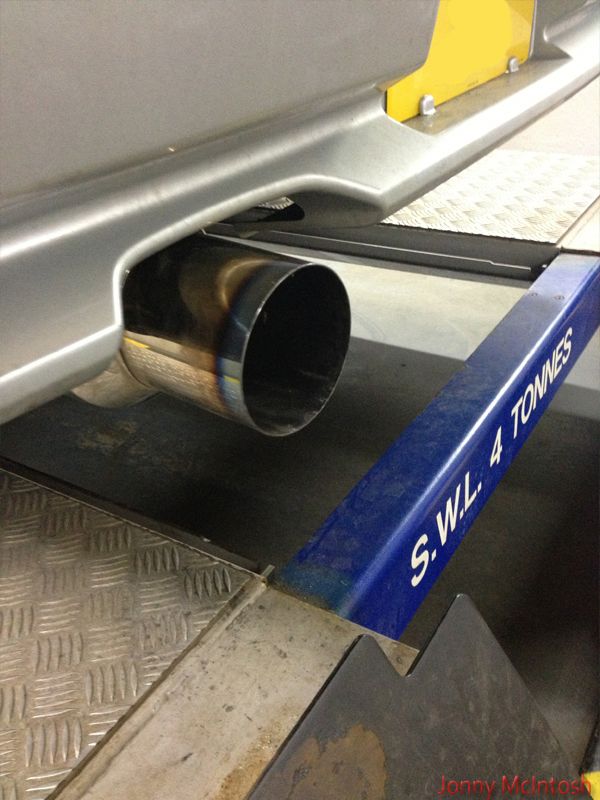 it's a smaller diameter pipe but unsilenced all the way through to the backbox, fits 10x better bought a diff from jdm garage UK, 4.3 ratio r32 auto r200 diff i'm waiting on s13 or r32 front diff bolts, 5 bolt r33 half shafts, s14 non abs prop shaft and an s14 backplate 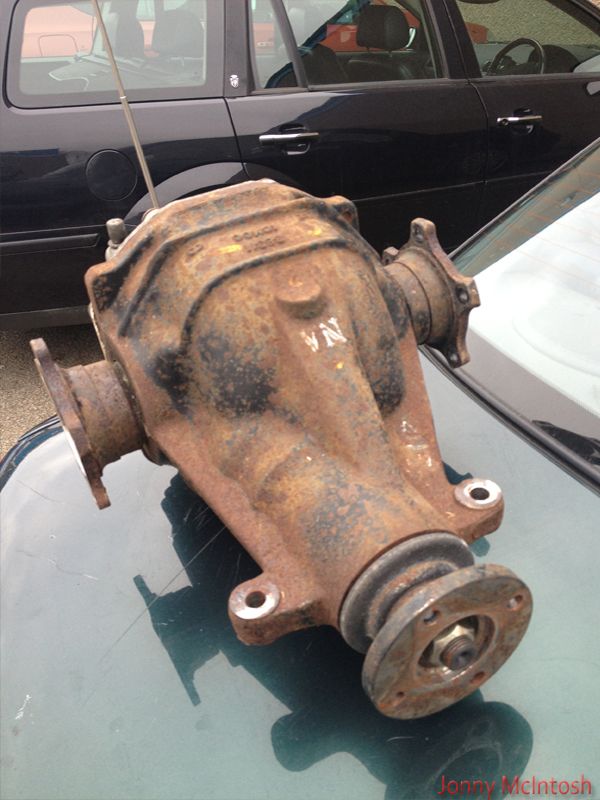 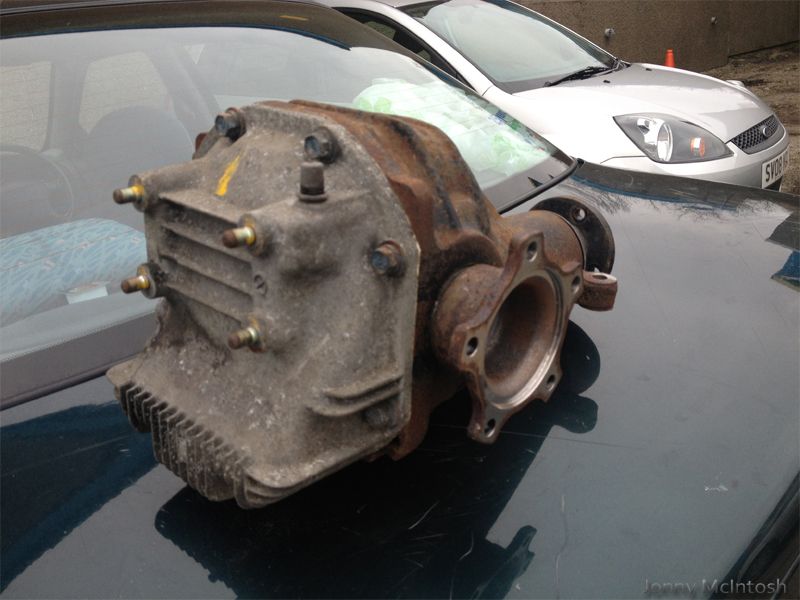 |
|
|
|
|
10-14-2013, 02:41 PM
|
#10 |
|
Leaky Injector
Join Date: Nov 2009
Location: Scotland, UK
Age: 34
Posts: 130
Trader Rating: (0)
Feedback Score: 0 reviews
|
set the tps to .45 where it should be and also checked the timing
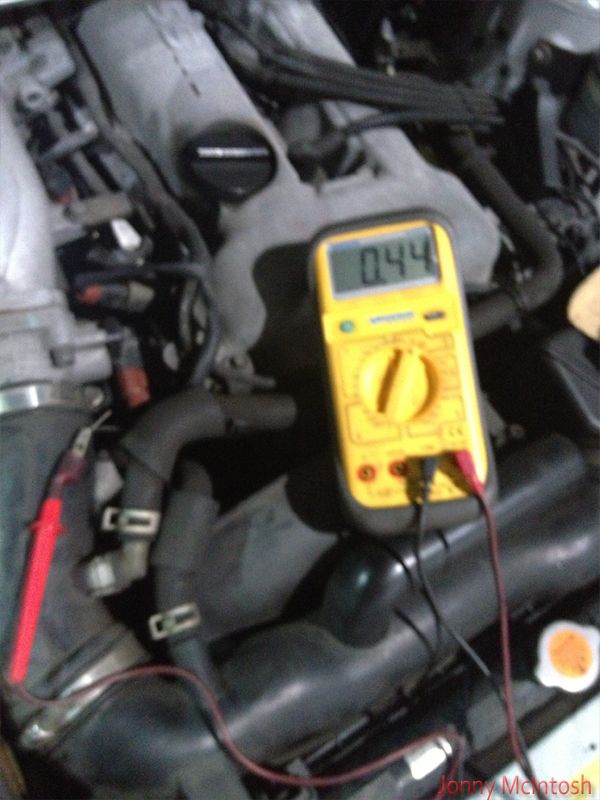 now running 100% energy suspension bushes arrived from america, forgot to take pics of them i got the front rack poly bushes and front lower arm polybushes then fitted some new brake discs and pads on the back, they were overdue to say the least! all in the attempt to get some sort of handbrake for the crail track day coming up 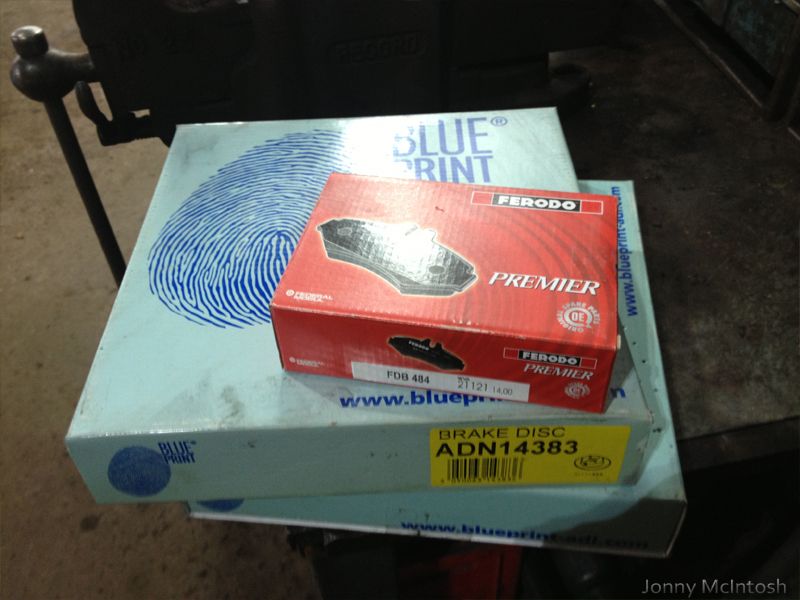 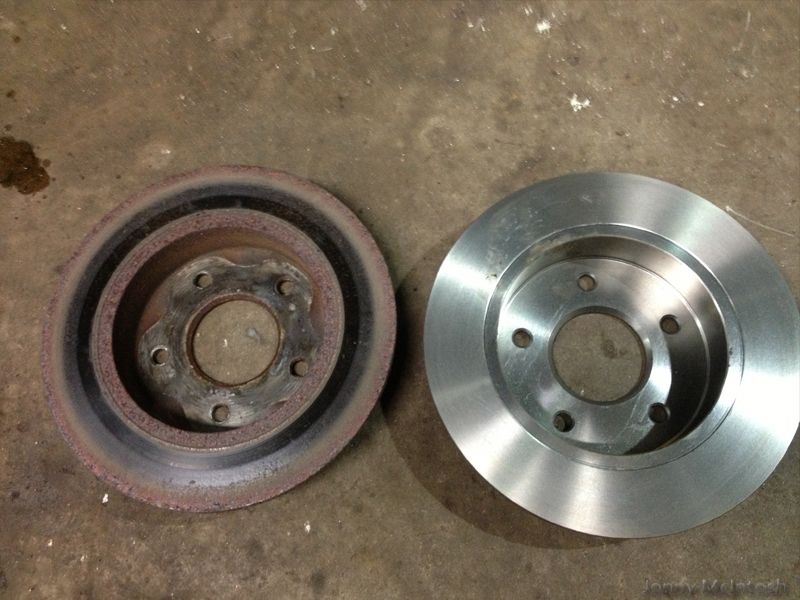 then put on a new set of brake pins and pad retainers as the old ones were not proper, just a few nails with holes drilled in the end, i'm a bit ocd at times about things like this 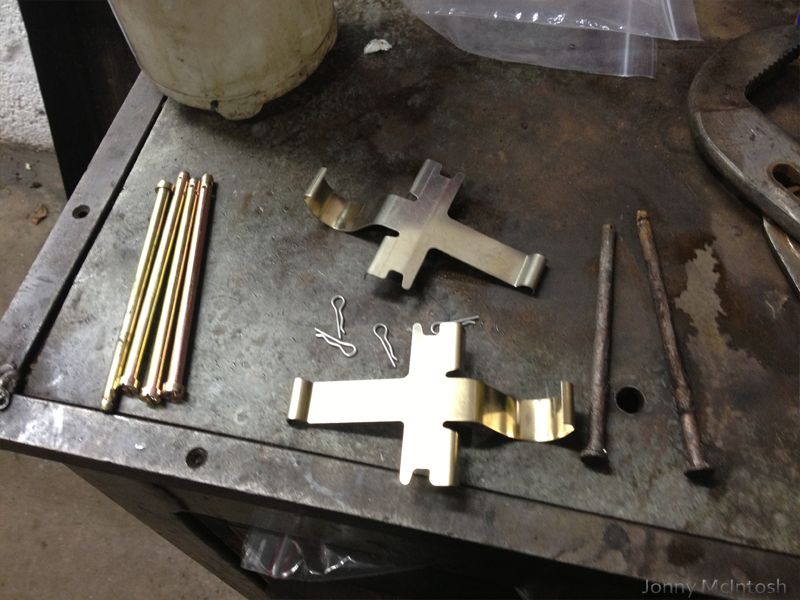 took 2 of my equips to 'work' with me 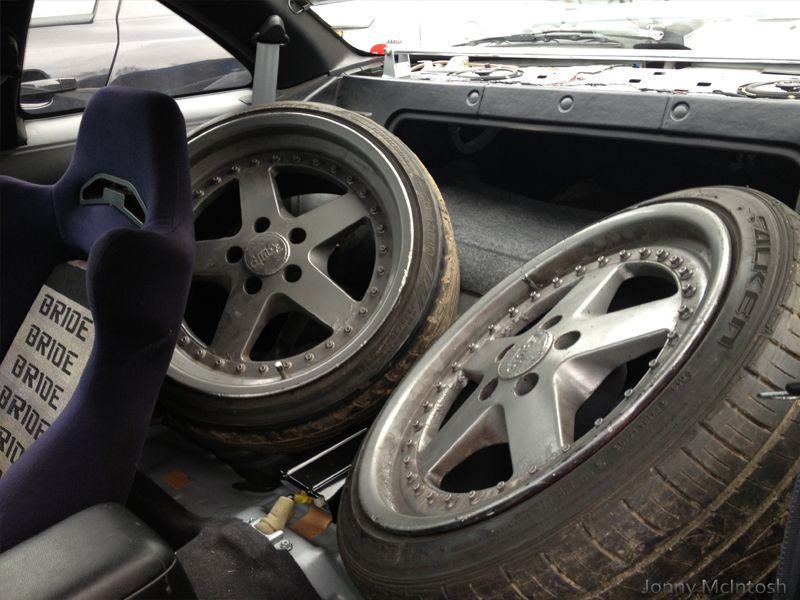 tried them on 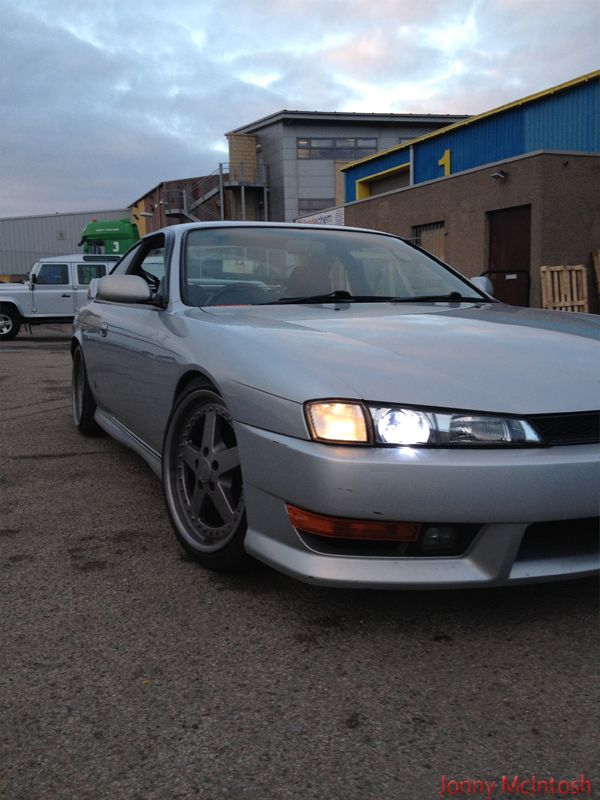 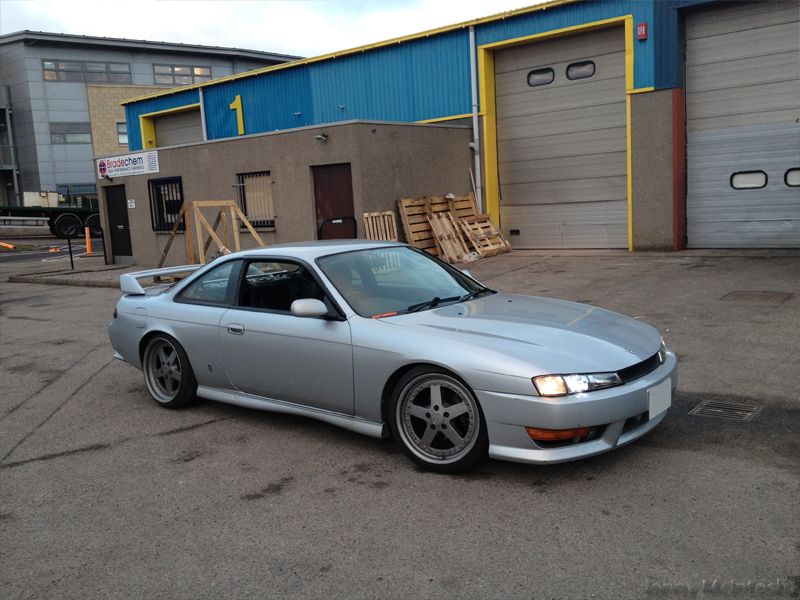 however because the rear arches have been pulled out so much by previous owner the wheels don't fill the arches as much as i'd wanted :S 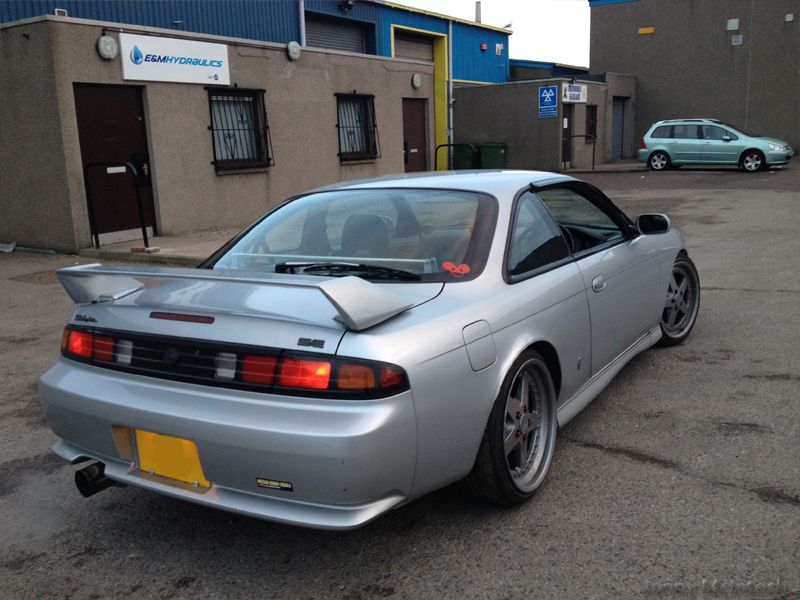 I sold them simply because the offset was not good for me! |
|
|
|
|
10-14-2013, 02:43 PM
|
#11 |
|
Leaky Injector
Join Date: Nov 2009
Location: Scotland, UK
Age: 34
Posts: 130
Trader Rating: (0)
Feedback Score: 0 reviews
|
I've had a change of idea aswell with how i want the car to look,
I had a set of work e wing mesh wheels on the front of the car, i now want a full set 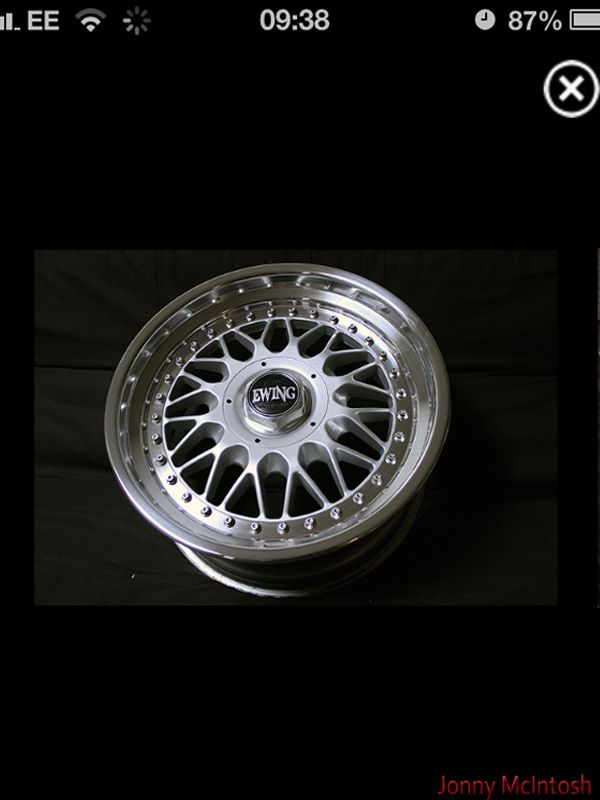 the wings are immaculate with no rust so thought i'd do a bit of undersealing first! jdm bits! 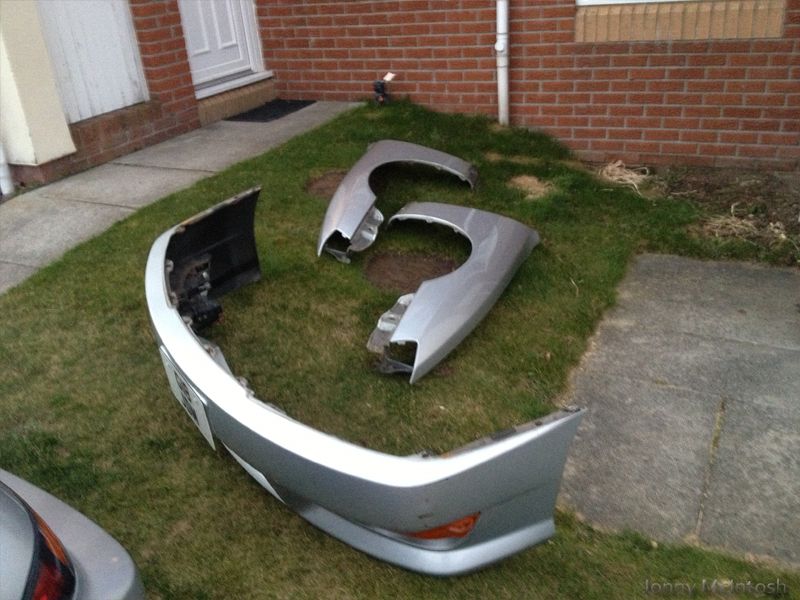 no face! 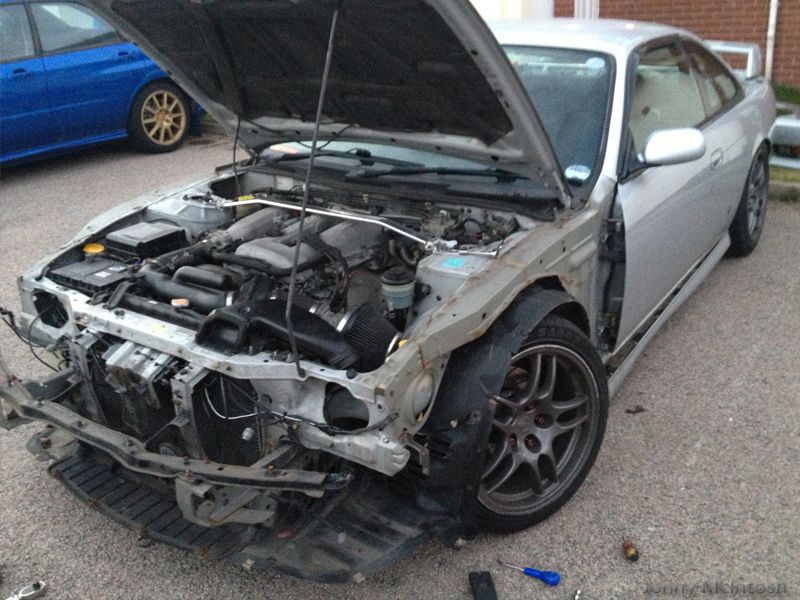 clean wings 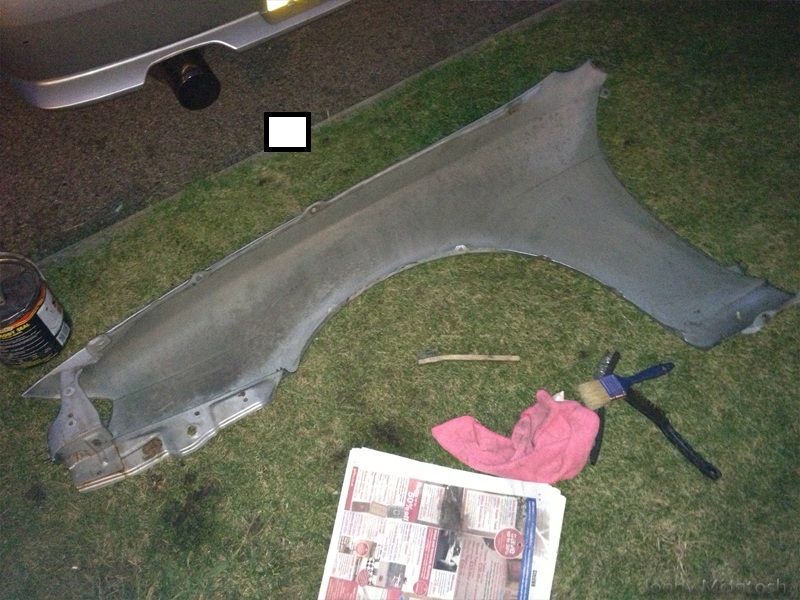 then sealed up properly on the inside 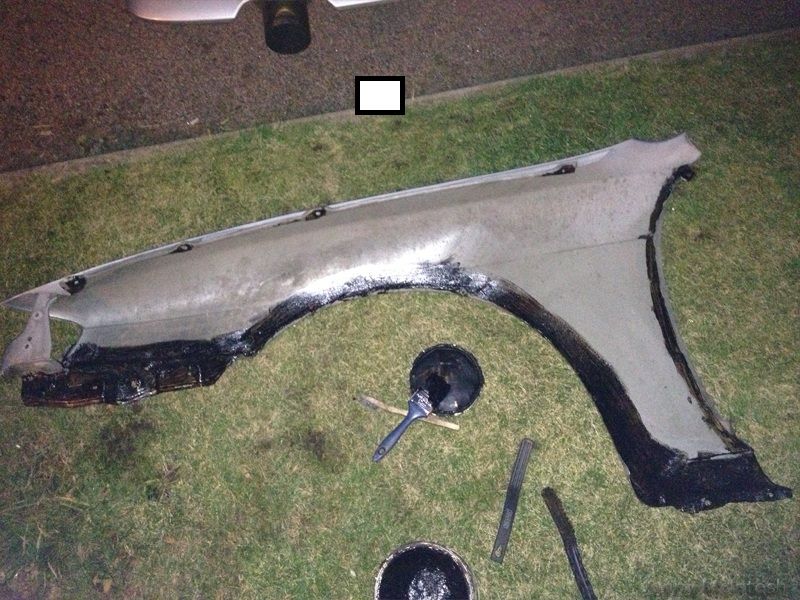 lip flattened then some more sealer put on 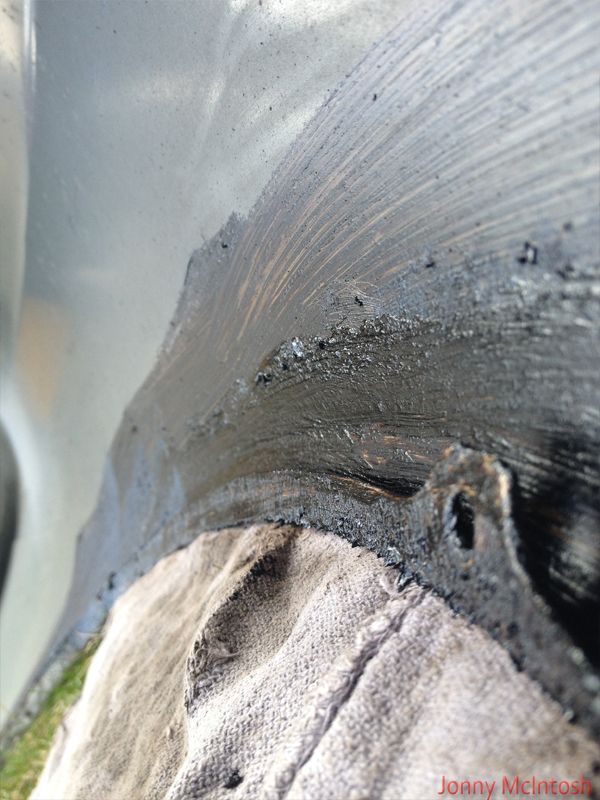 removed clutch damper part and pedal feels better, then done some other bits and pieces for crail day  9/3/13 SXOC CRAIL DRIFT DAY! 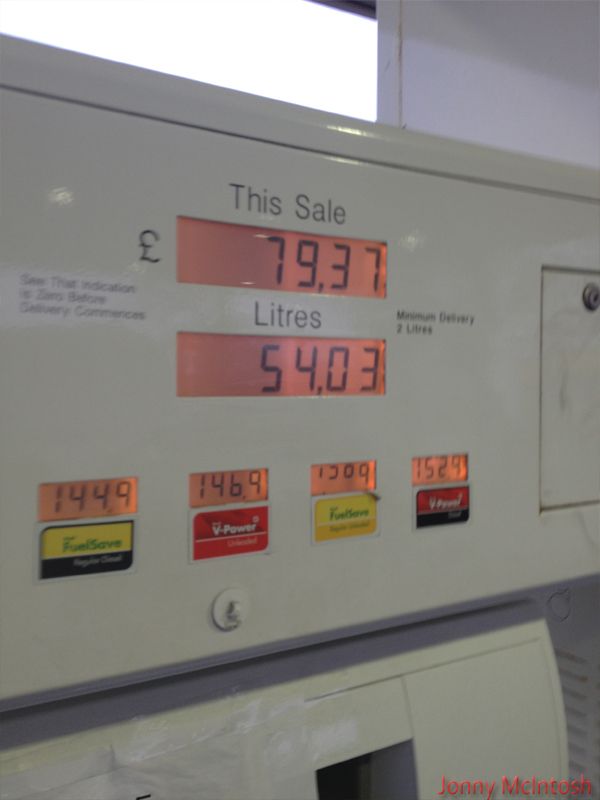 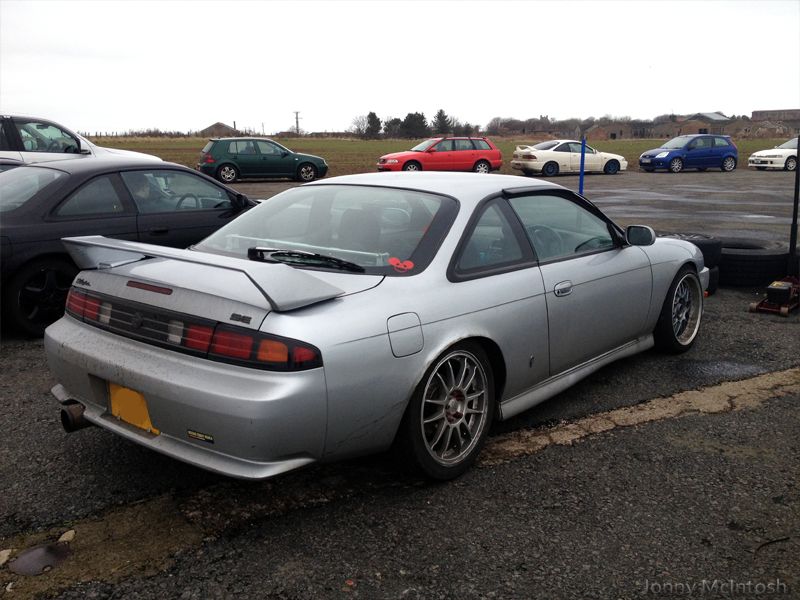 car performed excellent, it certainly took a tad longer to adjust to the n/a powerless skids compared to always having turbo'd cars, I'd say i learned alot more about drifting though as it took technique rather than just mash on the accelerator pedal, i'm very keen to get back into a turbo'd car now and try more things out when it dried up the front tyres started gripping better making throwing the car into corners possible and i was entering the back corner on the 3rd gear rev limiter! speed was everything! then you basically slow down skidding the corner and have hardly any power to keep going so a few clutch kicks would see you round the corner and still slide the straights 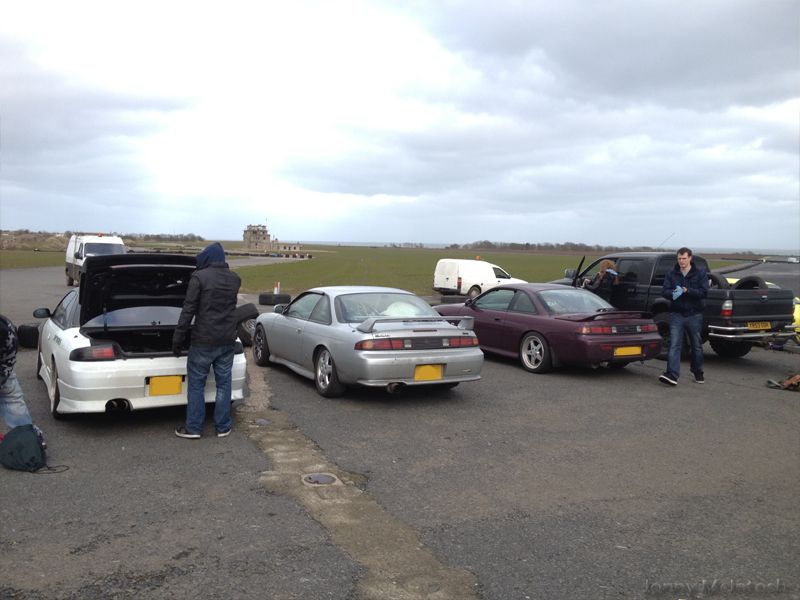  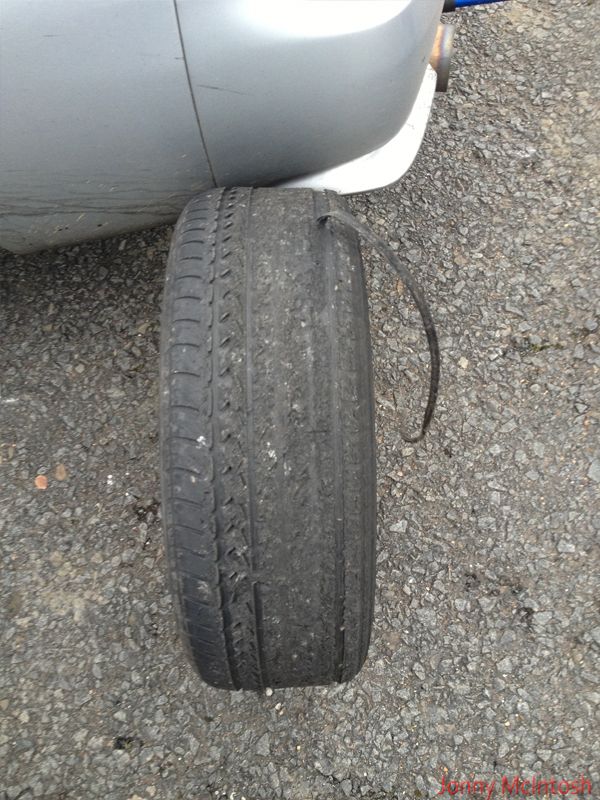 THANK YOU TO ALL THE PHOTOGRAPHERS FOR BEARING THE COLD WEATHER!!! the pics are awesome russel, weiner, thacko, kyle (sorry if i missed any)  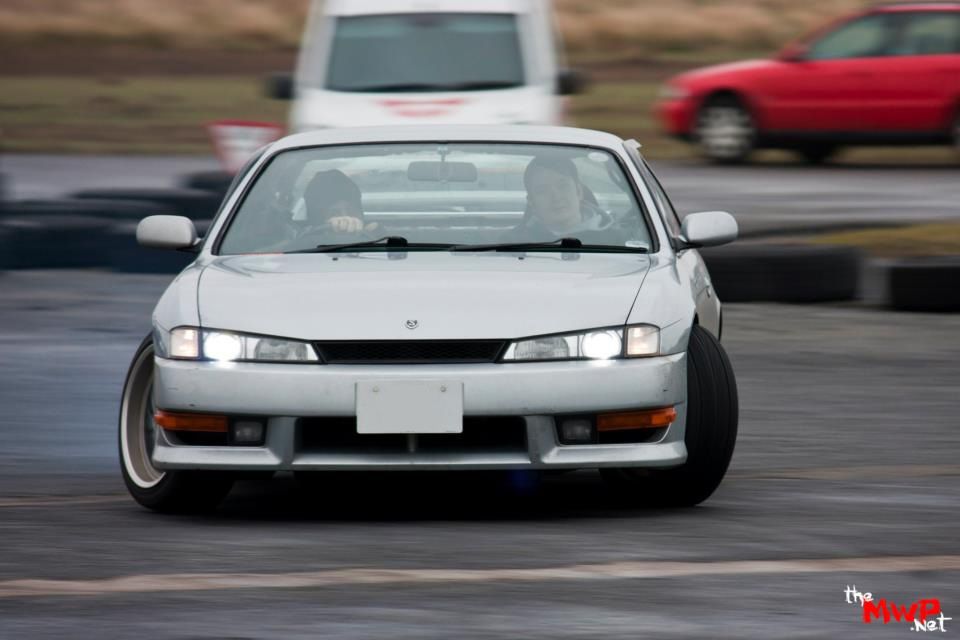 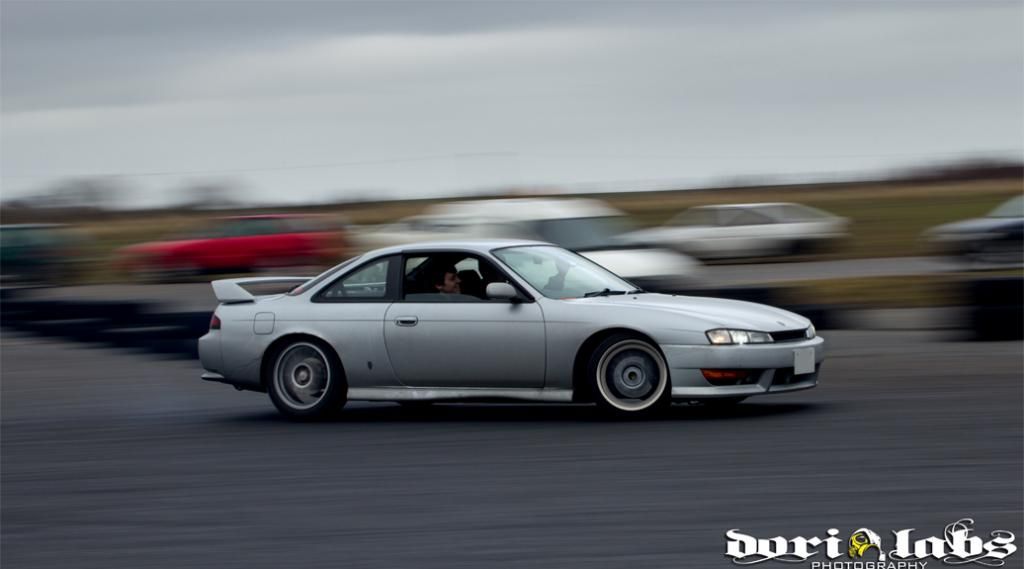 don't think i posted this earlier....after drift day haha 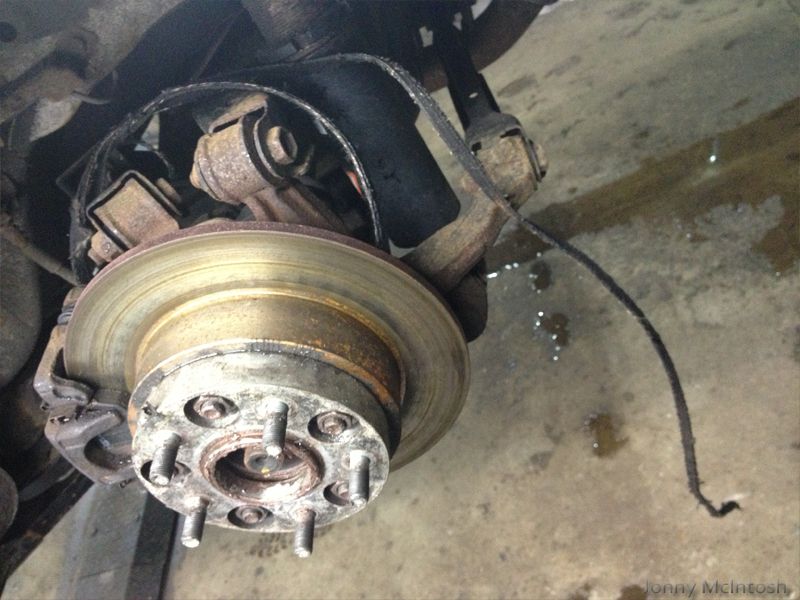 |
|
|
|
|
10-14-2013, 02:47 PM
|
#12 |
|
Leaky Injector
Join Date: Nov 2009
Location: Scotland, UK
Age: 34
Posts: 130
Trader Rating: (0)
Feedback Score: 0 reviews
|
went to the sxoc (200sx owners club) food meet....cambo's awesome ps13!
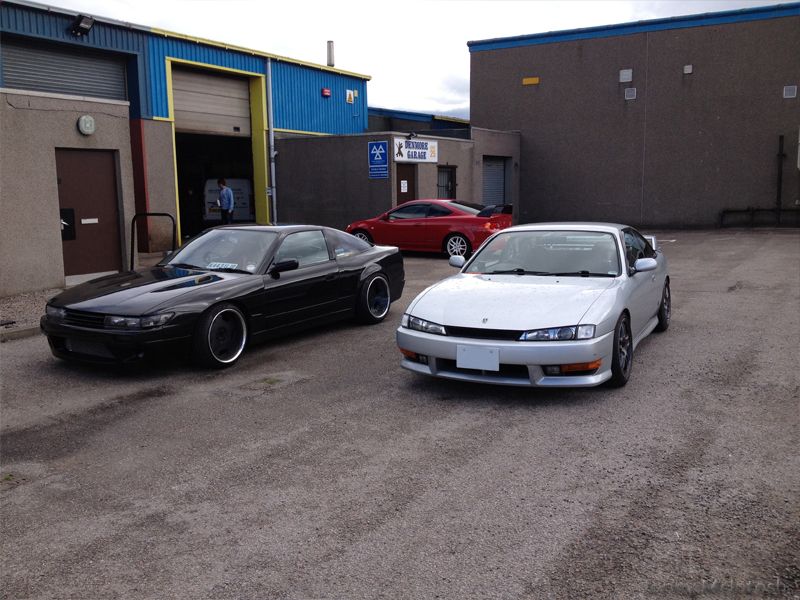
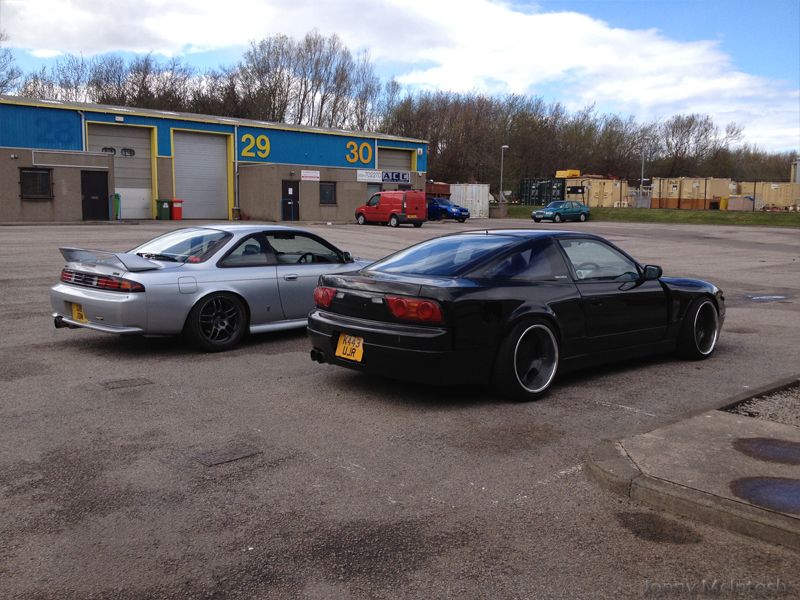
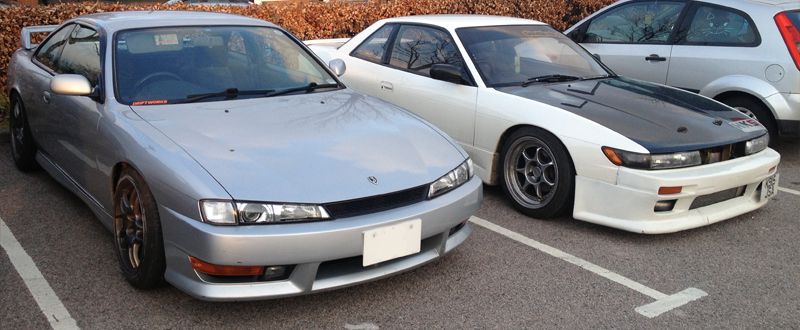 opened up my r32 diff from jdmgarage 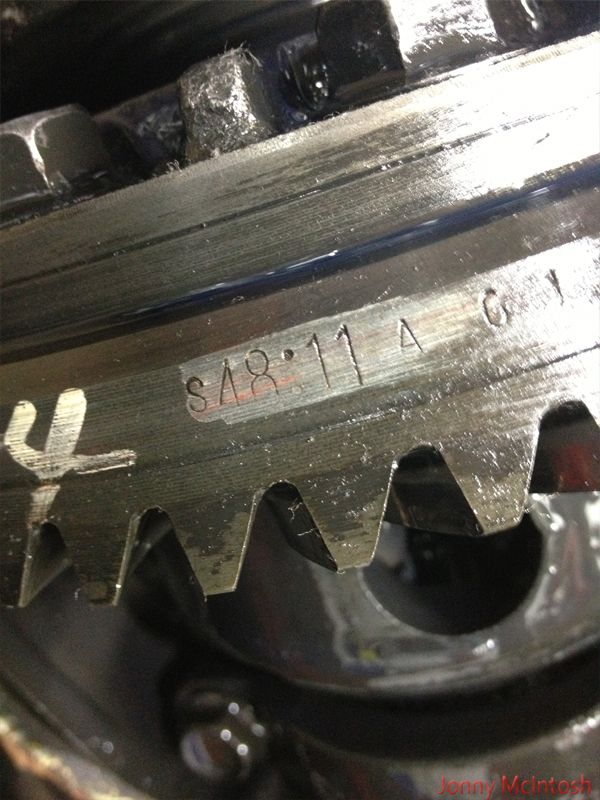 ratio 48:11 being 48/11= 4.363 final drive let it drain overnight 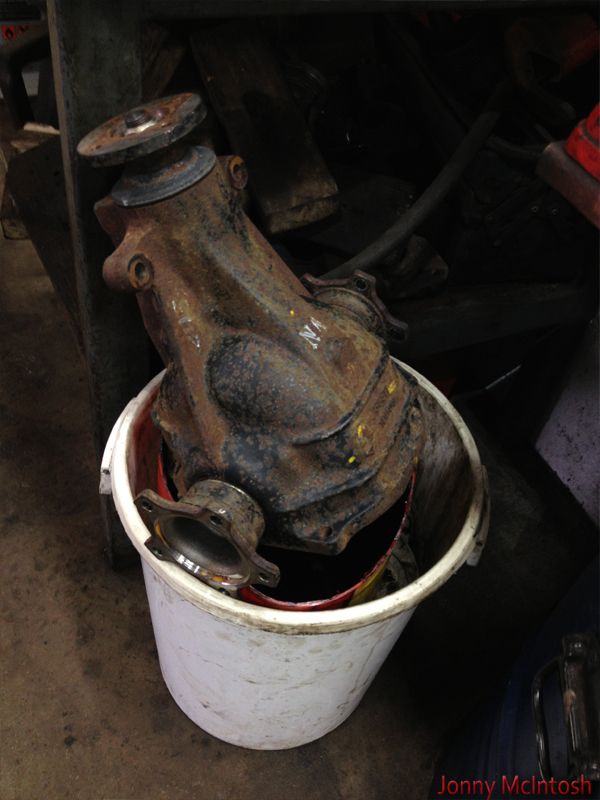 also gave it two coats of hammerite black 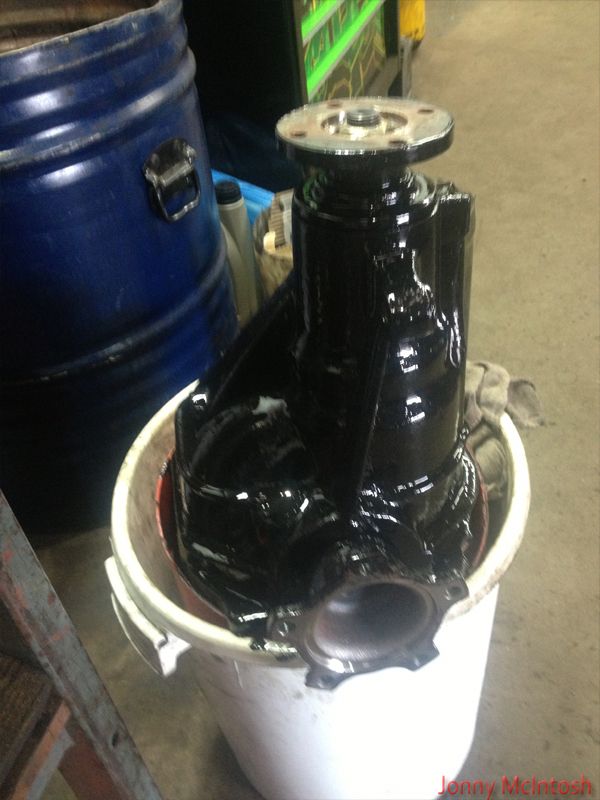 along with my r33 driveshafts 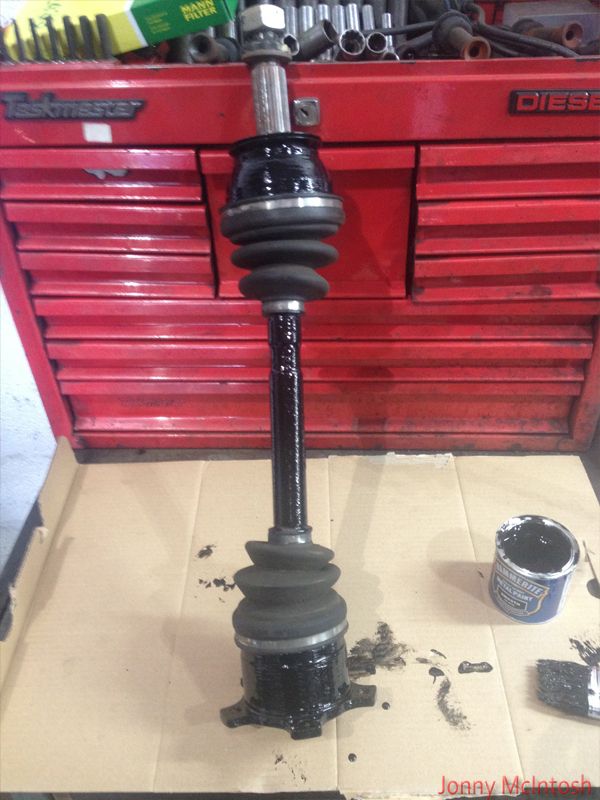 next was to toast the bushes out the rear lower arms i have spare 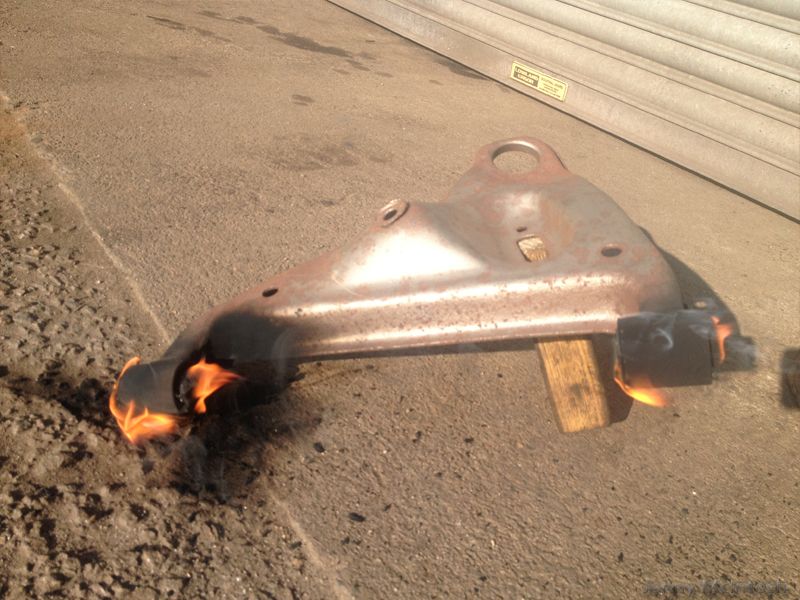 they are about to get powdercoated black to match the subframe diff and shafts i've got some new driftworks lower arm bushes to go in the arms was at a local car meeting 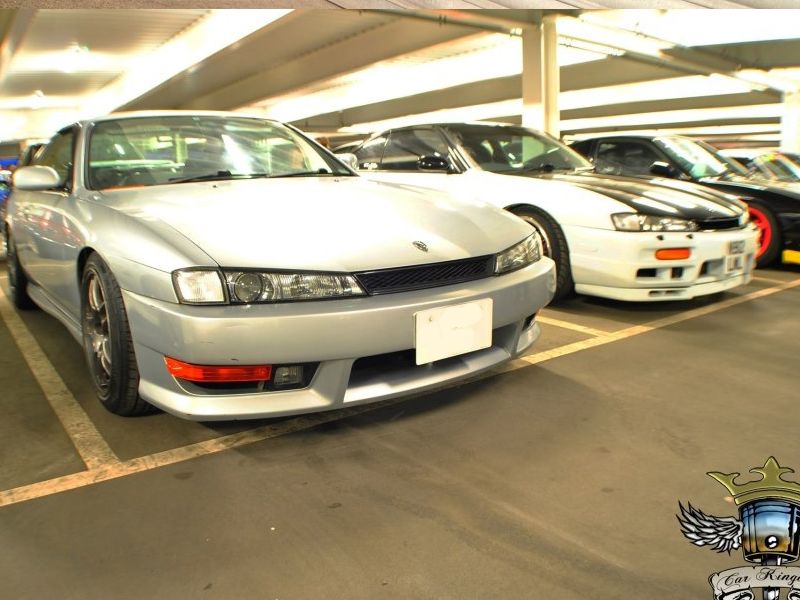  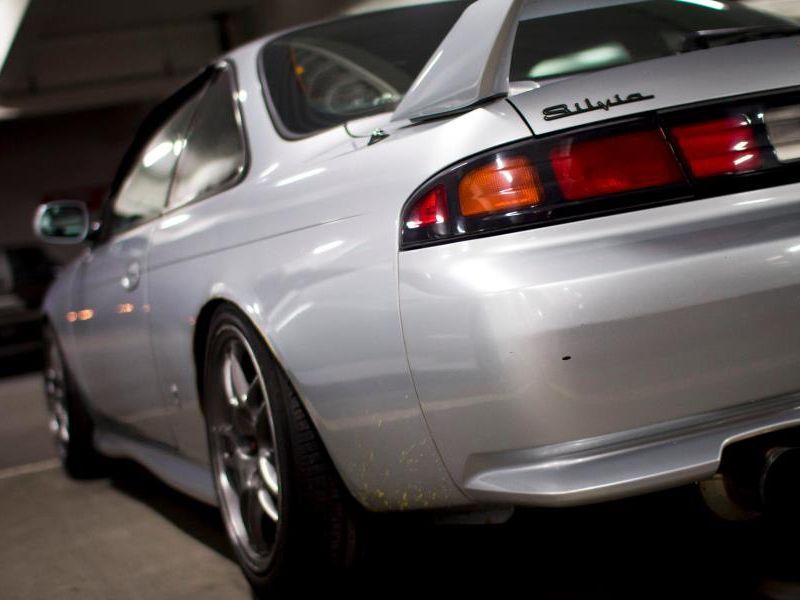 recently bought another S14a as a new daily driver so i can get serious with the silvia, took it out skidding one night in a closed private area miles out of civilisation  it's only a single track place so it's tight and the corners are 90 degree bends so it was a tad tricky especially with no power.   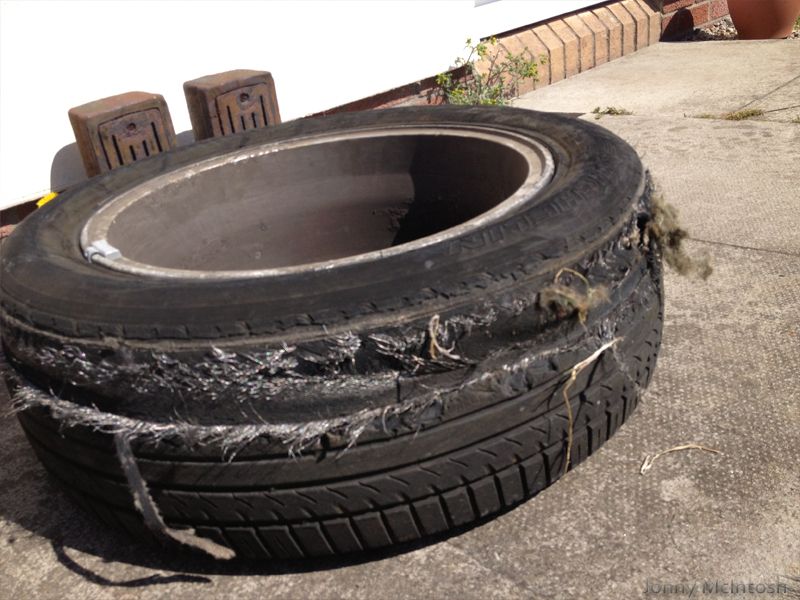 thanks to josh for a good price my r32 diff got welded so that'll be filled with some love juice then an s14 backplate put on once it's painted silver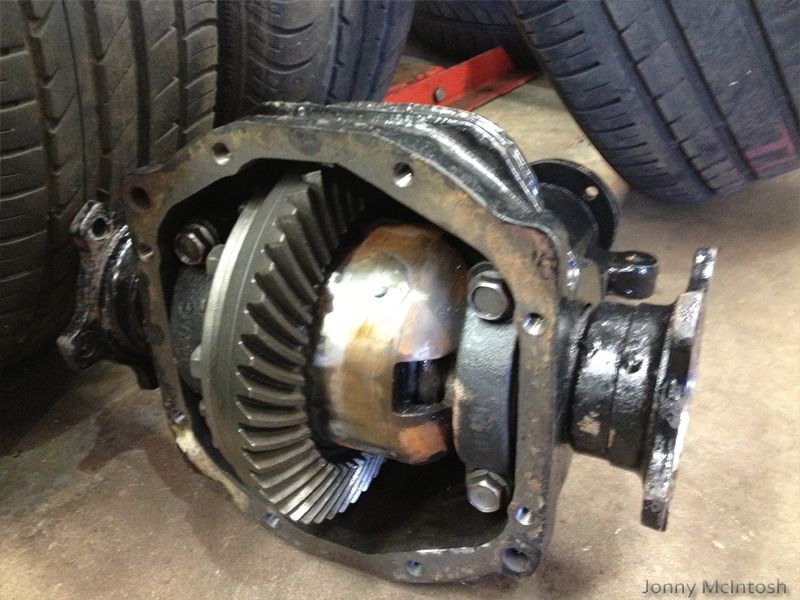 had john over and it was pretty cool seeing my two s14's and his s15 together 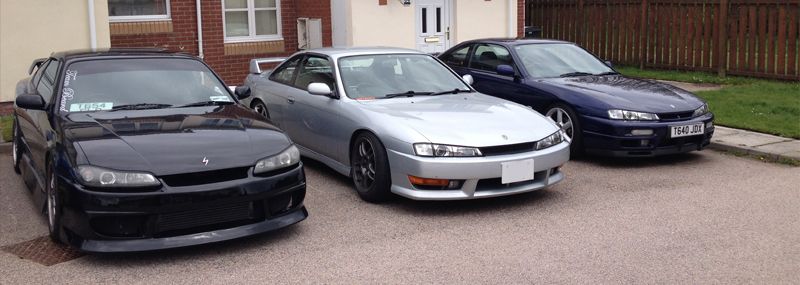 |
|
|
|
|
10-14-2013, 02:49 PM
|
#13 |
|
Leaky Injector
Join Date: Nov 2009
Location: Scotland, UK
Age: 34
Posts: 130
Trader Rating: (0)
Feedback Score: 0 reviews
|
jamie's epic sil80 showed up at my work, i gave it an oil change and fitted a pressure sensor to the oil sandwich plate
  anyway here's the new fog light 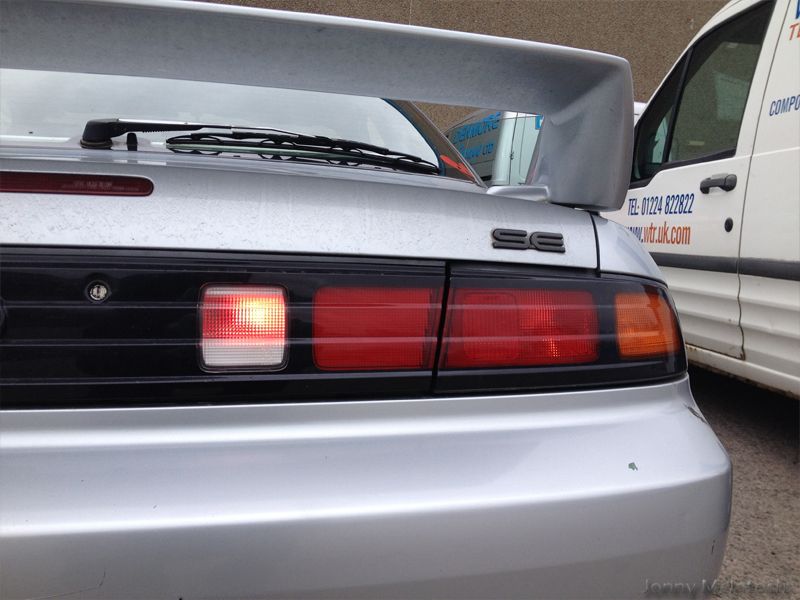 bought another exhaust, this time it's an apex exhaust, it's seriously the loudest thing I've heard .... ever! 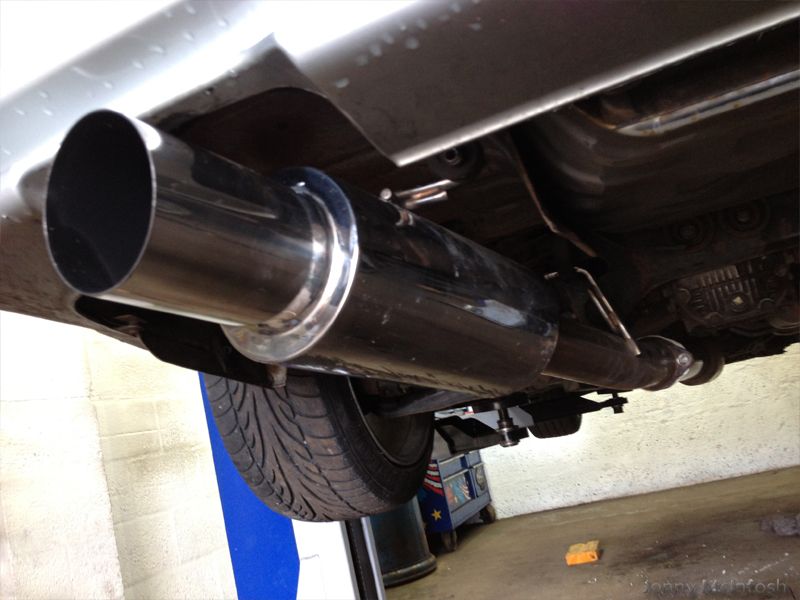 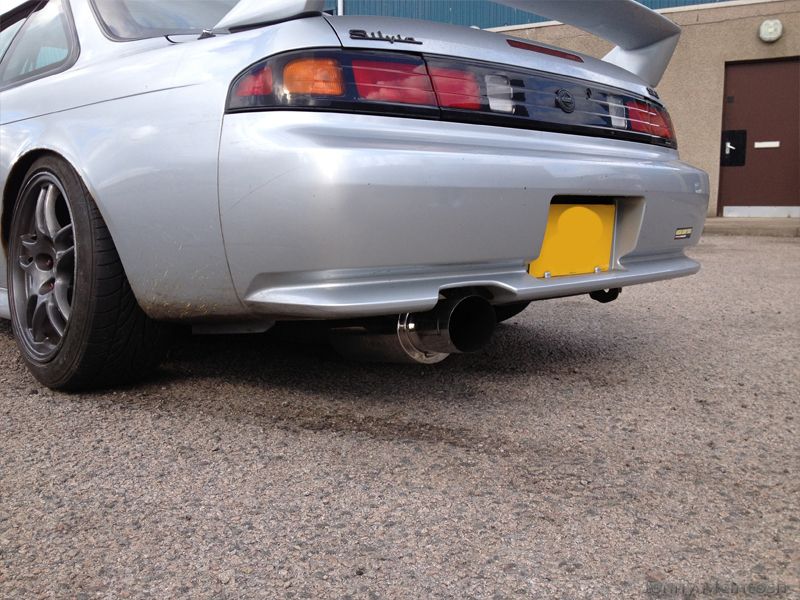 changed my front tension rod bushes for poly ones...thanks to joey200sx for the bushes 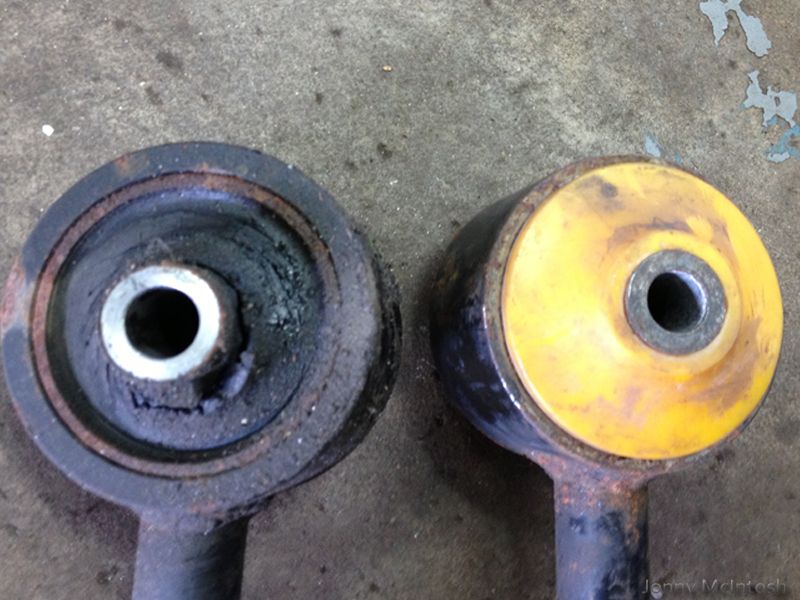 painted my diff cover for the r32 diff 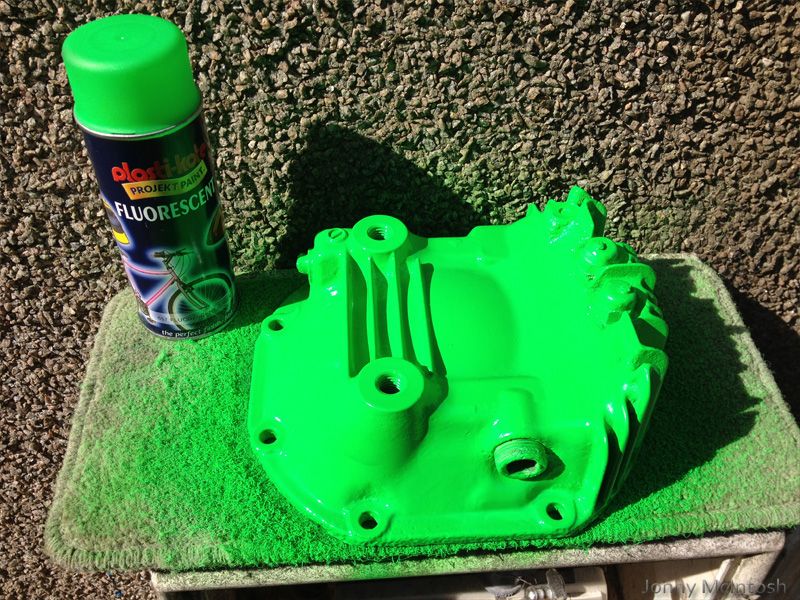 |
|
|
|
|
10-14-2013, 02:52 PM
|
#14 |
|
Leaky Injector
Join Date: Nov 2009
Location: Scotland, UK
Age: 34
Posts: 130
Trader Rating: (0)
Feedback Score: 0 reviews
|
started the buying of 1jz parts now as i'm getting serious about the conversion
bit of a bump in the build, I had stripped my first 1jz engine out of my soarer. ended up realising how much it would cost to rebuild the whole motor half way through the build jwhen I discovered it needed a lot more replaced than expected! some pics of the driftworks r32 r154 gearbox i bought 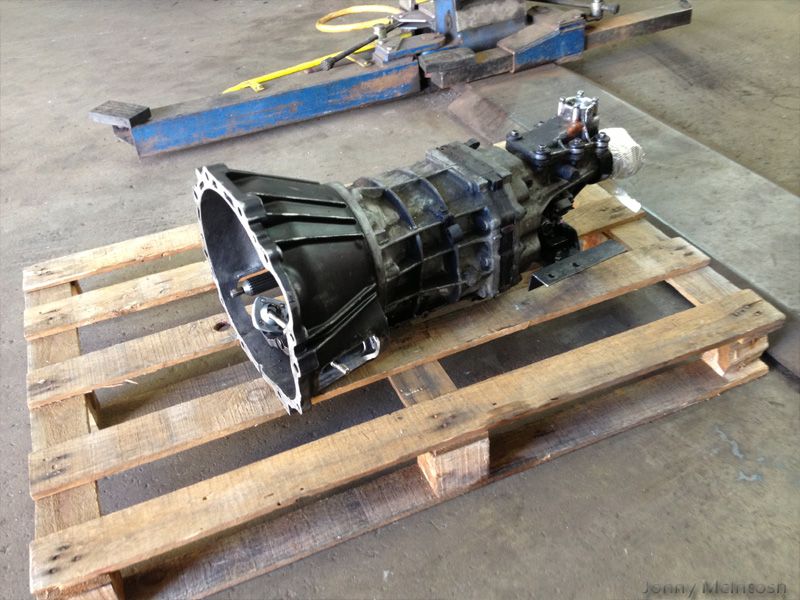 r154 prop shaft end 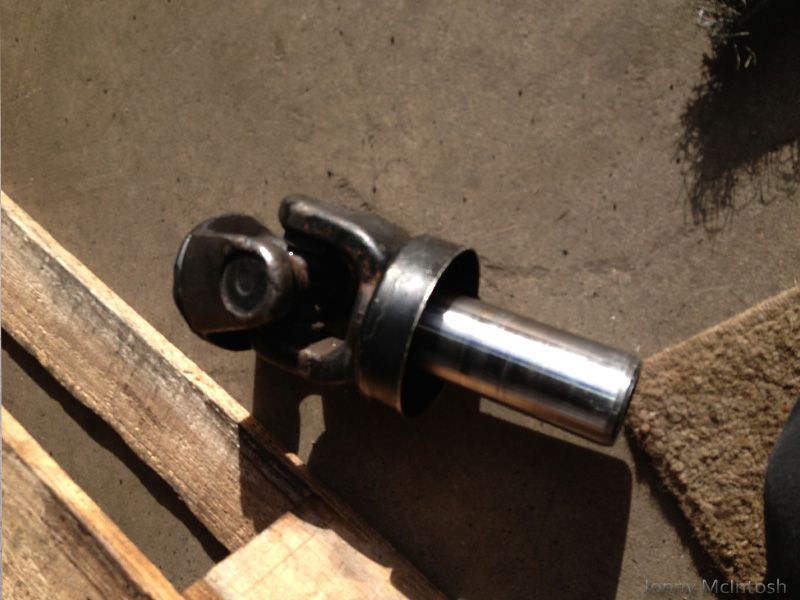 cleaned up 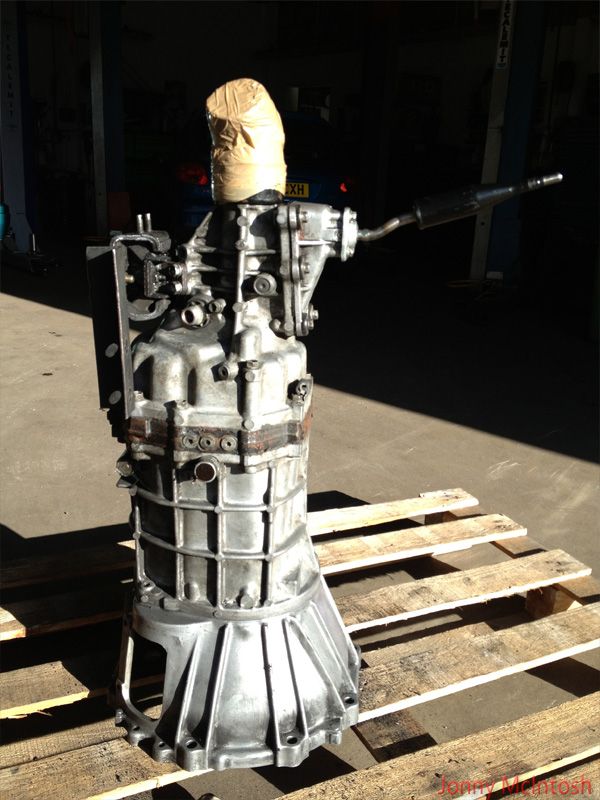 bought a crane, not lending this one out this time!! brings nothing but hassle haha 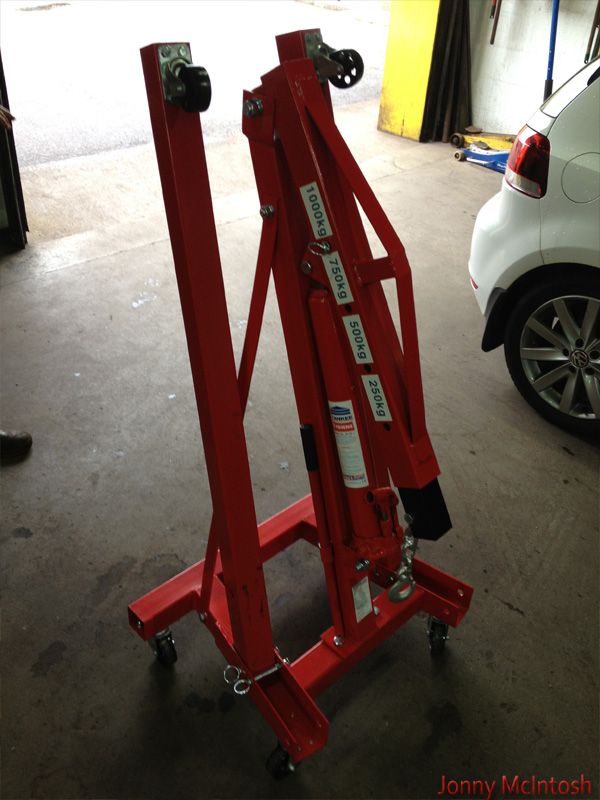 my front sump has a problem.... 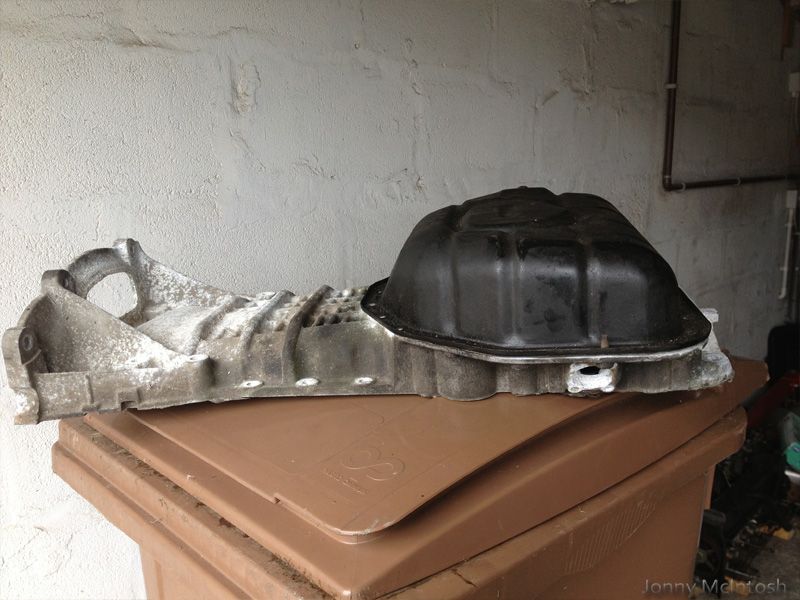 was from an n/a so it'll need the oil return drilled out and machined flat :S  another 1jz i found cheap online which has had a new timing belt, oil pump, water pump and a few other bits 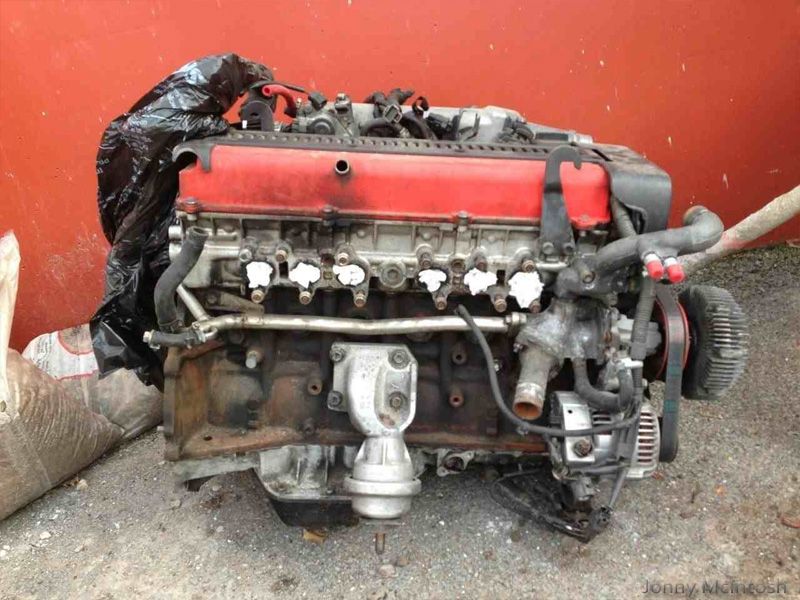 arrived and got it thrown in the back of my daily yellow box 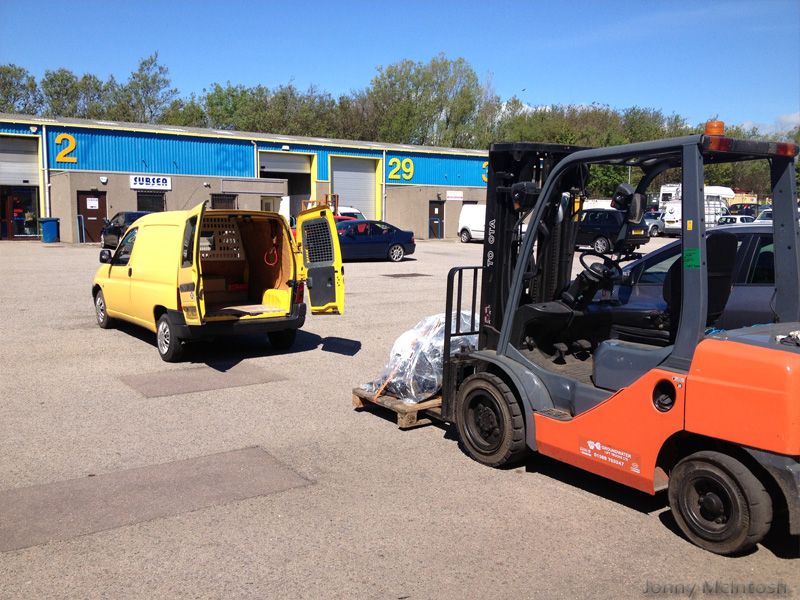 in the back  also got a full genuine toyota head gasket set for my other engine so that'll be built up eventually when i get time and kept as a spare original plan made easier by buying the other engine  got the new engine in the garage, tomorrow i'll get the old block off the engine stand, get this one on and swap over the sump and make some checks/changes then it'll be good to test fit  |
|
|
|
|
10-14-2013, 02:53 PM
|
#16 |
|
Leaky Injector
Join Date: Nov 2009
Location: Scotland, UK
Age: 34
Posts: 130
Trader Rating: (0)
Feedback Score: 0 reviews
|
recently ordered a full fabricage and act 6 puck clutch for the 1jz,
my parts list is almost complete, just got to get the gearbox work done then a test fit can happen eeeeek!!as for the car the coilovers will be coming off when I get time and standard wheels put back on so it can go into the bodyshop and have the rear arches sorted I have a deposit down on a greddy gracer lip from srb power so when it arrives from japan that'll be going on, japspeed manifold arrived, when the manifold and gaskets were lifted out the box this was what i was greeted with  all my bolts, studs, washers and nuts not in a bag just loose in a box which had a hole in it so after a few days of daily phone calls to chase up japspeed i had the missing ones sent out then set about cleaning my sump in prep for going on my engine 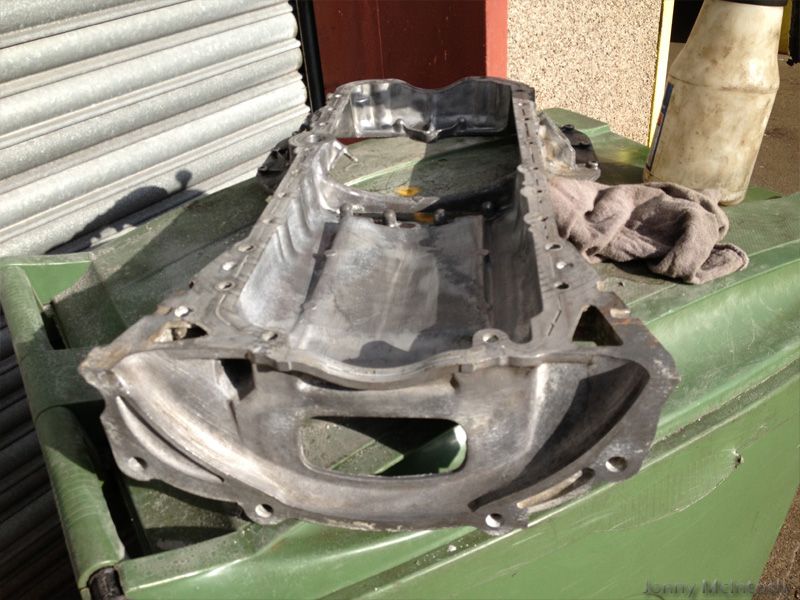 got all my stuff organised to be posted away for final modifications to fit the s14 chassis the rear casing has to be removed to get the shifter linkage off 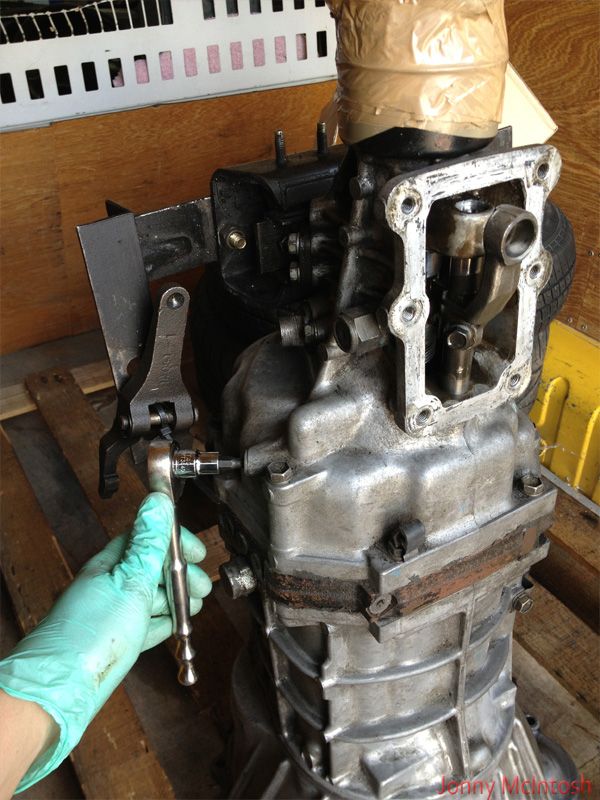 there is a small bolt which has a ball and spring, this bolt has to be removed and both ball and spring removed with a pencil magnet as they risk falling inside the box 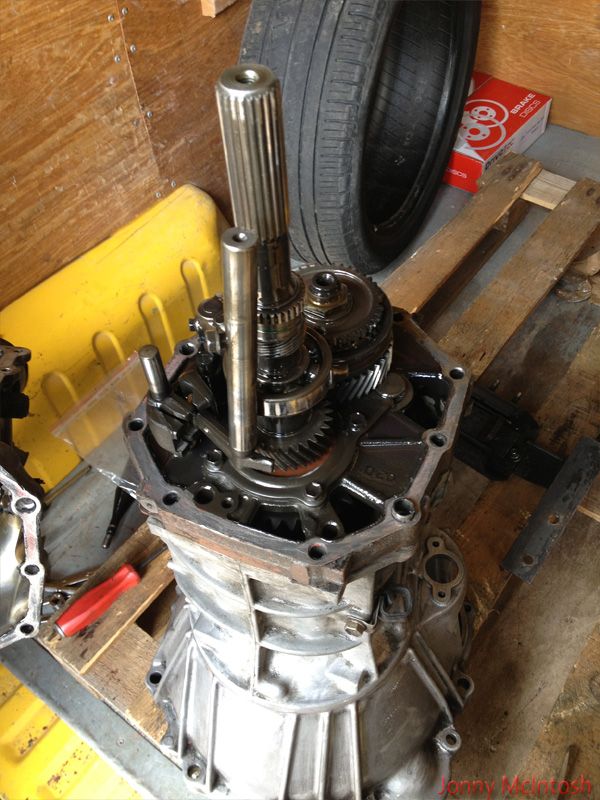 internal shifter/selector linkage rod  some other parts ready to go away r154 front prop section s14 front prop section shifter shifter housing shifter rod will also be sending away my spare fuel rail to be modified from a -6 to a -8 fitting for higher flow when i put in larger injectors 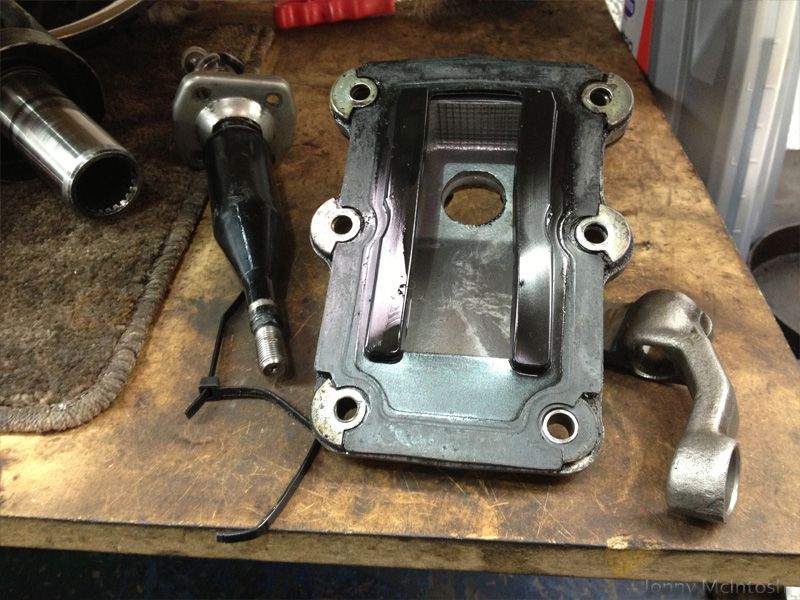 so got my diff built back up with the skyline breather and s14 backplate 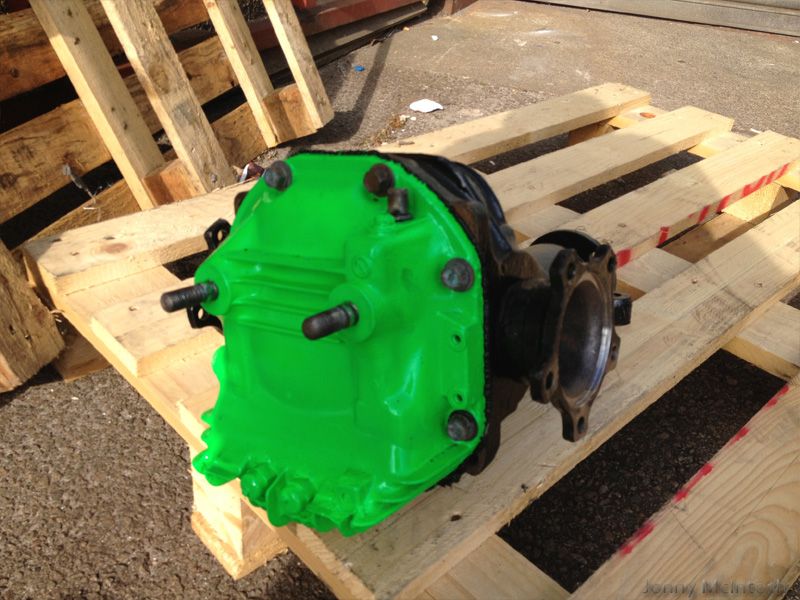 thanks to wayne@autoextreme my clutch arrived ACT 6puck sprung paddle!will be ordering my flywheel and walbro 400lph fuel pump this week from him, excellent service from him! top lad! 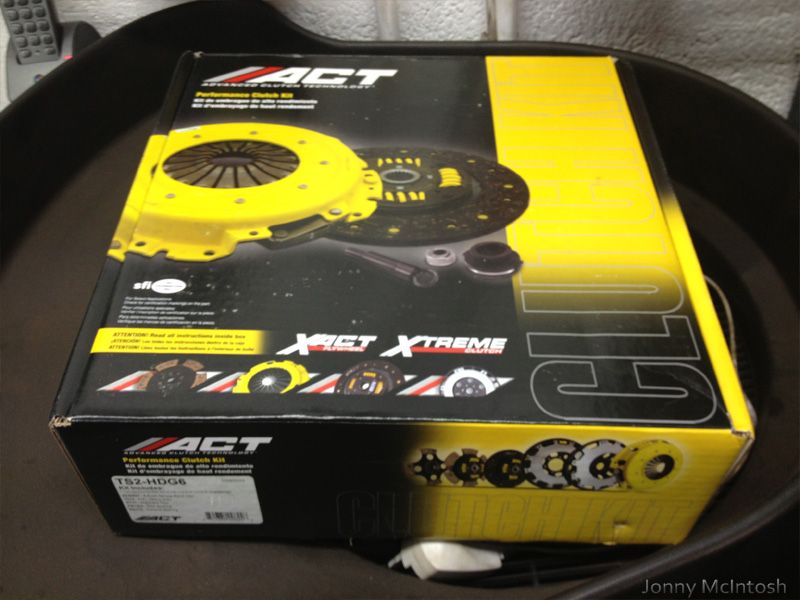 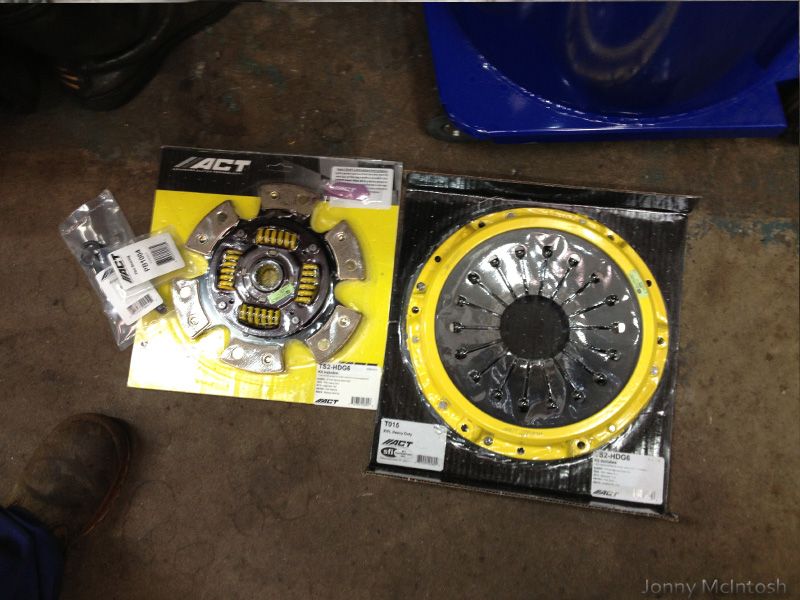 unfortunately i was missing the release hub since it's a pull clutch on a toyota, so got on the phone to toyota and have made an order of a few parts i need complete clutch release hub with all spring clips and washers as seen below in green, all pressure plate housing bolts and some other parts wasn't cheap.... 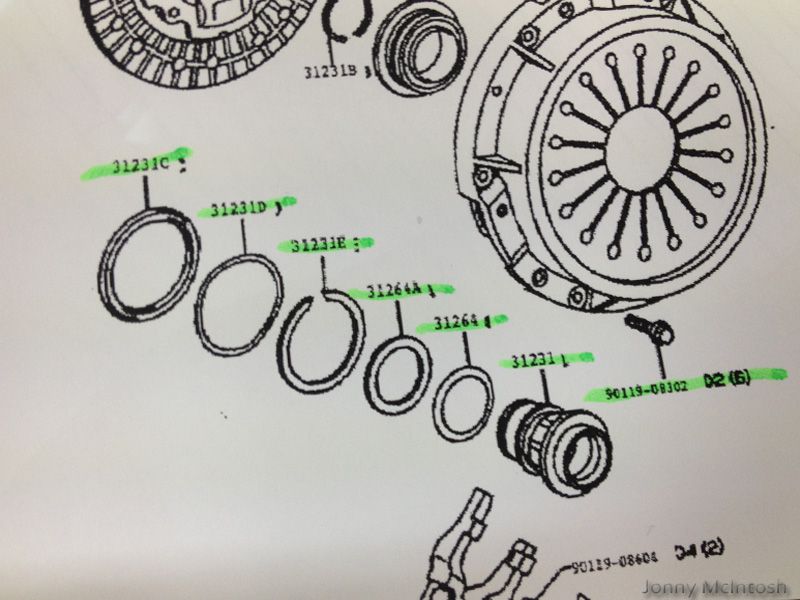 so after recieving all my bolts i needed for the job that friday night i set about fitting the japspeed manifold to my engine to see how much work was required for making the external wastegate fit however that was cut short 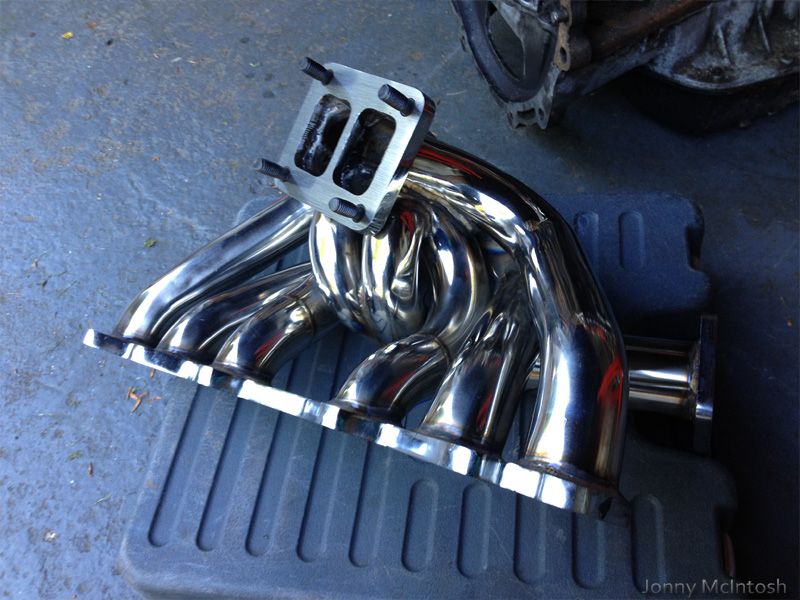 the manifold wouldn't go over the head studs 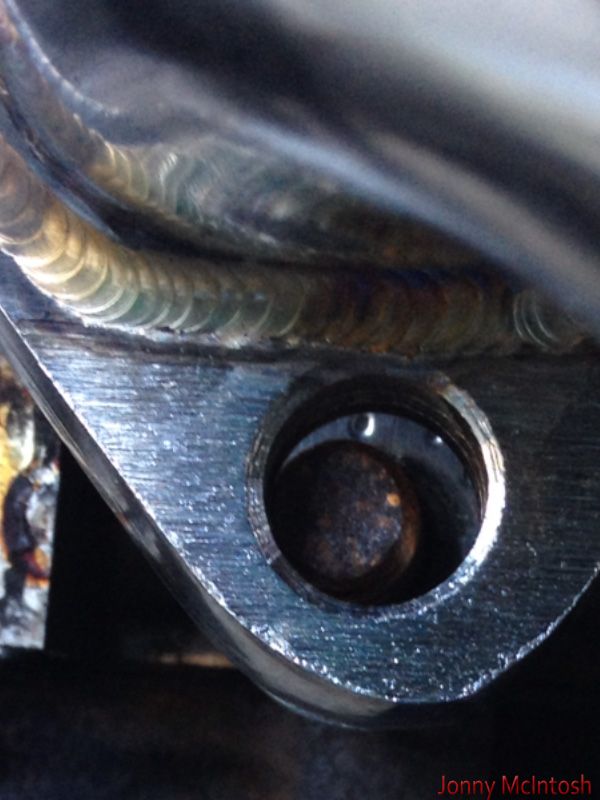 i'd tried filing them out but i was taking off too much in my opinion as it was more than just one hole that was drilled miles off that manifold was sent back and after a few calls to constantly remind them i finally got my money back. hockey pucks arrived for using as engine mounts 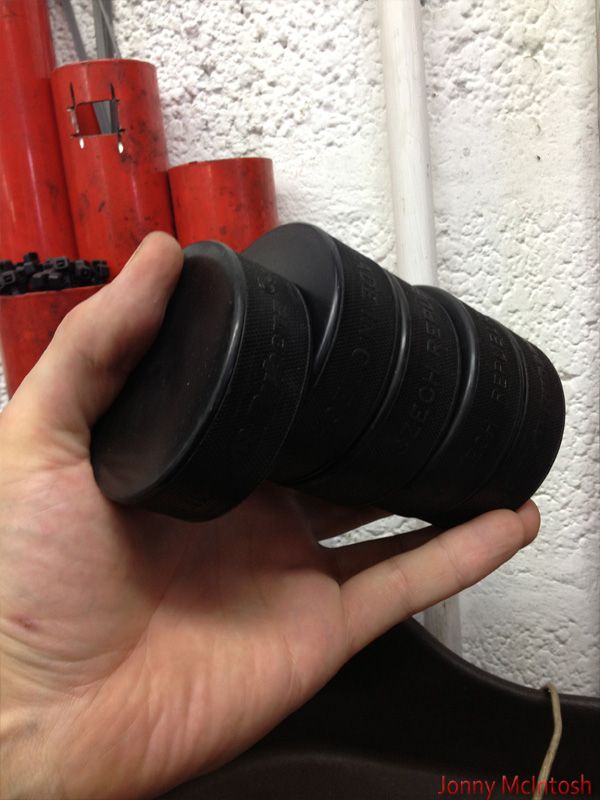 also since i've got a greddy lip coming i've wanted a set of vertex skirts, rear spats and a dmax roof spoiler to go with it all which in my opinion will complete the car for me bought some cheap vertex rep side skirts which have cracks, runs, chips, breaks and general turdy-ness everywhere, they're rough as a dog but will no doubt be knocked off a few times fitment is actually quite good so the car was put back on standard shockers and wheels to go into the bodyshop for some work 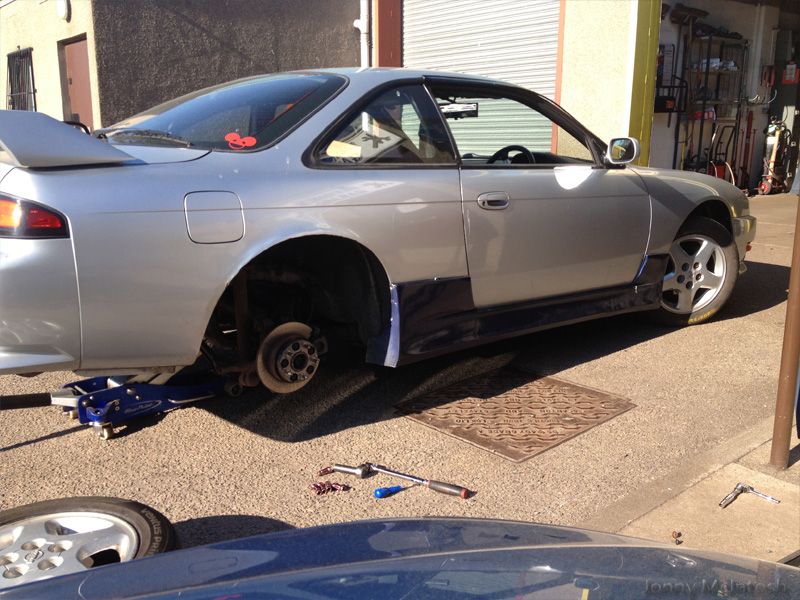 it's going in to get the rear arches done as when they were flared by pervious owner they have started rusting which is unfortunate also will be getting my skirts painted and have a new roof spoiler i bought from ep racing painted and fitted 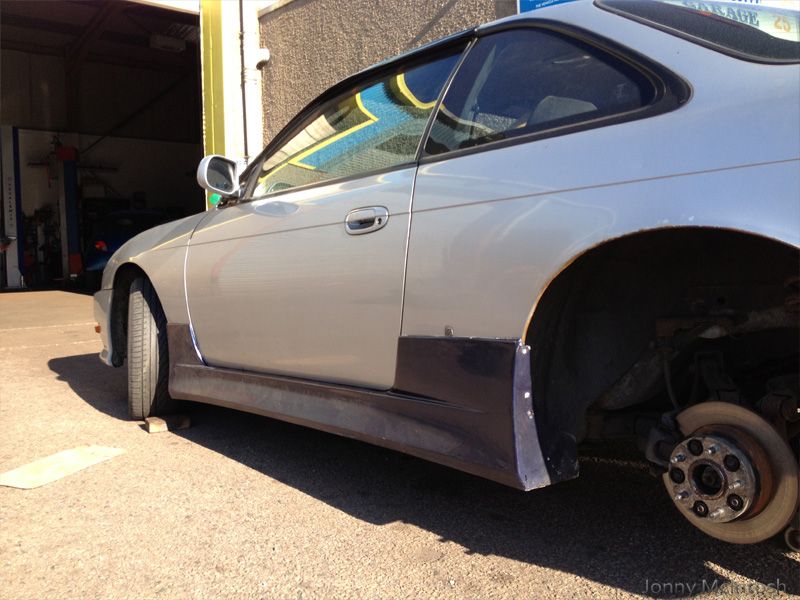 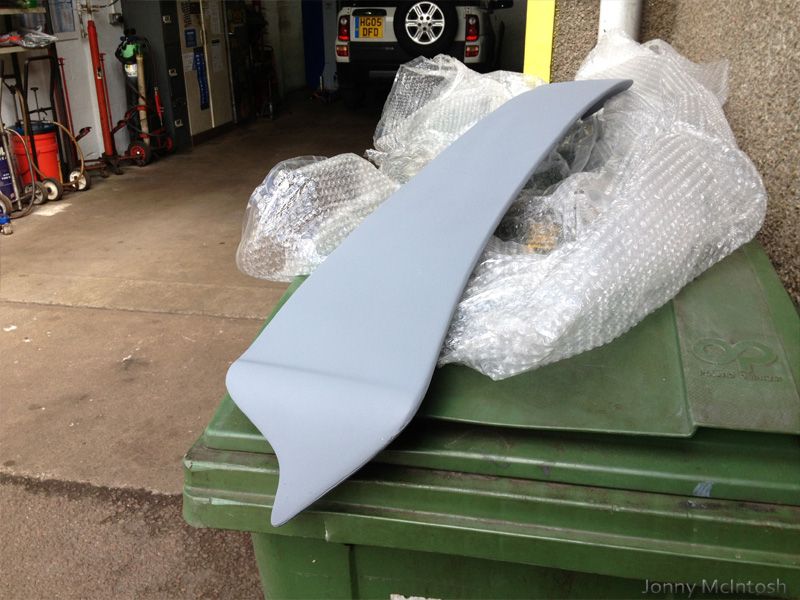 |
|
|
|
|
10-14-2013, 02:55 PM
|
#17 |
|
Leaky Injector
Join Date: Nov 2009
Location: Scotland, UK
Age: 34
Posts: 130
Trader Rating: (0)
Feedback Score: 0 reviews
|
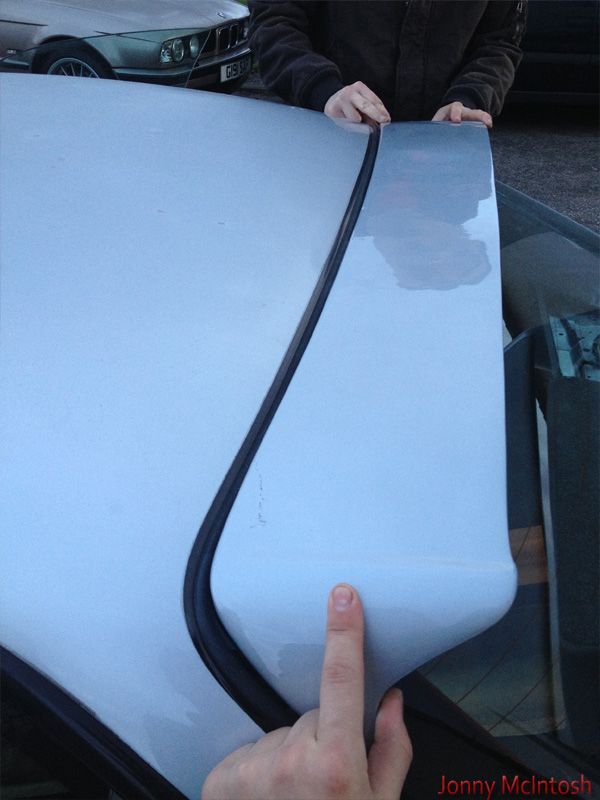
roof spoiler and skirts are painted, rear arches are done and look amazing! cannot thank stevie enough! the man has some epic skills, colour match is identical!
 Finally have sourced an HX35 holset turbo in a 12cm housing, it has a 3" vband rear fitment and a t3 twin scroll flange paying for it in a week if the guys cool to hold off as i bought a new sofa which unfortunately would have gotten me a manifold and a turbo together :S so i've called wayne at auto extreme and he is pricing up a 6boost manifold for me :S ..... whilst on the phone i ordered a 400lph walbro from him and a competition clutch lightened flywheel the car has had a lovely repair job on the rear arches by stevie, excellent work! car looks amazing now 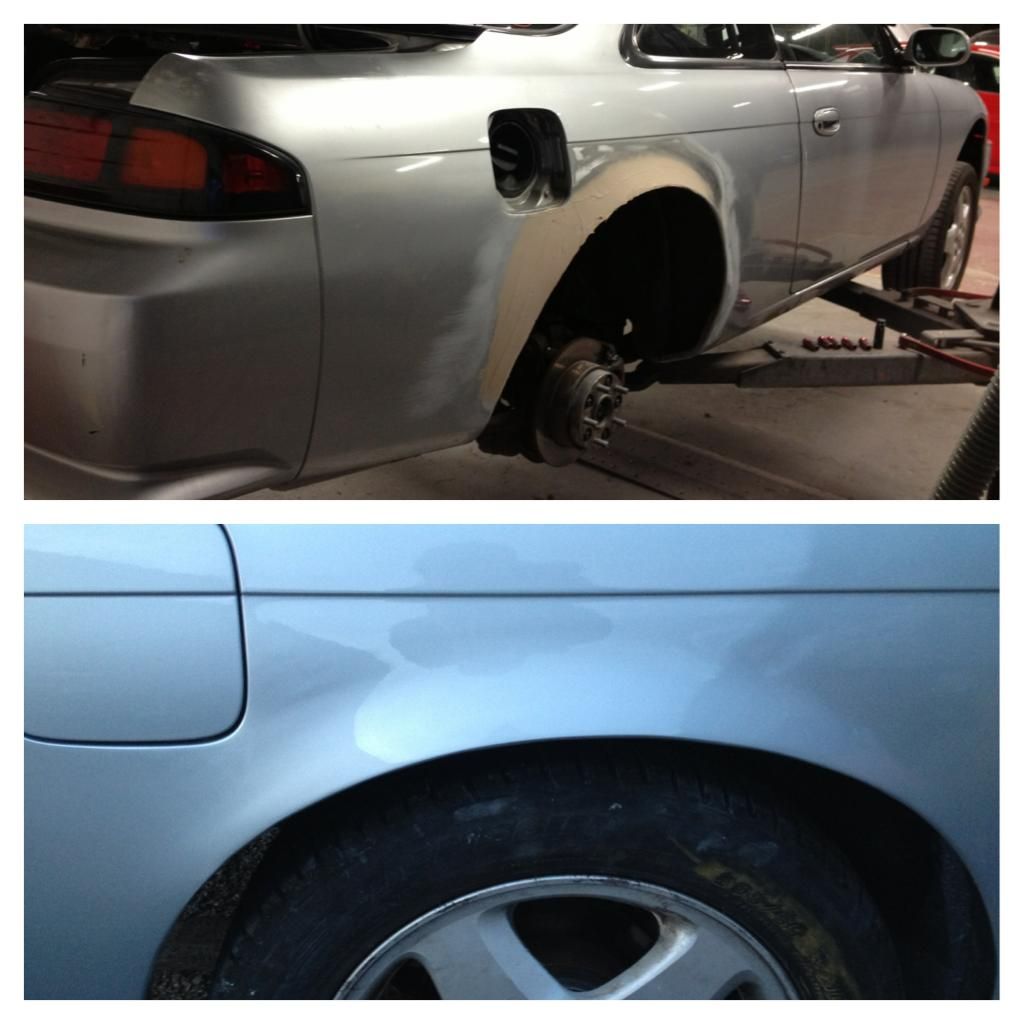 was sent a pic from stevie when the spoiler went on can't thank him enough!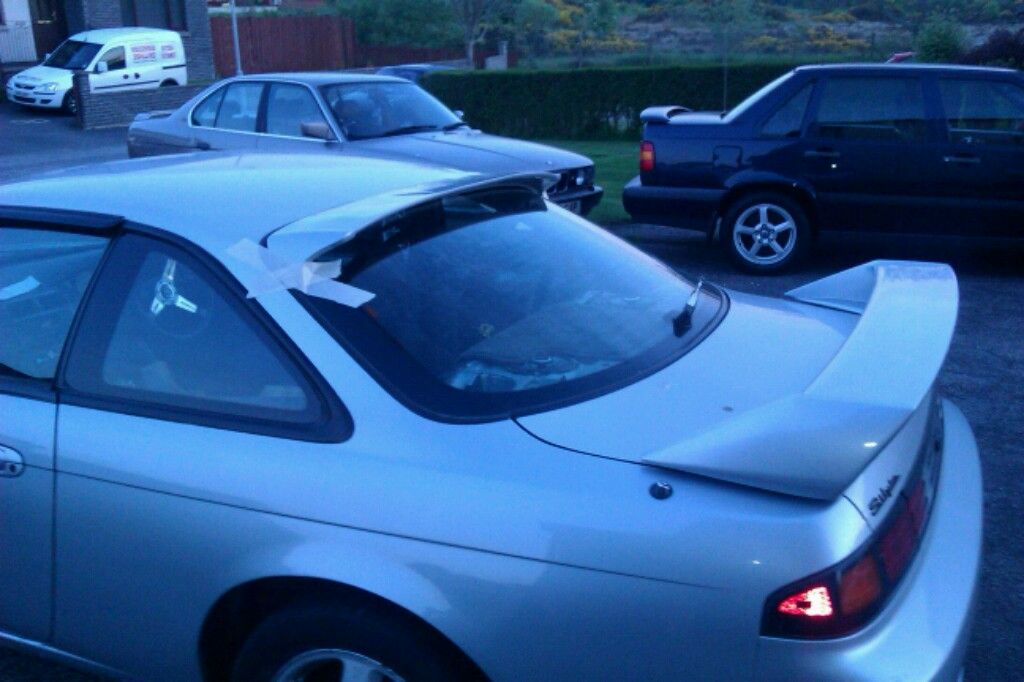 the injector rail is a tad restrictive in the 1j's, so it was taken out of my spare inlet section, cleaned up and sent away with my gearbox parts for modification 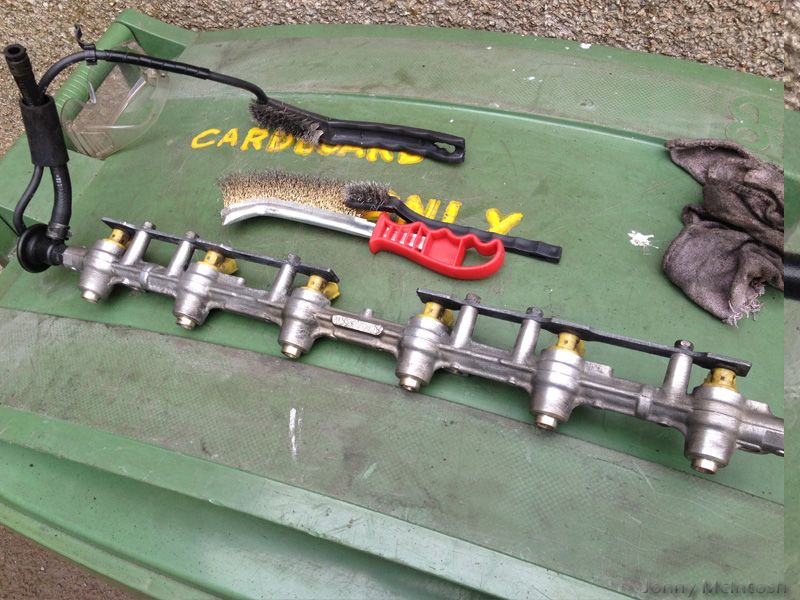 stripped 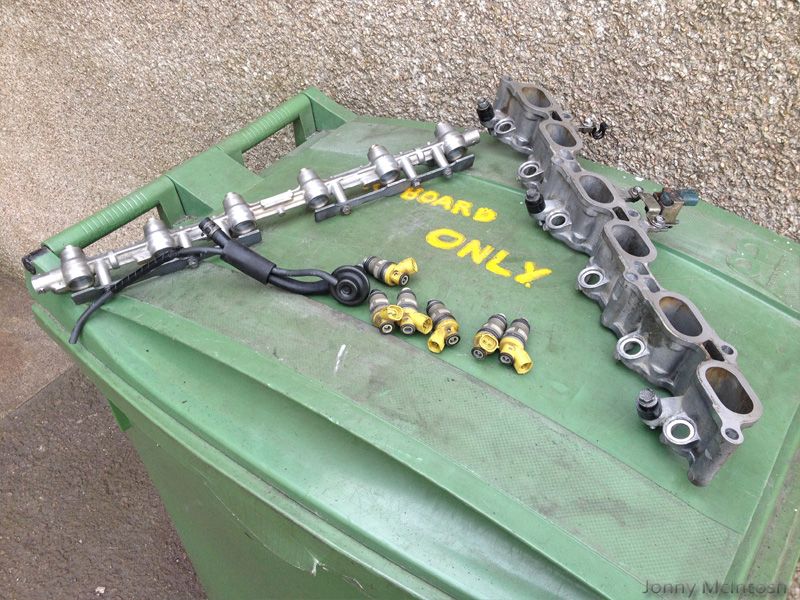 i'll be buying sard 800cc injectors so the standard yellow injec will not be going back in walbro 400lph fuel pump turned up thanks to wayne at auto extreme 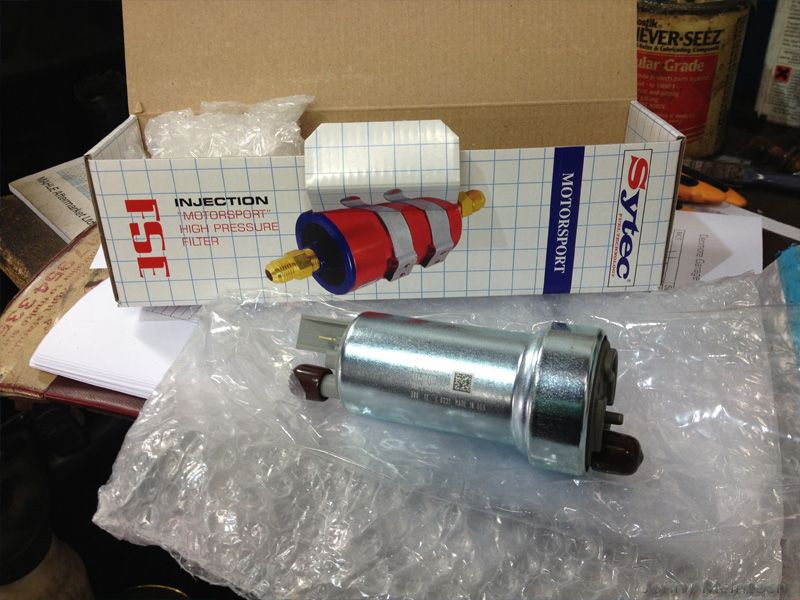 got the soarer's original 1jz block off my engine stand, i cannot believe how heavy just the block is!!! and put the new engine on the stand with the help of the crane 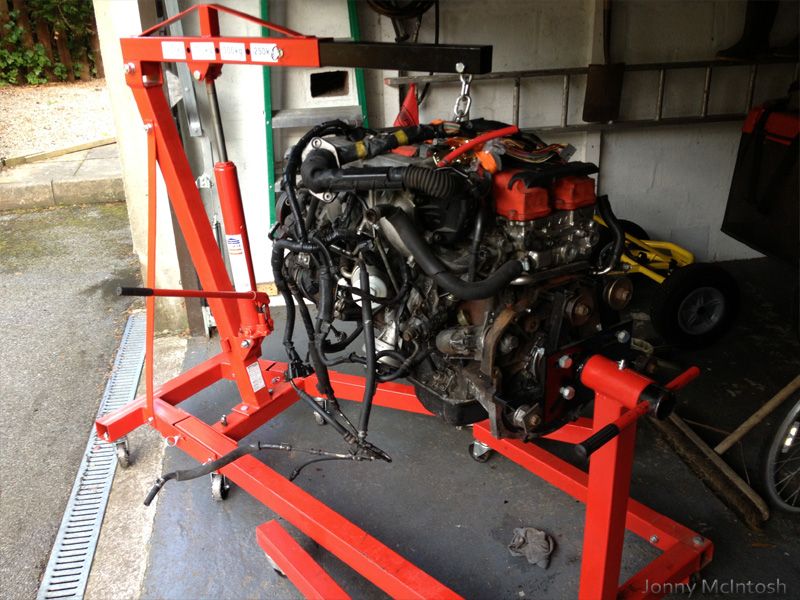 so i can now commence work on it in prep for fitting rather than in prep for rebuilding! plan of attack is swap over sumps to the front sump, remove air con, make up wiring loom, tidy up odds and sods only pic i took is: fuel damper removed, water pump fan removed, air con pump and fan belt off 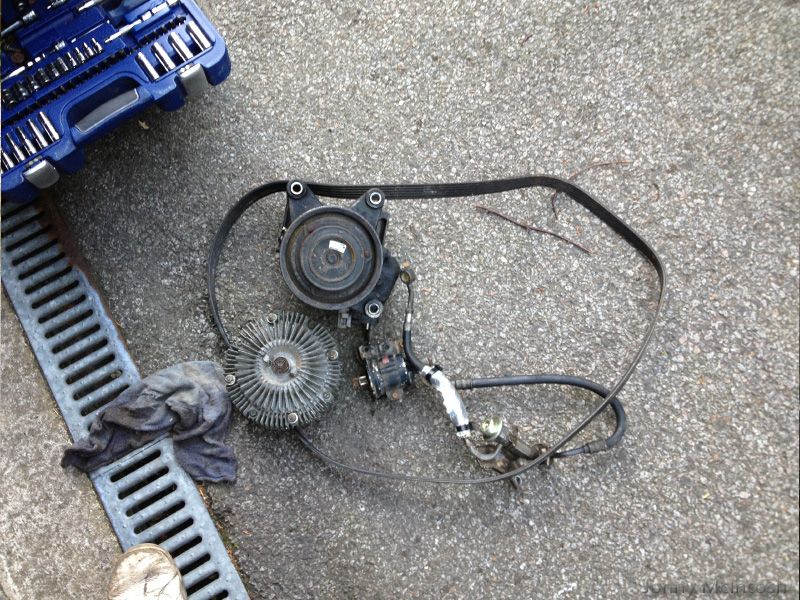 turbo turned up it's a brand new holset hx351w (the most up to date hx35 by holset) with a t3 twin scroll exhaust flange, 4" inlet, internal wastegated and has slightly lighter 7 blade compressor wheel.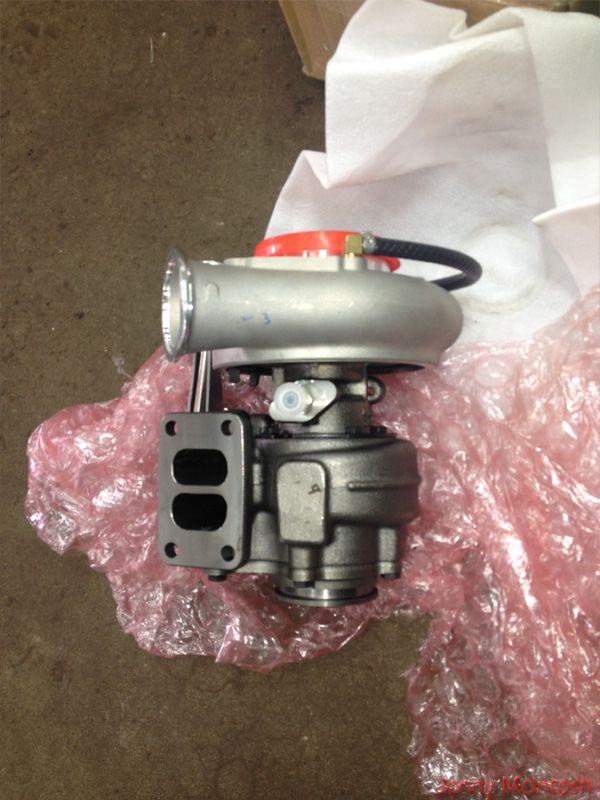 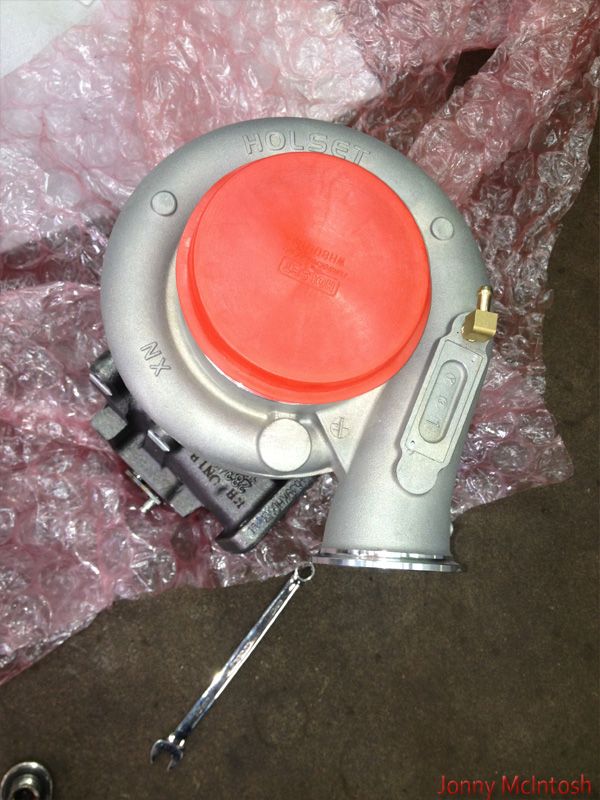 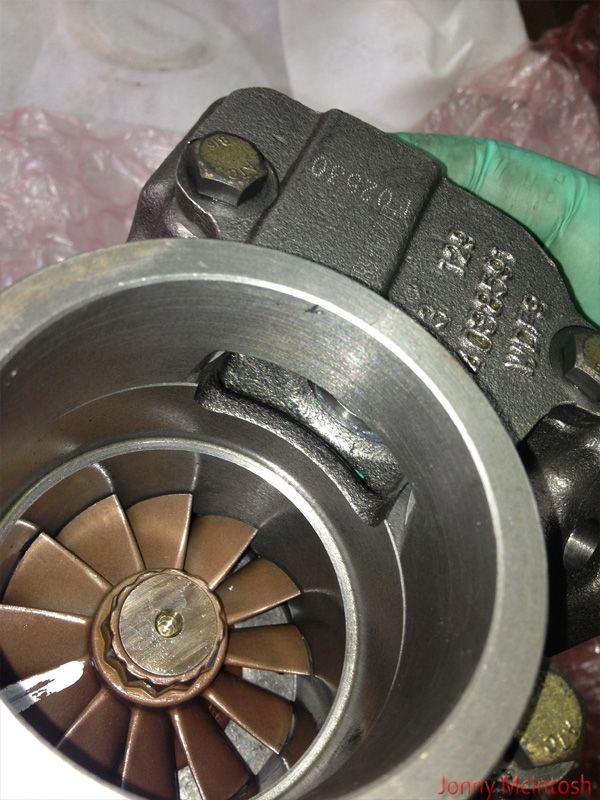 removed the actuator just now and the plan is to have the internal wastegate welded shut and a small plate welded over the gap for it to keep exhaust gasses flowing smoothly i will need to also have an oil feed reducer welded into the hole which was supplied with the turbo thanks to 'ian bizz phillips' pleasure dealing with you! took my aircon pump with me to work, stripped it down for the bracket to put back on the jz engine to support the power steering pump fairly straight forward to take apart, 10mm nut on the pulley, then a few circlips to take off then that gives you access to all the allen key bolts holding the bracket on the pump 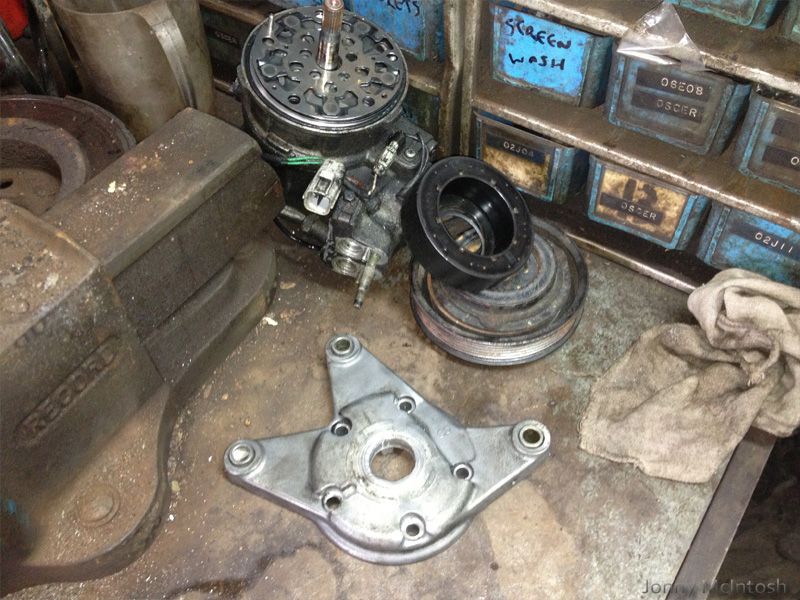 so got the car on a sorn since the road tax was due and it's now off the road, last picture before i started the strip  and here's where it's at now, just about ready to have the engine taken out removed aircon, radiator, abs pump bracket, all inlet pipework, carbon cannister, viscous fan plus cowling, front bumper and grill, clutch slave cylinder, exhaust unbolted   however since i am in Scotland it started raining....and has not stopped, all day friday was pouring down with rain, hopefully going to get the engine out tomorrow afternoon if the weather holds up :S i've just a few things left to do pull ecu wiring through bulkhead undo both fuel pipes drain gearbox and remove propshaft unbolt engine and gearbox mounts undo both heater matrix hoses unbolt power steering pump from engine and leave it in the engine bay for now undo wiring to alternator/fuse box brake booster pipe and a few earths |
|
|
|
|
10-14-2013, 02:58 PM
|
#18 |
|
Leaky Injector
Join Date: Nov 2009
Location: Scotland, UK
Age: 34
Posts: 130
Trader Rating: (0)
Feedback Score: 0 reviews
|
y Trust greddy gracer aero lip arrived from japan
  engine coming out few weeks ago, remove the engine with box and loom attached, just pulled loom through bulkhead 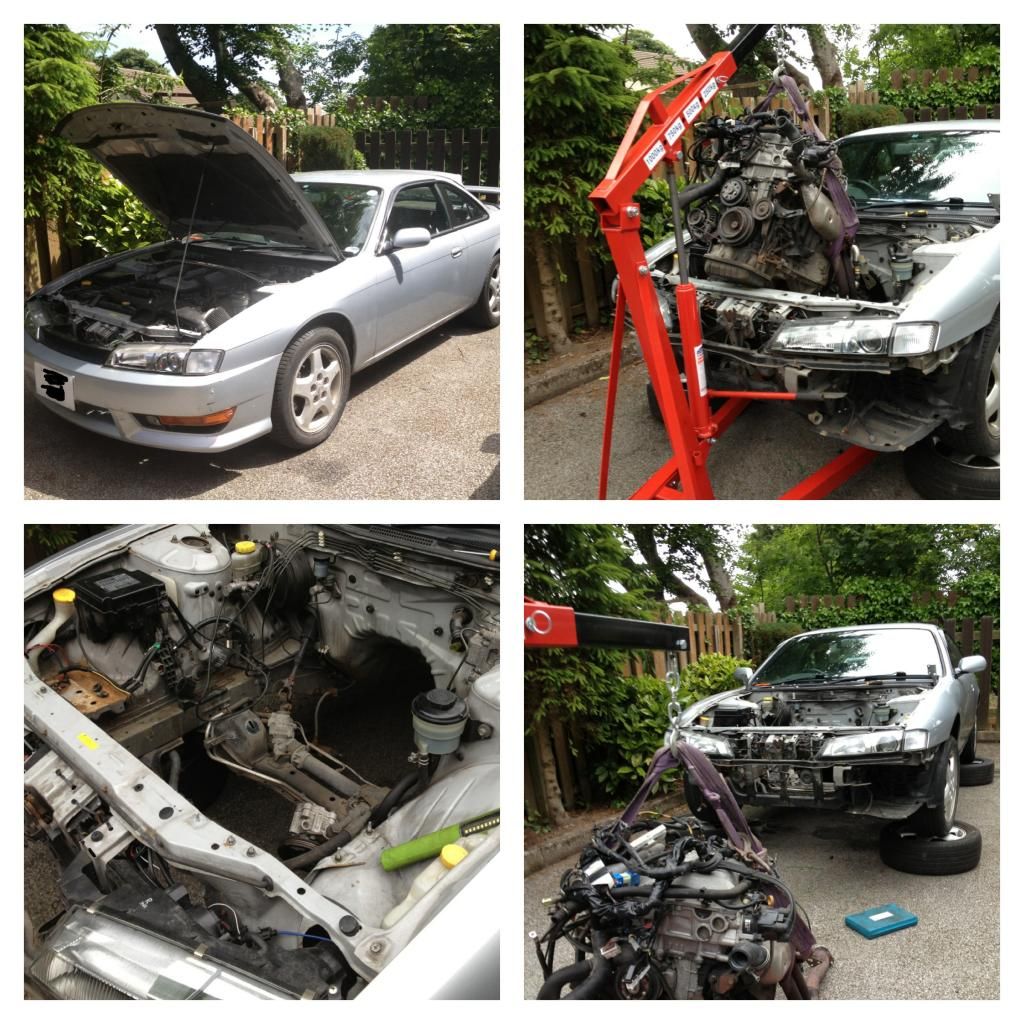 started collecting more bits from toyota! having boxes like these show up reguarly now :S this is all the washers, snap rings, clutch hub, pressure plate bolts and more stuff drivetrain related 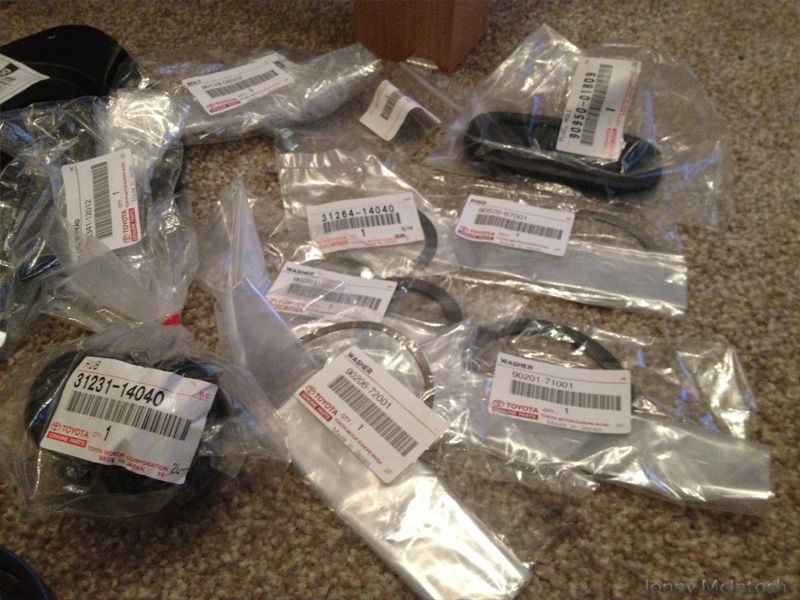 tried on my vertex skirts can't wait to see the car with the greddy lip, these skirts and some nice wheels on!just need kouki spats to finish it off! 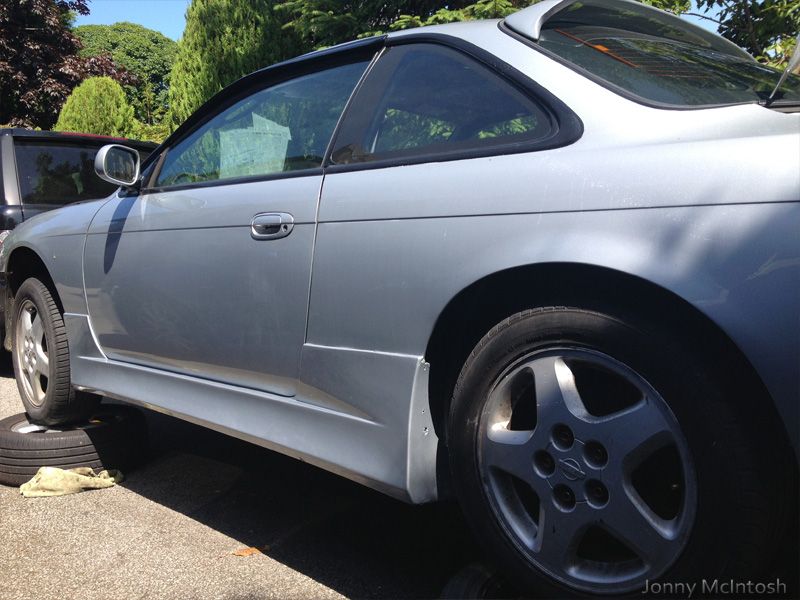 got the dash out and began stripping the rest of the car to remove the sound deadening on the floor pan 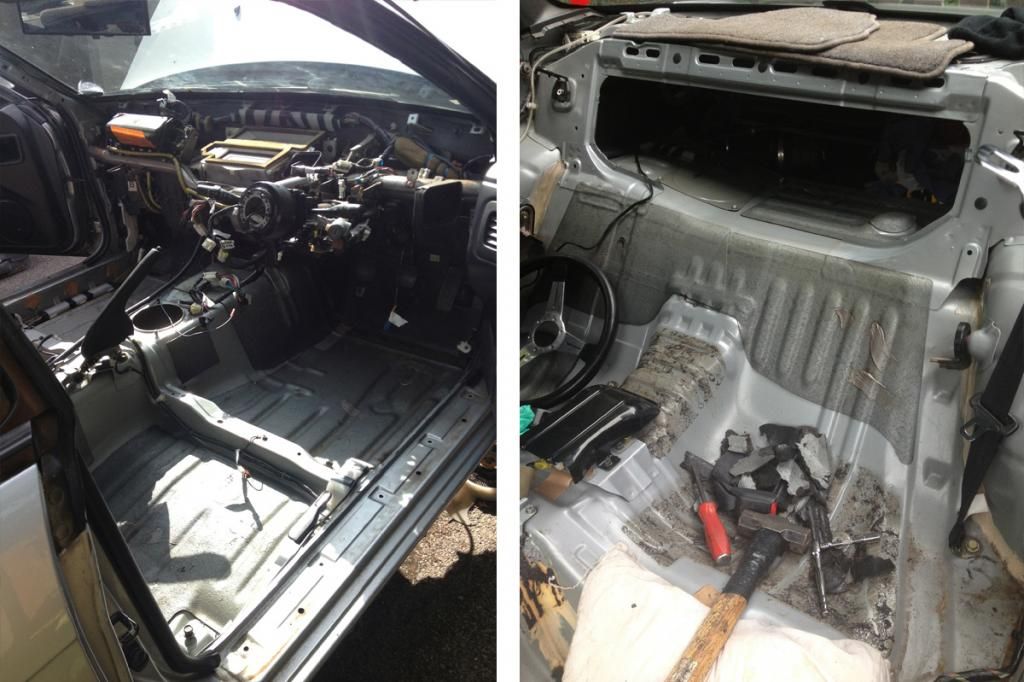 all done! just need to remove the glue left over now, using petrol, it seems to work well! 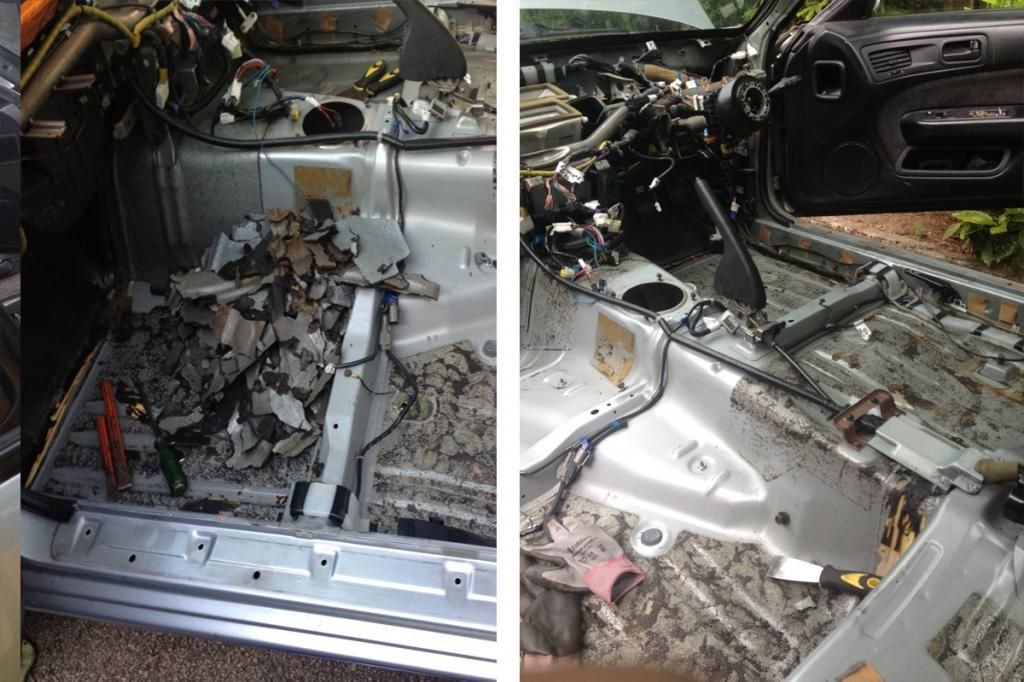 swapped the engine's sump over from a rear to a front sump, bought a new baffle plate from toyota and i have also bought another front sump, from an aristo it has the factory oil return hole and studs, this one has had the oil pan modified to fit around a standard s14 anti roll bar, that's also a big bonus! 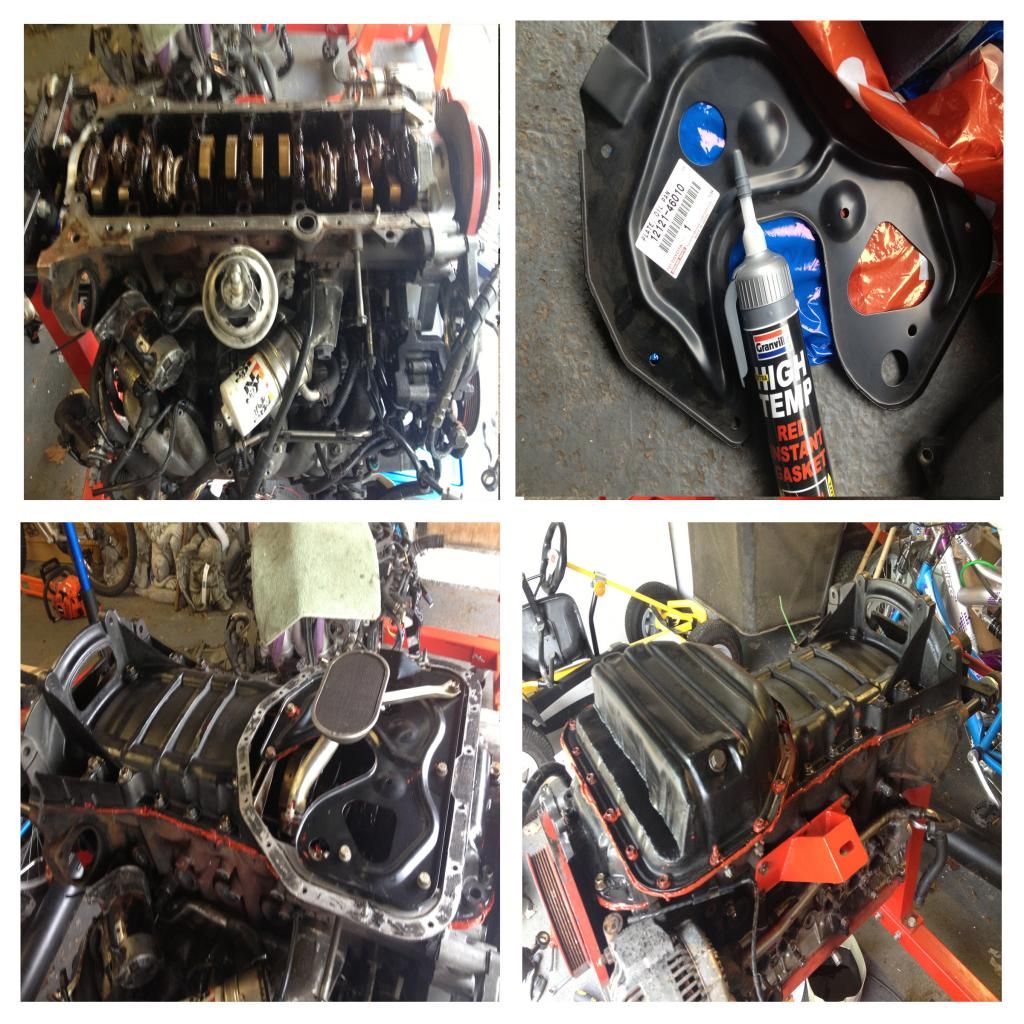 fitted the soarer throttle cable to the s14 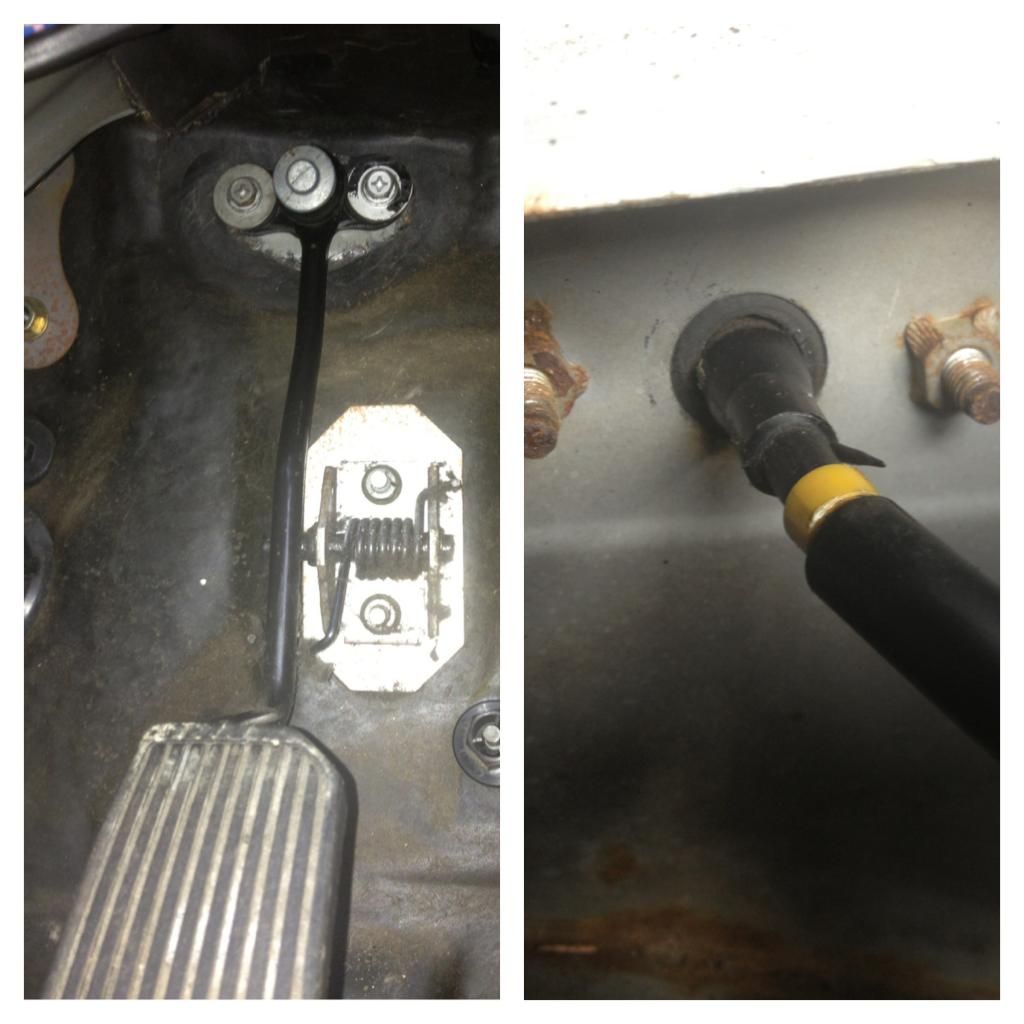 got steevo mounts fitted to the engine, don't have any pics but you can see them in above pics, used the auto flywheel bolts with a few mm chopped off the end of each bolt, then put lots of lock tight on the threads also removed the ABS pump complete with all the brake pipes, clutch pipe and all fuel pipes put in new brake pipes, i've ran a T piece join in behind the driver side strut top so it's out of the way! 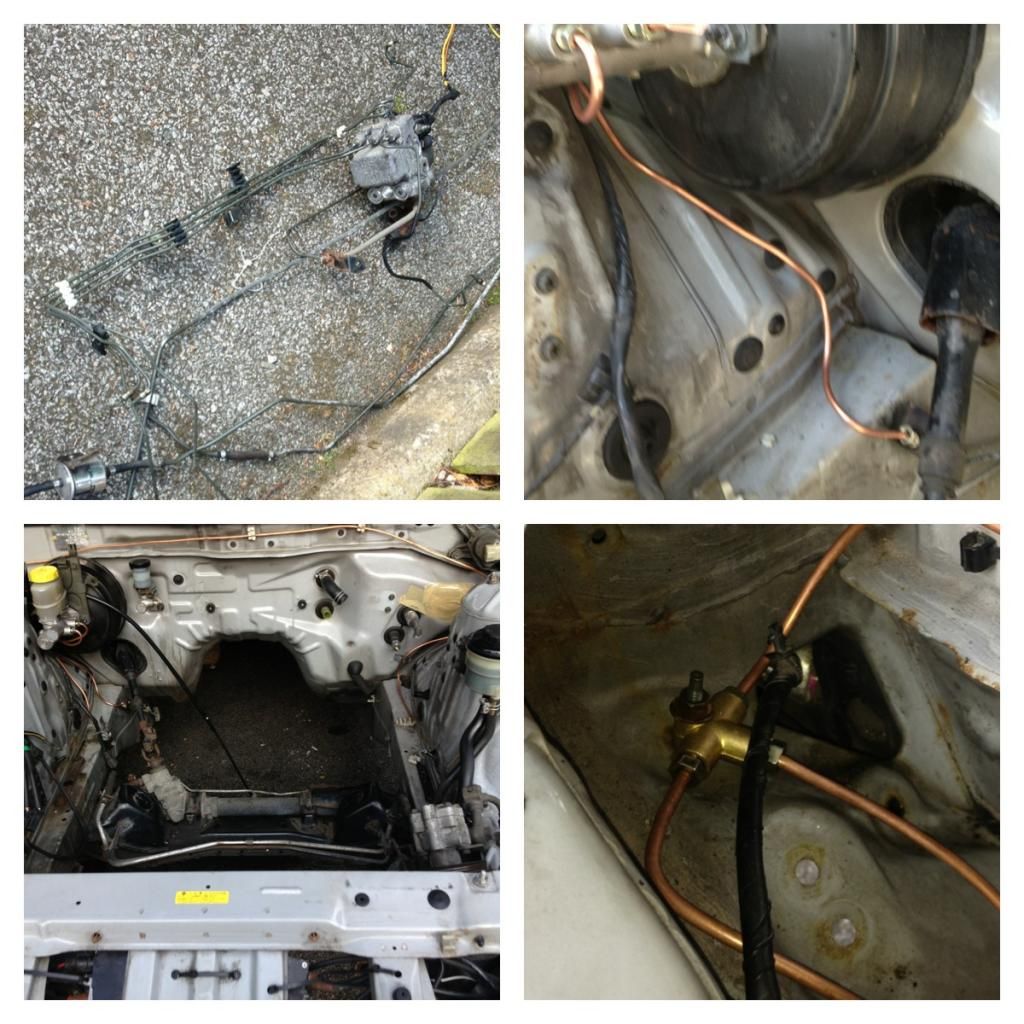 i've also moved the brake hoses over one bolt hole, seen it done before. I will drill and make a thread or rivet the other side of the mount, i've seen this done before and with what i have planned for lock mods i think this is an extra safety precaution just incase the tyre catches 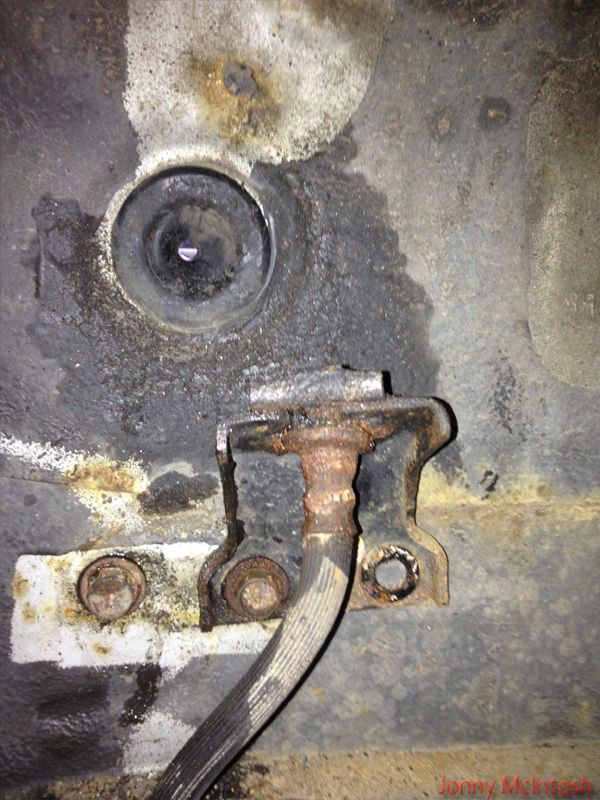 went out and bought some battery cable, a kill switch, a big roll of 8mm fuel pipe, hose clips and some other bits and bobs like oil for the engine 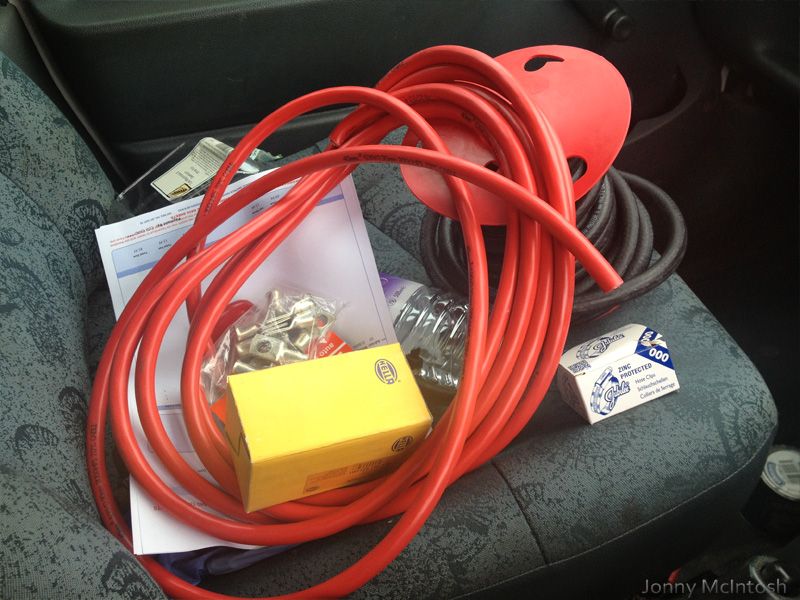 built the clutch hub together with the new bearing and all the washers and spring clips and so on 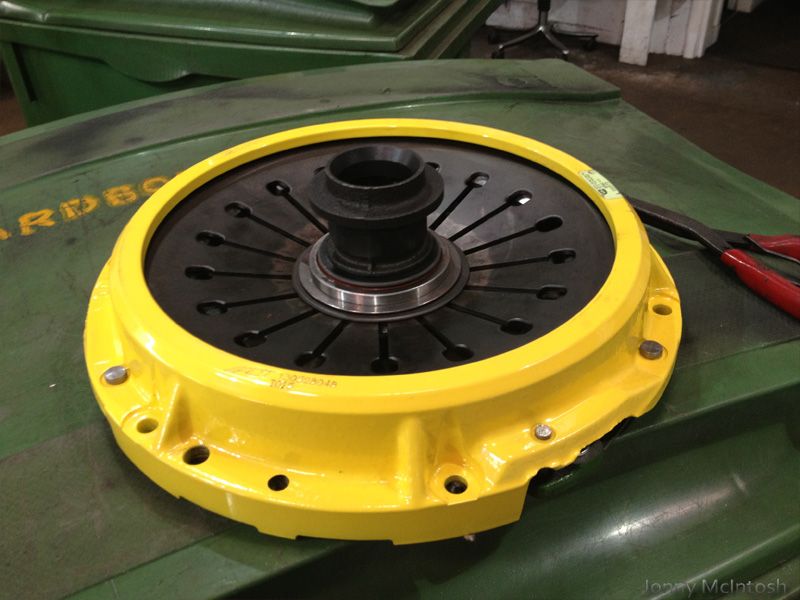 and the correct flywheel turned up, this time with arp bolts aswell, thanks to wayne at auto extreme for getting those sorted for me 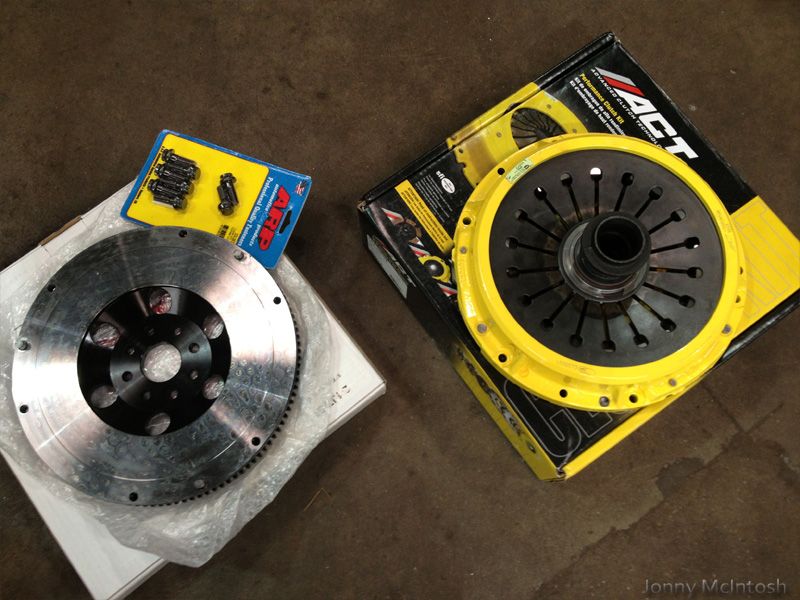 fitted the 400lph walbro to the tank cradle 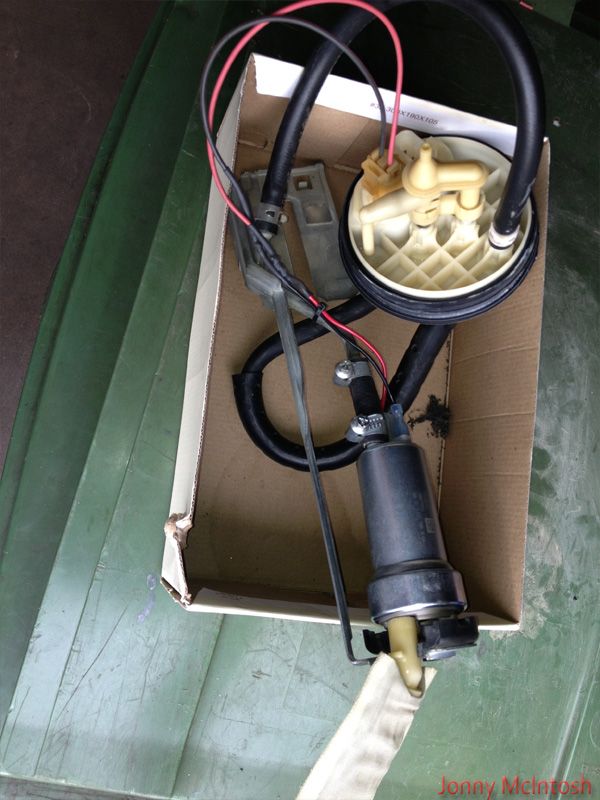 some silvia matts showed up, this time though they are black 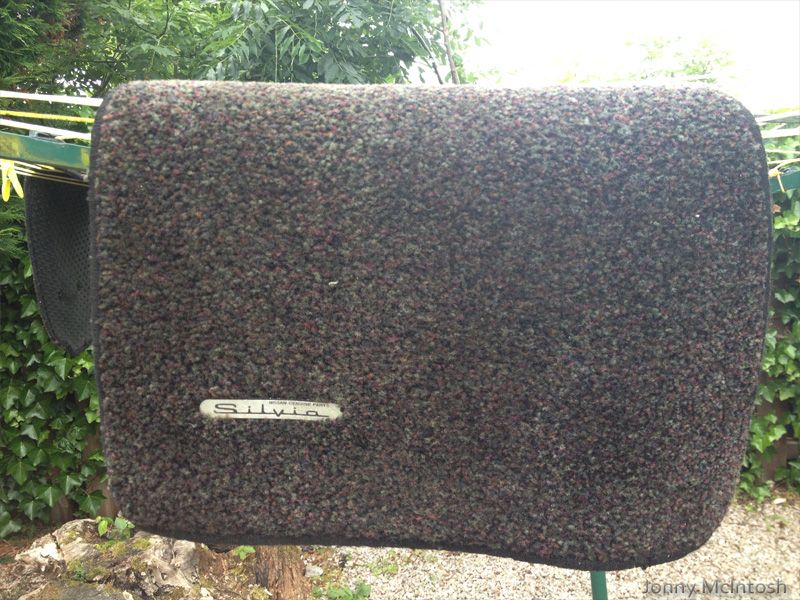 |
|
|
|
|
10-14-2013, 02:59 PM
|
#19 |
|
Leaky Injector
Join Date: Nov 2009
Location: Scotland, UK
Age: 34
Posts: 130
Trader Rating: (0)
Feedback Score: 0 reviews
|
WIRING!!! thanks to mark for the advice and help!
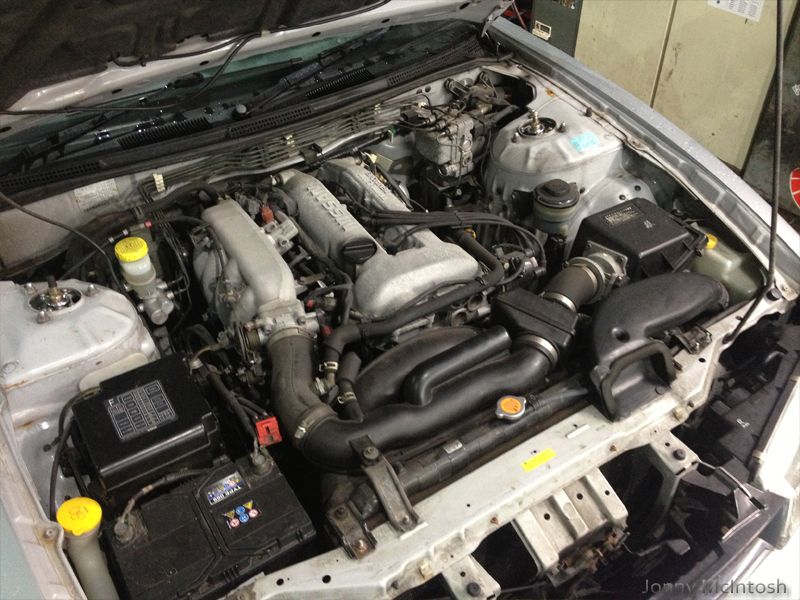
pretty sure the loom is done now! 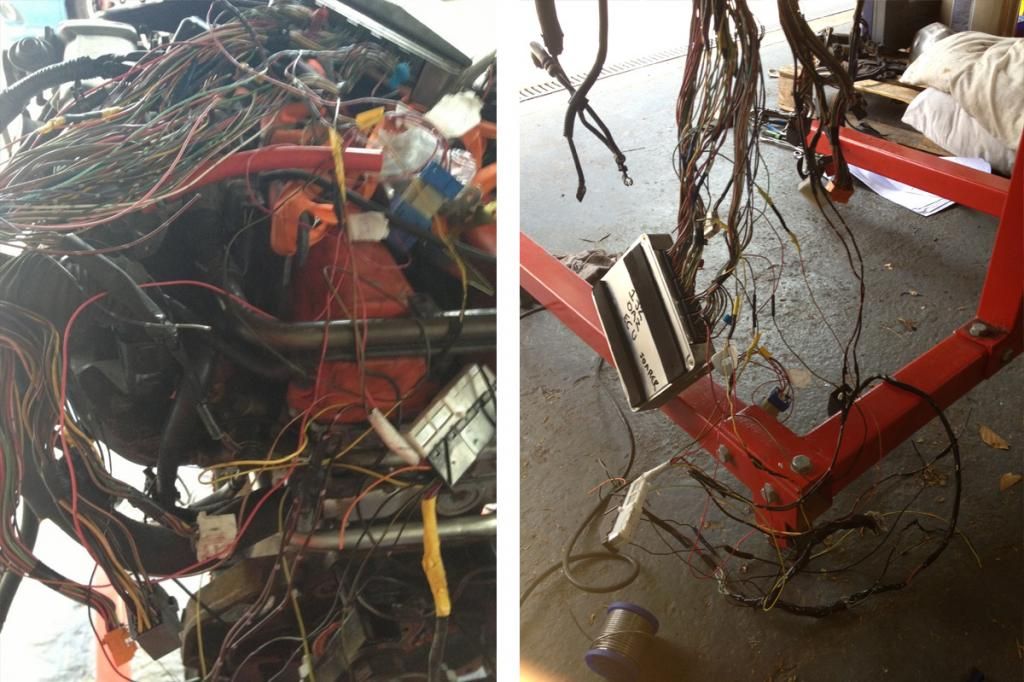 made up a battery cable to reach the starter and also the solenoid wire has been extended to reach it since the starter is on the other side of the engine HOPEFULLY won't have any issues with wiring when it all goes together for the first time! here's what i cut out of the nissan loom's f4 plug and ecu plug 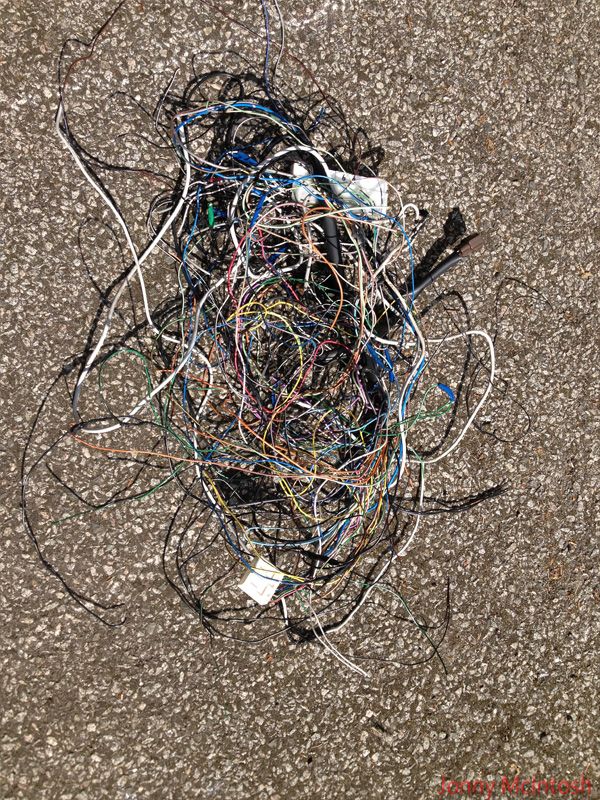 spent a rather long time like this: reading pinouts....  after some long thinking about it, the twins are going back on for now! don't have enough money to finish everything else, so for now the car will be ran this way untill i get enough cash behind me for a 6boost manifold and all the rest...ecu injectors etc   finally fitted the forced fablic steering rack poly bushes they are a great fit, will see how they feel on the road! got chopping and now have a mid mount intercooler, the 600mm x 289mm x 76mm core, more ground clearance so no smacking off bumps like the last few s14's i've had with the standard location of an fmic, shorter pipes aswell for quicker spool 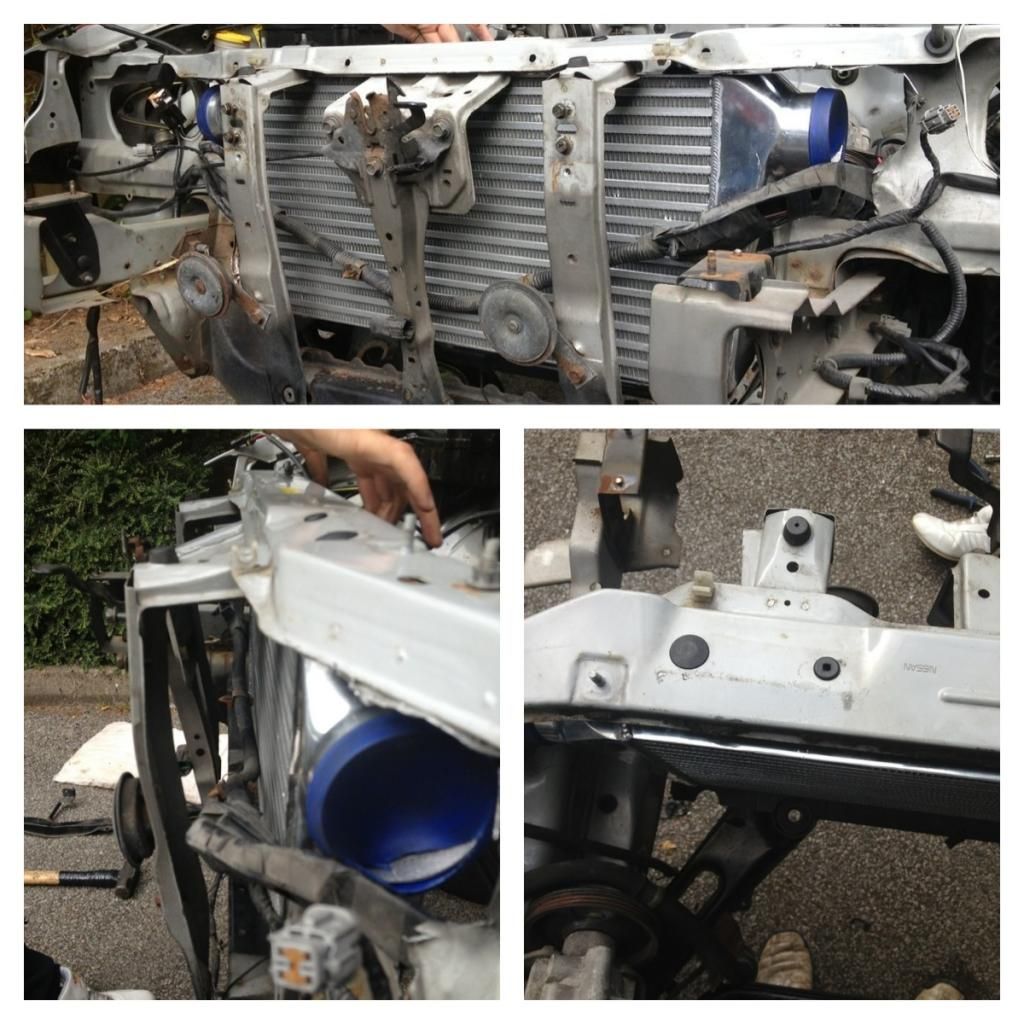 shifter back from steevo, modified and extended 3 inches, fited great and seems to work fine! box resealed and hopefully won't give me any troubles, his weldeding work is excellent, just waiting on my mount and propshaft now! 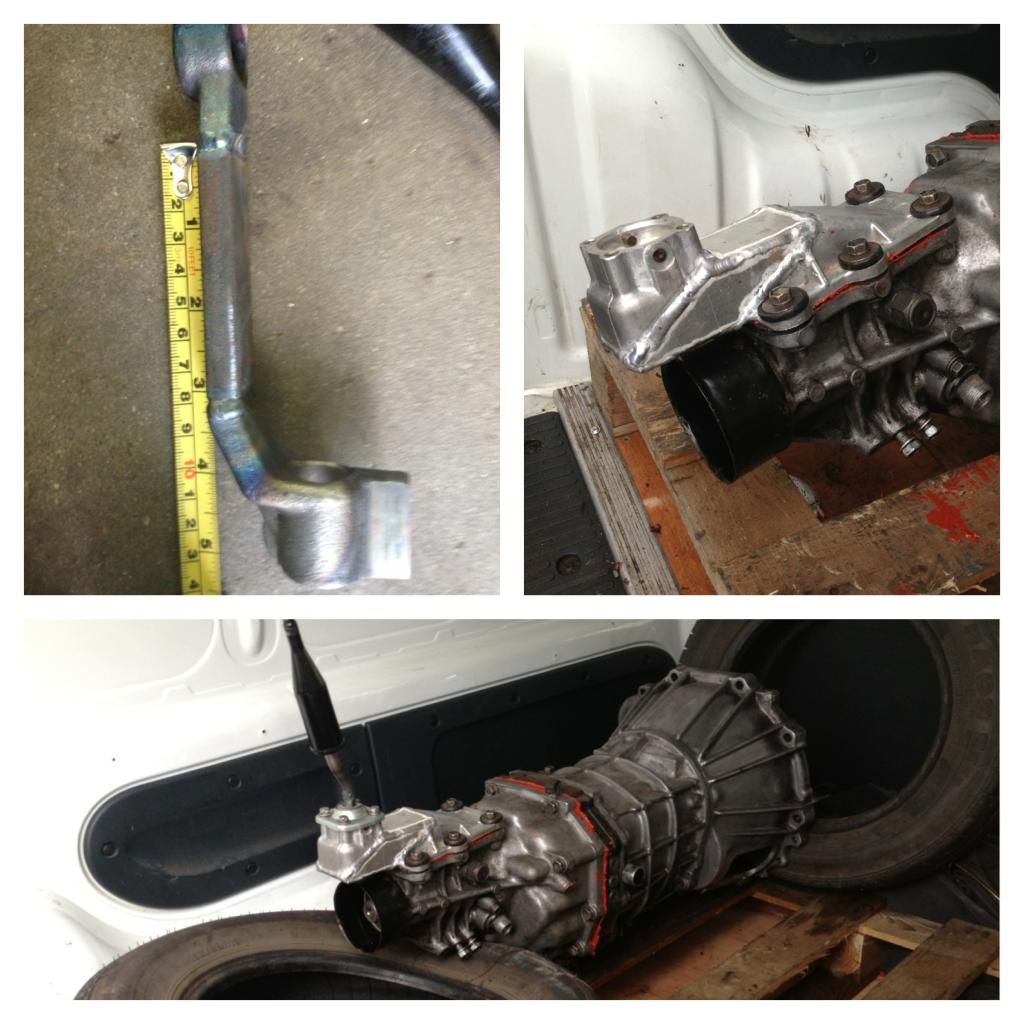 back to standard looking engine instead of the red, looks 1000x better, black pulleys and standard cam covers. i'll have a timing cover on shortly, i need to get the bottom pulley off and get the timing cover off the bottom and replace it with my other one, the mounting tabs are broken on it so when the top cover goes on it scuffs the belt, i'll get that changed at my work with the air gun as it'll be easier that way 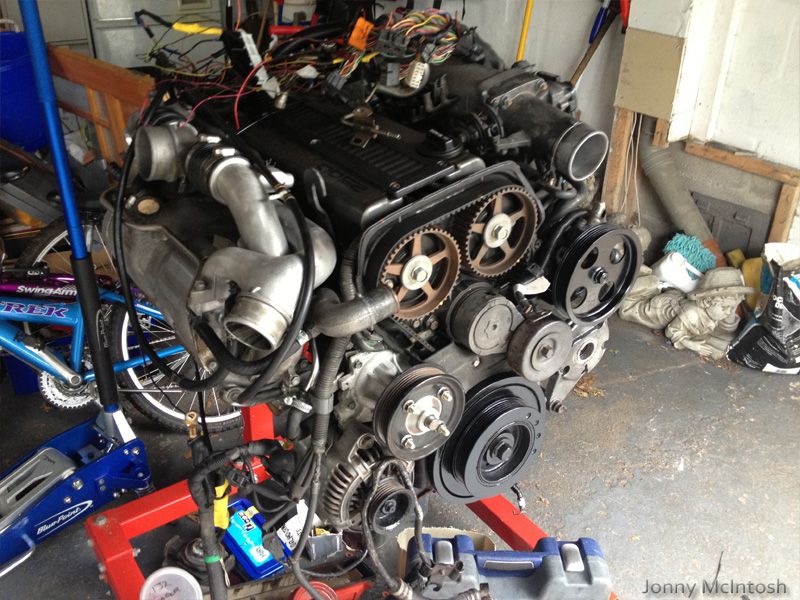 stripped out my heater box to remove the aircon matrix and pipework, have cut two stubds of pipe and jammed them in the back of the heater box to fill the holes left by them 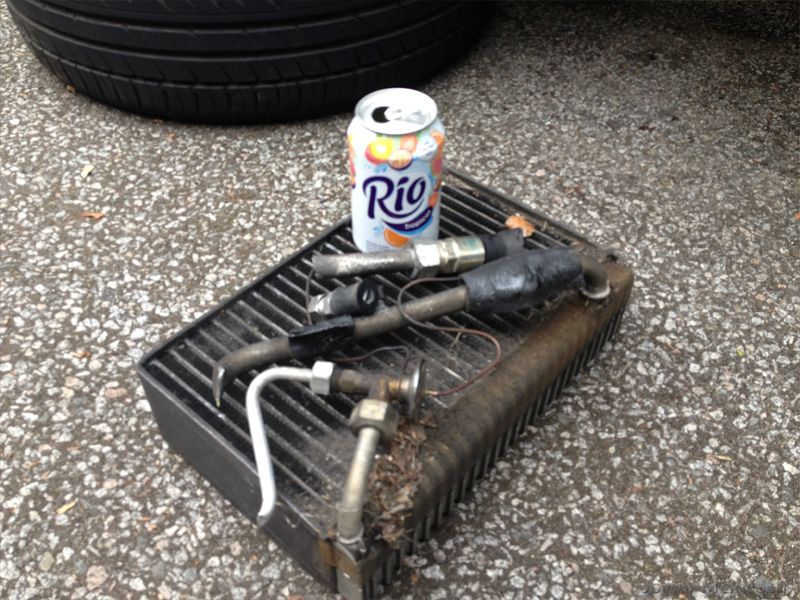 can anyone tell me if my clutch cylinder from my N/A s14 is different to a uk turbo s14? apart from the brake pipe coming out the side rather than a bleed nipple? 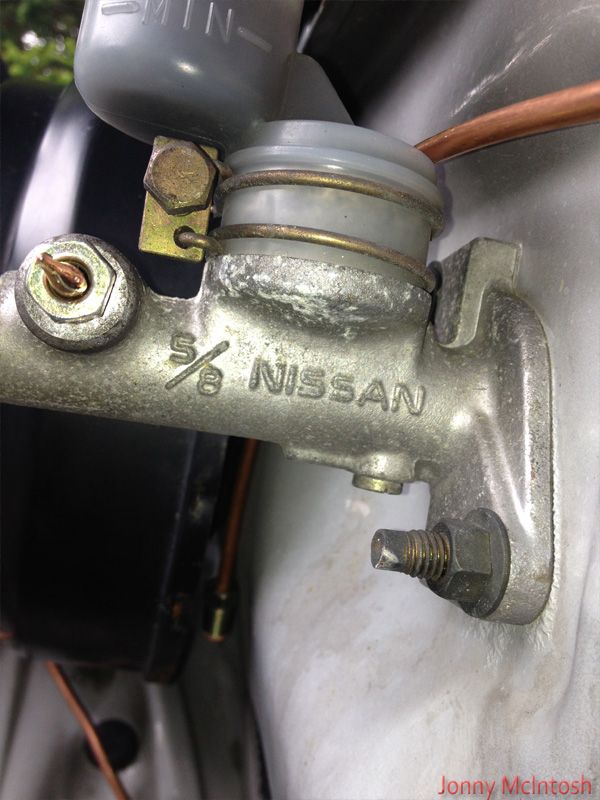 where i am at right now: all finished engine work, just waiting on parts arriving before i can get stuff done now! need steevo to send me my mount and propshaft need an evening free to get the 1jz off the stand, get the clutch and flywheel bolted to the engine, bolt my gearbox on and get the engine in the car! need to have DB power make me up a clutch hose s14>r154 conversion length updates fan belt on with the aircon removed 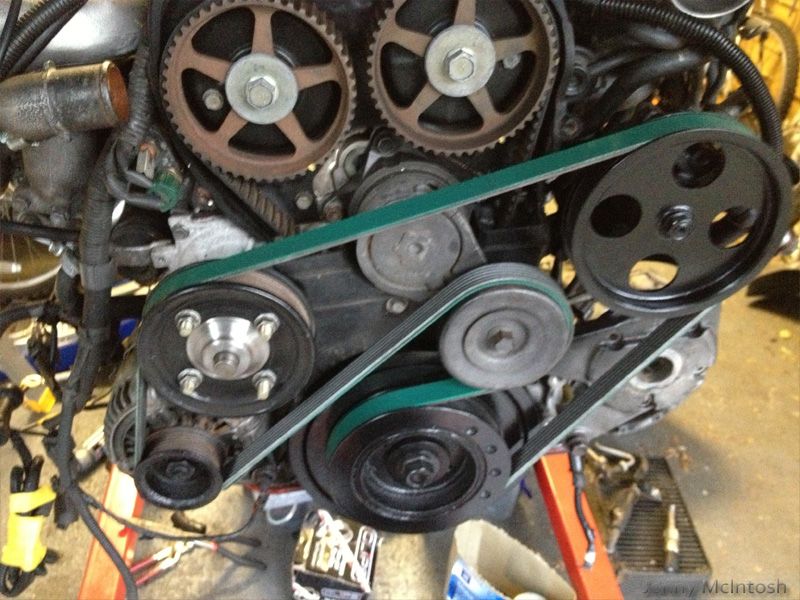 got myself a clutch cylinder from a uk turbo s14, howeber i'm doubting it'll clear the top turbo pipe 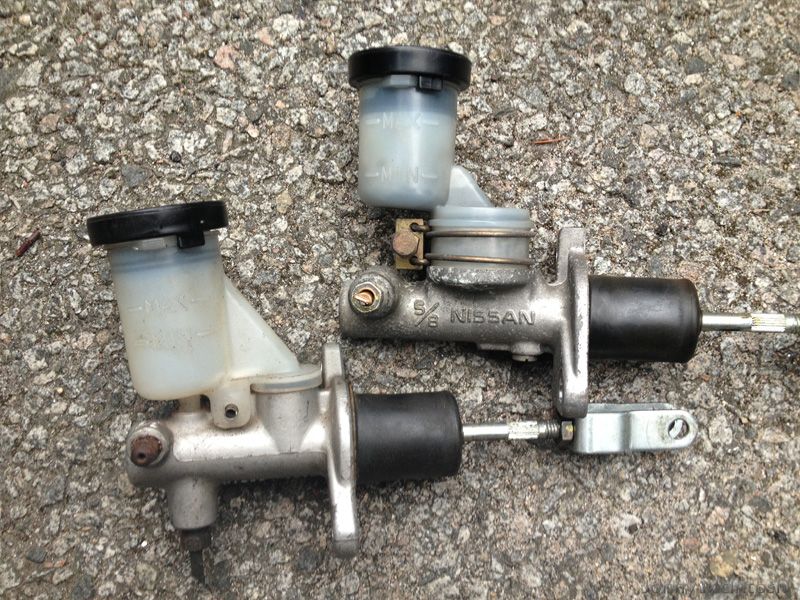 engine coming off the stand now since it's almost all finished 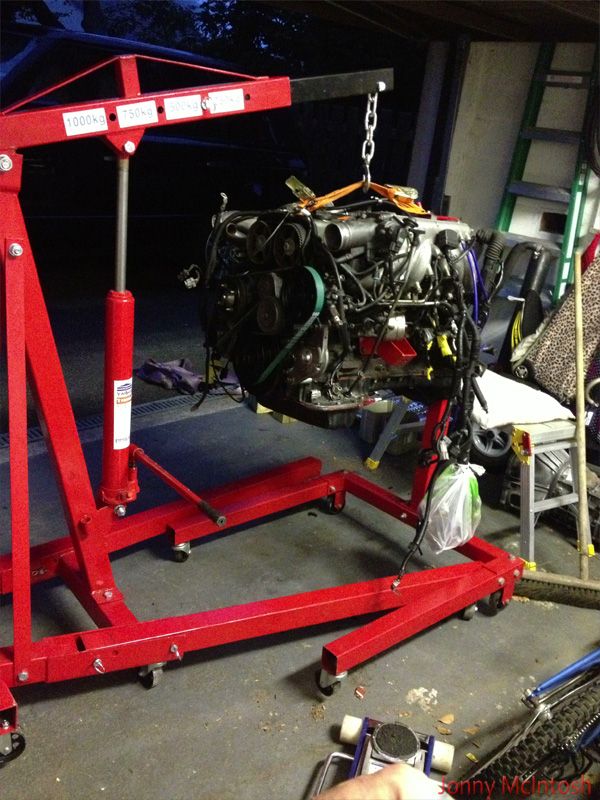 steevo gearbox mount arrived, gave it a quick blast in black 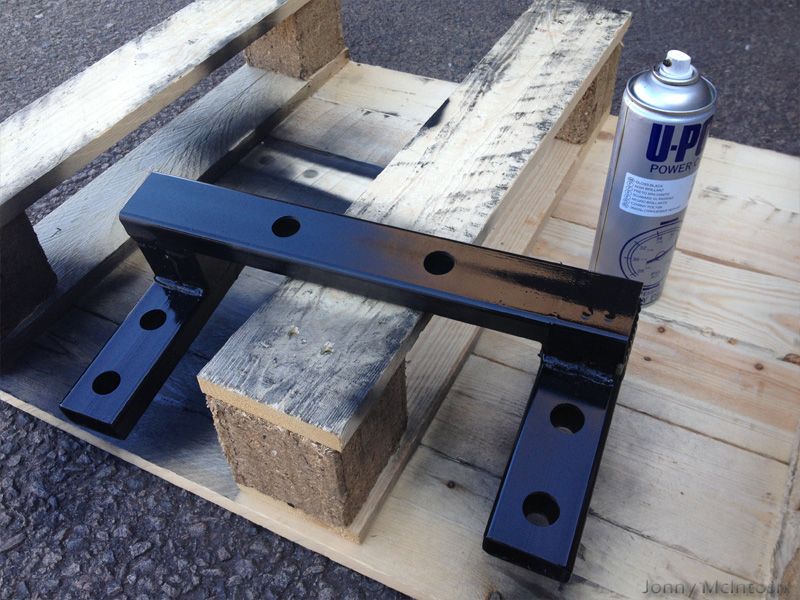 hockey pucks drilled out and some 12.0 high tensile bolts and nuts fitted 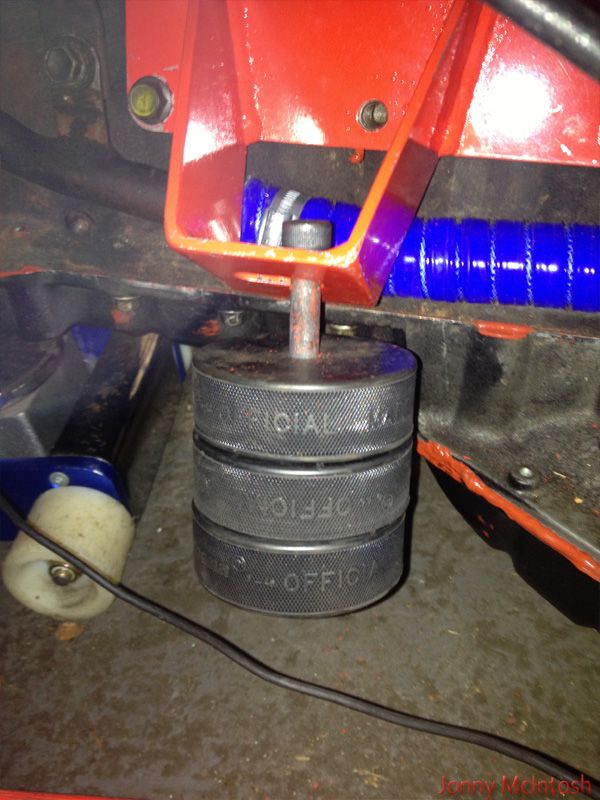 competition clutch lightened flywheel on with arp flywheel bolts and a good coat of the green loctight (the heavy duty stuff) ACT 6 puck clutch and new toyota hub with all new clips and new bearings R154 gearbox on 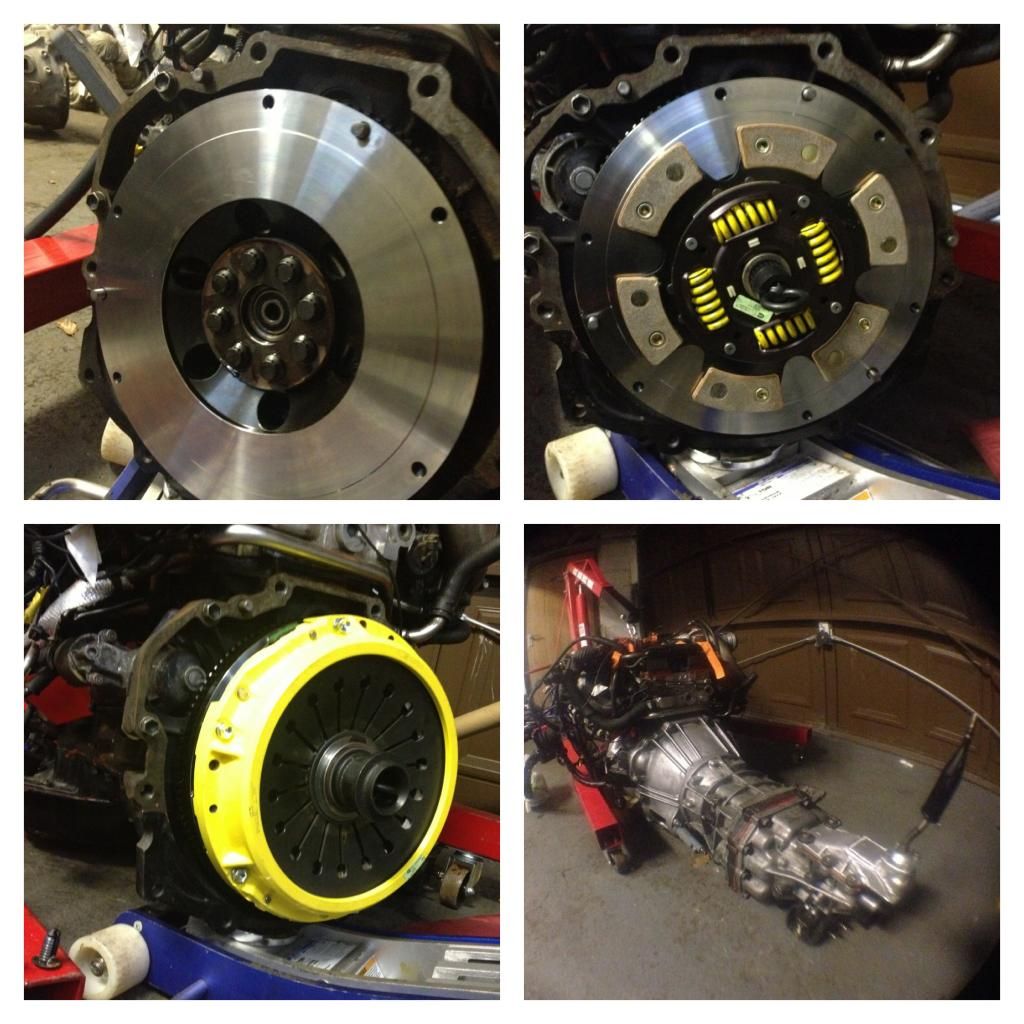 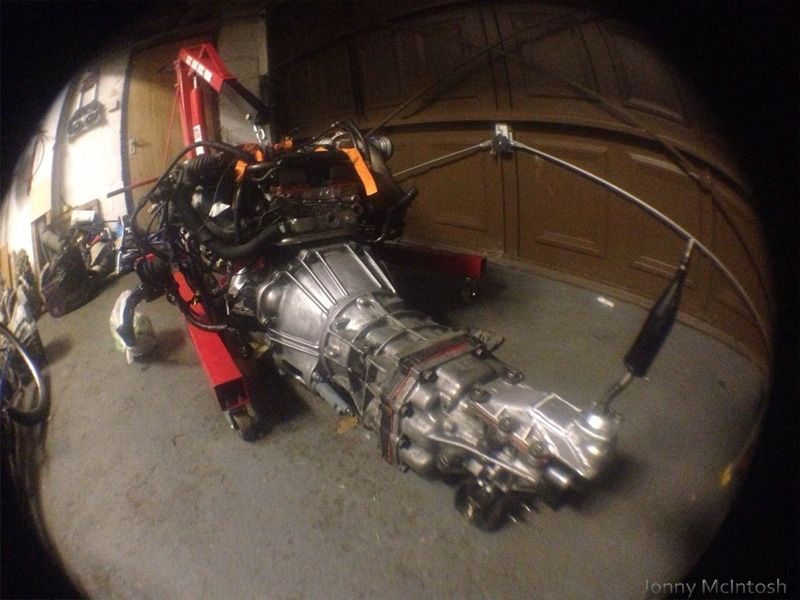 bought some 22mm castellated hose for the oil return pipework, this stuff is awesome! so simple to work with thanks to dale from fullattack for the info on this! 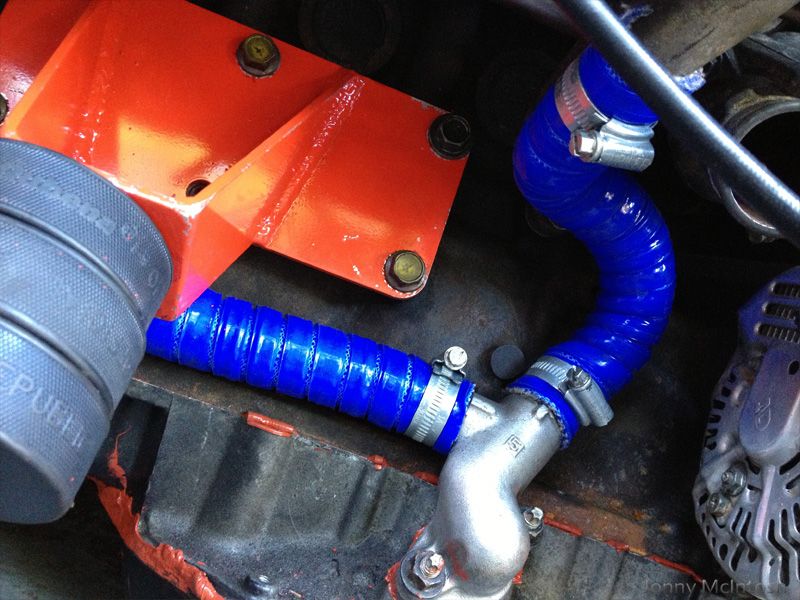 so it was a nice day and i'd finished work in good time so didn't want to waste the sun and dry weather! thanks to mike (mpig) for the hand with fitting we got the engine and box in! 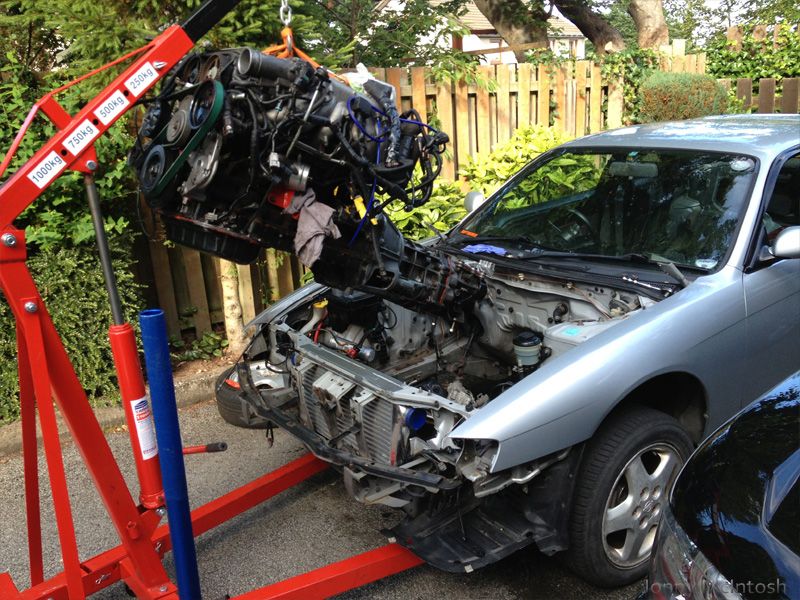 just needs a little shove....BIG SHOVE! 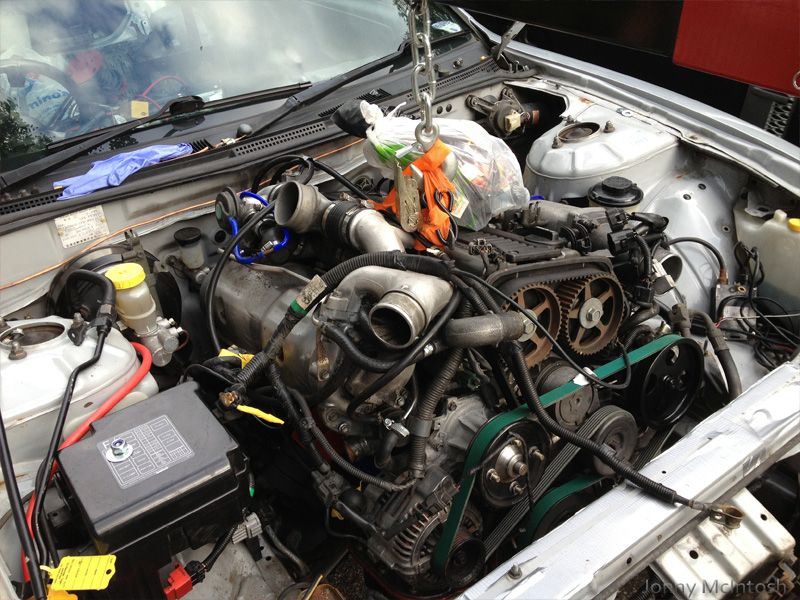 and it's in!  there is a block on the bottom of the gearbox/sump which was catching on the steering rack, that was what made it hard to get it in! will probably cut it off once i get the car up on a ramp and if it's not there for any important reason it'll be gone! new problem: clutch cylinder space  after speaking to maccyD (george) thanks for the info! i've ordered a vw golf cylinder 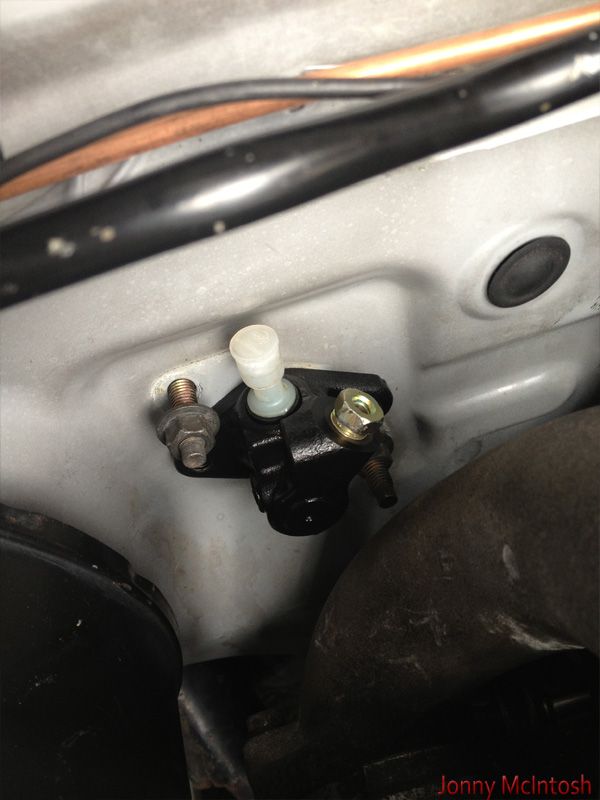 hopefully this is going to make enough pressure to work properly, i'll either have to drill holes on the bulkhead or have extensions welded onto the new cylinder to meet the original studs in the floor plan now is to get the car towed to my work so i can get the gearbox mounts and engine mounts set properly as right now with my steevo mount kit the gearbox is sitting against the tunnel i think just where the shifter extension has been raised going to see about spacing the mount down a little or cutting it up and making a few modifications to it i need to get my propshaft back from steevo which he should be getting back this week from the propshaft place! more updates soon! :S worked an 18 hour shift on Saturday and a 15 hour yesterday....so so busy just now at work with barely any time for this project just now :S my plan is to have it towed to my work this weekend and it can sit inside over the spare ramp in the workshop and I can do bits and bobs when i'm free... |
|
|
|
|
10-14-2013, 03:00 PM
|
#20 |
|
Leaky Injector
Join Date: Nov 2009
Location: Scotland, UK
Age: 34
Posts: 130
Trader Rating: (0)
Feedback Score: 0 reviews
|
got the car towed over to my work, thanks mike (mpig) for the tow!
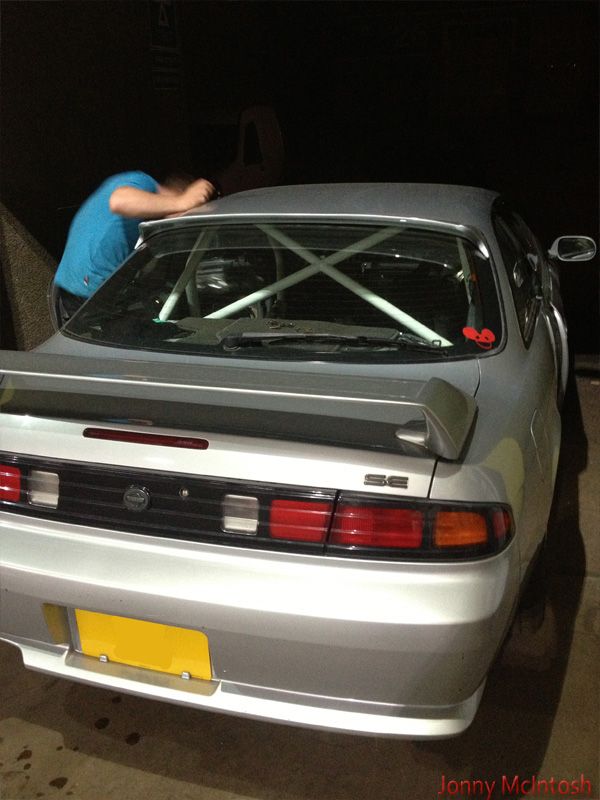
 got it up on the ramp to go over a few things spaced down my gearbox mount as a temp solution, i waited 3 MONTHS for this and it doesnt fit 100%....it'll have to be cut and modified 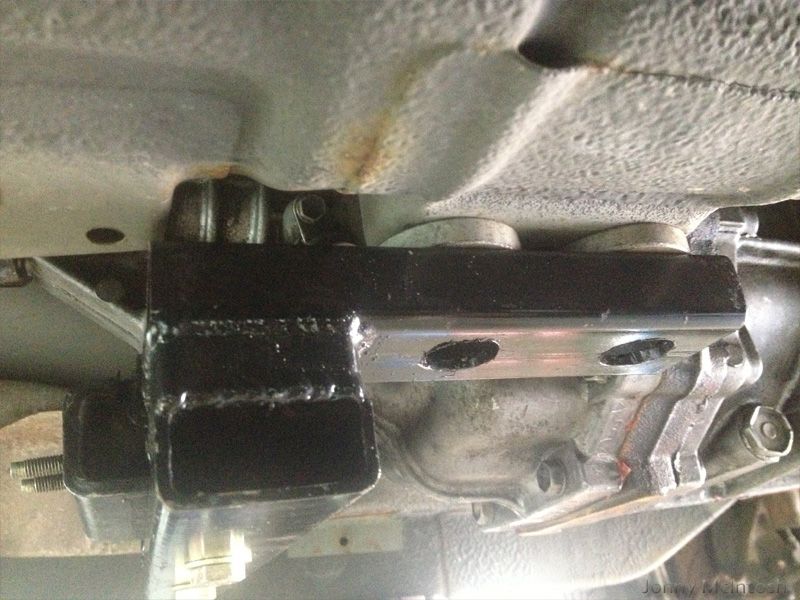 looking around underneath the car, the gearbox bel housing sits seriously close.... i'm going to take the engine back out and try dent that area in to create a bigger space 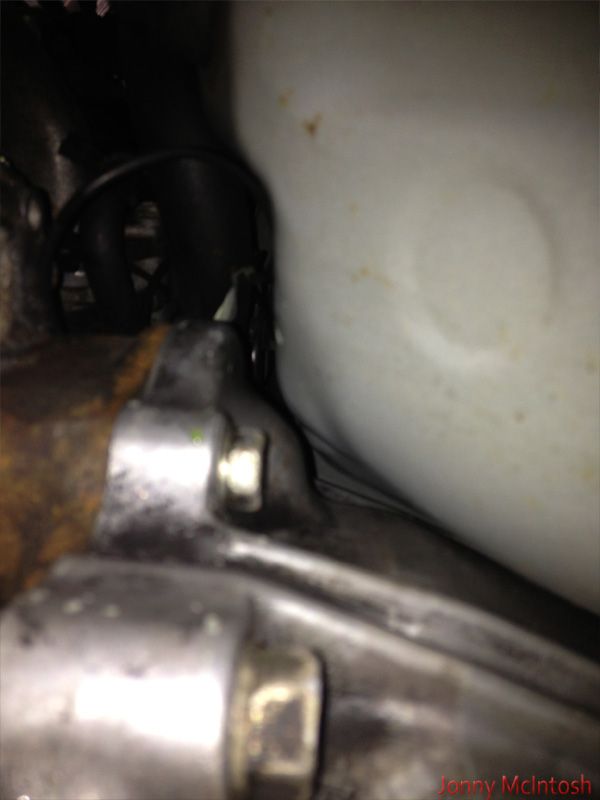 took the heater box down a little and managed to get the loom through the hole, wasn't ideal i think next time i'll remove it 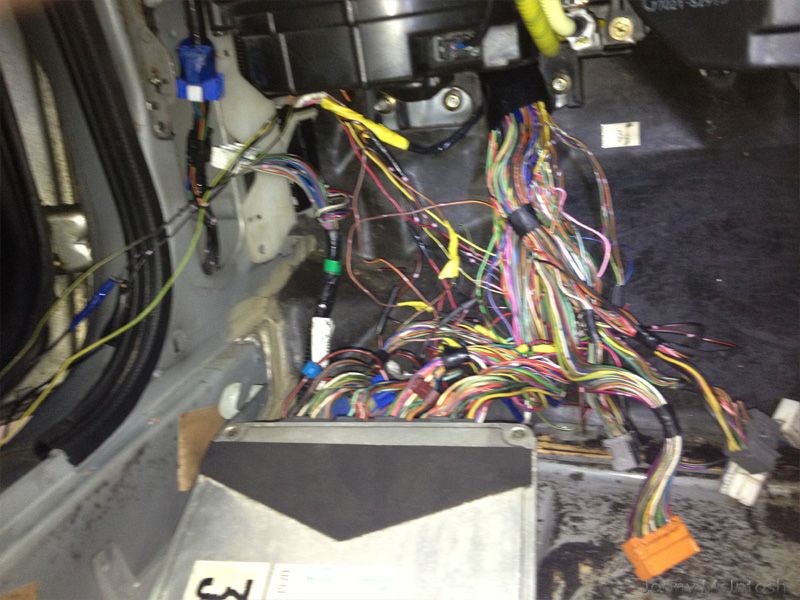 connected up a few more bits and bobs like battery cable, brake booster pipe, and a few others then attempted to start it led to this: S14 1jz swap not starting. Injectors not pulsing - YouTube few issues, the ecu relay was not switching the ecu on as it was wired backwards traced it down to the ecu not giving pulse for the injectors I replaced the crank sensor first in the engine as that's what i was led to believe wouldn't give a signal to the ecu to make fuel and tried again, nothing.... then went for a look at the cam sensor, found the rear sensor had a broken wire 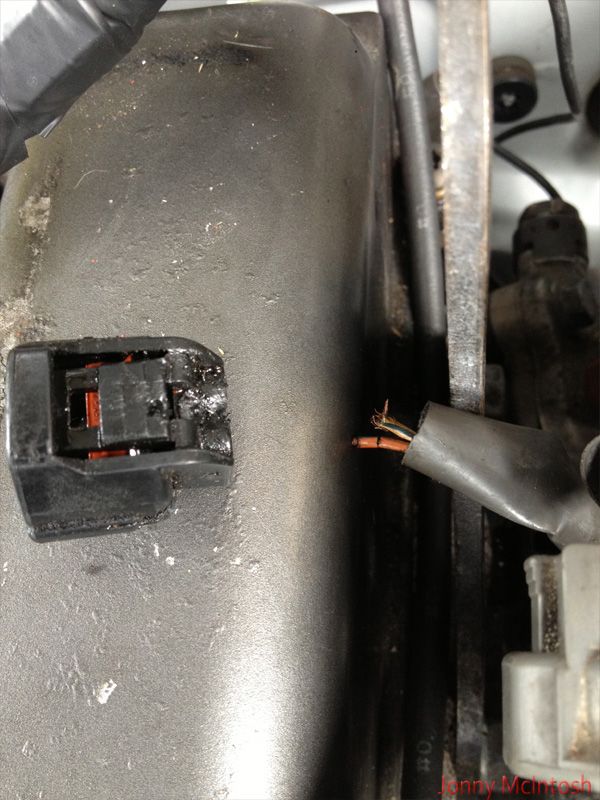 got the spare plug from my other engine loom and soldered the wires in so that was repaired still exactly the same but can only be a little closer than it was with those issues sorted.... then after speaking to dale and dan from driftworks forum a few helpful things were mentioned i ended up making new earths, one on the alternator, one on the bottom of the plenum i was missing, checked every other earth then mark came over, cannot thank him enough for the help he's gave with the wiring! i'd still be standing screwing my face up at it all if it wasn't for him haha basically we spent the evening checking out everything for power and so on. everything seemed fine, except the ecu would still not give signal pulse to the injectors for some reason we ended up doing a fault code check with the noide light which had shown a few fault code flashes, turns out i had a few error codes, we need to clear them and start again but for now it was coming up with a few, o2 sensor, air flow meter (i have a map sensor), vehicle speed sensor, IGF igniter verification some of the codes could be because we have had things unplugged while the ignition was on for checks anyway found out that for some reason the IGF wire had been cut on my ecu further up...it was my own fault for not checking, i'd always glanced at it and assumed it was an auto box wire cut to fool the auto ecu!! anyway connected that wire back up and bingo.... [video=youtube;jfUaj5bpGcs]http://www.youtube.com/watch?v=jfUaj5bpGcs[/video] i have the hunting/idle issue to sort out but i'll have to setup my TPS anyway as the throttle cable will be different etc hopefully my propshaft will show up sooner rather than later as i've got alot of testing to do on this car as i've paid near £130 for the driftland weekender coming up in september ------------------------------------------------------------------------ some more updates! all this is rather unorganised now right as things go: steevo had sent my propshaft with his sizes away to the machine shop, 3 months later they send him it back and keep his sizes he told me. finally got it back from him so i've taken my own sizes and the propshaft is now away at bailey morris being done! i've taken a lever and managed to push back the bulkhead gently around where it was almost touching the gearbox bel housing so it now has a good clearance, saves pulling the engine out again mounted the fuel filter bracket and fitted the z32 fuel filter up beside the engine, it's in a good place with lots of space around it on the inner chassis leg got an s13 CA18det UK spec clutch master cylinder, bulkhead holes match up and it looks like it'll work perfectly, it has the bleeder on the top and the clutch pipe at the bottom which LOOKs like it's far enough away from the turbo pipe 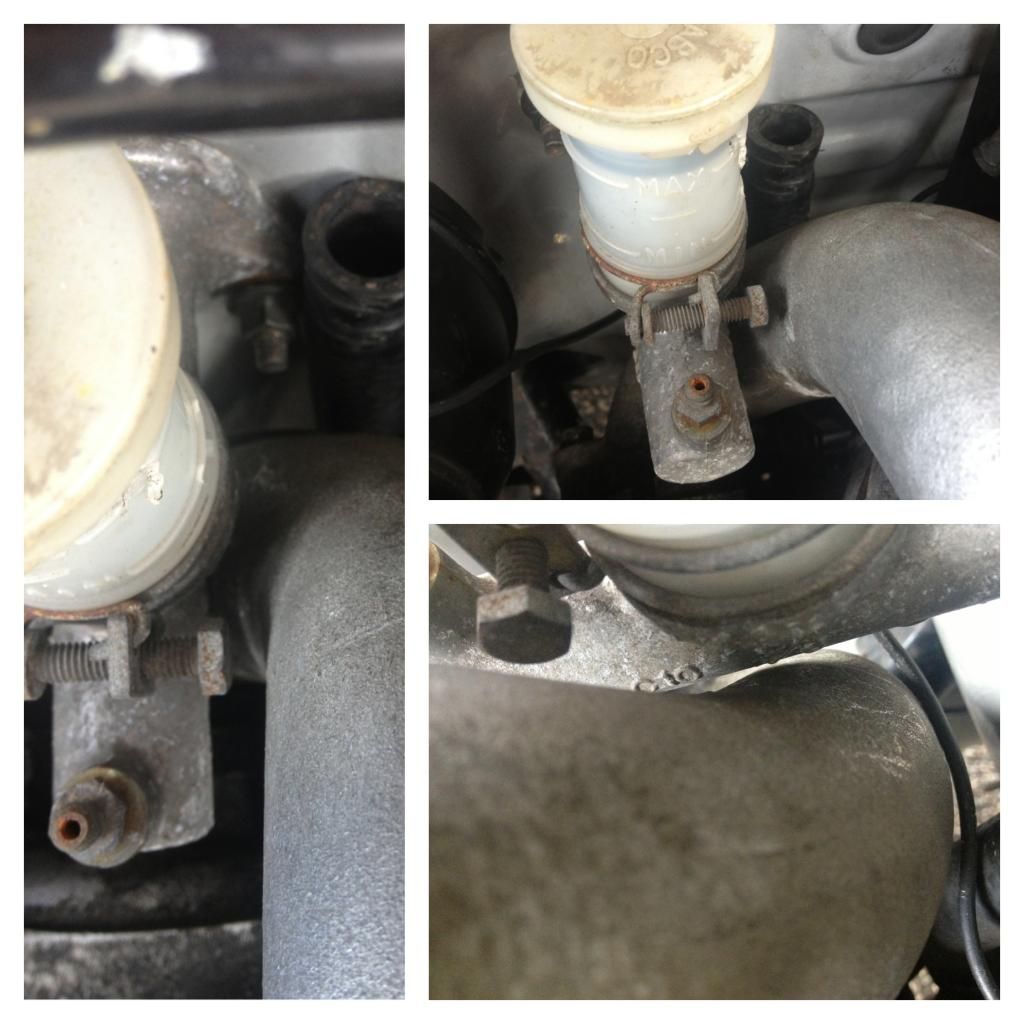 i'll have to spin the clip around so the head doesnt touch the turbo pipe, it's a tight fit! the mid mount core is in, it's now fitted with two bolts from the top slam pannel and will have two brackets welded to the bottom cross member for support here's a funky picture, i've ordered some 90 degree bends for the pipes, and some reducers also, hardest part will be getting the metal pipes angles right! 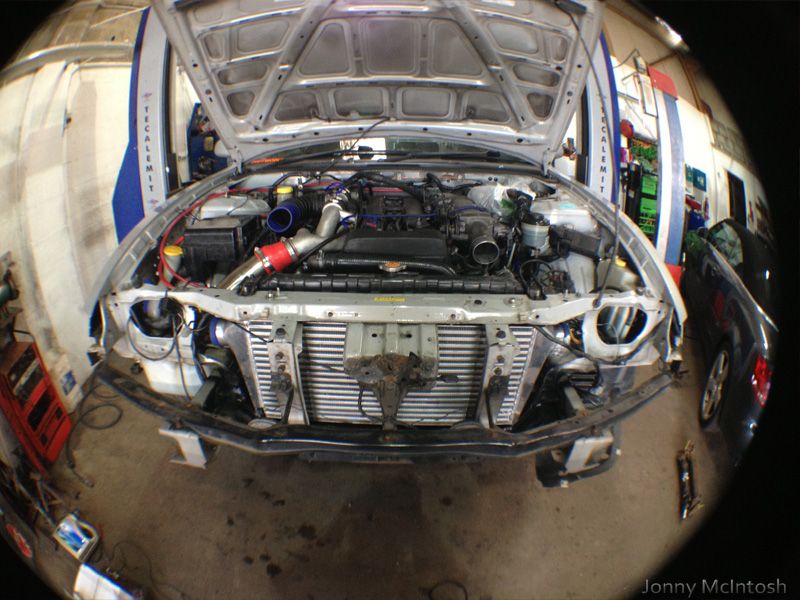 i bought a brand new alloy rad from a guy on sxoc, it's an s13 CA18det rad with the oulets on the same side, i'll be able to chop the water neck now and not have the big pipe going across the front of everything  need some slimline fans now! mark (redsx) came over and we finished the wiring, the car now has a working battery and oil pressure light on the dash! the wiring is still a big excessive but it'll do for now to get the car running,  i'm going to make another loom in the future using my spare 1j loom and an s14 loom, i'll be cutting out ALL of the extra stuff in a jz loom and heatshrinking the whole lot the same as one of the overpriced american looms you can buy online. took out the heater box to make it easier to get the loom back through the bulkhead as it's the final time i'll be doing this! 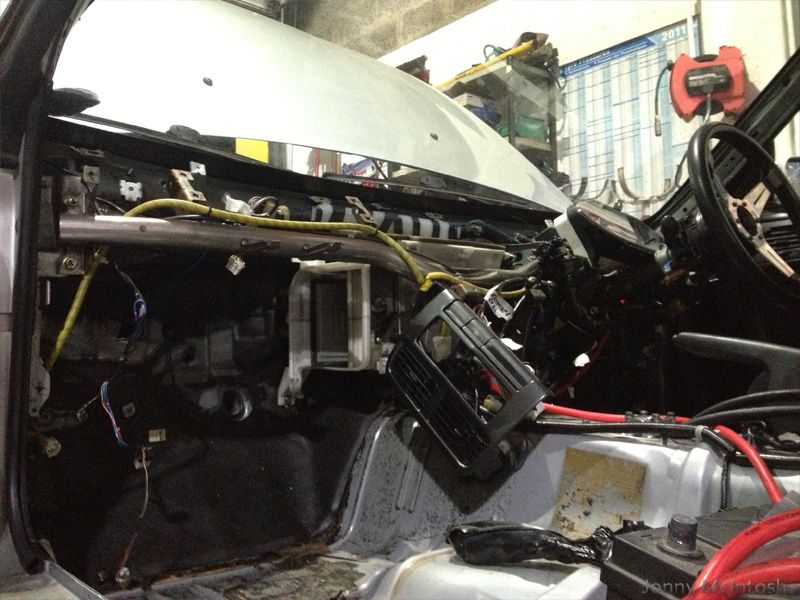 FABRICAGE ARRIVED 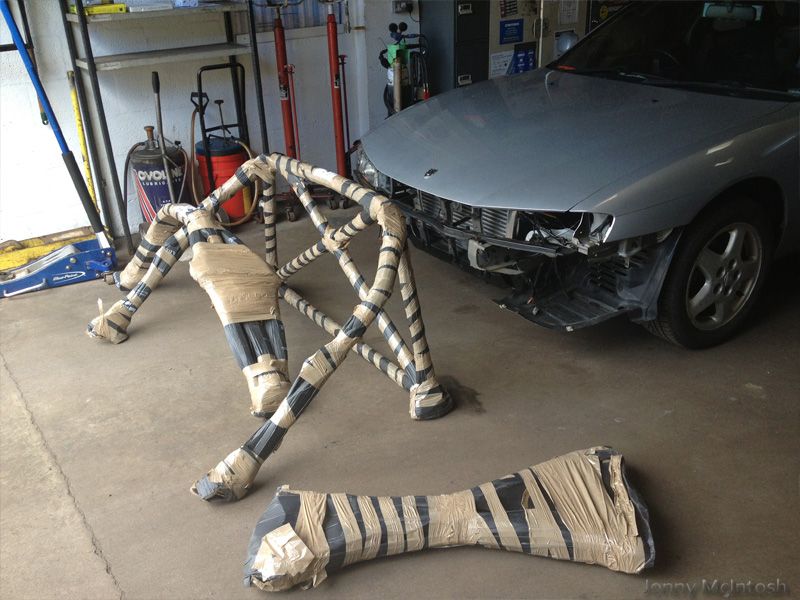 brief mock up minus one door bar 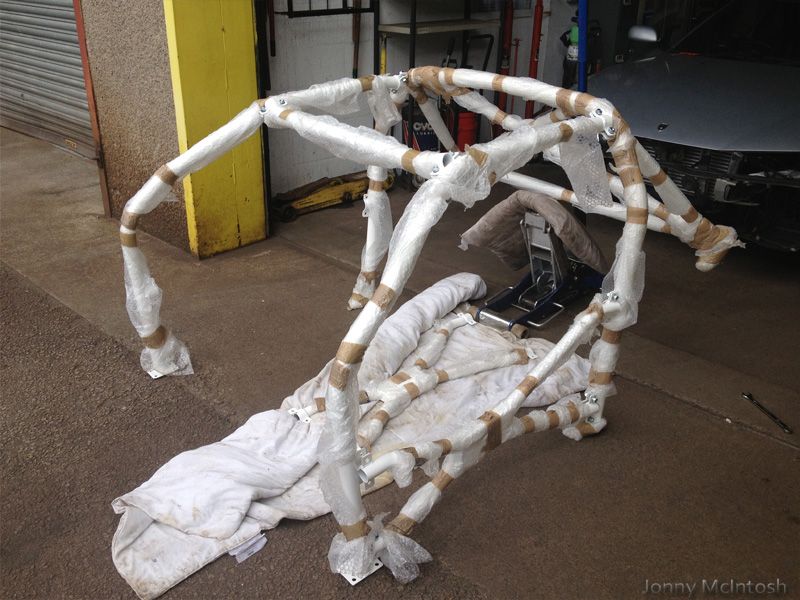 tried the cage in, then marked out the palces for welding in the floor plates 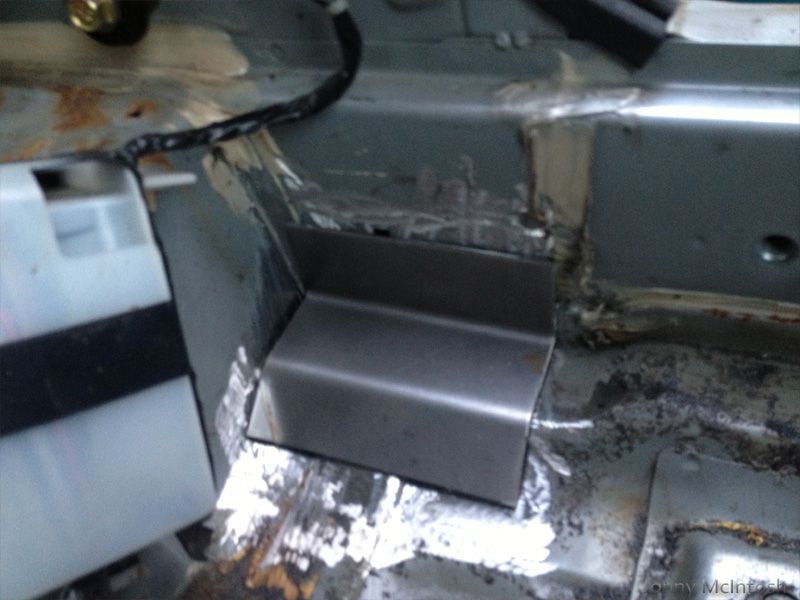 had my mate josh come over as he is a welder. all the plates are now welded in solidly 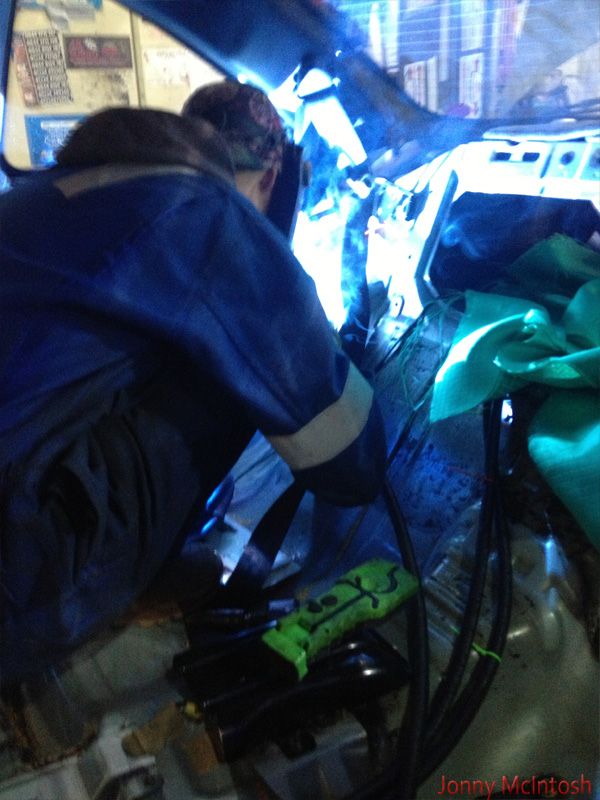 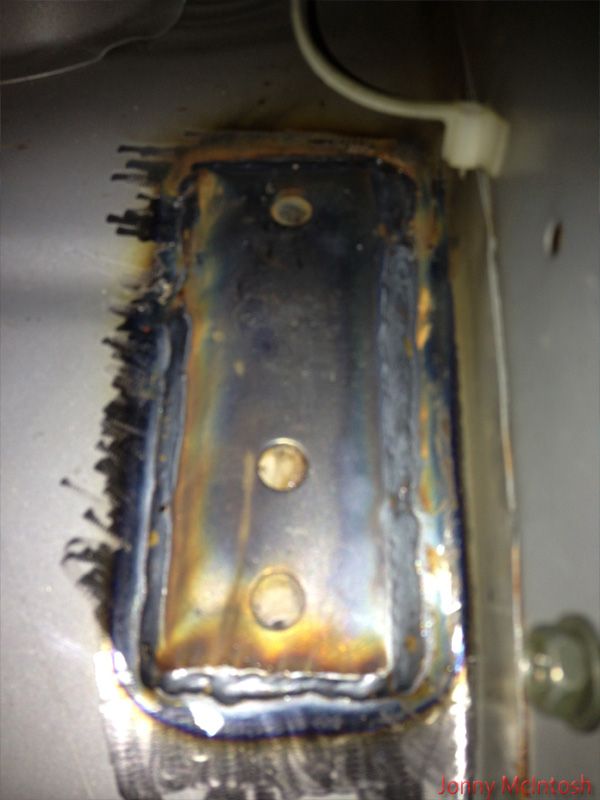 IN! 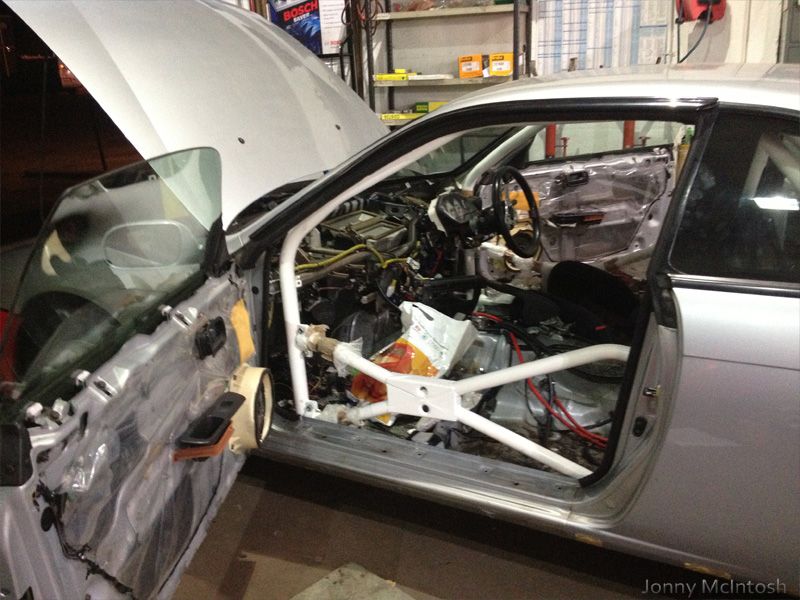 love this pic... 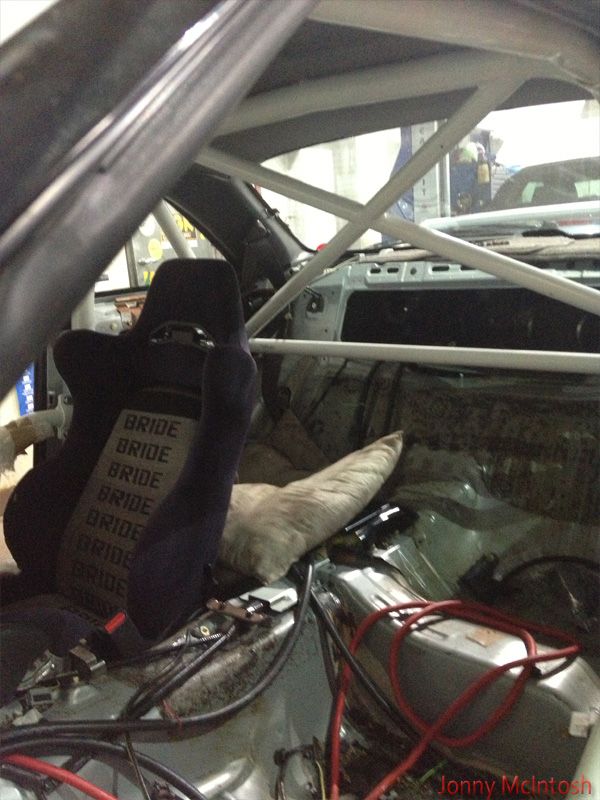 |
|
|
|
|
10-14-2013, 03:01 PM
|
#21 |
|
Leaky Injector
Join Date: Nov 2009
Location: Scotland, UK
Age: 34
Posts: 130
Trader Rating: (0)
Feedback Score: 0 reviews
|
and this one
 car is starting to look serious now! i strongly advise for any roll cage you guys speak to fabricage, pete has been an absolute 100% gem with customer service, really nice guy who knows it stuff and is very fair! plus so far it looks like it'll be nowhere near my head compared to the apex cage! got a spare 14a uk spec bumper which i'll be swapping for a black one for track days, also wired back in my HID headlight kit and everything works up the front now  thanks to dale i have one gearbox cover, just need the other side now which covers the slave cylinder pin and fork 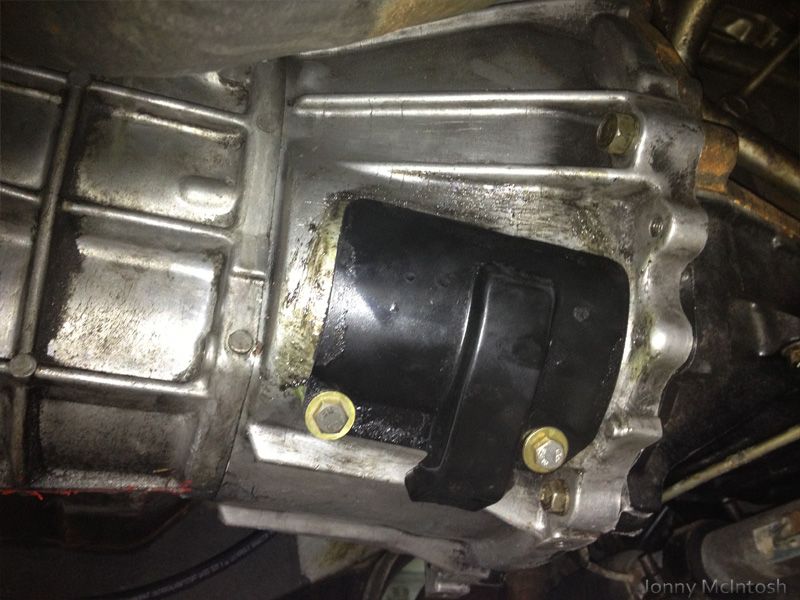 have fitted the clutch fork and brand new toyota cylinder now to the gearbox  some castellated hose arrived for the matrix pipes and the rad pipes, this stuff is expensive :S 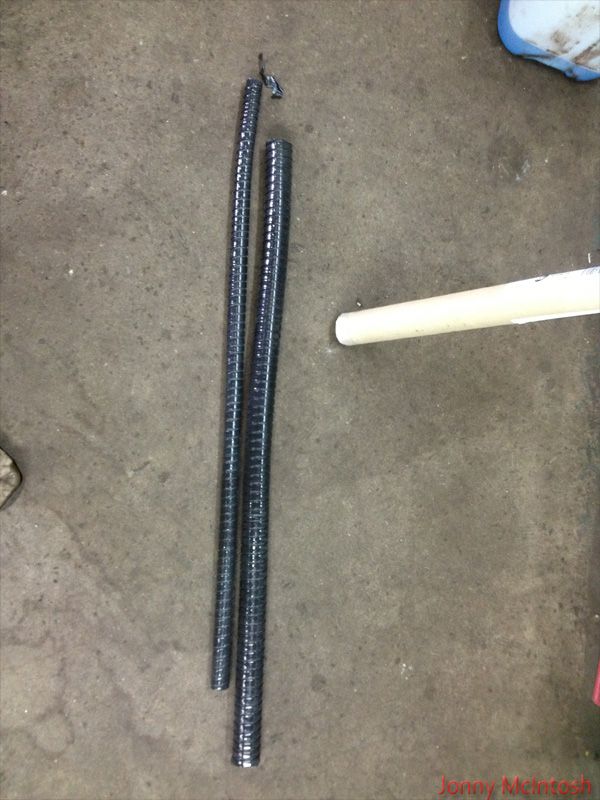 propshaft arrived back! all posh with my name on it it is only a front section now as they couldn't do me a full length propit has now got new universal joints both ends and has grease nipples so is serviceable 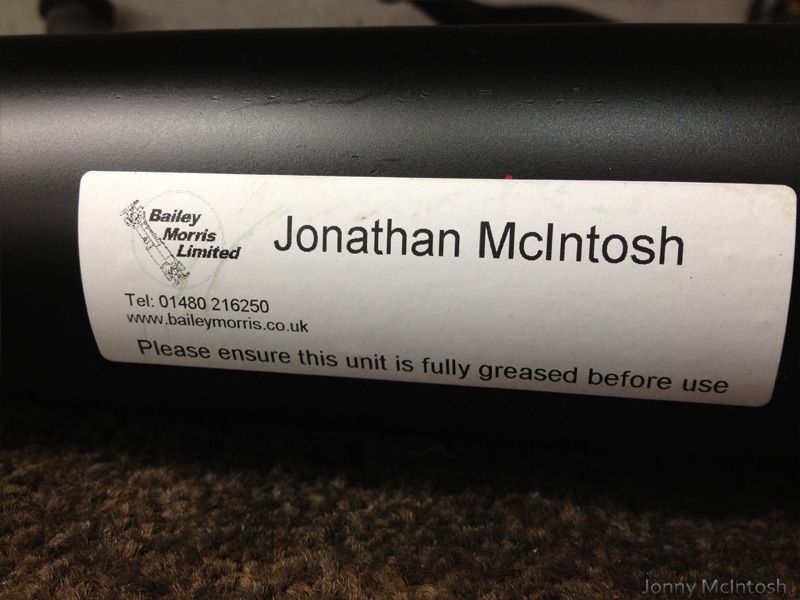 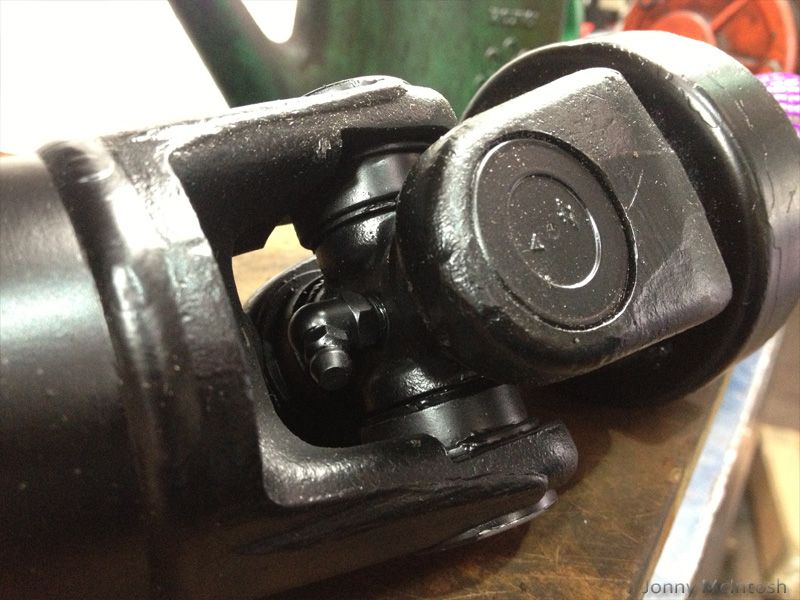 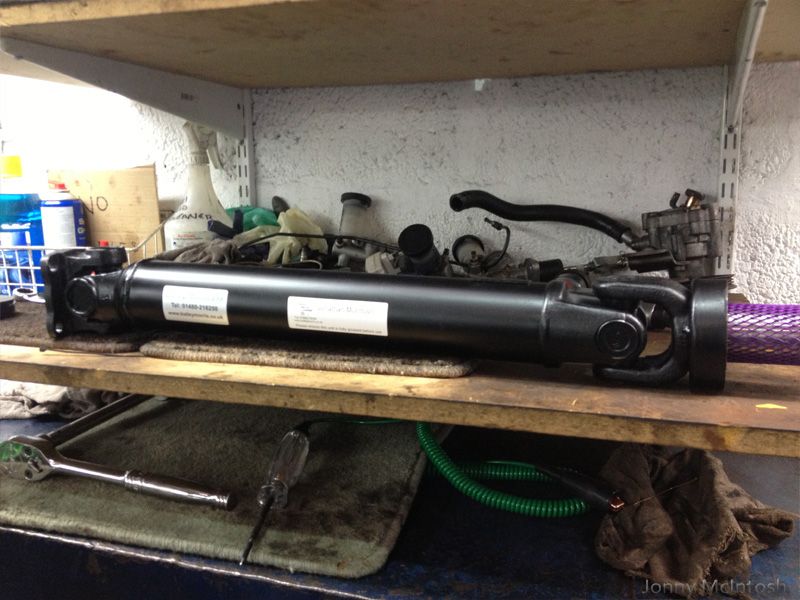 bailey are really good, i was £270 though but they have made a lovely job! thanks to mike again for the tow away from my work! the car is now in another garage, thankfully it's a double so i'll have some space to crawl about when swapping subframes over so thanks to dan at DB power i have a custom clutch hose made up, it's a full braided hose with banjo fitting into the s13 CA18 clutch cylinder just need to fit it into the gearbox cylinder and find out if i have a clutch! 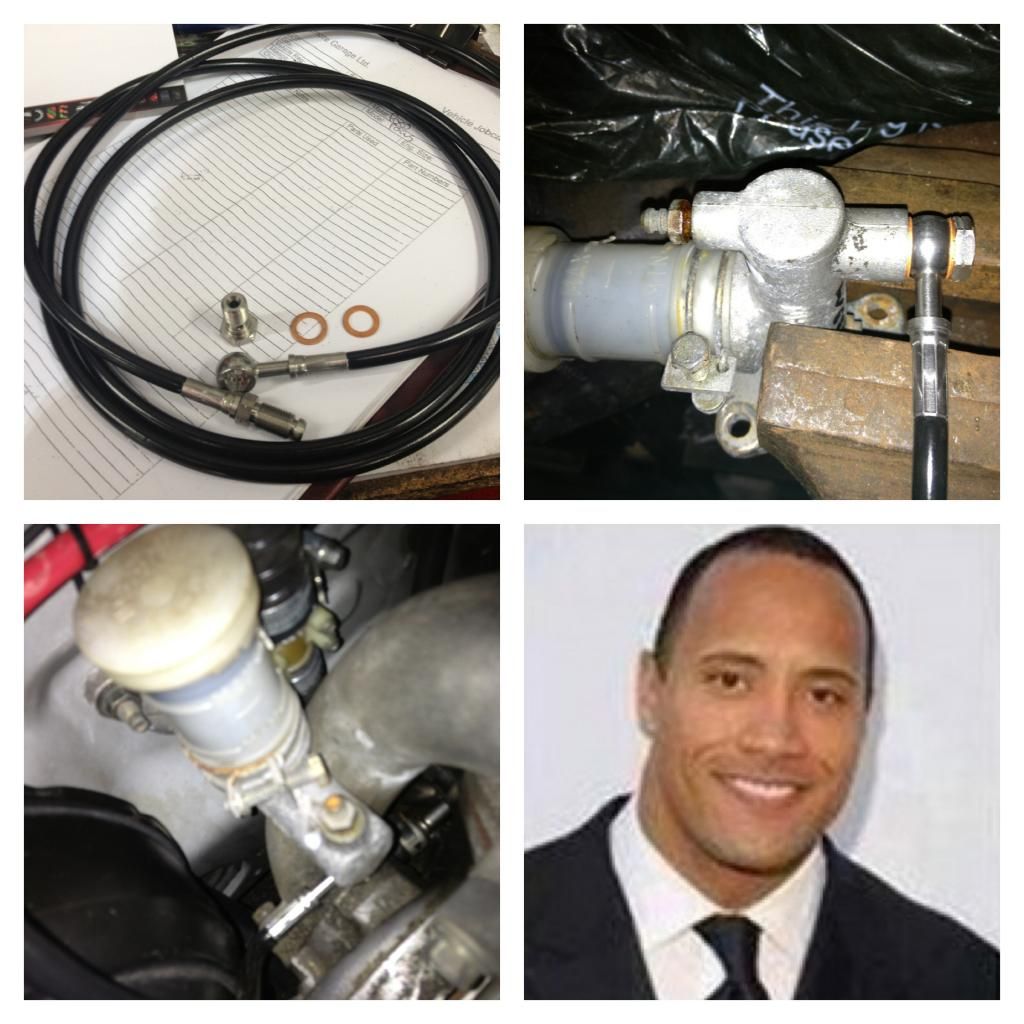 i also have now got chopping at more of the interior parts to get everything fitting around the cage the door cards were basically cut in half, i've also trimmed back the white speaker plastic housings meaning i can keep door speakers 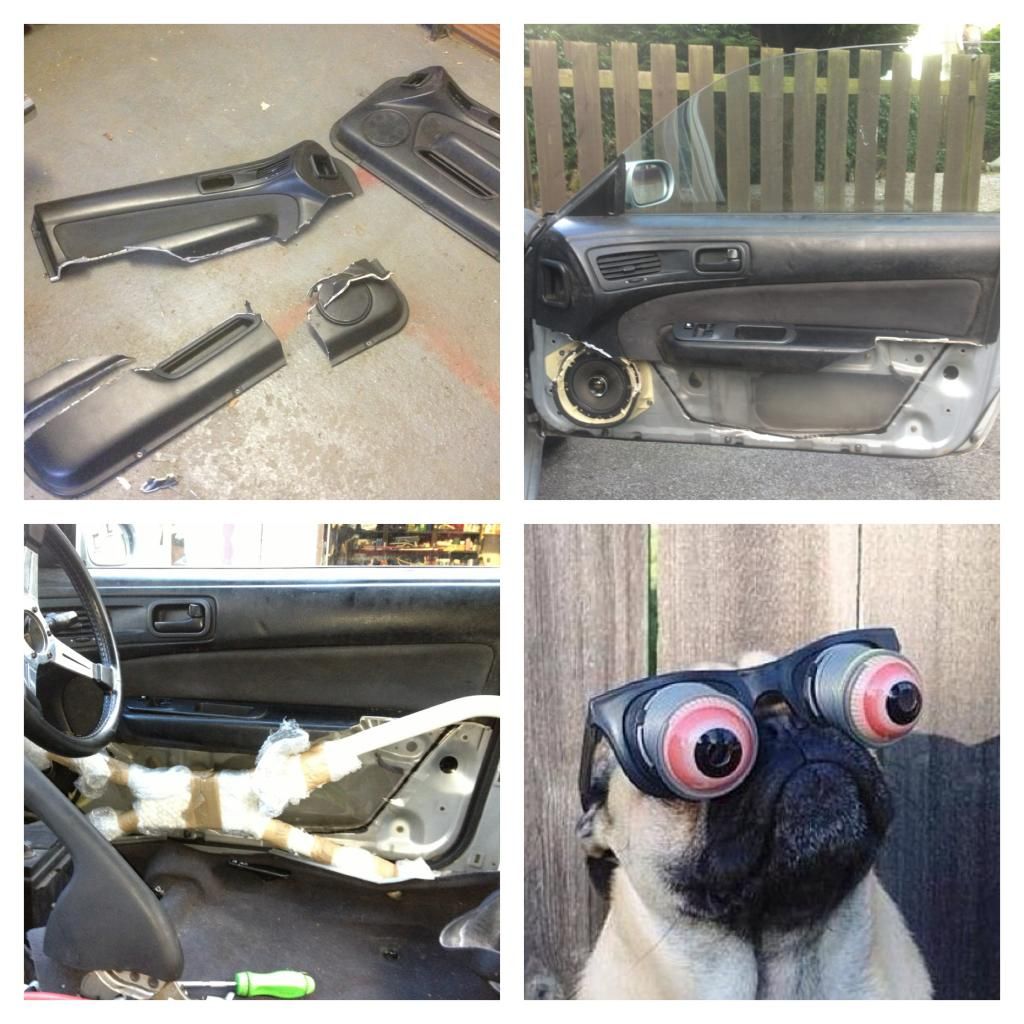 done the same with the dash 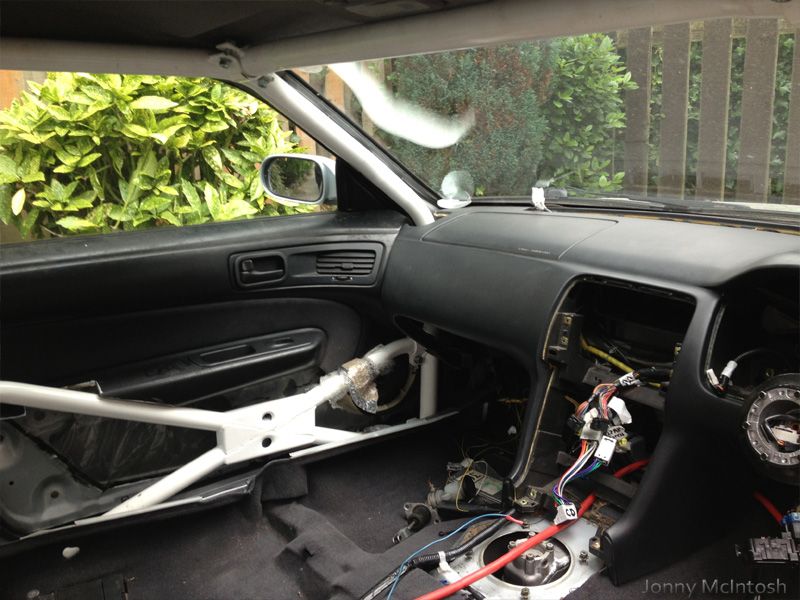 bit rough but it'll do for now 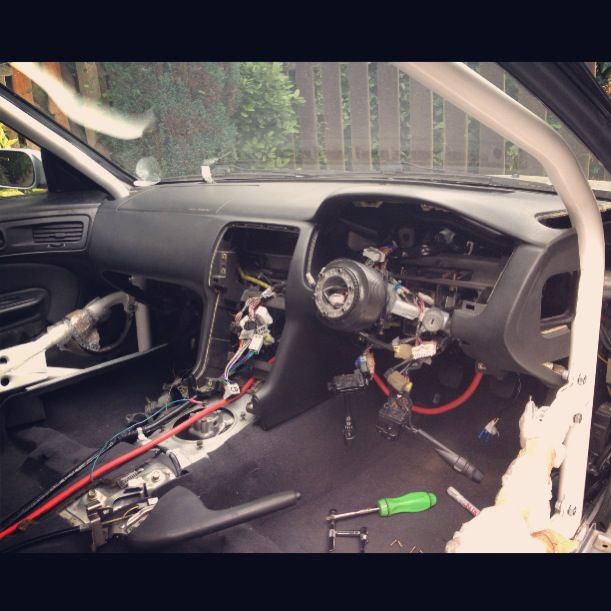 i bought some peugeot 306 fans, i need to make up some sort of wiring to do with these and the fan controller i have, the fans will also need the housing modified alot to fit onto my rad.... hopefully these will fit between the rad and the engine and run safe enough! 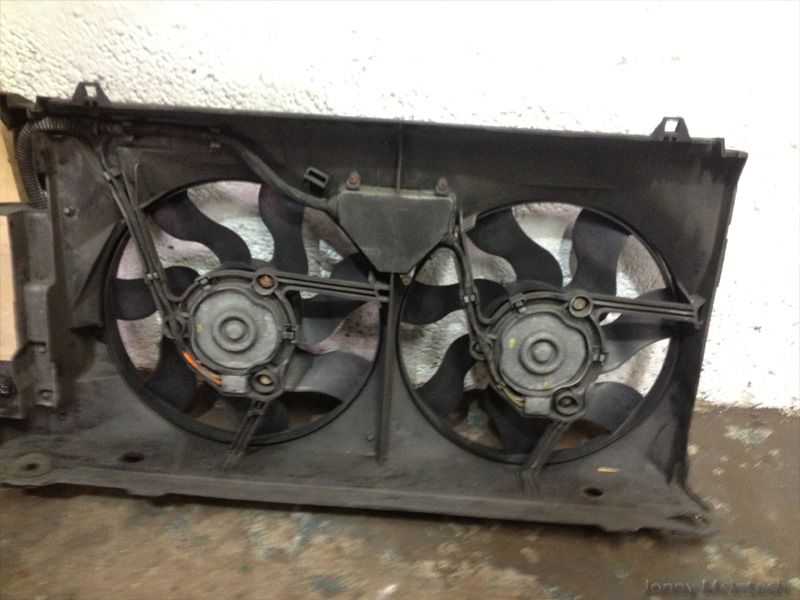 finally found a nice set of work e wings that are mint! they are from john f's new 180, i bought his rear volks aswell can't wait to see these on the car once they get some new tyres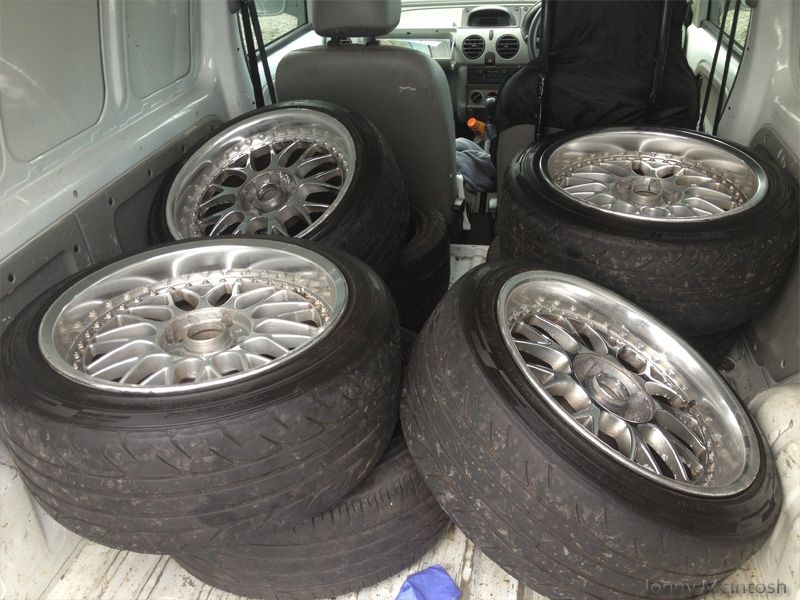 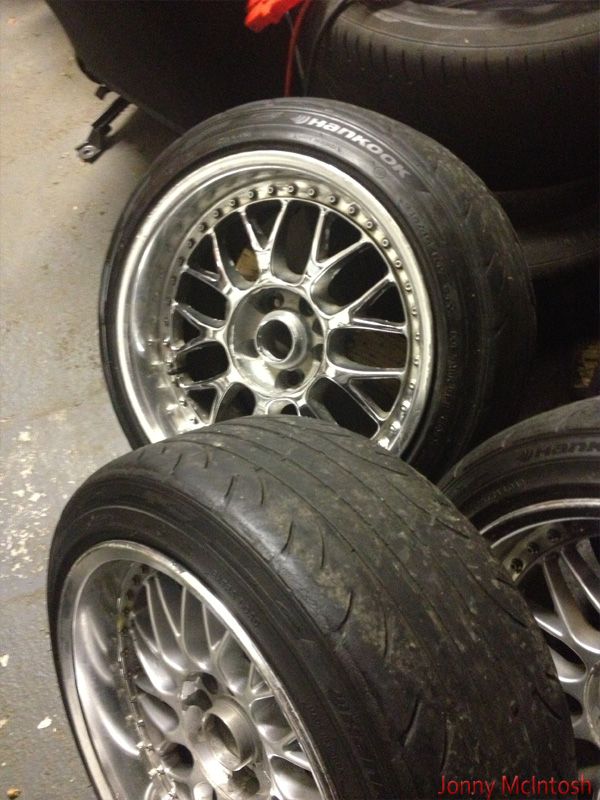 my favourite wheels!! e wings!!! finally cut out the bush inserts from the standard rear lower arms, they're now off to get powdercoated black to match the subframe, then have new balljoints and polybushes fitted 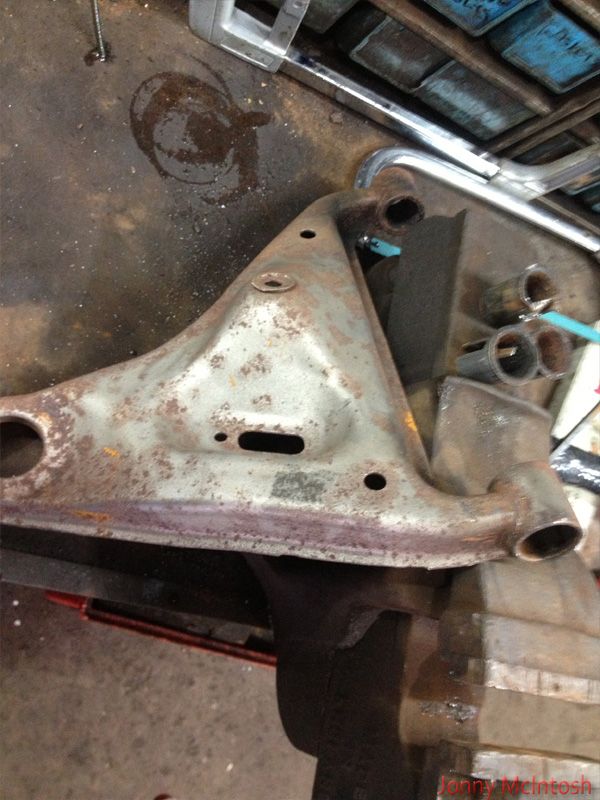 also bought a full rear arm allignment set, they are the hard bushed arms since i don't like rose joints will soon be ready to have the subframe swapped, i need to buy some more brake parts and pick up some new rear hubs 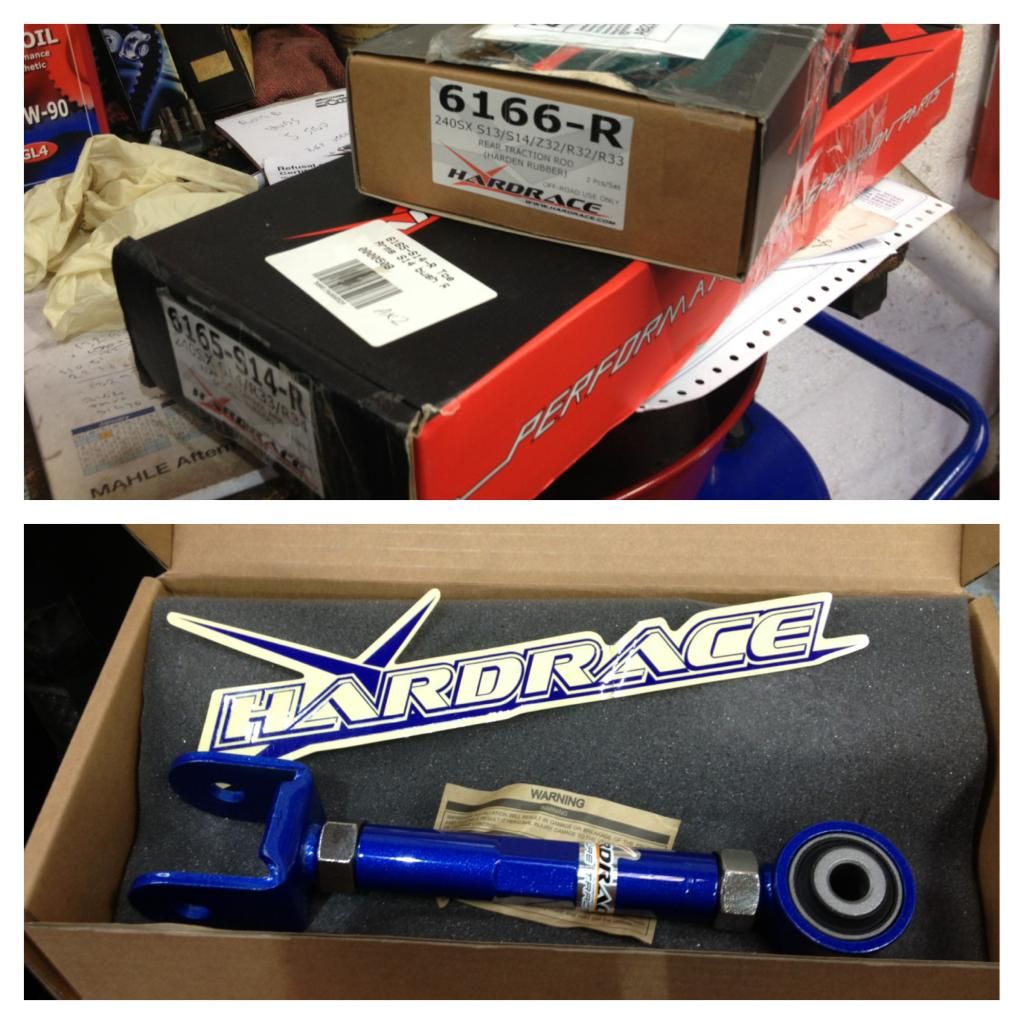 more updates, things have been very very quiet with the car as of late, i've not had any time at all to get near it  have seen it once in the last 3 weeks ..... anyway i'd like to thank dylan for this exhaust piece! (choppy) it will be tidied up and sorted out but it's the flange i was looking for to fit the standard twin's downpipe and also a small 3" section kinked to give rack knuckle clearance 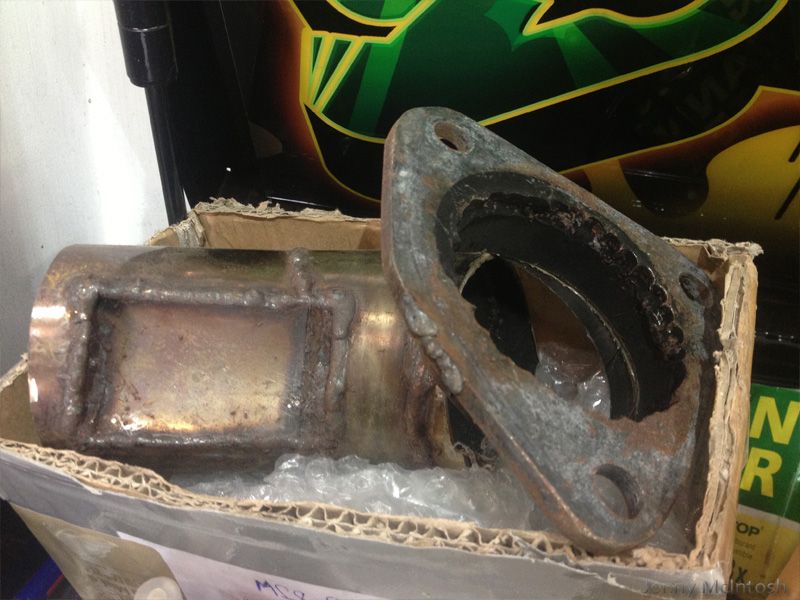 had a meter of 3" bore pipe arrive also, it's currently at my welder's place being cut up into lots of 10 degree sections to begin the custom pipework for intercooler and exhaust bought 4 moog balljoints for the underneath rebuild from rock auto, very good service and cheap, infact the time it took you wouldn't believe they were coming from america 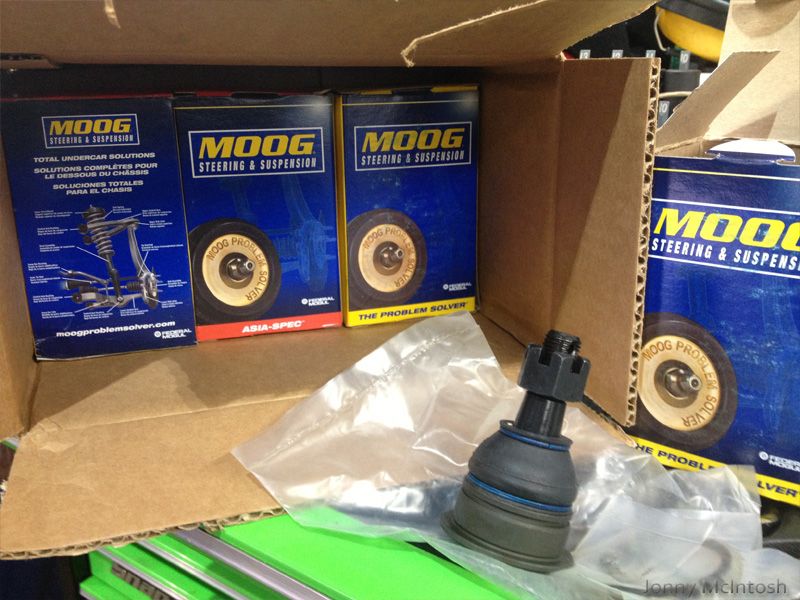 went out to stuart (s14_stu's) house and bought 4 hubs from his s14 he is breaking as i'll now have almost everything ready to completely build a second subframe to just throw onto the car when i'm ready 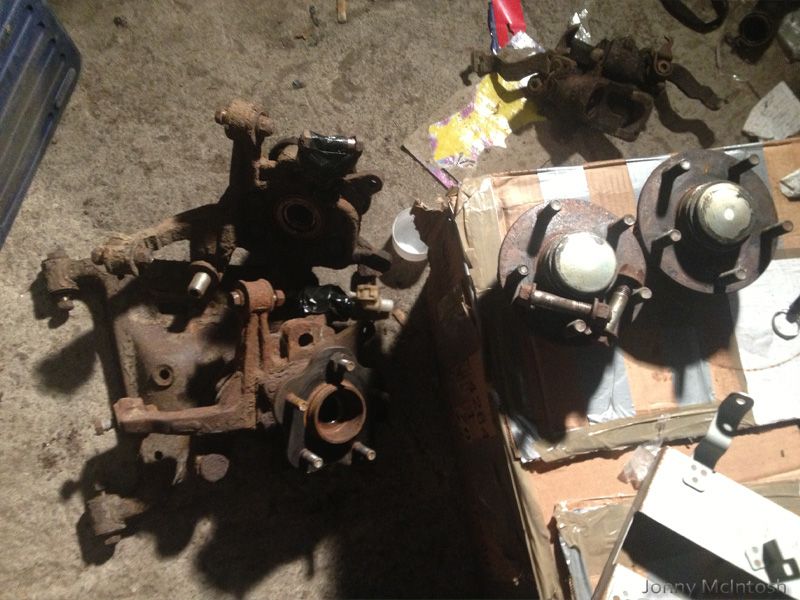 bought my first underseal proper spray gun and stone chip for the underneath, i'm not going to let this one rust into dust like every other 14!  bought some z32 new brakes from conceptua 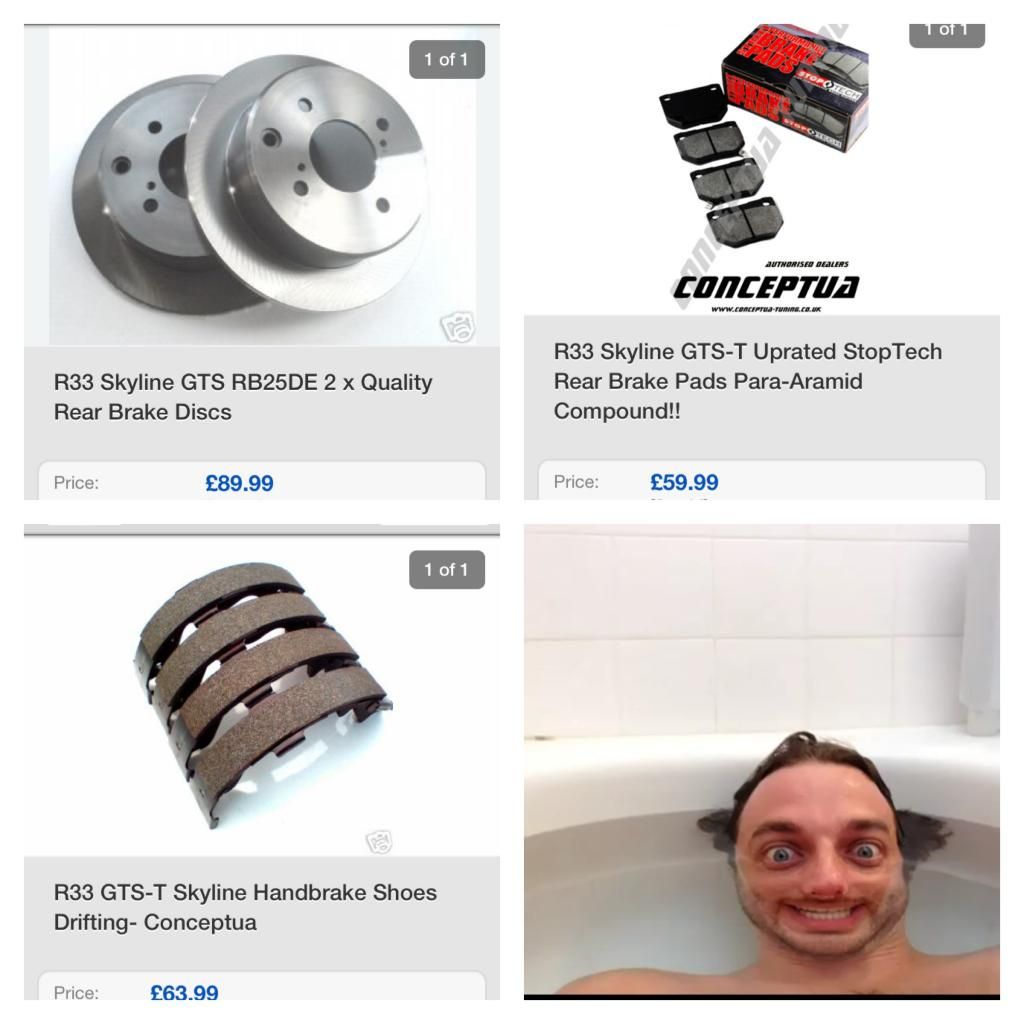 then they arrived 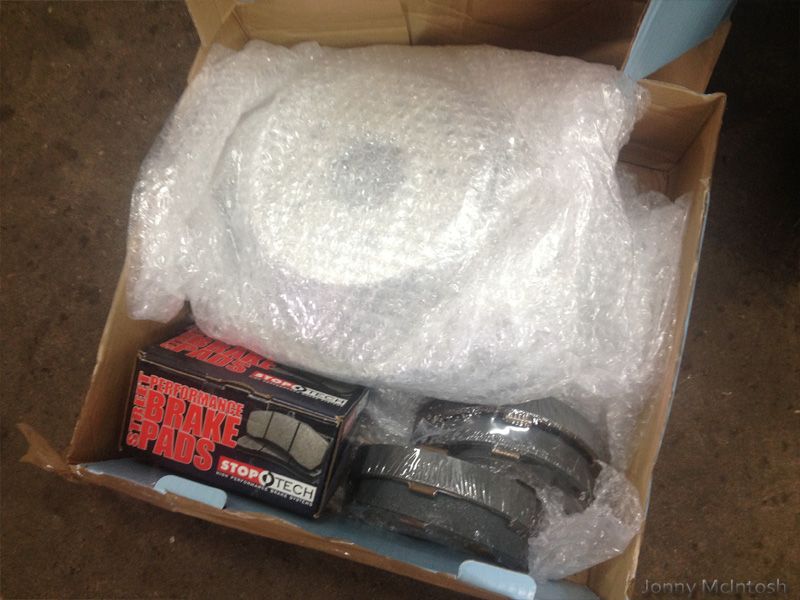 i have given my z32 calipers another coat of black paint, and the inner hub section of the disc a coat of black to keep things looking nice also these spare parts are now away to the powdercoaters to be made pretty like everything else 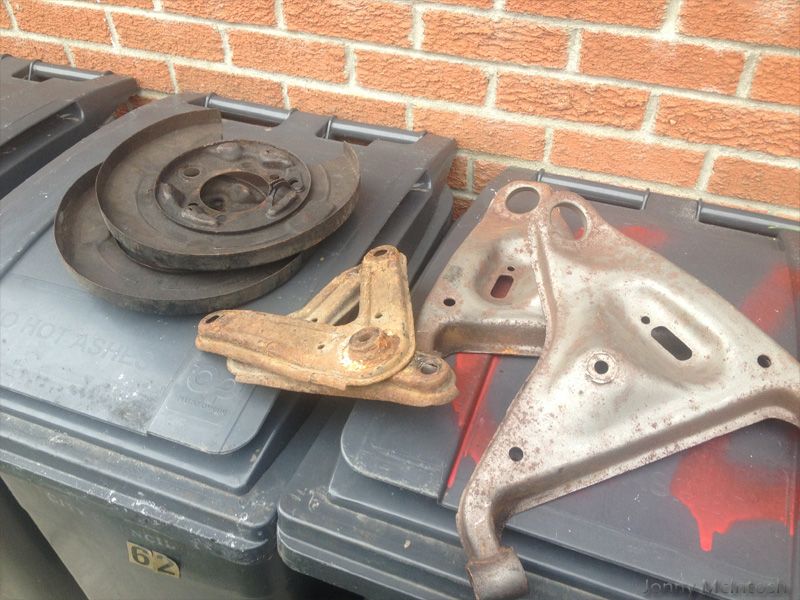 have used an old tub with a good soaking of brake cleaner, then lid on and given it a good shake then a brush off with a clean paint brush most of the brake dust has came off and the inner shoe fitting parts look alot better than before!  next job i'm focused on is getting this subframe swap done, waiting on gktech.com.au excentric lockout bolts (could have just gone to a bolts shop along the road from my work but never thought of it), and waiting on powdercoaters almost ready to have a full subframe assembled and ready for the car when my subframe is off it'll be getting the proper undersealing love and some replacement brake pipes since everything will be off for a freshen up anyway made a start to cleaning up the z32 calipers and a coat on the new discs just a first coat, going over with a second when dry  poor dark pic but tried on the greddy lip before it goes to paint  getting very excited to see the finished result with paint, lows and the wheels cut out some of the carpet and remoevd the loom plastic guides and taped it all up so it'll sit better since the cage has now gotten in the looms original route  bought some pipe and had it cut up with lots of 10 degree sections to begin making exhausts and intercooler bends, thanks to josh for cutting at his work  gktech parts arrived, solid gearbox mount, rear eccentric bolt lockout kit and a handbrake button  |
|
|
|
|
10-14-2013, 03:05 PM
|
#22 |
|
Leaky Injector
Join Date: Nov 2009
Location: Scotland, UK
Age: 34
Posts: 130
Trader Rating: (0)
Feedback Score: 0 reviews
|
and that's all the pics for now :S
sorry everybody for the 200+ pics I just threw onto this forum but I thought i'd share my build the car currently is sat in my parents garage on stands with the rear subframe/axle off and my new one is ready to fit with all the new parts I have bought for it i'm very close to finishing the 1jz swap/build of the car now and I am super excited |
|
|
|
|
10-15-2013, 01:27 AM
|
#25 |
|
Leaky Injector
Join Date: Nov 2009
Location: Scotland, UK
Age: 34
Posts: 130
Trader Rating: (0)
Feedback Score: 0 reviews
|
I bought it from these guys online. It's expensive for what it is.
Just a length of floppy silicone hose with metal wire circled inside it. You could try looking up ribbed silicone hose? Or even metal banded silicone hose? Artel Motor Sport - Castellated Hoses |
|
|
|
|
10-15-2013, 02:19 PM
|
#27 | |
|
Zilvia Member
|
your mate josh did a wonderful job on those welds. im going to school for welding and I cant tell you those are very pretty haha
__________________
Quote:
|
|
|
|
|
|
10-15-2013, 03:23 PM
|
#28 |
|
Leaky Injector
Join Date: Nov 2009
Location: Scotland, UK
Age: 34
Posts: 130
Trader Rating: (0)
Feedback Score: 0 reviews
|
thanks guys,
yeh josh is a certified welder and has been for many years, we have a mig welder at my work but I don't use it often enough to be confident to ensure a weld like that would be strong and safe enough for a roll cage |
|
|
|
|
10-15-2013, 03:58 PM
|
#29 |
|
Leaky Injector
Join Date: Nov 2009
Location: Scotland, UK
Age: 34
Posts: 130
Trader Rating: (0)
Feedback Score: 0 reviews
|
i finally have the car somewhere dry to keep it while i do the subframe change over/undersealing
got it lifted up high enough 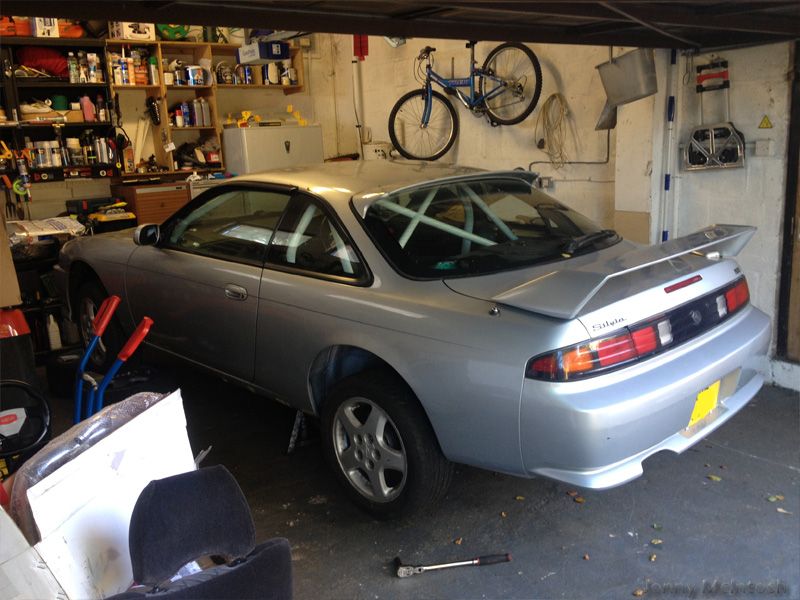 off it comes 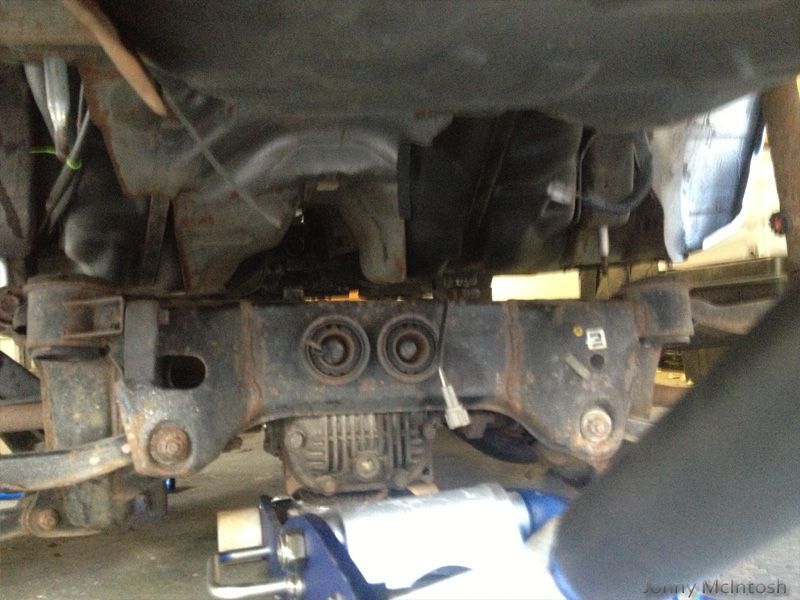 it's ridiculous how much the subframe locking collars have split the old bushes 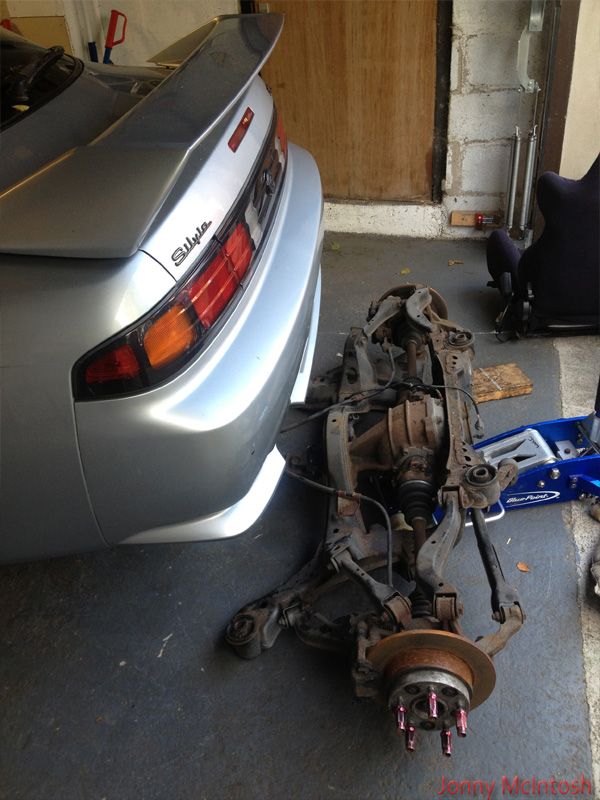 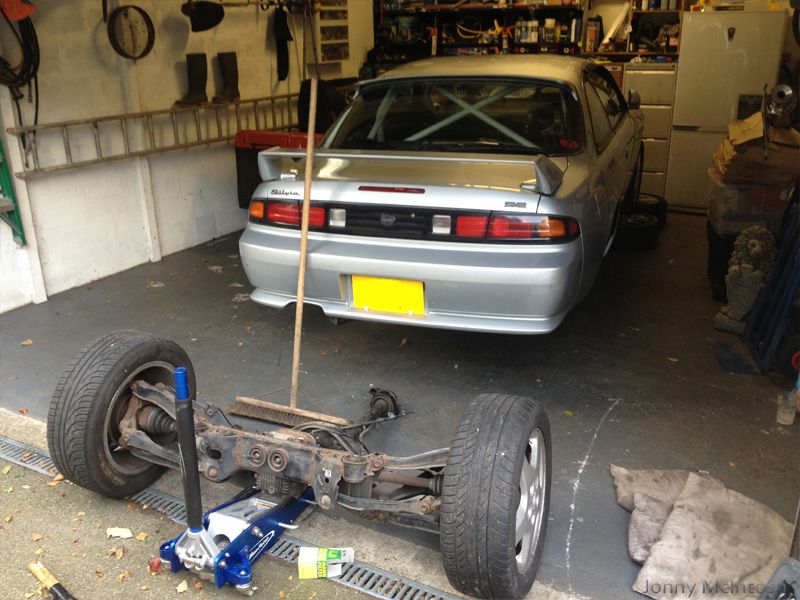 went and picked up some of my parts from the powdercoaters, was £110 though :S for two arms, two brackets and two backplates maybe i don't know the proper price of powdercoating parts but that seemed a little too expensive for my liking! 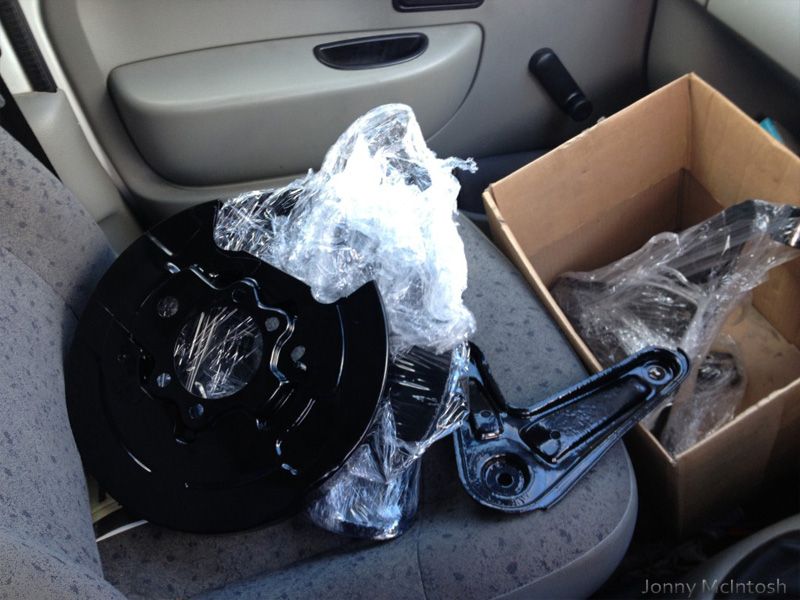 never the less, they made an awesome job, the stuff looks really nice now 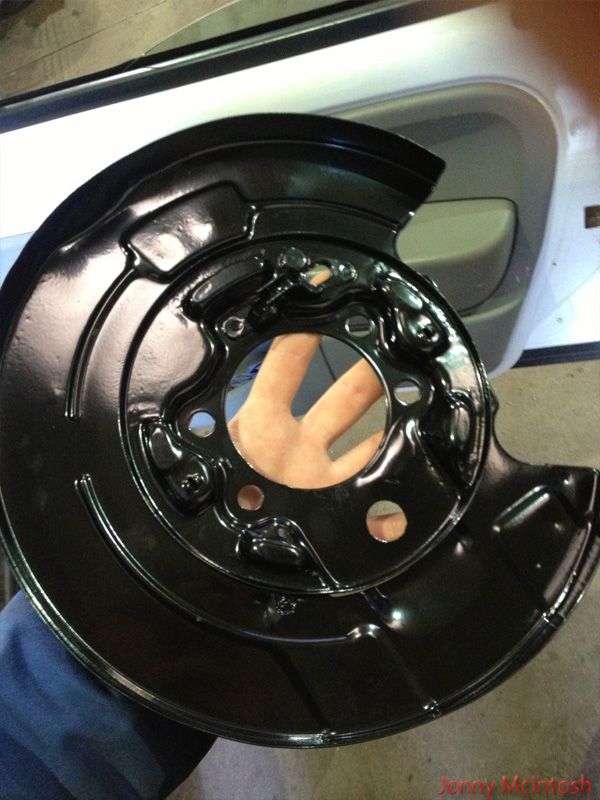 however with my lower arms i found out today that the s13 and s14 have different bushes i was gifted some driftworks s13 bushes from a friend brand new for doing work on his car, unfortunately they dont fit my arms i'm ordering some others tomorrow as i need to get the new rear end build up asap! 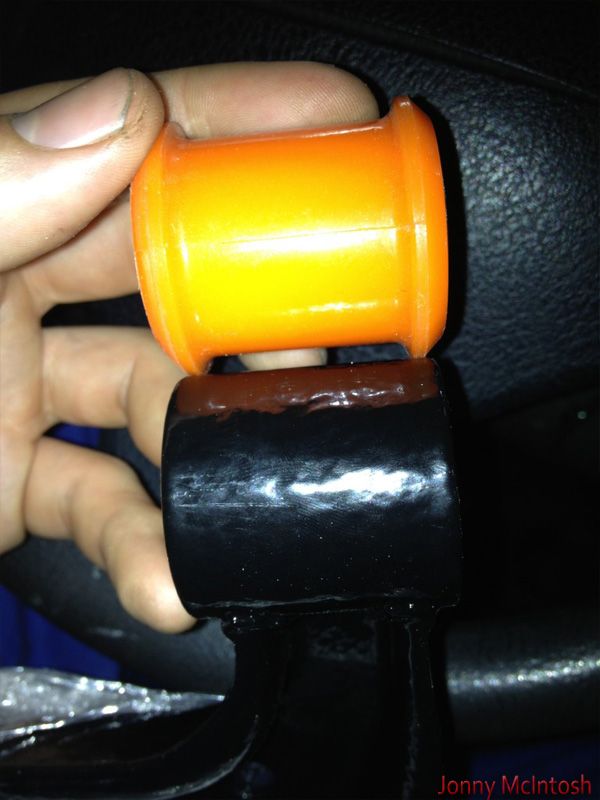 in the meantime i've started refurbishing my r33 gtr wheels, they're a nice 9j et30 offset with the 25mm spacers look great on the car, these are now going to be my skid rims, but i wanted them looking fresh as i was bored of the grey so i've repainted them silver no more lost in the wheel arch skid rims haha 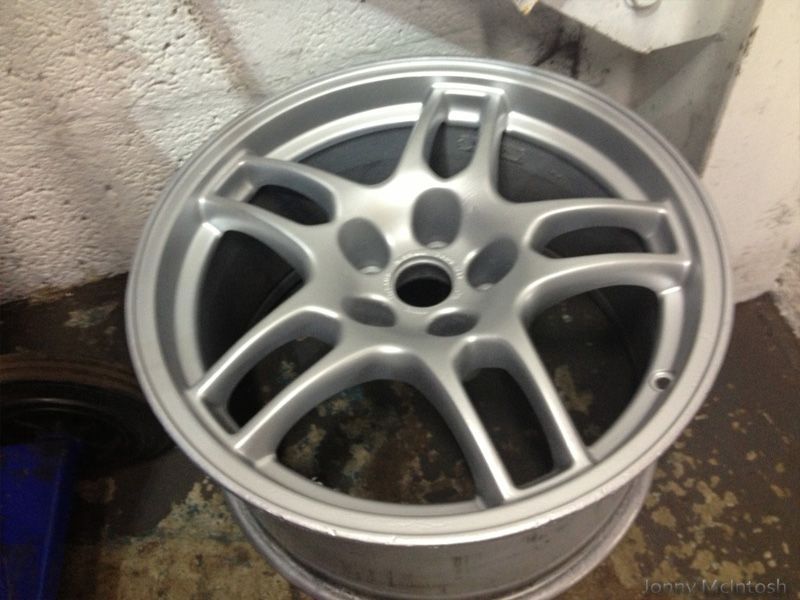 |
|
|
|
|
| Bookmarks |
|
|


 Linear Mode

