|
|||||||
| Tech Talk Technical Discussion About The Nissan 240SX and Nissan Z Cars |
 |
|
|
Thread Tools | Display Modes |
 01-22-2007, 12:19 AM
|
#1 |
|
Nissanaholic!
 
Join Date: May 2004
Location: Southern California
Posts: 1,917
Trader Rating: (40)
  Feedback Score: 40 reviews
|
DIY: Fender Rolling / Flaring Tutorial for S13 240sx - w/ buckling resistance ;)
Since some of you liked my battery reloc write up so much, thought I'd whore it out and post my fender rolling one now that I've done a few more cars (tutorial is from Oct 2006) and have started tinkering w/ possible anti-buckling procedures (limited success depending on amount of flaring). Anti-buckling procedures are in second post (from Jan 2007). Don't mind the bluish tint camera - forgot to set it from manual settings -> automatic, oops! And keep in mind that each car has a different chance of buckling (some seem to buckle right as you roll, some take a pretty good flare before buckling, and others have ripples when flaring because of messed up inner fender lip).
Title: "We be rollin', patrollin'..." So I dropped by to visit my buddies' local 240 shop today & decided I should roll and flare my fenders to prepare for upcoming modifications. There are numerous DIY articles and posts floating on the Internet, all with tid bits here & there, but all of them seem to be missing some info. What I will try to do is combine all that knowledge and put as much of it into one post as possible  . I'll probably still miss a lot of info, but hopefully this will help some of you guys out there who want to run bigger tires/less negative camber with your crazy low offset & wide rims. . I'll probably still miss a lot of info, but hopefully this will help some of you guys out there who want to run bigger tires/less negative camber with your crazy low offset & wide rims.Note: Although it is possible to use the same method for the front fenders, it is more common to just "hammer" in the lip up front because of the flimsiness of the front fenders. This method has not been tried with the front fenders yet... This rolling tutorial is being performed on a '92 Nissan 240sx convertible. Total Project Time: - Approximately 2-3 hours for both rear fenders with taking pictures and comparing/aligning both sides. Took our sweet time (at least on one of the sides, haha) to make sure everything was going to plan. Equipment: - Ratchet set for loosening/tightening lug nuts (my stock lug nuts are 21mm) - Towels/rags - something to clean the fenders and work area - Eastwood fender roller - Heat gun (I used the Chicago Electric Adjustable Heat Gun from Harbor Freight), a hair dryer could also work but will be slower - Infrared Thermometer (not necessary, but highly recommended to prevent paint cracking)   Preparation: - Put your car up on jack stands. - Remove the wheels Step 1: Clean your fenders - Clean around the fender area and inside the wheel well behind the lip (this step is VERY important; you don't want any pebbles getting stuck inside your fenders and showing up when you roll!) - Clean the fenders again just to be sure   Step 2: Attach the fender roller - Use the supplied adapters and your stock lug nuts to attach the fender roller - The orange knob in the middle of the arm adjusts the height of the roller. I had to change height frequently while rolling to get everywhere - the 240 fender isn't exactly a circle, but more of an oval. - The knob by the roller head adjusts the angle of the head. I left it at the same angle my friend used (which is about 15-20 degrees from vertical). - The long arm in front of the hub adjusts the distance between roller and the fender (counter-clockwise moves the roller closer). I adjusted the roller until it touched the fender. Rolled a bit. Then tightened a little more, approximately 1/2 - 1 turn each time.  Step 3: Heat up fender - You will want to heat up the lip, edge, and all around the fender area you will be rolling. 120-140 degrees Fahrenheit is the recommended temperature, according to popular sources. If you don't have an infrared thermometer just make sure it's hot to the touch, but not to the point where your paint is boiling! - Note: we rushed the driver side a bit, and had uneven fender temperatures (120 F backside, 100F front side). The passenger side was done with no cracking at all. This cracked the paint almost right away. So please take your time if you want to minimize paint cracking. Step 4: Start rolling - As stated above: I adjusted the roller until it touched the fender. Rolled a bit. Then tightened a little more, approximately 1/2 - 1 turn each time. You will need to apply force liberally, but not too much - if you hear paint cracking, slow down, loosen the roller, and check for damage. - You can either roll the lip flat and stop, or continue adjusting the arm in front of the lug nuts to get flares. This all depends on your setup preferences. - It is much easier to have a friend heat and monitor the fenders while rolling. Have him/her heat up the area surrounding where you are rolling and basically follow and lead you while you are rolling. We heated up about 1 foot beyond the fender lip to make sure the metal stays hot & malleable. - Start rolling from the top of the wheel well and work your way toward front and rear progressively. As you get closer to the front and rear areas, there will be less room for the roller to move, so adjusting height is required. Also, you may need to use a little more force to "persuade" the lip into folding. - When comparing both sides for evenness, look both behind and in front of the car to see how each side flares. When on the left side behind the car, look w/ the left eye. Try to position yourself in the same relative position on the right side of the car w/ the right eye. Looking from the front of the car and directly above the wheel well will offer more angles to compare both sides. - Note: the driver side tends to buckle a lot easier than the passenger side when flaring because there is no gas tank equipment to reinforce the fender. Be very careful when working on the passenger side and make sure everything is heated correctly and not too much pressure is being applied. This has happened on both my coupe and my friends hatch. With the '92 240sx convertible, we did not experience the buckling problem, perhaps due to the extra bracing the vert has, or maybe we were just more careful/prepared this time around.  Step 5: Finish up - Once everything is even, unbolt the roller, reattach your wheels, torque the wheels to factory spec, and enjoy your new found wheel well room!!!    Last edited by brokeAs240sx; 01-22-2007 at 12:59 AM.. |

|

|
| Sponsored Links |
|
01-22-2007, 12:22 AM
|
#2 |
|
Nissanaholic!
Join Date: May 2004
Location: Southern California
Posts: 1,917
Trader Rating: (40)
Feedback Score: 40 reviews
|
Preventing Buckling... well, most of it anyway
.If any of you have tried to roll/flare your fenders, you know what a bummer it is when the fender buckles (almost inevitable for most 240's). I was able to fix mine w/ some new toys from Eastwood - inflatable dent poppers/removers. It gets rid of half to most of the buckle. Not perfect, but much better than doing nothing. These pumps can also possibly be used before/during rolling/flaring to help prevent buckling, or at least keeping it to a minimal. However, I have not yet tried using it as a buckling preventer/inhibitor. Total Project Time: - Approximately 20-30 minutes, taking your sweet *** time  Equipment: - Ratchet Set (10mm & 14mm) - Heat gun (I used the Chicago Electric Adjustable Heat Gun from Harbor Freight), a hair dryer could also work but will be slower - recommended but not required - Infrared Thermometer (not necessary, but highly recommended to prevent paint cracking) - Inflatable Dent Remover/Poppers   Preparation: - Locate buckle - say a final farewell to it.    Step 1: Remove Interior - Remove your rear seat & rear quarter panels to allow access to the inside of the fender.   Step 2: Heat Up Fender - Heating up the fenders (120-140 degrees as when rolling/flaring fenders) will help make the metal more maleable   Step 3: Pump and Sculpt - Start pumping w/ either the large or small pump. It should pop the fender right out. - Allow the fender to cool. Step 4: Repeat and Alternate Pumps Used - Deflate the pump. - After the first time, some but not all of the buckle should be gone (depends on how badly you buckled the fender). "Heat-cycling" the fenders & pumping/popping it w/ the pump should start shaping the fender back to its original form. I did 3 cycles, which got rid of nearly all of the buckling. You can't really tell in the pictures, but a smaller less noticeable buckle is still there. Step 5: Stuff It! - When accessing the inside of the fender, you may have some foam cubes. You can reinsert and wedge these in between the fender and wheel well, which will help pop out some more of the remaining buckle. This isn't the professional way, but seems to work pretty well.  Step 6: Marvel at a Job Well Done - YAY!   **** NOTE: I've unbuckled a few cars now, and it seems the fastback's buckle (depending on how bad it is), can possibly rebuckle after some driving. A possible solution to this is to insert something, such as foam sheets to help push against the fender once it's been unbuckled... think of it as sound deadening .The coupe & other fastback done seem to have retained their shape after unbuckling for this past month. |
|
|
|
|
01-22-2007, 12:43 AM
|
#6 | |
|
Nissanaholic!

Join Date: Jan 2004
Location: San Diego, CA
Posts: 2,011
Trader Rating: (5)
Feedback Score: 5 reviews
|
Great writeup! I'll be looking at this in the future.
Quote:
__________________
 D-Street.net | bcuison.wordpress.com |
|
|
|
|
|
02-08-2007, 01:11 AM
|
#10 |
|
Nissanaholic!
|
your fender didn't buckle since you didn't pulled it up instead of out.
That adds no useable width. if you try and lower your car the wheels won't be flush without rubbing to all hell. people need to lay off the fender rollers, body hammers, paper and jackhandles all work better. |
|
|
|
|
02-08-2007, 01:16 AM
|
#11 |
|
Nissanaholic!
|
Also, Heat the inner skin when you do it. the outter skin is easy to shape, the inner skin pulling it in a weird direction is what buckles it, you need to stretch/rip the inner skin.
Also disconnect your rear shock. because it helps for some retarded reason, I think its because you can get a better angle on the roller. |
|
|
|
|
02-08-2007, 01:25 AM
|
#13 | |
|
Post Whore!
 |
Quote:
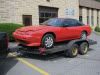
I did mine by leaving the wheels on. Jack the car up. Used wooden baseball bat to pry on fender while I pushed it into the tire. Adjust the ride height of the wheel to get the best prying position. I pryed on that tire pretty good and it never popped off the bead. Picture.  |
|
|
|
|
|
02-28-2007, 05:03 PM
|
#17 |
|
Post Whore!
|
I got my fenders rolled by brokeass. How I just need to save up for the wheels.
                     
__________________
Sale: Hello Kitty Horn Button S14 Rear Valences K.Y. Gordon the Thief (Tony Chen) |
|
|
|
|
02-28-2007, 05:27 PM
|
#18 |
|
Nissanaholic!
|
Damn, so you're rolling SEs, and you found it nessicary to not only roll your fenders before you even got wheels but pull them as well.
so now, when you do get wheels, they'll be forever sunk or spaced because you did the roll before hand. hahahahahahahahahaha. Touche Zilvia, Touche! |
|
|
|
|
02-28-2007, 05:37 PM
|
#19 | |
|
Post Whore!
|
Quote:
I'm not worried about the spacing. If the gap is too much, I'll get bigger tires. If the gap is not enough, then I'll roll it more.
__________________
Sale: Hello Kitty Horn Button S14 Rear Valences K.Y. Gordon the Thief (Tony Chen) |
|
|
|
|
|
02-28-2007, 05:44 PM
|
#20 |
|
Post Whore!
 Join Date: Mar 2005
Location: Socal! Off 60/605
Posts: 7,256
Trader Rating: (27)
Feedback Score: 27 reviews
 |
Yeah, typically its not a good idea to roll fender before getting the wheels that will require them
Also, getting wheels before paint is also a good idea to work out fender clearance I would've just hammered it flat versus pulling
__________________
 A SPEC PRODUCTS CORP AME Wheels, Advan, ARC, Gram Lights, Nardi, Personal, Recaro, Works Bell, Work Wheels, Volk Racing, 5Zigen, & more! 626.618.1100 x 103 / aim: aspectuan Advertiser's Specials!  Read / Give Feedback! Please Rate Us! Read / Give Feedback! Please Rate Us!
|
|
|
|
|
02-28-2007, 06:05 PM
|
#21 |
|
Leaky Injector
 
|
are you getting your wheels before the repaint? if not, it kind of defeats the purpose of a paintjob if your gonna pull it even more afterwards. just a thought...
__________________
zilvia is wack now... |
|
|
|
|
02-28-2007, 06:21 PM
|
#22 | |
|
Post Whore!
Join Date: Oct 2004
Location: Charlotte, NC
Age: 41
Posts: 3,627
Trader Rating: (0)
Feedback Score: 0 reviews
|
Quote:
__________________
high performance driveway photography  zenki s14---v8 fc rx7 my crappy flickr page (drift cars whoo) |
|
|
|
|
|
02-28-2007, 07:07 PM
|
#24 |
|
Post Whore!
|
If volks weren't so expensive I would have picked them up earlier.
__________________
Sale: Hello Kitty Horn Button S14 Rear Valences K.Y. Gordon the Thief (Tony Chen) |
|
|
|
|
02-28-2007, 07:21 PM
|
#26 | |
|
Post Whore!
|
Quote:
__________________
Sale: Hello Kitty Horn Button S14 Rear Valences K.Y. Gordon the Thief (Tony Chen) |
|
|
|
|
|
02-28-2007, 07:52 PM
|
#27 |
|
Post Whore!

Join Date: Mar 2002
Location: Seoul, South Korea
Posts: 2,870
Trader Rating: (5)
Feedback Score: 5 reviews
|
It doesn't help if you drop the rear strut in most cases. That's only if you're car is too low and the roller wheel is only hitting the fender well and not the actual fender.
If you don't want the dent, you should consider not rolling it so high, maybe about only 1" to 1.5" high of the actual fender, so you decrease the area you're actually pulling. Also, don't get so angle happy. As someone pointed out, you're pushing the fender lip up, but not as much usable clearance. Jung918 fenders are MAD ripply like mr. ripleys believe it or not. Tell brokeass to go a bit slower and work it over evenly. That reminds me of one of my first pulls and when I used a hammer to roll it. And Yes, get wheels before the pull! People always want to pull but you should just roll your fenders first and then get your favorite wheels and test fit them to know how much you have to work.
__________________
Go big or go home! 
|
|
|
|
|
03-01-2007, 07:32 AM
|
#28 | |
|
Premium Member
 
Join Date: Jun 2004
Location: miami beach
Age: 39
Posts: 1,039
Trader Rating: (0)
Feedback Score: 0 reviews
|
Quote:
Dude thats fucking gross! might as well cut and mold in overfenders now 8o
__________________
 section ef&ec changed my life section ef&ec changed my life
|
|
|
|
|
|
03-01-2007, 07:48 AM
|
#30 |
|
Nissanaholic!
Join Date: Apr 2005
Location: Houston
Age: 37
Posts: 1,706
Trader Rating: (6)
Feedback Score: 6 reviews
|
hahah, dude posted pics of his roll/pull and gets made of fun of b/c its all wrong.
your car doesn't look like it needs paint. you should've got wheels before you pulled and painted. |
|
|
|
|
| Bookmarks |
|
|


 Linear Mode

