|
|||||||
| Builds (and builds only) Got a build thread? It goes here, build threads anywhere else on the forum will be locked and never moved. |
 |
|
|
Thread Tools | Display Modes |
 10-17-2013, 03:44 PM
|
#31 |
|
Leaky Injector
 Join Date: Nov 2009
Location: Scotland, UK
Age: 34
Posts: 130
Trader Rating: (0)
 Feedback Score: 0 reviews
|
thanks!! I snoop on zilvia as often now I thought i'd be aswell sharing what I've done so far
 thanks to paul at magic aero my kouki spats arrived, these are awesome quality and not that bad priced at £180 brand new! 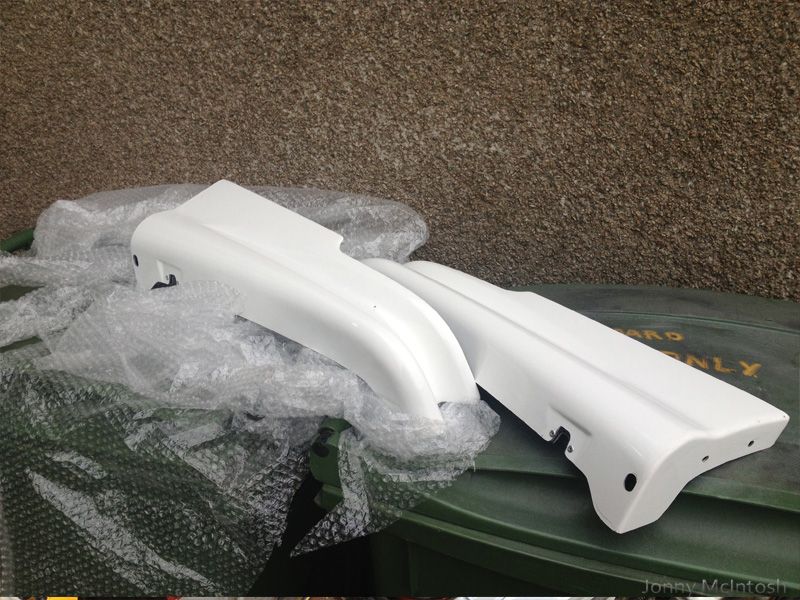
__________________
http://zilvia.net/f/builds-builds-on...1jz-build.html |

|

|
| Sponsored Links |
|
10-29-2013, 04:35 PM
|
#32 |
|
Leaky Injector
Join Date: Nov 2009
Location: Scotland, UK
Age: 34
Posts: 130
Trader Rating: (0)
Feedback Score: 0 reviews
|
last two weeks have been horrible haha, spent with the wire wheel on the grinder and the stonechip gun
i've got proper pictures from my camera to upload of this to show what the chassis looks like now however i've taken the wire wheel on the grinder over all of the inner arches at the rear, above the subframe and the rear chassis legs/above exhaust etc car has 3 coats of stonechip on now and each coat had two days to dry the pics will show what i mean when i get them uploaded from the camera however here are a few so far 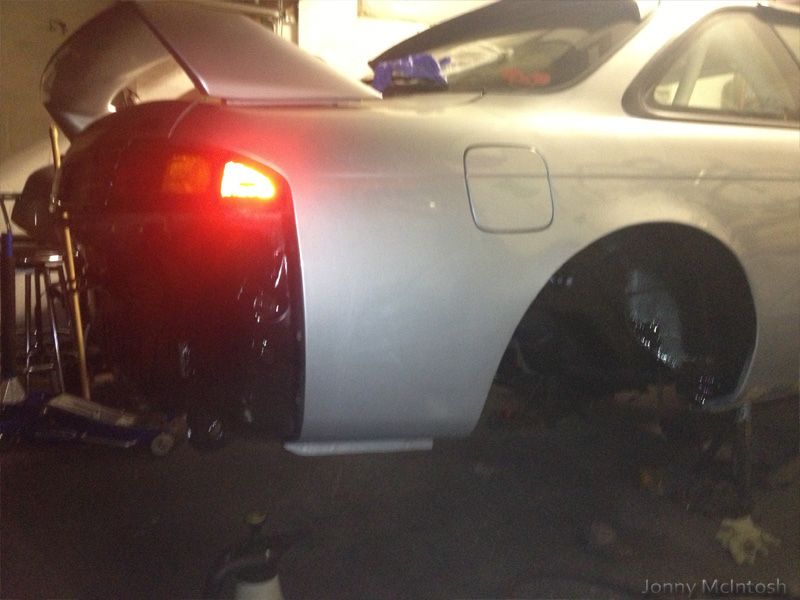 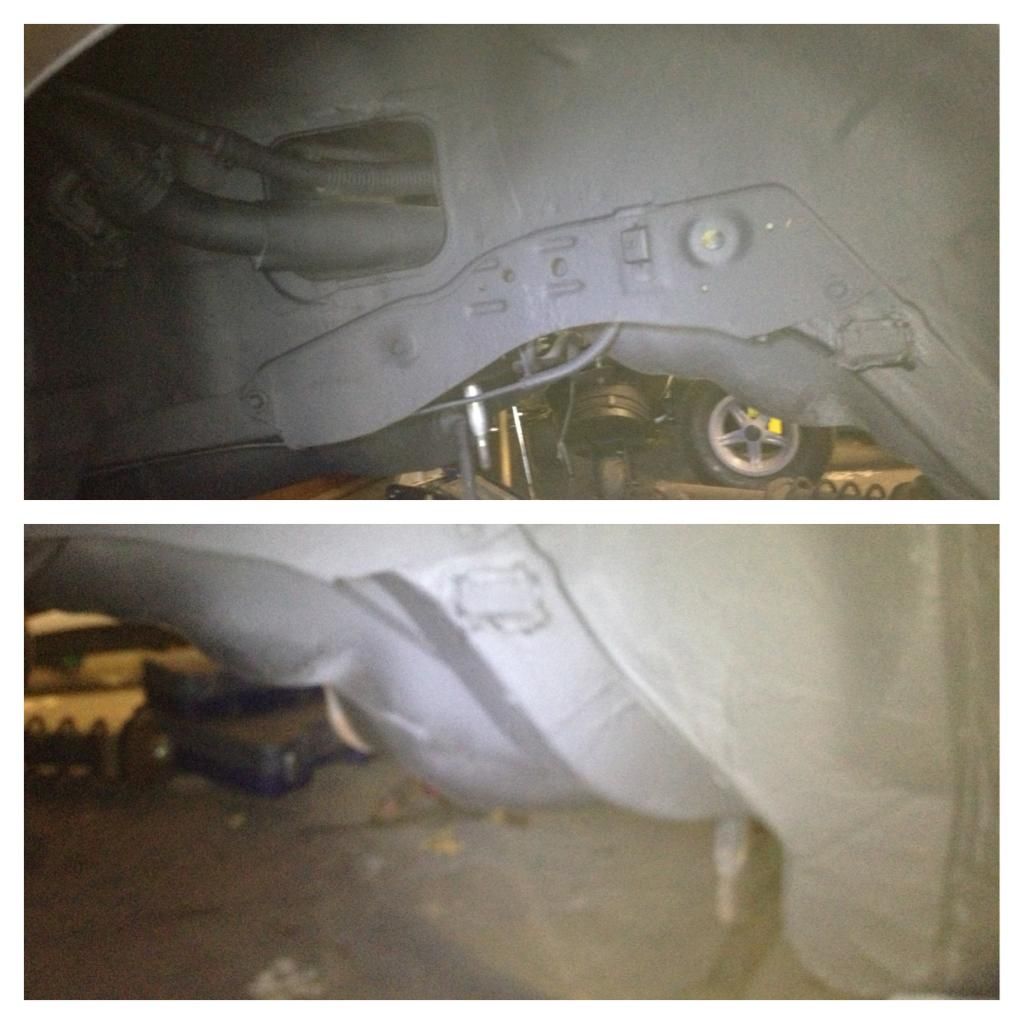 also can i just say....god i love imports soo clean compared to UK cars!!! the 70mm boost 90 degree hose arrived for the throttle body, and the 64>70mm reducer for the turbo pipe arrived  radiator is back to the welder to get modified again with a slightly different angle picked up a genuine uras/monkey magic kit and another set of vertex skirts only reason i bought it all was because i wanted the vetex skirts for spare and the guy wouldn't sell seperate so worked out quite well, i'll be selling the uras rear bumper and skirts for cash plus another set of vertex skirts to a friend so all in all i've managed to get myself 3 pairs of vertex skirts....always nice to have spares, don't know how many i'll destroy with delam tyres just need to sell the front bumper to cover me the money it's due and i'll be happy 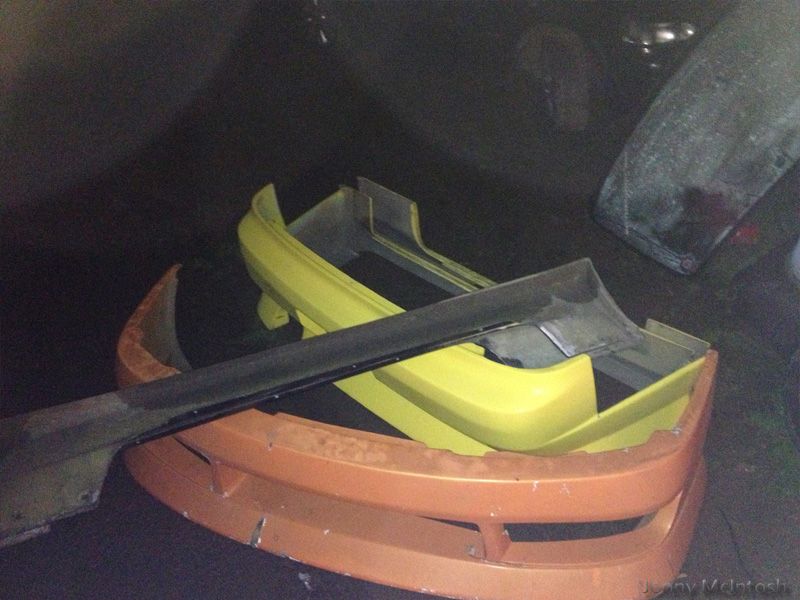 a pic of the sills mid clean up before spraying stonechip on....making all the uk 200sx boys jealous :P 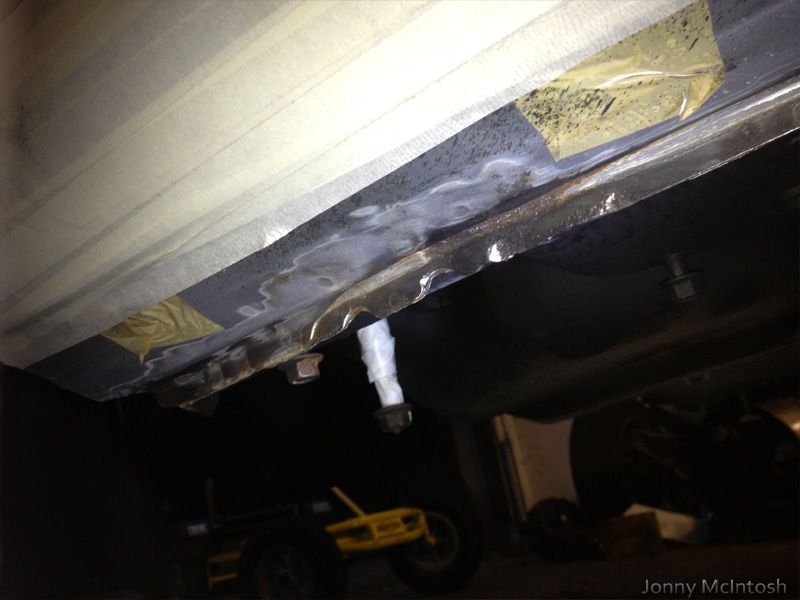 managed to source a jdm non abs sr20det turbo prop shaft which will work perfectly with my r32 non abs diff and bolt to the front of my custom prop for the R154 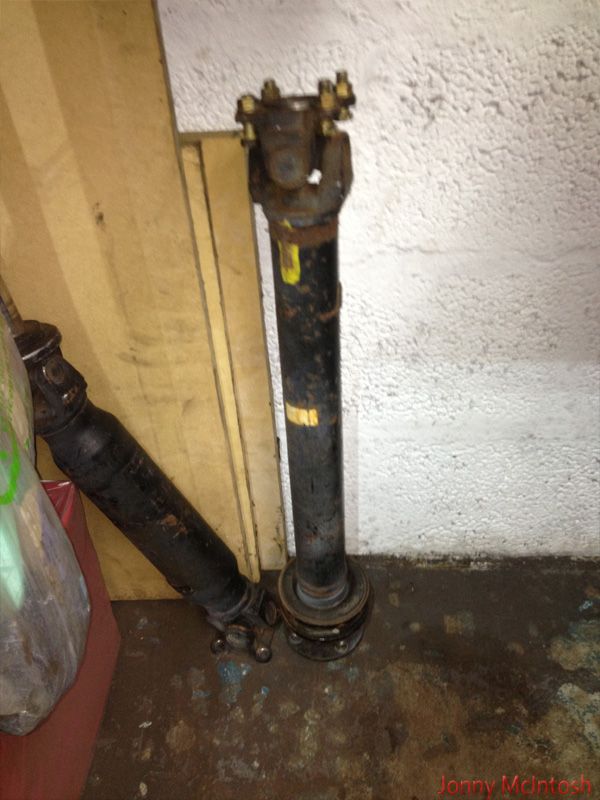 thanks to conceptua my s14 lower arm poly bushes arrived, can't complain at £50 delivered, fair price!! 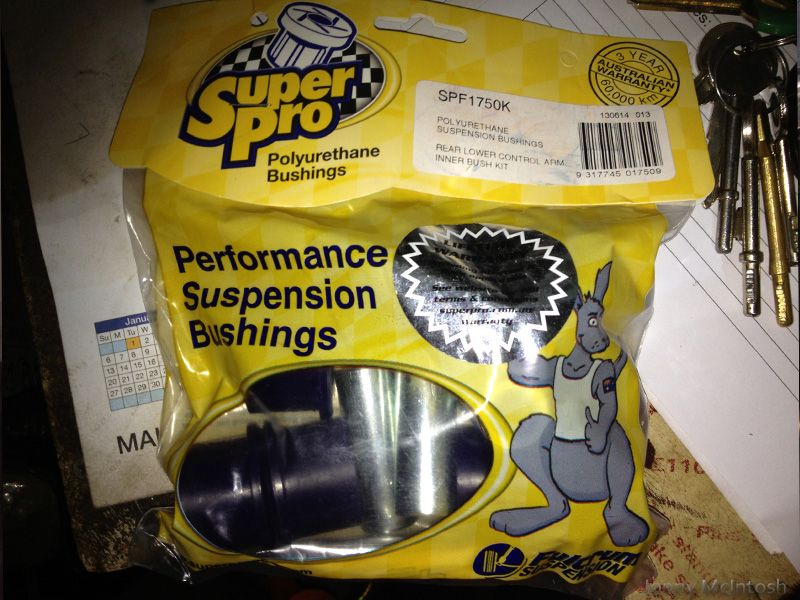 also ordered some brand new r33 handbrake cables from them, they should be here tomorrow so i can get on with the subframe build if i don't get a kick ass hangover this weekend plan is to have the car back down on 4 wheels in the next week or two so i can roll it out the garage and turn it around to begin the front end work
__________________
http://zilvia.net/f/builds-builds-on...1jz-build.html |
|
|
|
|
10-31-2013, 04:01 AM
|
#34 |
|
Leaky Injector
Join Date: Nov 2009
Location: Scotland, UK
Age: 34
Posts: 130
Trader Rating: (0)
Feedback Score: 0 reviews
|
I am yeh, it's a kouki, however it'd be a bit hard to post it to you without it breaking plus the postage costs from the uk to where you are would be well over the value of the actual bumper!
plus it needs some repairs as it has a crack on the front tried to fit my super pro rear lower arm bushes yesterday, they don't fit too good!  need to cut them down a little as they meet in the middle, so i'll shave a few mm off one and see how that goes need to cut them down a little as they meet in the middle, so i'll shave a few mm off one and see how that goes
__________________
http://zilvia.net/f/builds-builds-on...1jz-build.html |
|
|
|
|
11-04-2013, 05:40 PM
|
#35 |
|
Leaky Injector
Join Date: Nov 2009
Location: Scotland, UK
Age: 34
Posts: 130
Trader Rating: (0)
Feedback Score: 0 reviews
|
bit the bullet and took delivery of these a while ago, brand new from driftworks, a full set of geomaster hubs+offset rack spacers, bought these for a few reasons,
one of them being the increased traction and stability they offer for higher horse power cars, when my big holset turbo is fitted these will be a good help for keeping the car driveable they give loads of steering lock which is also a bonus, 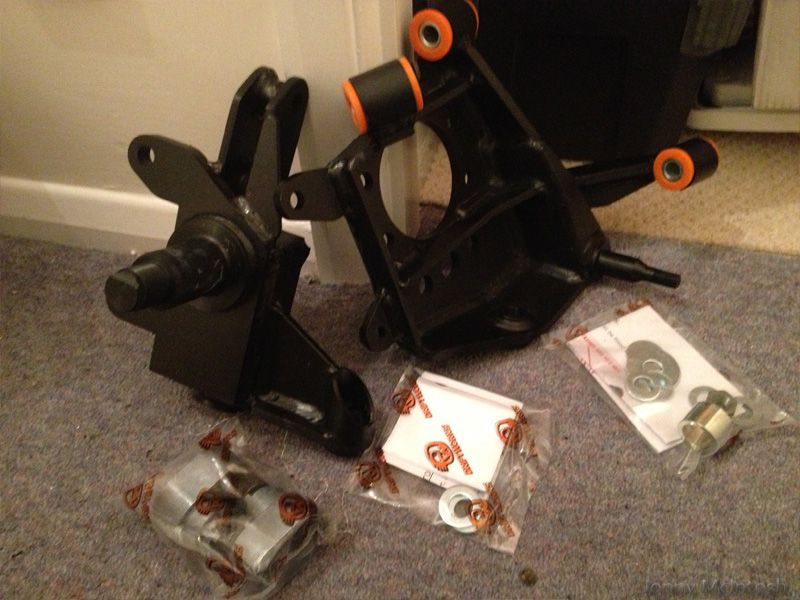 after a discussion with daze coop' i'll be having some custom front suspension parts made up for fitting the front hubs rather than using the offset spacers pressed my moog ball joints into the arms 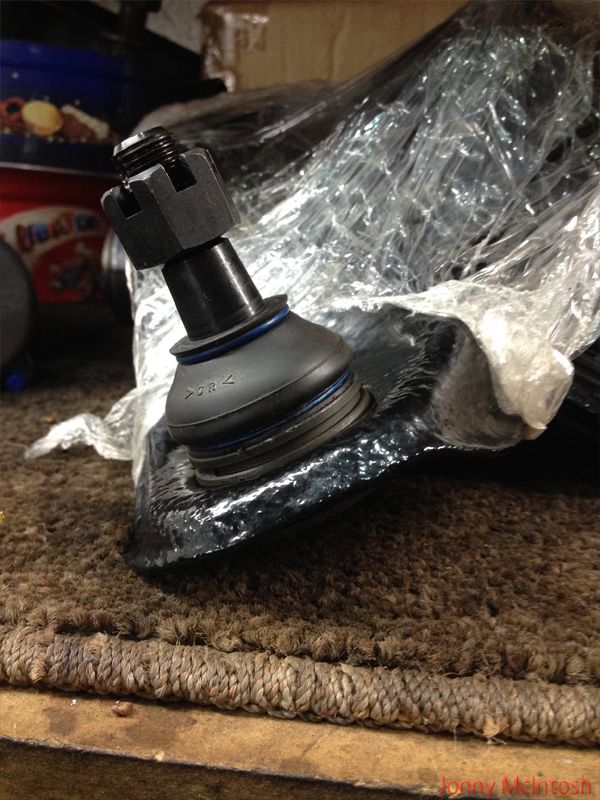 flipped them over and went to fit the super pro bushes, greased everything up and fitted them, bushes went in fine however when the metal tube was pressed in, one side would always pop out 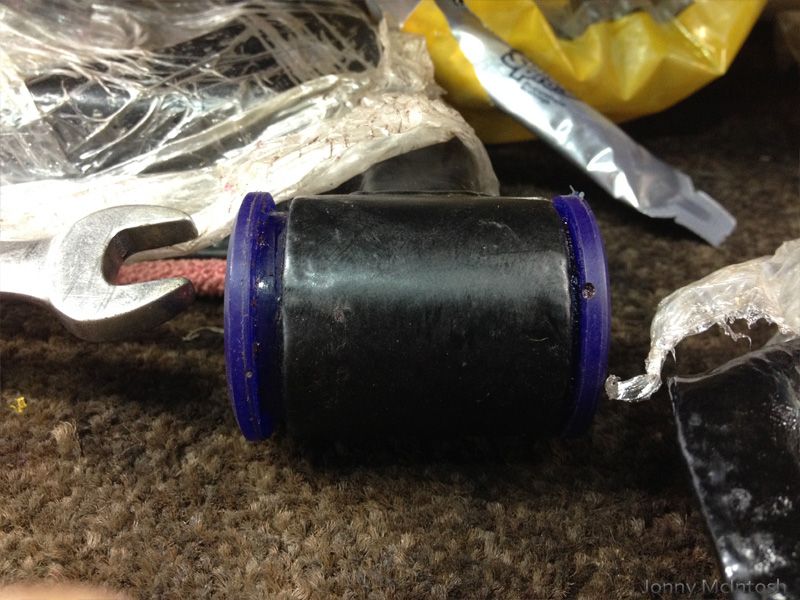 so thanks to daze coop' for the advice and everyone else on fb, i decided to rub out the insides of the arms with some sand paper.... 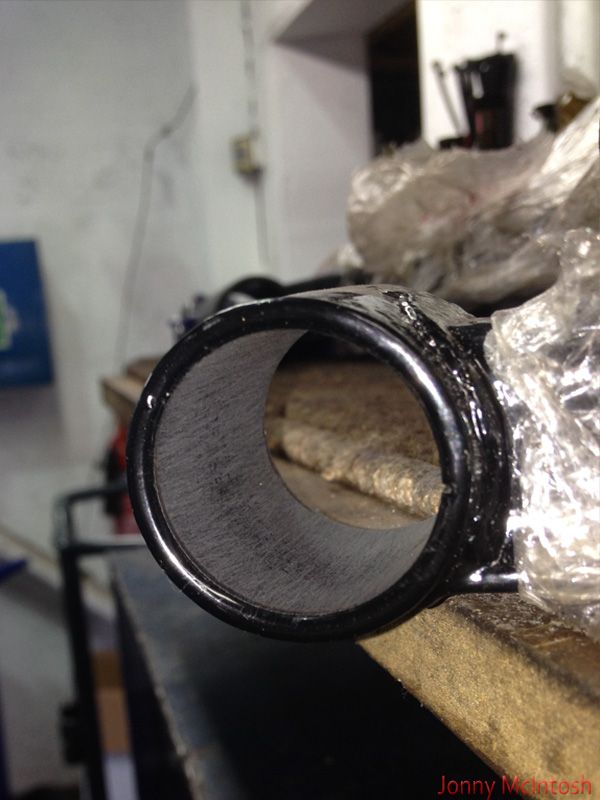 now they fit perfectly and stay in! 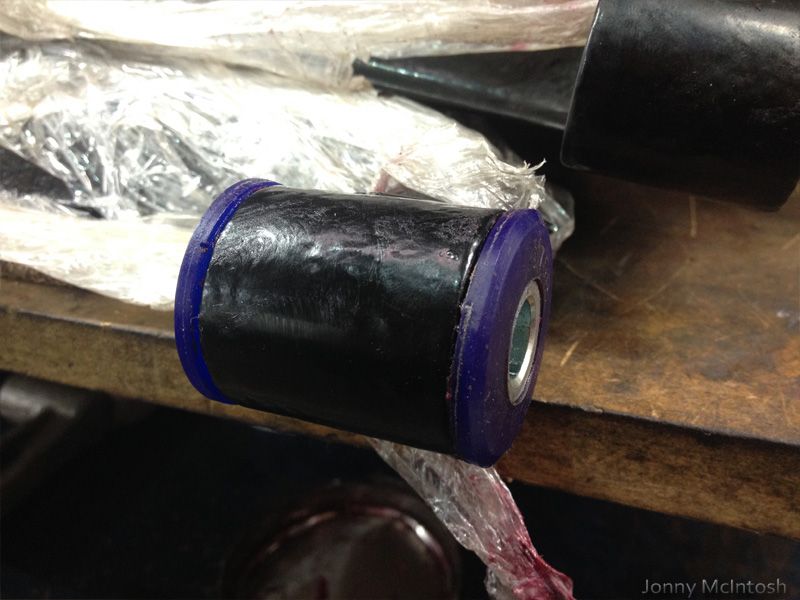 gave my bearings a good clean with the wire wheel on the grinder again, then got going with the hammerite, looks poo but doesn't matter, just to keep it from rusting 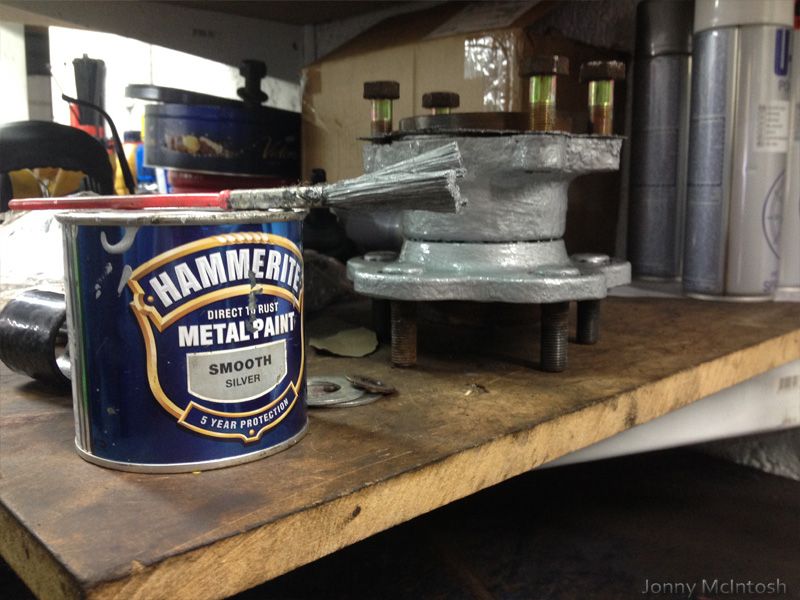 made a start to my rear brake setup, swapped over the handbrake levers onto the new brake shoes 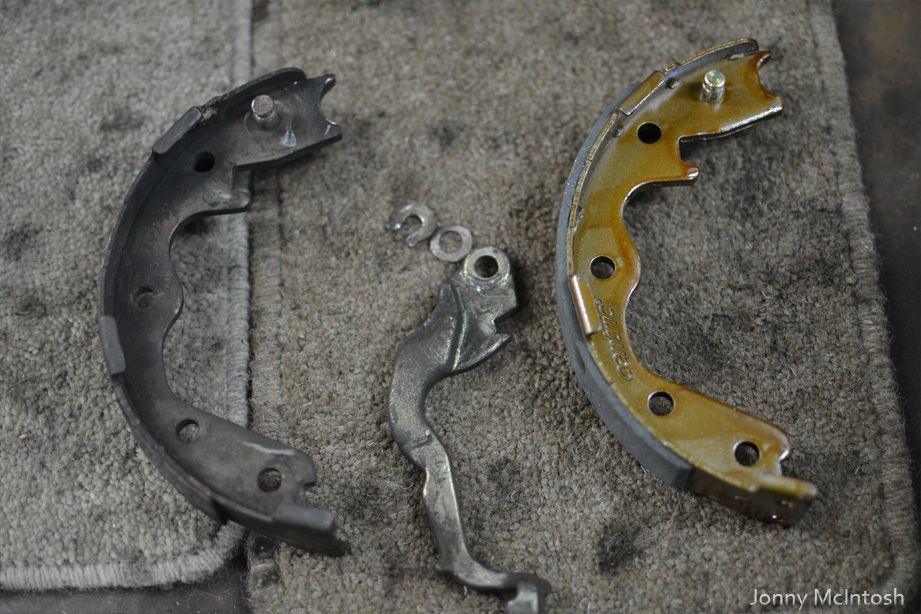 was definately time for replacements, nothing left on the old shoes 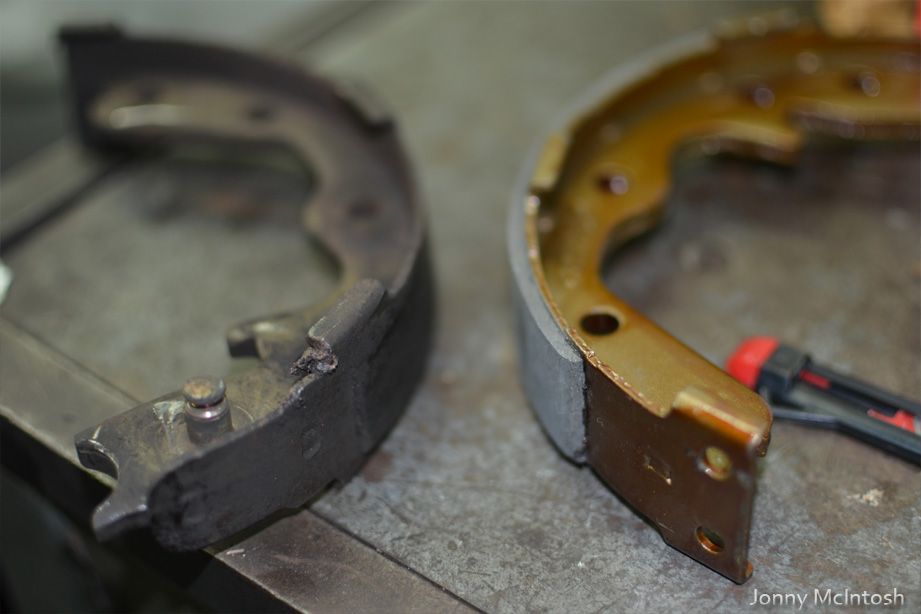 got them all built up and done 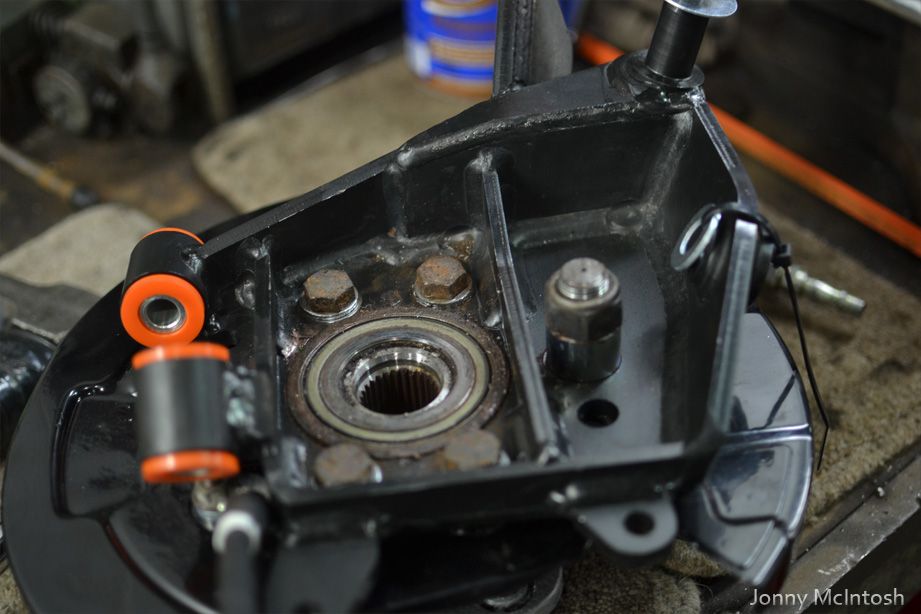 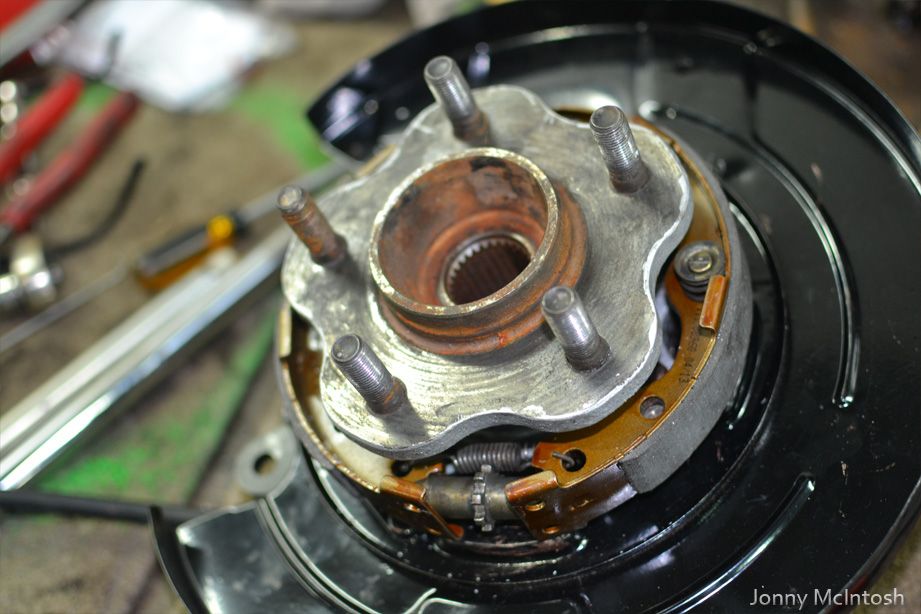 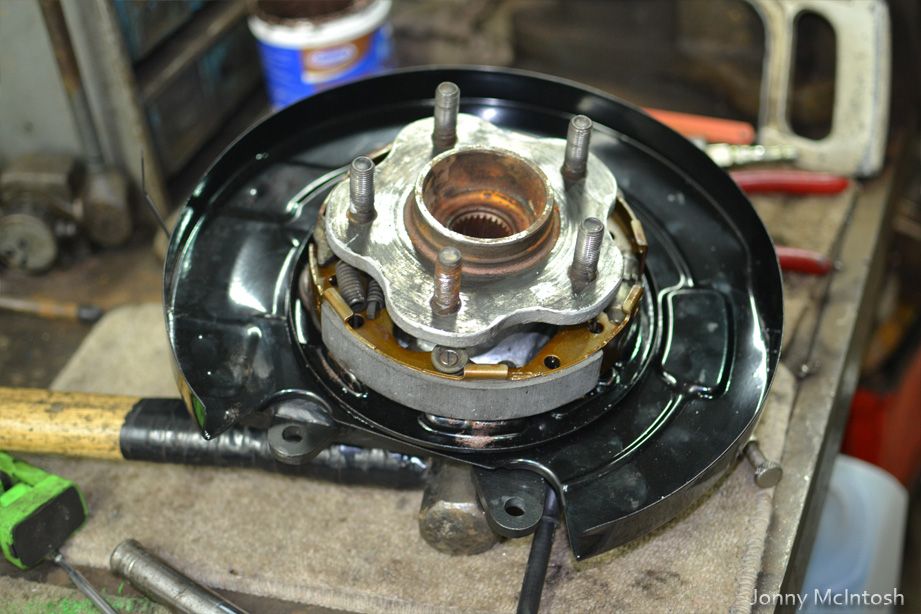 I managed to get some extra time at work tonight and stripped all the arms into pieces to fill them with copper grease all of the internal threads on the arms have a thick coating of grease and the exposed threads+under each nut has a coating of grease  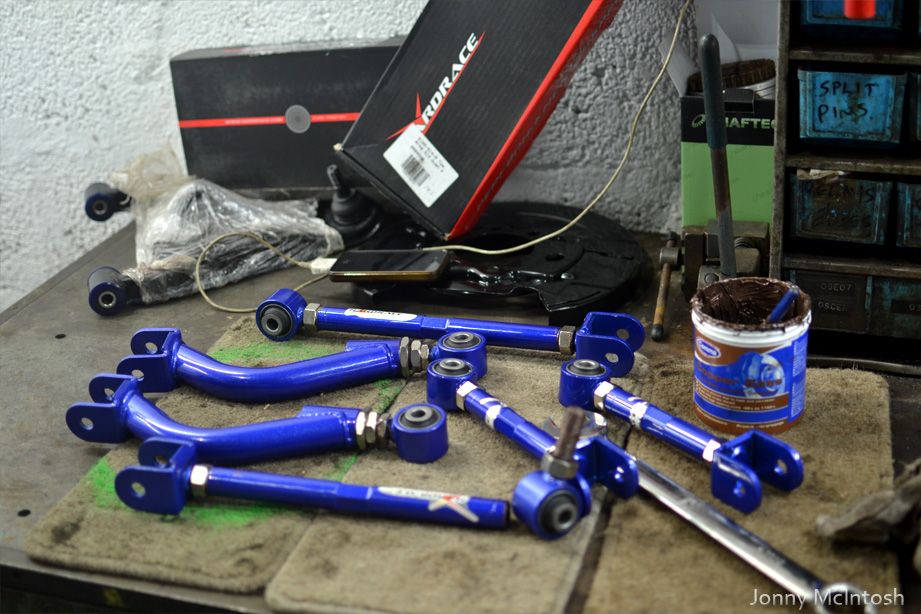  got the pics off my camera of the chassis from a few weeks ago, half way through cleaning up the arch with the wire wheel on the grinder  just after adding the second coat in these pics it was still half dry and looks wet in some of the pics    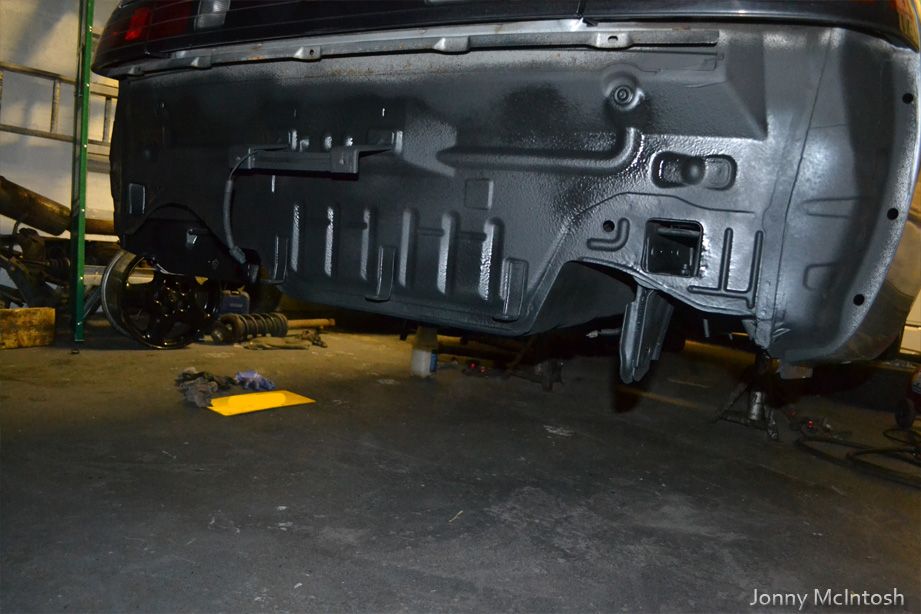 hopefully this weekend i can get my subframe built together and fitted to the car! working so much overtime at work right now so it's hard to get 5 minutes near the car!
__________________
http://zilvia.net/f/builds-builds-on...1jz-build.html |
|
|
|
|
11-04-2013, 05:43 PM
|
#36 | |
|
Post Whore!
 
Join Date: May 2010
Location: Jacksonville
Posts: 2,807
Trader Rating: (21)
Feedback Score: 21 reviews
|
Quote:
|
|
|
|
|
|
11-11-2013, 04:48 PM
|
#37 |
|
Leaky Injector
Join Date: Nov 2009
Location: Scotland, UK
Age: 34
Posts: 130
Trader Rating: (0)
Feedback Score: 0 reviews
|
got my rad back thanks to josh for adjusting it agian, this time it looks perfect
it has a different angle now and there are no kinks or folds in the top rad pipe now just have to hope it seals on the engine  hydro arrived from driftworks, not sure on where to put this, either on the left of the standard handbrake and gearstick with a massive wand or down by my left knee....will decide later also bought a bag of 7/16's UNF thread 3/8's brake pipe nuts for this 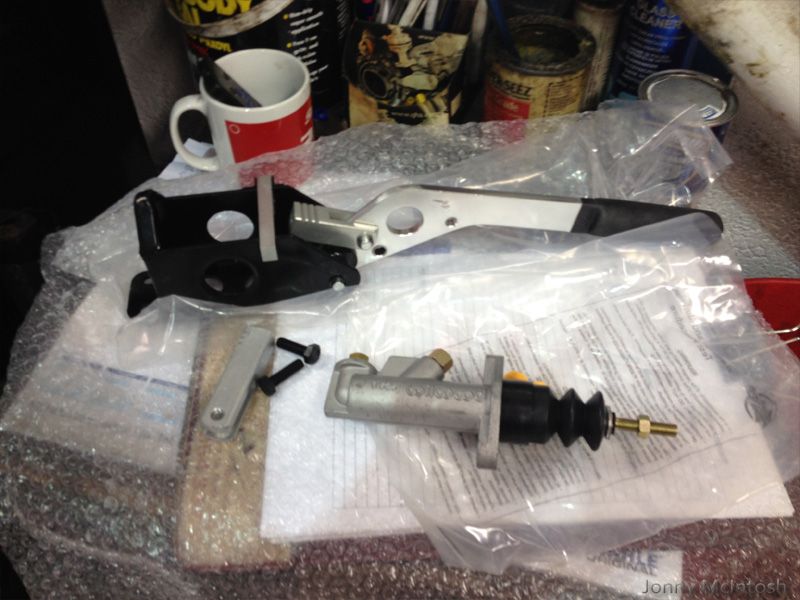 started on the subframe assembly mounted the diff with r32 front bolts  then went on all of the arms, shafts and hubs 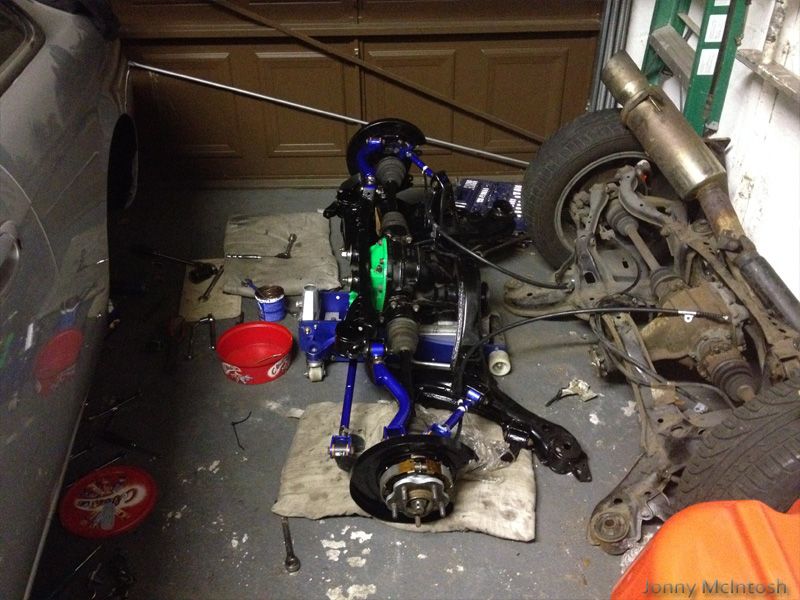 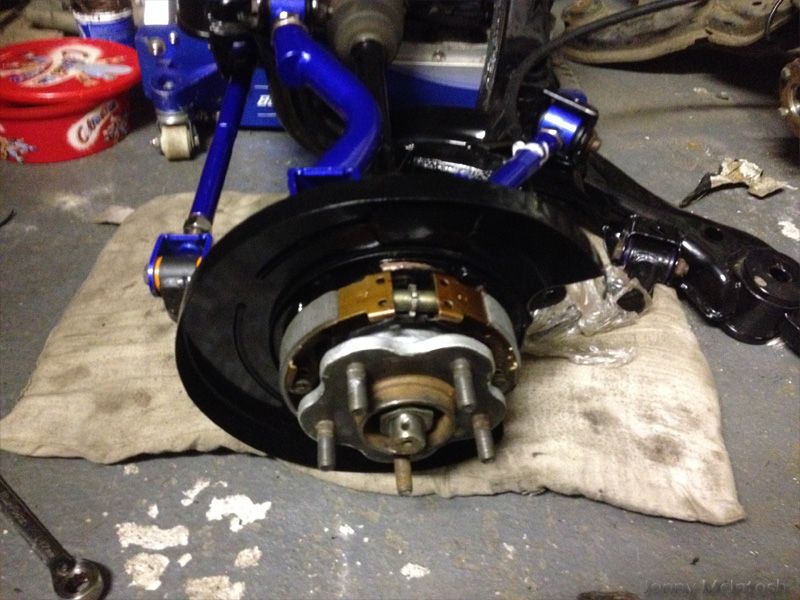 not too impressed with the distance between the rear traction arm and the driveshaft boot.... looks to me like if i run my car low i'll struggle to keep a safe distance between them, i'll be grinding them down if they touch 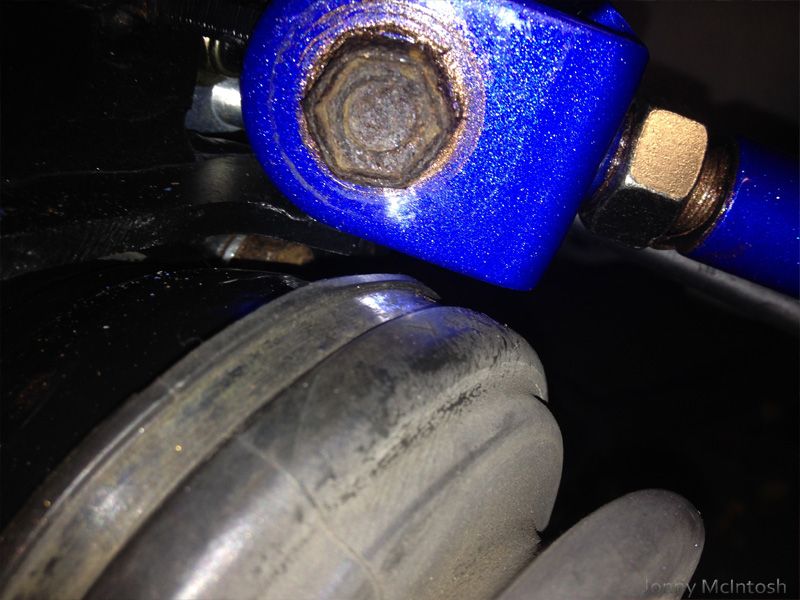 old R180 N/A jdm subframe out of the garage and is now in my lockup/storage unit probably till the day it goes to be weighed in for scrap....unless i buy a cheap s14 and want a quick alternative to a factory 3.6 diff, could always throw this in i've dumped this out of the way now but have to go back as i forgot to take measurements of the standard arms for a rough allignment on how to set my hardrace arms, also i've left my 25mm spacers on the hubs and i forgot to take off the caliper carrier bolts for my z32's 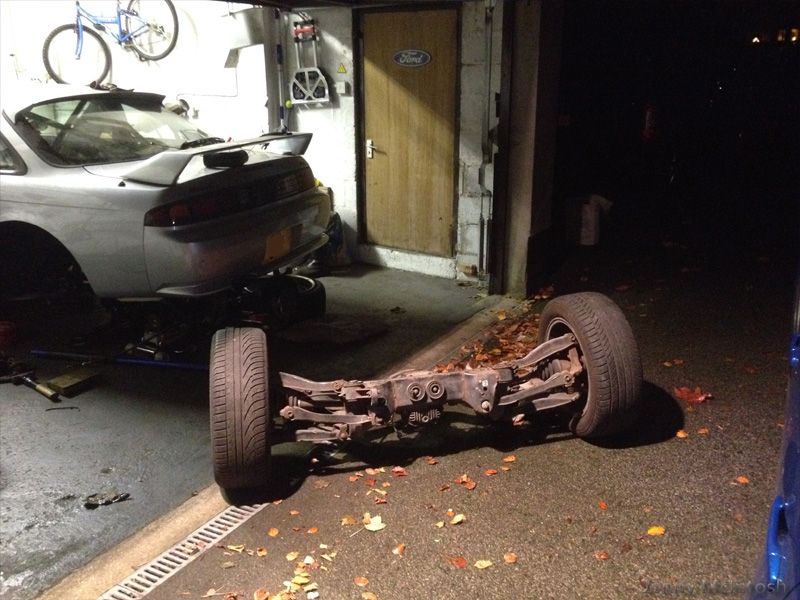 I've not taken any pics of this yet since it was 2 degrees tonight in the garage when I was working but i fitted all new copper brake pipes/lines on the car with a new T piece at the rear as the standard ones are apparently restricted and can cause issues with the hydro i'm led to believe also put my clutch pipe into the gearbox slave cylinder tonight, fits perfectly, about the only thing that does on this car tried to bleed it alone but need a second person to pump the pedal so i'll get a hand with that from someone later on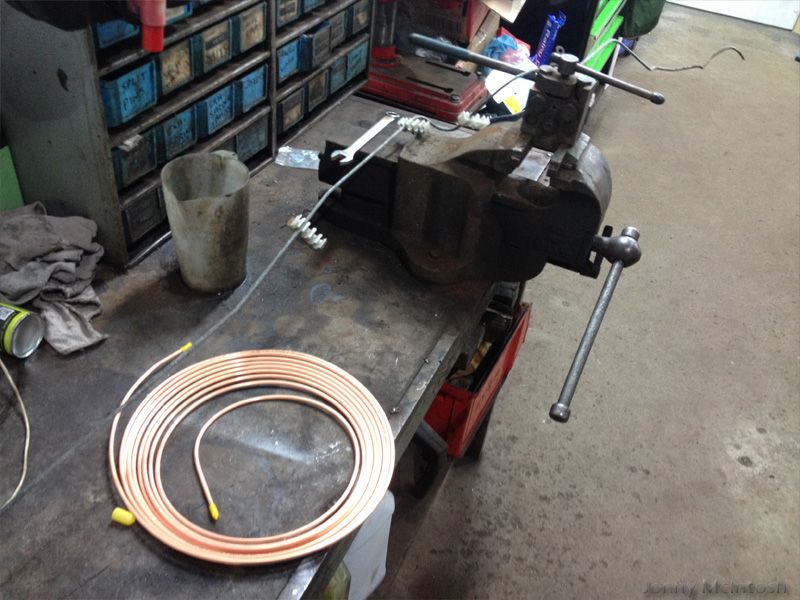 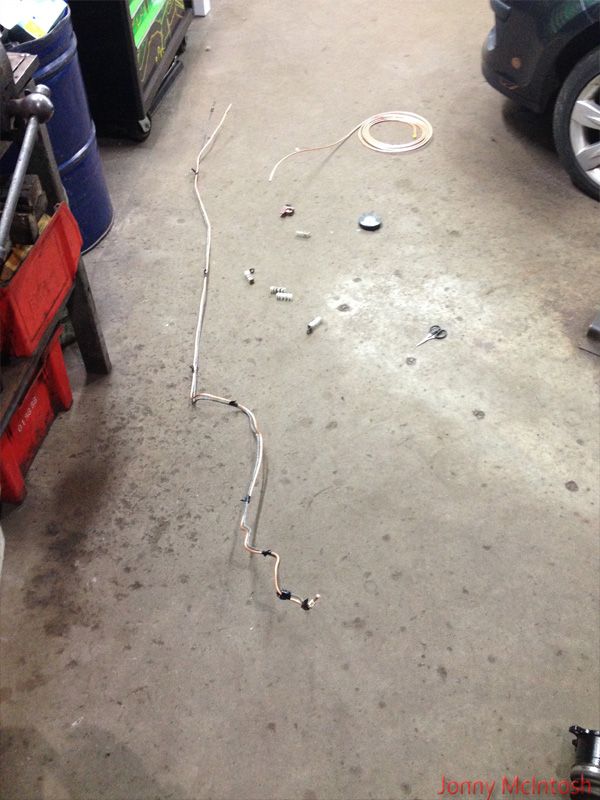
__________________
http://zilvia.net/f/builds-builds-on...1jz-build.html |
|
|
|
|
11-20-2013, 05:47 AM
|
#38 |
|
Leaky Injector
Join Date: Nov 2009
Location: Scotland, UK
Age: 34
Posts: 130
Trader Rating: (0)
Feedback Score: 0 reviews
|
a few more jobs were done before the subframe was fitted
the pegs/studs on the car were all covered in copper grease, the diff was filled up with new oil brake pipes were fitted to the car with a new T piece was going to fit the rear calipers but realised the s14 bolts are too long so i bought some new bolts from nissan for the z32 rear calipers then after much hassle it's on....the solid bushes make it much harder to fit than a set of polybushes this is the only pic i have at the minute, i'll take loads more once the brakes and coilovers are finished 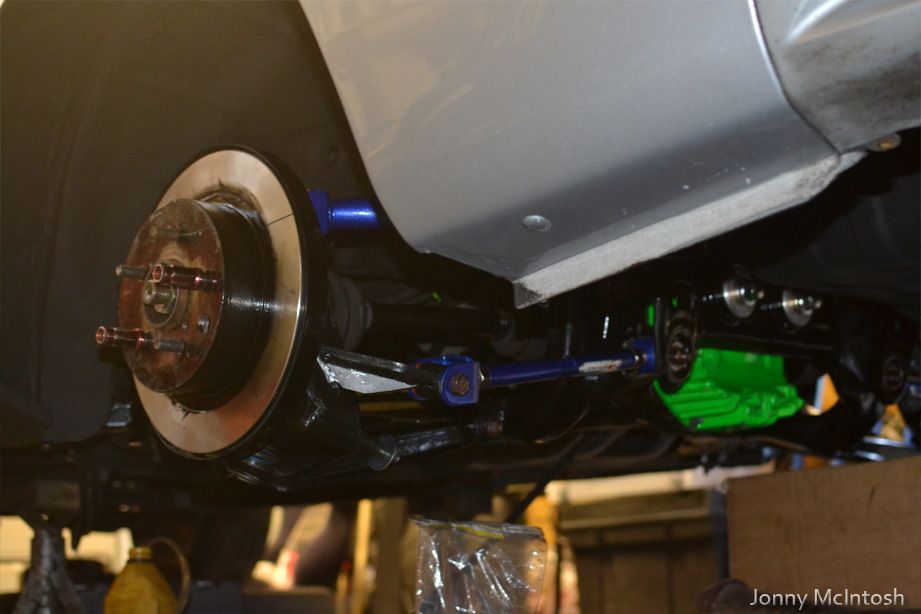 dropped off my coilovers, V brackets for sills and some more parts to be fitted the problem now is that it was snowing a few days ago it's suddenly become freezing here....the garage was too cold to work in, the main door lets in a draft because of a gap along the bottom it's literarly too cold to do anything just now so i'm leaving it a few days to see if the weather picks up a little on the plus side I decided to treat myself to a snap on creeper board....right at the end of the build :S wish i'd bought this from day 1...would have made life so much easier! got it brand new for a good price from the local snap on dealer that comes to my work 
__________________
http://zilvia.net/f/builds-builds-on...1jz-build.html |
|
|
|
|
12-02-2013, 11:19 AM
|
#40 |
|
Leaky Injector
Join Date: Nov 2009
Location: Scotland, UK
Age: 34
Posts: 130
Trader Rating: (0)
Feedback Score: 0 reviews
|
haha yeh I tried to buy one at the weekend for cheap but I missed out
Full list of what remains to do so the car can be taken out of the garage and ready for alignment+first test drive UNDERNEATH -Tighten hub nuts, 36mm big socket and use new split pins -coilovers clean, refit, adjust height and fit new boot to front -backbox, weld hanger crack back up and fit to car in prep for custom middle section -fit custom front propshaft and jdm non abs rear section -secure handbrake cables to subframe -fill up gearbox with oil, fit shifter with grease on ball joint -fit spacers and new work wheels -fit front to rear brake pipe and join into hydro then bleed -buy an arb kit and fit that -grease again any visible threads on show – subframe pegs, alignment arms etc -make exhaust from bottom of turbos that reaches standard s14 fitment backbox -fuel pipes to be made out of a roll of copper 8mm pipe along floor then heat wrapped for protection -fit solid gktech gearbox mount ENGINE -fit strut brace -p/s pipe washers to buy and replace Nissan/Toyota -p/s vacuum pipework to be connected -whole vacuum system pipework replaced with new pipes and routed correctly -fit boost controller solenoid plus boost gauge take off T -secure rad with new made up brackets on slam pannel -exhaust to make up -intercooler pipes to make up + pressure test system with bungs -air filter to position as far away from heat as possible -dip stick bracket made to secure it -buy correct new plugs plus gap them to bpu stage 1 spec COOLING SYSTEM -smooth off water neck for top rad hose -fit expansion tank hose to s13 rad (8mm silicone) -make up something to get fans to fit -fit water neck adapter for gauge sensor -custom fan switch for drifting INTERIOR -fit rear strut brace -tighten clutch pedal box bolt behind dash -fit gktech handbrake drift button -fit hydro and weld plate for strength on trans tunnel -harness eye bolts to be fitted to trans tunnel with spreaders -fit bride driver seat + recaro passenger seat with harnesses -bolt dash in for final time with heater controls and cd player etc -tighten all cage bolts -fit rear view mirror and tie wrap sun visors around cage -secure battery into boot with box and secure cable, make an earth that’s suitable for it -fit battery kill switch with insulated terminals into center console or dash -carpet rear bench where seat was -fit rev counter onto dash and run wiring to engine ign amp box -fit water temp gauge running wire to sensor on engine (or use existing wire down by ecu) -fit boost gauge with silicone hose going to T piece in engine -tidy up ecu loom finally and secure ecu, possible mount in glovebox for easy removal STILL TO BUY TO GET CAR FINISHED AND READY FOR ALIGNMENT: Tein steering rods+ends DW geomaster tension rods Custom extended lower arms Custom Front Cross Member for moving rack instead of using offset rack spacers Front brakes + braided hoses I'm sure there's more which I've forgotten but not bad off the top of my head It's not much left to do but money's tight right now as i'm going to start doing up my bathroom in January and it's bloody freezing! not much getting done at nights when the garage is one or two degrease above freezing
__________________
http://zilvia.net/f/builds-builds-on...1jz-build.html |
|
|
|
|
12-02-2013, 05:02 PM
|
#41 |
|
Leaky Injector
Join Date: Nov 2009
Location: Scotland, UK
Age: 34
Posts: 130
Trader Rating: (0)
Feedback Score: 0 reviews
|
have been buying loads of bits online, gauges, vacuum pipe, interior parts, seat rails etc
tried on the shifter and lucky enough my autobacs dildo fits on with the nissan thread insert remoevd just think it'll be a bit high! 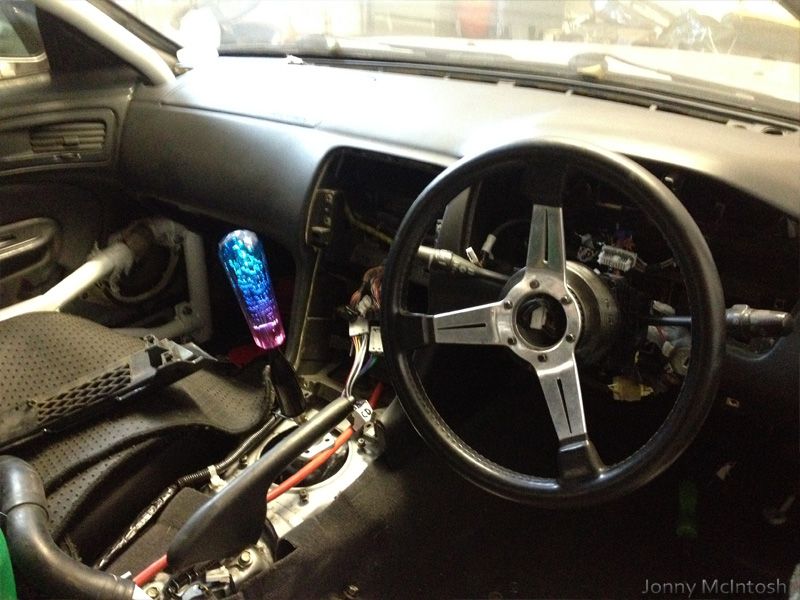 bought some shit on ebay to use as temp monitoring, going to buy a dakota converted for the rev counter eventualy and an spa temp gauge once i have a bit more spare cash 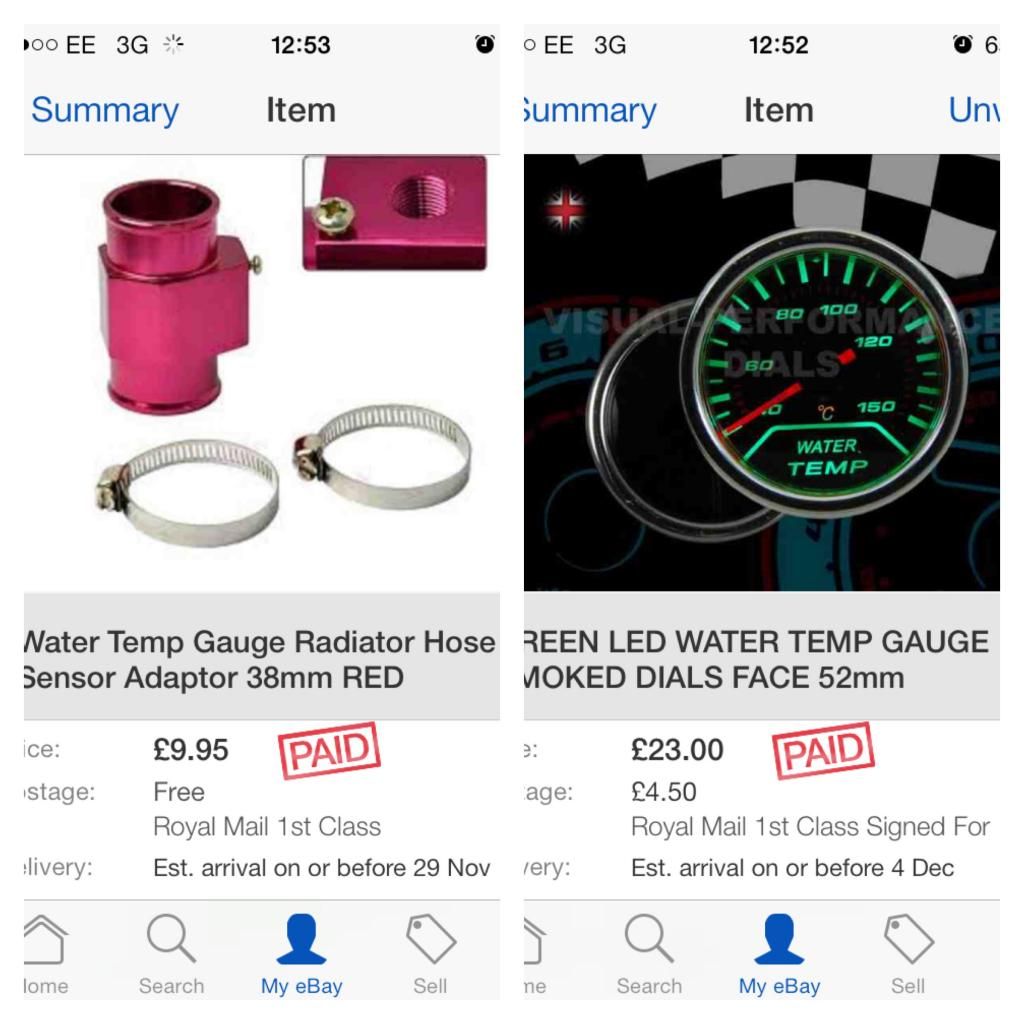 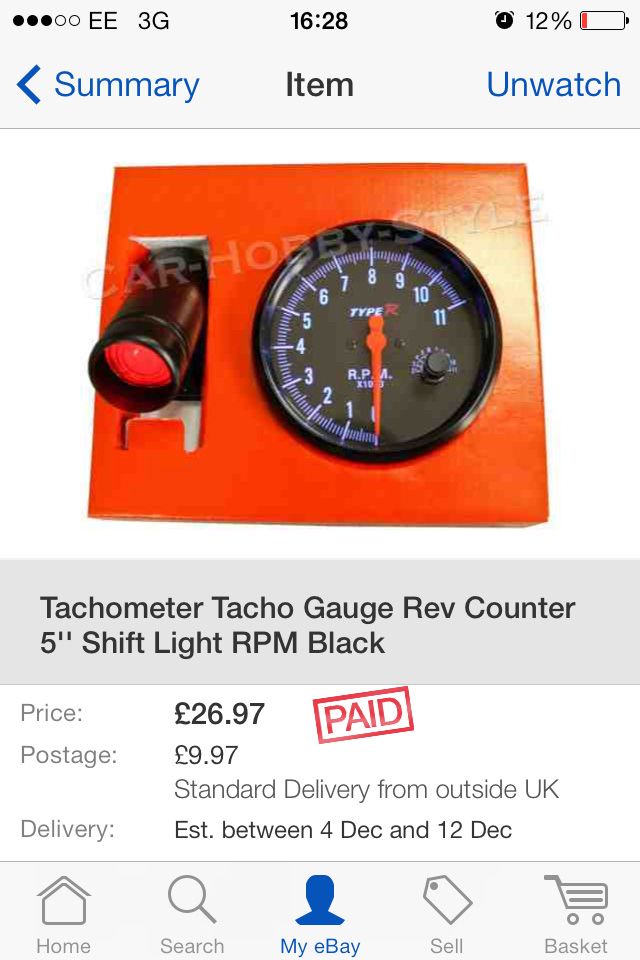 reason i bought an ebay coolant temp gauge was because i wanted to be sure that i had an acurate reading over the sr dash gauge however my plan was cut short because the top water neck pipe was too small to take the water sensor take off i'd bought 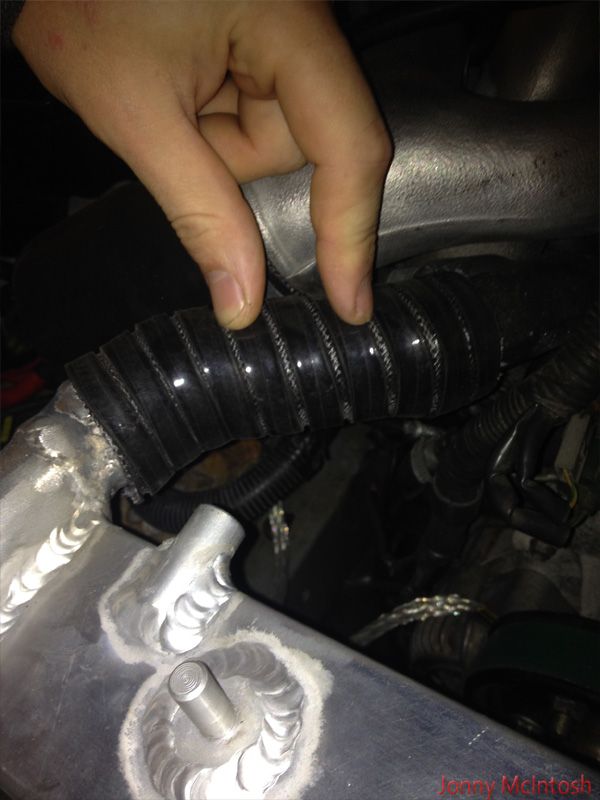 so after looking around online and speaking with a few people it seems the 1jz has it's own water gauge sensor my thoughts then were to take that sensor out, fit an adapter and make my own gauge run off that hole went on ebay 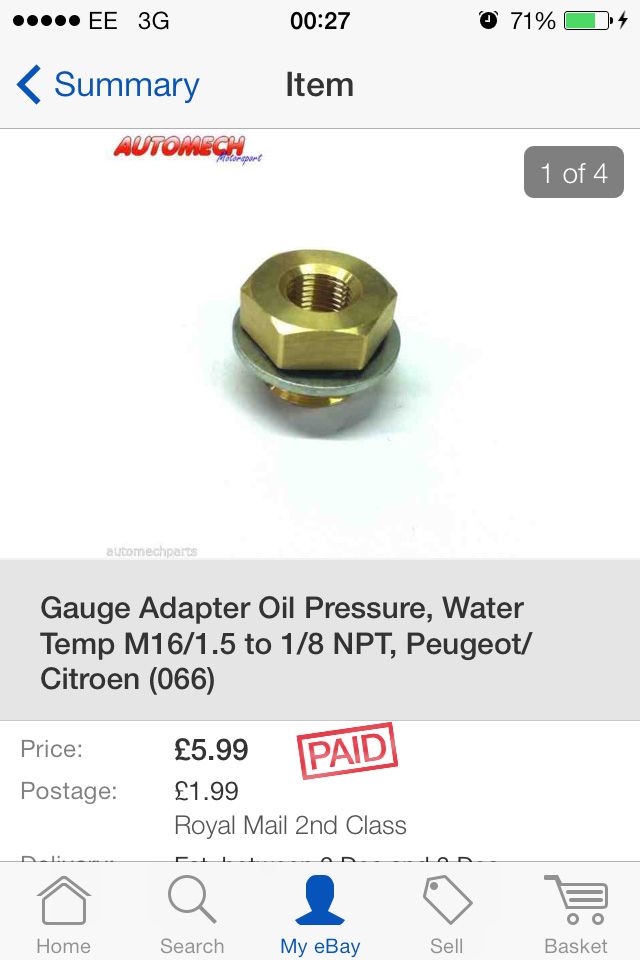 hopefully this plan will work just need to sort out small efficent fans! also bought a factory soarer downpipe as apparently they help reduce chance of having boost spikes compared to a 3 inch downpipe, this should also help with making the exhaust stripped the heat shields off and i'll be trying it on the car when i go to work on it next 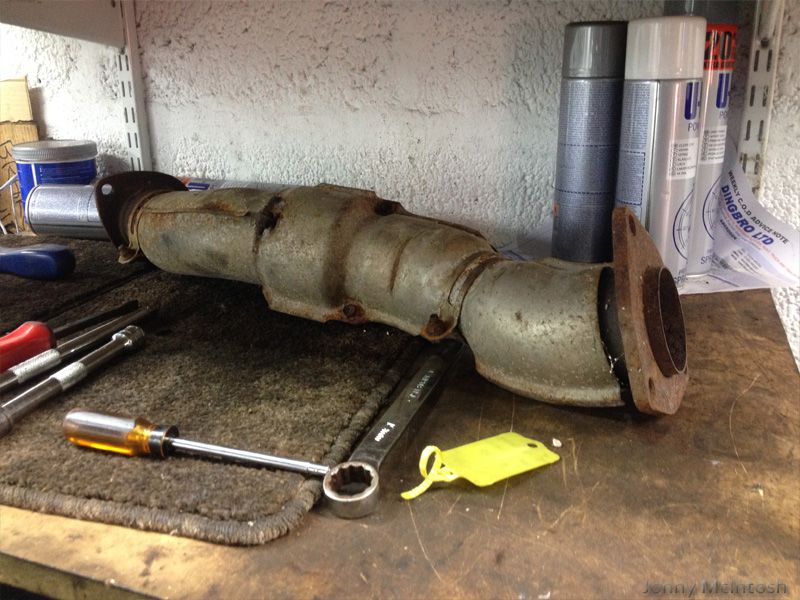 oh yeh, also had a massive 76mm greddy gauge show up and some new boost pipe 3+5mm, and some 8mm for the rad expansion tank but it's blue i ordered black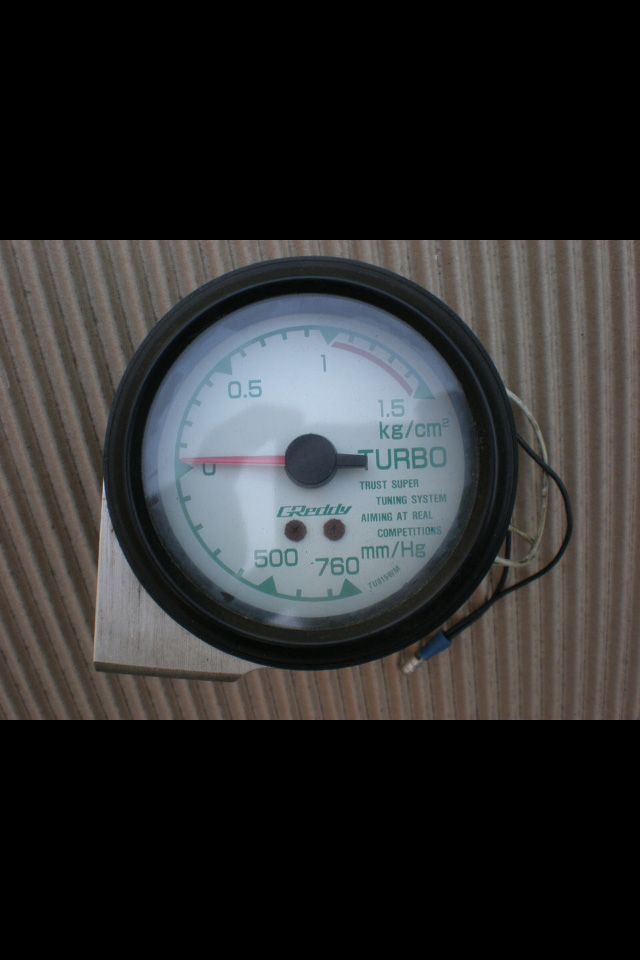
__________________
http://zilvia.net/f/builds-builds-on...1jz-build.html |
|
|
|
|
12-08-2013, 05:43 PM
|
#42 |
|
Leaky Injector
Join Date: Nov 2009
Location: Scotland, UK
Age: 34
Posts: 130
Trader Rating: (0)
Feedback Score: 0 reviews
|
slowly working my way through the list when i can get the time
coilovers were cleaned with a soft wire brush and washed down with some carb cleaner to remove the old grease, they've only done a few summer months on the road and they looked shit already! paint's started coming off the springs already! cleaned, adjusted and regreased wound them up 3cm for now as the hubs lower the car roughly 50mm anyway so i'll have a bit of playing around with it when i'm ready for allignment to get my height perfect before on the left and after on the right [IMG]http://i283.photobucket.com/albums/kk282/jdm-997/Silvia% 20S14a/303_zps3739a0b6.jpg[/IMG] and fitted to the car, along with brake pipe covers that have been painted silver had somehow managed to fit a camber arm backwards on the passenger side so that was unbolted from the hub and spun round the correct way 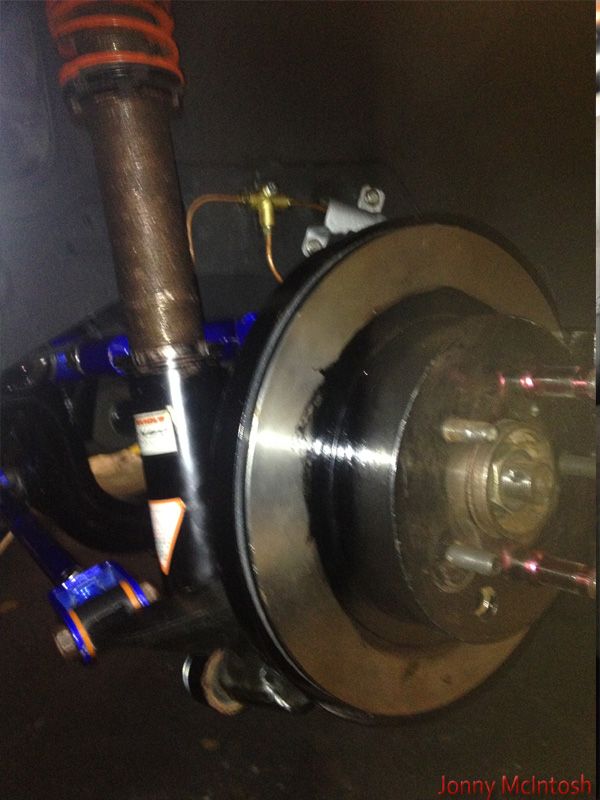 welded up a hole on the apex backbox, it's an awful weld as i'd ran out of gas half way through haha i also took a little bit off the prop, just wanted to make sure i had a safe ammount of clearance in the back of the gearbox since the prop is a tad longer than i asked for, dressed up the end again with a dremel and put a taper on it 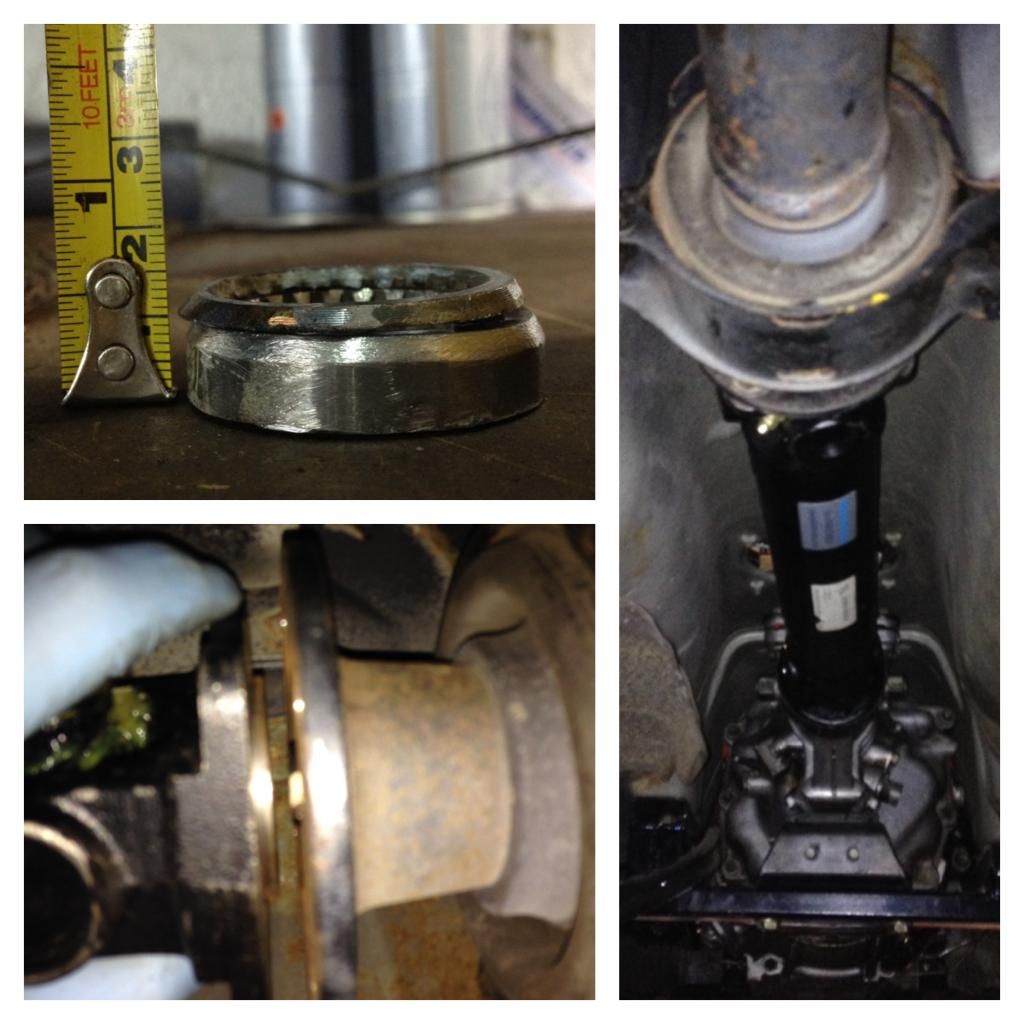 fits perfect now and with the prop in hard to the back of the box the left picture between flanges shows how much clearance it now has so the prop was fitted front and rear sections, along with the handbrake cables being secured across eachother so they fit perfectly over the studs on the floor with both locating pins in bought 5 litres of this comma 75w90 gl4 oil to just use to get me going first, i'll be changing all fluids to better oils before going drifting put in 4 litres so far, going to open fill plug and fill oil till it leaks out of the hole next time i'm at the car, i don't want to risk overfilling the box  lastly thanks to clive for the recaro passenger rail it means i'll get my seat bolted in without any hassle 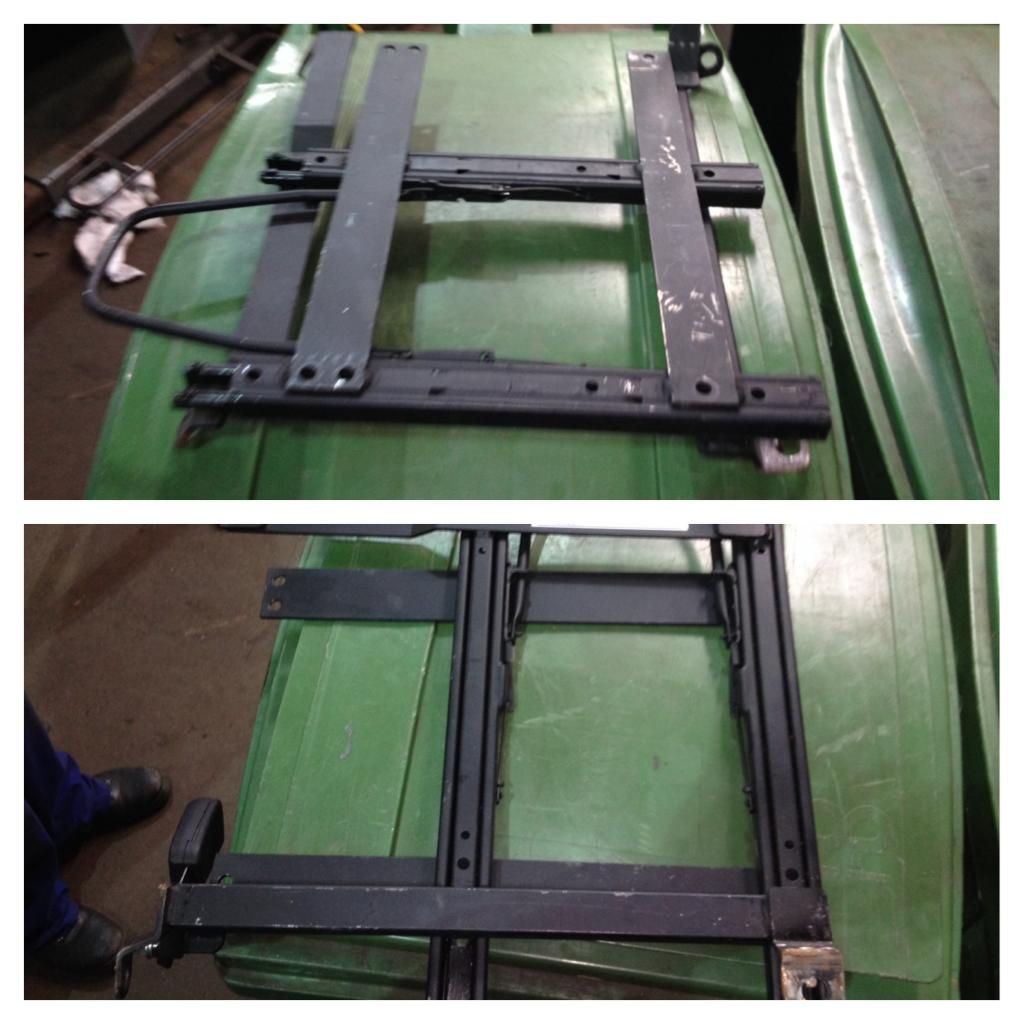
__________________
http://zilvia.net/f/builds-builds-on...1jz-build.html |
|
|
|
|
12-17-2013, 05:43 AM
|
#43 |
|
Leaky Injector
Join Date: Nov 2009
Location: Scotland, UK
Age: 34
Posts: 130
Trader Rating: (0)
Feedback Score: 0 reviews
|
a few more jobs done tonight after work as I managed to get an hour on the car,
rear driveshaft nuts set to 250nm with new split pins all the cage bolts have been tightened and cage is finished, gktech handbrake button is now on, rear strut brace fitted and tightened in now, clutch cylinder is now sorted and in for final time after a bit of messing about before and I have a full clutch pedal with full disengagement when pedal pressed recut one of the bad threads on the turbo Y pipe so I can now bolt on the soarer front pipe and decide how it'll meet the rest of the exhaust managed to get out to stevie's and collect my parts, he's made an awesome job painting them as usual! 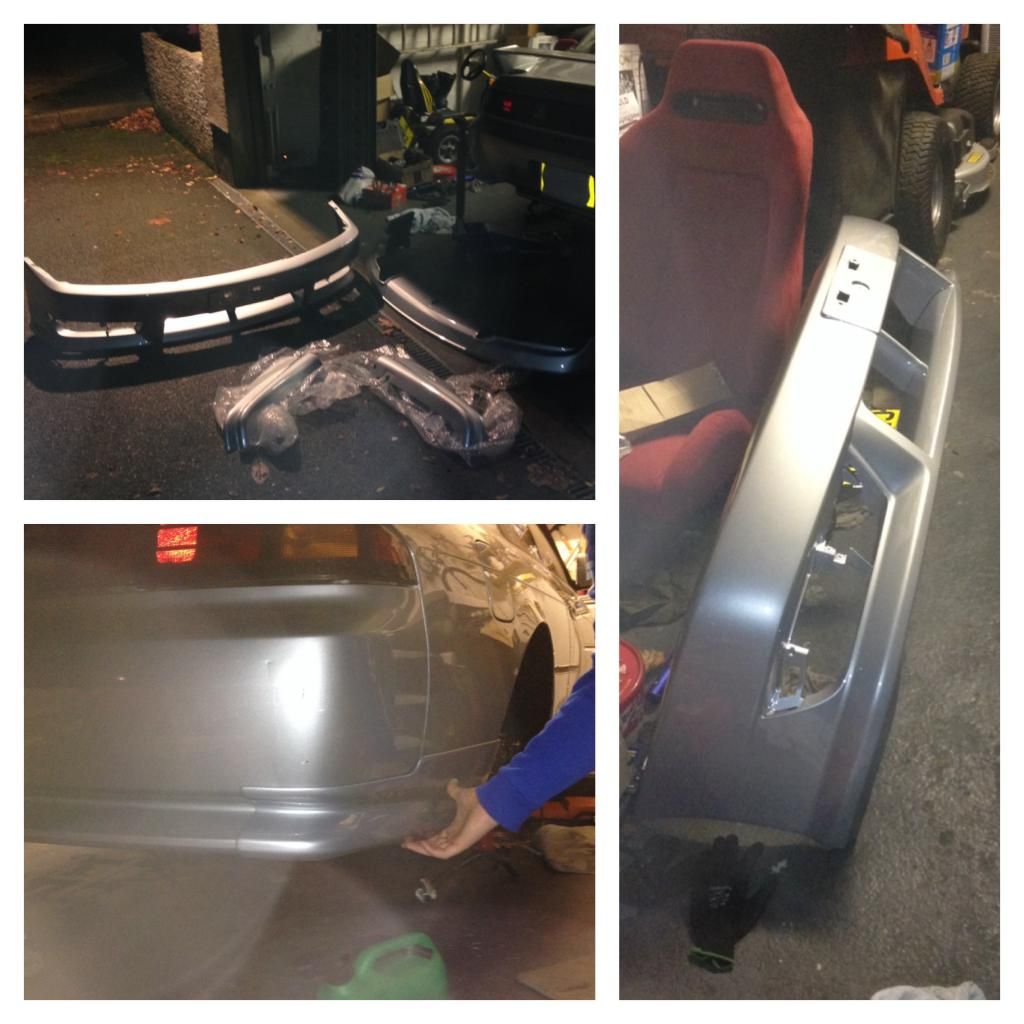 as for now, i've got some parts on order from toyota, front sump dipstick tube (there is a difference between rear and front sump) and some p/s pump washers so hopefully i'll get my pipes to seal since it's leaking possibly found fans, need to go over to the garage and measure the gap between rad to find out if I can fit them, they are 3 and 1/2 inch deep so I don't think I'll have space for them but here's hoping
__________________
http://zilvia.net/f/builds-builds-on...1jz-build.html |
|
|
|
|
12-18-2013, 11:03 AM
|
#44 |
|
Leaky Injector
Join Date: Nov 2009
Location: Scotland, UK
Age: 34
Posts: 130
Trader Rating: (0)
Feedback Score: 0 reviews
|
new ideas......been doing some research
so i measured the gap between my engine and rad, it's only 2inches....DOH! after reading up as much as i could find, there are no 2inch thin electric fans which would be able to flow enough air to keep a jz cool why is it that everyone goes from electric fans back to a viscous on an sr? because they are not efficent enough. if they can't keep an sr cool, what are they going to do on a jz! so the idea now is rather than rely on two tiny slim electric fans, i'll move the mid mount intercooler back down to the front position behind the bumper and run some big high power peugeot 306 push fans infront of the radiator hopefully this setup will work better than having a mass of squashed parts theory being build the car to be reliable and work well as a drift car, if the difference between having short intercooler pipes and overheating problems or having longer pipes but can get an extra few laps each time before max safe temp reached then that's what i'll be doing
__________________
http://zilvia.net/f/builds-builds-on...1jz-build.html |
|
|
|
|
12-25-2013, 11:12 AM
|
#45 |
|
Leaky Injector
Join Date: Nov 2009
Location: Scotland, UK
Age: 34
Posts: 130
Trader Rating: (0)
Feedback Score: 0 reviews
|
some more parts arrived and got some work done on xmas eve since it was my first day off work in months
hks fuel cut defender plugs bkr7e (need to gap them to correct gap for jz) dakota digital rpm converter 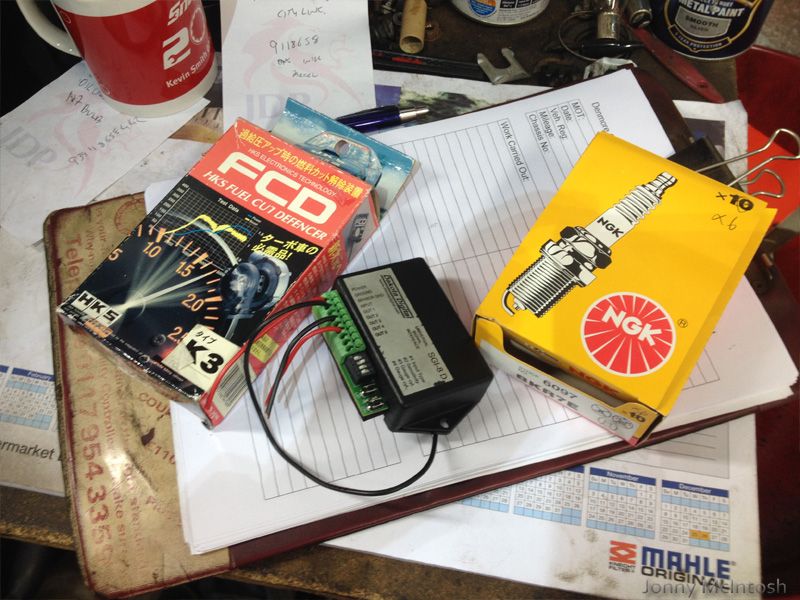 thanks to dale again i managed to get a second gearbox clutch cover for my R154 total of around £50 second hand for the pair, toyota want £200 :S 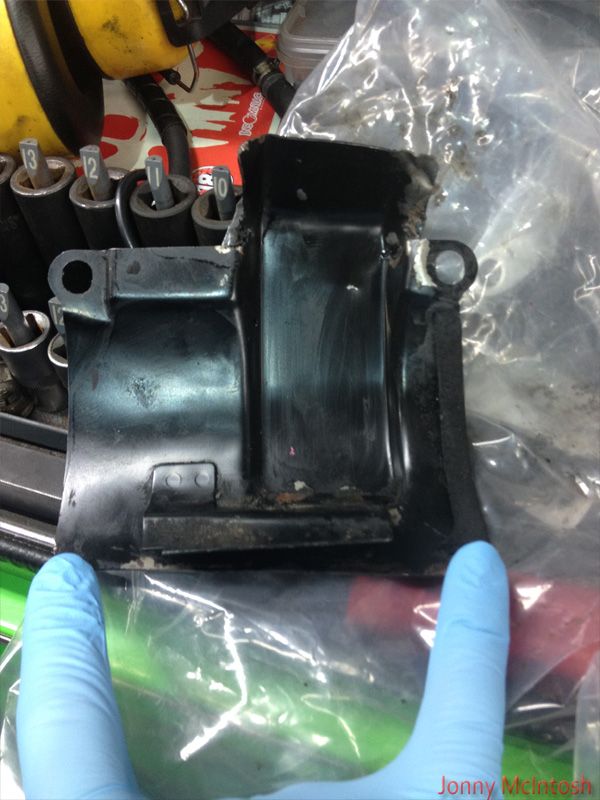 tried on a wheel 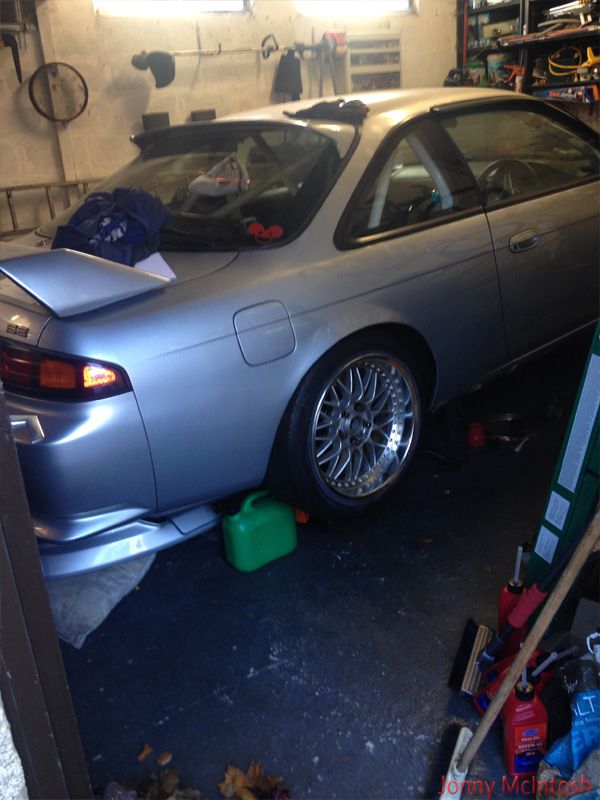 also tried on some more body parts, just roughly held up skirts and rear spats....car made it onto finalboss  took home my brake pipe flaring tool from work, it can do 5/16's also which was perfect for flaring the 8mm fuel pipes 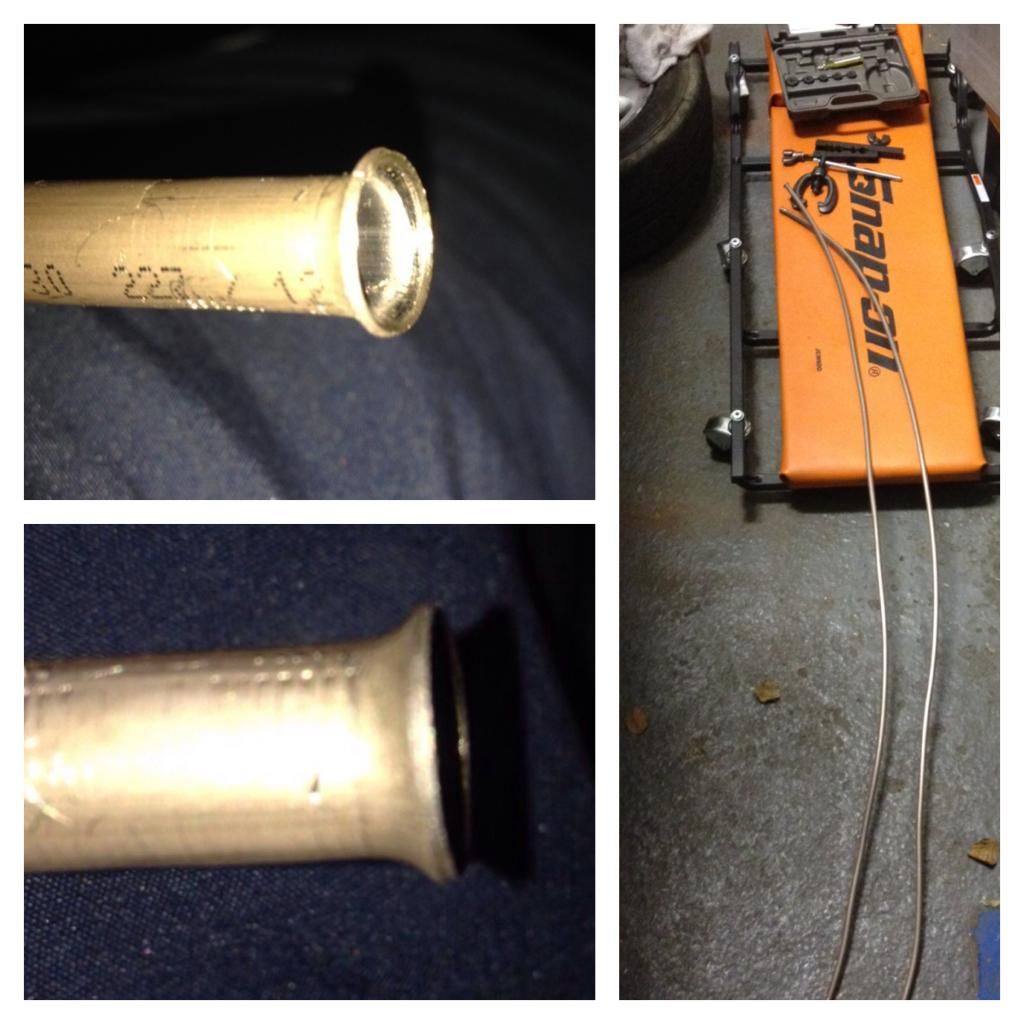 so got some copper pipe ran along the chassis rail under the car, this is alot safer than having two rubber pipes along the floor i'll be adding some heat protection along the back of these for when the exhaust is made 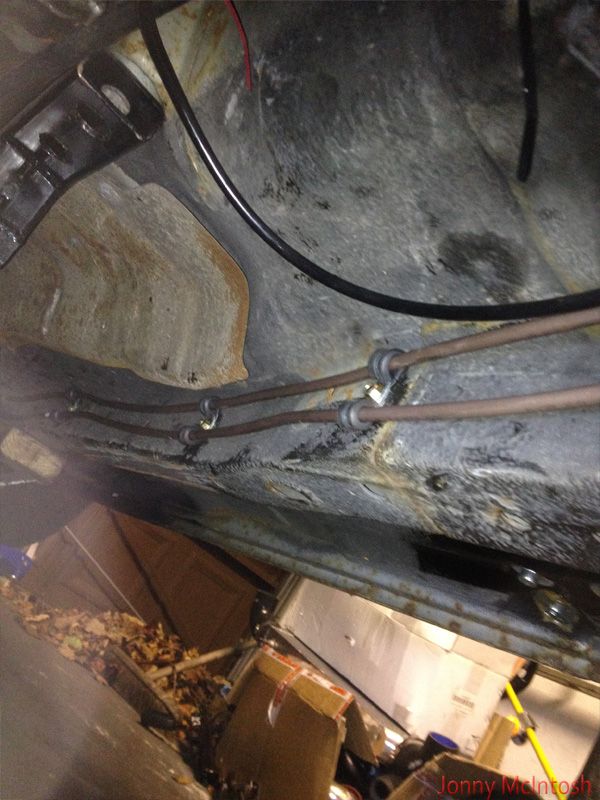 still to stonechip the front half of the car, going to do this when it's up on a lift/ramp at my work not doing that job on my back again hahawasn't happy with the top cooling hose so luckily enough the top sr20 rad hose cut in half has the perfect bend that i need 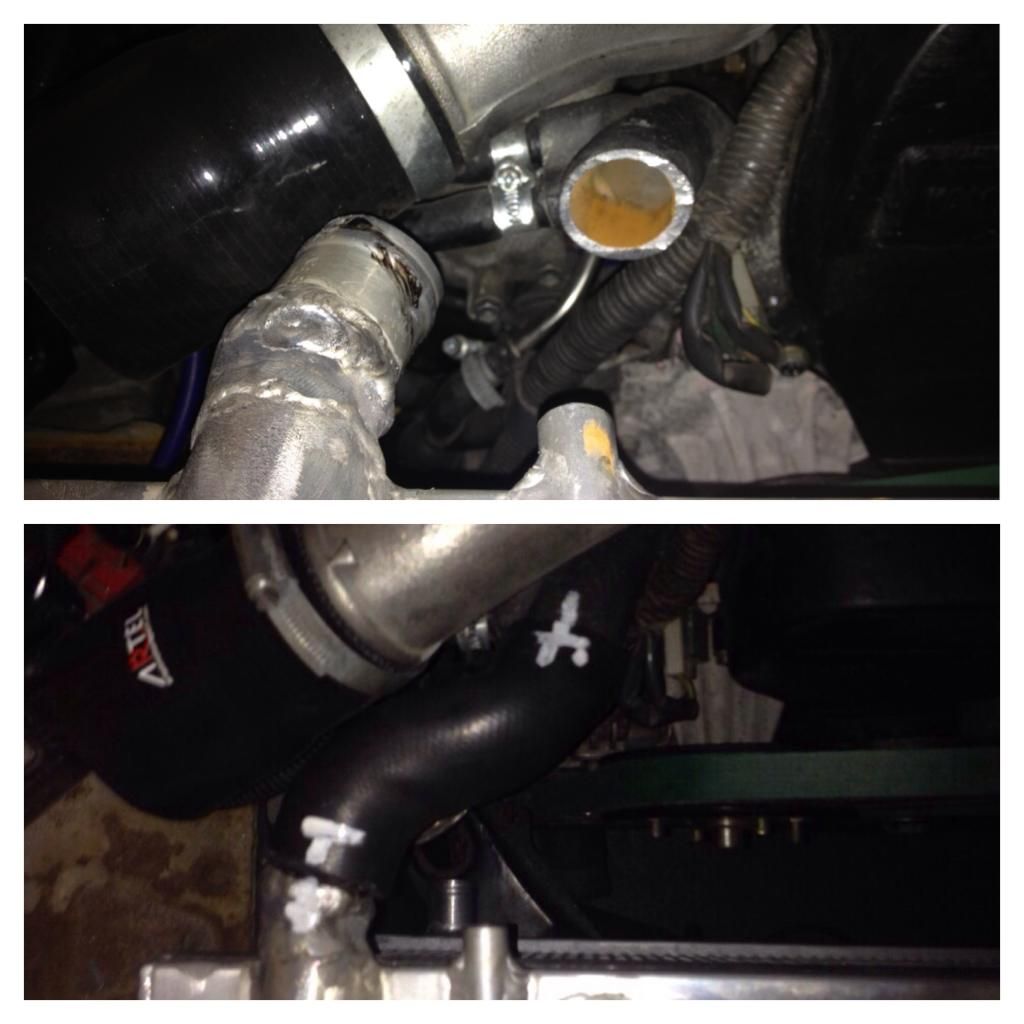 this will work perfectly also swapped over the rail on the recaro seatgoing back to the garage tomorrow (boxing day) to fit the dash for a final time and all the stuff around/inside it and hopefully get the car down on all 4's to have it towed to my work
__________________
http://zilvia.net/f/builds-builds-on...1jz-build.html |
|
|
|
|
01-04-2014, 12:30 PM
|
#46 |
|
Leaky Injector
Join Date: Nov 2009
Location: Scotland, UK
Age: 34
Posts: 130
Trader Rating: (0)
Feedback Score: 0 reviews
|
Happy New Year!
brake pipe on and have a good footbrake with no leaks, fuel pipes on, forgot to post this earlier, that was the car being rolled out of the garage to be spun round, looks so stupid with coilovers on the back and standard shocks/springs up front  the peugeot 306 twin push fans fitted where the mid mount intercooler was 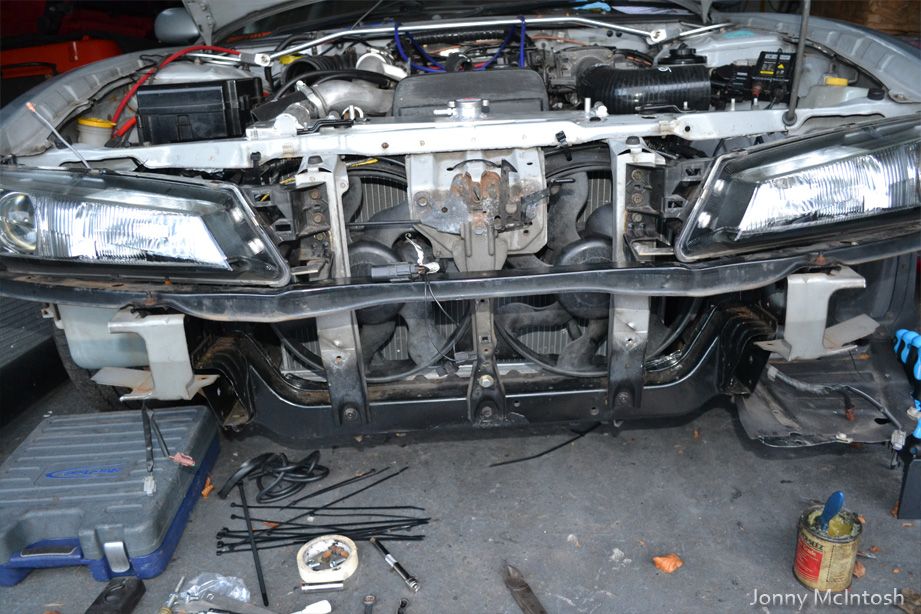 they are a good fit! 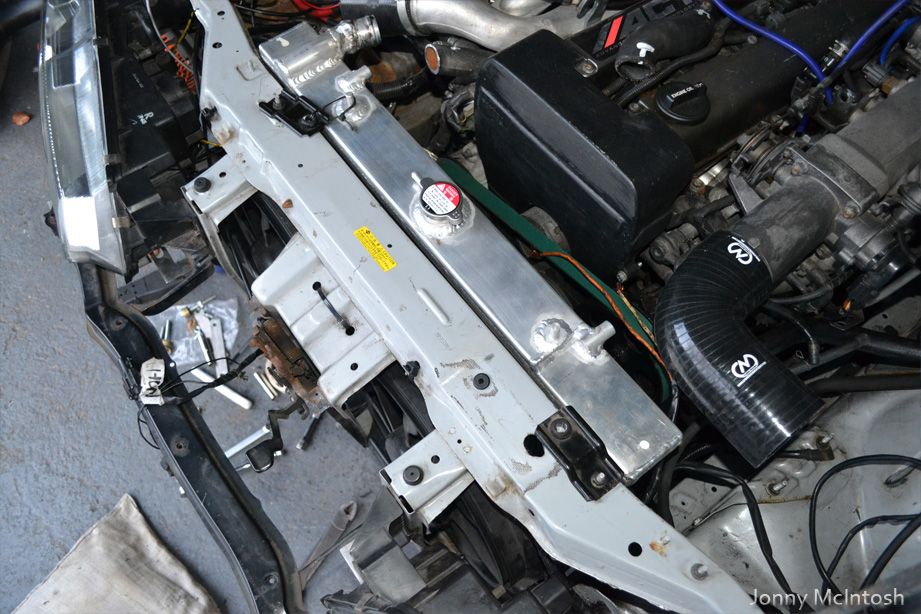 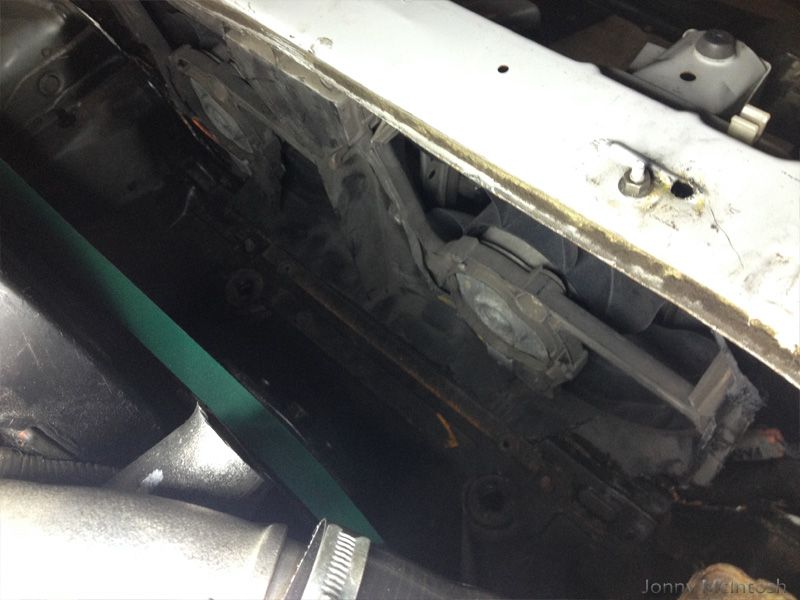 had chopped the cowling down a good bit on them to get them in and also means less of the rad is covered 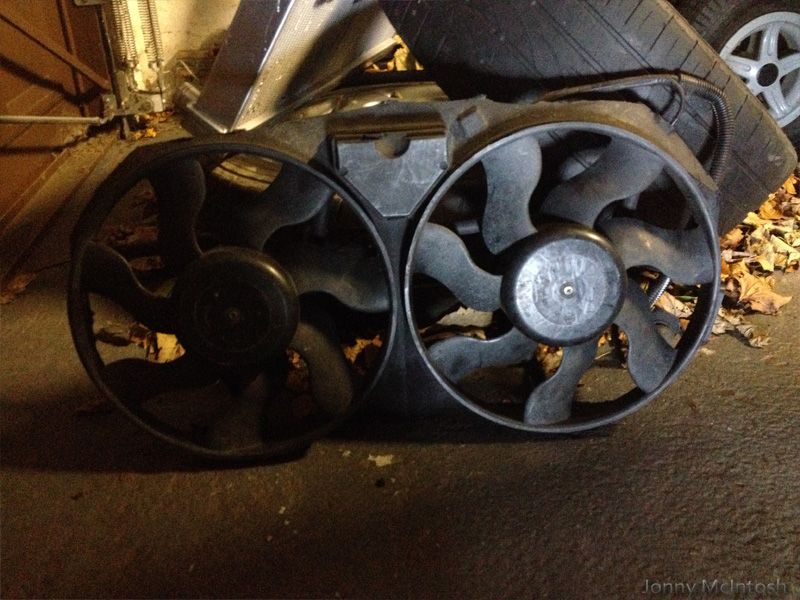 made up a secure mount at the bottom to keep the fans from touching the front bars on the slam pannel, used threaded bar (cut it down to the nut with a grinder after pic) sand some big penny washers and nuts, only thought was though first sight of a slight bump and that bar will go right through the rad or the intercooler 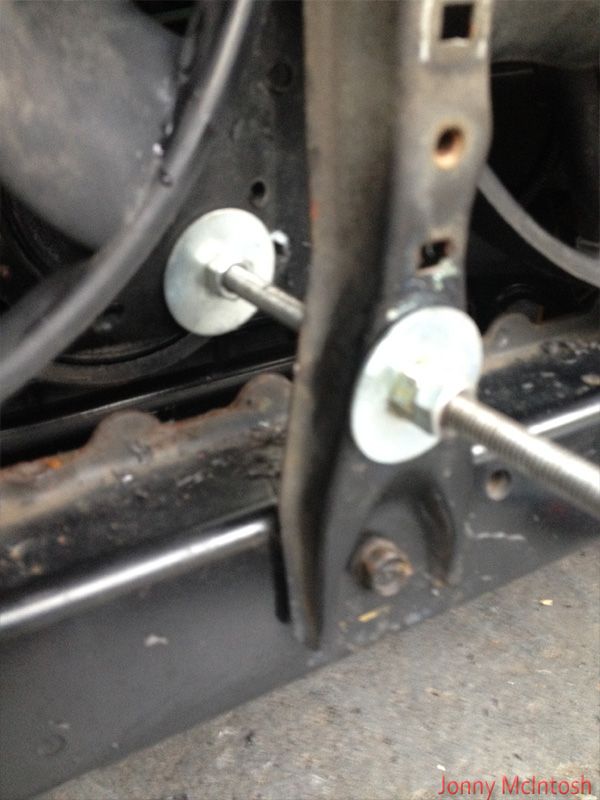 will do for now though just to get it running safe got the front mount fitted battery tray hole cut out also didn't realise until today that an aftermarket s14 intercooler kit uses 2.5 inch pipe for the turbo side and 2.75 for the throttle body side (well my kit did anyway) so thankfully out of my massive box of crap i managed to get two s14 2.75 inch throttle body fmic pipes and cut them up to fit what i need i do unfortunately have the recirc pipe and cold start pipe for an sr outlets still on one of the pipes so they will have to be blocked off, thinking about squashing them in a bench vise but don't know if they will stay shut under pressure, i'll probably just get bungs and fit them so the setup consists of so far: turbo 64mm to 70mm reducer 70mm pipe with bends silicone joiner 70mm pipe 70mm to 76mm 90 degree silicone elbow core 70mm to 76mm 90 degree silicone elbow pipe join pipe 70mm 90 degree elbow to throttle body happy enough as it's a fairly steady consistant size for air flow i need to buy a 1m length of 70mm black silicone hose to cut up as i need to make sure i have enough pipework covered on two parts where i was a little short with the standard 3" silicone joiners it can be seen here with the two blue silicone hoses  apart from that it should all work pretty well in theory, it'll all be pressure tested to 1.5 bar with my home made tester and compressor problem now is the kouki bumper won't go back on since the core is in the way, going to have to cut it up which means i'll probably have to take some off the greddy lip too since it goes to the edge that's hitthing the corereally want to retain the factory fogs too! will hopefully all fit ok with a little trim here and there :S 
__________________
http://zilvia.net/f/builds-builds-on...1jz-build.html |
|
|
|
|
01-05-2014, 04:08 PM
|
#47 |
|
Leaky Injector
Join Date: Nov 2009
Location: Scotland, UK
Age: 34
Posts: 130
Trader Rating: (0)
Feedback Score: 0 reviews
|
got the dash in tonight, bolted in and fully fixed in place,
just leaves gauges, dakota rev converter, harnesses, seats and few small things for the inside to be finished going to get the seats and harnesses fitted tomorrow night if the weather stays up as i can't open the drivers door wide enough in the garage to get the seat in also rerouted the battery cable a bit better behind the dash so it's out of the way just need to fit a kill switch along the line and run it underneath the center console 
__________________
http://zilvia.net/f/builds-builds-on...1jz-build.html |
|
|
|
|
01-24-2014, 05:55 AM
|
#49 | |
|
Leaky Injector
Join Date: Nov 2009
Location: Scotland, UK
Age: 34
Posts: 130
Trader Rating: (0)
Feedback Score: 0 reviews
|
Quote:
the from a company in the uk called apex performance they are big on the uk 200sx owners club, www.sxoc.com
__________________
http://zilvia.net/f/builds-builds-on...1jz-build.html |
|
|
|
|
|
01-24-2014, 05:57 AM
|
#50 |
|
Leaky Injector
Join Date: Nov 2009
Location: Scotland, UK
Age: 34
Posts: 130
Trader Rating: (0)
Feedback Score: 0 reviews
|
trial fitted the seats, both clear the cage....well just touch against it but it's enough that they will still move on the rails
it's ridiculous the difference in height with the bride low rail compared to the recaro rail on the passenger side will be looking for a bride low rail for passenger side in near future!! made holes for the rear harness mounts so the harness eye hook's are all fitted I NEED CAGE PADDING NEXT! 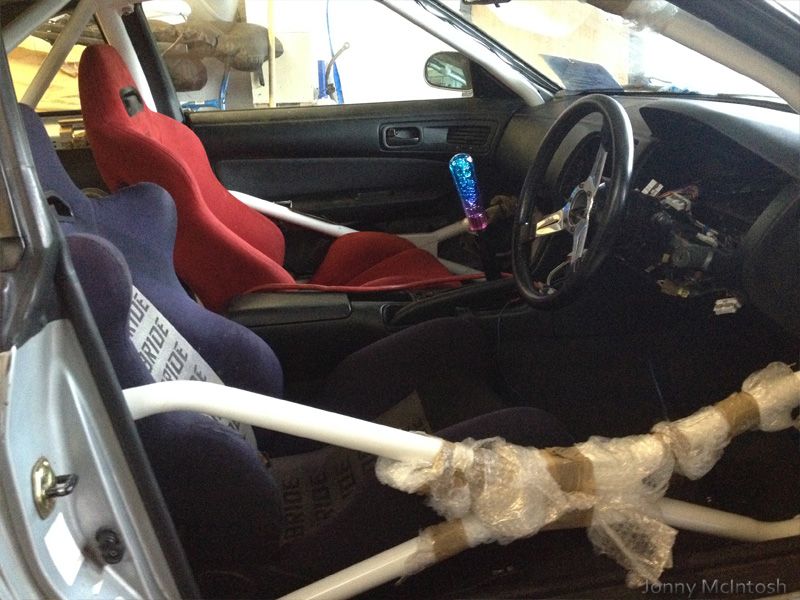 i've taken off the intercooler brackets and will be modifying them as the core sits too far over at one side, plus will mean i can get the bottom pulled in more so i won't have to modify as much of the bumper to fit! got an order through from driftworks over the holidays, tein track rods and ends with spacer, kinked tension rods, t shirt and offset spacer boots however i'm going modified crossmember if i can 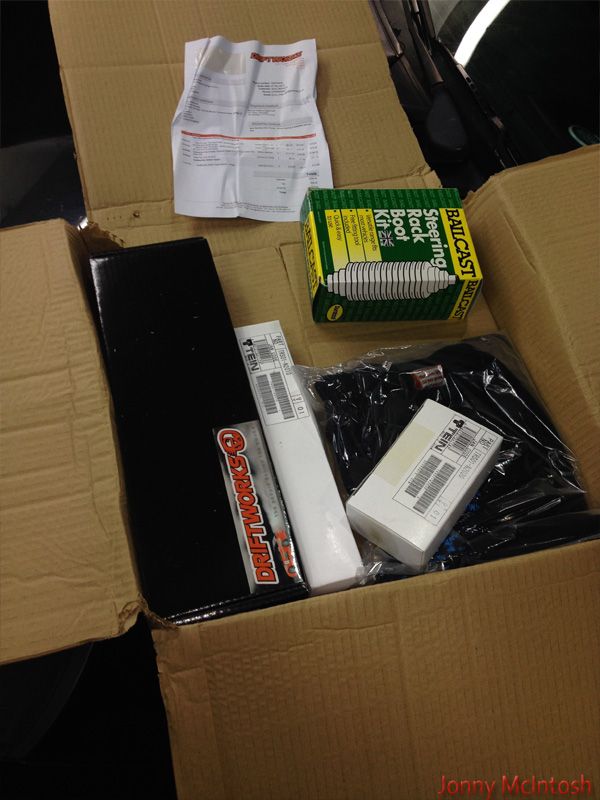 made myself a pipe beader for intercooler pipes, seen this idea online so made my own, it's just an old pair of vise grips with a 70mm exhaust clamp and a smaller 40mm clamp bar welded on works perfect 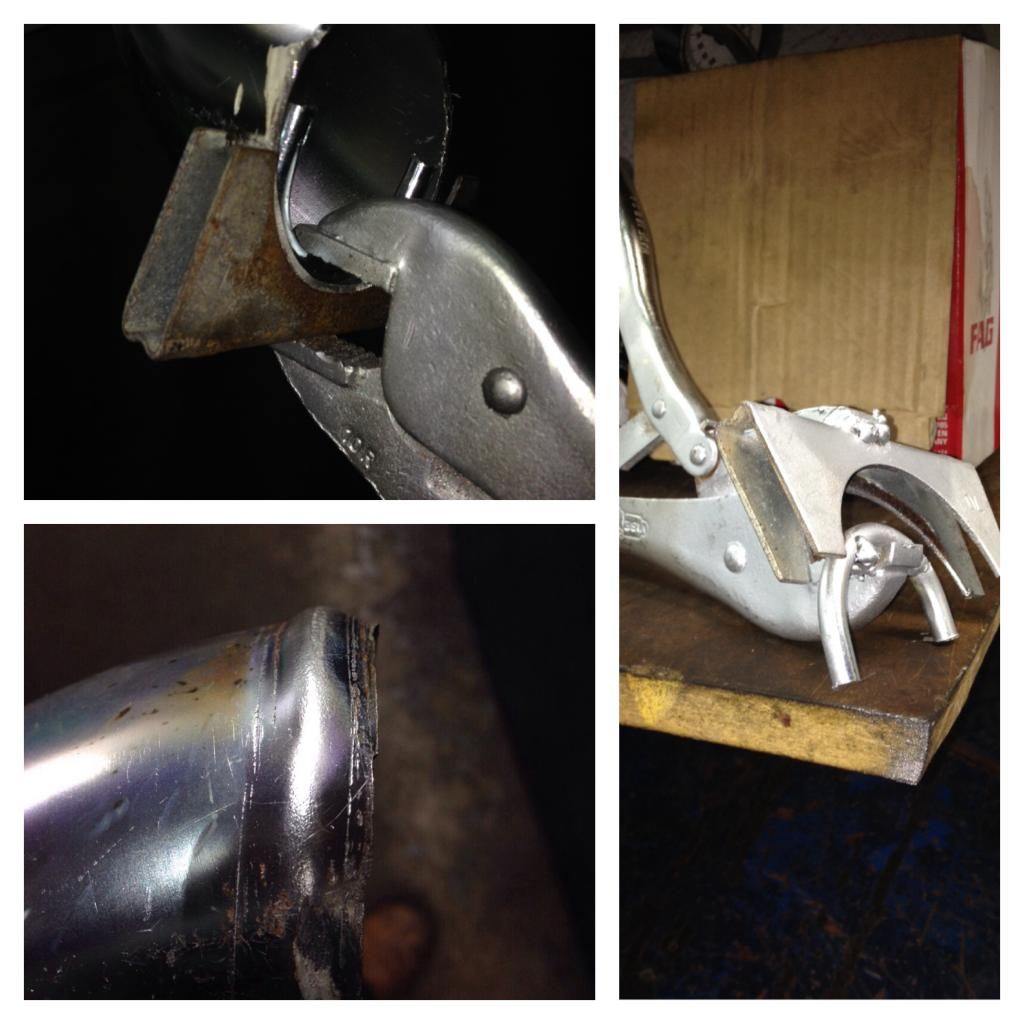 last few bits from toyota arrived, thermostat, jzx90 dipstick tube, p/s pipe washers 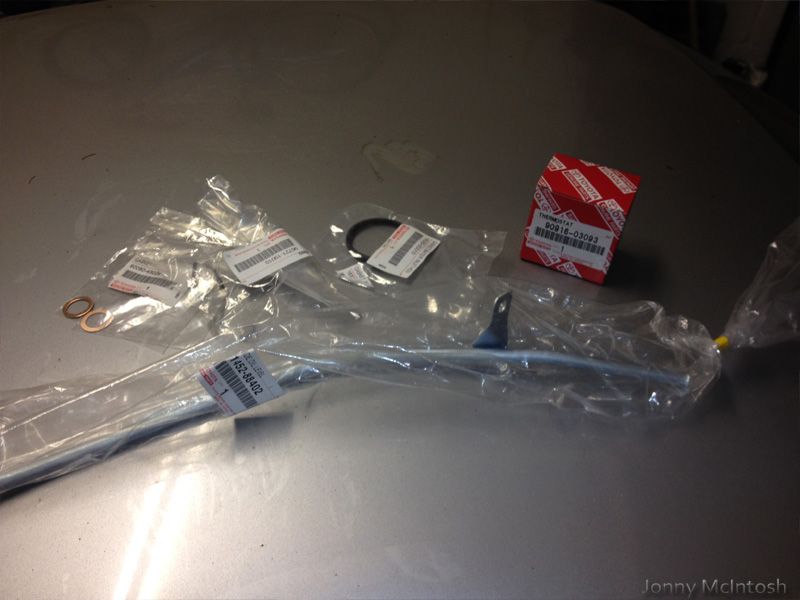 replaced every vacuum pipe on the engine, also removed the pipework for the carbon cannister crap, also fitted an mbc at the turbo's to do me till i get an electronic one old crap 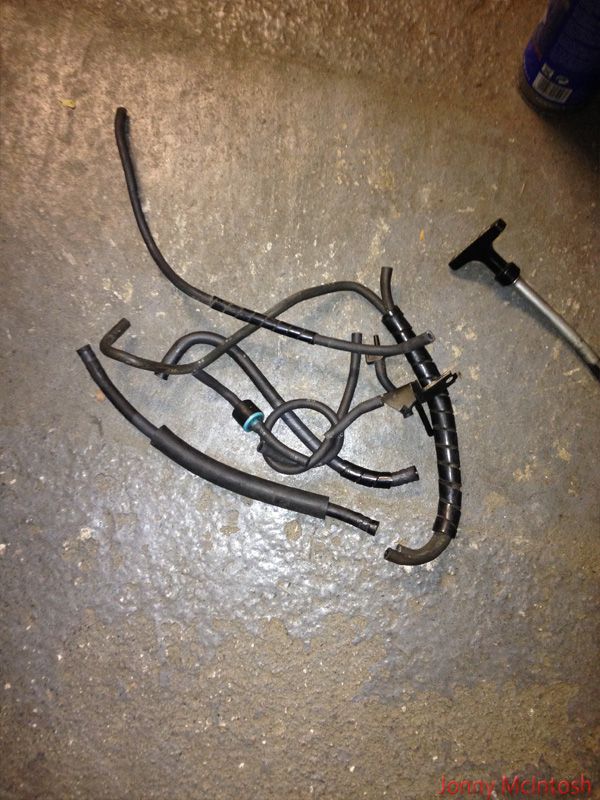 i've ran a wire into cabin for water temp gauge tucked along the spark plug loom along with a vacuum pipe for greddy gauge, tested my water temp gauge with sensor in a cup of boiling water and got no reading, gauge is either dead or sensor is broken so i'm waiting to hear back from ebay seller now..... replaced the thermostat, purely just for peace of mind, no idea how old it is/if it worked, fitted a genuine toyota 82 degrees one 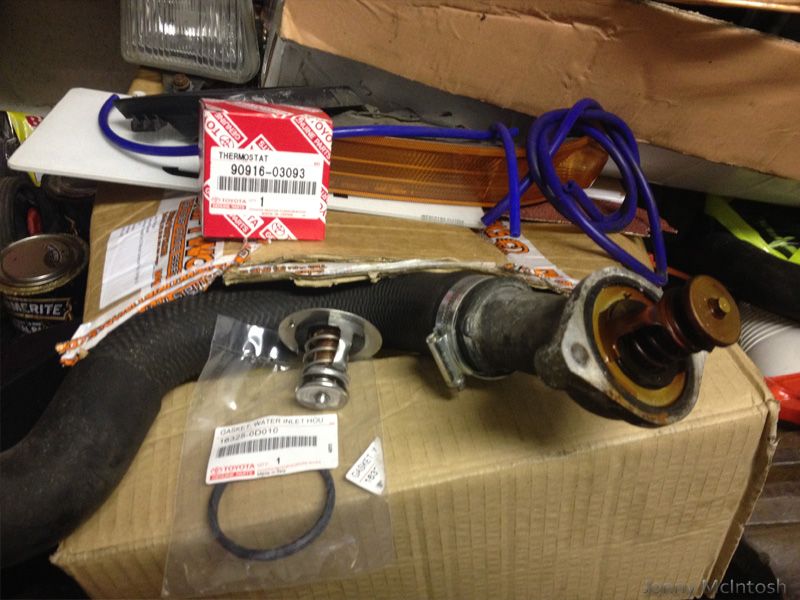 changing it was crap, should have done this when the engine was out on a stand!! 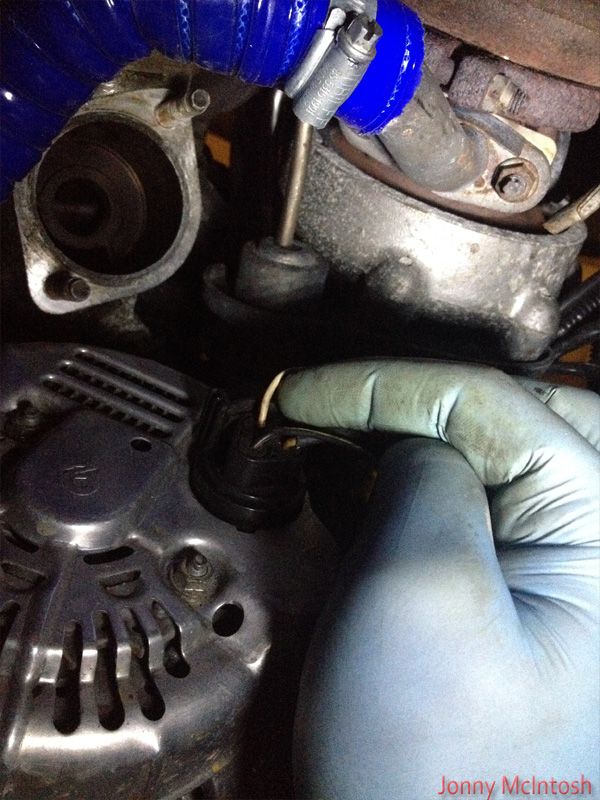 gapped plugs to 0.028 and fitted them, wrapped some insulating tape around the coils while they were out, should really have used heatshrink but had none with me fitted them and as usual with jz's 5/6 of my coil pack clips were broken haha, need some new ones!  have done a few other things on the list! throttle cable is now secured into the pedal and i've adjusted the cable at the throttle body so it's shut when pedal is untouched and fully open when pedal is flat to the floor ------------------------------------------------------------ nothing much has been done to the car as we've had a week of hell! we bought a puppy on saturday the 11th, a wee golden lab 7/8 weeks old eddie 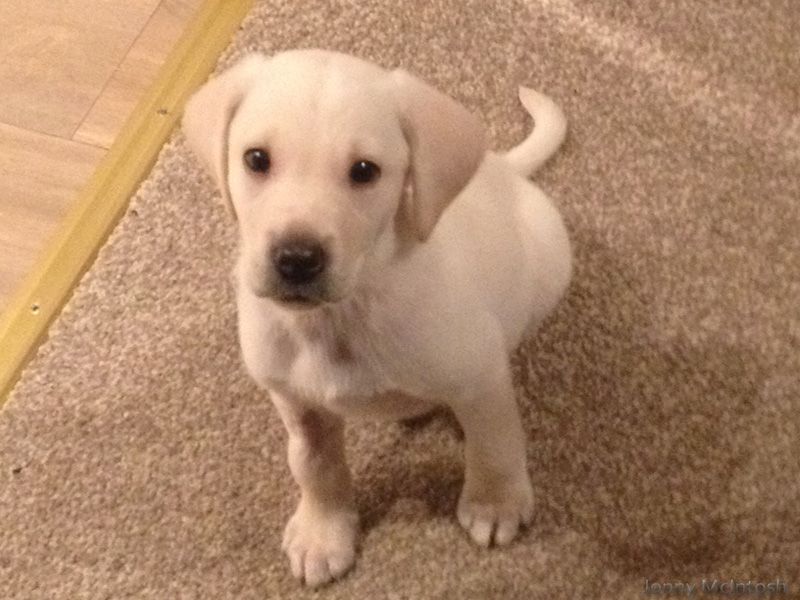 unfortunately after just 2 days he was very ill, he had picked up something from the farm he was on when we bought him then was rushed into the emergency ward in the hospital quarintined with suspected parvo virus he hasn't had any jabs yet so his immune system is basically non exsistant, got to see him every night at the hospital 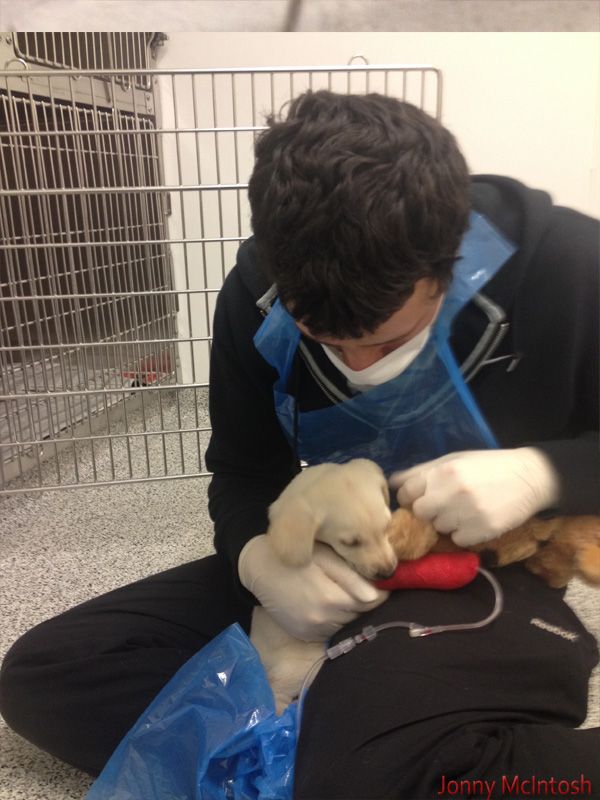 annoyingly i had to foot the bill for the hospital which put it this way, i could have had that 6boost manifold i wanted.....as the breeder wanted nothing to do with it and his insurance doesnt start till the 26th of this month anyway he's home now and on the recovery so i've only had a very few hours this week on the car...... had to cancel my tow truck as i had no chance of getting it to work with the dog problem swapped wheels over though so it's ready to be taken over to my work i have modified the intercooler brackets so the core will sit central and can tuck in better at the back got a 14a bumper for skidding, just a standard uk black one to save the kouki greddy bumper combo till i get better few more parts have arrived like boost hoses and some stuff i needed for it bought some fabulous profounds vip jdm wheels, 18x9 et20 iirc for skidding 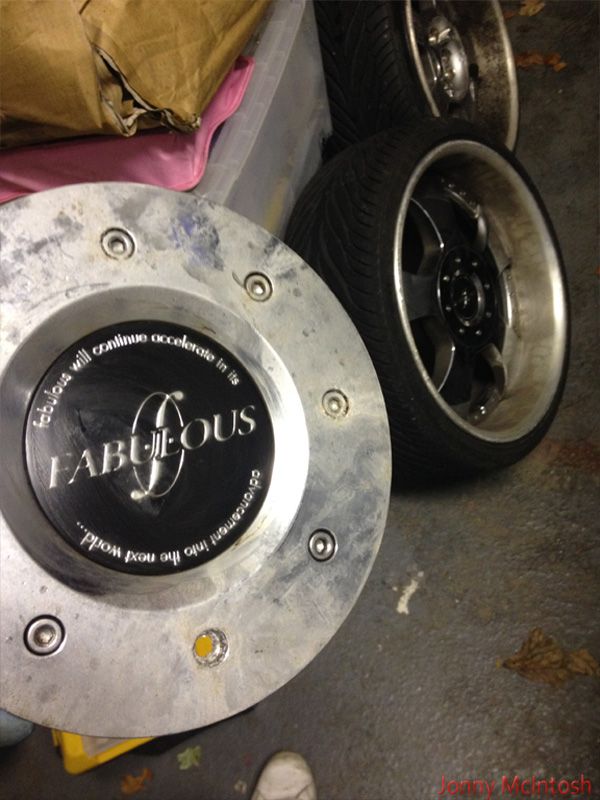  also have been using my pipe beader on every intercooler pipe so they're ready for fitting minus a few bungs on one pipe 
__________________
http://zilvia.net/f/builds-builds-on...1jz-build.html |
|
|
|
|
01-24-2014, 08:59 AM
|
#51 | |
|
Zilvia Member
|
Quote:
__________________
***FortuneMinds*** 95 240SX S14 / 14 Lexus IS250/ IG / Twitter: juvi22003 |
|
|
|
|
|
02-02-2014, 04:44 PM
|
#52 |
|
Leaky Injector
Join Date: Nov 2009
Location: Scotland, UK
Age: 34
Posts: 130
Trader Rating: (0)
Feedback Score: 0 reviews
|
got some time on the car last night (Wednesday) for the first time in 2 weeks nearly!,
managed to get the modified intercooler brackets on and the core now sits perfectly central and is tucked in tight at the bottom 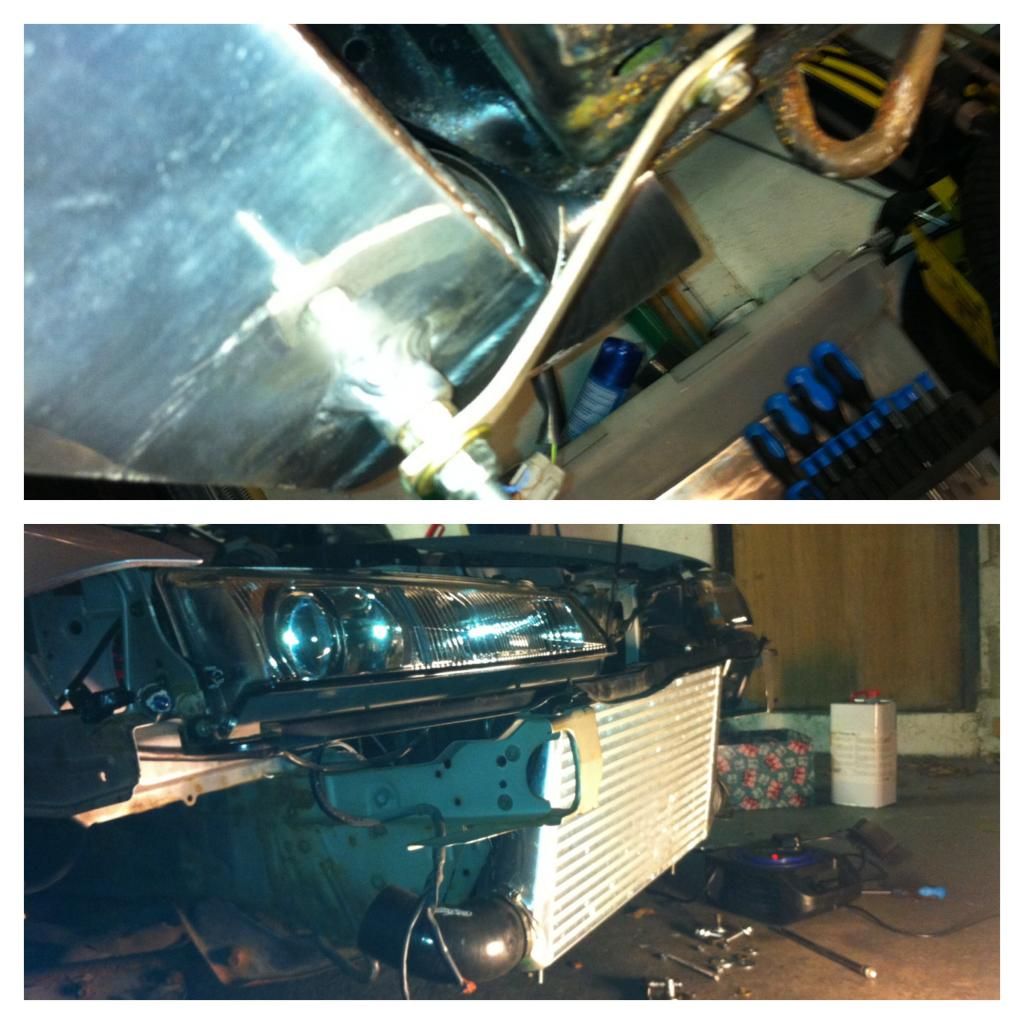 the crank sensor and o2 lambda sensor loom has been secured correctly on the original bracket bolted to the front turbo got the greddy boost gauge fitted in place on the dash with the brackets screwed in, need to find a light source that comes on with the lights on the dash, may just steal a feed from the back of the clocks also got a second coat of silver paint on the battery tray and the other side where the i/c pipes go through to protect the area from rusting found a wire at the alternator plug that has broken insulation and is down to just a few strings of wire holding it together, one of the 3 small wires on the alternator multi plug, so i'll have to remove the pin from the plug and solder it back onto a good bit of wire before it breaks!
__________________
http://zilvia.net/f/builds-builds-on...1jz-build.html |
|
|
|
|
02-02-2014, 04:46 PM
|
#53 |
|
Leaky Injector
Join Date: Nov 2009
Location: Scotland, UK
Age: 34
Posts: 130
Trader Rating: (0)
Feedback Score: 0 reviews
|
big update!! got all day saturday and sunday morning spent on the car
took my intercooler pipe over to a local welding shop and managed to get them to plate over the standard s14 recirc and cold start pipe 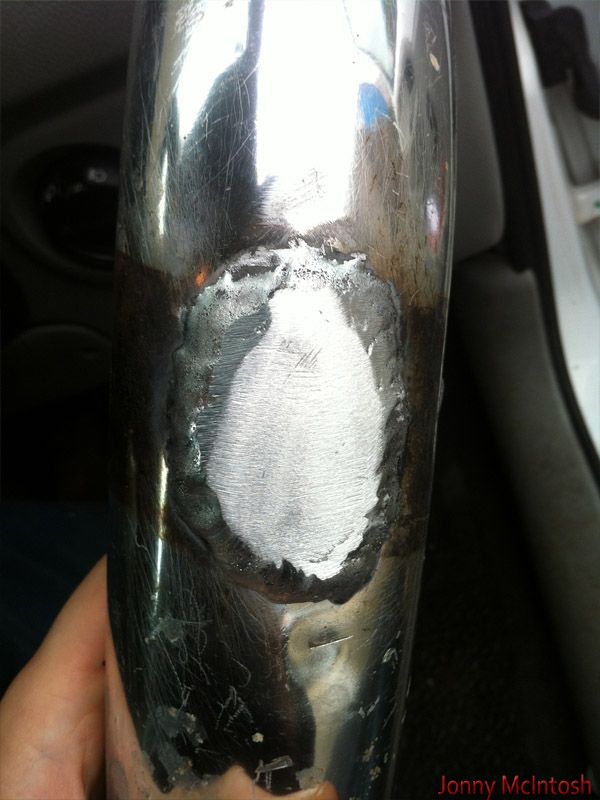 thanks to spice weasel for doing my lower arms and cross member got the rack moved 25mm and +20mm in the lower arms and braced them 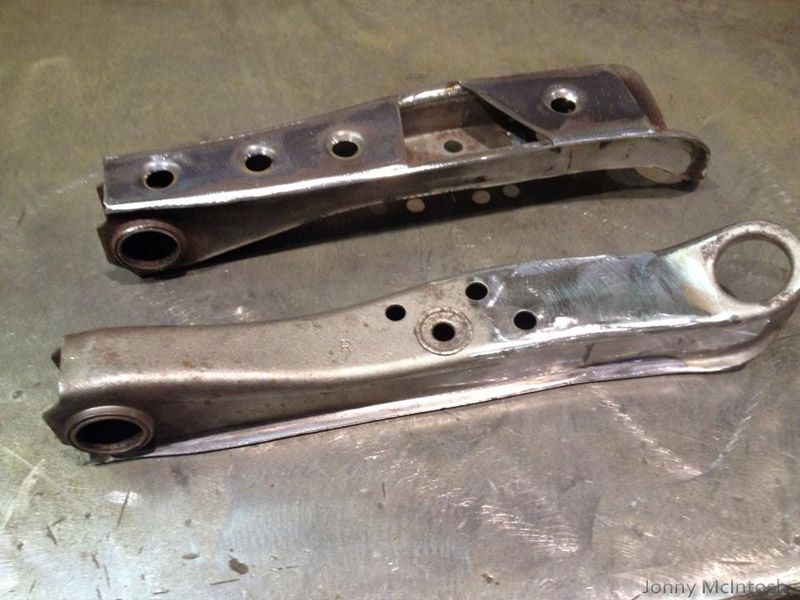 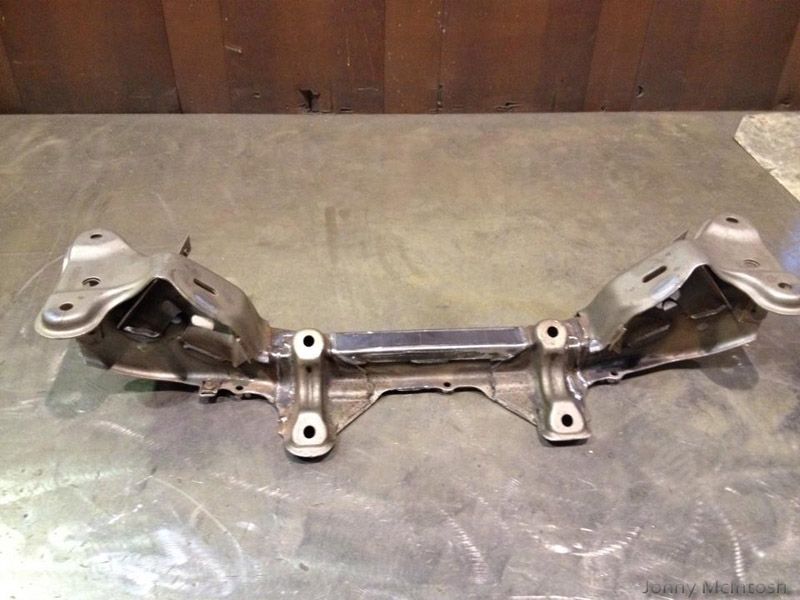 for the first time it came out the garage in months, looking ridiculous with standard suspension on the front 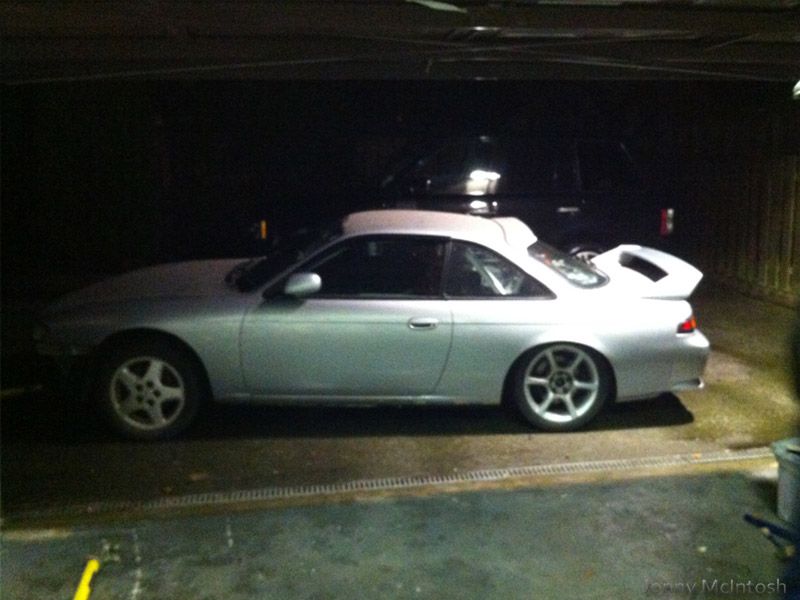 threw a battery in for lights and it was towed to my work, many thanks to mark (redsx) 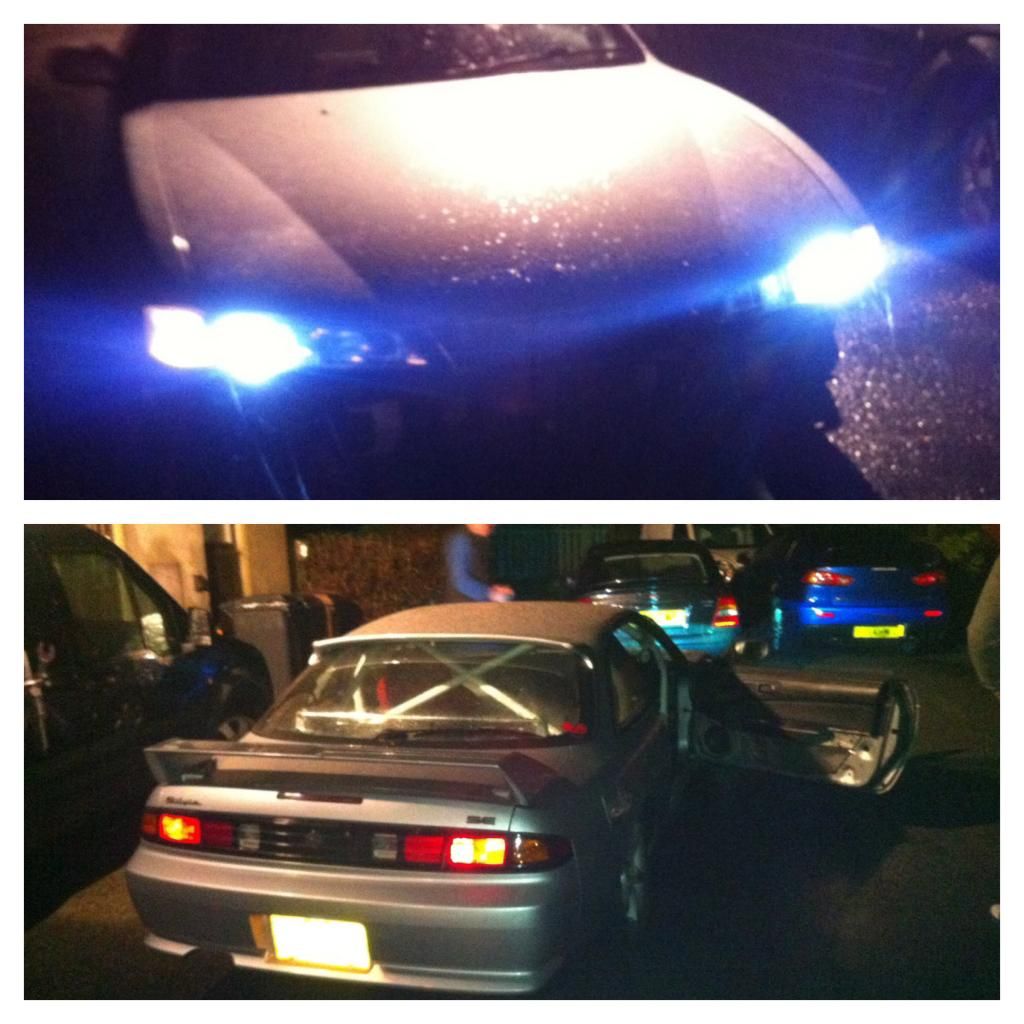 so, up on the ramp saturday morning and the work started welded on an exhaust hanger to the steevo gearbox mount bracket then fitted an sr20 solid gktech mount to replace the worn old weak sr mount that came with my gearbox 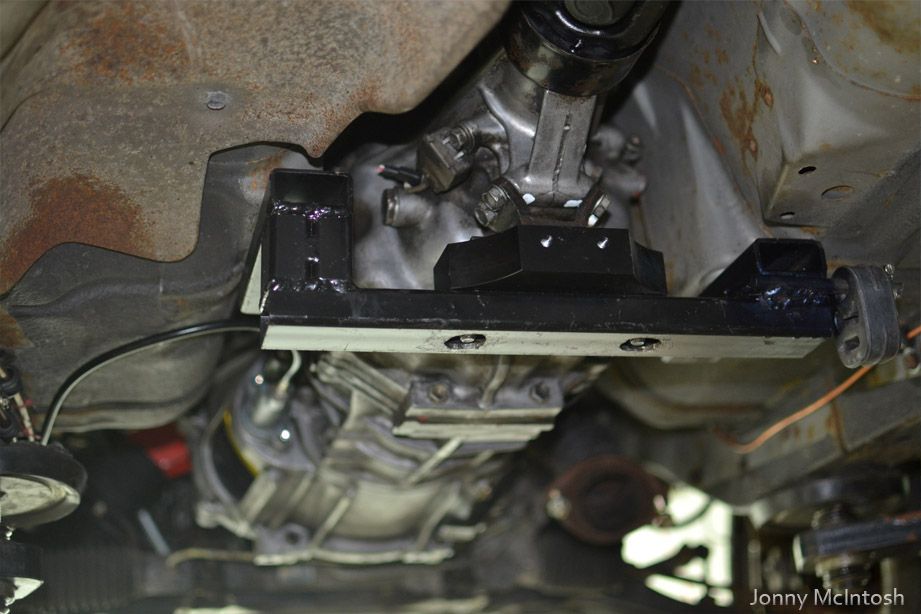
__________________
http://zilvia.net/f/builds-builds-on...1jz-build.html |
|
|
|
|
02-02-2014, 04:47 PM
|
#54 |
|
Leaky Injector
Join Date: Nov 2009
Location: Scotland, UK
Age: 34
Posts: 130
Trader Rating: (0)
Feedback Score: 0 reviews
|
secured the fuel pipes with more P clips in places that i couldn't get to properly lying on my back
then josh came over and i cannot thank him enough for welding up the exhaust joins, i'd bought a box on ebay of 3" offcuts from an exhaust fab shop with various bends etc managed to get enough bends and straights made up to fit the car started off my fitting the soarer downpipe retaining the flexi, then it needed shortening by around 2 inches as the flange sat too low so the soarer downpipe was shortened and tacked into place then a few small bends were tacked into place to get the angle right for facing the back of the car 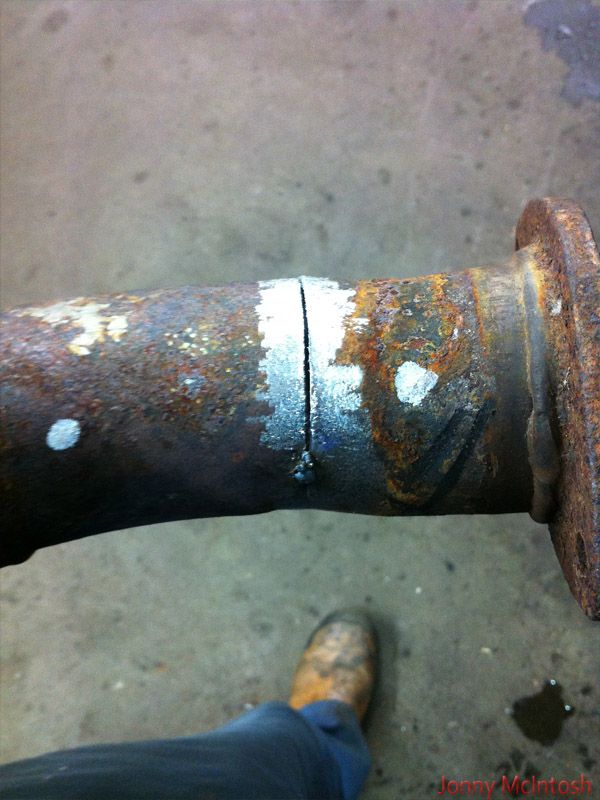 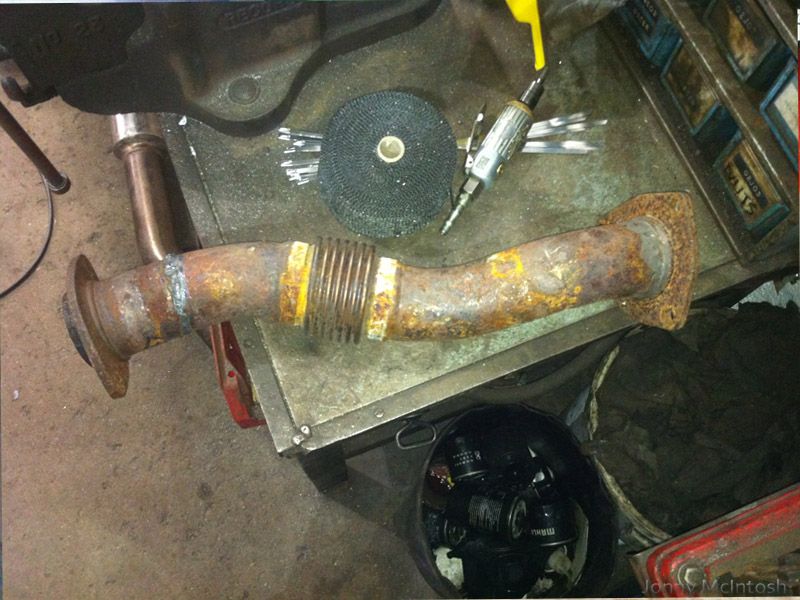 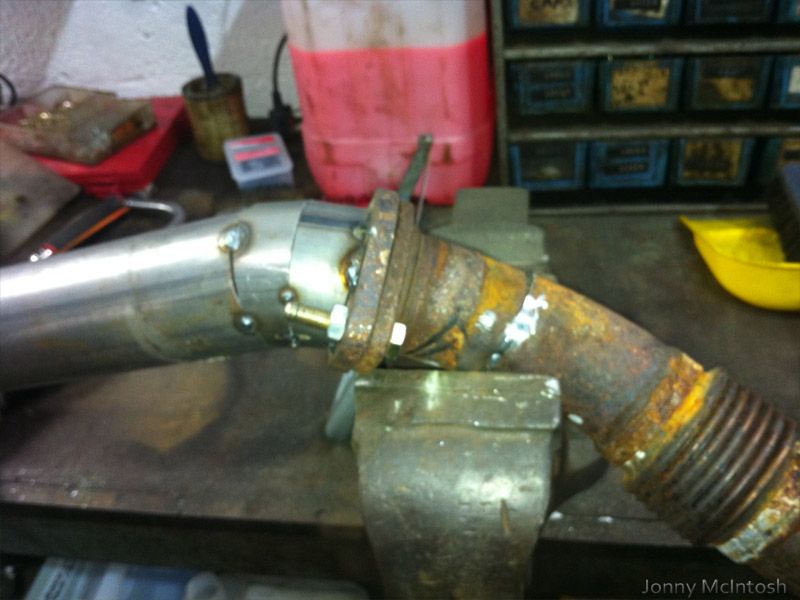 then welding and pipe making started 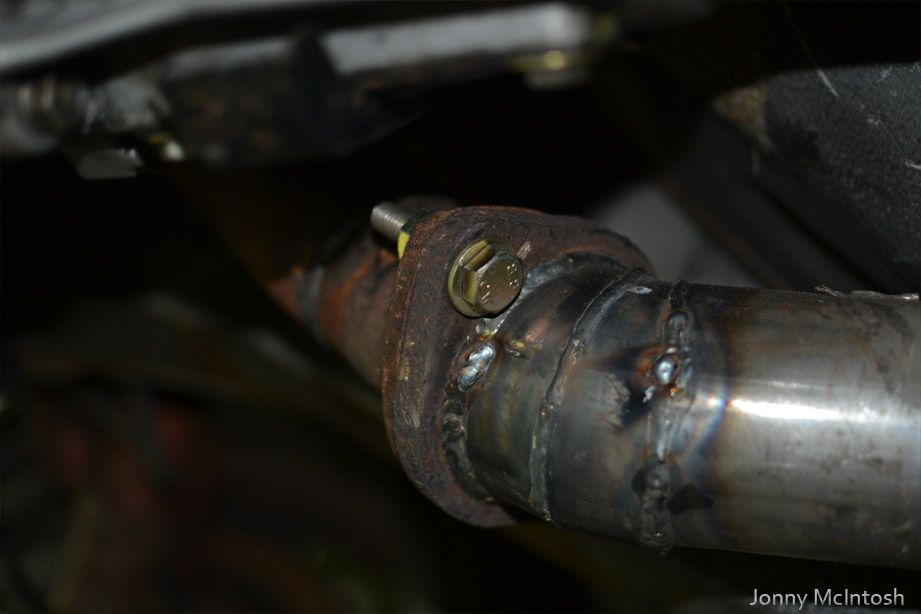 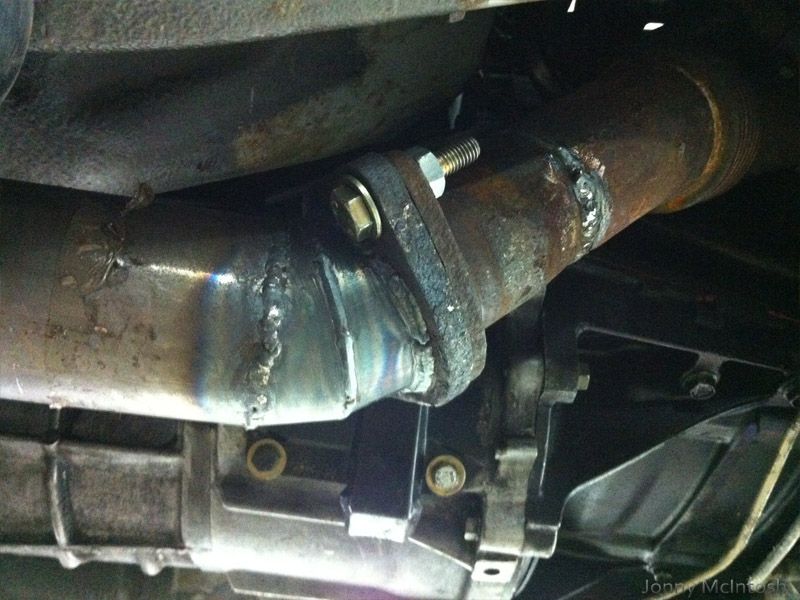 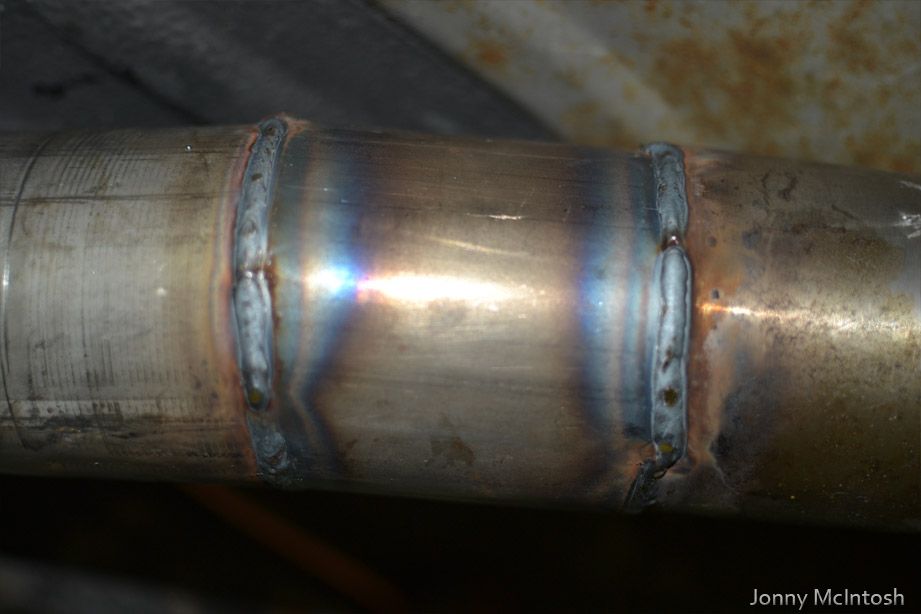 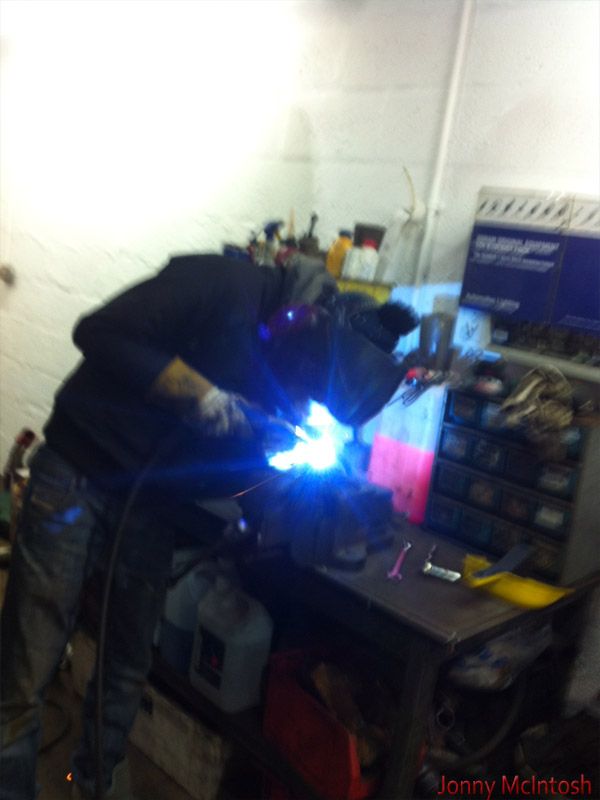
__________________
http://zilvia.net/f/builds-builds-on...1jz-build.html |
|
|
|
|
02-02-2014, 04:48 PM
|
#55 |
|
Leaky Injector
Join Date: Nov 2009
Location: Scotland, UK
Age: 34
Posts: 130
Trader Rating: (0)
Feedback Score: 0 reviews
|
me on the left and josh on the right
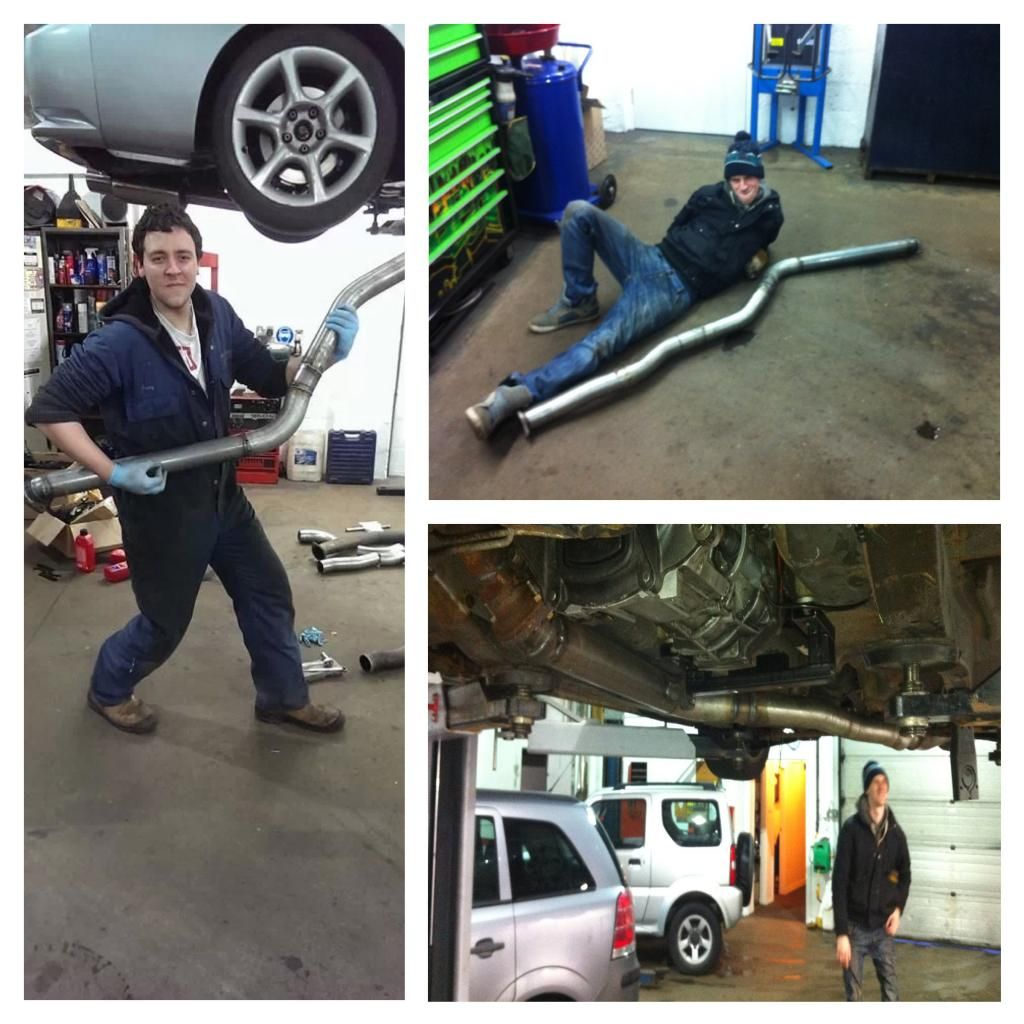 one jz to s14 apex backbox pipe made up 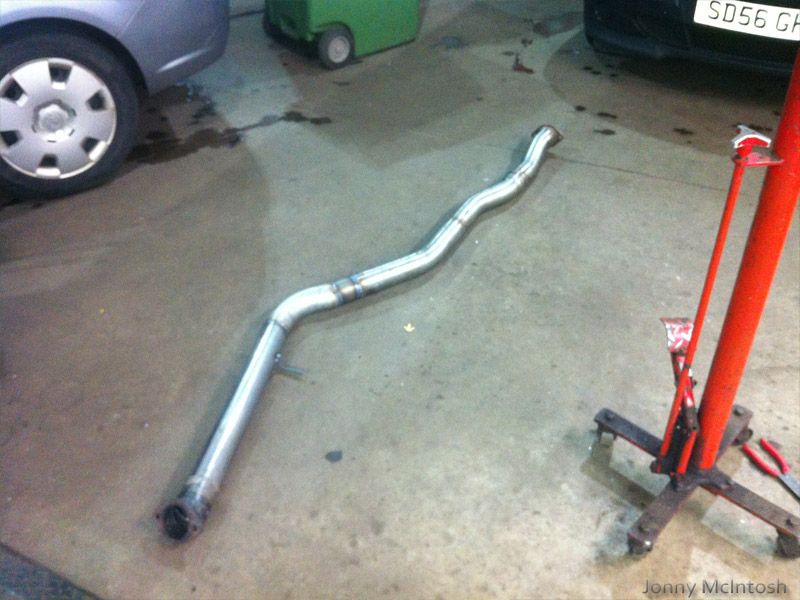 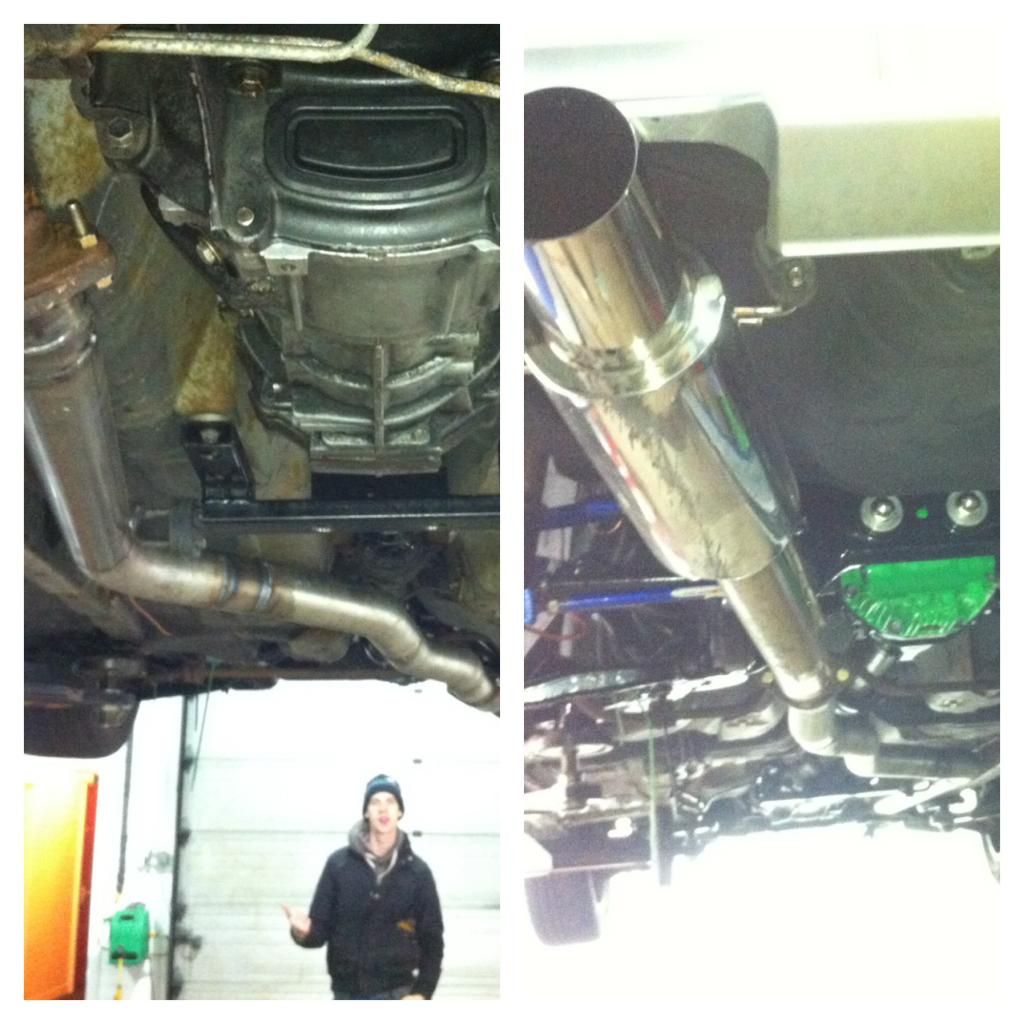 then heat wrapped the downpipe, i'll be doing the rest but i ran out of metal tie wraps 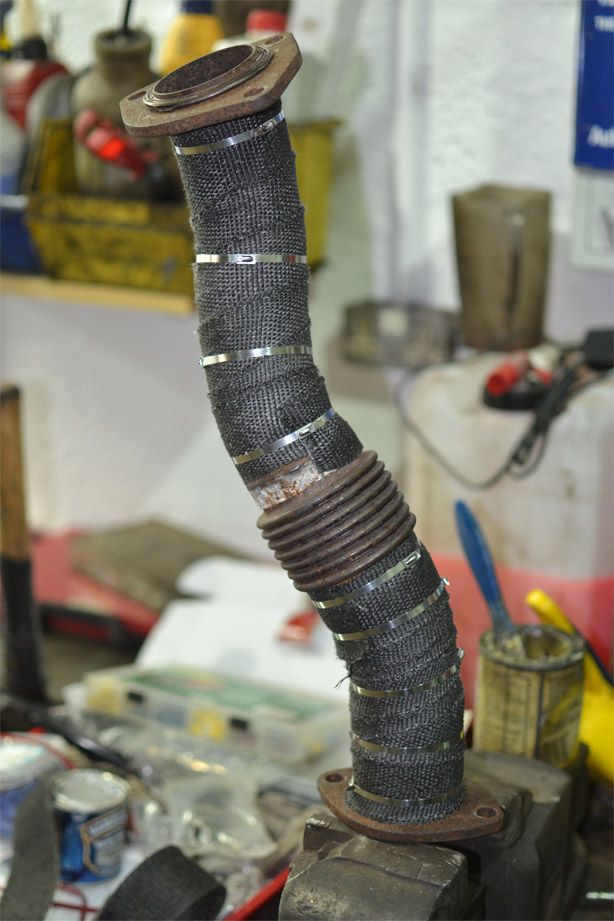 and fitted, going to spray the welds with paint to protect them a little better and heat wrap more of the pipe 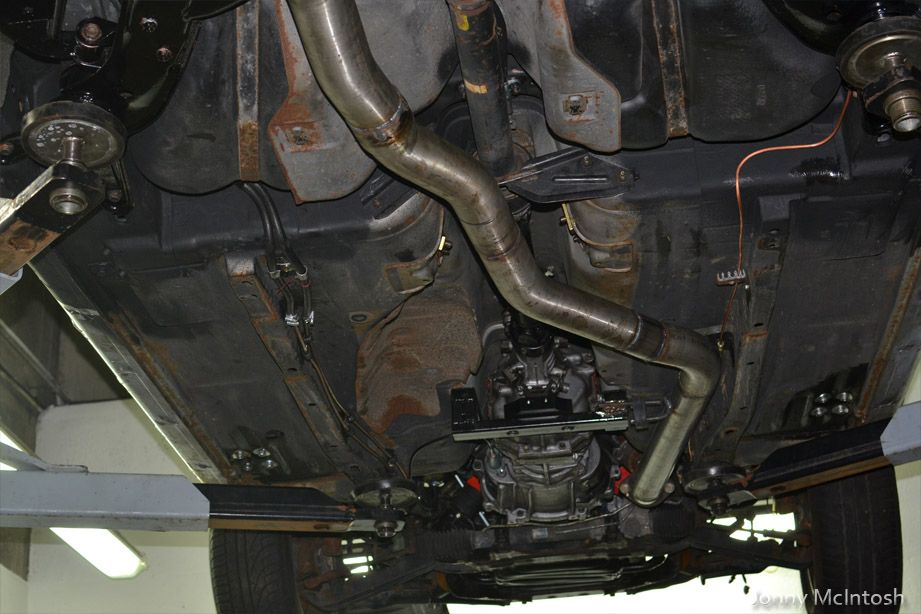 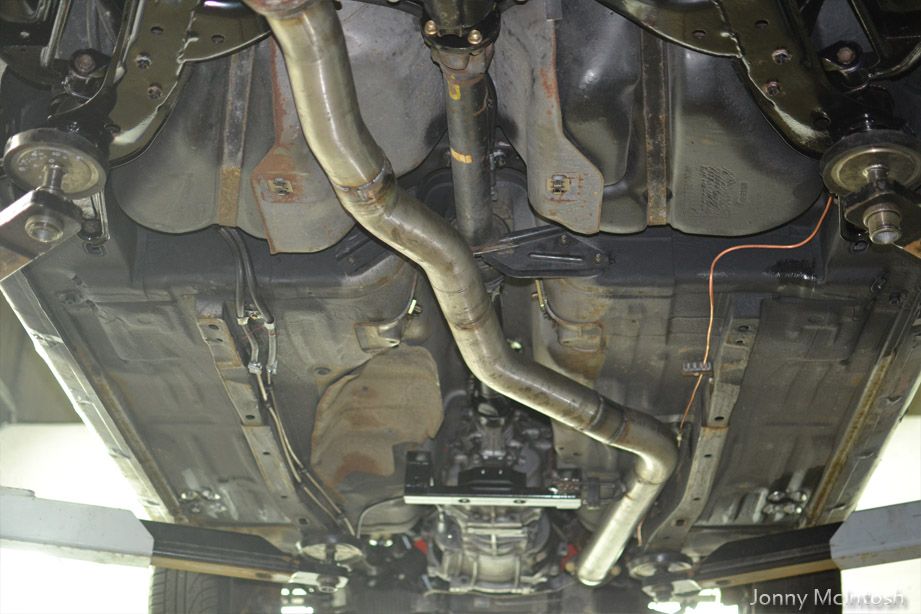 mates up to the apex backbox perfectly [IMG]http://i283.photobucket.com/albums/kk282/jdm-997/Silvia%20S14a/360_zps62c1d640.jpg[/IMG not a very good pic but the coolant temp sensor was removed, the adapter fitted and now the universal gauge sensor fitted so i can run an aftermarket gauge on the dash using the factory coolant temp sensor hole 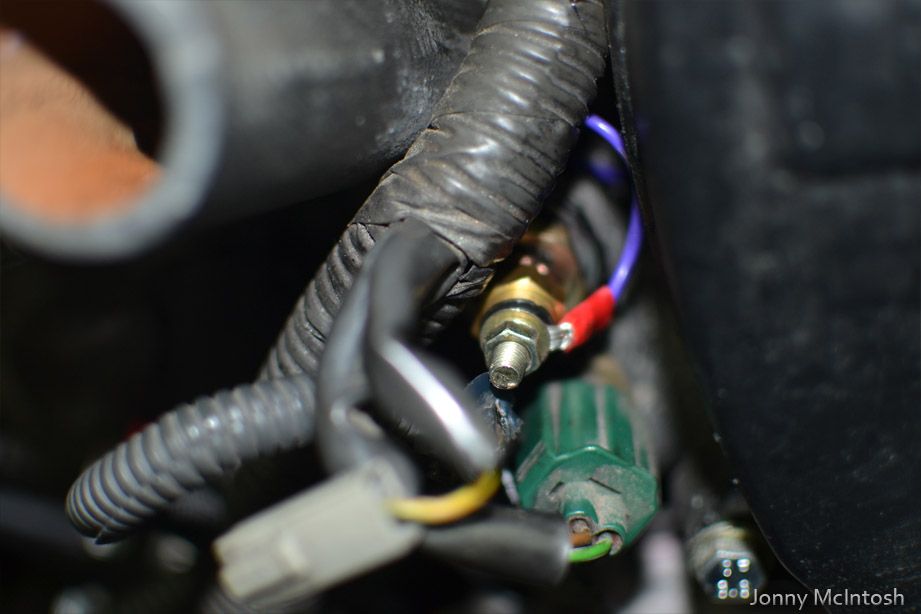 then onto the air intake, i bought a mushroom filter and mounted it as far away from the heat as possible 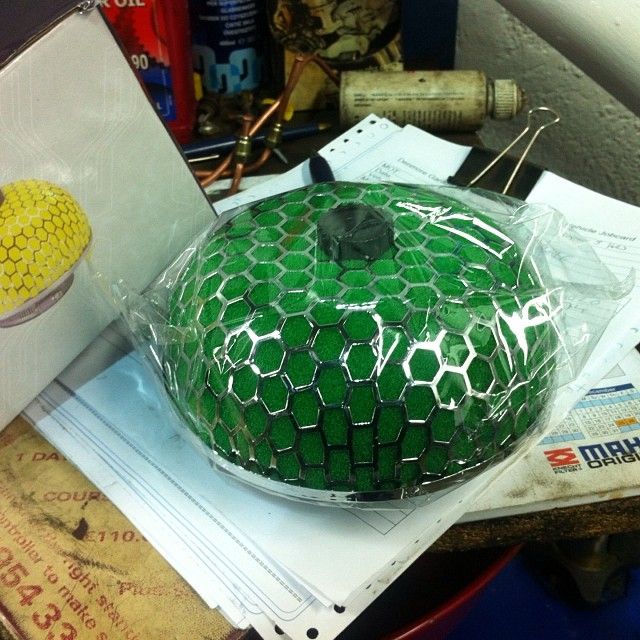 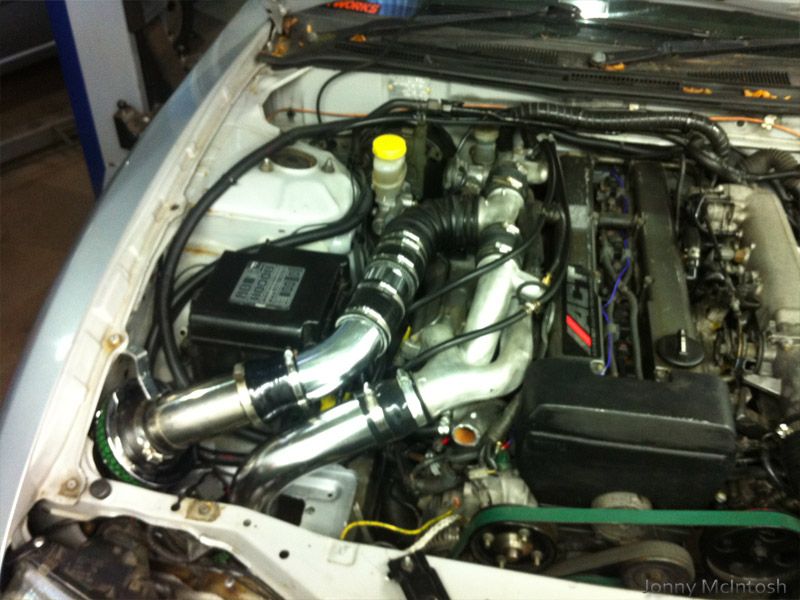
__________________
http://zilvia.net/f/builds-builds-on...1jz-build.html |
|
|
|
|
02-02-2014, 04:49 PM
|
#56 |
|
Leaky Injector
Join Date: Nov 2009
Location: Scotland, UK
Age: 34
Posts: 130
Trader Rating: (0)
Feedback Score: 0 reviews
|
don't have any pics but i pressure tested the intercooler system from throttle body end to turbo end and it seems one of the brand new artel motorsport elbow's has a pin hole causing a leak!! annoying!!
also removed the 2 of the alternator multi plug wires and replaced them with new wires onto the crimps inside the plug. 2/3 were at that point of breaking off so i'd rather do it now than at the side of the road! fitted the other side of the gearbox clutch inspection cover so i've now got a genuine toyota pair of covers fitted oh and a dipstick arrived at toyota for the jzx90 finally after the tube arriving a few weeks ago then got onto the cooling system stuff -smoothed off the water neck as it had a sharp edge from cutting off the bend -fitted rad -fitted both coolant top and bottom pipes -8mm hose going from rad to expansion tank just need to get some brackets made up to hold it in place as right now i have s14 brackets and tie wraps put in 3 litres of pink new coolant and around 5 litres of water in total so far, it took around 15 minutes to fill constantly squeezing the pipes to try bubble air out hopefully a fair bit of air is now out so it'll be easier to bleed when i start it up later 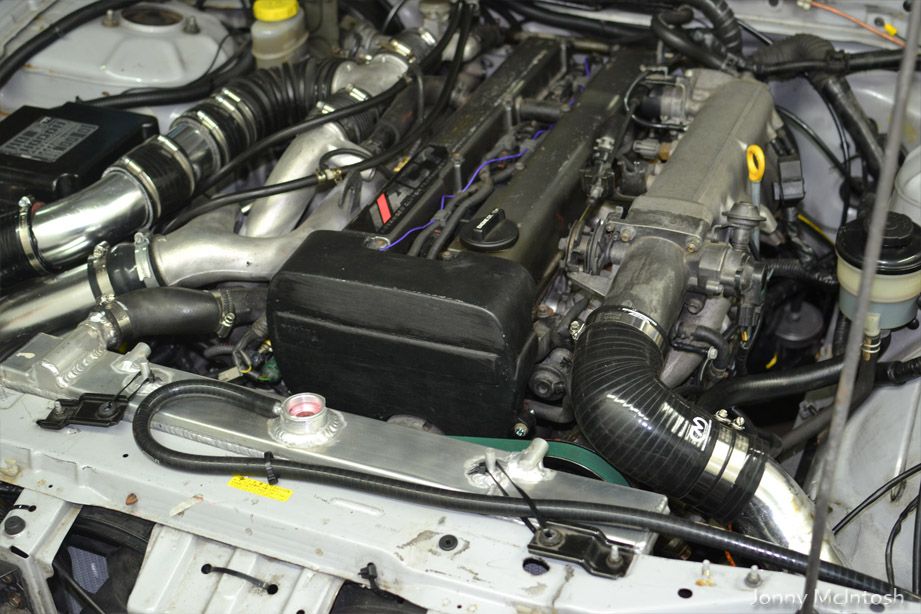 also did various little jobs too like wrapped up the battery cables in wire casing blah blah blah then it'll be tested out around my work's yard car park and back in for the front suspension/steering work to begin and will be taking off all remaining surface rust with grinder and stone chipping the rest of the chassis.
__________________
http://zilvia.net/f/builds-builds-on...1jz-build.html |
|
|
|
|
02-05-2014, 12:03 PM
|
#57 |
|
Leaky Injector
Join Date: Nov 2009
Location: Scotland, UK
Age: 34
Posts: 130
Trader Rating: (0)
Feedback Score: 0 reviews
|
so after filling the coolant up i came into work the next morning to find a small puddle on the floor
turns out the modified rad water next has a few pin holes from welding so the rad is now at another welding shop being sorted and will hopefully be 100% sealed next time i get it back lucky i didnt start the car as it would have sprayed everywhere so moving onto wed night's work, got some of the stuff going onto the cars front suspension setup: front geomaster hubs replacement front wheel bearings modded lower arms tein rods and ends offset spacers for now till i fit the modded cross member bigger rack boots cs2 coilovers with a new boot in one as it had torn after a few months on the road (not all in this pic) 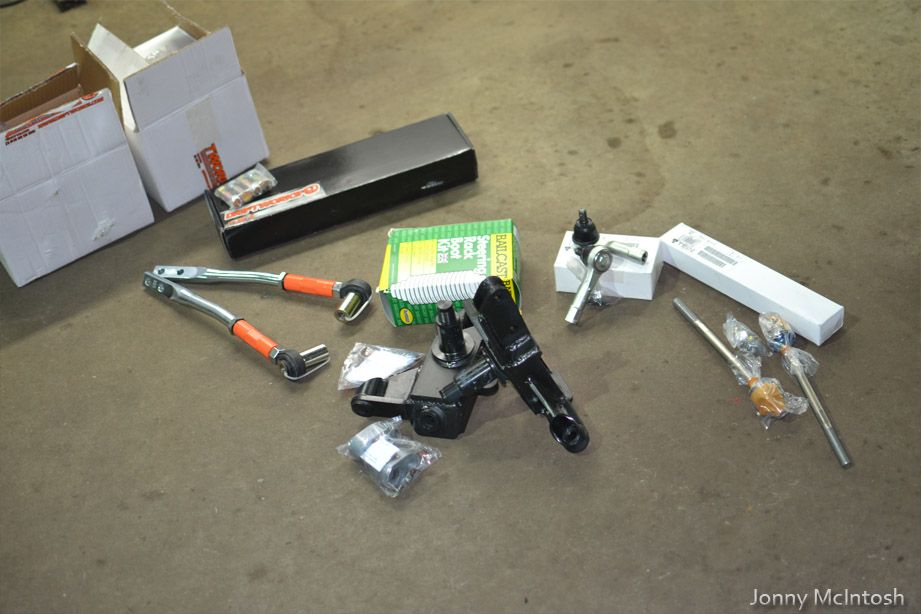 will be stripping the tension rods and greasing fully all the threads, same with the tein rods, a wee squirt of oil inside the rod end too stops threads siezing inside, going to get the front bearings packed up with extra grease and fit them onto the geomaster hubs before going onto the car started to remove the old stuff from the car, undone the calipers, tie rods from the rack, undone the tension rod bolts, lower arm bolts, abs sensors and shockers 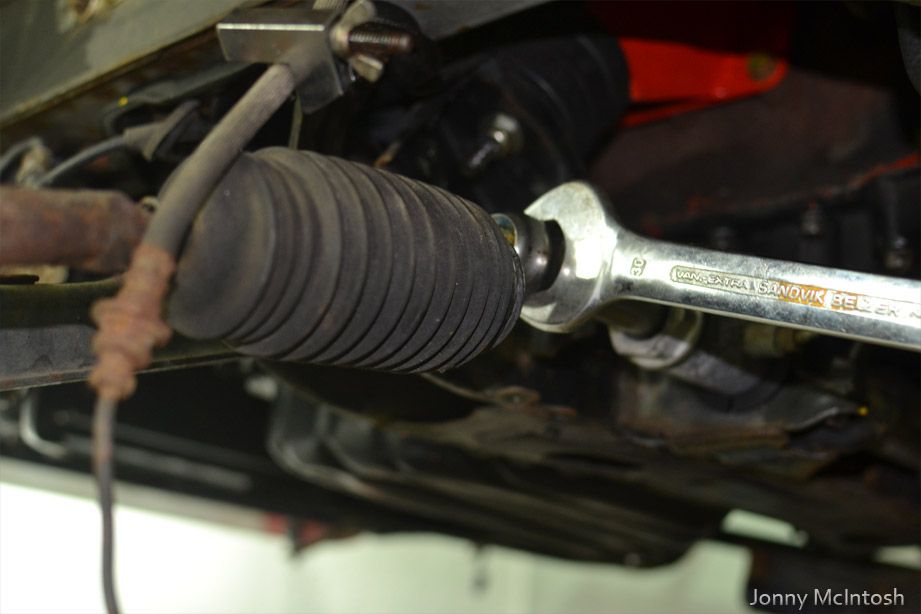 arb's off too. not sure if i'll be putting it back on 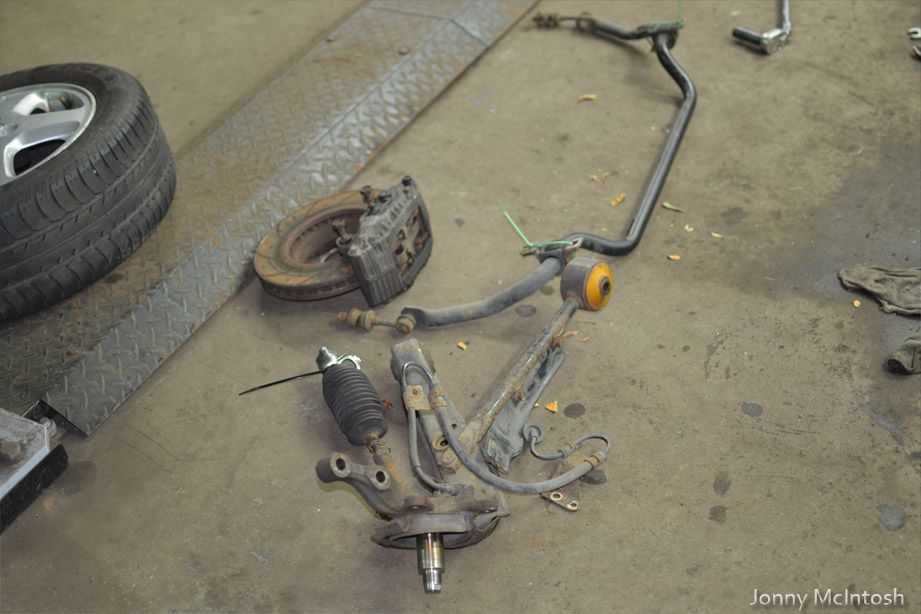 empty arches ready for grinding any surface rust and stone chipping will look really good too!!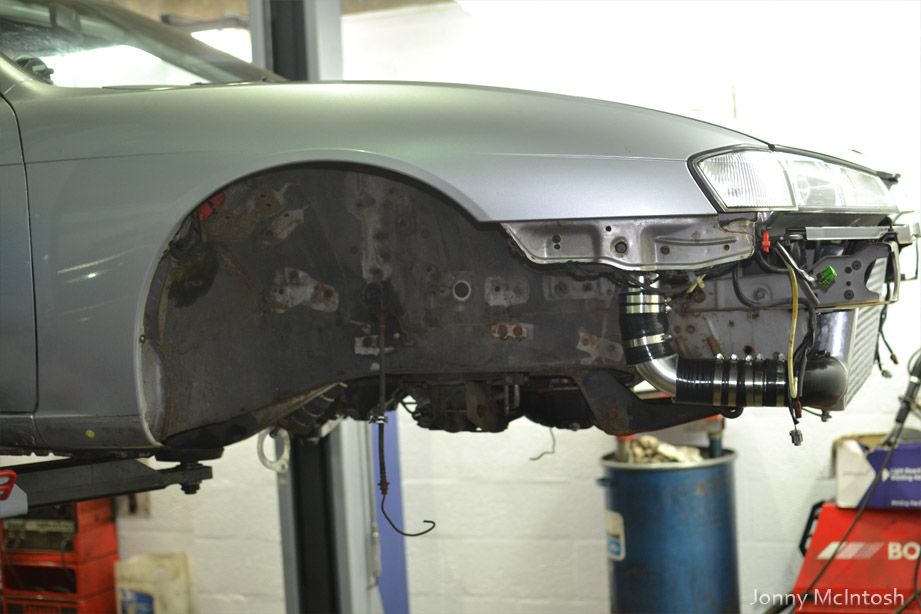  also please excuse all the jubilee clips, that was just to get a pipe to seal
__________________
http://zilvia.net/f/builds-builds-on...1jz-build.html |
|
|
|
|
02-05-2014, 12:17 PM
|
#58 |
|
Leaky Injector
Join Date: Nov 2009
Location: Scotland, UK
Age: 34
Posts: 130
Trader Rating: (0)
Feedback Score: 0 reviews
|
got the rad back today from the welders, said he done 3 passes on it to make sure it was definately sealed
 also the lower arms arrived, extended 20mm and braced gave them a coat in black paint, will give them a second coat later  called dan at dbpower, got some braided black front hoses coming for the brakes too, looking for some r33 gtr brembo calipers and discs, i believe the discs on those will clear the lower arms better with the lock mods
__________________
http://zilvia.net/f/builds-builds-on...1jz-build.html |
|
|
|
|
| Bookmarks |
|
|


 Linear Mode

