Zilvia.net Forums | Nissan 240SX (Silvia) and Z (Fairlady) Car Forum

Go Back   Zilvia.net Forums | Nissan 240SX (Silvia) and Z (Fairlady) Car Forum > General > Chat > Builds (and builds only)

Builds (and builds only) Got a build thread? It goes here, build threads anywhere else on the forum will be locked and never moved.


Reply
 
Thread Tools Display Modes
Old 01-15-2013, 08:48 AM   #31
KoukiMonsta
Nissanaholic!
 
KoukiMonsta's Avatar
 
Join Date: Mar 2009
Location: NC
Posts: 1,969
Trader Rating: (23)
KoukiMonsta is a well-known jackass
Feedback Score: 23 reviews
Quote:
Originally Posted by cchondro View Post
If your talking about a mil spec plug its totally worth the investment if you are going to be pulling the motor a lot.
I'll be getting one done on my chase bays harness once I get the car going.
I know Jordan's innovation does them for a fee.
Yeah that's what I am talking about. I will see what happens down the road.
__________________
@UpshiftEngineering

Last edited by KoukiMonsta; 02-13-2015 at 06:23 PM..
KoukiMonsta is offline   Reply With Quote
Sponsored Links
Old 01-16-2013, 03:09 PM   #32
KoukiMonsta
Nissanaholic!
 
KoukiMonsta's Avatar
 
Join Date: Mar 2009
Location: NC
Posts: 1,969
Trader Rating: (23)
KoukiMonsta is a well-known jackass
Feedback Score: 23 reviews
I know everybody likes pictures...

Brake master, clutch, and PS res. are all in place, perfect spot top right for PS. That throttle cable isn't going to cut it...

Wish I could recall who made that heat shield. few years back some guy on here, its sweet.


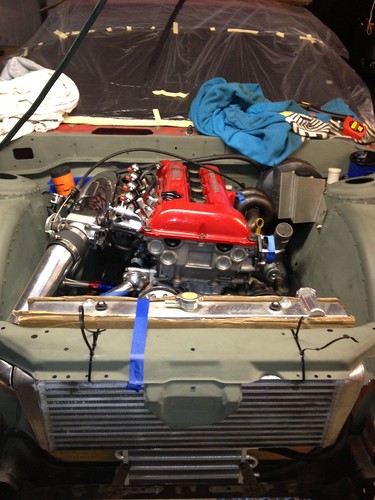
Picked up this AN fitting, put it in the lathe, turned down the hex portion.
.


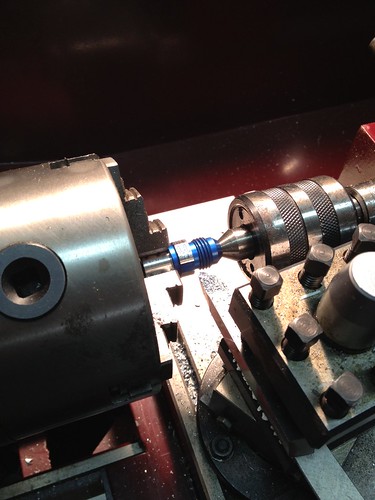
Drilled a hole in the waterneck and bam got that sucker welded in. also tapped it for aftermarket water temp.


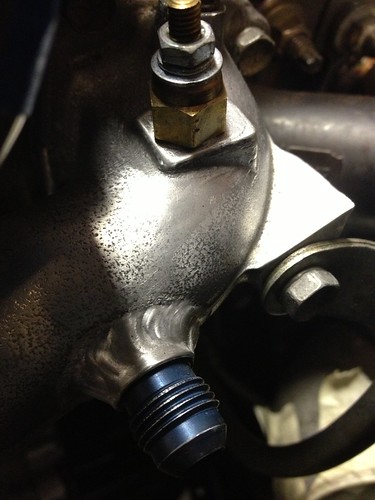
swapped out the steering column bushing


New rack bushings, also made up some new lines since the others were beat to all hell.

We can also note at this point there's no motor....back out for paint!


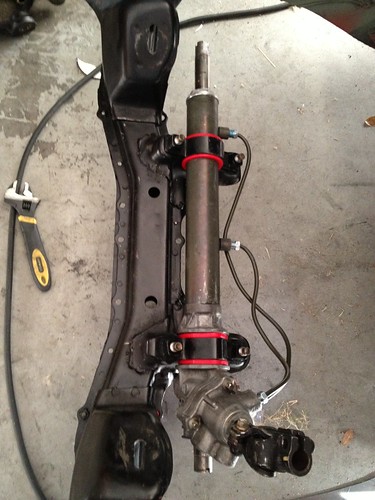
During mockup I didn't have a clutch or flywheel in there. and only a few bell-housing bolts, so had to take care of that

This is an old ACT clutch of mine, its got some life left so just gonna rock it till it dies. HD pressure plate, 6 puck un-sprung.


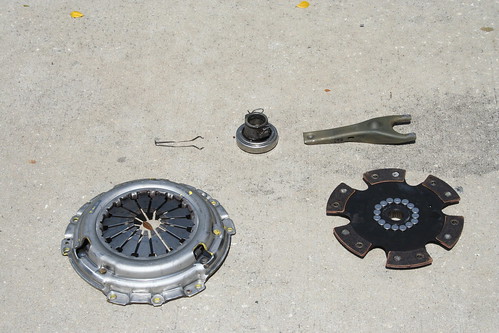
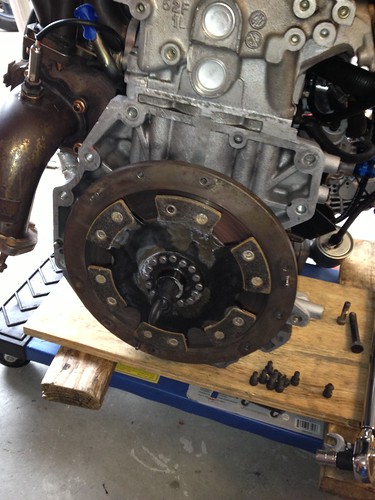
I have seen it a couple times before and thought the idea of low mount PS pump was cool so one day I thought I'd fab up something. Took a couple tries but its pretty sturdy. Im not sure how much stress it will be seeing..?
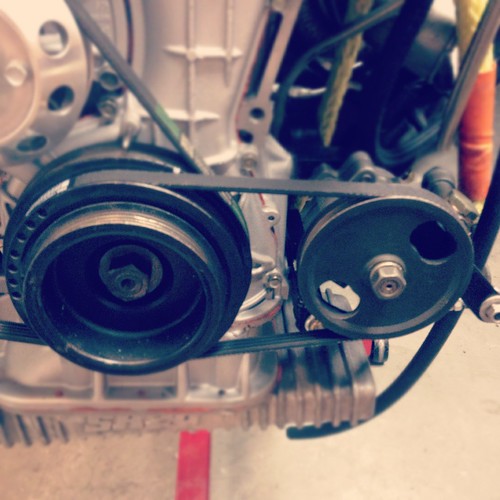


Just for fun


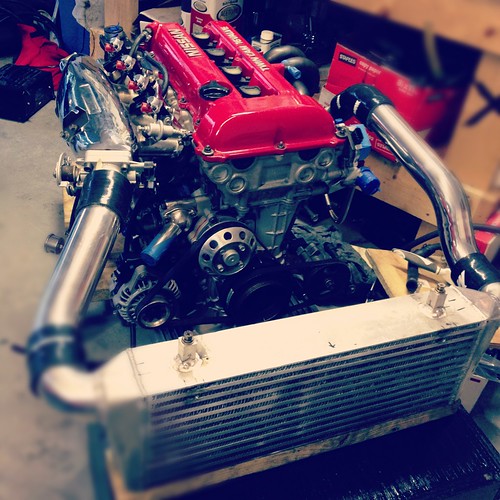
I'll leave you guys with this...makeshift paint booth. 'Merica
__________________
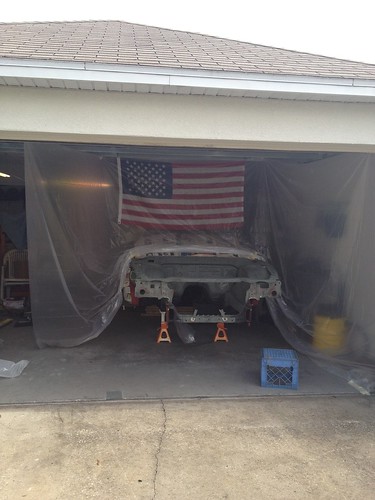
@UpshiftEngineering

Last edited by KoukiMonsta; 02-13-2015 at 06:29 PM..
KoukiMonsta is offline   Reply With Quote
Old 01-16-2013, 03:40 PM   #33
alexander240
Zilvia Junkie
 
alexander240's Avatar
 
Join Date: Apr 2012
Location: New River, NC
Age: 32
Posts: 356
Trader Rating: (8)
alexander240 is an unknown quantity at this point
Feedback Score: 8 reviews
Ahh nice work so far! ahh I miss florida...I'm originally from orlando...
alexander240 is offline   Reply With Quote
Old 01-16-2013, 03:58 PM   #34
smoked240
Zilvia FREAK!
 
Join Date: Jun 2010
Location: North Dakota
Age: 33
Posts: 1,067
Trader Rating: (4)
smoked240 is not welcome here anymoresmoked240 is not welcome here anymoresmoked240 is not welcome here anymoresmoked240 is not welcome here anymoresmoked240 is not welcome here anymoresmoked240 is not welcome here anymoresmoked240 is not welcome here anymoresmoked240 is not welcome here anymoresmoked240 is not welcome here anymore
Feedback Score: 4 reviews
Send a message via MSN to smoked240
Nice build man! Coming along nicely. I was in the same boat as you, never touched a welder and one day I just picked it up. What I've found best when learning, cut a practice piece and do some welds on it, play with the settings some till you get a nice weld. I've learned to run the welder hotter to get a nice burn in but if you do make sure you move the bead fast
__________________
smoked240 is offline   Reply With Quote
Old 01-21-2013, 10:03 AM   #35
KoukiMonsta
Nissanaholic!
 
KoukiMonsta's Avatar
 
Join Date: Mar 2009
Location: NC
Posts: 1,969
Trader Rating: (23)
KoukiMonsta is a well-known jackass
Feedback Score: 23 reviews
Quote:
Originally Posted by smoked240 View Post
Nice build man! Coming along nicely. I was in the same boat as you, never touched a welder and one day I just picked it up. What I've found best when learning, cut a practice piece and do some welds on it, play with the settings some till you get a nice weld. I've learned to run the welder hotter to get a nice burn in but if you do make sure you move the bead fast
I can agree with every point you made! Lots of practice and things become a bit cleaner/neater/stronger.
__________________
@UpshiftEngineering
KoukiMonsta is offline   Reply With Quote
Old 01-21-2013, 11:48 AM   #36
CleanAndLegit
Post Whore!
 
CleanAndLegit's Avatar
 
Join Date: Aug 2009
Location: Rancho Cucamonga
Posts: 3,693
Trader Rating: (55)
CleanAndLegit is an unknown quantity at this point
Feedback Score: 55 reviews
nice progress man! would mind posting info on that ps pump bracket?
CleanAndLegit is offline   Reply With Quote
Old 01-26-2013, 12:40 PM   #37
KoukiMonsta
Nissanaholic!
 
KoukiMonsta's Avatar
 
Join Date: Mar 2009
Location: NC
Posts: 1,969
Trader Rating: (23)
KoukiMonsta is a well-known jackass
Feedback Score: 23 reviews
Quote:
Originally Posted by CleanAndLegit View Post
nice progress man! would mind posting info on that ps pump bracket?
I took this pics after i made it. I never remember to take in progress pics since its just me working and im usually dirty and in the zone lol

I used the mounting points for the AC compressor. the top one is a pivot point and the lower to tension the belt simply using a turnbuckle.

also note sweet XRP fitting from Toby. Re-did the high pressure PS line with xrp stuff. its great quality!


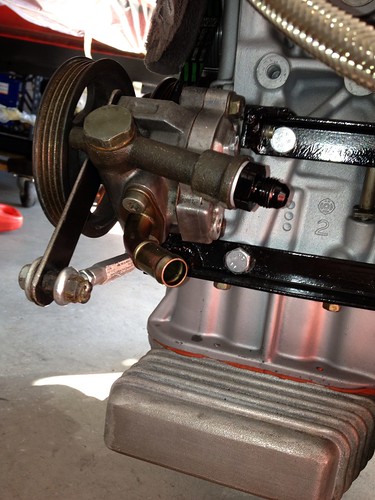
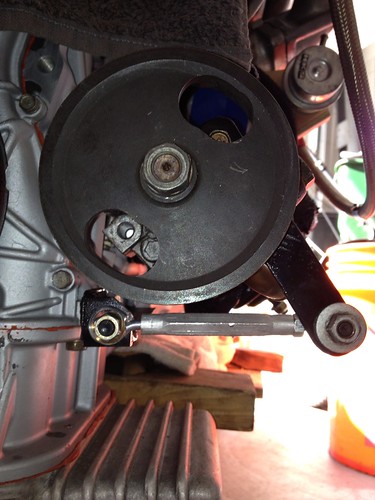
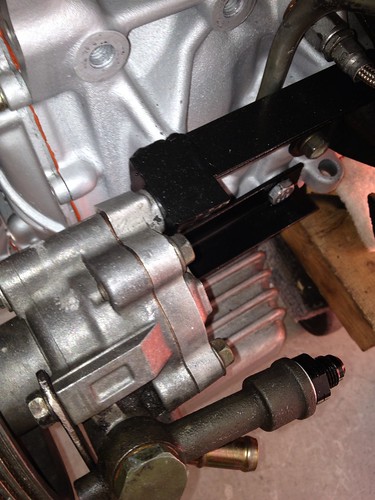
please dont hate my horid welding


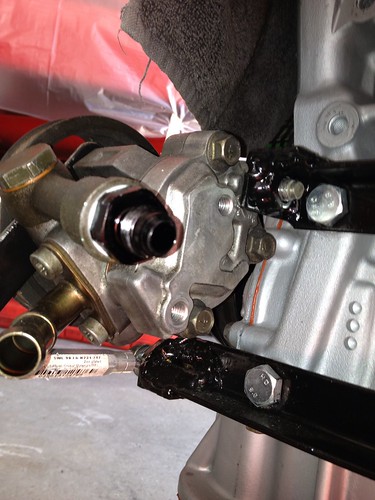
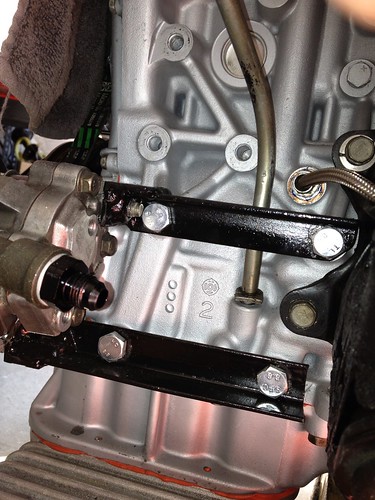
Hope that gives some insight to anyone wanting to attempt something like this.

thanks for reading!
__________________
@UpshiftEngineering
KoukiMonsta is offline   Reply With Quote
Old 02-05-2013, 01:46 PM   #38
KoukiMonsta
Nissanaholic!
 
KoukiMonsta's Avatar
 
Join Date: Mar 2009
Location: NC
Posts: 1,969
Trader Rating: (23)
KoukiMonsta is a well-known jackass
Feedback Score: 23 reviews
I am gonna leave this here...updates soon, been super busy with not car junk

color is Eastwood- hot rod black. i was going for a bit more flat color as to let the engine itself 'pop' more. first time using a real paint gun id say i did a fair enough job.

__________________
@UpshiftEngineering
KoukiMonsta is offline   Reply With Quote
Old 02-05-2013, 01:51 PM   #39
CleanAndLegit
Post Whore!
 
CleanAndLegit's Avatar
 
Join Date: Aug 2009
Location: Rancho Cucamonga
Posts: 3,693
Trader Rating: (55)
CleanAndLegit is an unknown quantity at this point
Feedback Score: 55 reviews
looks great man!
CleanAndLegit is offline   Reply With Quote
Old 02-05-2013, 01:58 PM   #40
cchondro
Zilvia Junkie
 
Join Date: Jun 2012
Location: central florida
Age: 32
Posts: 436
Trader Rating: (1)
cchondro is an unknown quantity at this point
Feedback Score: 1 reviews
You better post some closer pics
and that's not so bad for your first spray
looks really good.
it gets pretty easy as you continue on with it
cchondro is offline   Reply With Quote
Old 02-05-2013, 02:15 PM   #41
greenwood
Zilvia Addict
 
greenwood's Avatar
 
Join Date: May 2011
Location: nc
Posts: 620
Trader Rating: (5)
greenwood is not welcome here anymoregreenwood is not welcome here anymoregreenwood is not welcome here anymoregreenwood is not welcome here anymoregreenwood is not welcome here anymoregreenwood is not welcome here anymoregreenwood is not welcome here anymoregreenwood is not welcome here anymoregreenwood is not welcome here anymore
Feedback Score: 5 reviews
lolled at the RTV party
greenwood is offline   Reply With Quote
Old 02-05-2013, 03:25 PM   #42
KoukiMonsta
Nissanaholic!
 
KoukiMonsta's Avatar
 
Join Date: Mar 2009
Location: NC
Posts: 1,969
Trader Rating: (23)
KoukiMonsta is a well-known jackass
Feedback Score: 23 reviews
Quote:
Originally Posted by CleanAndLegit View Post
looks great man!
thank you sir

Quote:
Originally Posted by cchondro View Post
You better post some closer pics
and that's not so bad for your first spray
looks really good.
it gets pretty easy as you continue on with it
have no fear, more (better) pics soon enough, its not the greatest job..that pic is a bit deceiving. i was learning to use the gun as i went through, next time ill be able to do a better job.

but as i stated in the beginnning this whole build is a massive learning process for me, before this all i did was bolt on mods.

but thanks for the kind words brotha!

Quote:
Originally Posted by greenwood View Post
lolled at the RTV party
haha, right on
__________________
@UpshiftEngineering
KoukiMonsta is offline   Reply With Quote
Old 02-27-2013, 03:13 PM   #43
KoukiMonsta
Nissanaholic!
 
KoukiMonsta's Avatar
 
Join Date: Mar 2009
Location: NC
Posts: 1,969
Trader Rating: (23)
KoukiMonsta is a well-known jackass
Feedback Score: 23 reviews
alright finally an update..

Ive got some stuff back in the bay. Finalized how the brake lines will run. As per this entire build, my first time dealing with flaring and bending brake lines. I like how it came out, and most important it takes care of the hideous hardlines up on the firewall...(brake booster is another story i havent found a good solution for that)


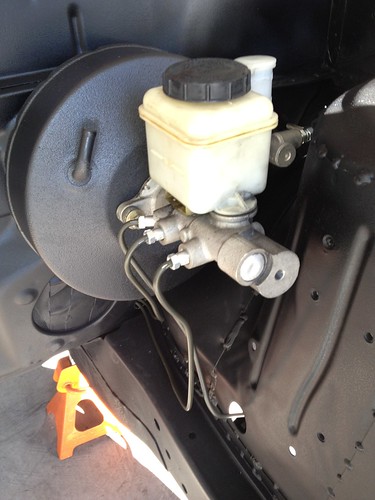
I also ave those extra large oil filter. took my summit relocation block to vatozone and tried a bunch of filters till i found a larger one that fit.

you can also see the connection in rear brake lines, slightly altered but from there back its stock. the fuel hard lines will remain the same as im going to run the oem fuel filter holder.


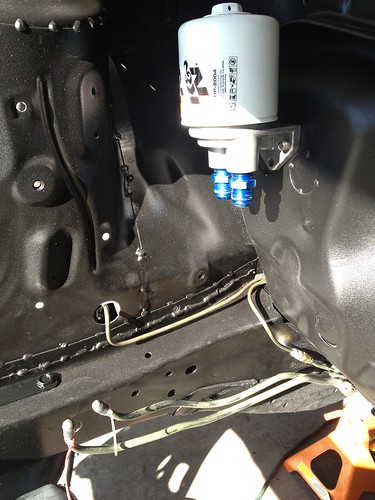
and the lines running through interior. and the 3 pedals! got a legit ma nual brake pedal too.


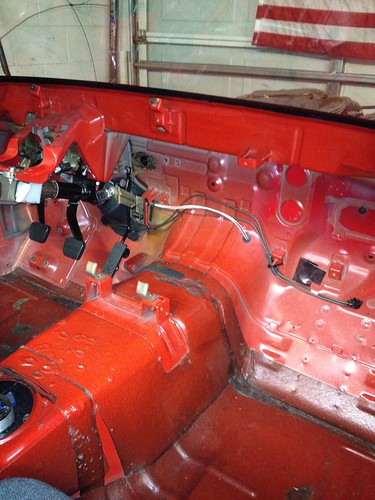
i undercoated my brake booster, love me some texture


heres an oil filter comparison. the left is for a sentra w/ sr20. they couldnt tell me what the K&N was for but its much larger.


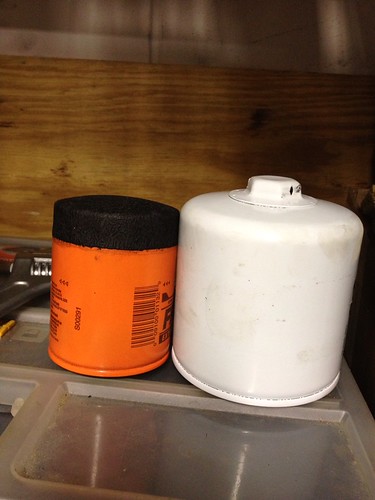
since i did a 5 speed conversion i had to piece junk together anyways. decide to do something about the clutch line also. got an isis line and changed up the fitting for the slave end. straight line master to clutch no silly damper.


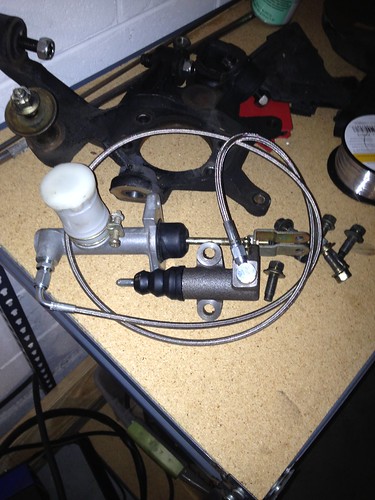
i also knoecked out the rear bushings one day. knuckles and RLCA.
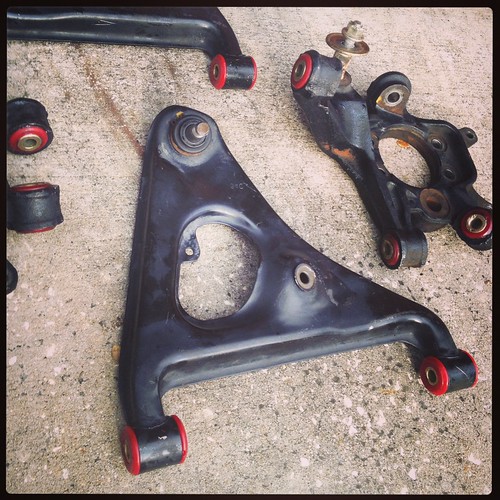
__________________
@UpshiftEngineering
KoukiMonsta is offline   Reply With Quote
Old 02-27-2013, 05:16 PM   #44
Extreme Dimensions
Zilvia.net Advertiser
 
Extreme Dimensions's Avatar
 
Join Date: Feb 2008
Location: Fullerton, CA
Posts: 1,468
Trader Rating: (9)
Extreme Dimensions is a splendid one to beholdExtreme Dimensions is a splendid one to beholdExtreme Dimensions is a splendid one to beholdExtreme Dimensions is a splendid one to beholdExtreme Dimensions is a splendid one to beholdExtreme Dimensions is a splendid one to beholdExtreme Dimensions is a splendid one to beholdExtreme Dimensions is a splendid one to beholdExtreme Dimensions is a splendid one to beholdExtreme Dimensions is a splendid one to beholdExtreme Dimensions is a splendid one to behold
Feedback Score: 9 reviews
Nice! keep up the excellent work.
__________________
- Chris Gary
p: 714-278-8000 x 19
E: [email protected]
Extreme Dimensions is offline   Reply With Quote
Old 03-14-2013, 09:08 PM   #45
KoukiMonsta
Nissanaholic!
 
KoukiMonsta's Avatar
 
Join Date: Mar 2009
Location: NC
Posts: 1,969
Trader Rating: (23)
KoukiMonsta is a well-known jackass
Feedback Score: 23 reviews
Get ready ladies. I got some sweet stuff on the way!
__________________
@UpshiftEngineering
KoukiMonsta is offline   Reply With Quote
Old 03-19-2013, 07:27 AM   #46
va240dude
Post Whore!
 
va240dude's Avatar
 
Join Date: Apr 2008
Location: 千葉県/Virginia/Under my 240
Age: 42
Posts: 2,833
Trader Rating: (161)
va240dude is an unknown quantity at this point
Feedback Score: 161 reviews
I like what you did with the brake lines. How hard was it to bend and flare them with the tool?
__________________
180SXオタクだ!
va240dude is offline   Reply With Quote
Old 03-19-2013, 08:01 AM   #47
Mr.Clerc
Leaky Injector
 
Mr.Clerc's Avatar
 
Join Date: May 2012
Location: Wappingers Falls, New York
Age: 29
Posts: 120
Trader Rating: (0)
Mr.Clerc is an unknown quantity at this point
Feedback Score: 0 reviews
that engine bay <3 my make shift paint booth looked a lil like that ahahah. keep up the awesome work mang!
Mr.Clerc is offline   Reply With Quote
Old 03-19-2013, 11:51 AM   #48
KoukiMonsta
Nissanaholic!
 
KoukiMonsta's Avatar
 
Join Date: Mar 2009
Location: NC
Posts: 1,969
Trader Rating: (23)
KoukiMonsta is a well-known jackass
Feedback Score: 23 reviews
Quote:
Originally Posted by va240dude View Post
I like what you did with the brake lines. How hard was it to bend and flare them with the tool?
First ill mention this isn't standard old school stainless line. It's called 'poly armour' I got it at autozone. I can clearly tell it is more pliable and easier to bend/manuver around. I def recommend it after playing with both types.

I had 5 of 6 flares done by a shop with hydraulic flaring equipment. I have used the cheap tool from summit before, and used it for the sixth flare. Though it was easier for me to just have them done. That said the flare I did seems to hold fluid.

Quote:
Originally Posted by Mr.Clerc View Post
that engine bay <3 my make shift paint booth looked a lil like that ahahah. keep up the awesome work mang!
Thanks!
__________________
@UpshiftEngineering
KoukiMonsta is offline   Reply With Quote
Old 03-19-2013, 01:05 PM   #49
rwtf
Zilvia Addict
 
rwtf's Avatar
 
Join Date: Jun 2011
Location: Maryville, TN
Age: 32
Posts: 830
Trader Rating: (3)
rwtf is an unknown quantity at this point
Feedback Score: 3 reviews
thats pretty sweet setup for the PS pump, I would like to do something like that myself But I want to get A/C workin.
__________________
rwtf is offline   Reply With Quote
Old 04-03-2013, 12:24 PM   #50
KoukiMonsta
Nissanaholic!
 
KoukiMonsta's Avatar
 
Join Date: Mar 2009
Location: NC
Posts: 1,969
Trader Rating: (23)
KoukiMonsta is a well-known jackass
Feedback Score: 23 reviews
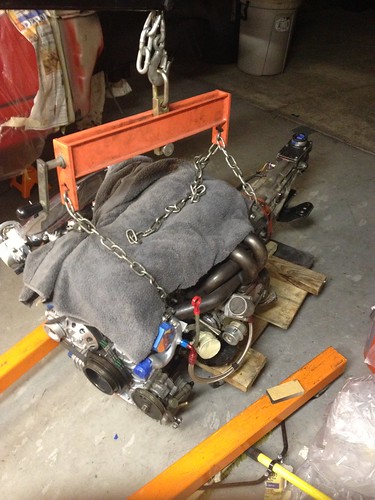
So the motor is in! for good....Ideally. Not mant pics of the process since i had previously bolted everything up. was pretty stright forward slapping everything back together. check the photos, there always the best part.


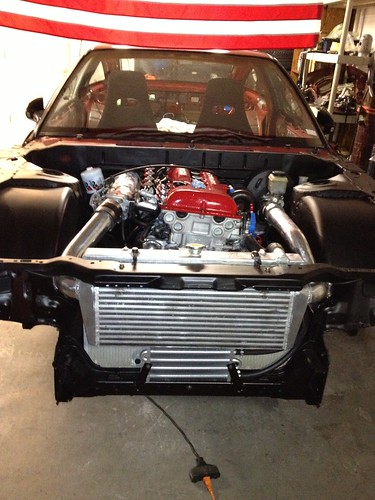
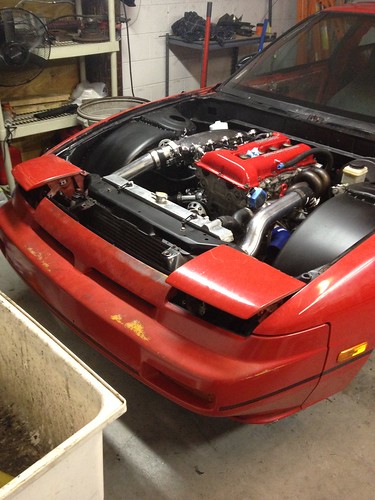
stay tuned, suspensions going on and wiring soon after.
__________________
@UpshiftEngineering
KoukiMonsta is offline   Reply With Quote
Old 04-03-2013, 01:59 PM   #51
ryandriftingfat
Zilvia Addict
 
Join Date: May 2010
Location: CA
Posts: 790
Trader Rating: (10)
ryandriftingfat is an unknown quantity at this point
Feedback Score: 10 reviews
What size wheel / tire are you planning for up front?
ryandriftingfat is offline   Reply With Quote
Old 04-04-2013, 12:59 PM   #52
KoukiMonsta
Nissanaholic!
 
KoukiMonsta's Avatar
 
Join Date: Mar 2009
Location: NC
Posts: 1,969
Trader Rating: (23)
KoukiMonsta is a well-known jackass
Feedback Score: 23 reviews
Quote:
Originally Posted by ryandevilhorns View Post
What size wheel / tire are you planning for up front?
Not sure yet honestly.

This build isn't going anywhere fast.. I did my best to enlarge the front wheel wells to the 'max' so down the road I can put some serious rubber in that bitch. And stay low.
__________________
@UpshiftEngineering
KoukiMonsta is offline   Reply With Quote
Old 04-04-2013, 06:28 PM   #53
Dylan22
 
Join Date: Oct 2012
Location: Ontario, Canada
Age: 32
Posts: 45
Trader Rating: (0)
Dylan22 is an unknown quantity at this point
Feedback Score: 0 reviews
Wow, engine bay looks great! Awesome job on that. Can I ask how you are routing your PS reservoir to the pump with it located in that position? And(Forgive me if I over read this) are you using low pressure hose/clamps or AN fittings?
Dylan22 is offline   Reply With Quote
Old 04-04-2013, 09:24 PM   #54
240drifter1
Zilvia FREAK!
 
240drifter1's Avatar
 
Join Date: Mar 2007
Location: Knoxville, TN
Posts: 1,505
Trader Rating: (1)
240drifter1 has a reputation beyond repute240drifter1 has a reputation beyond repute240drifter1 has a reputation beyond repute240drifter1 has a reputation beyond repute240drifter1 has a reputation beyond repute240drifter1 has a reputation beyond repute240drifter1 has a reputation beyond repute240drifter1 has a reputation beyond repute240drifter1 has a reputation beyond repute240drifter1 has a reputation beyond repute240drifter1 has a reputation beyond repute
Feedback Score: 1 reviews
Send a message via AIM to 240drifter1
That looks awesome. I hope you keep the car and vc red.
240drifter1 is offline   Reply With Quote
Old 04-10-2013, 09:39 PM   #55
Bumpkin203
Zilvia Junkie
 
Bumpkin203's Avatar
 
Join Date: Nov 2010
Location: Okinawa
Posts: 478
Trader Rating: (13)
Bumpkin203 is an unknown quantity at this point
Feedback Score: 13 reviews
Build looks awesome man!
__________________

Instagram @bankai_r32
Bumpkin203 is offline   Reply With Quote
Old 04-11-2013, 07:09 AM   #56
BossHogg
Zilvia Addict
 
BossHogg's Avatar
 
Join Date: Aug 2011
Location: america
Posts: 998
Trader Rating: (16)
BossHogg is just really niceBossHogg is just really niceBossHogg is just really niceBossHogg is just really niceBossHogg is just really niceBossHogg is just really niceBossHogg is just really niceBossHogg is just really nice
Feedback Score: 16 reviews
looks great!
__________________
BossHogg is offline   Reply With Quote
Old 04-11-2013, 12:32 PM   #57
KoukiMonsta
Nissanaholic!
 
KoukiMonsta's Avatar
 
Join Date: Mar 2009
Location: NC
Posts: 1,969
Trader Rating: (23)
KoukiMonsta is a well-known jackass
Feedback Score: 23 reviews
Quote:
Originally Posted by Dylan22 View Post
Wow, engine bay looks great! Awesome job on that. Can I ask how you are routing your PS reservoir to the pump with it located in that position? And(Forgive me if I over read this) are you using low pressure hose/clamps or AN fittings?
I am using high pressure steel AN fittings for the high pressure line. Since I never had any oem ps lines with the shell it was a no brainer. Ordered XRP stuff from Tody. So worth it, awesome product. For pump feed, return, and to the cooler it's low pressure with just hose clamps. The reservoir lines sneak up behind the booster. Tight fit but man it's dang near perfect.

Quote:
Originally Posted by 240drifter1 View Post
That looks awesome. I hope you keep the car and vc red.
The car will always be red, vc I imagine will change at some point.

Quote:
Originally Posted by Bumpkin203 View Post
Build looks awesome man!
Quote:
Originally Posted by BossHogg View Post
looks great!
Thanks for the words everyone. Helps keep motivation going on this sucker.

I got an update coming soon!
__________________
@UpshiftEngineering
KoukiMonsta is offline   Reply With Quote
Old 04-14-2013, 08:18 PM   #58
KoukiMonsta
Nissanaholic!
 
KoukiMonsta's Avatar
 
Join Date: Mar 2009
Location: NC
Posts: 1,969
Trader Rating: (23)
KoukiMonsta is a well-known jackass
Feedback Score: 23 reviews
Well the next step was to get this thing back on four wheels and rolling for the first time in a year. So thats exactly what i did.

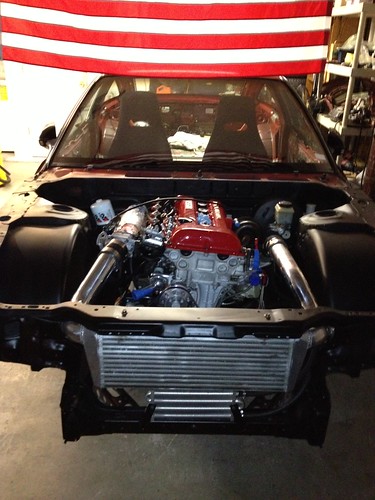
can you fucking say MONSTER TRUCK, but so sweet to see it roll outside and catch some rays.

finished up a bunch of engine bay stuff


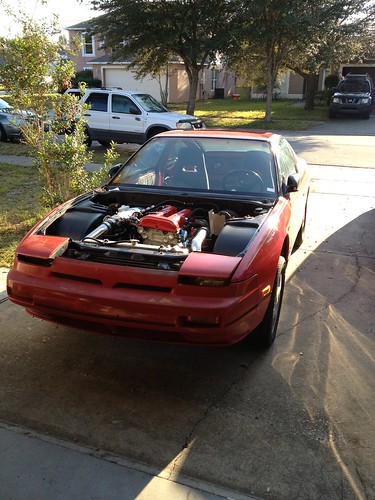
mocked up some stuff for fun


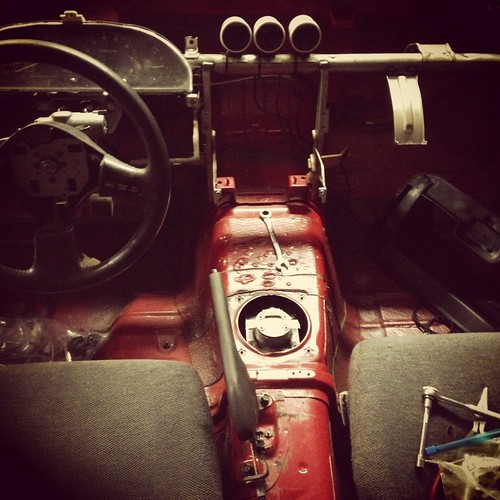
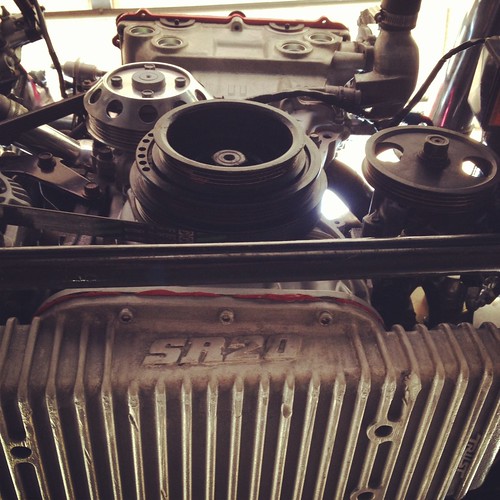
brackets for my super corroded rad


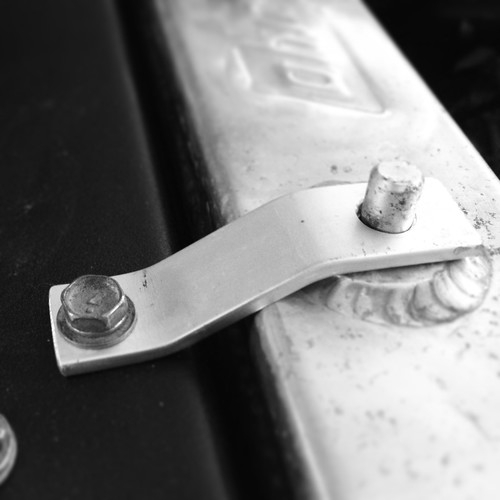
stock arms, ES bushings, z32 hubs, stock calipers, drilled/slotted rotors, baller bolts for entire subframe...for now


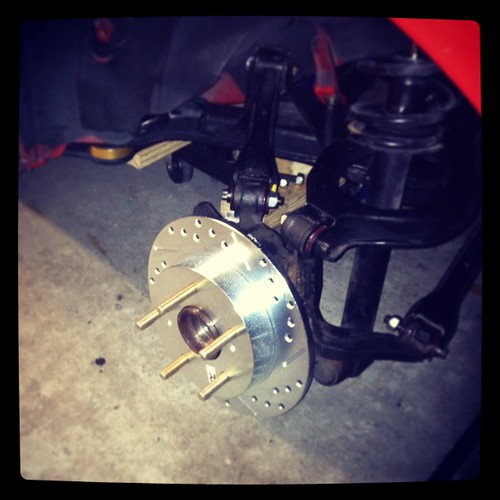
So now its on the ground...well 5 miles above it but she rolls. as i said before gotta wire her up. now wiring sucks i will tell you so its kinda a procrastination thing.

thanks for lookin
__________________
@UpshiftEngineering
KoukiMonsta is offline   Reply With Quote
Old 04-21-2013, 04:48 PM   #59
KoukiMonsta
Nissanaholic!
 
KoukiMonsta's Avatar
 
Join Date: Mar 2009
Location: NC
Posts: 1,969
Trader Rating: (23)
KoukiMonsta is a well-known jackass
Feedback Score: 23 reviews
Ive been doing work. hope you fuckers like it

So i want to put the ecu, fuses, relays etc in a location that allows for easy access. to swap fuses, test shit, check ecu codes ect.

so the glovebox seemed like a brilliant spot for this, hidden but easily opened. so i got this setup going on


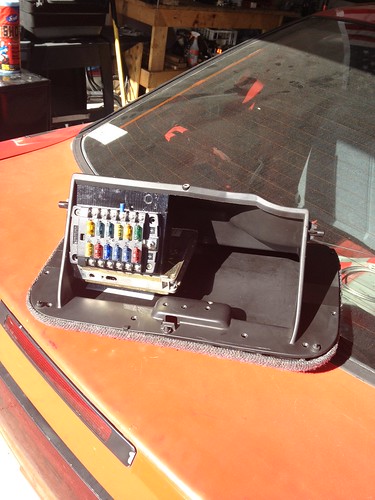
blue sea 12 fuse, its awesome


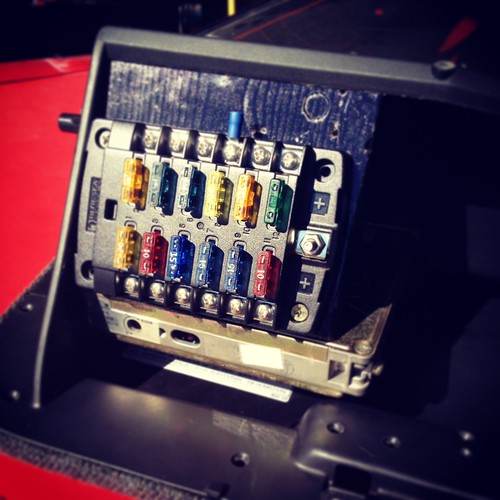
ditching all the dummy lights and other bs


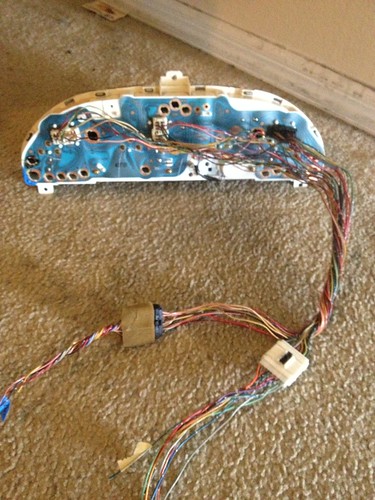
So at this point ive spent a couple months looking over the fsm wiring diagrams trying to get a solid grasp and now i really understand them. as always in this build, this is my first time. and i wil be entirely re doing everything. this is only going to have "racecar" wiring no accessories.


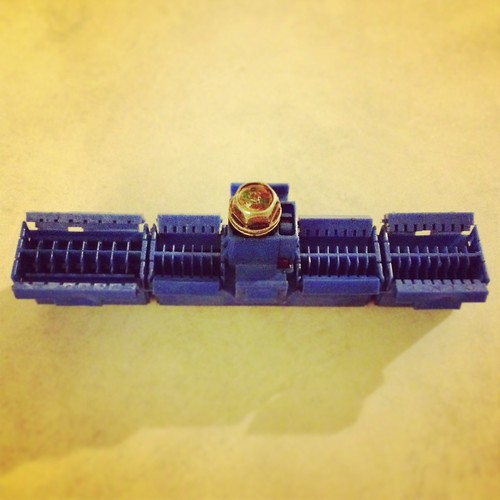
decided to go a little overkill on relays, i like the idea of seperati ng things so its easy to determine the circuit at fault in the case of issues down the road...of course inevitable.


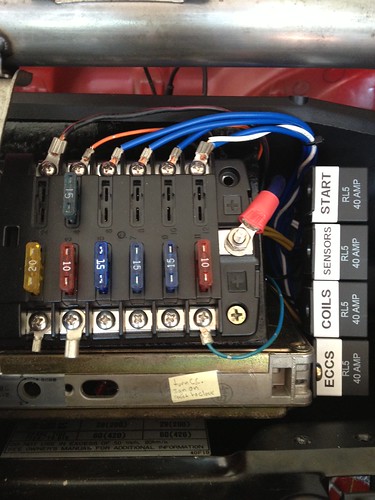
i dont really have many pics from the engine harness creation. heres a process pic


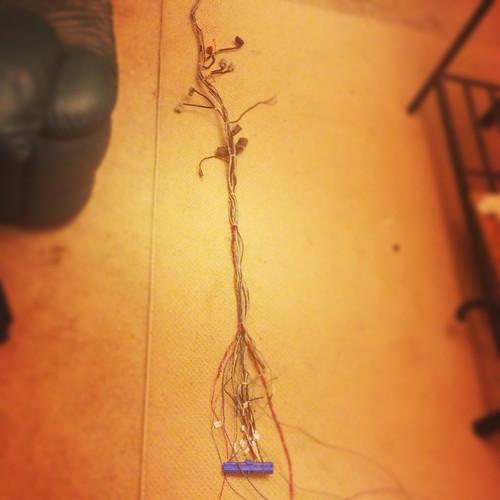
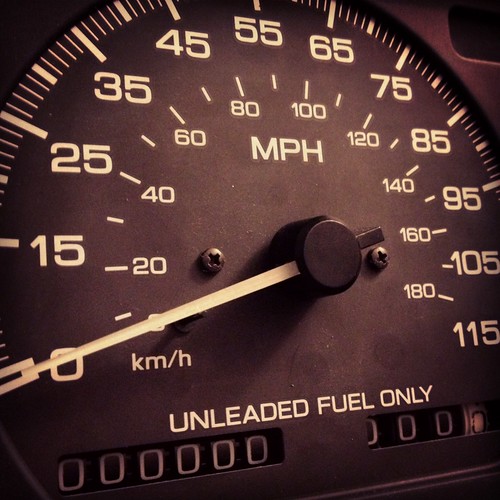
wiring for tail lights and fuel. cut tons of stuff from the rear


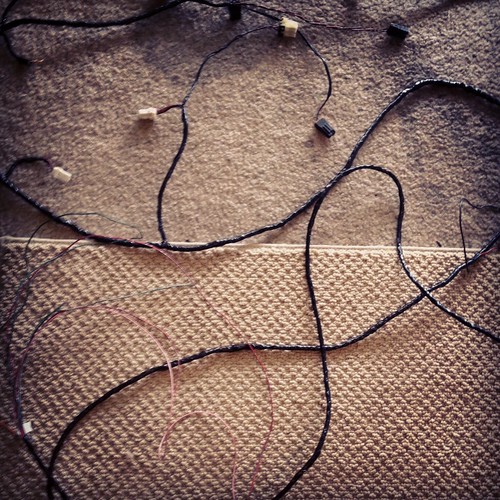
made this quick panel to get wires run. those switches are IGN and fuel


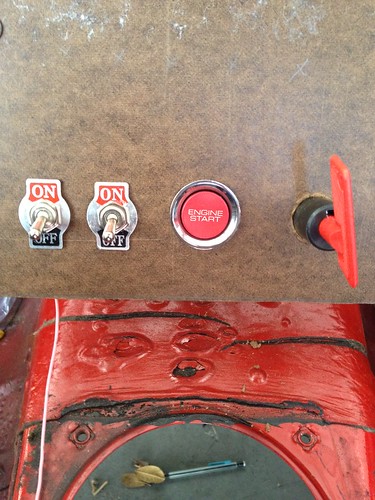
stay tuned, this thing will be running soon
__________________
@UpshiftEngineering
KoukiMonsta is offline   Reply With Quote
Old 04-21-2013, 08:10 PM   #60
supersayianjim
Nissanaholic!
 
supersayianjim's Avatar
 
Join Date: Jan 2010
Location: location X
Posts: 1,815
Trader Rating: (10)
supersayianjim will become famous soon enoughsupersayianjim will become famous soon enoughsupersayianjim will become famous soon enoughsupersayianjim will become famous soon enough
Feedback Score: 10 reviews
kick ass build!!
supersayianjim is offline   Reply With Quote
Reply

Bookmarks


Posting Rules
You may not post new threads
You may not post replies
You may not post attachments
You may not edit your posts

BB code is On
Smilies are On
[IMG] code is On
HTML code is Off

Forum Jump


All times are GMT -6. The time now is 10:10 PM.


Powered by vBulletin® Version 3.8.11
Copyright ©2000 - 2024, vBulletin Solutions Inc.
vB.Sponsors
Copyright ? 1998 - 2022, Zilvia.net