|
LAID OUT
Join Date: Mar 2004
Location: LAS VEGAS
Age: 42
Posts: 2,015
Feedback Score: 1 reviews
|
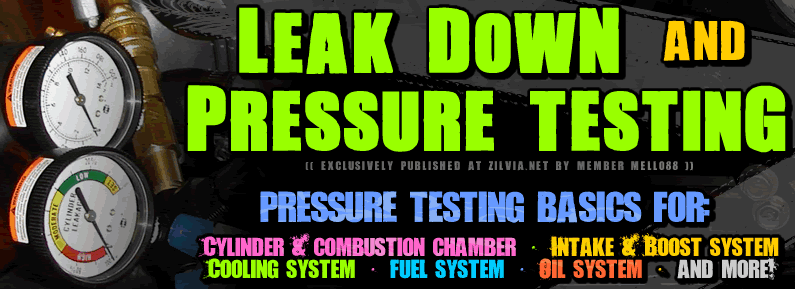
Leak Down & Pressurized Testing 101 *Approved*
Leak Down & Pressurized Testing 101
 * Image: Leak down & pressure testing 101
Learn how to pressure check your engine's combustion, coolant, intake, fuel and oil systems for fun & profit.
* Image: Leak down & pressure testing 101
Learn how to pressure check your engine's combustion, coolant, intake, fuel and oil systems for fun & profit.
Ok, maybe not profit... Or much fun either... But -- it will help you solve an existing problem, or even
prevent a future problem. Read on to learn more about getting the most of out of your leak down tester!
WARNING! This guide is meant to give you some general guidelines to go by, but the techniques and methods I have laid out in this article may not work for everyone or on every motor. You can probably hurt yourself or damage your engine using a leakdown tester (as with any tools in your garage) so please follow all safety instructions and precautions when working on your car. I assume no liability for your actions as a result of reading this guide.
Chapters
========- 0) Leak Down Tester tool overview. What is this magical device?

- 1) Leak Test: Cylinder & Combustion Chamber

- 2) Leak Test: Intake & Boost system

- 3) Leak Test: Coolant system

- 4) Leak Test: Oil system

- 5) Leak Test: Fuel system

- 6) Other uses

- 7) Build your own leakdown tester
- 8) Resources and external links
 Chapter 0) Leak Down Tester tool overview
========================
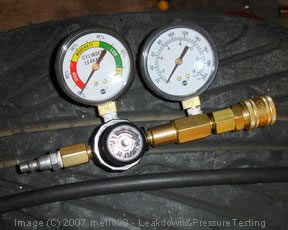
* Image of my leak down tester tool and spark plug hole adapter hose.
A "Leak Down Tester" (LDT for this article) is a very simple tool used to inflate a supposedly sealed chamber with air. As the chamber fills with pressurized air, you can observe the seals or seams for audible leaks. By spraying the seams with a soapy water solution, you can visually inspect more accurately, seeing very small pinhole leaks with ease.
The tester helps immensely during re-assembly by allowing you to double check the air-tightness of your work. Any leaks can be found now when the car is in your garage on jack stands, instead of driving down the road! While it helps detect existing leaks, it cannot predict future problems. If you have developed a boost, coolant or gasket leak, you can use the tester to help pinpoint the location for quicker repairs.
The LDT physically consists of two 1/4 quick disconnect air hose fittings (inlet & outlet), an adjustable pressure regulator, and one or more pressure gauges. One hose fitting connects to your tank of compressed air (30 to 100psi) while the other fitting connects to an included hose that threads into a spark plug hole. While the device is primarily made for testing cylinders & combustion chambers, it can easily be adapted to diagnose other sealed pressure systems such as intake/boost and cooling.
I've found that this tool can be a tremendous help in a number of situations, and should be included in every DIY-ers garage. While some people only purchase a LDT to use a few times on a potential swap motor, I have found a couple other uses that I think are useful enough to show you here.
* Sorry apartment dwellers... The tool requires a tank of compressed tank (from 30psi to 100+psi).
The pressure regulator adjusts the air flow through the LDT. The first gauge will show the input pressure (tank pressure), and the second gauge shows the sealing percentage of the chamber being tested (80% seal = a 20% leak). When you buy the LDT it may have the gauges mounted so that the pressure gauge monitors the compressed tank pressure. I think this is redundant (tank already has gauge & regulator), plus I would rather see the pressure of the chamber being tested. I removed and reversed my gauges so the pressure gauge shows the pressure of the chamber, not the tank.
 Chapter 1) Leak testing: Cylinder & Combustion Chamber
=============================
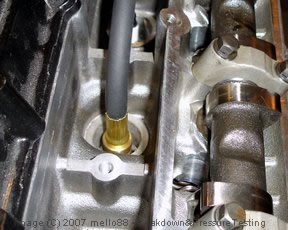
* Image of plug hole adapter hose threaded into RB20DET
Of course one of the top reasons to add a LDT to your arsenal is so you can measure the sealing capability of combustion chambers. With the LDT we can troubleshoot the piston rings, valve seats and the head gasket -- all at the same time. How well an engine seals helps determines it's ability to make power. If your engine leaks fire past a valve or past the rings, you are losing power and fighting a loosing battle.
The LDT helps diagnose cylinder and combustion chamber sealing, giving and indication of three main sealing areas:
- Piston & Piston Rings
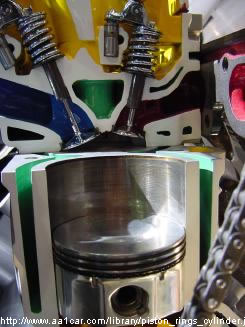
* Image courtesy of aa1car.com. Hope they don't mind.
Piston & piston rings - The piston rings keep the combustion chamber sealed from the crank case and oil. Leaking rings will allow oil to be burnt, and will allow more exhaust blow-by into the crank case. You will be able to hear excessive leaking past the rings, and will notice on the pressure gauge that the chamber cannot ever achieve a 100% seal.
.
- Valve & Valve Seats

* Image of my RB20DET valves. No wonder cylinder #3 leaked?
Valve & valve seats - The valve seats are the mating surface for the top of the exhaust valve. Each valve has a seat that runs the circumference of the valve surface. Because of their location and purpose in life, nearly all the air entering the cylinder passes by the valve seats. Therefore, the seats can easily become fouled if the combustion process is not clean (too rich and sooty) or the intake tract is dirty (Blown oil seal or no catch can). These deposits over time can build up and eventually cause a small leak each time the valve seats. A bent valve will also display a similar symptom, but I would expect a much more dramatic leak. You will be able to hear the air leaking past the valves and into the intake manifold or exhaust manifold, and should be able to pinpoint exactly which valve(s) are leaking.
.
- Head Gasket
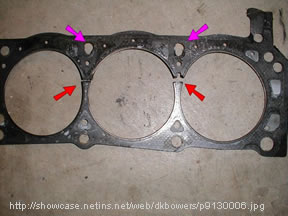
* Image courtesy of Netins.net/web/dkbowers Hope they don't mind.
Head gasket - The almighty head gasket separates the combustion chamber, oil passages and coolant passages from each other. Over time, it's possible for the head gasket to form a leak between two or more systems, causing a variety of combustion problems. Using a LDT you can test the head gasket's ability to seal these pressurized systems from each other. The LDT will audibly indicate most head gasket problems and may show bubbles or overflowing in the cooling system.
Steps to pressure test the cylinder & combustion chamber:- Remove the spark plug wire, or coil pack from the cylinder to be tested.
- Remove the spark plug from the cylinder to be tested.
- Set the cylinder being tested to top dead center using the timing marks or other method. One quick way to set TDC on any cylinder is to put a long screw driver down the spark plug hole, then rotate the crank with a ratchet and socket while watching the end of the screw driver handle. As the piston approaches TDC the screwdriver handle will reach it's peak height. Rock the crank until you're sure the piston is at exact TDC and both intake and exhaust valves are 100% closed.
.

* Image of RB20DET exhaust cam lobe position at TDC
You may wish to remove the cam cover, to ensure the cam lobes are pointing away from each other. Remove the screw driver if used to set TDC.
- Thread the LDT into the spark plug hole, twisting the hose until the adapter is threaded snugly and the o-ring seals.
- Set the compressed air tank regulator to 100psi, connect the hose to the LDT.
- Attach the LDT adapter hose to the main LDT.
.
* Image of ratchet and 27mm socket on crank pulley bolt
** Warning: Hold the crank in position with the ratchet! **
SLOWLY open the LDT regulator by twisting it counter clockwise. As you begin to allow the air to fill the combustion chamber, watch the gauge needles and listen particularly for air leaks from the LDT adapter in the spark plug hole. Continue to slowly build the chamber pressure, while increasing your grip on the ratchet holding the crank. As the combustion chamber pressure climbs towards 100psi, the force on the piston may cause the crank to want to spin one way or the other. You should feel and repel this force on the ratchet, as every millimeter the piston moves will change the cylinder pressure.
- Finally open the LDT regulator 100% to fill the chamber will all available air/pressure. Observe the leaking percentage gauge. Does the gauge indicate 80% or better sealing?
- Time to diagnose the main leak-risk areas:
Piston rings - Some leaking past the piston rings is normal, especially on a cold engine. Excessive leaking may indicate a ring sealing problem. A leak down test should be performed when the engine is at operating temperature, but that is sometimes not an option (like when you're re-assembling the motor on a stand). You may pour a small amount of engine oil down the spark plug hole to help the piston rings seal. If this improves your leak percentage, it may indicate problems with the rings on that cylinder. Remember, as the engine gets up to operating temperature the metals expand and offer a tighter seal.
Valves - Listen to the intake and exhaust ports; do you hear air escaping from one, or both valves? This may indicate a valve sealing problem, caused by a bent valve stem and/or contaminates on the valve seat. Try rocking the crank very slightly to ensure the valves are 100% seated. Sometimes the cam lobes may be keeping them partially open.
Here is a video of my motor leaking from the cylinder #3 exhaust valves:
[ame]http://video.google.com/videoplay?docid=-6823759025551605709&hl=en[/ame]
Head Gasket - Do you hear any bubbling? Remove the radiator cap or cooling system bleed screw and check for bubbles or leaking fluid. Be sure to listen to the adjacent cylinders for leaking, this can help indicate where a head gasket is blown. If you have good numbers except for two cylinders next to each other, it is very likely that the head gasket between them is blown.
- Remove the LDT from the spark plug hole
- Replace the spark plug
- Replace the plug wire or coil pack
- Move on to the next cylinder
- Set the cylinder to TDC.
 Chapter 2) Leak testing: Intake & Boost system
=============================
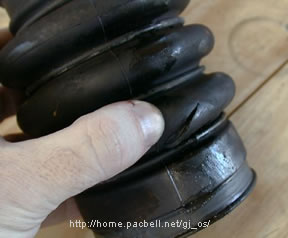
* Image courtesy of home.pacbell.net/gj_os/, hope they don't mind.
Another popular use for the LDT is to check the intake system for "boost leaks". Any leaks in a pressurized mass-air system will cause combustion problems, typically including backfires, poor performance and excessive exhaust soot. The entire intake system between the turbocharger and the combustion chamber needs to be able to hold more air pressure than you intend to force through it under boost. Most street driven vehicles typically run low to moderate boost levels, from 5 to 16 psi of boost. Pressure checking the intake system to 2 bar (or 30psi) will ensure no leaks for all but the most hard core engines.
While my motor is on the engine stand being re-assembled, I needed to pressure check the various intake manifold gaskets and recent RTV work. I knew I could get the vac hoses sealed off easily enough, but I was more skeptical about the throttle body hole and the injector holes. I ended up making a quick throttle body blockoff plate from some 3/8" thick wood and RTV, and blocked the injectors using rubber stoppers on long lag bolts.

* Image showing my injector block offs - 1/2" rubber stoppers on a lag bolt
By installing a block off plate in place of the throttle body and stoppers in the injector holes, I was able to pressurize the intake manifold through the spark plug hole by allowing only one intake valve to be open. I slowly pressurized the system to 2 bar (30psi), then I went around with soapy water and sprayed all the gaskets and RTV work watching for bubbles.
I found the paper gaskets on the intake manifold allowed a small leak (through the paper fibers, it seemed), so I reassembled the manifolds using RTV on both sides of the gasket, then re-pressure checked. I am confident that the intake system is good to at least 2 bar now, way more boost than I will ever run! Don't forget to spray the bubble mixture around your IACV, PCV vavlve, EGR, etc.. I actually found that my PCV leaks slightly after about 5psi, so I replaced it with a teflon-taped bolt for pressure testing.
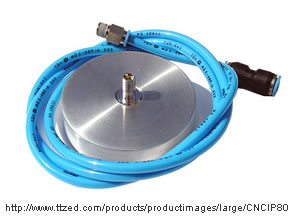
* Image of 3" boost leak adapter. Courtesy of TTZed.com, hope they don't mind.
Pressure checking the intake system on a motor installed in car is a little easier, since all the hoses should be hooked up to something. You'll need to buy or make a 2.5" or 3" pressurized tester adapter like the one shown above. You can make your own out of a 3" cap, tire valve, a 3" silicone coupler and some RTV. To use the adapter, remove your turbo outlet "hot pipe" and twist it so you can clamp the adapter on the end. The opposite end of the pipe should still be securely clamped to your intercooler!
Slowly inflate the hotpipe to 2 bar to test the hot pipe, hot pipe->fmic coupler, fmic, fmic->cold pipe coupler, cold pipe, cold pipe-> throttle body coupler, the throttle body and the intake manifolds. The valves can be in just about any position for this to work.
Be sure to double check around the Throttle Body. I found my throttle body shaft seal near the TPS was leaking horribly, which wouldn't let the intake pressurize any more than 10psi. Even at that low level it was leaking quite a bit of air, it was so bad it wouldn't hold anything more than 3-5psi before I could hear it rushing out...
 Chapter 3) Leak testing: Coolant system
=============================
You can pressure check the coolant system to check for water leaks. I did this with the engine dry on the motor stand, but it's possible with the engine mounted in the car.
Steps to pressure check your coolant system
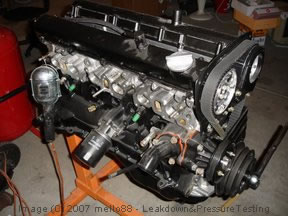
* Image of test motor waiting patiently on the stand
.
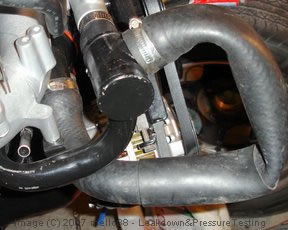
* Image of test motor coolant hoses connected or blocked
Connect all hoses together. Here you can see I used a length of fuel hose to seal two coolant nipples together. You can also see my use of rubber stopper-on-a-stick to block off a 16mm heater hose fitting. With a little creativity you'll find enough stuff around your garage to block off all openings.
.
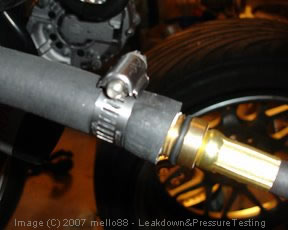
* Image of LDT plug hole adapter clamped to 16mm coolant inlet hose
Clamp 16mm heater core hose onto plug hole adapter with the Teflon tape
.
* Image of test motor upper and lower water outlets connected with hose
Clamp radiator hose from water outlet to water inlet.
.
- Slowly pressurize the cooling system. You're going to want to test the system to a little over what your radiator cap is rated for. On a stock radiator, the cap opens around .5 bar (7 psi). Many people upgrade their radiator cap to a higher pressure cap, which opens from .9 to 1.3 bar (13 psi to 19 psi). Personally I would make sure your cooling system can withhold at least 25% more pressure than what your radiator cap is rated at. For instance, I am running an ARC 1.3 Bar cap, which means I should pressure test to about 1.6 Bar (a little over 23 psi).
- Listen for air leaks. As the system is pressurizing, move around the various fittings and connections to listen for air being leaked. If you have no leaks at all, you will barely be able to hear the air rushing into the engine... But if you hear a loud "whooshing" noise, you need to investigate further if you're not able to obtain the minimum test PSI!
Click here for a video of my water pump's RTV leaking:
http://picasaweb.google.com/joelmell...75119644418818
.
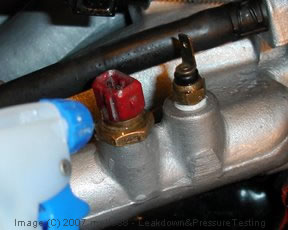
* Image of soapy water being sprayed on coolant temperate sensors
Now that you have solved some of the minor leaks by tightening the hose clamps and blocking off missed openings, you can test the actual gaskets. This is done by using a small squirt bottle filled with some soapy water. Simply spray the mixture on any pressurized connection and observe the fluid as it runs down the seal. If there are any pinhole leaks, you will see small bubbles forming! Don't forget to check around your sensors and auxiliary connections, such as the heater core, turbo banjo bolts, etc.
- Remove LDT after diagnosing any leaks
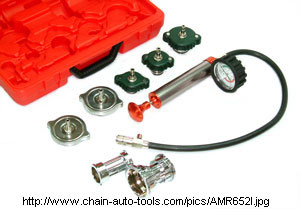
* Image of radiator pressure test kit
To test a cooling system on a motor already installed into a vehicle, you may wish to pick up a radiator pressure test kit. It's basically a radiator cap with a nipple on it that you install in place of your existing pressure cap. You then pressurize the cooling system through the nipple, but be sure to not exceed the pressure rating of your regular radiator cap. For instance, if you're running a 1.3 bar cap, you should only pressure test to 25psi or so. This is because the stock cap works like a blow off valve, dumping excess pressure to the coolant overflow tank. If you exceed the rating of your normal cap, you may "find" a leak by blowing out a seal somewhere.
 Chapter 4) Leak testing: Oil System
====================
Install an oil filter
RTV the oil pan on
Torque the cam covers down
Place cap on oil dipstick tube
Disconnect and block off PCV hoses
Install LDT onto PCV tube
Use 10-20psi tank pressure. Note: I would suggest using low pressure here, since the valve covers are not normally pressurized. The turbo should be able to handle the same pressure as the pump would generate, but I would keep the pressure low here just in case.
Pressurize and listen for leaks/use soapy water on: - Oil filter
- Oil pan
- Cam covers
- Oil pump
- Banjo bolt on block
- Banjo bolt on turbo
- Drain on turbo
- Drain fitting on block
- Turbo oil seal - listen to turbo inlet, outlet and turbine side
Here's a video of my turbo oil seal leaking, and a quick overview of how I hooked up the LDT:
[ame]http://video.google.com/videoplay?docid=-3095853517775055224[/ame]
 Chapter 5) Leak testing: Fuel System
====================
Remove fuel inlet hose
Install hose with inflation adapter onto fuel inlet hose
Use 40-60psi tank pressure.
Pressurize and listen for leaks - Fuel injectors
- Fuel pressure regulator
- Fuel hose & fittings
- Fuel pressure gauge/sender & fittings
Stock fuel pressure is 43.6 psi. You should be able to hear your FPR open up at ~45 psi and start venting back to the tank.
This is also an adequate way to preset your Nismo or Adjustable Fuel Pressure Regulator before firing up the engine for the first time. Simply pressurize the fuel rail to ~50psi then loosen the lock nut and adjust the bolt on the FPR until your fuel pressure gauge reads 3bar (43.5psi)! I ran a 1.5" VDO fuel pressure gauge on a 3/8" tee in the fuel hose before the fuel rail.
 Chapter 6) Other Uses?
====================
It should be possible to pressure check the exhaust system (muffler, cat, down pipe, dump pipe, turbo gasket, manifold gasket) for leaks by using a block off plate installed on the muffler tip, or bolted in place of the catback, cat, downpipe, etc.
As I find useful ways to test other various systems I'll update the guide.
[Image coming soon]
Chapter 7) Build your own leakdown tester
====================

* Image courtesy of Mike Nixon (xs11.com hotlinked for now)
More to come in this section. For now if you're interested in building your own leakdown tester, check out these resources:
 Chapter 8) Resources & External Links
====================
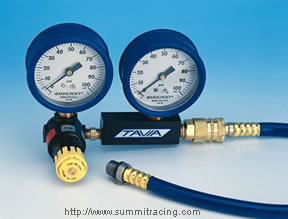
* Image of a LDT available from Summit Racing
There are many different leak down testers on ebay, selling from about $50 to over $100 each. Summit Racing also sells the exact tester I own.
Last edited by MELLO*SOS; 10-21-2007 at 03:00 AM..
Reason: added build your own chapter
|
 02-05-2007, 01:28 AM


 Threaded Mode