|
|||||||
| Tech Talk Technical Discussion About The Nissan 240SX and Nissan Z Cars |
 |
|
|
Thread Tools | Display Modes |
 04-20-2008, 12:16 PM
|
#1 |
|
Zilvia FREAK!
 
|
T25 Turbo Rebuild
I wanted to make a thread on here because i didn't exactly find anything explicitly based on the Nissan\Garrett T25 turbo and what to expect when rebuilding it. There was a helpful one found on google that helped a little, but still wasn't exactly the same, here is the link:
http://photo.platonoff.com/Auto/2005...o_Rebuild/?all so I will basically list the tools, procedures and parts I used and problems I encountered while embarking on this mission. TOOLS 13 MM Spanner/Box wrench (preferably slimline if you have available) 1/2 SAE Spanner/Box wrench (this is actually slightly smaller than the 13MM and actually works better in my opinion) these tools will be for the exhaust housing bolts which are extremely difficulty. i ended up having to zip one off with my cutoff wheel. 5/16 SAE or 8 MM 12 point socket These tools are used to remove the REVERSE THREADED nut holding the intake compressor wheel on. Various needle nose pliers. pictures below will show a modified pair of angled snap ring pliers to remove a the large snap ring for the intake compressor housing. 13MM socket This will be used when you remove the reverse thread nut. hold the 13MM socket on the exhaust end of the compressor shaft and turn clockwise to loosen, again REVERSE THREAD! T-15 TORX BIT you will use this to remove the three thrust bearing screws, your rebuild kit should include new ones. use red loc-tite on these screws when you install the new thrust bearing. HAMMER This will be used to tap off the exhaust housing from the CHRA (Compressor Housing/Rotating Assembly). don't get overzealous, i will discuss mistakes i made at the end of this writeup. Precision screw drivers (those small screw drivers to fix eye glasses) or picks these will be used in various places throughout the rebuild, they come in very handy in hard to reach places and when trying to persuade the snap rings that secure the journal bearings. ADVICE/CONSIDERATIONS: First, do not even attempt this unless you have soaked the turbo in PB blaster or another type of penetrating oil/spray for a day or two. spray ALOT of BP blaster where the CHRA meets the exhaust housing. also do not attempt until you have all of the right tools and the proper rebuild kit. inspect the rebuild kit when you receive it to make sure everything is included. Take before and after pictures. Mark the compressor wheel to preserve the factory balance. i personally didn't because i really don't plan on running this setup for that long. Also take various pictures at different angles before you disassemble so you can clock the turbo properly when you reassemble. Here are some shots i took so i could reference the position of both housings:   DISASSEMBLY INTAKE/EXHAUST HOUSING REMOVAL (most difficult part in my opinion) removing the intake compressor housing is a little tricky. use a pair of angled needle nose pliers. i picked mine up from auto zone for ~$7. There is a large snap ring that has alot of tension, that is why you have to use angled needle nose pliers. here are some pics of how i modified them to grip the snap ring better: 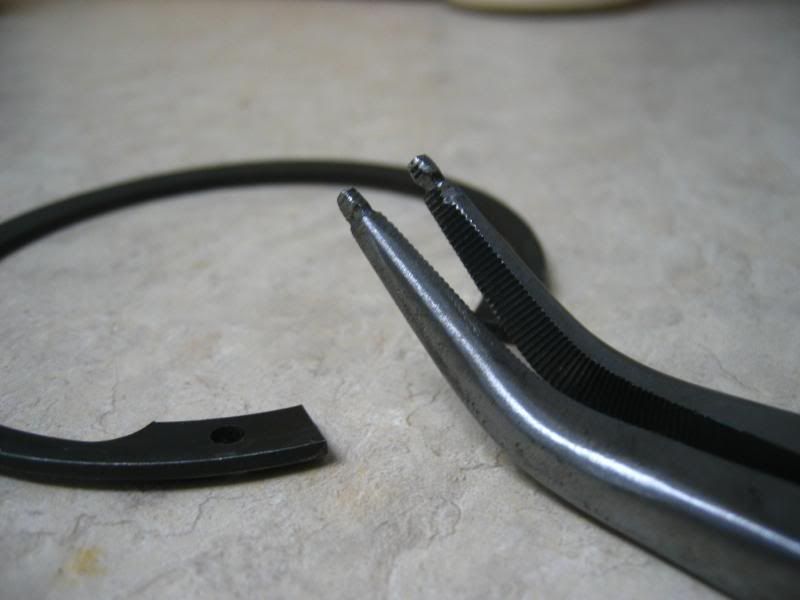 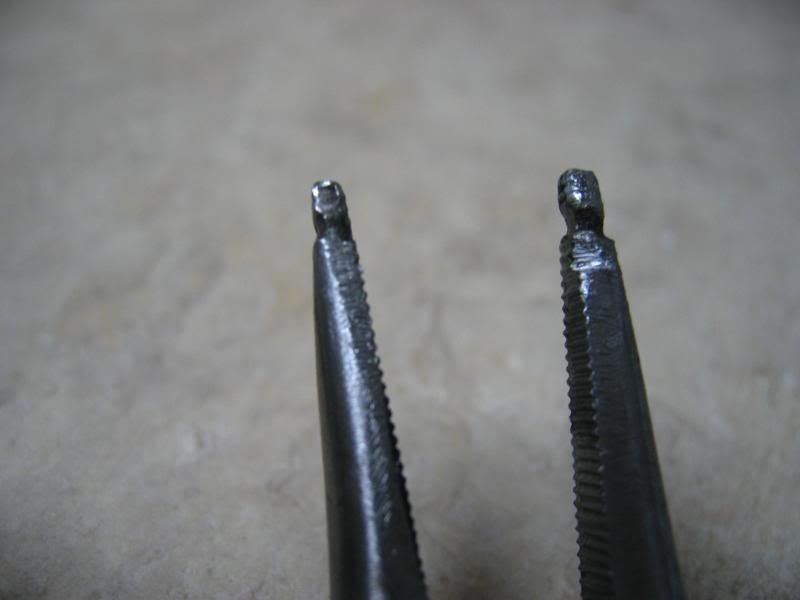 once the housing is removed, you must now remove the intake turbine. Removing the intake compressor/turbine nut is easy, use the 5/16 socket on the intake end, and a 13 mm socket on the exhaust end, and remember it is REVERSE THREADED, so pretend you are trying to TIGHTEN something, by this i mean TURN CLOCKWISE. be careful when persuading the turbine off as you don't want to damage it. here is a shot of the removed nut and 5/16 socket i used: 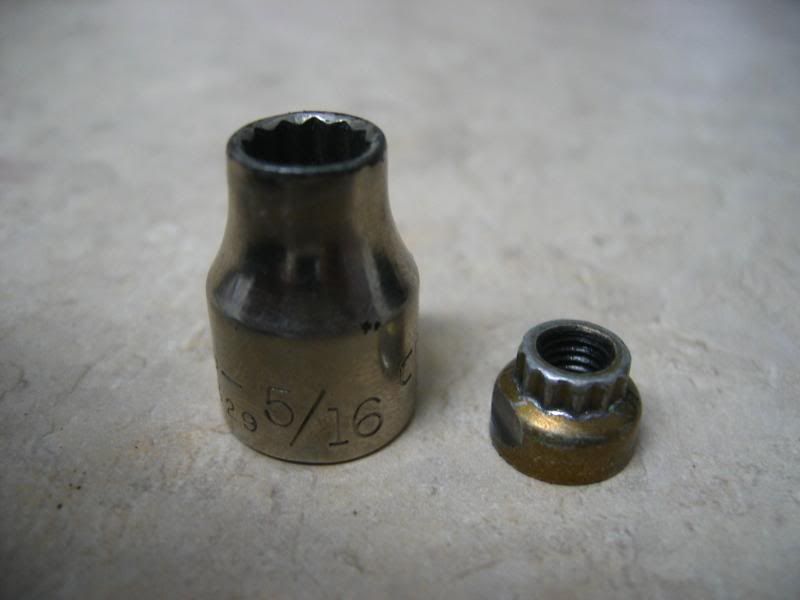 once the intake turbine is off, you will now encounter another smaller, high tension snap ring. you can use regular needle nose pliers and pics/screwdrivers to remove this. have patience, it is tricky to get this off, also be careful, mine whipped out with high velocity lol. this pic gives you an idea of what you will see: 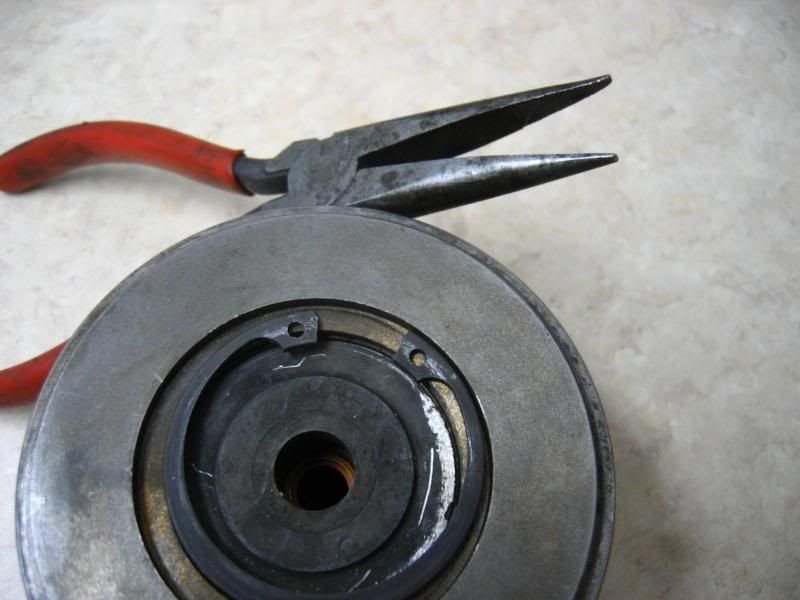 removing the plate is tricky as it "snaps" to the thrust bearing underneath to create a tight seal so oil doesn't leak out. i hit it with some pb blaster and gave it a few light taps all around and i was able to slip it out. once it is removed you will see the thrust bearing: notice the cooked oil on the other side of the plate, however it appears to minimal. rebuild kits include a new plate: 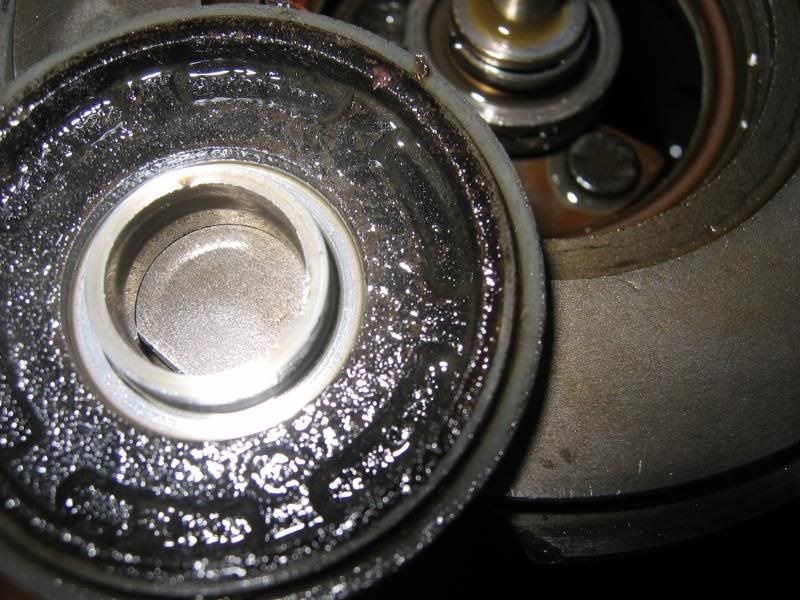 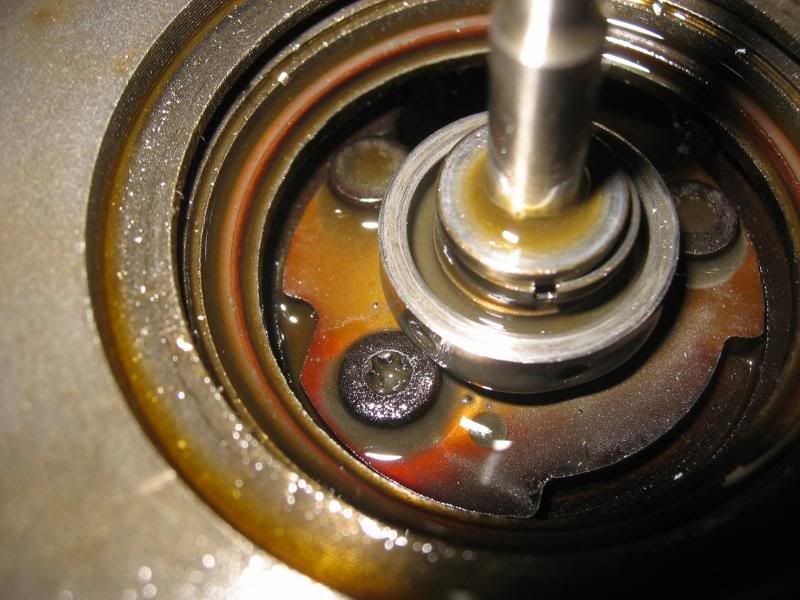 use the T-15 TORX bit to remove the three screws. notice the metal ring in the picture, this is what keeps that top plate secure and creates a nice tight seal so oil doesn't leak out. the rebuild kit includes a new thrust bearing and ring. here is the old thrust bearing removed: 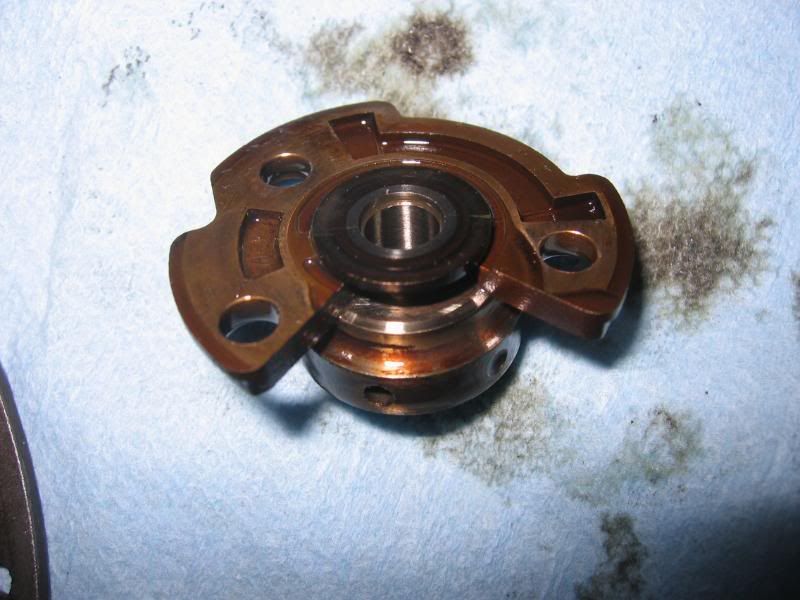 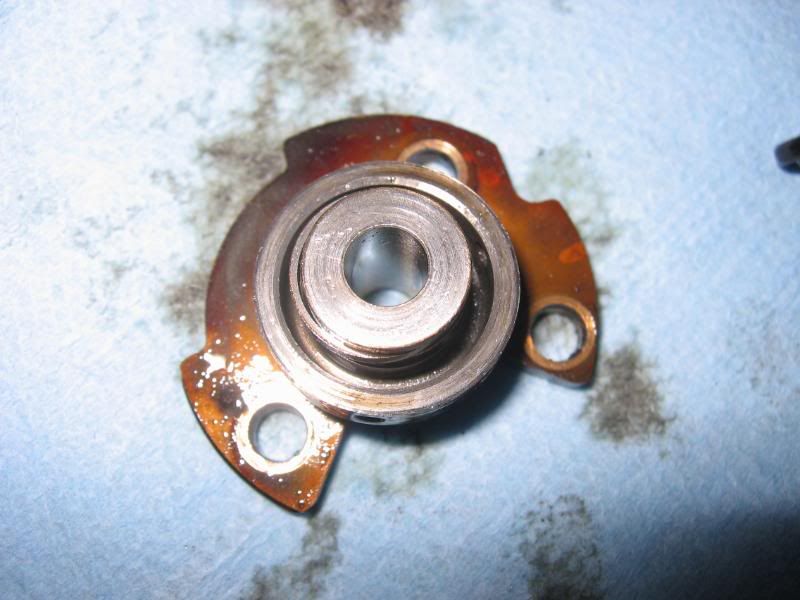 artistic shot: 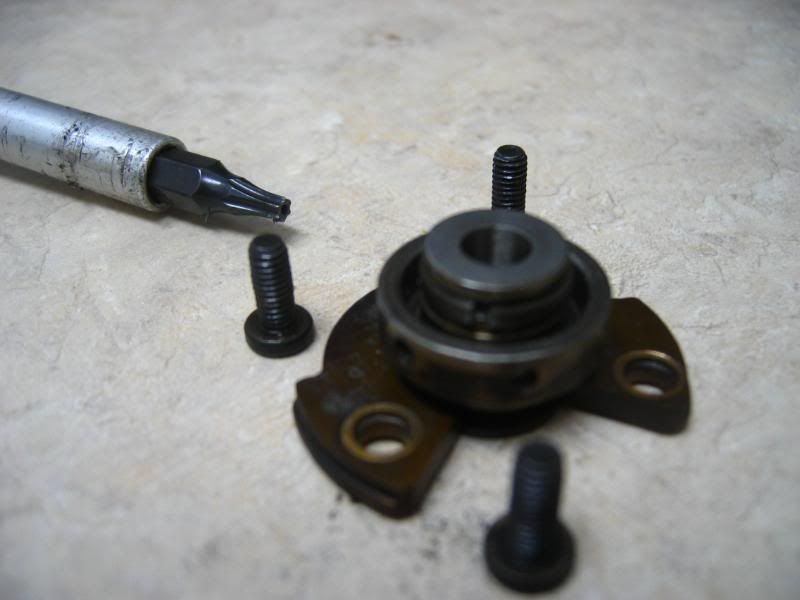 this is the piece that usually causes alot of in and out shaft play. the bronze colored piece usually wears down. the thrust bearing had alot of slop and play. there are companies that seel 360° thrust bearings. this turbo comes stock with a 270° thrust bearing, and this is also what was included in the rebuild kit. once the thrust bearing is removed, you will see this: 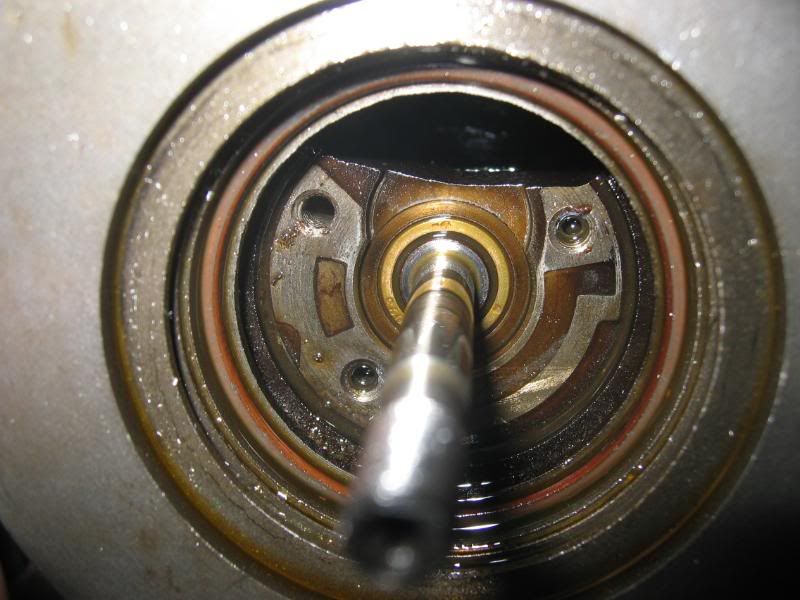 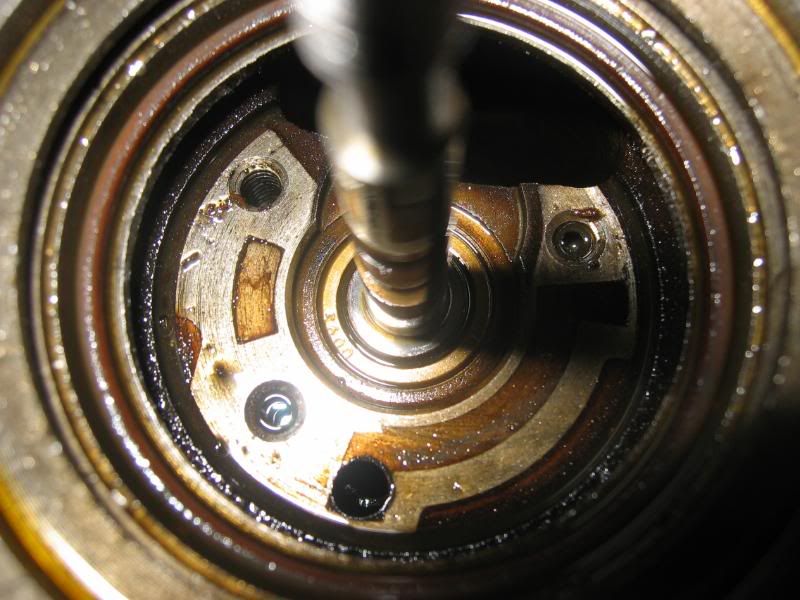 note the red o-ring. the rebuild kit includes this, make sure you replace it. ok so, that was the easy part. here comes the fun. EXHAUST HOUSING REMOVAL this is the most difficult part (when you DON'T know how to do it). now that i know how to do it, it's a piece of cake. there are 5 13MM bolts holding the CHRA to the exhaust housing, using two metal plates. here is a shot of the plates i am referring to (i will explain later why the plates have grind marks on them).  three of the bolts were simple to loosen and remove, however the fourth exhaust hosing bolt sits right under the oil drain flange, which is an extremely tight spot. it's extremely frustrating to work the bolt out, and on TWO different T25's i stripped the bolt. yes, i had two T25s to work with, i had to pick up another one (turbine shaft was siezed) because i completely screwed up the original one, i will explain this later). so what i had to do was cut off the 4th bolt with an airpowered cut off wheel. i really need to get an electric one. but whatever, i got the bolt off, here are some shots:  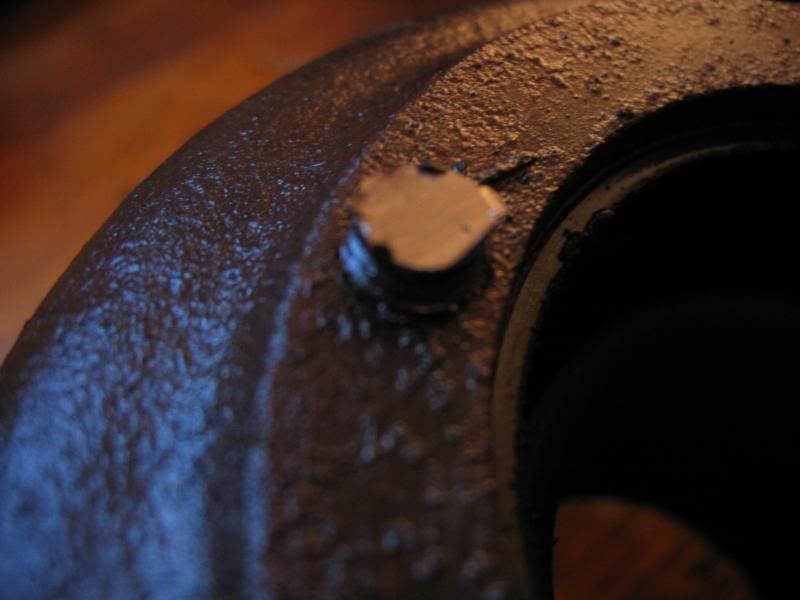 This is why the above pictured plates have grind marks on them. since i had two turbos to work with, i used the two plates (out of a total of four) in the best condition. ok so once all of the bolts are out of the way, the plates slip right off, but the exhaust housing is still completely stuck to the CHRA. use a hammer to carefully tap the exhaust housing off while holding onto the CHRA. spray some more PB blaster where the CHRA meets the exhaust housing and tap gently so the BP blaster can find its way into the gap. be sure to tap a few times, the tap on the opposite side, and continue in a star pattern. you will be tapping the same way exhaust flows out to your down pipe. tap AWAY from the intake and TOWARD the exhaust BE VERY VERY CAREFUL!!!! i got sloppy and here is a picture of what i did, and why i had to purchase another T25. 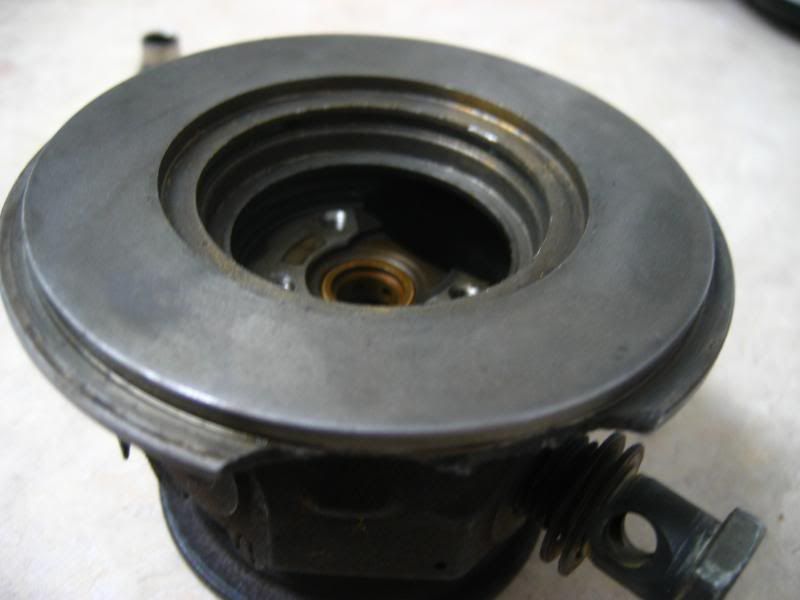 so once i did this i was completely screwed and went on a wild goose chase to find another T25. these are abundant so thanks to a follow Zilvian, i purchased a seized T25. the wheel barely spun and when it did i could hear grinding. all that grinding was cooked oil on the exhaust end. ok so once the exhaust housing is removed, you can now start to coax the turbine shaft completely out of the CHRA. be careful when doing this as you don't want to damage the fins or damage the shaft itself. you can use a puller or something soft to tap on the intake end of the shaft (rubber mallet, wood, etc). the intake journal bearing should slip right out, this is included in the rebuild kit. once you remove the compressor wheel, there is a plate that covers the exhaust end of the CHRA. once i pulled this off, a shit load of cooked oil came out. here are shots of what crusty cooked oil looks like: this is the plate that covers the exhaust end of the CHRA: 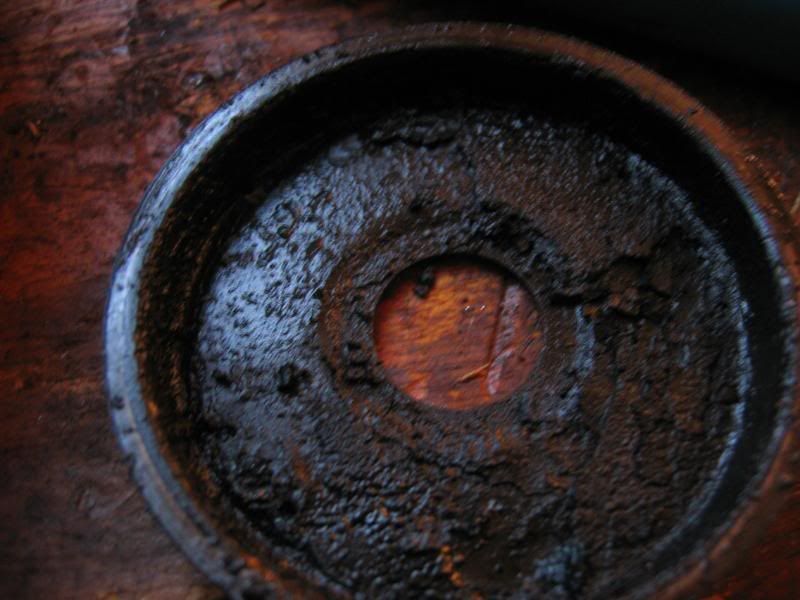 exhaust end of the CHRA: 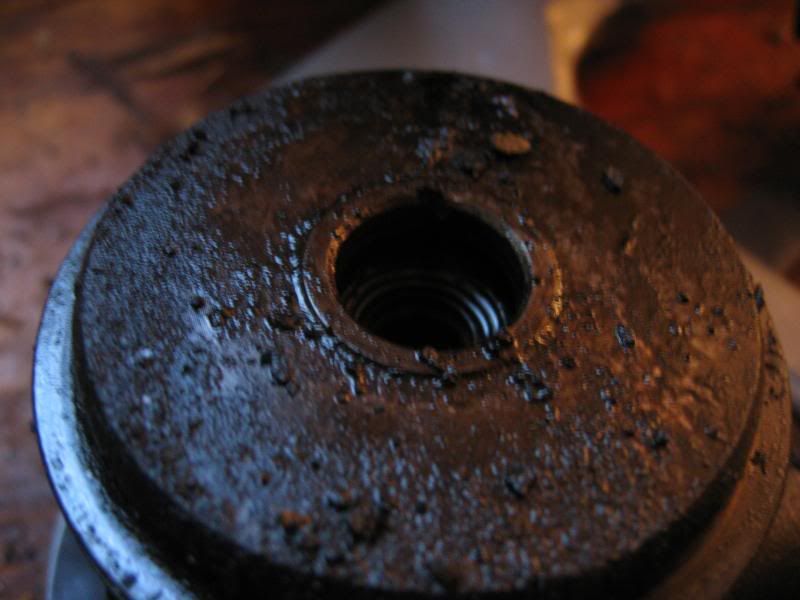 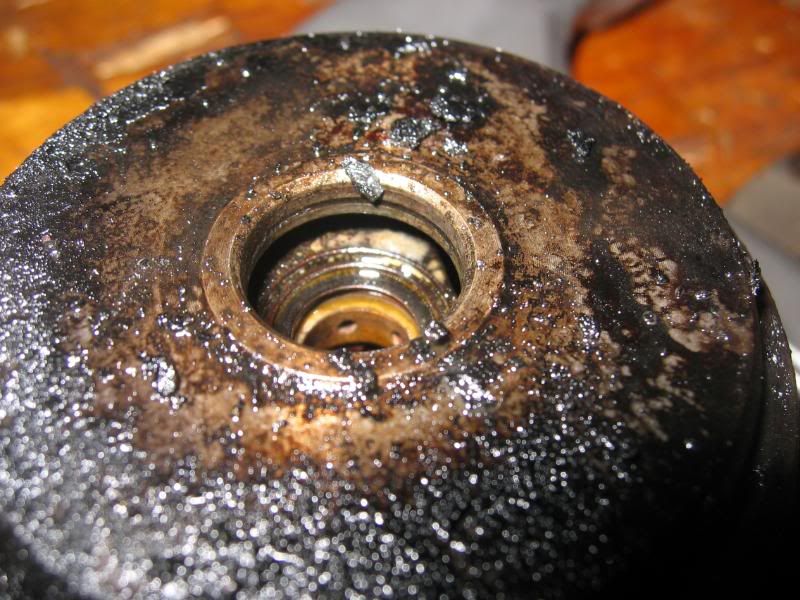  to remove the cooked oil off of the parts, you can either hit it with a wire wheel or some type of strong solvent. i personally let all of these parts soak in a 5 gallon bucket with a 1:1 mixture of simple green for a day and a half. the cooked oil chipped right off and everything was pretty clean afterwards. here are shots of the exhaust wheel from the second turbo i used which was seized with all of the cooked oil: i opted not to use this one, and used the wheels from my original turbo because these were in much better condition. it is nice having two turbos to work with in case you damage a piece. you can also use the best pieces from both to assemble one unit. notice more cooked oil sticking to the fins. 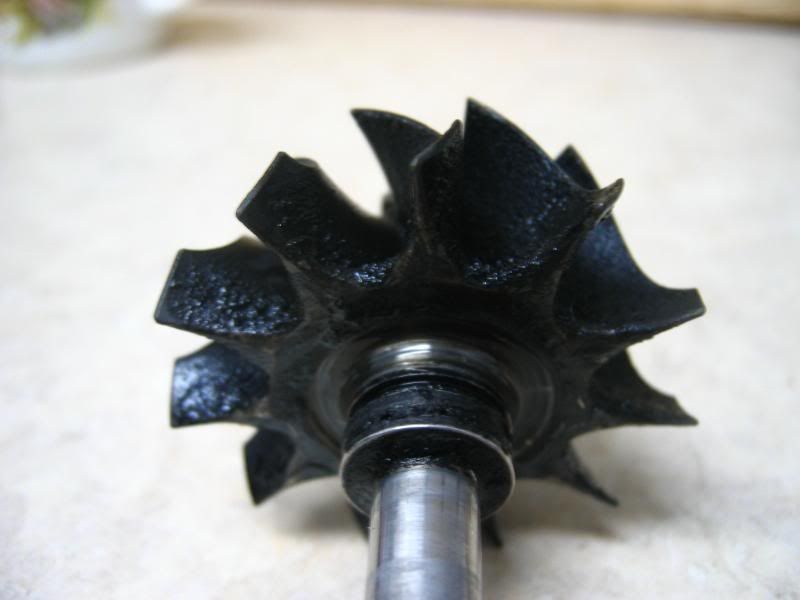 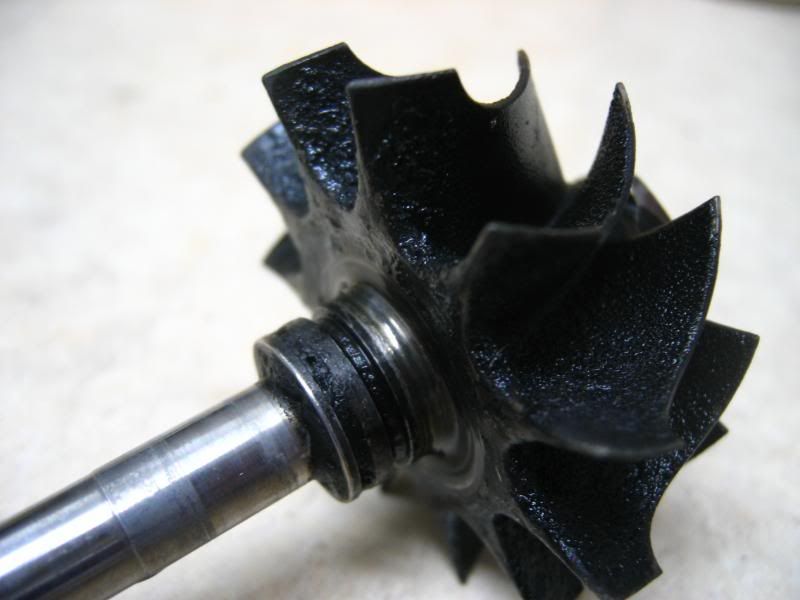 now that the exhaust wheel and plate are removed, you can now see the exhaust side journal bearing, but it is being secured by both a metal shim/washer, and some flat coiled ring that works like a snap ring, but not quite. here is a picture to show you what i am talking about, because i dont' exactly know the correct term for this little gem. THIS IS NOT INCLUDED IN THE REBUILD KIT, TAKE YOUR TIME REMOVING IT AS YOU dO NOT WANT THIS PIECE TO BE DAMAGED. i shoved something in it to show everyone what it looks like: 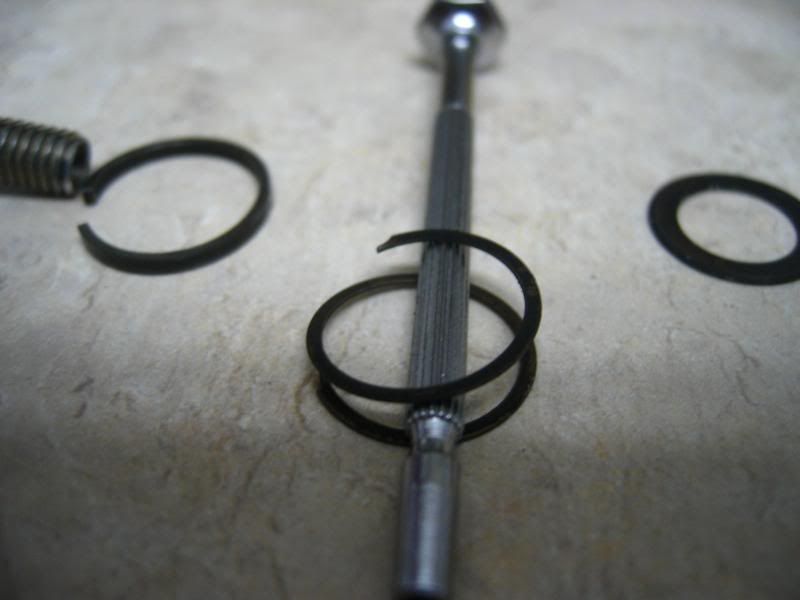 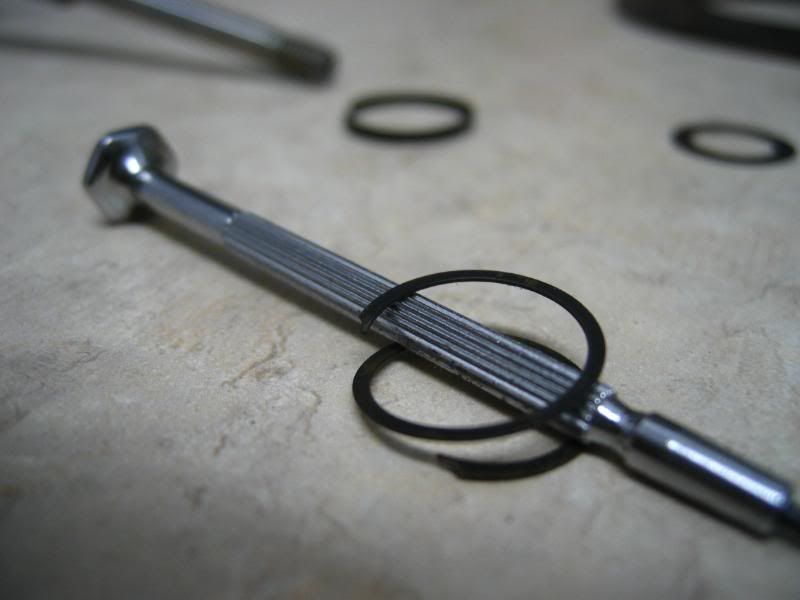 it was pretty tricky to remove, i used two very small screw drivers to "unwind" it and it came out pretty easily. once you take this out, a washer/shim will fall right out, a new one is included in the rebuild kit. The exhuast the journal bearing will hopefully slip right out. under the exhaust journal bearing, there is snap ring securing it in place. the same goes for the intake side. there are a total of two journal bearings and two snap rings inside the CHRA shaft. new snap rings and journal bearings are included in the rebuild kit: 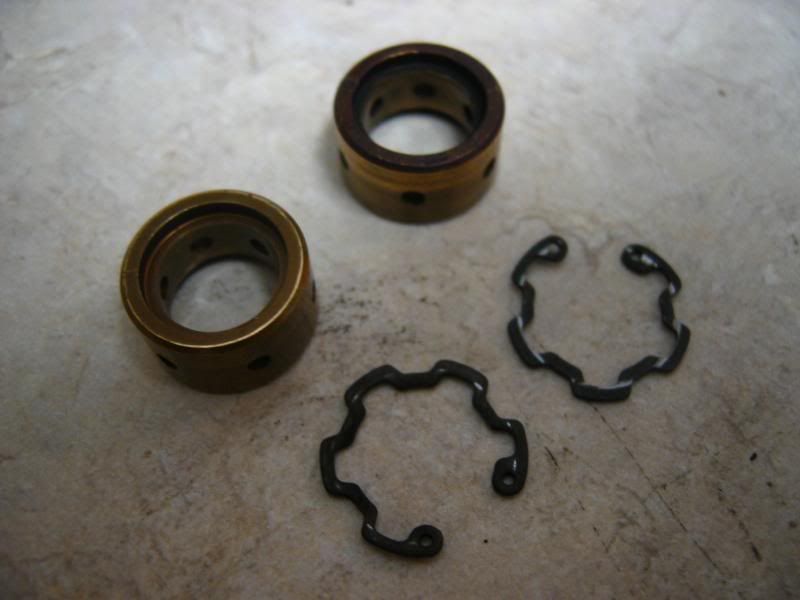 DO NOT throw any of the removed parts away just yet. you never know. you might lose something, break something, or who knows, just save them in a zip lock bag. i soaked the entire CHRA in simple green, the crusty plate that goes over the exhaust end of the CHRA, the intake housing, exhaust housing, the wheels, basically everything. here are a few shots of the shiny new CHRA:  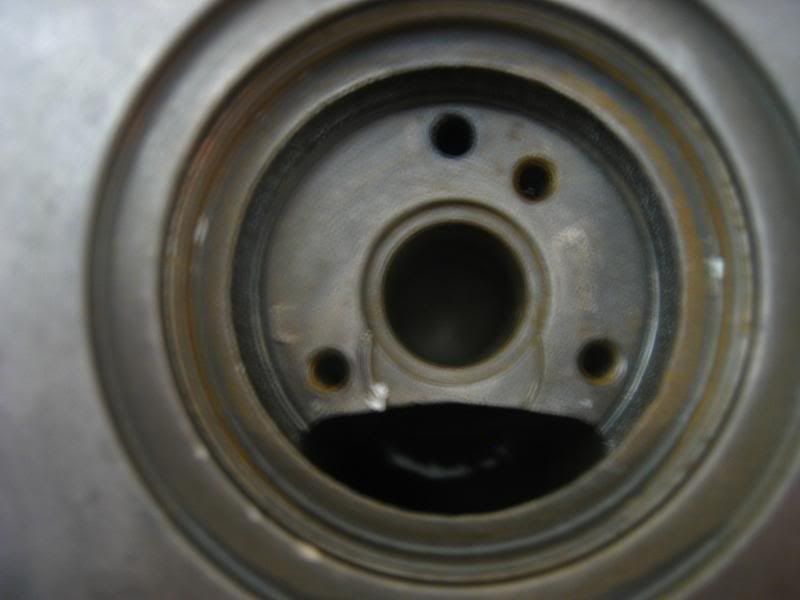  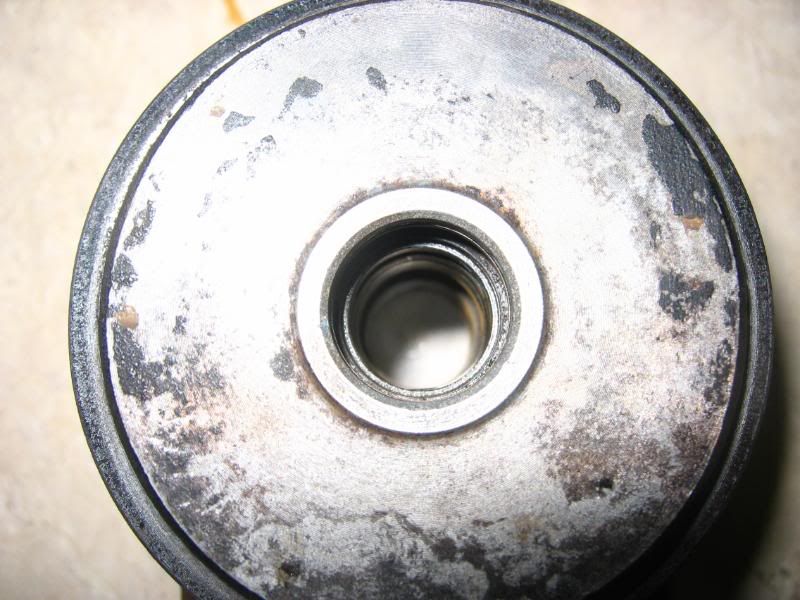 intake housing: 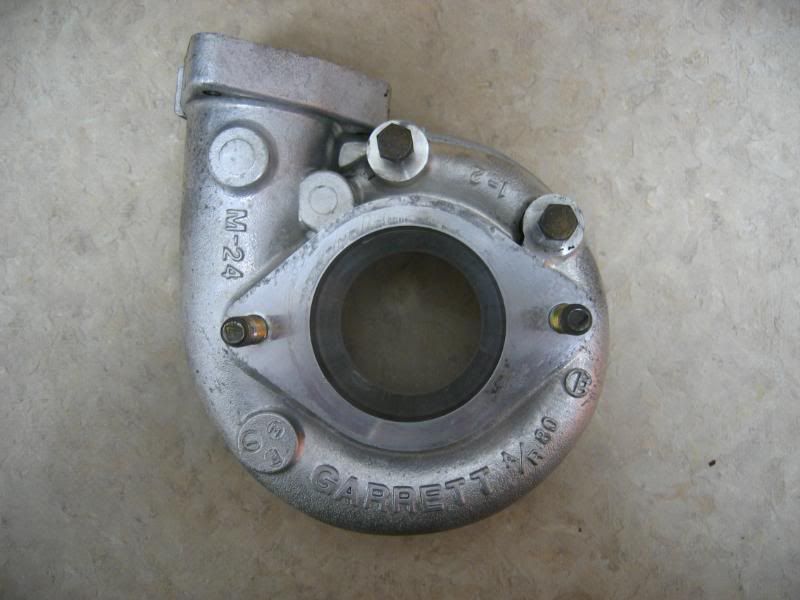 CHRA information i guess: 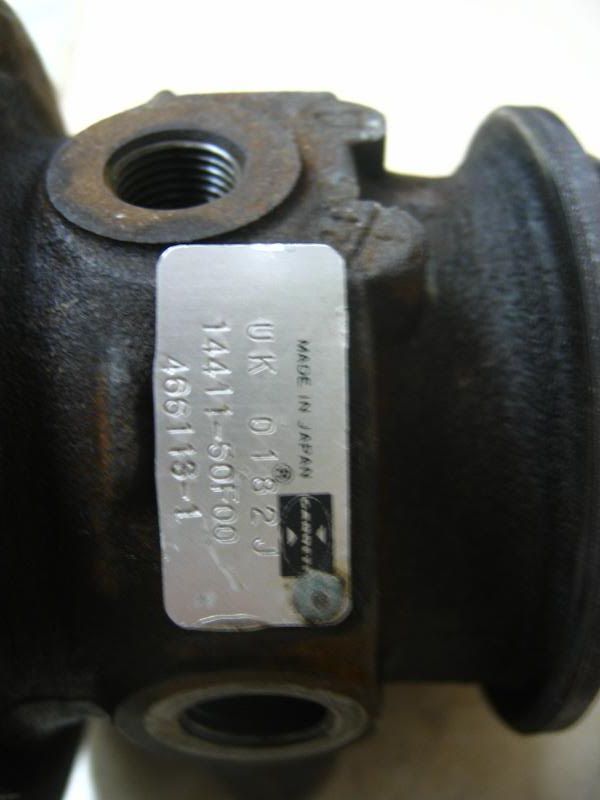 so here are all of the parts i removed exactly how they came out. 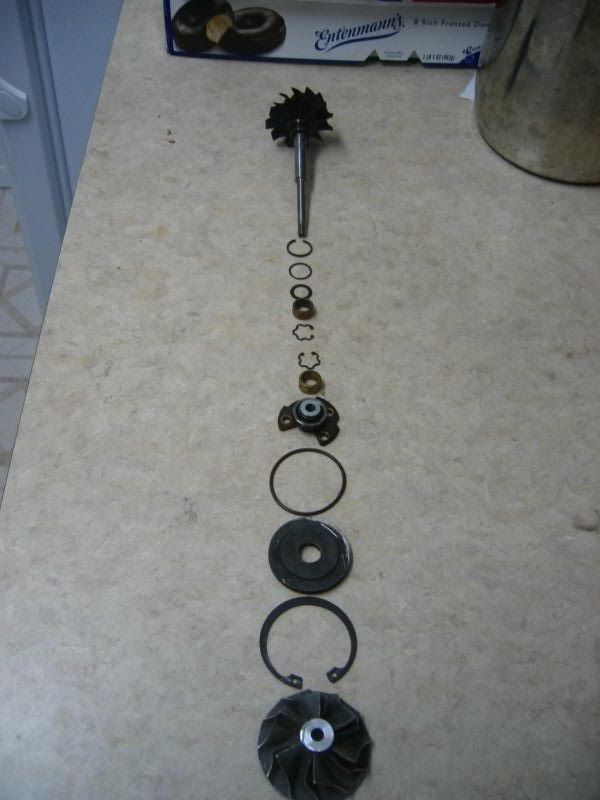 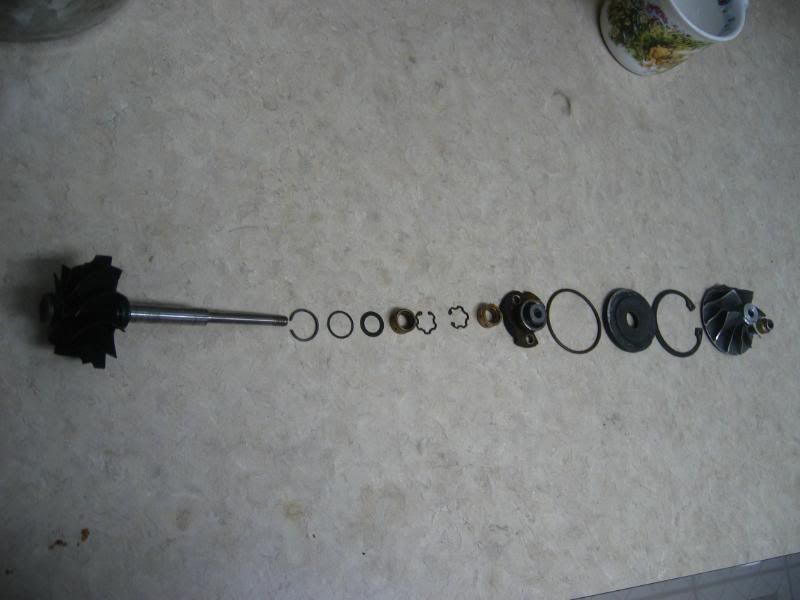 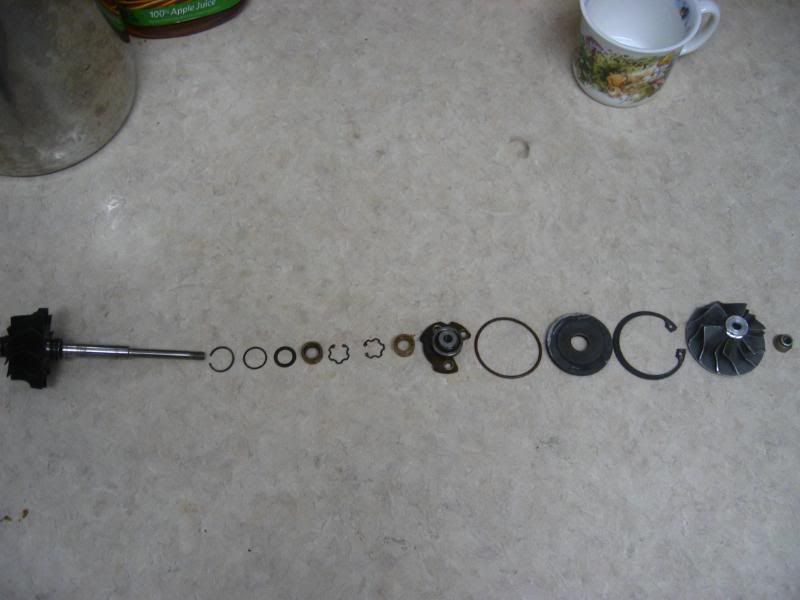 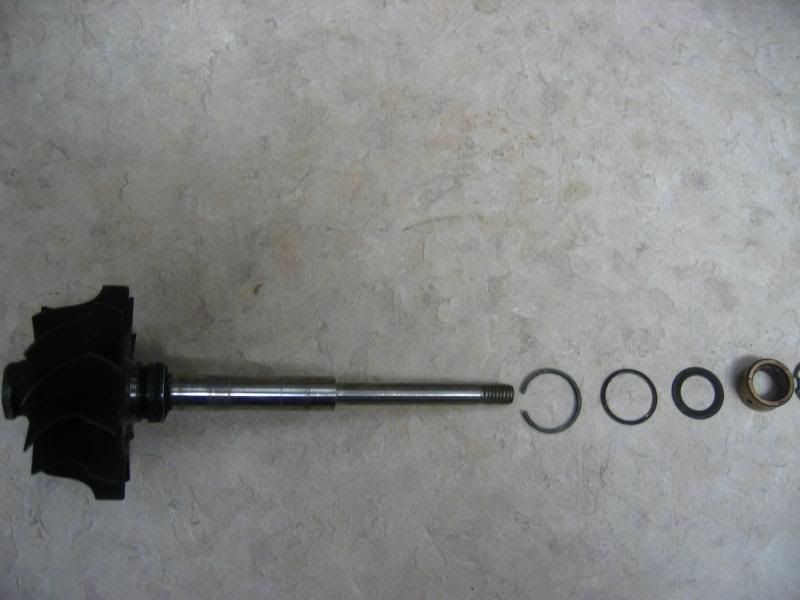 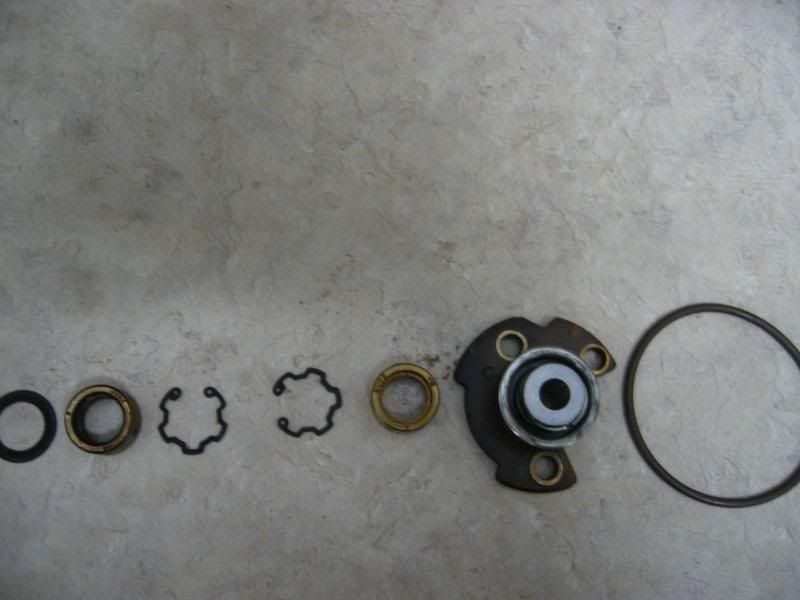 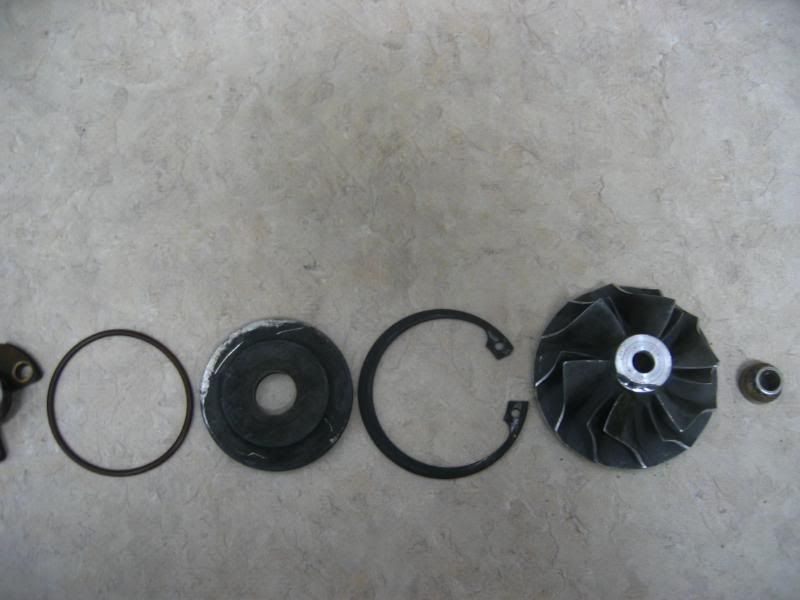 REASSEMBLY so now you are pretty much ready to reassemble everything with the new parts. make sure you have cleaned everything thoroughly. i sprayed the CHRA with brake parts cleaner like crazy. wanted to make sure nothing was lodged in any of the crevices. on the exhaust end of the turbine wheel, there is a metal ring that snap around the shaft, and creates a tight seal when the wheel is inserted into the compressor housing. this is why alot of turbos like to spew oil out of the exhaust, this is a common point of failure on turbos. you must remove the old metal ring, and insert the new one, here is a shot of the crusty turbine wheel that i didn't use because of all the cooked oil, but the picture is just for reference:  i started reassembly with the exhaust end of the CHRA. i stuffed a new "serrated" snap ring into the CHRA. i had to use my little screw drivers/picks to set the snap ring into place. i couldn't fit snap ring pliers in there. i eventually got it properly set in. then i coated the new journal bearing with oil and slipped it in. then place the new metal washer/shim on top of the journal bearing and the metal coil wanna-be snap ring on top. this is trick to insert in. i used two small screw drivers. i held the end of the metal coil thingy and started kind of pushed it while swirling around. it went in quite easily. i won't lie, i dicked around for a good 15 minutes with this stuipid thing. but once i got the right idea, it went right in. now do not insert the compressor wheel just yet, flip the CHRA over, and insert the intake side snap ring. you basically just shove it in, and again, coax it into the crevice using small screw drivers. coat the new intake side journal bearing with oil and slip it in. for the intake end, there is no outer coil snap ring thingy. the thrust bearing holds it in place instead. now that you have inserted the snap rings, bearings, washer, and coil clip thingy, it should look something like this. 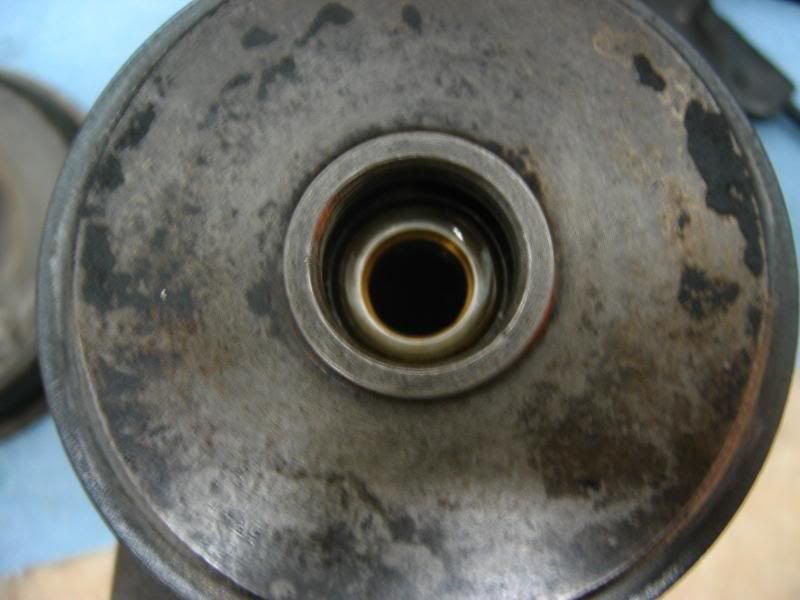 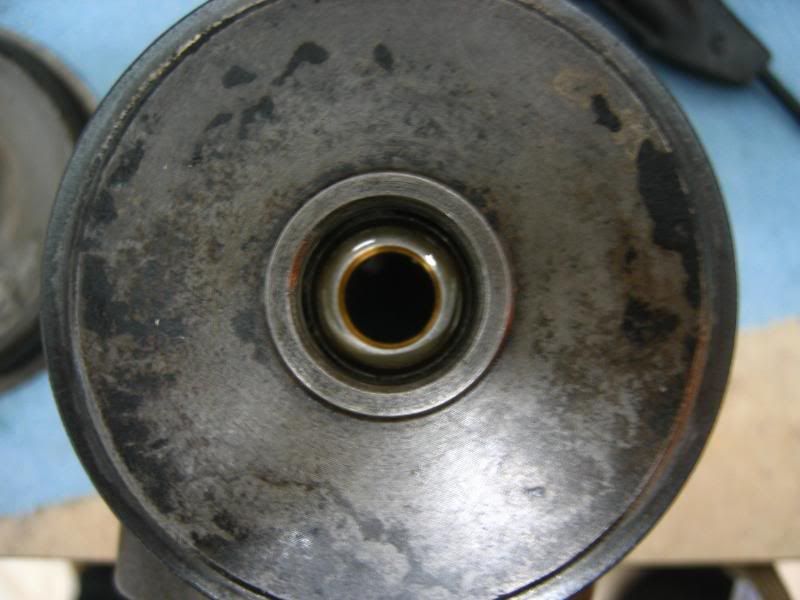 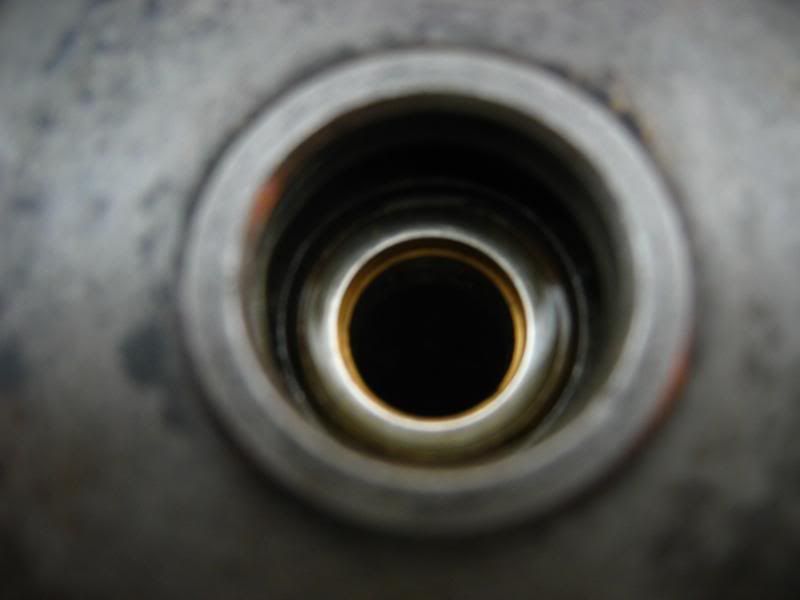 you will now install your thrust bearing and plate with the smaller snap ring. make sure you replaced the o-ring that seals the intake side of the CHRA. getting the snap ring on is tricky so it will take some fiddling around with screwdrivers and your needle nose pliers. once you've confirmed everything is secure and you haven't forgotten anything, you can now place the exhaust plate on, and then the compressor wheel. make sure you lube it up with oil before inserting. make sure you remembered to put that new metal ring on the exhaust wheel. this will create a nice tight seal so oil doesn't spit out of your exhaust. you will also feel a slight snap when you insert the exhaust wheel in fully, this is that ring on the exhaust wheel mating with the CHRA shaft. if you chose to mark the original positions of the intake/exhaust compressors, now is the time to line everything up when you slide the intake compressor on. so here is what your finished product will look like:    now that you're done celebrating because that was a bitch, it is now time to press the exhaust housing back on. you will use the plates and bolts to actually press the CHRA into the exhaust housing. do this slowly in a start pattern when tightening the bolts as you don't want to damage and gall the mating surfaces. now is also the time to reference your original pictures so you can line up the exhaust housing to the CHRA so your turbo is properly clocked and your oil drain line isn't on the top of the turbo when you mount it. how much would that suck. once the exhaust housing is bolted on securely, make sure the exhaust wheel is spinning freely and not making contact with the housing. now we move to the intake housing. again, reference your pictures when connecting the intake housing. i actually chose to clock mine a little different because my outlet pipe sat flush with my after market exhaust manifold. so i moved it away from the exhaust manifold a few millimeters. |

|

|
| Sponsored Links |
|
04-20-2008, 12:16 PM
|
#2 |
|
Zilvia FREAK!
|
NOTES
my original turbo had a large amount of in,out shaft play. when it spooled up it sounded crazy and it made alot of turbulence and basically made a screaming noise lol. now i know why, look at what happened to the fins from scraping: 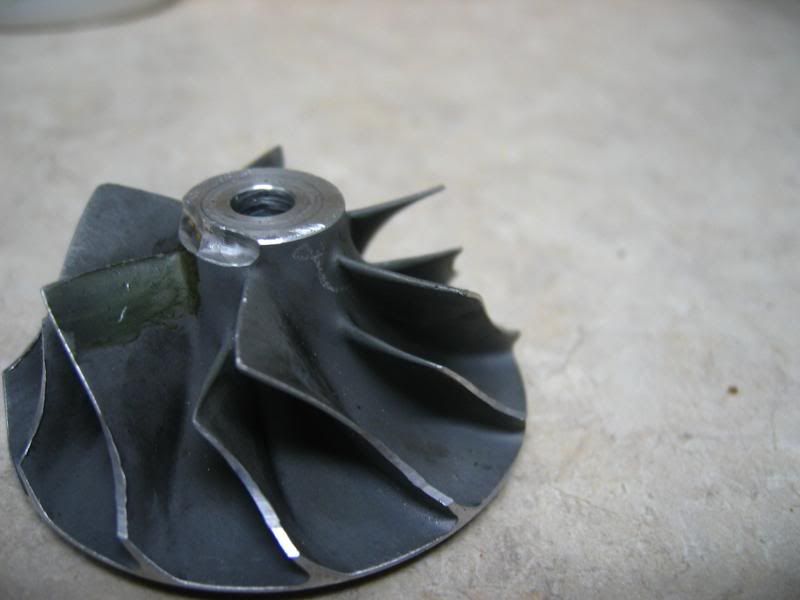 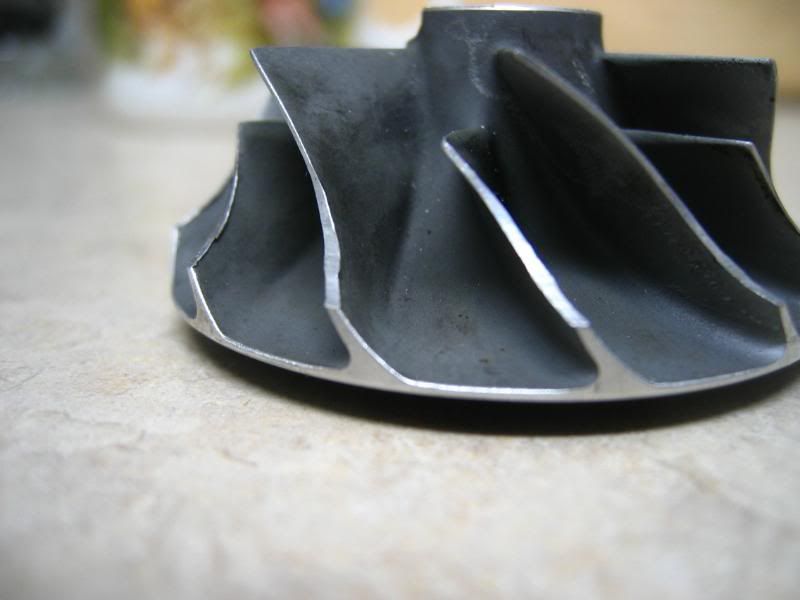 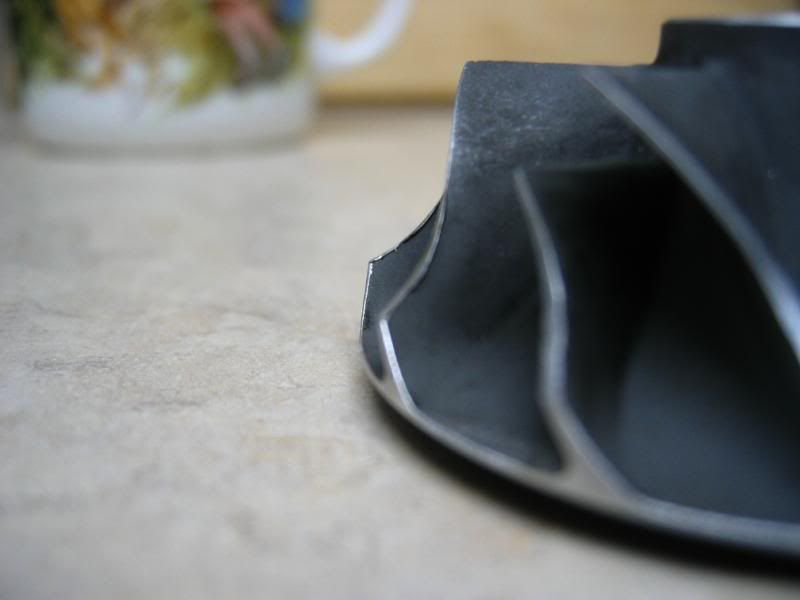 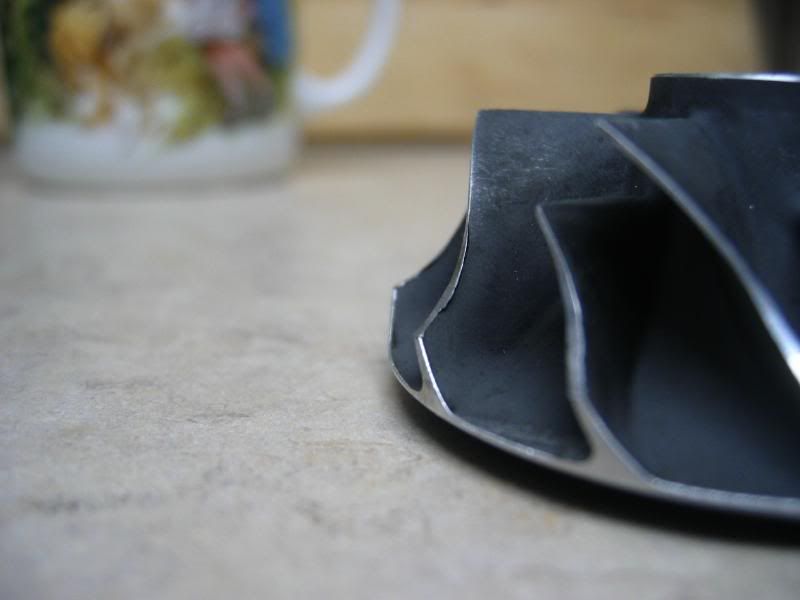 and here is a shot of the intake compressor i used from the better condition turbo, i'm pretty sure it won't be screeching anymore: 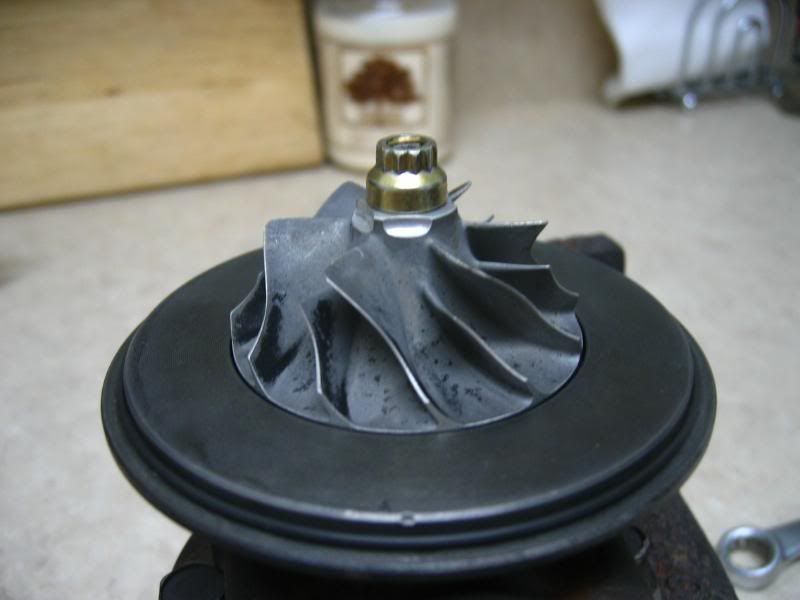 here is a shot of a T28 intake housing/wheel compared to the T25. i'm also disassembling a S15 automatic T28BB because it is completely fucked, and i want to know what makes these bad boys tick. 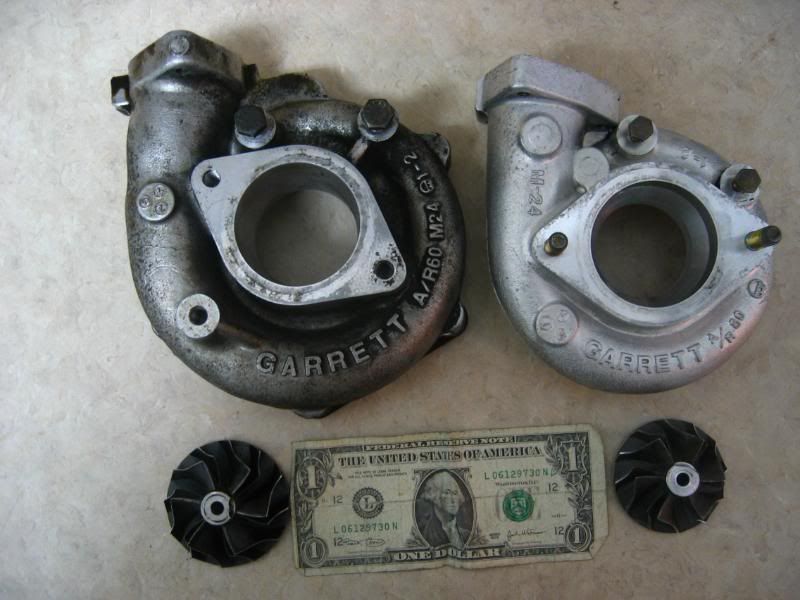 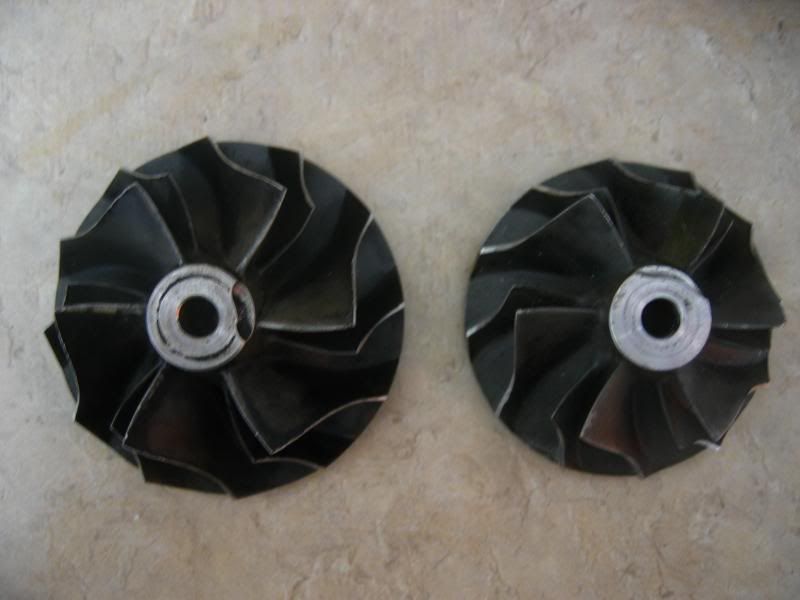 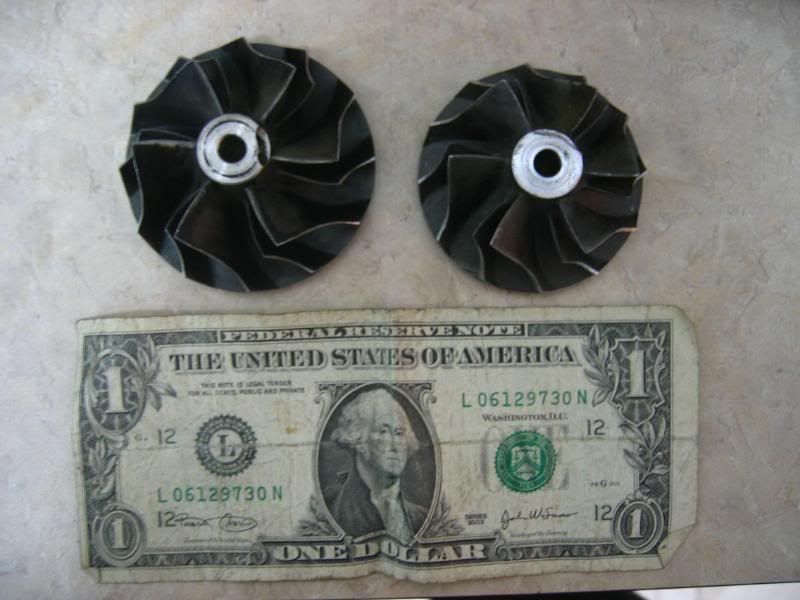 that pretty much wraps it up, oh yeah, mods....should this be in premie project or something like that? |
|
|
|
|
04-20-2008, 12:19 PM
|
#3 |
|
No Limit Soldier.
 
Join Date: Jan 2006
Location: Hayward CA, San Gabriel CA
Age: 37
Posts: 5,550
Trader Rating: (0)
  Feedback Score: 0 reviews
 |
Nice writeup man
+rep! This will come in handy, and help prevent other wasteless threads.
__________________
allntrlundrgrnd: "you never really appreciate your parents fridge until you look into your own and its full of condiments only" |
|
|
|
|
04-20-2008, 12:30 PM
|
#5 |
|
Zilvia FREAK!
|
Thanks guys!
well it WAS a pain in the ass, but now that i've gone through it, i'll be able to do one in a couple hours probably, not including the time it takes to soak all the parts in degreaser. i forgot to mention, feel free to post any problems you have run into or any of the ideas/tools you've used to make this procedure easier. this is an informal thread to assist diy'ers in rebuilding their turbos. |
|
|
|
|
04-20-2008, 06:22 PM
|
#7 |
|
Nissanaholic!
 
|
Awesome writeup.
__________________
My seller review thread |
|
|
|
|
04-20-2008, 06:41 PM
|
#8 |
|
Leaky Injector
|
Great write up. Did you balance the whole shaft assembly or just install the old better condition one in. If I remember correctly the whole assembly should be balanced as to insure the assembly doesn't cause excessive wear caused from the vibrations.
|
|
|
|
|
04-20-2008, 07:46 PM
|
#10 | |
|
Zilvia FREAK!
|
Quote:
plus it's gonna be a few weeks before i even install this turbo so maybe i can find a shop to balance the asssy. thanks for the reps guys! |
|
|
|
|
|
05-07-2008, 08:56 PM
|
#12 |
|
Zilvia FREAK!
|
well, just wanted to share my excitement with those that are interested.
this still qualifies as a my turbo being rebuilt i think, and wanted to post more pics of the end product. turbo is completely rebuilt, I've got all new gaskets (turbo inlet, outlet, exhaust inlet, exhaust outlet, and mr gasket copper manifold gasket) and purchased an earls stainless braided oil feed line and coolant lines along with an S14 water neck. I also wrapped my stainless headers with DEI exhaust wrap and sprayed it with DEI silicone spray which they recommend to seal the wrap and protect it. this should reduce under hood temps ALOT. i also used stainless steel locking ties to tighten the wrap on the end of the runners and at the end of the collector. I'm not exactly satisfied with how tight the stainless locking ties are. they don't exactly lock like zip ties do. they kinda suck to tell you the truth. I'm gonna see how they hold up tho. enjoy! 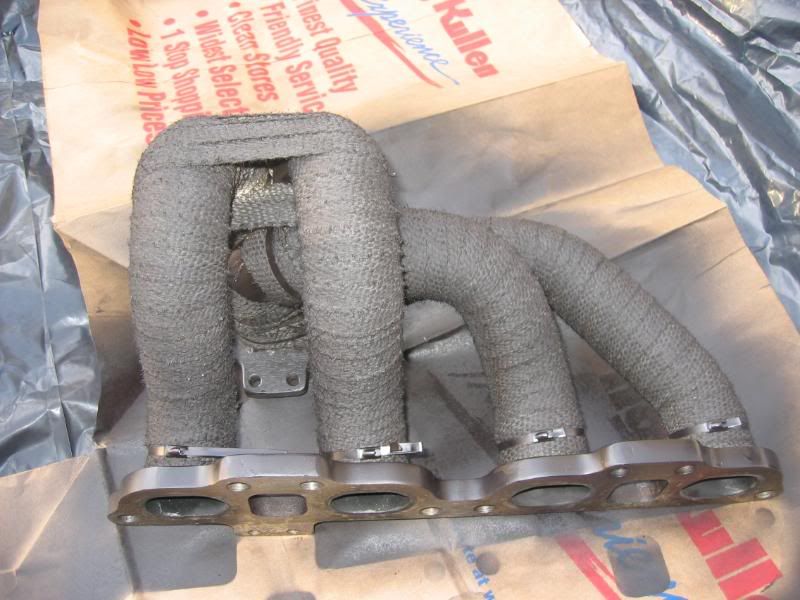 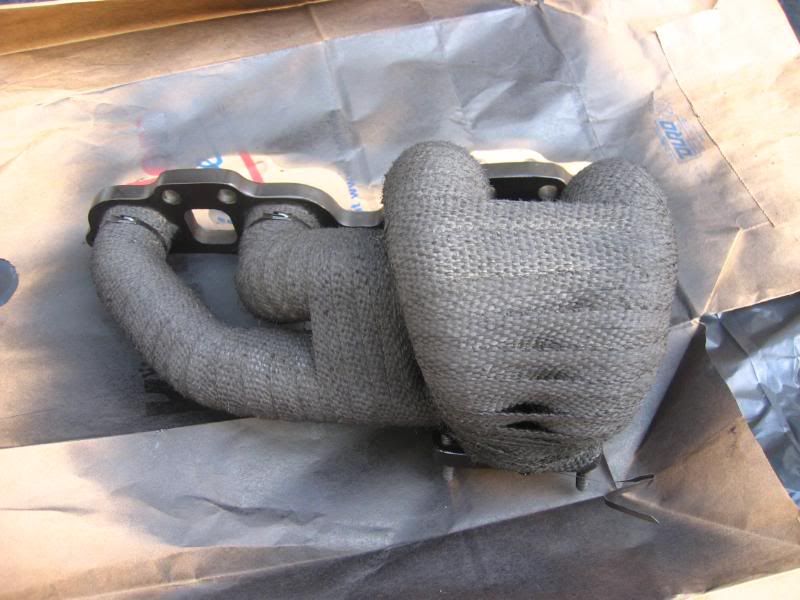 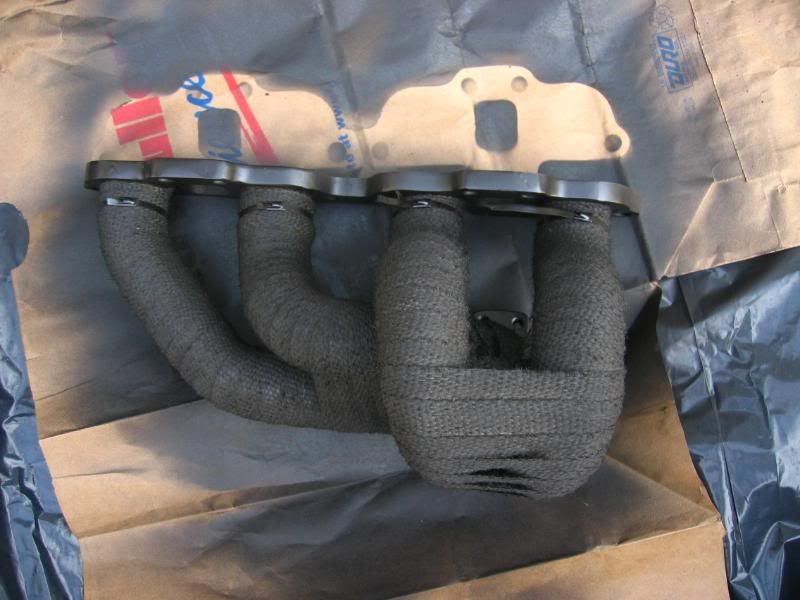  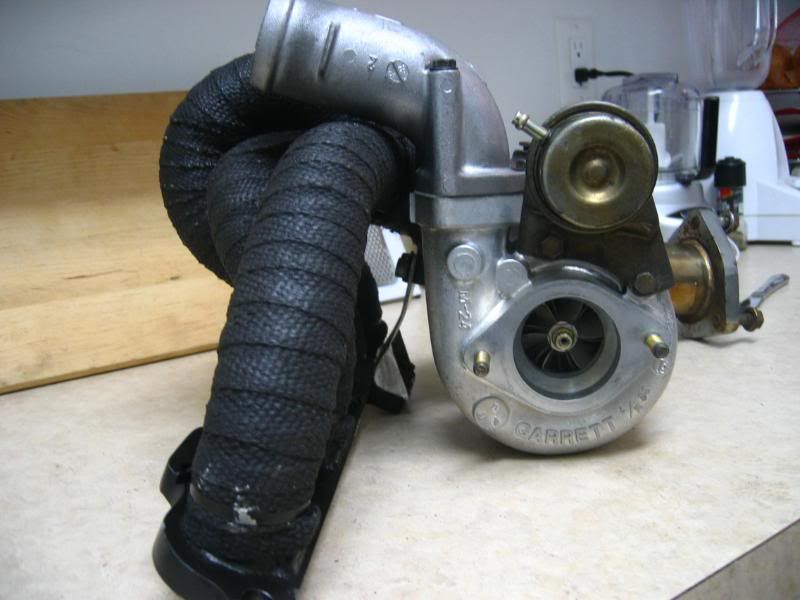  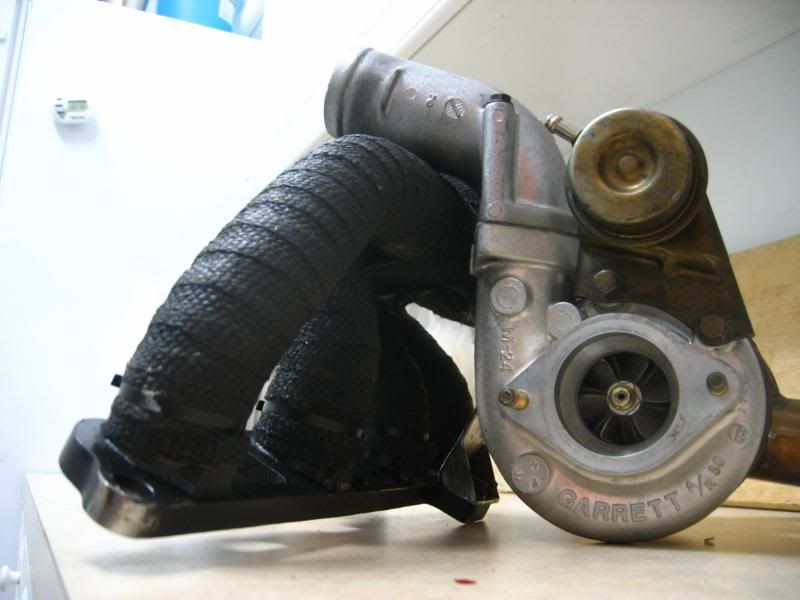  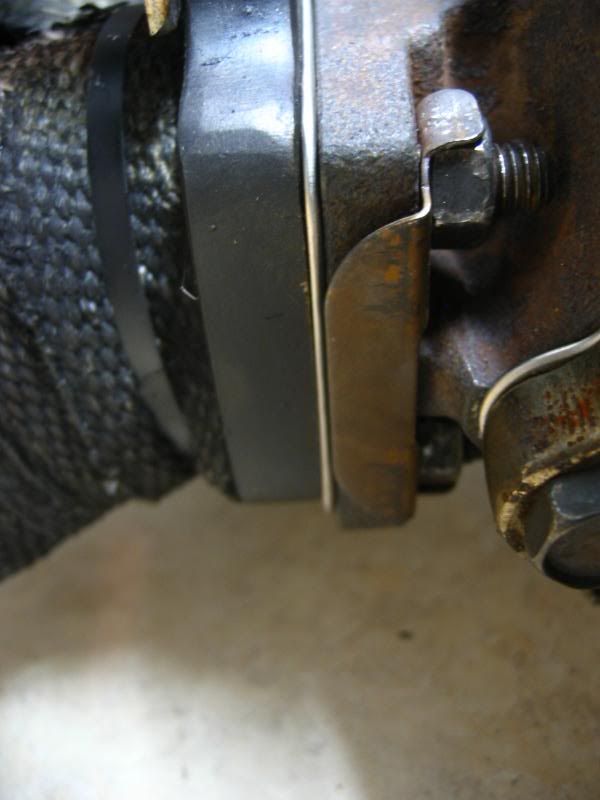 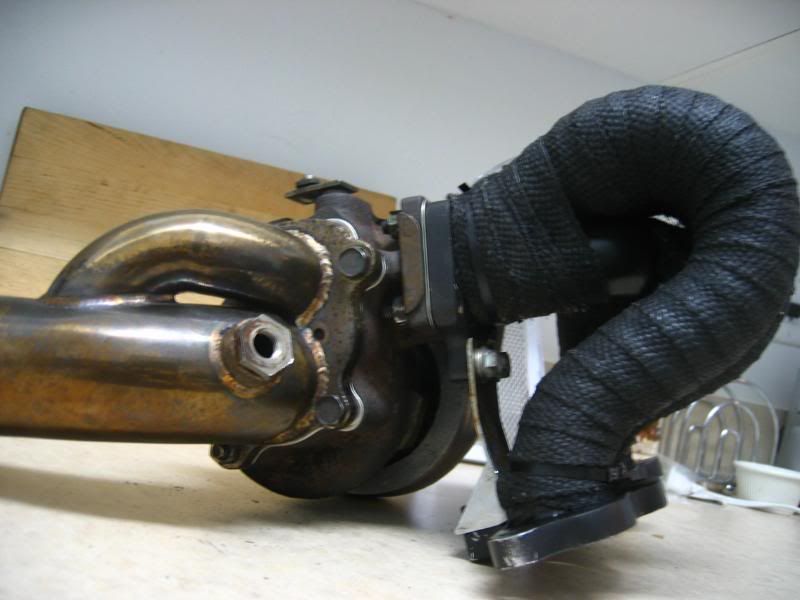 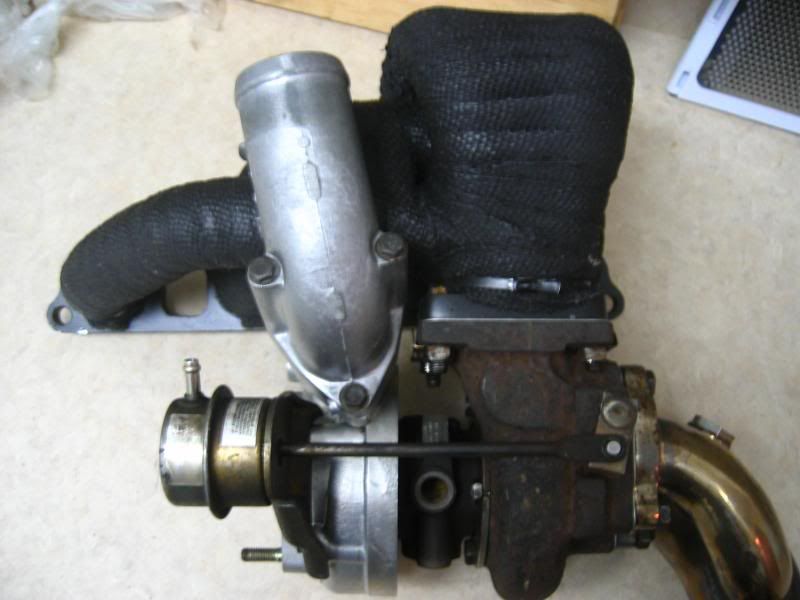 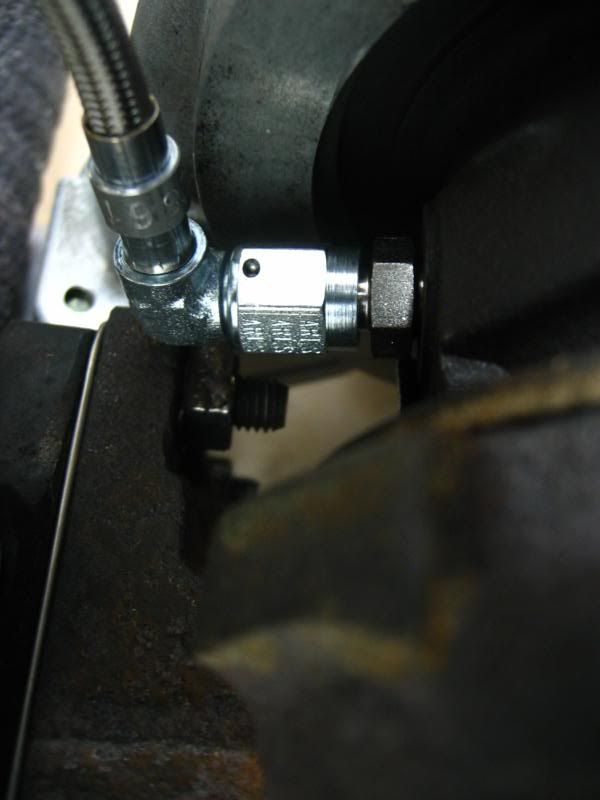 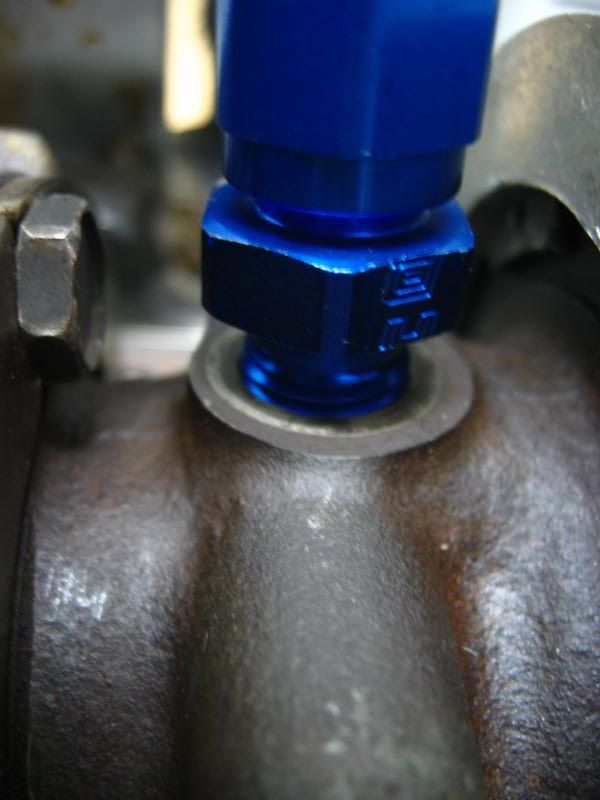 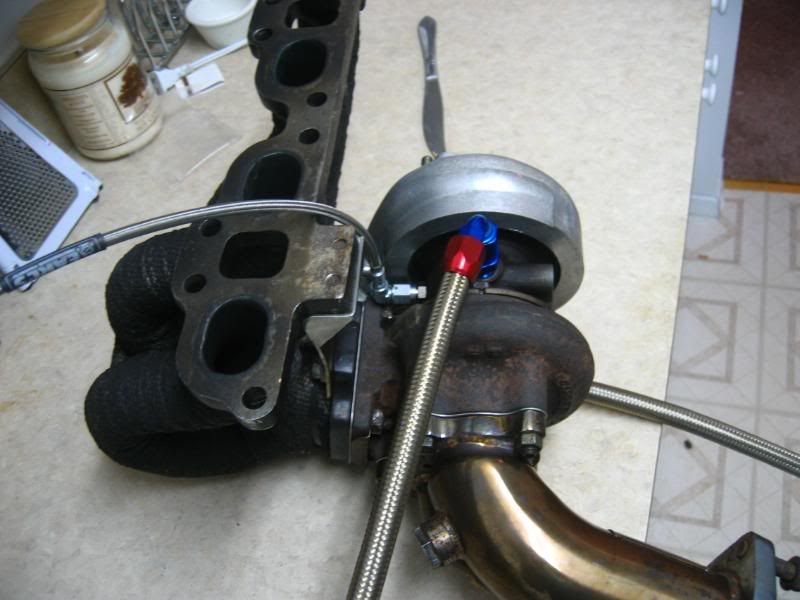 |
|
|
|
|
06-30-2012, 02:14 PM
|
#21 |
|
Zilvia FREAK!
|
Didn't feel like asking in small question thread and thought this would be appropriate, but when installing the thrust bearing and plate onto the CHRA is the thrust bearing supposed to be tight and unable to spin by hand or be able to rotate even if just a little bit?
|
|
|
|
|
03-15-2013, 11:15 AM
|
#22 |
|
i want to rotate my t 25 compressor housing cause the exhaust manifold interfere with the turbo outlet i have try many option hit with a hammer pry etc pb blaster the huge c-clip etc but it won't budge i want to let the turbo on the engine cause a have a brand new gasket and dont want to mess it up do you guys have an idea for me so i can leave the turbo there and clock the t25
|
|
|
|
|
|
| Bookmarks |
|
|


 Linear Mode

