|
|||||||
| Home | Rules & Guidelines | Register | Member Rides | FAQ | Members List | Social Groups | Calendar | Mark Forums Read |
| Builds (and builds only) Got a build thread? It goes here, build threads anywhere else on the forum will be locked and never moved. |
 |
|
|
Thread Tools | Display Modes |
 01-18-2017, 08:01 AM
|
#35 |
|
Zilvia Member
 Join Date: Oct 2009
Location: Toronto, Canada
Posts: 293
Trader Rating: (0)
  Feedback Score: 0 reviews
|
Man your car is super clean! Get it done so we can all cruise together this summer.
__________________
Instagram:https://instagram.com/jpacione/ |

|

|
|
01-18-2017, 03:46 PM
|
#36 | ||||
|
Zilvia Member
Join Date: Aug 2006
Location: Ontario Canada
Age: 33
Posts: 262
Trader Rating: (6)
Feedback Score: 6 reviews
|
Quote:
Quote:
Quote:
Quote:
I should have a substantial wiring update by the end of this weekend. I've been at my shop every night after work grinding away at the mess I left myself. So far it's all going well... can't wait to get through it and back to the fun stuff. |
||||
|
|
|
|
01-18-2017, 04:27 PM
|
#37 | |
|
Nissanaholic!
 
|
Man what a sweet car, Awesome choice in wheels as well!!! As for the Bride seats that is a Kevlar artis 1 gorgeous seat, Also that is a ergo not brix easiest way to tell is the lower leg bolsters... keep up the great work looking forward to more updates..
__________________
Quote:
|
|
|
|
|
|
01-22-2017, 05:17 PM
|
#38 |
|
Zilvia Member
Join Date: Aug 2006
Location: Ontario Canada
Age: 33
Posts: 262
Trader Rating: (6)
Feedback Score: 6 reviews
|
Here we go with the wiring!
As mentioned this has been the major hurdle to overcome in the build. A massive part of me wanted to ignore it, put it off longer and start installing the cool parts I’ve collected. I considered the idea of getting a new chassis harness, but really that was going to be a lot more work than just finishing my clean up. In order to get the wiring sorted out without feeling defeated I started setting small goals for myself, taking it piece at a time. Personally I feel a large undertaking seems so much more manageable when it's compartmentalized. When I 5-speed swapped the chassis years ago I made some rookie mistakes with my wiring. Instead of using the AT lower harness and splicing into the MT reverse and speed sensor wires I bought an MT harness and wired everything as if the car started life as a manual – seemed like the easy way to do it, all the connectors plugged in so it should work, right? Wrong. I quickly realized I was missing my speedo signal, had non-functioning reverse lights, and had a disaster of a harness. I kept all the extra lower wiring at that time knowing I would have to revisit it later. I started off by running all the wires from SS, Rev sensor, starter signal and alternator up to the correct plugs. I had done an extremely poor job soldering some of the wires initially. Luckily, I had un-touched sections of the original harness so I put those to use. De-pinning the old Nissan connectors wasn’t so bad once I made a small pick-like tool out of MIG wire to release the catches. Patience is the name of the game here – if you get frustrated and rammy the locks will break fairly easily and then the pins could push out of the connector. I should mention that de-pinning connectors isn’t necessary if split loom or tape is used to wrap the harness. I wanted to use braided harness loom and most of the connectors are too big to push through the loom, hence the de-pinning. After mocking up the harness on the car I had the layout sorted. 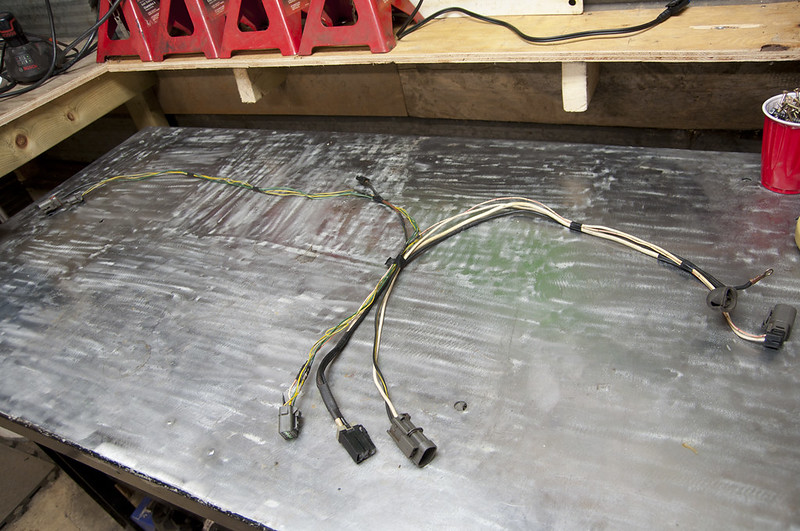 De-pinned the reverse sensor 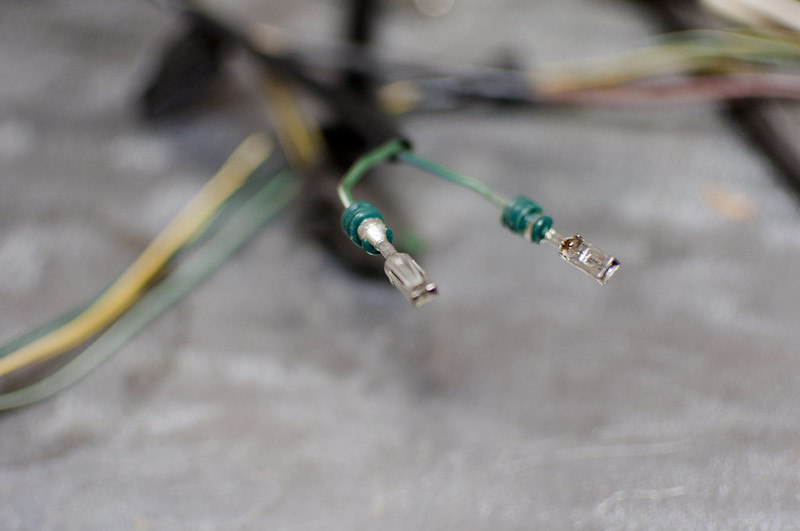 Reverse sensor and speed sensor wrapped and heat-shrinked on the ends. You can see the signal wire for the starter in the same run just behind the 2 sensors. 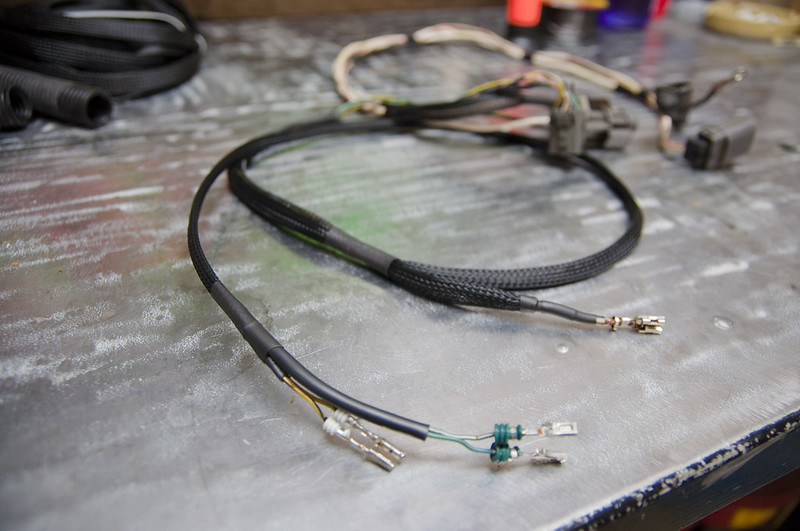 re-fit the pins in their respective housings. Taking lots of pictures of the pins in the connectors before disassembly is a must. You can take notes all day but a picture says a thousand words. 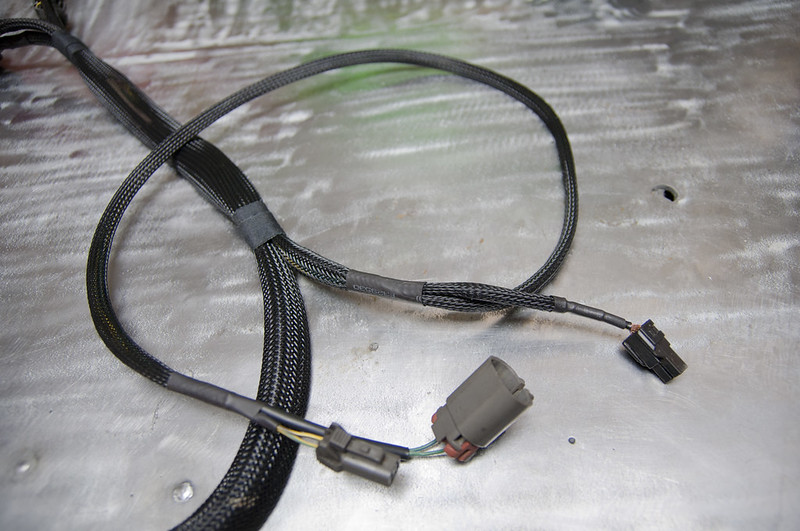 Same process for the alternator connections. I ran into some fun here – the ground cable bolt on the alternator had corroded and the bolt was firmly seized. Unfortunately it broke part way down the threads. I tried to drill the M5x0.8 bolt out but because it broke off below the flush point I couldn’t grind it to a flat surface to center punch it. Ended up drilling slightly off center, had to size up to an M6x1 and heli-coil it. One benefit to this is now it’s a steel bolt in steel heli-coil threads as opposed to a steel bolt into aluminum threads on the alternator case - less opportunity to corrode. 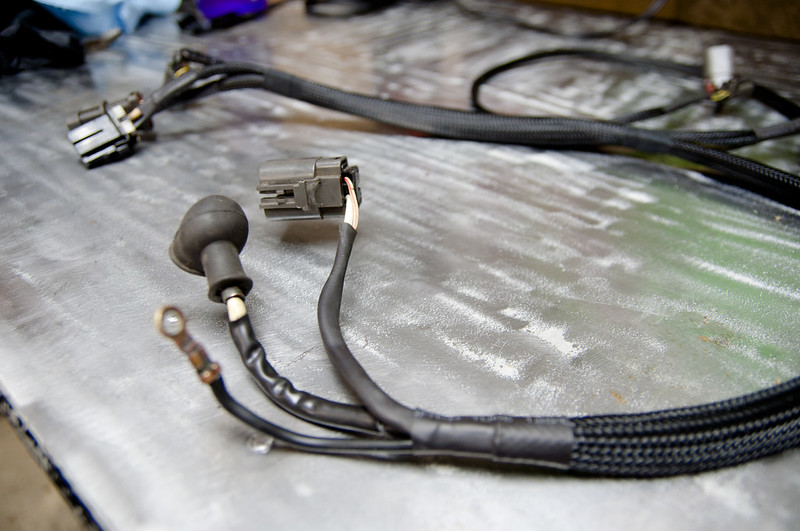 Here I wanted show the process for one of the major power connectors by the passenger side fuse box. Start off with a picture to reference which wire to which pin 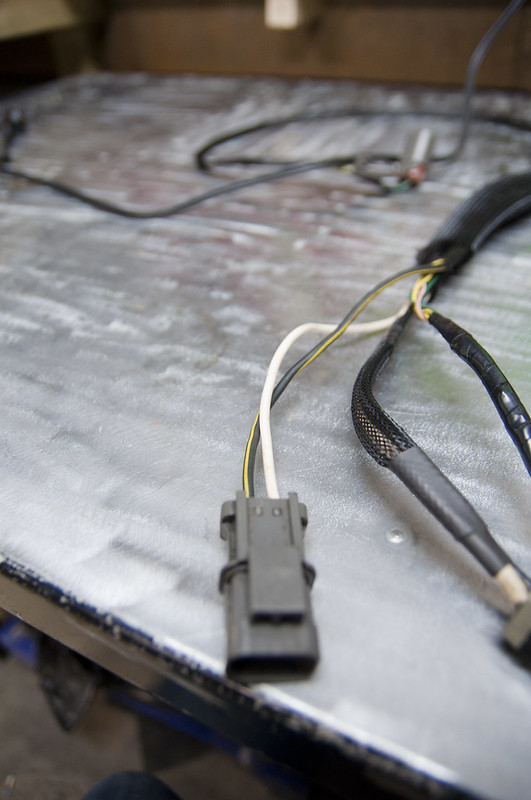 de-pin, cut the harness wrap to appropriate length 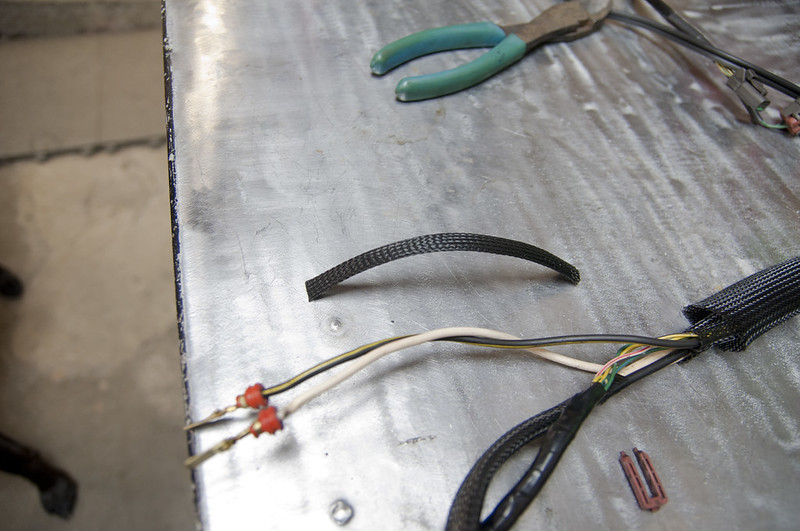 slide the wrap over, cut heat-shrink and slide it past the pins.  re-pin the connector, heat the shrink tube to hold the mesh loom in place, voila. 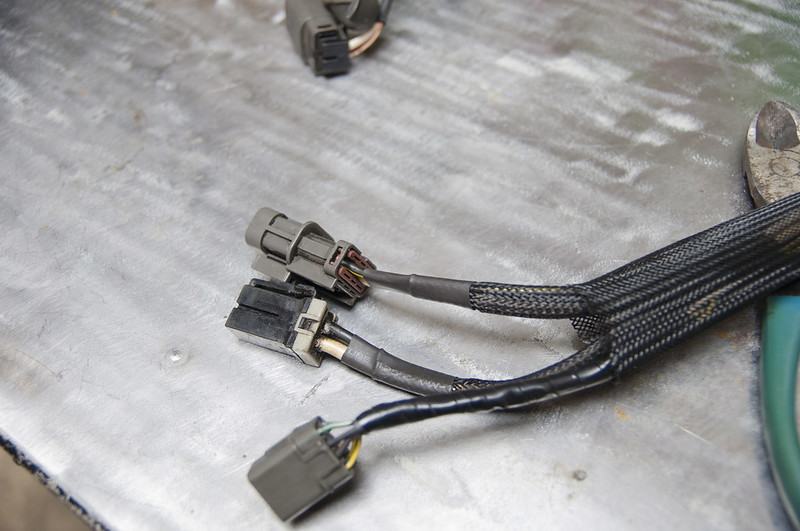 Finished product. I couldn’t find any heat shrink locally for the thickest par of the harness so I used the harness tape we often use at work - it’s basically hockey tape but looks alright and holds well.  With the transmission harness complete I had to turn my attention to the chassis side of it. This is the disaster I left myself 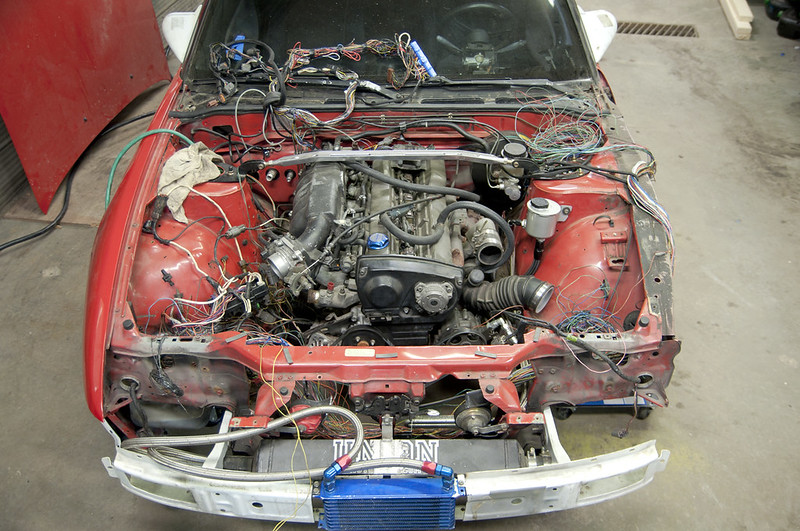 Fun, right? The roll of wire by the brake master cylinder is made up of the wires for the A/T computer, Cruise control computer and hardware connections. I went as far as removing the relay holders and de-pinned the fuse terminals in the fuse boxes to further thin the harness. Fewer wires left cut and taped in the harness would make any future trouble shooting easier I figure. Passenger side fuse box before cleaning up  After cleaning up 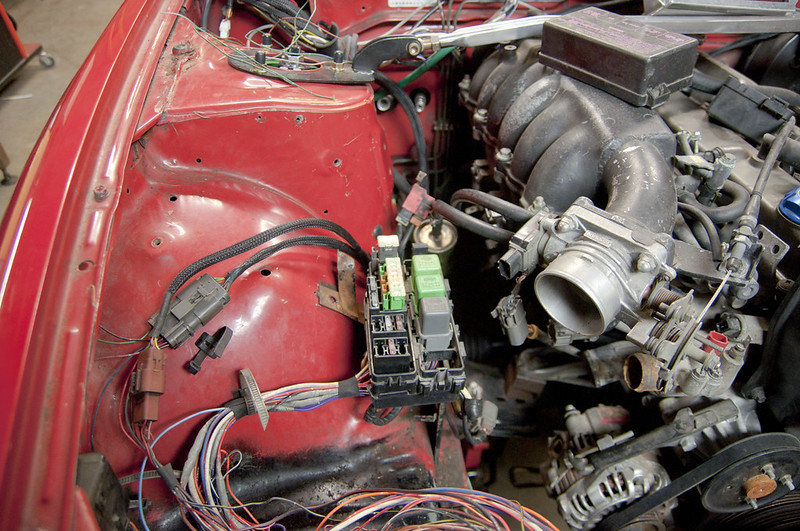 Drivers side relay box before cleaning up. I had initially planned to use the 2 of the existing relays to run fan 1 and fan 2 off a 2-temp thermal switch. This didn’t end up being a worthwhile plan. The gauge of the wire was too small and I was having trouble getting an adapter for the BMW temp switch I planned to use. Instead I bought a Flex-A-Lite fan controller, I’ll save details on that for another post. 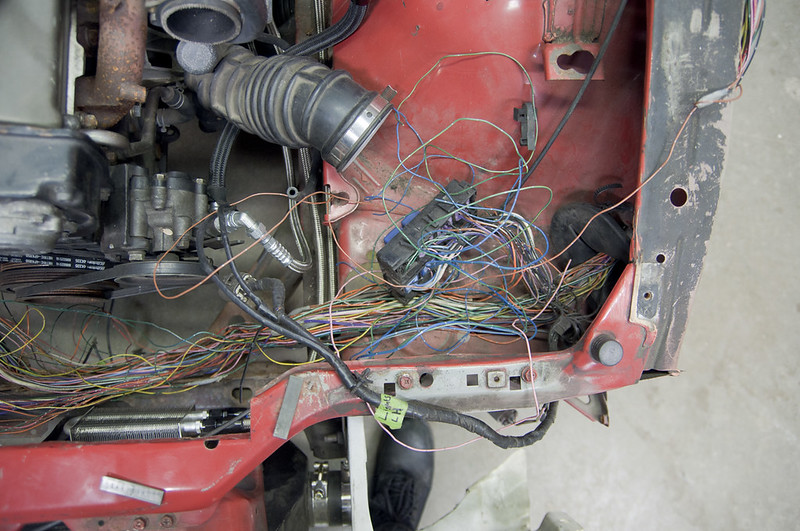 Here is the relay box cleaned up. I’m trying to fit it under the fender brace but the cover adds a lot of height to the box. 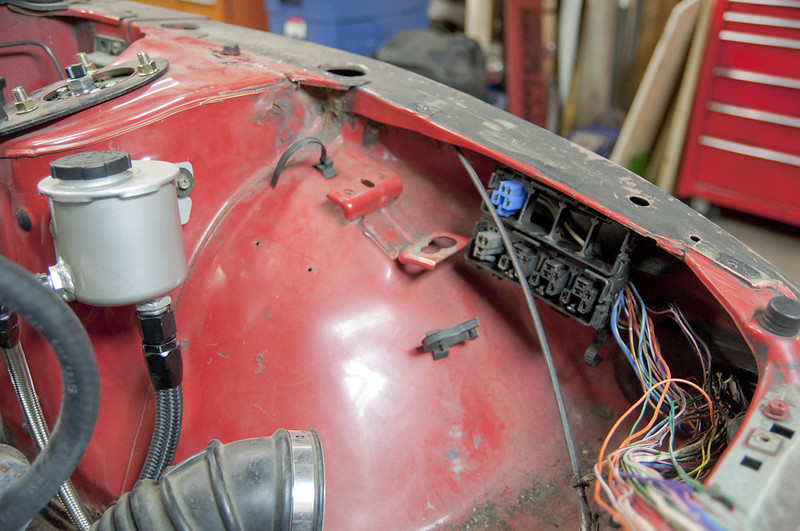 In the process of tidying all this wiring up I pulled the dash with the intentions of completely removing the wires for AT, cruise and unused foglights right back to the connectors behind the dash. I changed my mind on this; it’s just not worth the hassle to remove what might add up to 2lbs of wires when I don’t need the space behind the dash. I was happy I pulled the dash when I was tracing what wires I could and couldn’t remove from the harness and when I was confirming the chassis side of the speed sensor and reverse sensor. 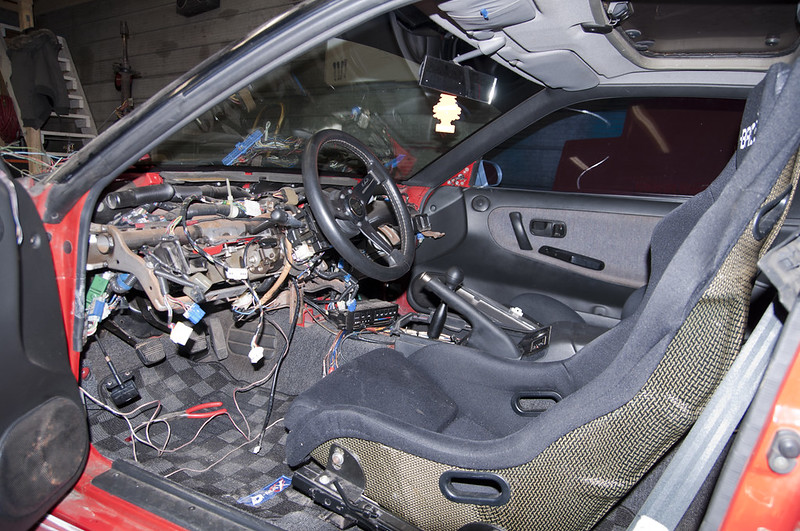 This evening I finished the majority of the chassis harness work. I still have to solder 5 wires but I ran out of suitable size heat shrink. I tucked the harness back under the rad support to finalize the length of the last wires so I should be able to smash them out tomorrow after work. 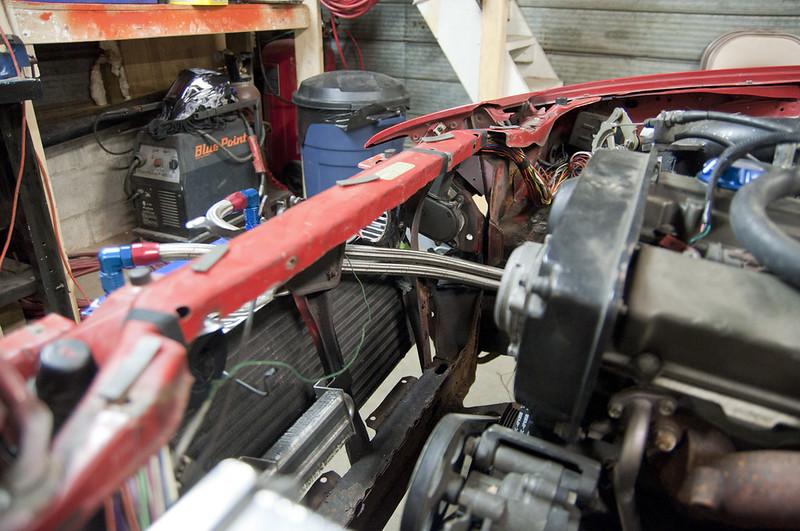 Seeing the engine bay this tidy (as far as wiring goes) was a HUGE achievement. I threw my ARC intake box in to see if I could get away with the fuse box in the location seen above. It looks like I'm going to be forced to leave it in the stock location. Wires are a little too tight and extending them a whole 4" isn't worth the hassle. 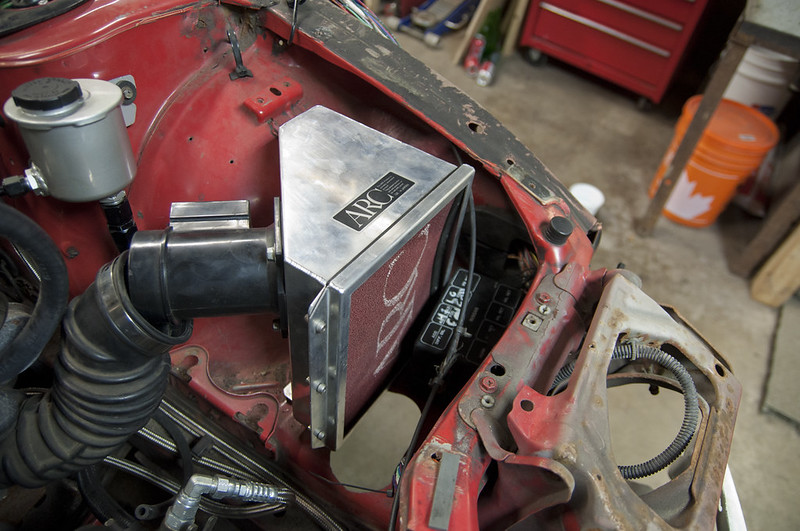 Once I ran out of heat shrink I pulled the headlight assemblies out of storage and reinstalled them. I need to find a cover for the drivers side that doesn't have a dent in it. 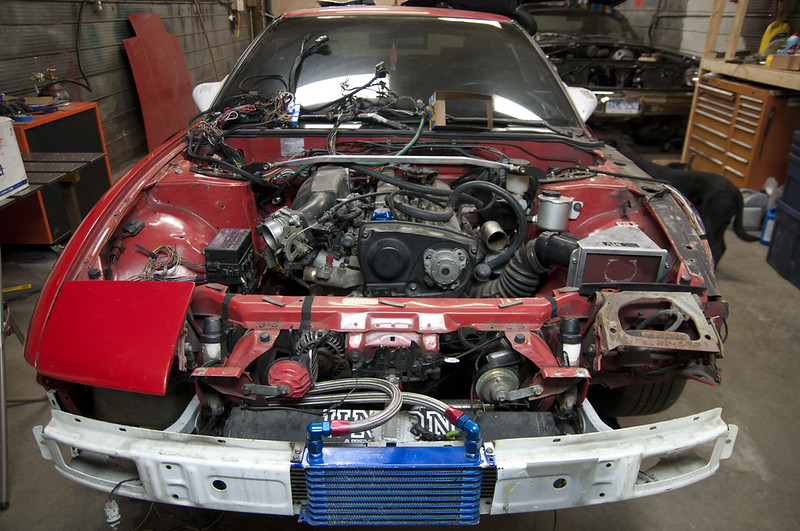 I was really hoping to reconnect the battery today and make sure all my wiring is correct. The wiring diagrams and my DVOM say it's all good but seeing everything function is a must before the harness is loomed and permanently installed. That's all for this week, stay tuned... -Andrew |
|
|
|
|
03-26-2017, 06:00 PM
|
#40 |
|
Zilvia Member
Join Date: Aug 2006
Location: Ontario Canada
Age: 33
Posts: 262
Trader Rating: (6)
Feedback Score: 6 reviews
|
Well I let the build thread get way behind but I have been working away at the car.
I've finished 99% of the interior work, sadly I don't have any pictures of the in-progress and it's currently partially disassembled again. I'll save the post on the interior until it's complete. The recent effort has been going into the engine bay. I hate how messy and cluttered the bay looks, it really gives the unfinished impression. I contemplated tubs but decided it isn't a necessity. A fresh coat of paint and some refreshing of the motor should make a big difference. I borrowed an engine crane from a friend of mine and we pulled the RB25 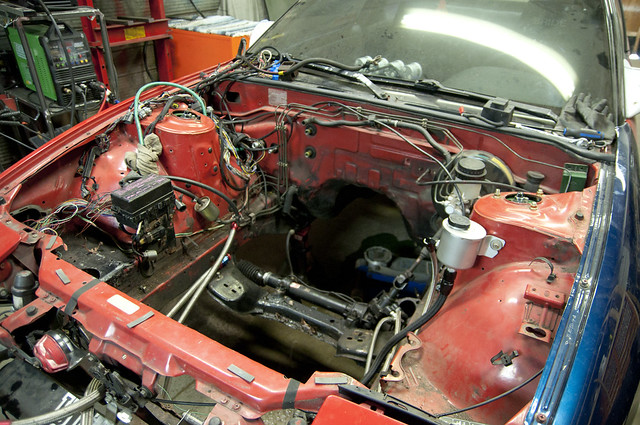 Unfortunately I had to remove all the parts I had recently re-installed after fixing my wiring. This looks like unnecessary work but I wanted to be sure all lights/accessories functioned before stripping down for paint. Started cleaning with some foaming degreaser 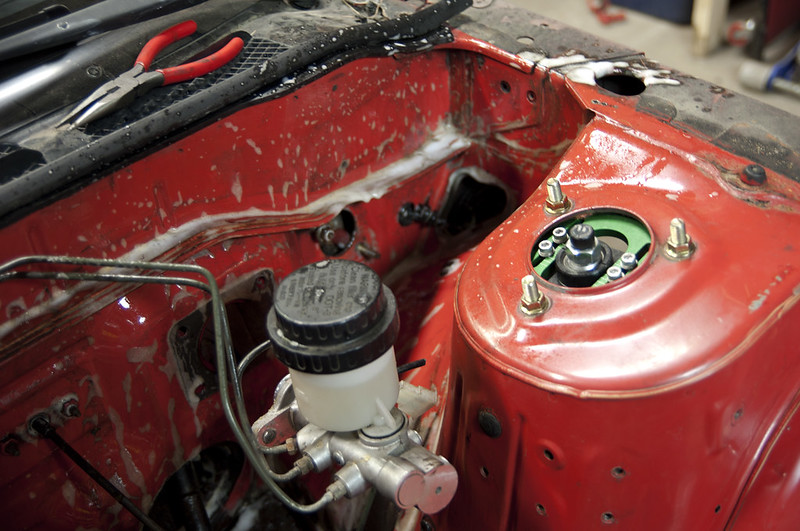 Here I have the wiring, brackets, headlights, PS, brake booster/lines and clutch master all pulled and the bay cleaned. I still need to get a proper grease/wax remover before sanding 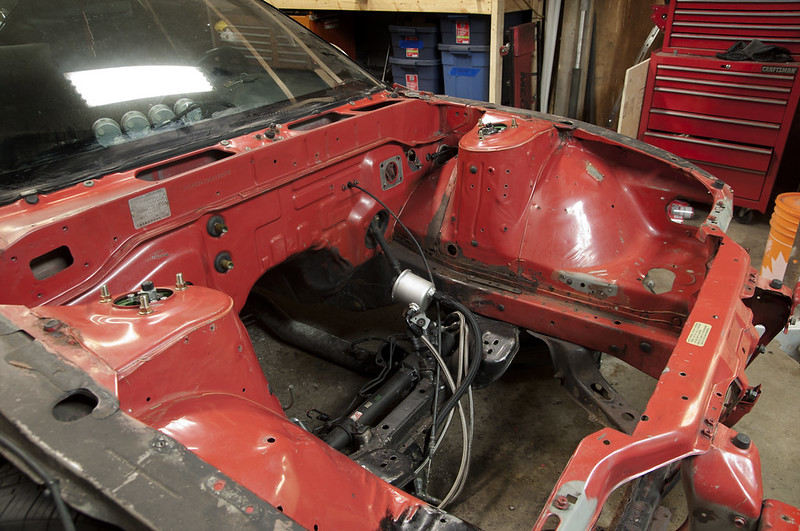 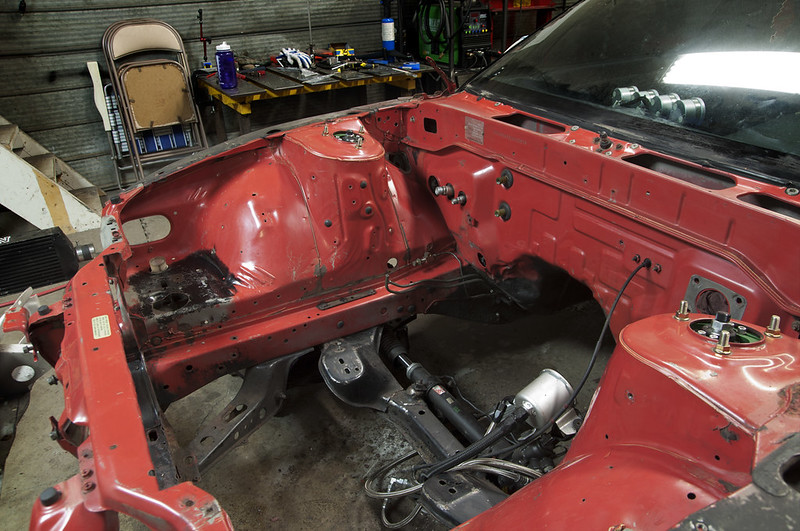 I had to pull the motor to take care of this rust. It's worse on the driver's side but both will need patches. 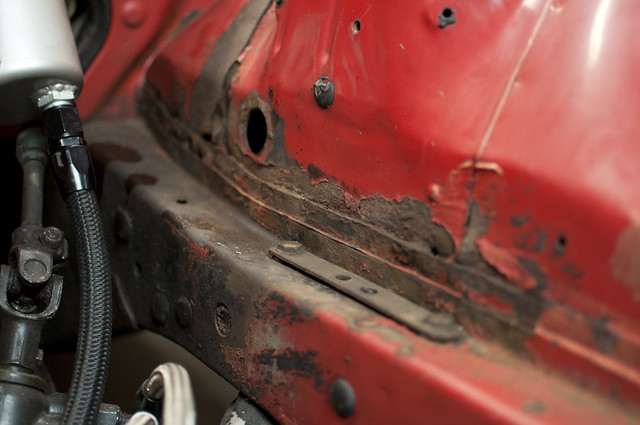 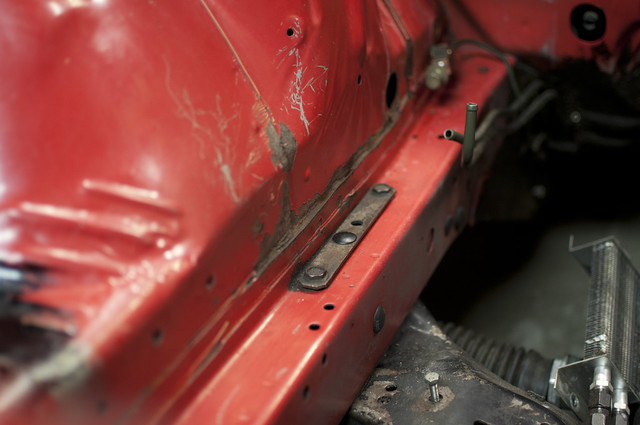 And as usual the top of the strut towers need a clean up. 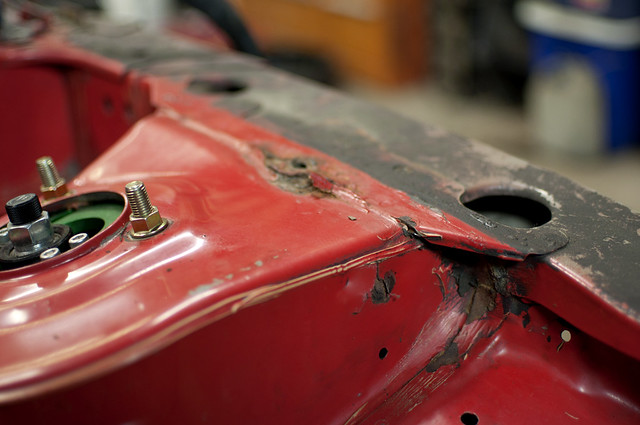 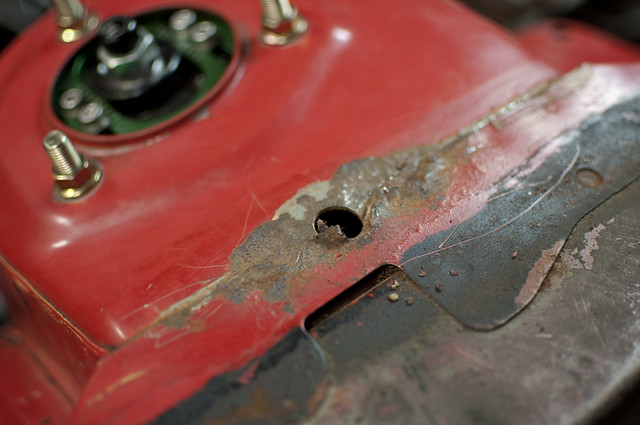 With the engine and trans out I had a look at the clutch. It's super low mileage so as I expected nothing to worry about. 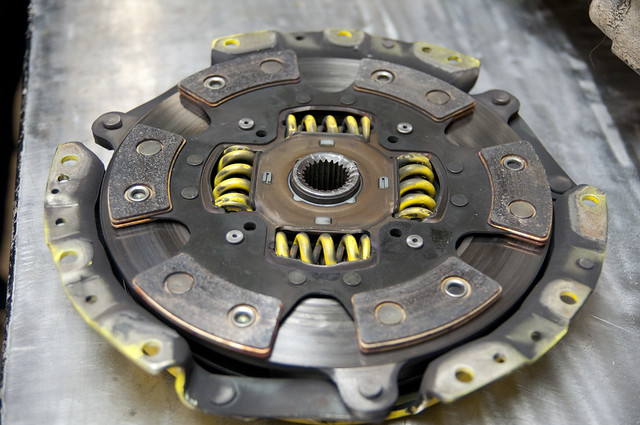 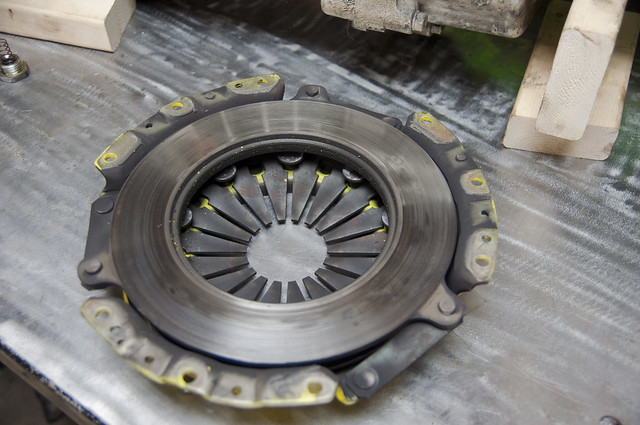 I got this strengthened clutch pivot from GK Tech. Most people say the RB25 pivot is plenty strong but now I know there's nothing to worry about. Next to the original 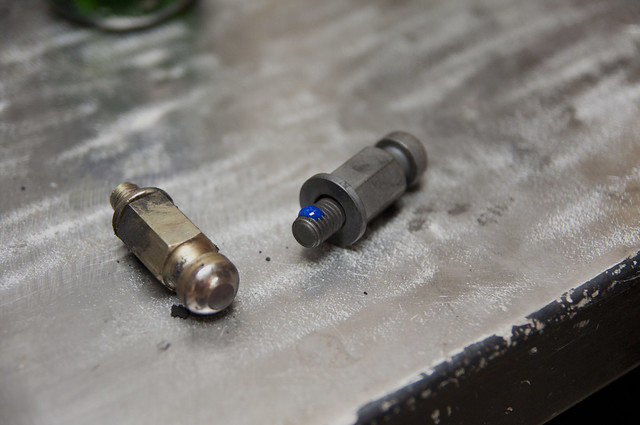 Installed 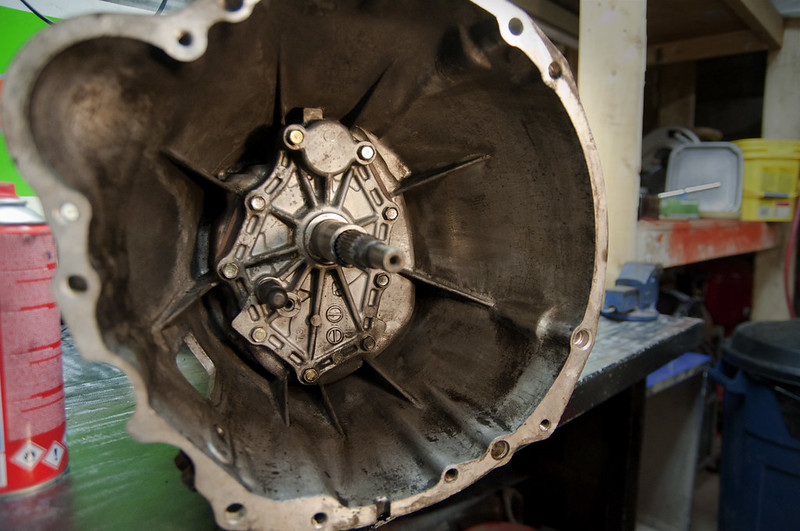 In the effort to get rid of my horrible feeling shifter I had done a number of things. Firstly, I got rid of the C's short shifter that was installed... as it was meant for SR20. Got a Nismo short shift linkage, some GK Tech return springs and a new Vertex knob. With the transmission out already it was easy to install them. The new GK tech springs are a double spring with a couple options for stiffness 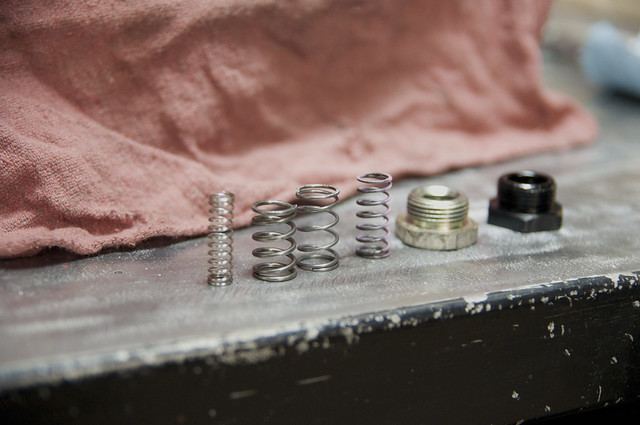 The kit comes with new caps to fit the larger diameter springs. You can see the slight difference here 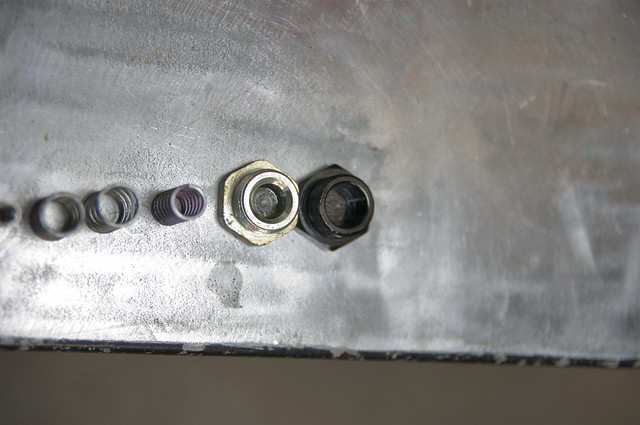  The return force is much stiffer and the shifter has no more slop with the proper linkage installed. It feels really nice on the bench, hope it isn't overly stiff when driving longer trips 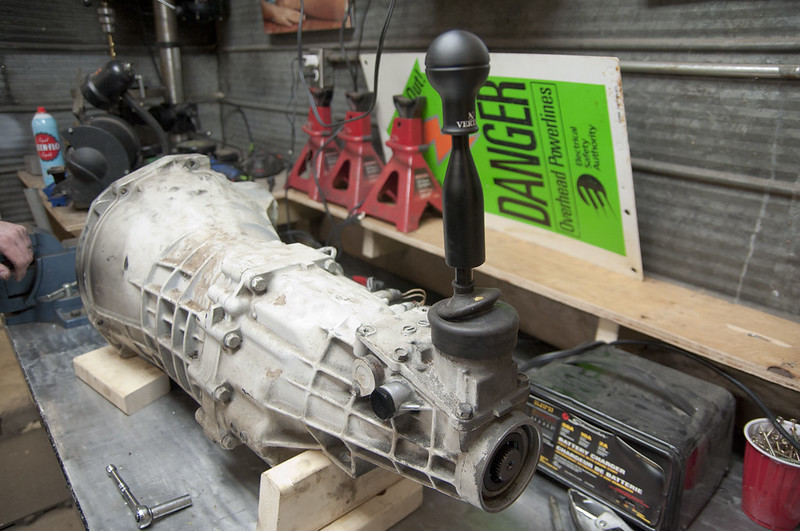 I'm going to be sanding the bay this week, hopefully building a make-shift booth and spraying paint this weekend. I'm going to spray it silver or something that will go well with red valve covers. Im still undecided what colour the body will be done so the silver is neutral in that regard. I'll try to stay on top of the updates. Lots to be done and nice weather is around the corner |
|
|
|
|
03-27-2017, 08:45 AM
|
#41 |
|
Zilvia Member
Join Date: Oct 2009
Location: Toronto, Canada
Posts: 293
Trader Rating: (0)
Feedback Score: 0 reviews
|
Looks good dude! Yes silver bay club
__________________
Instagram:https://instagram.com/jpacione/ |
|
|
|
|
04-06-2017, 03:20 PM
|
#43 |
|
Nissanaholic!
Join Date: Jan 2010
Location: location X
Posts: 1,815
Trader Rating: (10)
Feedback Score: 10 reviews
|
what are you going to do about that rust?
__________________
http://www.240sxforums.com/forums/rb...ject-s-rb.html |
|
|
|
|
04-06-2017, 06:34 PM
|
#44 |
|
Zilvia Member
Join Date: Aug 2006
Location: Ontario Canada
Age: 33
Posts: 262
Trader Rating: (6)
Feedback Score: 6 reviews
|
The strut tower top plates are pretty easy to take care of. I drilled all the spot welds out, used the plates as a template to make a new one out of 16g sheet. Those are getting spot welded on in the same way and some small beads around the edges. The rail to fender patches will be done with 16g as well. I'll probably overlap it in 2 layers, one from from the wheel side and the other from the bay side.
I have pictures of the progress so far but my memory card is at the shop, I'll grab it when I'm there this weekend |
|
|
|
|
04-16-2017, 11:41 AM
|
#45 |
|
Zilvia Member
Join Date: Aug 2006
Location: Ontario Canada
Age: 33
Posts: 262
Trader Rating: (6)
Feedback Score: 6 reviews
|
Ok time for a little update here.
I definitely didn't make as much progress as I needed to earlier in the off season so I'm trying to get this engine bay done as quickly as possible so the car can go for paint sooner. I underestimated how much time it would take to make the patches and do the rust repair properly. Sucks to realize, but at this point all I can do is push through. I started with the strut top repair. Drilled all the spot welds from the old plates to remove them. At first it looked worse than I thought underneath, but most of the rust was from the plate that came off. 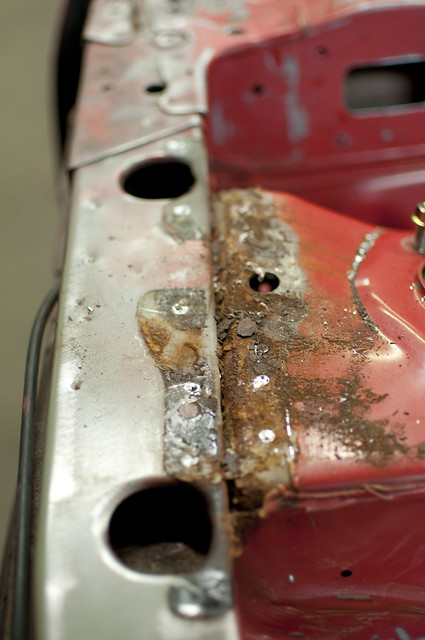 Some wire wheeling, rust converter and it's looking a lot better. 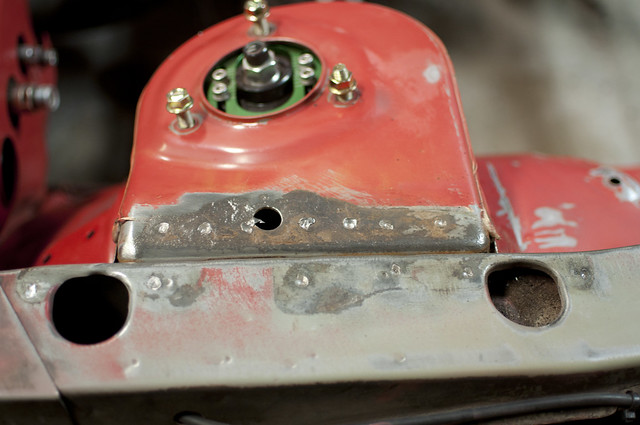 Other side done 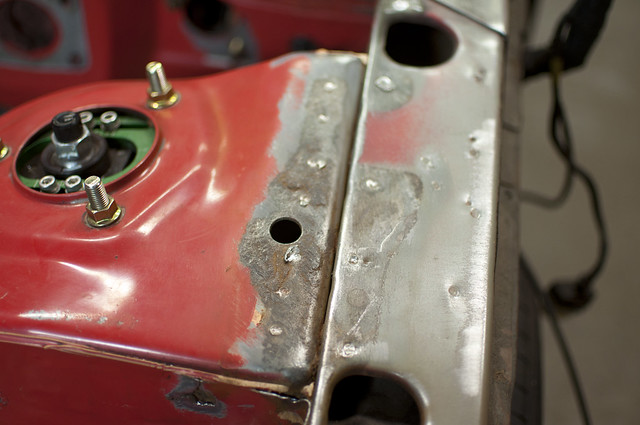 Plate cut out, holes cut for plug welding 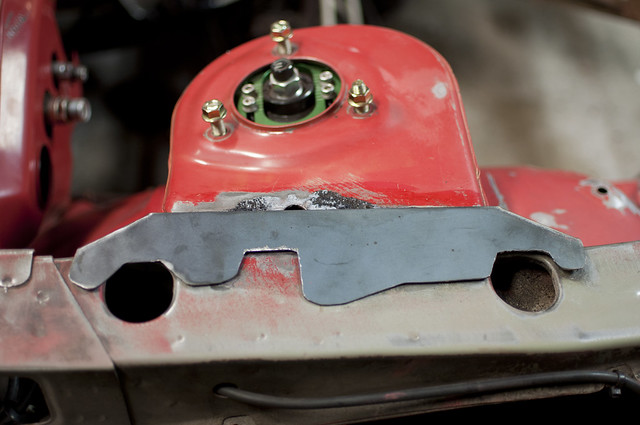  Plate clamped down, starting the plug welds. 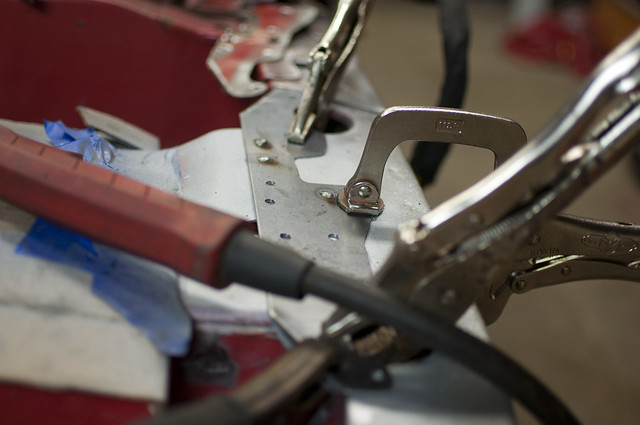 Zapping away  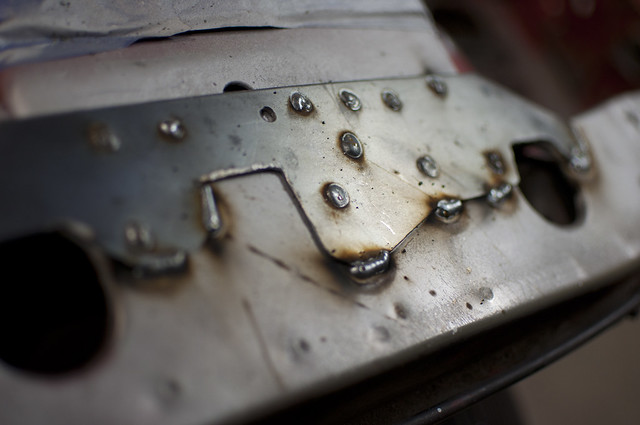 Both plates are done and mostly cleaned up around the edges and plug welds. Moved on to the repairs where the frame rails meet the fender tubs. The rust didn't look as bad from the engine bay side but the wheel side was a different story. once I ground the undercoat off the patch size grew considerably. I'm repairing this in 2 layers like the OEM rail/fender is welded up. First section cut to size and then zapped in, some sealer rust paint overtop. 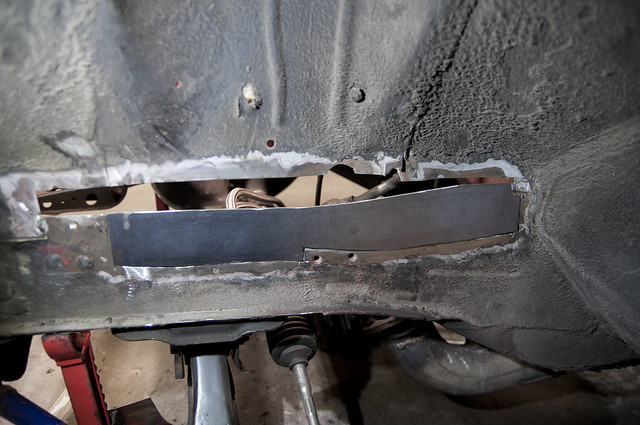  I drilled holes to plug weld the patch to the frame rail and strengthen the whole plate instead of just welding around the edges. I forgot to take pics while welding it, only have the after shots. Using similar gauge steel to the original stuff makes welding it in a little more challenging. Lots of small spot size welds, moving around the heat and waiting for the patch to cool to avoid warping it and breaking other welds. 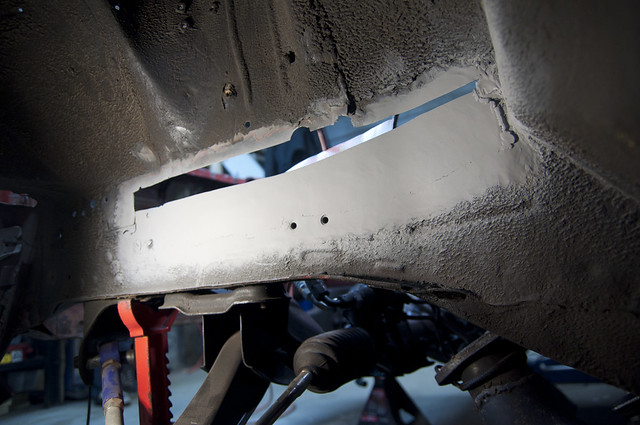 The other side is in better shape so it should be a little faster to get done, then I can put a fresh layer of undercoating in both front wheel houses and finish sanding the bay down. Last edited by Ka24Power; 04-16-2017 at 05:02 PM.. |
|
|
|
|
05-07-2017, 02:48 PM
|
#49 |
|
Zilvia Member
Join Date: Aug 2006
Location: Ontario Canada
Age: 33
Posts: 262
Trader Rating: (6)
Feedback Score: 6 reviews
|
Well I've made some good progress in the last few weeks. I'm starting to see the light at the end of the tunnel - helping me pick up momentum!
Since I last updated the drivers side rail/inner tub and passenger side inner tub are patched, as well as a couple small spots on the drivers strut tower. 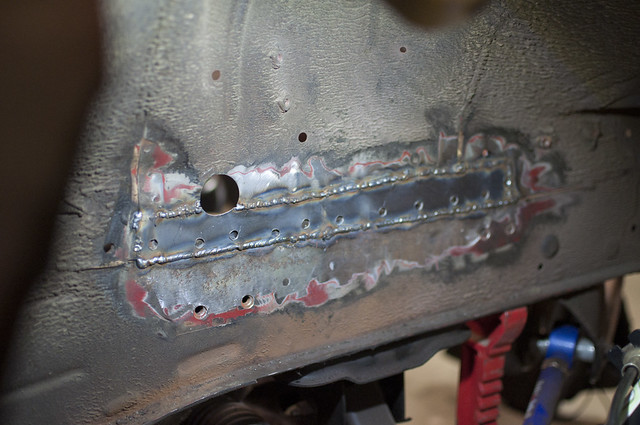 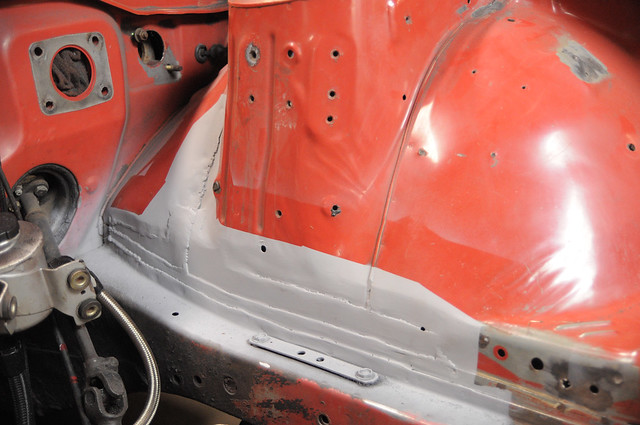 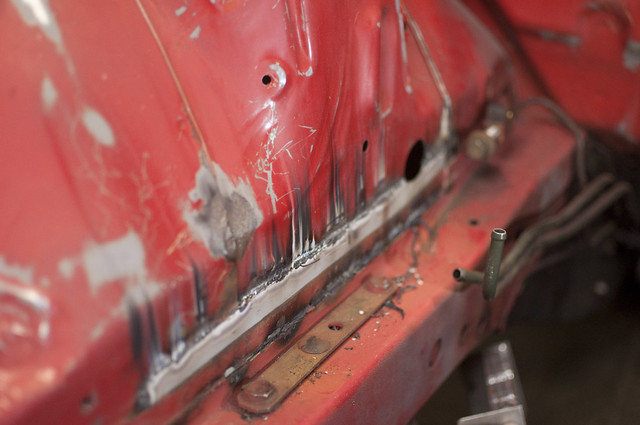 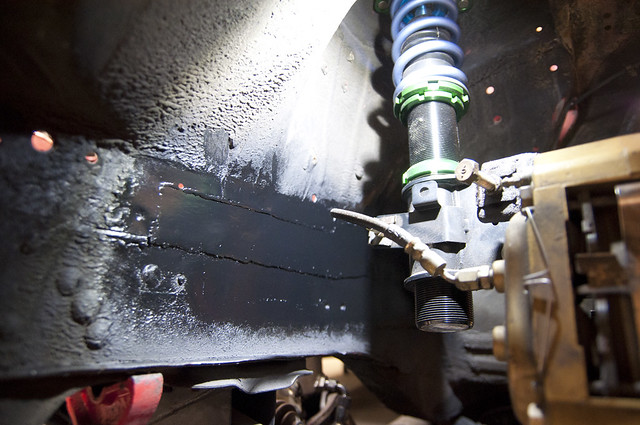 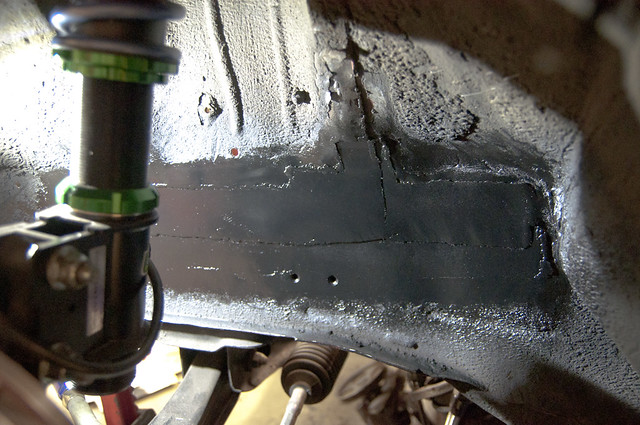 With the big patches complete I took care of a small one on the drivers strut tower and filled in a few of the unused holes in the engine bay. Also zapped in the corners of the modified rad support for rigidity - forgot to take pics but it's nothing exciting. At this point I'm 99% satisfied with the state of the engine bay before paint. I had previously planned to build a DIY booth in my shop and paint it myself. With the way the project dragged out longer than I planned I've decided to have the body shop paint the engine bay. I'm going to do the rest of the work on the engine while the car is away so I can save time. Time for a final test fit of all panels - gotta make sure it all looks proper before fighting painted panels into place! did the cool boy hood mod  bay all ready to spray  Brought the Rega's to the shop, dropped the coils   I still have to make some fender braces in front of the wheels and I need to make a couple brackets that are missing from the rear valances. I have a hood vent on order that I need to fit and then I can send the car out! I'll be building a plywood splitter/guard to try and protect my front lip. I know it won't last long if I don't do something to protect it. Hopefully the next pictures of the car will be all the same colour... |
|
|
|
|
05-07-2017, 02:59 PM
|
#50 |
|
Zilvia Member
Join Date: Aug 2006
Location: Ontario Canada
Age: 33
Posts: 262
Trader Rating: (6)
Feedback Score: 6 reviews
|
This isn't related to the 240 but I've been having a lot of fun with my current DD as well. I picked this thing up last year with a 'bad rear axle' which turned out to be a bad u-joint and wheel bearing. I had the rear bumper fabbed by a local guy and threw my summer wheels/tires on a couple weeks ago. Once I rebuild the E-locker 3rd sitting in my garage that will be going in, followed by a mild lift and tube front bumper.
by far one of the best DD's I've owned - despite the awful fuel mileage. 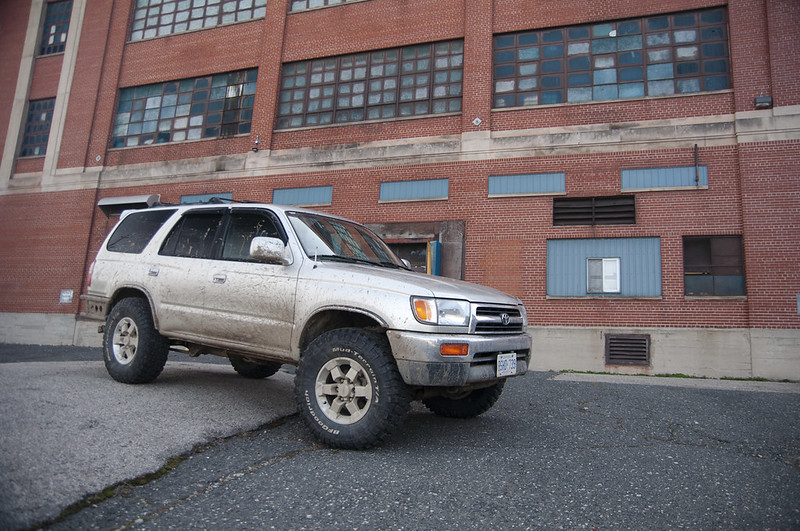 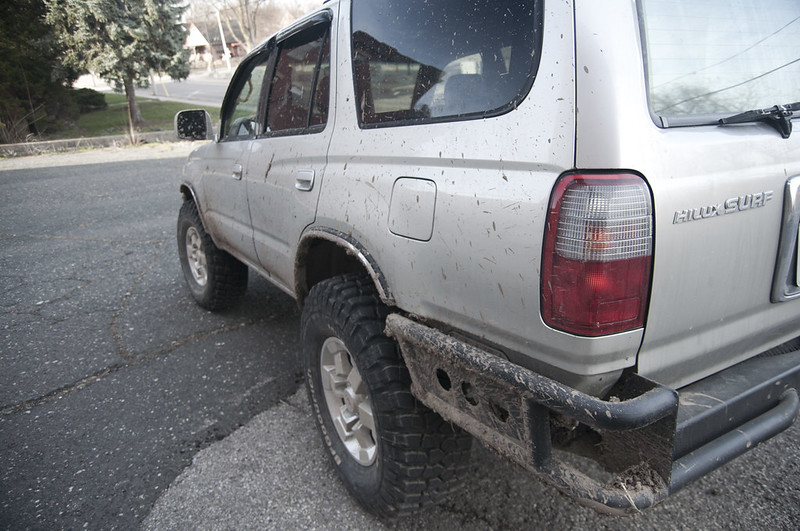 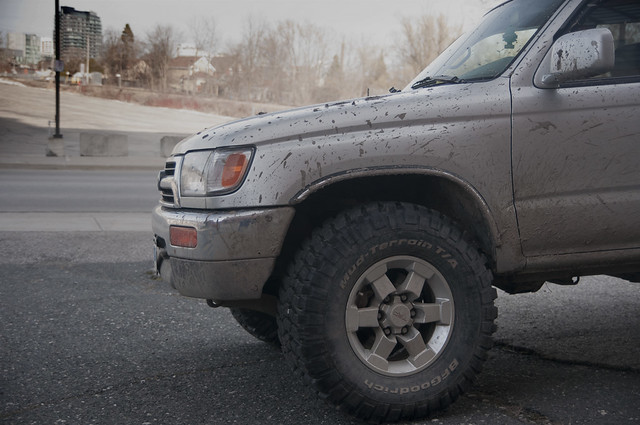 |
|
|
|
|
05-08-2017, 08:08 AM
|
#51 |
|
Zilvia Addict
 
Join Date: Jul 2008
Location: Canada
Age: 37
Posts: 719
Trader Rating: (0)
Feedback Score: 0 reviews
|
You should hold off on the 4 runner bumpers. I am currently finishing the design and CAD work and they should be ready for CNC in a couple weeks.
Love the progress on both vehicles. -Jordie
__________________
-Jordie Lewis '93 Skyline Type M |
|
|
|
|
05-08-2017, 08:10 AM
|
#52 |
|
Post Whore!
 
Join Date: Sep 2008
Location: It's dark, and hell is hot!
Posts: 9,414
Trader Rating: (23)
Feedback Score: 23 reviews
|
I know you're hyped, but I can't wait to see it as well. I know you wanted to paint the bay yourself, but sometimes it's worth it to sub it out (for your sanity).
And going by my FB and Instagram feed, there's quite a few people purchasing Hilux's now... |
|
|
|
|
05-08-2017, 08:29 AM
|
#53 |
|
Zilvia Member
Join Date: Aug 2006
Location: Ontario Canada
Age: 33
Posts: 262
Trader Rating: (6)
Feedback Score: 6 reviews
|
Oh shit Jordie are you designing the Outrun Fab front bumper? I'd like to see how it will look!
Thanks Matt, part of it is for my sanity but mostly to speed the process up |
|
|
|
|
05-08-2017, 08:57 PM
|
#54 |
|
Nissanaholic!
Join Date: Jan 2010
Location: location X
Posts: 1,815
Trader Rating: (10)
Feedback Score: 10 reviews
|
awesome progress!!!
__________________
http://www.240sxforums.com/forums/rb...ject-s-rb.html |
|
|
|
|
07-07-2019, 11:06 PM
|
#55 |
|
Zilvia Member
Join Date: Aug 2006
Location: Ontario Canada
Age: 33
Posts: 262
Trader Rating: (6)
Feedback Score: 6 reviews
|
Long time no talk, Zilvia
A lot has happened since the last update but I didn't take pictures of nearly enough of it. After the engine bay metal work was done I built a spray booth in my shop and laid some single stage silver down. First time using a gun, didn't turn out half bad. I'd definitely go with a base/clear next time around 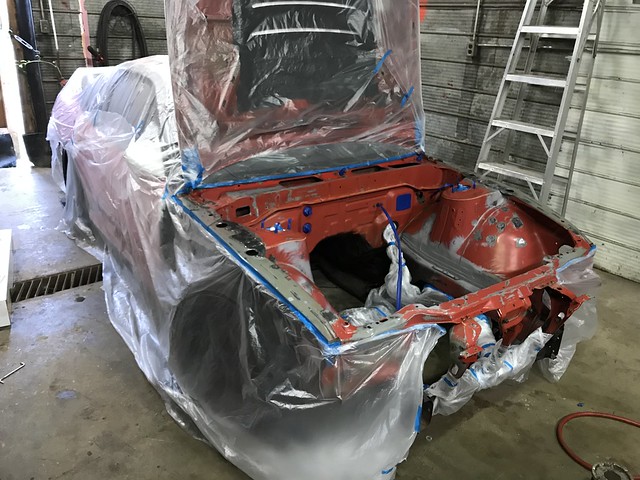 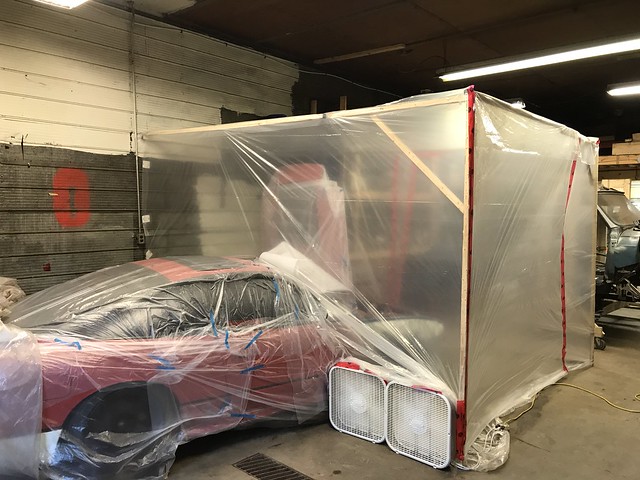  The engine went back in with a few changes.. To start I pulled the intake manifold off for a refresh. I found a ton of old dry crystalized coolant in the passages, fun surprise. Sandblasted away the old spray paint and had it sonic cleaned to get the old coolant out. Went together with fresh gaskets and some Nismo 740's. Also did a coolant hard line delete for the oil filter warming circuit. Got rid of the stock valve covers in favour of RB26 ones. Had them painted the same colour as my second S13 - always loved this colour. Added some press in -AN fittings for the vents and drilled the front cover for the VCT gear. I had been searching for cams with no luck. I almost gave up on the idea but literally 2 or 3 days after I installed the new covers and timing belt a set of Tomei 256 Poncams popped up on YAJ. Jesse@streetercorp came through as always! Tossed some Yellow Jacket coil packs in to finish the top end build. 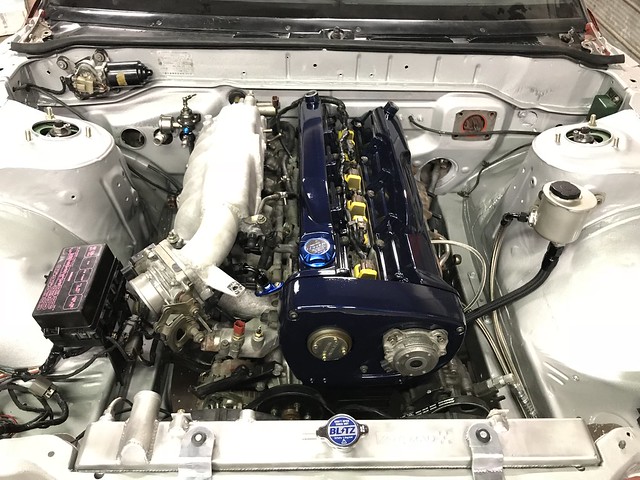 When the car came off the road I was dying for more power. The stock turbo was at its limit so I did some digging and decided to order a Hypergear ATR43G3SAT bolt on unit. This thing is LARGE compared to the stocker. Followed it up with a RawBrokerage S13 swap elbow. The combo didn't work with a stock downpipe.. later I had a local shop Unit2 Fab modify it to maximize ground clearance.  With the new bigger turbo, injectors, cams the old intercooler setup was going to be a problem. Found and older Blitz kit that needed a little cleaning up. It was an SR kit so I made new engine bay piping. Keeping the engine cool was a bit of an issue in the past, I modified the rad support to fit a new Koyo rad and put some slim aluminum fans behind it with a Flex-a-lite PWM auto fan controller. I might need to mount my oil cooler somewhere else in the future but I like how protected it is here. Theres also a small PS cooler between the intercooler and rad.  Grabbed a Sikky big swap swaybar. I absoultely hate the bright green but I couldn't justify powder coating a brand new part. My shop mate was installing a new bar in the back of his ST at the same time  Had most of the body parts back on after paint and mounted all the small stuff in the engine bay. I went a little OCD and bought a ton of new zinc plated hardware and a nut-sert tool. Well worth it for assembly. I felt like I had so much done at this point but I had so much ahead of me... I'll add more tomorrow.   |
|
|
|
|
07-08-2019, 05:05 PM
|
#58 |
|
Zilvia Member
Join Date: Aug 2006
Location: Ontario Canada
Age: 33
Posts: 262
Trader Rating: (6)
Feedback Score: 6 reviews
|
So it was looking like a complete engine bay but like an idiot I left all the fab work until the end.
I was pretty dead-set on running the ARC box especially after I got my hands on a NOS stock air filter. My turbo location made a Z32 MAF impossible to run, had to make some tight corners to meet the turbo at all. Hypergear recommends a 3.5" intake pipe for this turbo, to make things more fun. A handful of pie cuts later I had this mocked up  I read good things about R35 MAF sensors and they're really small - tucked it away to keep the bay looking clean. Also put the catch can return line on the intake pipe. Had Mitch @ Unit2 weld it all up for me. Turned out awesome.  I decided to build an overkill catch can setup, because why not? It's 3 layers baffled with some fuel cell foam in one layer to separate oil from air. It was really fun designing this and putting it together. I had a friend weld the tub for me and then had Mitch finish weld it.   Here it is all plumbed. The -AN fittings on the cylinder head mean trimming the hood bracing, the fittings on the catch can were the same story. Glad I never painted the underside of the hood..  The car ran like crap with no tune and all the changes but it finally moved under its own power!! I had it towed to Unit 2 and they did a great job tucking the downpipe/exhaust up for maximum ground clearance. Brought it to my work and did a full nut and bolt check, aligned it and then cranked the coilovers all the way up for the trailer. Time to tune! 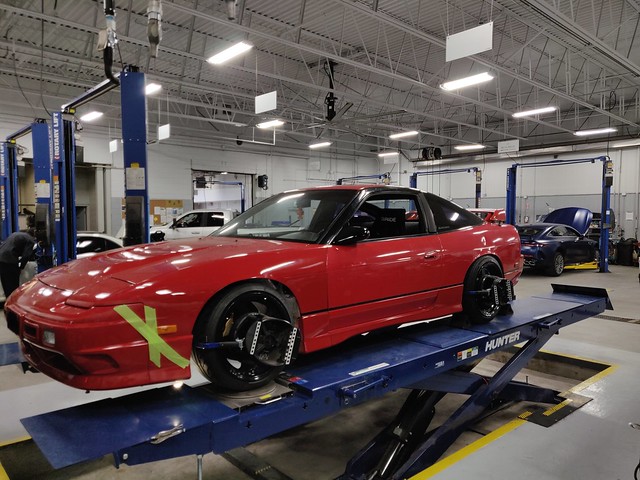 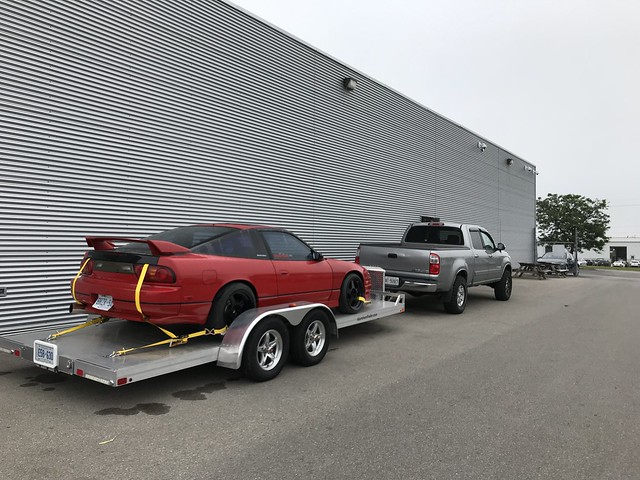 When I first got to the tuner everything seemed to be going well. He didn't find any issues with the car and seemed pretty happy with what I'd brought him. I threw in some fresh plugs, we set the ignition timing and he calibrated the MAF and injectors. All seemed to be off to a great start... but then we had a problem with the MAF signal. Completely unexpected and overlooked on my part was the placement of the MAF. I was so stuck on running the ARC intake box I put it too close to the turbo and the bend in the intake pipe. The air is so turbulent at idle its almost impossible to tune. Voltage was seen fluctuating from 600mv to 1200mv at times! Disappointed, I asked the tuner to do as much as he could so that I didn't completely waste a trip. He put a rough base tune in but I have to figure out a solution to this sensor so we can get it running really well. It idles like crap and doesn't cruise well, but under load the signal and tune smooths out. We only tuned to 6k at low boost levels. The silver lining of the day was having no other issue appear on the dyno. No fluid leaks, no overheating issues, motor was healthy when the air was moving fast enough to provide a stable MAF reading. Oh, and with the full straight pipe it sounded AMAZING. I was so happy but also so frustrated.  As soon as I got in the truck to drive home I was racking my brain for solutions. I've started with something really easy that might make all the difference - a honeycomb cell in the intake right before the MAF. Should really help straighten the air out before it hits the sensor. Part should be here this week, in the mean time I've been putting a few KM on the car to shake it down. Anyone who's had their project car off the road for more than a few years at a time knows how good it feels to be behind the wheel again. I wish it didn't take me so long, but I'm glad I did everything (*ahem*intake*ahem*) the way I did without rushing or compromising. The interior needs a really good detail, I'll get on that - stay tuned for another update soon      Last edited by Ka24Power; 07-08-2019 at 08:08 PM.. |
|
|
|
|
07-08-2019, 06:09 PM
|
#59 |
|
Nissanaholic!
Join Date: Feb 2012
Location: Oxnard, CA
Age: 30
Posts: 1,890
Trader Rating: (31)
Feedback Score: 31 reviews
|
You could always invert your arc box up, and run an oem scoop. That way you can run the z maf. That's what I did to solve my clearance issue
Sent from my SM-G975U using Tapatalk |
|
|
|
|
07-11-2019, 05:11 PM
|
#60 |
|
Zilvia Member
Join Date: Aug 2006
Location: Ontario Canada
Age: 33
Posts: 262
Trader Rating: (6)
Feedback Score: 6 reviews
|
Well the honeycomb cell showed up today, just epoxied it in the intake pipe. Waiting for the epoxy to cure means no driving tonight, at least tomorrow morning I'll know if it solved my problem.
@Mr.Nismo. Thats a good idea, I never thought of inverting the ARC box. I sold my Z32 maf when I got the car to start on this setup anyway so swapping back isn't a cost effective move anymore. I think at this point if the cell doesn't smooth the reading from maf I'm going to switch to a MAP based ECU. I'd rather spend the money on a newer more capable standalone than fab materials and labour to re-make the intake pipe. The tuner was suggesting installing a Link plug n play but I found a Haltech platinum pro plug in locally. I downloaded the Haltech software to fool around and it (obviously) makes the PFC look very dated. Now a small part of me hopes this cell is a bust so I can talk myself into the Haltech or similar. I really wanted to keep the period correct J-style theme going in the interior but losing the FC controller isn't the worst. I'd use the new standalone for boost control and get rid of the BLITZ power meter/SBC. The Uras edition white doesn't match anything else inside the car anyway. |
|
|
|
|
| Bookmarks |
| Thread Tools | |
| Display Modes | |
|
|


 Linear Mode

