|
|||||||
| Home | Rules & Guidelines | Register | Member Rides | FAQ | Members List | Social Groups | Calendar | Mark Forums Read |
| Archive and FAQs Archives and Frequently Asked Questions about the 240SX are in here. |
|
|
Thread Tools | Display Modes |
 10-10-2006, 10:20 PM
|
#1 |
|
Post Whore!
 
Join Date: Feb 2002
Location: Philly
Age: 40
Posts: 9,185
Trader Rating: (0)
  Feedback Score: 0 reviews
|
95/96 to 97/98 front end conversion....what's involved
Written by: George (aka 95KoukiS14 and SimpleS14)
Updated May, 2005 I've decided to make a write-up of what's involved to do the front end conversion. The conversion is very straight forward, once you start it, most (if not all) of it will be self explainatory. Before I continue I must mention a few things: * These are the steps that I have used on my car and I'm not at fault if anyone decides to use another method or cause any damage to their car. * This conversion is intended for a 95-96 240SX, to do this conversion on a S13 (89-94 240SX) custom work is required along with more parts (meaning more money). This write-up will not help you if you have a 89-94 240SX. * Please read all the steps before proceeding with anything. This will allow you to review the steps and ask any questions before you put your car into pieces. Ok after saying that now to get started. The conversion took me roughly 4 hours by myself. But I recommended that you have a second person to help you with the hood. Having a second person for the whole conversion should decrease the amount of time required for the conversion. You will have to do modifications to your rad support and headlights which I will explain later on in this write-up. TOOLS: Here is a list of the tools I used for this conversion: - Rachet with 10mm, 12mm and 14mm sockets - Phlips screwdriver (PH2 tip) - 10mm open end wrench - 14mm open end wrench - 6" and 3" rachet extentsions (or 3" and 10" extentsions) - test light for DC power - heat shrink and electrical tape - soldering iron - Drill with 1/4" drill bit - has to be strong enough to drill thru metal (drill bit size may vary) Here is a list of ALL the parts required for a OEM front end. I have listed the OEM parts with the part numbers and "suggest" pricing from the dealership. You can find a better price from buying used parts or going online to websites such as http://www.nissan-auto-parts-dealer.com. I bought ALL of the parts for a total of roughly $1600. This included clips that are not listed, because I lost some from my accident. I also did not buy the energy absorber because I might custom make my own to save $$$. I also used the Kouki JDM grill instead of the USDM grill, this cost me $200 shipped with front and rear Silvia emblems. Finally I bought my parts with wholesale pricing from the dealership, which was $5 more than parts.com when you included tax and shipping (from parts.com). I can probably hook you up if your located in North Virginia. I can provide anyone with an estimate and part number for any OEM part at request, even Nismo parts. OEM PARTS: (R)Head Lamp Assembly: 26010-81F25 - $205.95 (L)Head Lamp Assembly: 26010-81F25 - $205.95 (R)Park Lamp Assembly: 26170-81F25 - $47.23 (L)Park Lamp Assembly: 26175-81F25 - $47.23 (R)Fender w/o side spoiler: F3100-80F30 - $237.08 (L)Fender w/o side spoiler: F3101-80F30 - $237.08 Grille Assy.: 62310-81F25 - $144.49 Bumper Cover Assy: F2022-81F25 - $291.48 Bumper Bracket: 62290-80F00 - $84.92 Reinforcement: 62030-81F00 - $199.00 Hood Assembly: F5100-81FCM - $330.80 (R)Stay: 62270-81F00 - $8.92 (L)Stay: 62271-81F00 - $8.92 *(R)Front Fender Liner: 63840-81F00 - $34.24 *(L)Front Fender Liner: 63841-81F00 - $51.78 *(R)Brkt, Bumper Side: 62222-80F00 - $7.73 *(L)Brkt, Bumper Side: 62223-80F00 - $7.73 *(L)Impact Absorber: 62090-81F00 - $133.10 *(2)Bracket, Lamp Support: 62560-80F00 - $133.10 *Seal: 60895-50M01 - $0.64 *Spacer (R/L): 62274-35F10 - $0.29 MISC PARTS: Two pin cable to cable connectors or H1 connectors from a 97/98 240SX ("pig tails") or H4->H1 conversion kit - You can find these online, at a junkyard, or at a auto shop or electronic parts store. A good set of two pin cable to cable connectors can be found here: http://www.route66supply.com/store/product0.html NOTE: If you can't find it, than you can use some female connectors (flat prong style, 12-18 gauge) and splice them with the headlight harness (that's what I did). You will find these connectors at a cheap price in Radio Shack. * optional
__________________
Goals are dreams with a deadline. L.H.O.O.Q. Last edited by SimpleS14; 01-13-2021 at 11:32 AM.. |

|
| Sponsored Links |
|
10-10-2006, 10:21 PM
|
#2 |
|
Post Whore!
Join Date: Feb 2002
Location: Philly
Age: 40
Posts: 9,185
Trader Rating: (0)
Feedback Score: 0 reviews
|
STEPS (Removing parts)
I choose not to paint the parts before I started because I knew that they will get dirty or scuffed while working. Fresh paint is very soft and can scratch or scuff off easily, but its up to you if you decide to paint the parts before installing. Ok here are the steps:
* Remove the screws (with philps screwdriver) and clips that hold the plastic fender lining in place. Try to be easy on the clip, because they can break easily. * Open your hood to continue with the steps. Take off the two clips that hold the grille in place with the rad supprt. Gently, but firmly, pull the grille up and out of the reinforcement. * With the philps screwdriver remove the screw that holds the corner lights into place with the headlights. Gently, but firmly, pull out the corner lights. * You will use the same screwdriver to remove and disconnect your turn signals. * Now you will notice 10mm bolts (4) holding each headlight onto the car. Two on the side connecting to the fender and two in the front connecting to the rad support, remove these bolts. * You will notice 10mm bolts (8) that hold the bumper cover to the bumper bracket, remove these bolts. There are also 10mm bolts (2) on each side of the bumper that bolt onto the fender (around where the sidemarkers are). To remove these bolts you need to access them from inside the fender (that why you remove the fender lining first). * To remove the bumper bracket there are 10mm bolts (6) that hold the bumper bracket in place with the reinforcement and connect to each fender. There are four bolts in the mid section that connects onto the stays, remove these. Now on each side there is one bolt that connects the bracket to the fender, remove these and remove the bumper bracket. * Now your going to remove the stays. This step may not be necessary, but its help to part out your car to give you an idea of what goes where with the new parts. The stays bolt onto the reinforcement with 10mm bolts (6). There are three for each stay, remove these. * Now your going to remove the reinforcement, there are 14mm bolts (4) that hold the reinforcement in place to the frame (or cross member) of your car. There are two on each side, the closet of the two bolts will be easy to remove with the rachet. However the far most bolts can be removed with the rachet, but you have to use the 14mm open wrench to completely take them off. This is because of the lack of space to freely use the rachet. I would DOUBLE CHECK to see if the reinforcement can move freely, now slowly slide or pull out the reinforcement. * To remove the fenders there will be 10mm bolts (18) that hold BOTH fenders to the frame of the car, there are nine bolts for each fender. There are four bolts that hold the fender onto the car from under the hood. Basically when you look at your fenders from the engine bay you will notice bolts holding the fenders onto the car, remove these. To help you with these bolts I recommend you use the 3" extentsion. * Now look at the side of the car, on the front corner (where the bumper cover connected to the fender) you will notice one bolt that connects to the tie bar (part of your frame) remove that bolt on each side of your car. * Still looking from the side of your car, look underneath your car where the door meets with the fender or look at the first jack stand point. You will notice two bolts that are bolted onto the frame, remove these bolts. To help you with these bolts I recommended you use the 6" extentsion. * Now there are two more bolts to remove for each fender. The first one needs to be accessed from inside the fender. The bolt is located at the bottom of the fender closest to the door. This is were the 6" and 3" extentsion COMBINED comes in handy, because you need to have some type of reach to access this bolt and remove it. The last bolt is located at the top of the fender closest to the door. To access this bolt you need to open your door. To remove this bolt you will need to use the 10mm open wrench, remove this bolt and now you can completely remove the fender. * Now your going to remove the hood, there are 12mm bolts (4) that hold the hood onto the car. I recommended you have a second person to hold the hood for you while you unbolt the hood. I had someone to help me the first time, but the second time I had to do this by myself and it was time consuming. Ok now there are two bolts on each side, be careful and remove one bolt on each side one at a time. Now you can CAREFULLY remove the hood, if it hasn't slide off already. This hood is heavy and the size of it doesn't make it easy to handle at times.
__________________
Goals are dreams with a deadline. L.H.O.O.Q. |
|
|
|
10-10-2006, 10:23 PM
|
#3 |
|
Post Whore!
Join Date: Feb 2002
Location: Philly
Age: 40
Posts: 9,185
Trader Rating: (0)
Feedback Score: 0 reviews
|
STEPS (Installing parts)
NOTE: since you remove all the parts, install the new parts should be straight forward. Just install the parts the same way you remove them (now you tightening the bolts instead). You should be able to know what bolts go where. The actual installation will be explain briefly because of this, excluding the modifications and wiring necessary.
- Now your going to install the new fenders. I recommended you start with the bolt behind the door and the two bolts at the jack stand point. This is because you will need to realign the fenders to make sure it lines up with the doors, a-pillar and the gap between the door and fender is proper. - Once the fenders are securely placed your going to install the hood. Install the hood seal (optional part) along the front edge of the hood. This seal will clip to (8) holes underneath the hood. I recommended that you hand tighten the four bolts or tighten them just enough that you can move the hood back and fourth or side to side. This is because when you close the hood (not all the way) you will need to realign the hood so that the gap is even on both sides and the hood lines up properly with the fenders. Once you properly aligned the hood, carefully open the hood and tighten the bolts to hold the hood securely in place. ---------------------------------------------------------------------------- - IF YOU HAVE DECIDED TO BUY THE HEADLIGHT BRACKETS (optional part)...please read this following step. To install the headlight brackets...you will need to know how to spot weld. In my case I had a body shop do this for me. Basically what they did was drill out the top portion of the old headlight bracket and unbolted it from the bottom, so it can be removed. Once that was done they spot weld the new bracket onto the upper core support and bolted the bottom portion in the same locates. Their is another option of using nuts and bolts where you drilled out the old headlight brackets. The headlight bracket is the part of your core support that your headlights mount onto. The reason why I went with this (after a year and some months) was able to remove and install the headlights with greater ease. But as mentioned before..this is an optional part and there is a way around getting them. Just read the following step. ---------------------------------------------------------------------------- - Here is where the modifications to the core/rad support begins, have a drill handy. Close you hood all the way, the hood will help you when aligning the headlights. Now do this step one side at a time, place the new headlight unit in the two holes on the side of the fender (basically where the headlights bolt to the fender). Do not bolt the headlight just yet, instead hold the headlight and move it up and down until it looks aligned with the hood. You will notice that the notch on the headlight (plastic part of the headlight unit with two holes) doesn't fit one of the holes just right. What you have to do is use the drill to expand the hole and make it big enough so that you can slide that notch right in. Once you got the notch to slide in and the headlight flush with the core support (headlight bracket), make sure the headlight is flush with the fender and hood seal. If you do not have the hood seal, make sure that the headlight is flush with the fender and there is proper gapping from right to left on the top of the headlight. Now carefully place the drill into one of the holes on the headlight tab (where the plastic nub is) and slowly drill...just enough to get a mark on the core support (headlight bracket) where to drill. DO NOT DRILL THRU THE HEADLIGHT UNIT ITSELF....it's tempting, but you will cause damage to the headlight unit. Remove the headlights and continue to drill where you made your mark. You might not be able to drill two holes for each headlight....just as long as you have one your okay. Make sure that the bolts that came with the headlights can fit into the hole you just drill. It's best that you have to actually screw the bolt into the hole you just drilled. If the bolt is loose and can slide out easily, you have to use a nut on the other end to make sure the bolt is fastened to the core support and is holding the headlight in place. - Now your going to install the reinforcement, stays and bumper bracket. You should be able to install the new reinforcement the same way you removed the old one.....just in reverse order. - Now your going to install the bumper cover. You should be able the install the new bumper just the same was as you removed the old one. However you might not use the screws that came with the new bumper cover....mainly because you will have a set of your own (from old front end). - Install the sidemarker and turn signals just the same way you removed them. NOTE: This next step is about lighting, and there is more than one method. I will write three methods you can use, but there are more methods you can try at your own risk. ---------------------------------------------------------------------------- - Method #1: Now your going to power up your headlights, this is the method that will use female connectors (found at Radio Shack). Use a solder iron to push the female connector apart from the insulator (plastic cover). Look on the back of the headlight, clips the two wires that connect to the H1 connector. Slip the exposed wire thru insulator (plastic piece) that came off the female connector. With a piler open the female connectors just enough so you can slip thru the exposed wire from the headlights and clamp shut. Now with a soldering iron, solder the exposed wire to the female connector. Wrap the wires with electrical tape and heat shrink (optional). Since both wires are now soldered to the female connectors you should be able to simply plug them into the H4 socket. Black goes into the top socket, while red goes into the right socket. You can double check by plugging the connectors and turning on the lights. Now with the connectors plugged in, you can slide the insulator closer to the connectors HERE is a picture to give you an example. The high beams are a direct connection and require no modifications. - Method #2: Now your going to power up your headlights, this is the method that will use H1 sockets. Before you cut anything, make sure the H1 sockets that you have will clip right into the H1 connectors that are located on the back of the headlights. Once you have that checked your going to clip the H4 socket and have three wires exposed. Use a test light to determine which two wires you will use. One of the wires will not be used, therefore you will wrap that one in electric tape and strap it onto the harness to prevent any interference. Now your going to splice the two necessary wires into the H1 socket then plug into the headlight harness (H1 connector). Double check your connection by turning on your headlights. The high beams are a direct connection and require no modifications. - Method #3: Now your going to power up your headlights, this is the method that will use the two pin cable to cable connectors. Your going to clip the H4 socket and have three wires exposed. Use a test light to determine which two wires you will use. One of the wires will not be used, therefore you will wrap that one in electric tape and strap it onto the harness to prevent any interference. Now your going to splice the two necessary wires into one of the connectors. Now your going to cut the two wires coming from the low beam harness on the headlight side and splice them into the other connector. Double check your connection by turning on your headlights. The high beams are a direct connection and require no modifications. ---------------------------------------------------------------------------- - Install the headlights back into the correct holes on the fender and the hole(s) you drill into your reinforcement. When you have the headlights and place, close your hood and double check for proper gapping between the hood and the bumper. Note: if you do not have the reinforcement you will have some gap between the bumper and headlights....but its not obvious unless your up close playing with the bumper (moving up and down). - Open up your hood once again so you can install the corner lamps. The corner lamps clip into the headlights and screw that the top just like the previous headlights. Close the hood to double check for proper gapping, but you will reopen the hood to install the grille. - Now your going to install your grille. The 97/98 grille clips into the headlight bracket unlike the previous grille that clipped into the reinforcement. Before you fully install the grille, may sure that will evenly fit on both sides. Meaning that you do not have to use any force to install the grille at an angle or more to one side. Once you double check everything clip the grille into place. It's a good idea to double check everything because once you install the grille....its a pain to take out. - The rear fender lining will install the same way as you removed it. For now I have no steps on installing the front fender lining. The 97/98 front fender lining is different from the 95/96 and not all the holes will match up. Everything is now complete and you should have all the proper lighting working. Double check to make sure everything is aligned and nothing is loose or hanging.
__________________
Goals are dreams with a deadline. L.H.O.O.Q. |
|
|
|
10-10-2006, 10:27 PM
|
#4 |
|
Post Whore!
Join Date: Feb 2002
Location: Philly
Age: 40
Posts: 9,185
Trader Rating: (0)
Feedback Score: 0 reviews
|
Pictures
Here are some pictures....
Before (10/2002).... 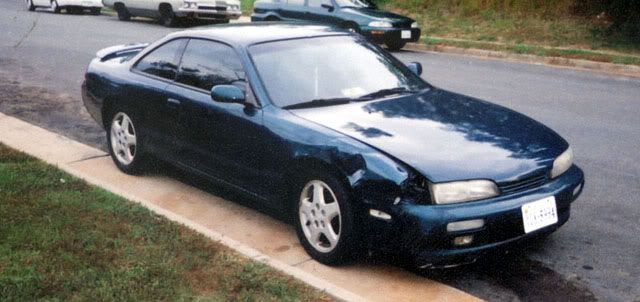 After (8/2003).... 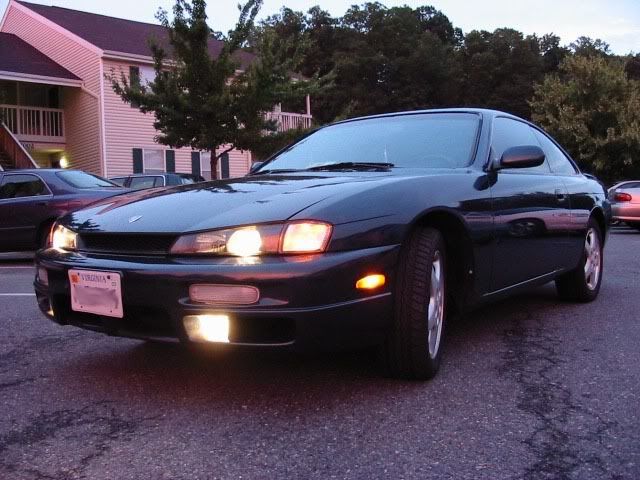 Note: The conversion was completed 10/2002. In regards to using the JDM front bumper.....you can use this, but you can not use the foam bumper support (which is optional either way). It's going to be a tight fit, but it will fit. Pic here.... 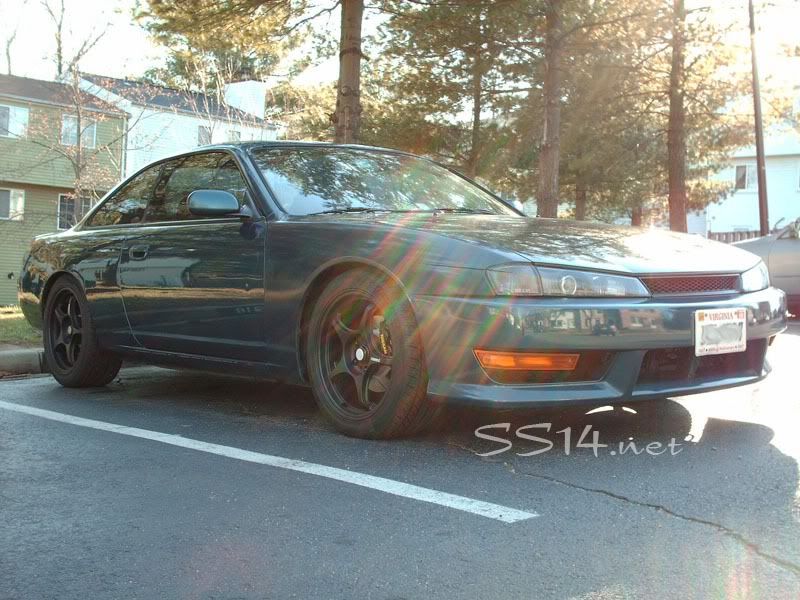 If you see any errors or have anymore questions, please e-mail me at: [email protected] AIM me at: SimpleS14 You can also PM me. 
__________________
Goals are dreams with a deadline. L.H.O.O.Q. |
|
|
| Bookmarks |
| Thread Tools | |
| Display Modes | |
|
|


 Linear Mode

