|
|||||||
| Home | Rules & Guidelines | Register | Member Rides | FAQ | Members List | Social Groups | Calendar | Mark Forums Read |
| Builds (and builds only) Got a build thread? It goes here, build threads anywhere else on the forum will be locked and never moved. |
 |
|
|
Thread Tools | Display Modes |
 04-21-2014, 08:23 AM
|
#31 |
|
Zilvia Junkie
 Join Date: Feb 2008
Location: Carry Water, Chop Wood
Age: 36
Posts: 507
Trader Rating: (0)
  Feedback Score: 0 reviews
|
since the last update, I made an axle back with a Magna flow muffler.
     Here's a clip of it running poorly because of the bad battery issue I was having. https://www.youtube.com/watch?v=-gRB1g5zBdM So I bought a new battery for the truck and put the red top optima in the car (the reason the car would crank but not fire). I made some panels for over the lights with some 1/16th inch ABS sheet.   Pulled it put of the garage under its own power. the white bunny clutch seems to work just fine.   Took the Brides out of the truck and put them back in the car, along with the carpet and factory steering wheel, radio, speakers, door panels, glovebox.  Safety First =)  last piece of the puzzle came in...         I bought AreoCatch Hood latches to keep it in place =)       I just have to put some RTV inbetween the skeleton and Outter CF part and attach the latches for good.. It is going to get painted at the end of the month by a friend (same friend who painted the bay white). I will be driving it to work and back till then like this to make sure it is running good before paint.. -Jimmy |

|

|
| Sponsored Links |
|
04-21-2014, 10:16 AM
|
#33 | |
|
Zilvia Addict
 Join Date: Feb 2010
Location: Albany NY
Age: 39
Posts: 607
Trader Rating: (5)
Feedback Score: 5 reviews
 |
This thing is looking awesome! Lots of nice work man.
I see your in PA, where about? Want to do some rust / body repair on both of my two tones next winter??? haha
__________________
Quote:
|
|
|
|
|
|
04-25-2014, 09:25 PM
|
#35 | |||
|
Zilvia Junkie
Join Date: Feb 2008
Location: Carry Water, Chop Wood
Age: 36
Posts: 507
Trader Rating: (0)
Feedback Score: 0 reviews
|
Quote:
Quote:
Quote:
got the hood latches on. =)  finally took it out for a drive to my work..  I forgot my tools, and the car was falling on its face and not revving up so luckily my sister and I ran into our dad and he had a 10mm so I advanced the timing a hair to the end of adjustment on the dizzy. it ran better but is still stumbling a bit. Ive been messing with the SAFC settings and I'm stumped. I am sure the maf selection is correct and since im not turbo I don't use the dec. air settings. Only thing I didn't mess with yet is the tps which shouldn't be too out of wack (it was not correct but I put it back to where it was before I pulled the motor apart) but I will double check it. The mods to the engine are Brian Crower 264/264 cams, BC .5mm oversize valves, BC spring and retainer kit, stock injectors, Walbro 255 fuel pump. Does anyone have any idea what the fuel percentages/rpm points should be set at? I've tried turning them up and down but I don't think im getting anywhere.. I have searched on KA-T.org and saw the SAFC thread but nothing pertains to an NA motor with my specifics. -Jimmy |
|||
|
|
|
|
05-13-2014, 08:52 PM
|
#37 |
|
Zilvia Junkie
Join Date: Feb 2008
Location: Carry Water, Chop Wood
Age: 36
Posts: 507
Trader Rating: (0)
Feedback Score: 0 reviews
|
I decided to take the car to work the next day, Saturday. and parked by my self in the furthest spot away from the store away from everyone... so I thought... wtf. I knew a bunch of cars would park around me... when I went to lunch I snapped this..
 when I got back from lunch I parked next to my co-workers.  the last week of april I started by putting up tarps/plastic in the garage for paint...  after the garage was done, I started by taking the car apart. trim first.   body panels..     I put the car on blocks so the painter (friend of mine, JR) could paint the rocker panels. also, Let the masking begin!!  moved my hood to the other building outta the way so it wont get over spray on it. Also started sanding the parts and body with 220 grit on my electric DA sander..  after some arguing and researching in the two-tone thread and finding out my silvia front was originally painted two-tone (as seen in the early pics of getting the front end). I even sanded the fenders and found under the factory black stripe the base coats were two-tone.  these are the colors I chose.  had to fix some spots on the rockers.  JR spraying the white sealer/primer.  first base coat.   the next couple days came and JR sprayed the 2nd base.  followed by the clear coat. then a day or 2 later I started assembly. thanks to the wife, my sister and her BF for helping. =)   pulled it out to re-spray the spoiler and trunk trim piece under the lights.  had another friend come over and help put the spoiler and exhaust on..   Got the black trim tape on... and took the car to Carlisle Performance and Style 2014. had it next to me while i rc drift.  I just rinsed it off from taking the tarps and plastic down and all the pollen in the air and put away for the night..  Its hard to capture the colors in picture since they are metallic, the top looks purple or blue with silver-ish and the bottom looks dark grey metallic or sometimes a brown-ish grey metallic.. i bought the Chase Bays Brake line and Clutch line tuck kits. for OEM master cylinders. the last thing i have to do is find a hose that can handle the vacuum from the brake booster to the manifold. ANY Pointers for that? I have come to the conclusion that the car needs tuned as well. it runs but needs a FULL ECU tune before taking on any long trips... I will take it to Innovative Motorworks to see John Kerr and have him tune it with Nismotronic when the time comes. Last edited by Super_OK_S13; 04-01-2019 at 12:53 PM.. |
|
|
|
|
06-15-2014, 08:02 AM
|
#39 |
|
Zilvia Junkie
Join Date: Feb 2008
Location: Carry Water, Chop Wood
Age: 36
Posts: 507
Trader Rating: (0)
Feedback Score: 0 reviews
|
Little Update
I installed the ChaseBays OEM Relocation Lines for the brake and clutch. Clutch line.  The Clutch line itself deletes the "dampening box" and attaches to the slave cylinder.  Routed over the bellhousing and attached along the throttle cable, run behind the brake booster and to the master cylinder.  I didn't get a shot of the 3 lines sitting on the bench but there are 2 long and 1 short one.  The short one goes to the driver side line, and the 2 long ones get routed along the cross member with zip ties.  One to the passenger line and the other to the rear line.  After tucking the booster line along the back of the engine with a cable clamp, here's the finished look.   My friend Robb Stumph took some pictures of the car one night. Here is one of them.  Last edited by Super_OK_S13; 02-21-2017 at 06:02 AM.. Reason: Posting Update. |
|
|
|
|
06-21-2014, 02:55 PM
|
#41 |
|
Nissanaholic!
 Join Date: Jan 2010
Location: location X
Posts: 1,815
Trader Rating: (10)
Feedback Score: 10 reviews
|
so much work!! you are an effing hero!! you should had spung for a metal hood tho.
__________________
http://www.240sxforums.com/forums/rb...ject-s-rb.html |
|
|
|
|
08-03-2014, 11:41 AM
|
#42 |
|
Zilvia Junkie
Join Date: Feb 2008
Location: Carry Water, Chop Wood
Age: 36
Posts: 507
Trader Rating: (0)
Feedback Score: 0 reviews
|
Been a little bit since my last post. I guess its time for an update!!!
I've been just driving it around to local dinner meets at sheetz/sonic and brothers pizza and to work when im low on gas in the truck (my daily) and when it doesn't rain.. Sheetz  Sonic  At my paps garage where I first installed the Silvia front.  Towards the end of July, I decided to get my Coffee Table Wheels some tires and jump-start my 5Lug Conversion.  Up on blocks went the car. #hovercarstatus  ---Wheel and Tire Specs--- Front 17x9 +24 with 225/45/17 Rear 17x10 +22 (might be +20) with 235/45/17  Front hubs went on no problem...  rear arm bolts/hubs need some persuasion of PB Blaster  Figured I wont be needing my 4 lug se anymore, sold them to fund the new 5Lug Rotors and new pads.  needed to get some new lug nuts..  the rears poke a little bit so I had to raise ride height till I get a full rear arm package for an alignment.  Otherwise I like the full chrome look on the car...    couple shots from the other night..    2 things I definitely need to get... 1) 225/45 for the rears. the 235/45 are to tall.. 2) front camber plates or new coilovers with them already installed. Wifey might get me the D-Max Streets around Black Friday |
|
|
|
|
08-04-2014, 06:29 AM
|
#44 |
|
Leaky Injector
 |
I'm impressed with your build thus far. Engine bay turned out flawless, prob the cleanest dohc bay I've ever seen. This car has a lot of sick things bout it man keep it up
|
|
|
|
|
09-30-2014, 06:54 PM
|
#46 |
|
Zilvia Junkie
Join Date: Feb 2008
Location: Carry Water, Chop Wood
Age: 36
Posts: 507
Trader Rating: (0)
Feedback Score: 0 reviews
|
Its been about 2 months since the last small update...
I've had an issue for a while, with almost no bottom end torque, throttle response, spitting/sputtering and hesitation from 2000-3000rpm and decided to (rather got around to doing it) put the secondary butterflies back in the intake manifold and reset the TPS to within factory voltage specs. Did this around the beginning of September for a charity show on the 20th. Tear down =)  Intake manifold off.  Up on the bench  Swirl valve back on but will not be hooked to vacuum as the butterflies stay open with no vacuum.  Butterflies in and new screws Loctited in place.  While I had all this going on I figured I would clean up and wrap/cover some wires on the passenger side frame rail so they don't stand out as much. Started with the distributor plug. de-pinning  slipped shrink tube over it. later you will see a finished plug.  The wires I wrapped up were the blue/black fan wires. and sleeved the water temp sensor wires.  Since the car was apart I figured I would paint some stuff too. truck bed wrinkle black on the radiator.   Semi-Gloss Black intake tube.  So the Bay was put back together! The Throttle response after putting the secondary butterflies in and resetting the TPS is ALOT better!!! But it still hesitated so I took the MAF off and sprayed it with cleaner and it got a little better.   Before I took it anywhere I wanted to get RUCAS. I reached out to Nick at Elite JDM and he had ISIS Street RUCAS delivered FedEx next day!! =) guess it helps i only live about 2 hrs from the shop.. But MUCH props for the Service!!! Put them on that night!  This is MAXXED out negative and Factory Bolt adjusted to max negative. Is there supposed to be more?  Brought the kids out to the garage for support! =)  Decided that my ghetto expanding hood prop had to go.. made a small tab to hold a rod I fabbed up quick one night. basically just 1/2" conduit with air tool plug ends grinded down to fit the tab and hood prop hole.   Painted truck bed liner and shrink wrapped the ends to protect the hood.  The rest are just random pics!! =)       Last edited by Super_OK_S13; 10-27-2015 at 09:45 AM.. |
|
|
|
|
10-04-2014, 05:55 PM
|
#50 | |
|
Zilvia Junkie

Join Date: Jul 2008
Location: SoCal and Hawaii
Posts: 557
Trader Rating: (2)
Feedback Score: 2 reviews
|
such a clean car!
simplicity at its best!
__________________
Quote:
|
|
|
|
|
|
10-28-2014, 07:39 AM
|
#52 |
|
Zilvia Junkie
Join Date: Aug 2009
Location: Toronto
Age: 32
Posts: 455
Trader Rating: (0)
Feedback Score: 0 reviews
|
Nice progress man. I think this would look loads better with an oem aero front bumper on it...aside from that i like the new colour!
__________________
BNR32 connoisseur // 1990 GT-R |
|
|
|
|
11-25-2014, 09:44 PM
|
#54 |
|
Zilvia Junkie
Join Date: Feb 2008
Location: Carry Water, Chop Wood
Age: 36
Posts: 507
Trader Rating: (0)
Feedback Score: 0 reviews
|
Thanks for the kind words!! last week I bought a Nikon D3300 DSLR. I've been having fun so far!! I Had a camera buddy explain some how to's and technical stuff to me about the features and cause/effect of the Main 3 settings. Here are some I took when I got it =)
Katsumi (daughter) Benson (dad) 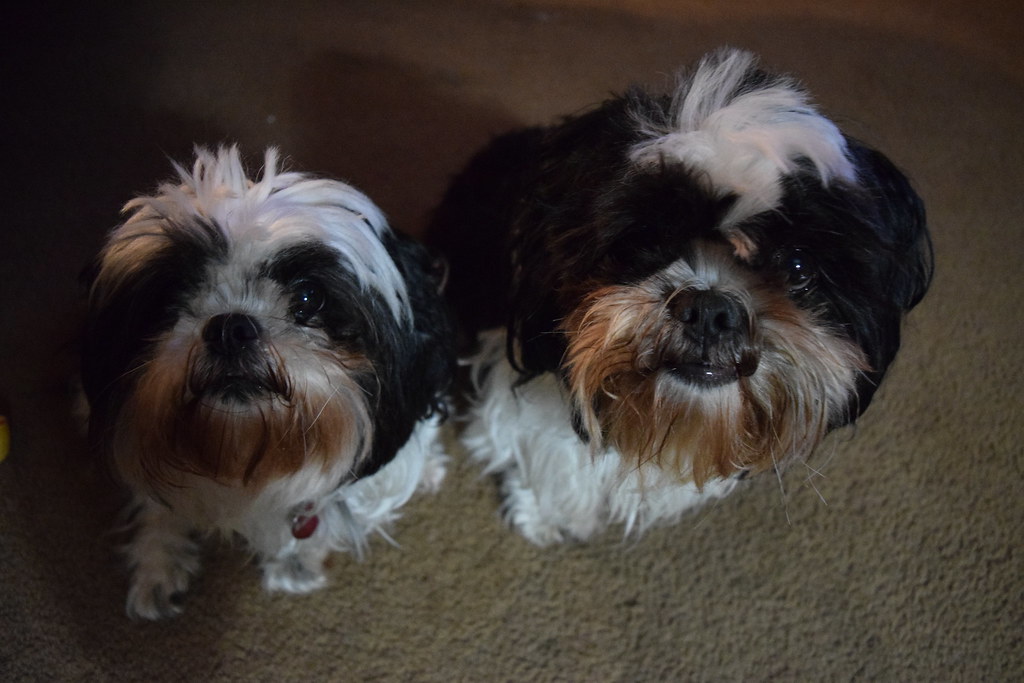 My S13 Silvia Rc drift car  Rc s13 drift car  Lego coffee mug and OLD halloween monkey mask from my great uncles old house. 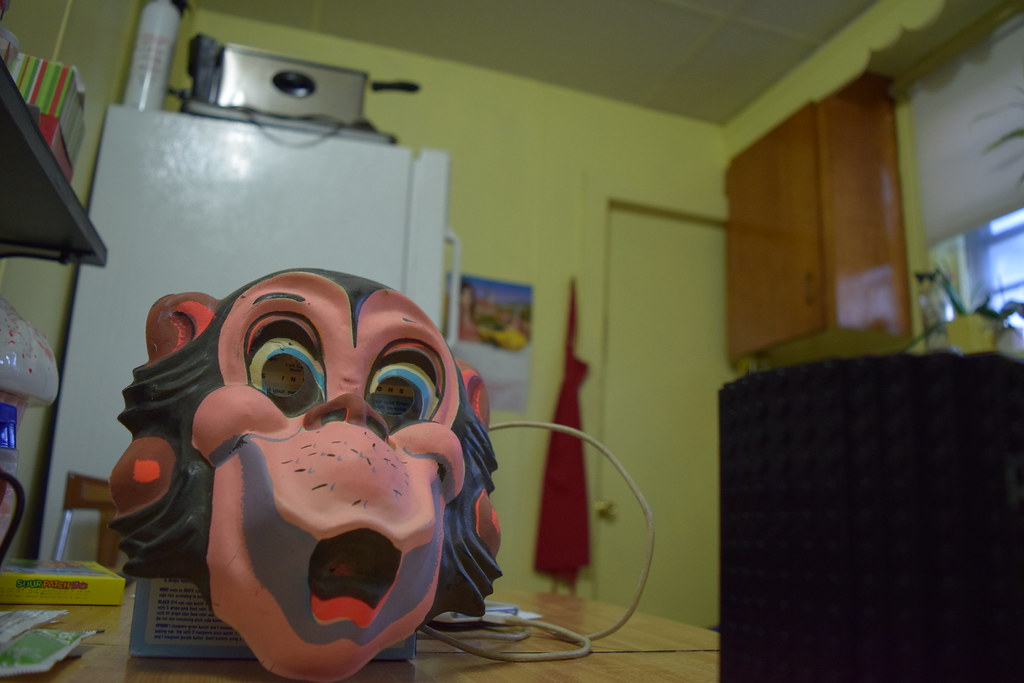 My rc jzx100 Chaser.  OK onto some of my car from today (11/25) 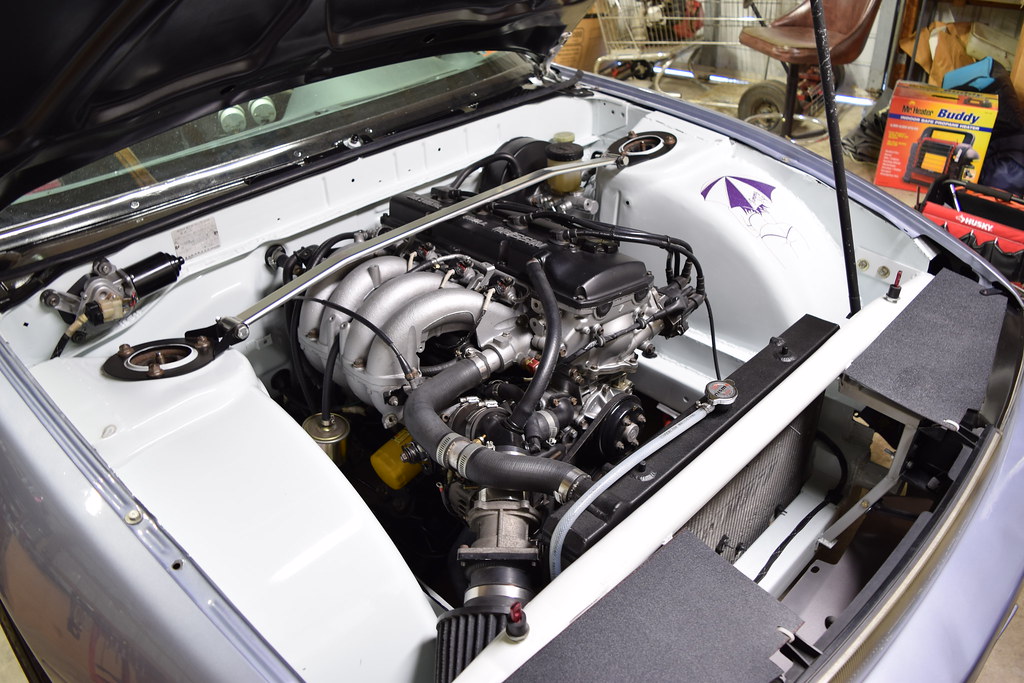    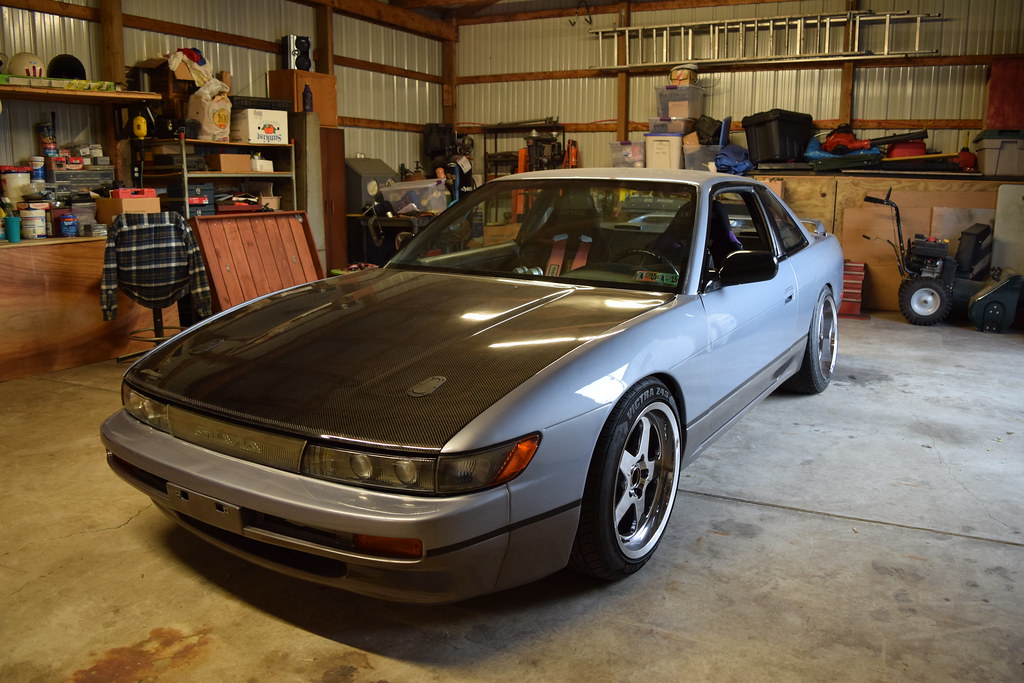  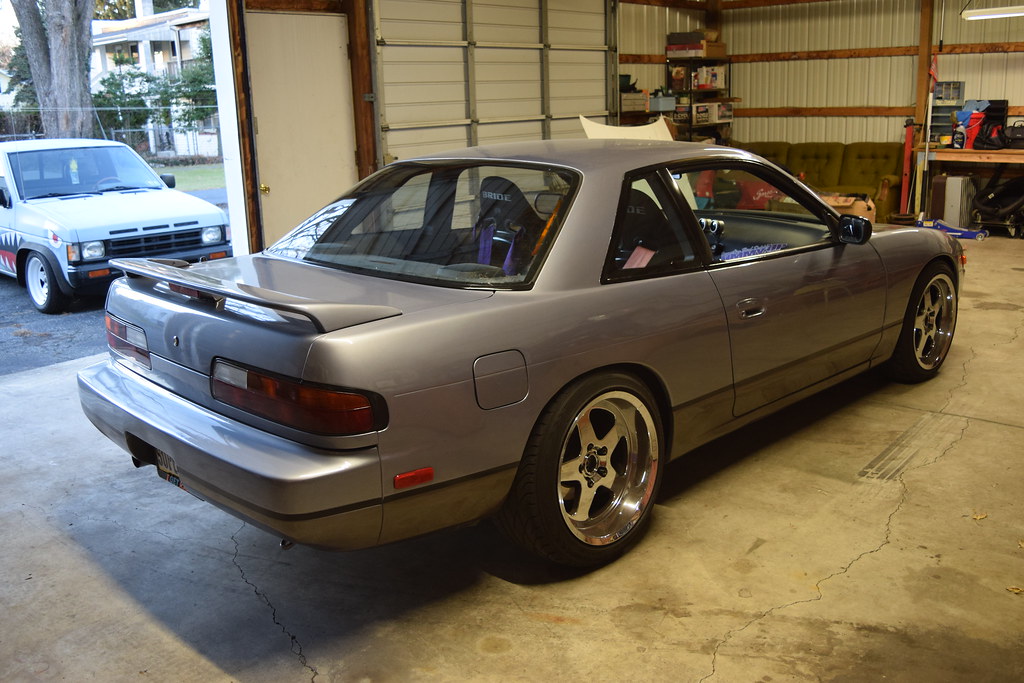 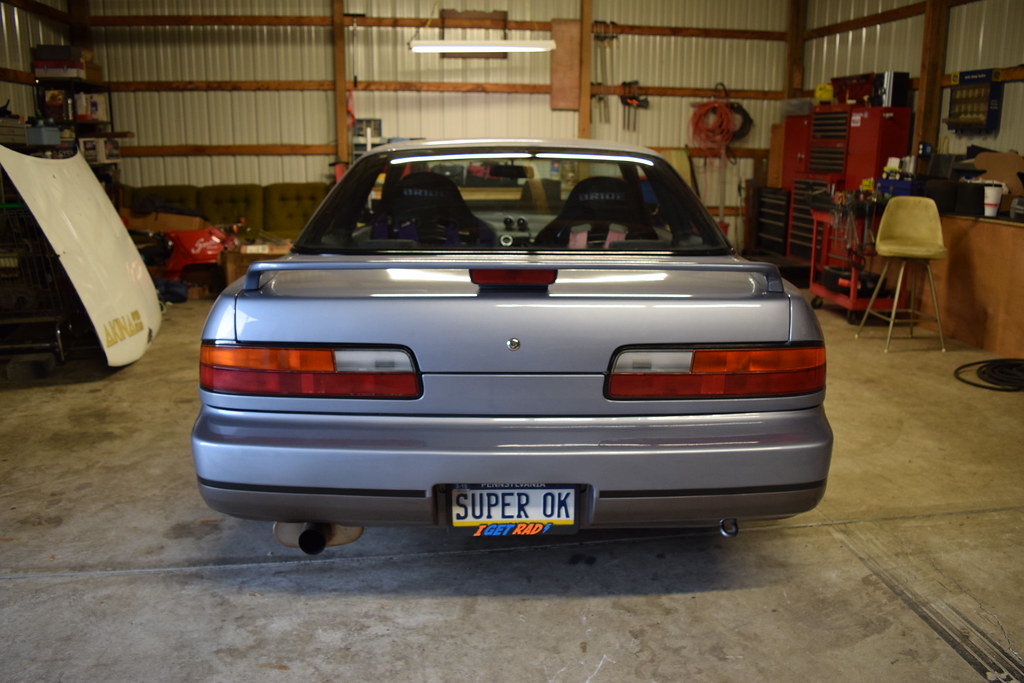 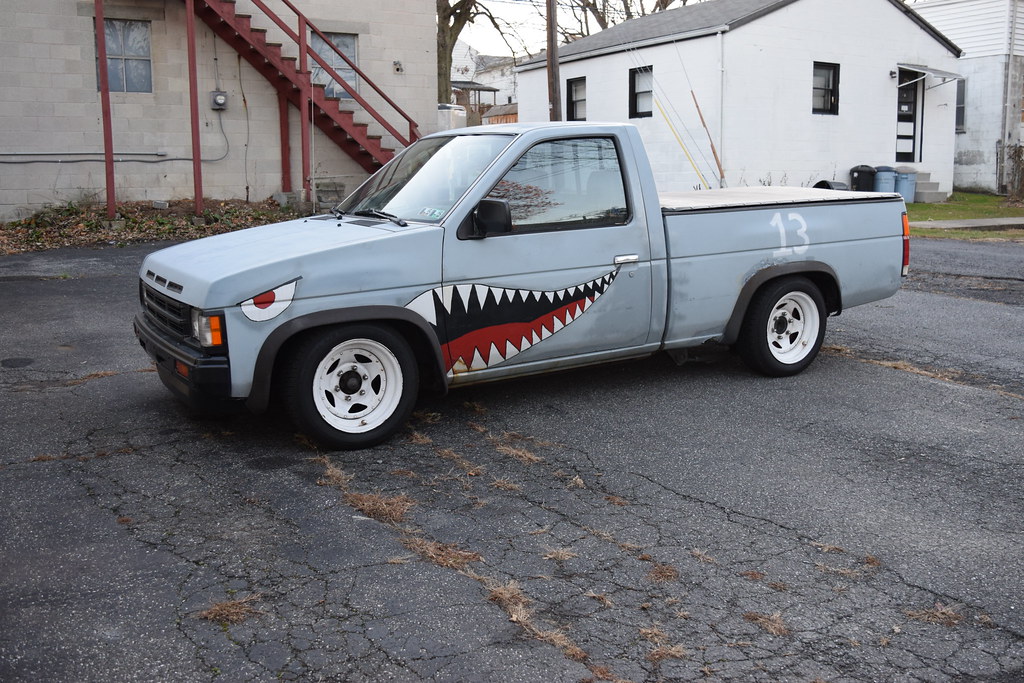  DSC_0389 by super_ok_s13, on Flickr DSC_0389 by super_ok_s13, on Flickr DSC_0396 by super_ok_s13, on Flickr DSC_0396 by super_ok_s13, on Flickr DSC_0402 by super_ok_s13, on Flickr DSC_0402 by super_ok_s13, on Flickr DSC_0403 by super_ok_s13, on Flickr DSC_0403 by super_ok_s13, on Flickr DSC_0409 by super_ok_s13, on Flickr DSC_0409 by super_ok_s13, on Flickr DSC_0410 by super_ok_s13, on Flickr DSC_0410 by super_ok_s13, on Flickr DSC_0415 by super_ok_s13, on Flickr DSC_0415 by super_ok_s13, on FlickrAs far as Turbo... not yet... I'm not really interested and $$ wise, I have other stuff around my house/property that needs attention first, plus I want a semi-reliable setup. if I do it down the road, a simple t28 setup will do.. Body wise, I would like to get an OEM style Lip and OEM Silvia Skirts and some sort of rear extension valance. I really like 240sxdriftin's mods.. Last edited by Super_OK_S13; 10-27-2015 at 09:50 AM.. |
|
|
|
|
02-03-2015, 10:35 AM
|
#56 |
|
Zilvia Junkie
Join Date: Feb 2008
Location: Carry Water, Chop Wood
Age: 36
Posts: 507
Trader Rating: (0)
Feedback Score: 0 reviews
|
Once again, Its been a couple months since an update...
To kick off 2015!! At the end of November I registered for the Rod/Custom/Tuner Show at Motorama 2015 in Harrisburg, PA. If you've never been to it, it has ALL kinds of stuff going on over 2 days. Supercross style racing with bikes and quads ranging from small 50cc to large size 700cc in all age ranges. go-kart racing, micro wingless sprints, 1/10th and 1/8th scale off road RC racing, Robot Wars, and a bunch of friends hook up and have a big RC Drift Demo/Fun Comp setup somewhere in the venue. Plus a Shitload of vendors and Advertisers for different racing venues from all over. Anyway, My car was "accepted" to be there in the car show portion. So I started prepping the car/cleaning it up/acquiring some new parts. I started by giving the interior a re-fresh and covering the door cards and glovebox. Start by using a razor blade and cutting the black skin off the door showing the hardboard shell.. 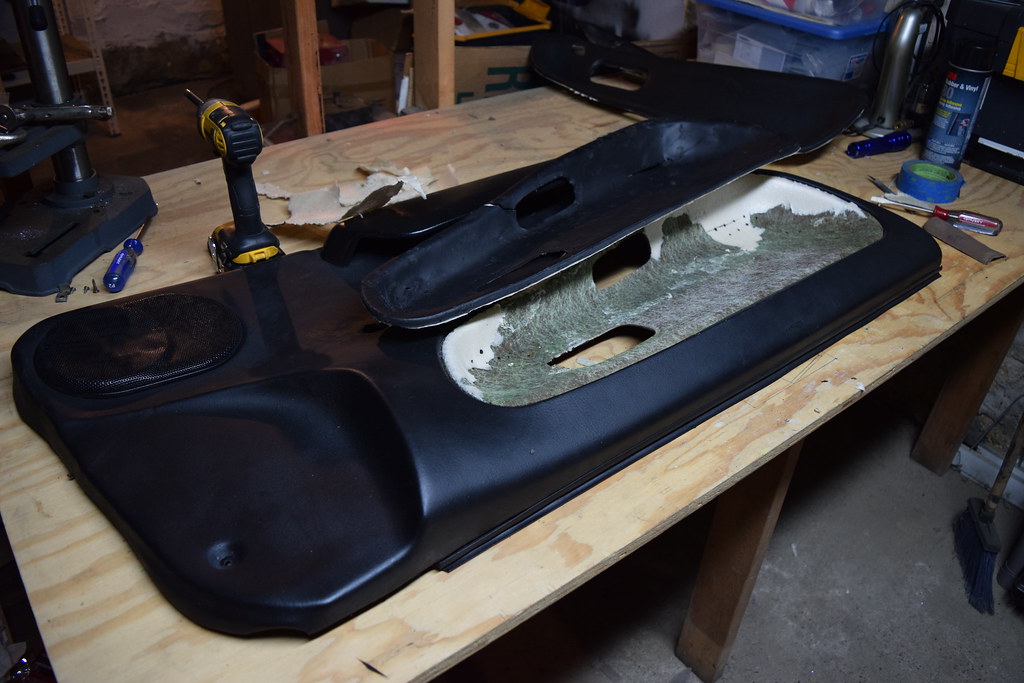 DSC_0091 by super_ok_s13, on Flickr DSC_0091 by super_ok_s13, on FlickrTools of choice.  DSC_0092 by super_ok_s13, on Flickr DSC_0092 by super_ok_s13, on Flickrunder the vinyl skin is a foam skin that needs to come off. most of it pulls off but some sections needed to be scraped and loosened up easily/scraped off.  DSC_0090 by super_ok_s13, on Flickr DSC_0090 by super_ok_s13, on Flickr DSC_0099 by super_ok_s13, on Flickr DSC_0099 by super_ok_s13, on Flickrthe tops of my skins were pulling away from the door shell, so the next step is taping off around the door. 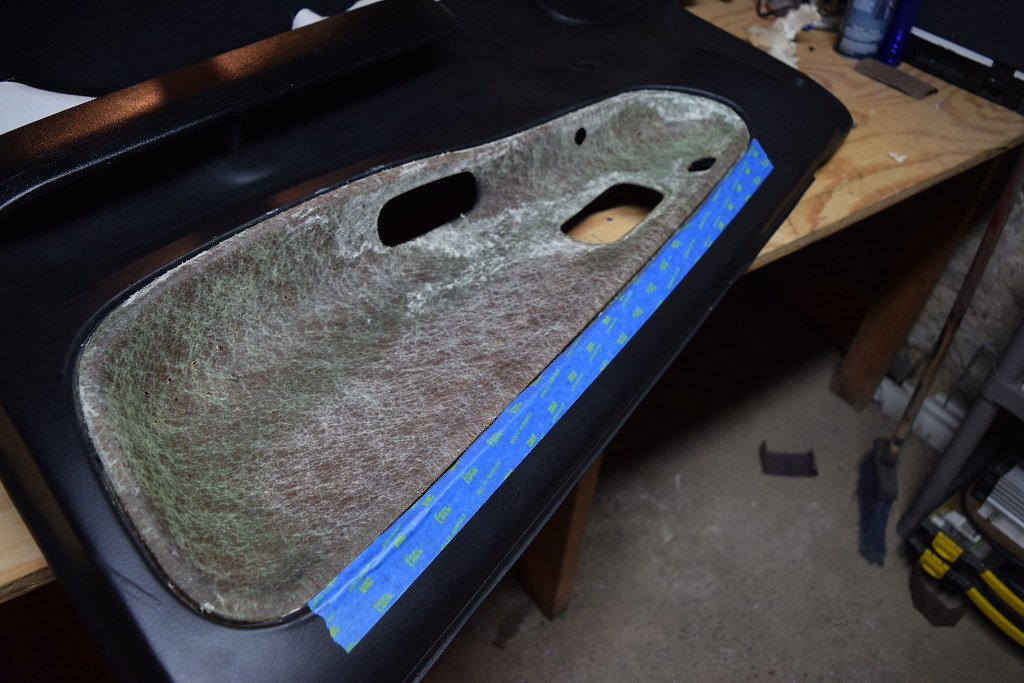 DSC_0100 by super_ok_s13, on Flickr DSC_0100 by super_ok_s13, on FlickrI cut up some plastic on account of overspray. 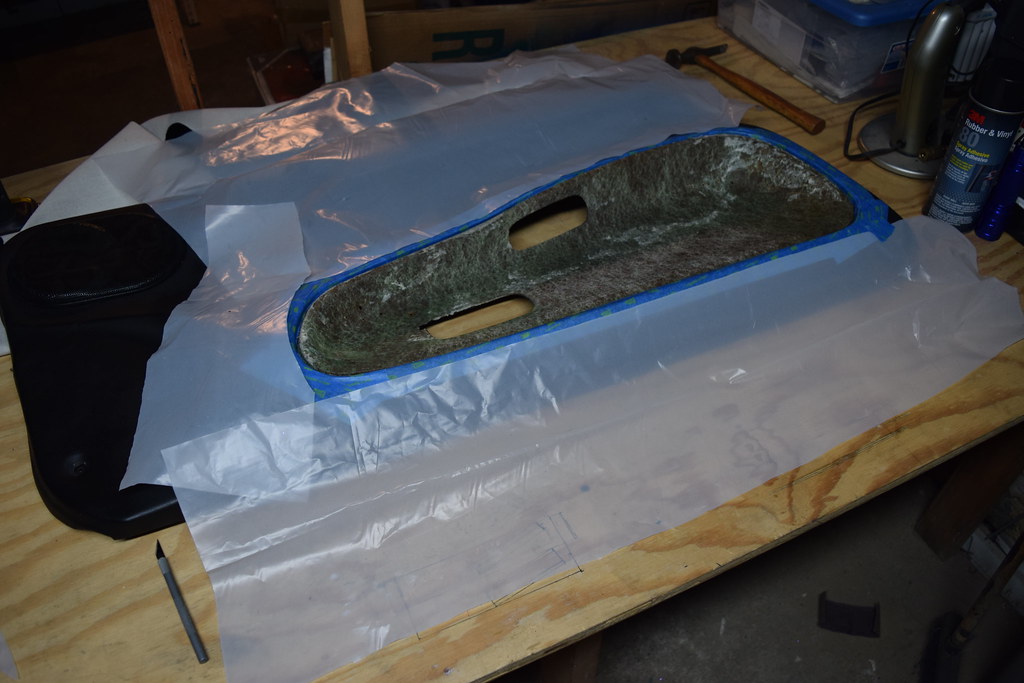 DSC_0102 by super_ok_s13, on Flickr DSC_0102 by super_ok_s13, on FlickrI sprayed under the top section and let it setup for a bit and finished taping the plastic..  DSC_0104 by super_ok_s13, on Flickr DSC_0104 by super_ok_s13, on Flickrtrimmed the fabric a little bit extra to tuck into the groove. 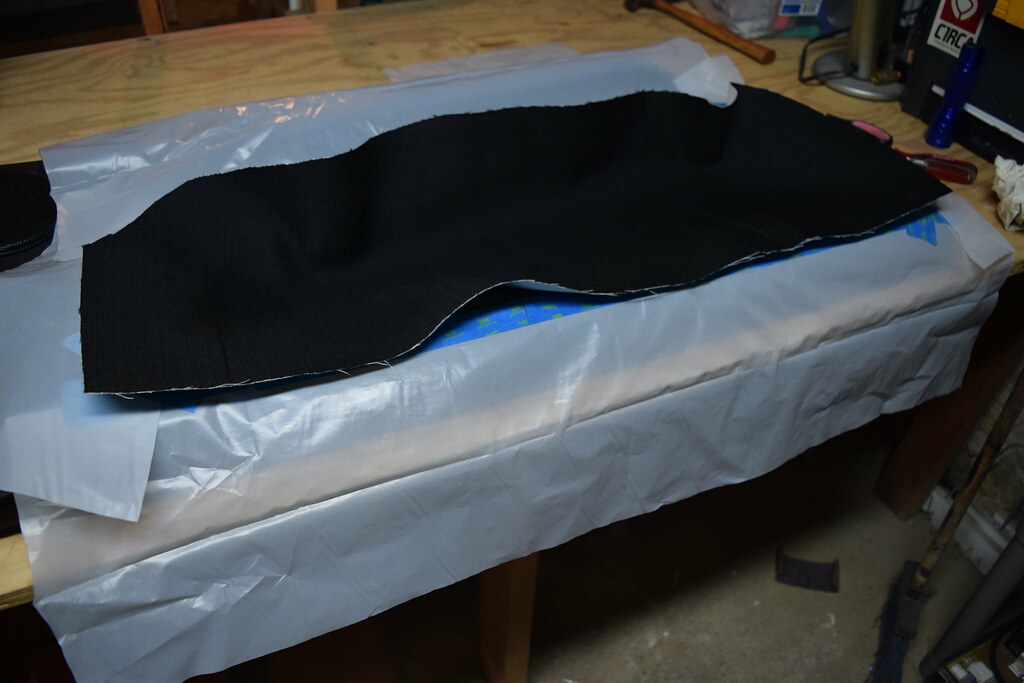 DSC_0107 by super_ok_s13, on Flickr DSC_0107 by super_ok_s13, on Flickrthis is the spray glue I chose, as it says its good for head liners. I guess that means it should be ok for a little heat.. 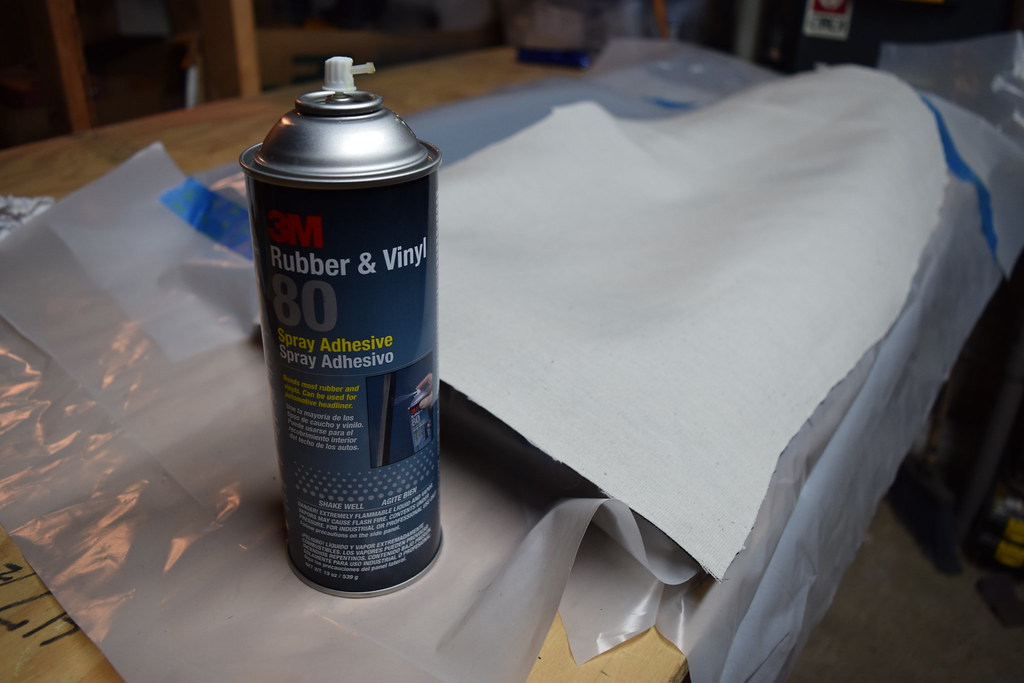 DSC_0109 by super_ok_s13, on Flickr DSC_0109 by super_ok_s13, on Flickrspray both the shell and the back side of the fabric and let it setup for a couple minutes.  DSC_0112 by super_ok_s13, on Flickr DSC_0112 by super_ok_s13, on Flickr DSC_0113 by super_ok_s13, on Flickr DSC_0113 by super_ok_s13, on Flickrnext I laid the fabric on and pressed the fabric into the contours with the back of the screwdriver and tucked it into the groove as tight as I could with the tip. 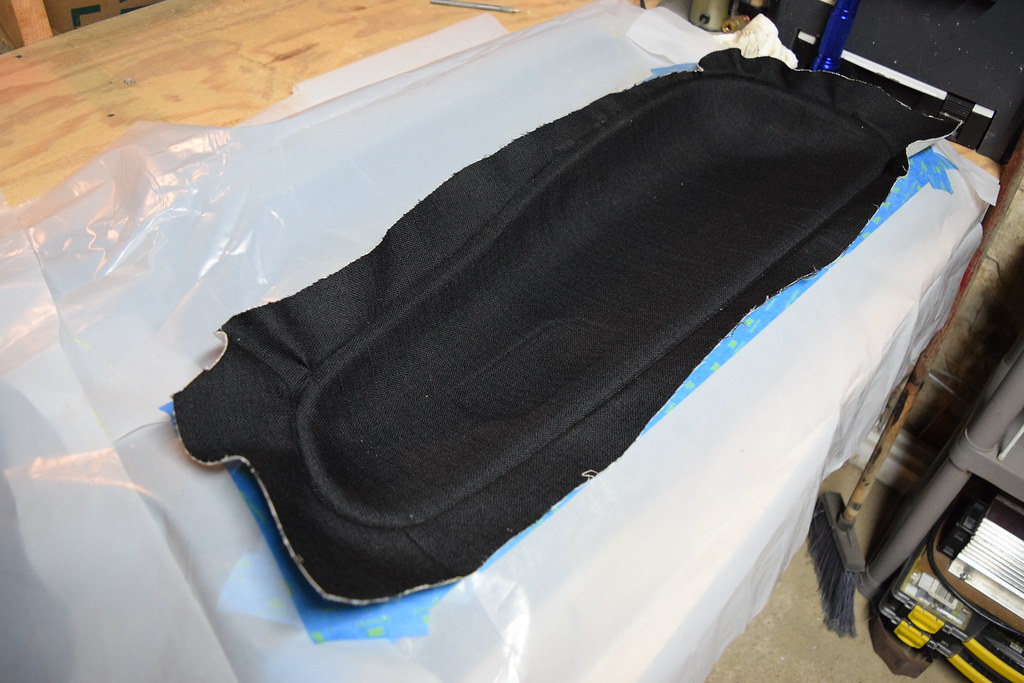 DSC_0108 by super_ok_s13, on Flickr DSC_0108 by super_ok_s13, on Flickrafter its all tucked in I started on the other panel to let the glue cure. once I got done with the second panel I started cutting the excess fabric off with the exact-o knife.  DSC_0118 by super_ok_s13, on Flickr DSC_0118 by super_ok_s13, on Flickr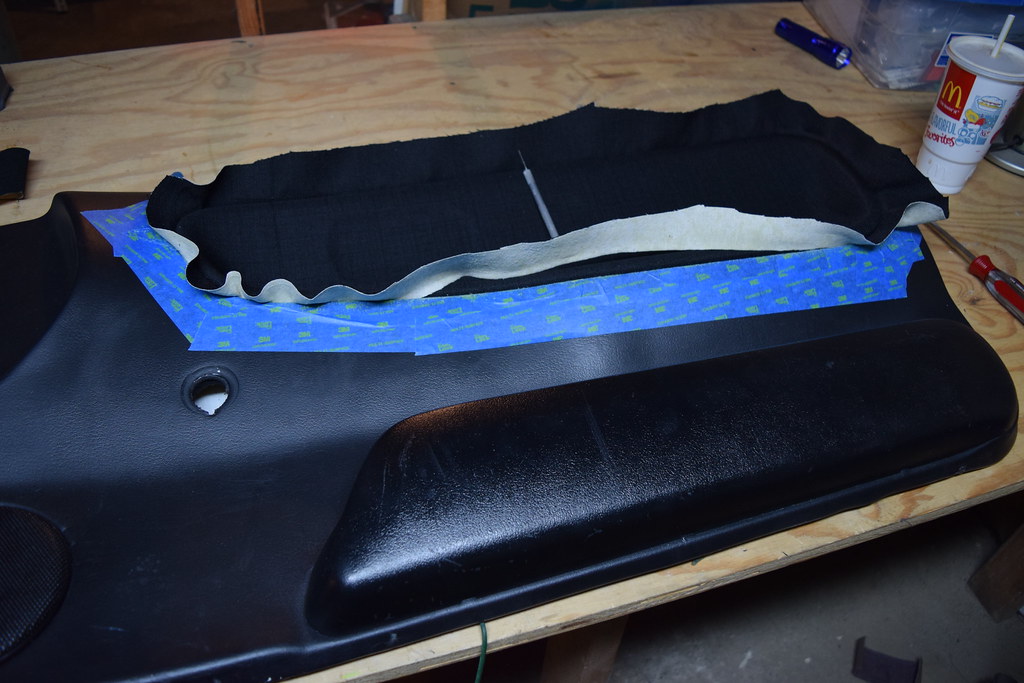 DSC_0116 by super_ok_s13, on Flickr DSC_0116 by super_ok_s13, on Flickr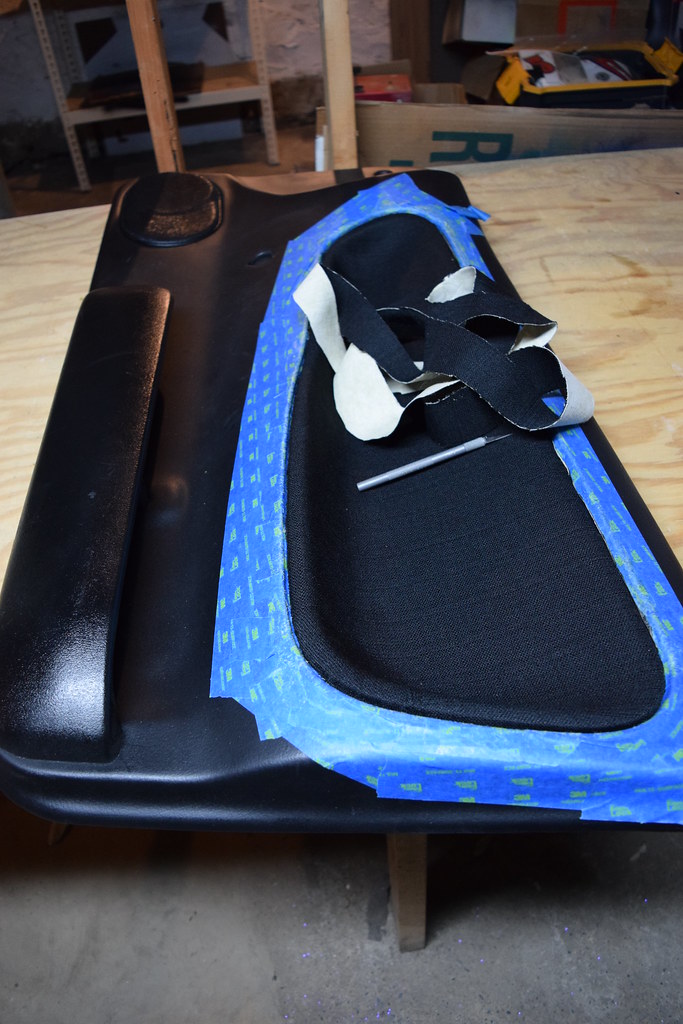 DSC_0120 by super_ok_s13, on Flickr DSC_0120 by super_ok_s13, on Flickras you cut I recommend tucking the fabric also. it will hide the edge of the fabric.  DSC_0121 by super_ok_s13, on Flickr DSC_0121 by super_ok_s13, on Flickrhere you can kinda see the back of the fabric. 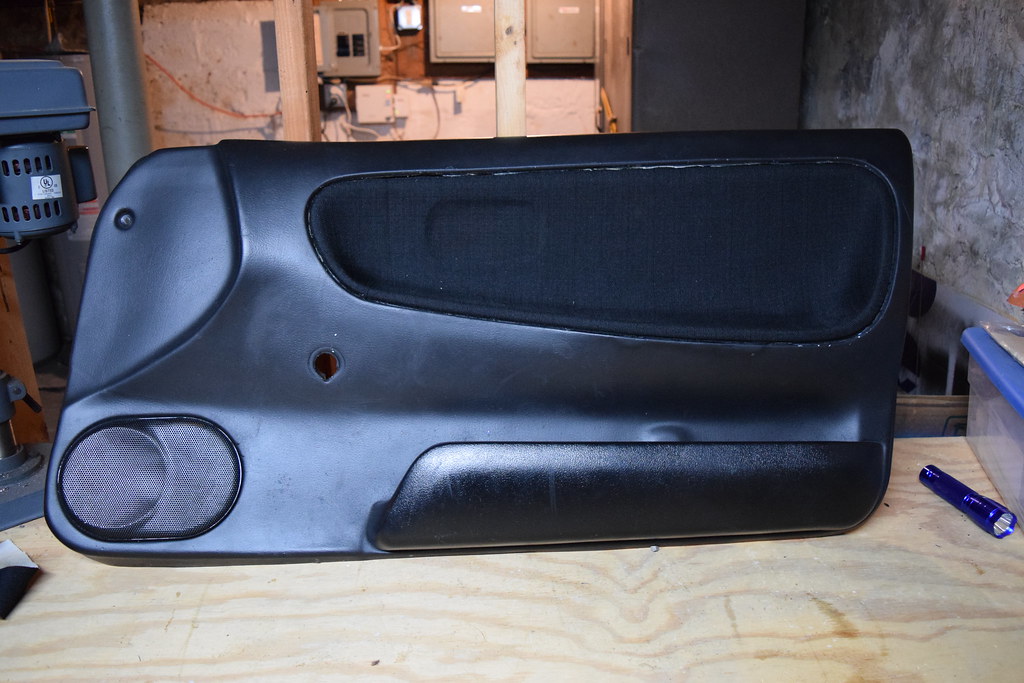 DSC_0122 by super_ok_s13, on Flickr DSC_0122 by super_ok_s13, on Flickrsince most of the fabric/craft stores in my area have idiots working at them they didn't know what the black plastic vinyl piping was and I couldn't find it myself, sooooo. I found that black Para-cord worked, so that's what I stuffed into the groove to hide the edges of the fabric. no glue was used in doing this, just stuff it in there.  DSC_0135 by super_ok_s13, on Flickr DSC_0135 by super_ok_s13, on Flickr DSC_0133 by super_ok_s13, on Flickr DSC_0133 by super_ok_s13, on Flickr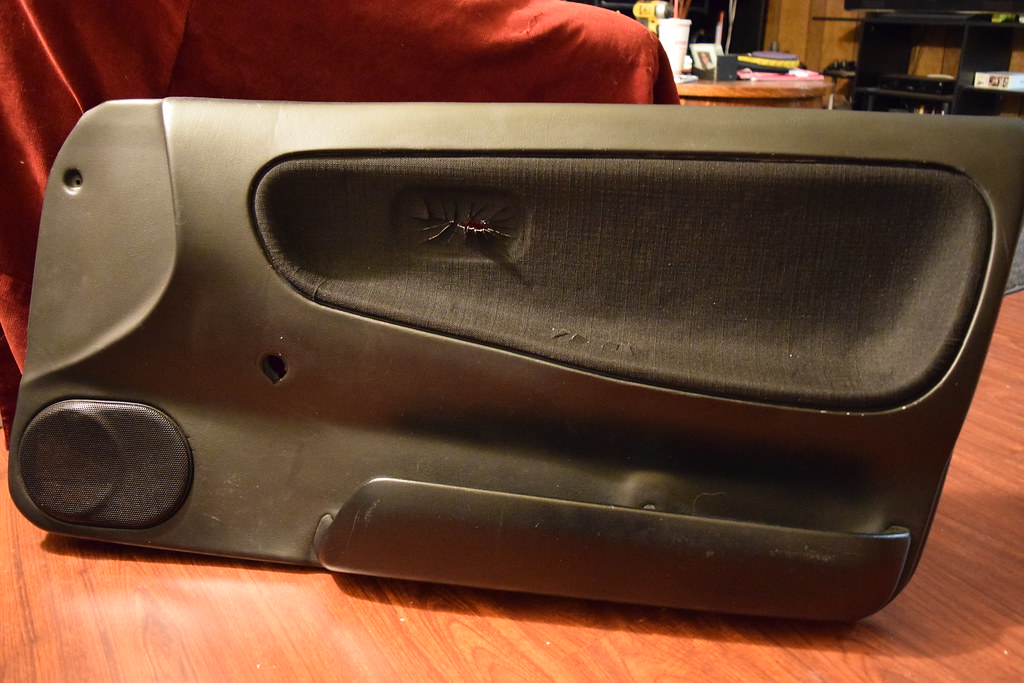 DSC_0137 by super_ok_s13, on Flickr DSC_0137 by super_ok_s13, on FlickrI ended up using leftover fabric to make a shift boot.. had to hand sew it since we don't have a machine and my sister wasn't home to do it with hers.  DSC_0080 by super_ok_s13, on Flickr DSC_0080 by super_ok_s13, on Flickr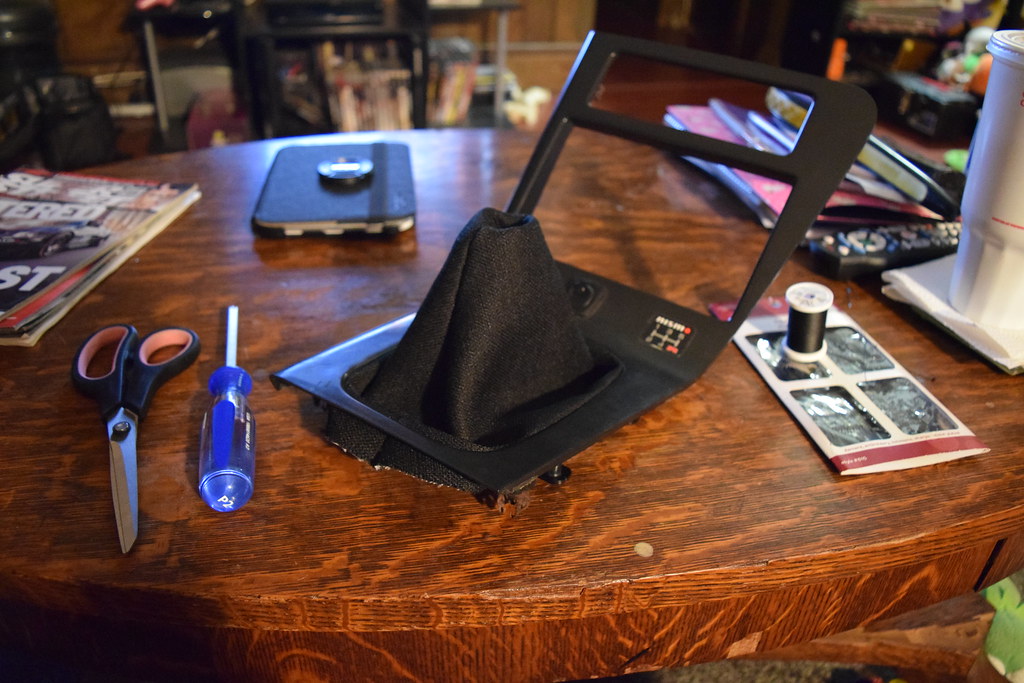 DSC_0082 by super_ok_s13, on Flickr DSC_0082 by super_ok_s13, on Flickr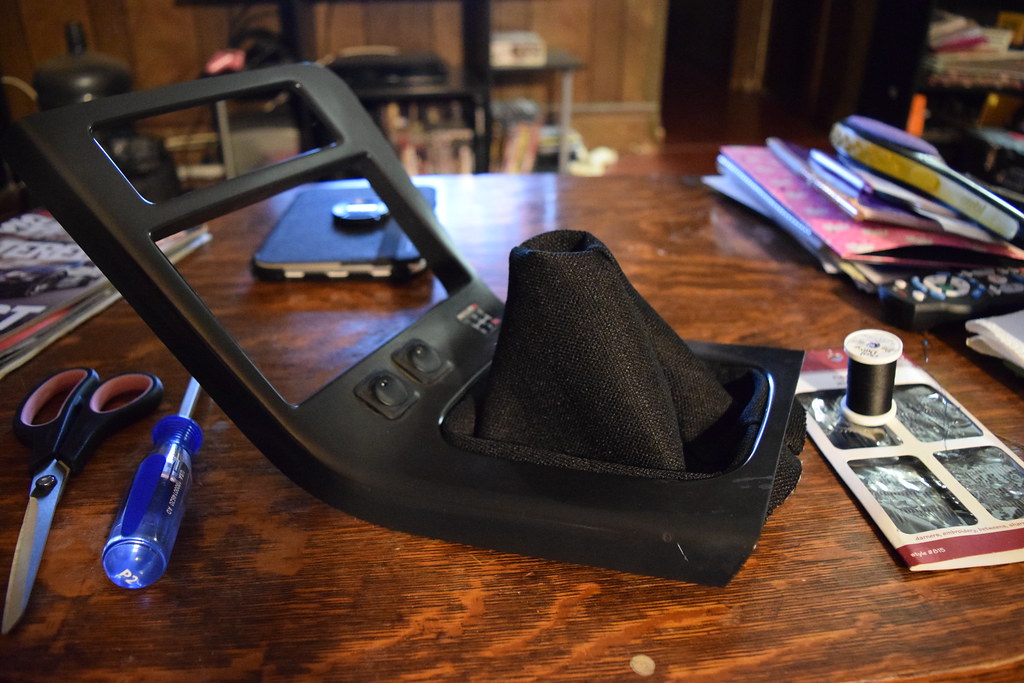 DSC_0085 by super_ok_s13, on Flickr DSC_0085 by super_ok_s13, on FlickrI don't have much on the glovebox but the same concept applies as far as taking the old stuff off, making sure to cut the piece is big enough to wrap around to the backside. it also needs notched and cut around the lock/handle holes carefully.  DSC_0086 by super_ok_s13, on Flickr DSC_0086 by super_ok_s13, on Flickr DSC_0087 by super_ok_s13, on Flickr DSC_0087 by super_ok_s13, on Flickrafter the interior was all but done I started on some of the engine bay parts, cleaning them up for paint. 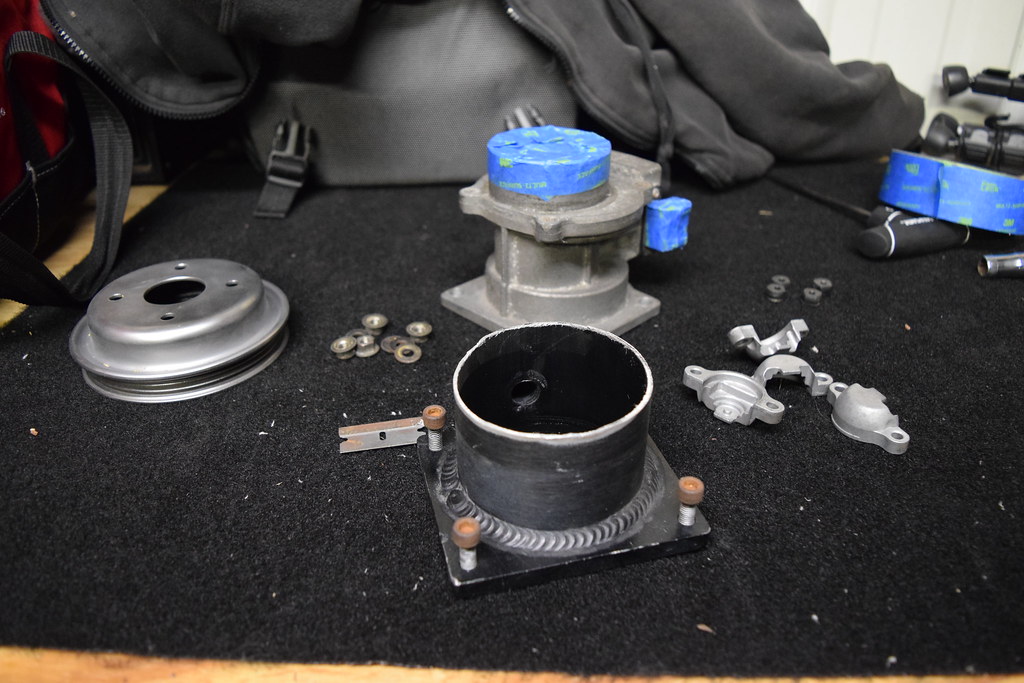 DSC_0089 by super_ok_s13, on Flickr DSC_0089 by super_ok_s13, on Flickrobiously not the maf but the other parts were glass beaded before new paint... 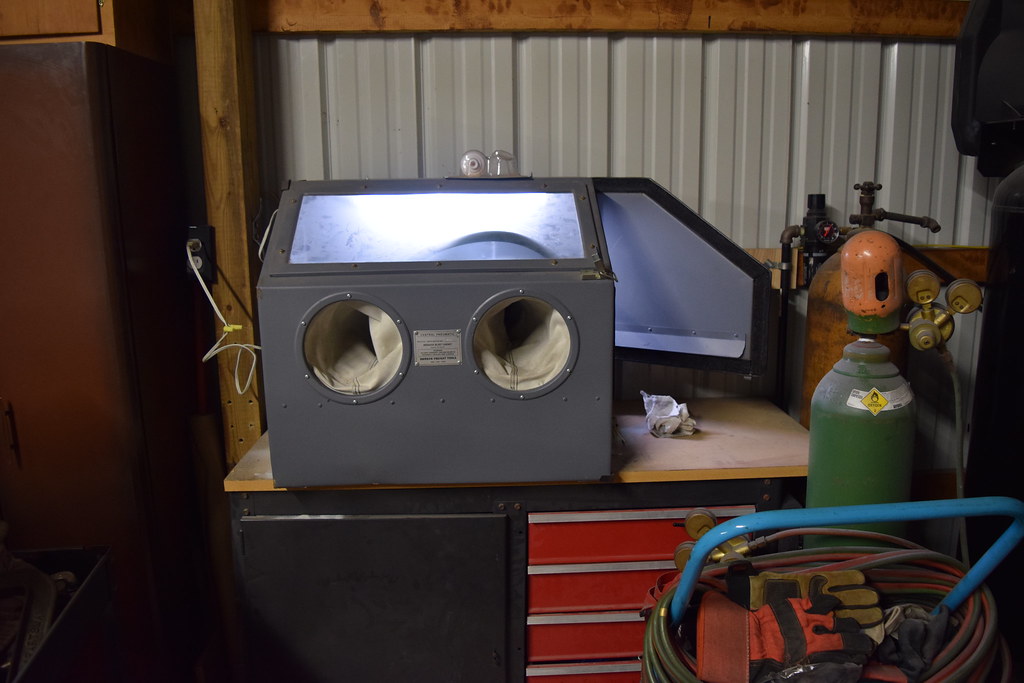 DSC_0098 by super_ok_s13, on Flickr DSC_0098 by super_ok_s13, on FlickrBought a couple cool stickers for my garage door =)  CSC_0071 by super_ok_s13, on Flickr CSC_0071 by super_ok_s13, on Flickr CSC_0073 by super_ok_s13, on Flickr CSC_0073 by super_ok_s13, on FlickrI decided it was time to add some color to the engine bay and started with the valve cover as there was waaay to much black and silver. it just looked monotonous and plain.. I will post later tonight with the rest of the update... Last edited by Super_OK_S13; 10-27-2015 at 10:00 AM.. |
|
|
|
|
02-03-2015, 04:27 PM
|
#59 |
|
Zilvia Junkie
Join Date: Feb 2008
Location: Carry Water, Chop Wood
Age: 36
Posts: 507
Trader Rating: (0)
Feedback Score: 0 reviews
|
OBEEWON- I've never been to the TST meet unless you are talking about the mount joy sonic meet, but you saw it at the Pennstate Harrisburg car show one year, when I went with Jesse Bretz and his two-tone coupe. But I think it was white/grey not this color. That was when you had the maroon SC and yellow wheels(?) I don't think I'm on the TST forum. If there is another misty blue metallic two tone coupe around here I'm gonna shit...... haha
|
|
|
|
|
02-04-2015, 01:03 PM
|
#60 |
|
Zilvia Junkie
Join Date: Feb 2008
Location: Carry Water, Chop Wood
Age: 36
Posts: 507
Trader Rating: (0)
Feedback Score: 0 reviews
|
I wanted metal flake in Purple, but I cant afford a 200$ jar of House of Kolor flake. So being DIY everything, I looked for other ways to achieve the look of metal flake on a decent budget, not dollar store cheap...
I started by stripping the valve cover, scuff pad, and cleaning it with acetone before spraying high temp primer, then high temp gloss black.  DSC_0008 by super_ok_s13, on Flickr DSC_0008 by super_ok_s13, on FlickrI did some test pieces on some scrap, and it seemed to hold up..  DSC_0011 by super_ok_s13, on Flickr DSC_0011 by super_ok_s13, on FlickrAfter the black was laid down I used a high temp clear to give the glitter something to hold to. 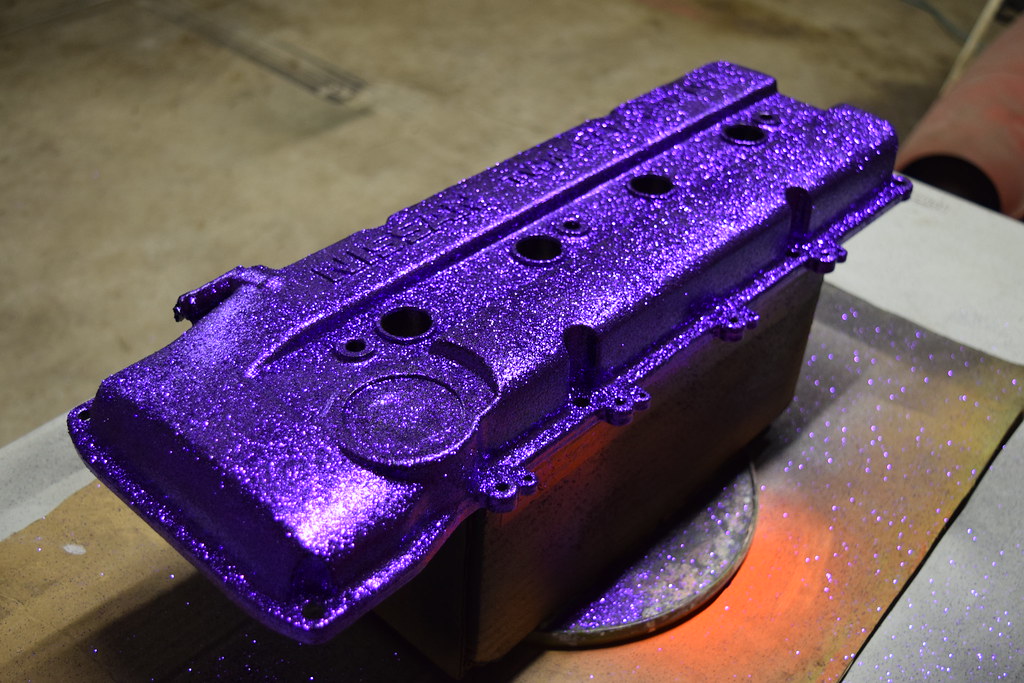 DSC_0013 by super_ok_s13, on FlickrDSC_0013 by super_ok_s13, on Flickr DSC_0013 by super_ok_s13, on FlickrDSC_0013 by super_ok_s13, on Flickr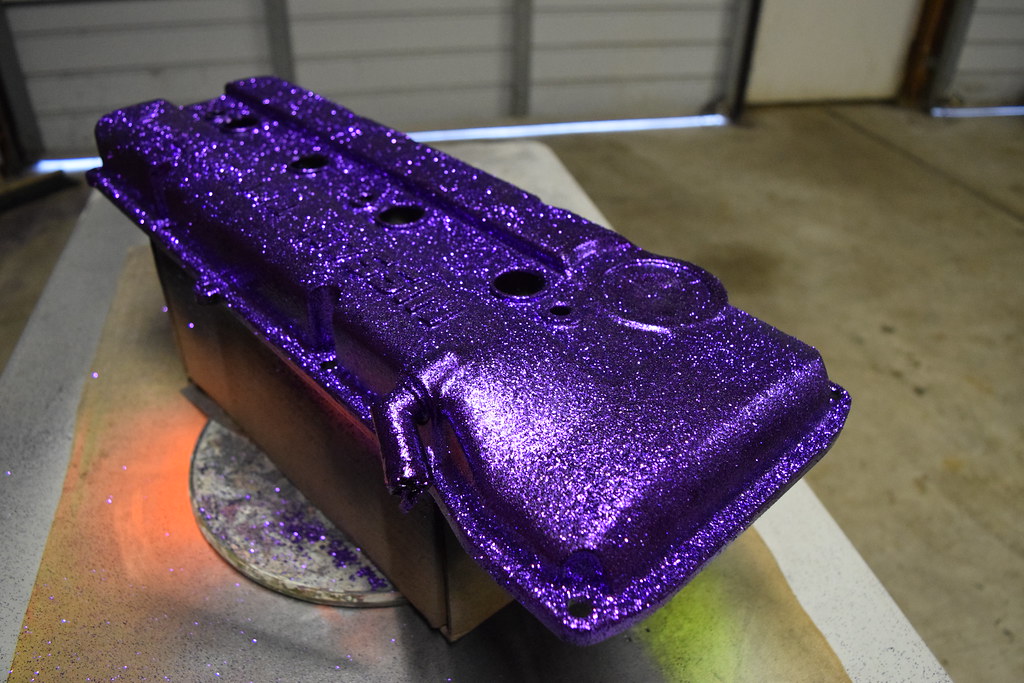 DSC_0028 by super_ok_s13, on Flickr DSC_0028 by super_ok_s13, on FlickrI also thought that the valve cover wasn't enough and did the strut bar ends. 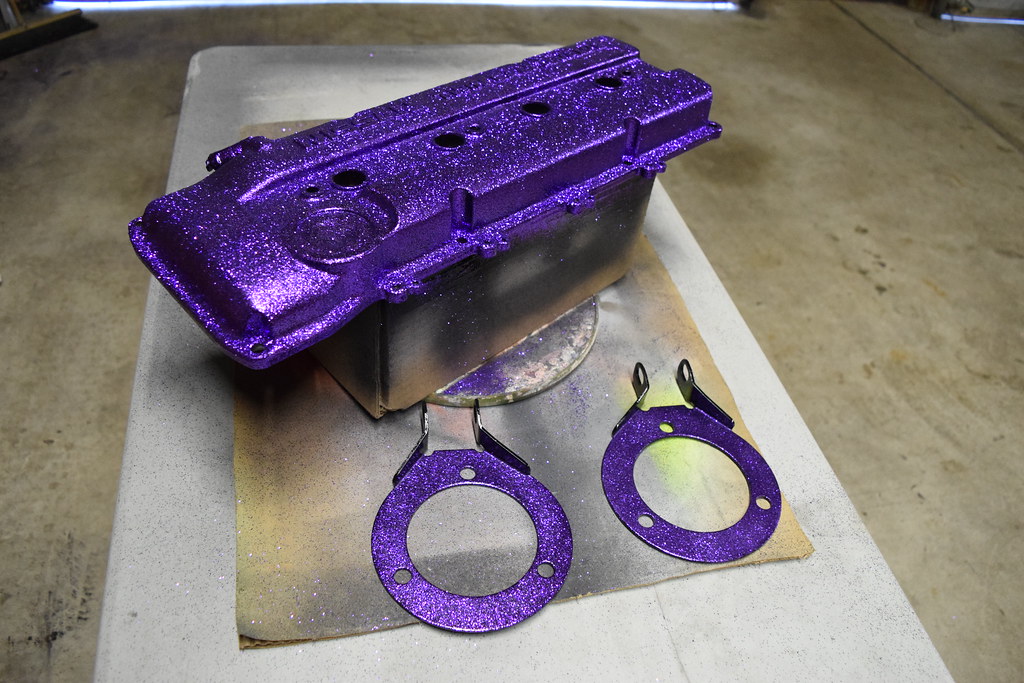 DSC_0034 by super_ok_s13, on Flickr DSC_0034 by super_ok_s13, on FlickrThis is after sanding the letters and the 1st of 2 cans of Spraymax 2k high gloss clear, I used 2 cans to burry the flake/glitter. 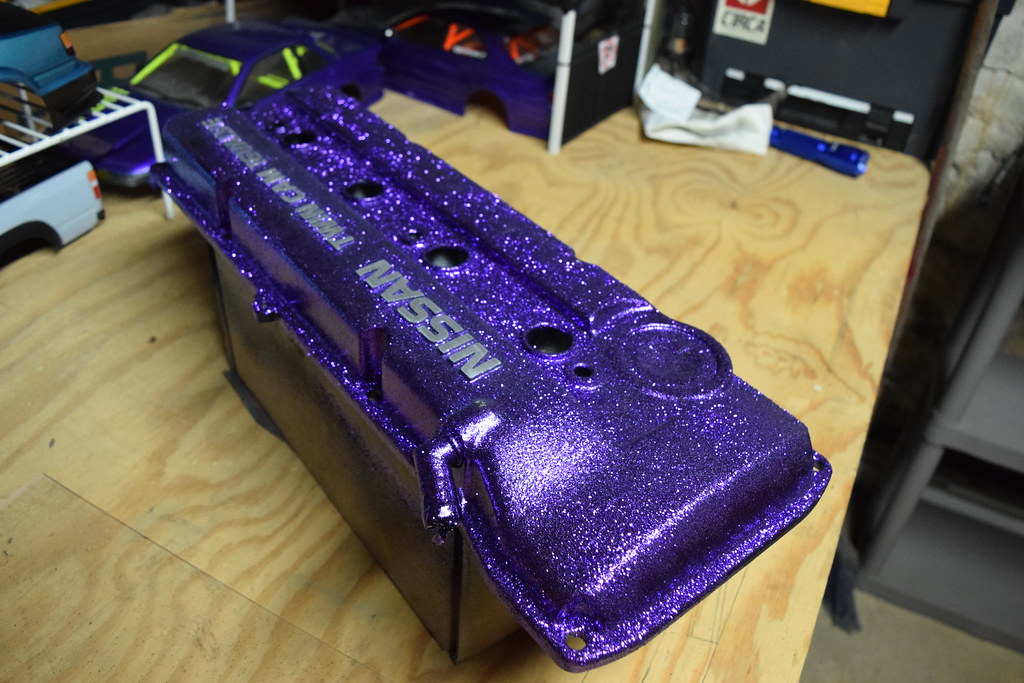 DSC_0019 by super_ok_s13, on Flickr DSC_0019 by super_ok_s13, on FlickrSince I had some of the bay apart to freshen up I decided I needed a new header since the pace-setter warped somehow and was rubbing on the steering u-joint. so I set out to find an s14 tube style and bought a megan racing s14 downpipe. took the old header off and up on the bench. 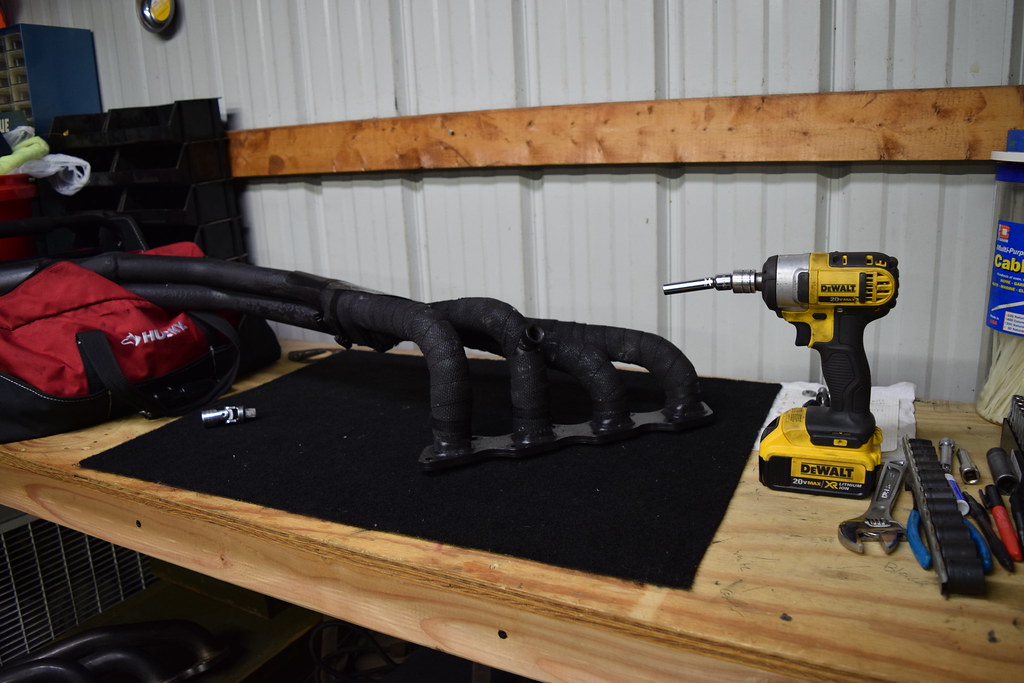 DSC_0179 by super_ok_s13, on Flickr DSC_0179 by super_ok_s13, on Flickr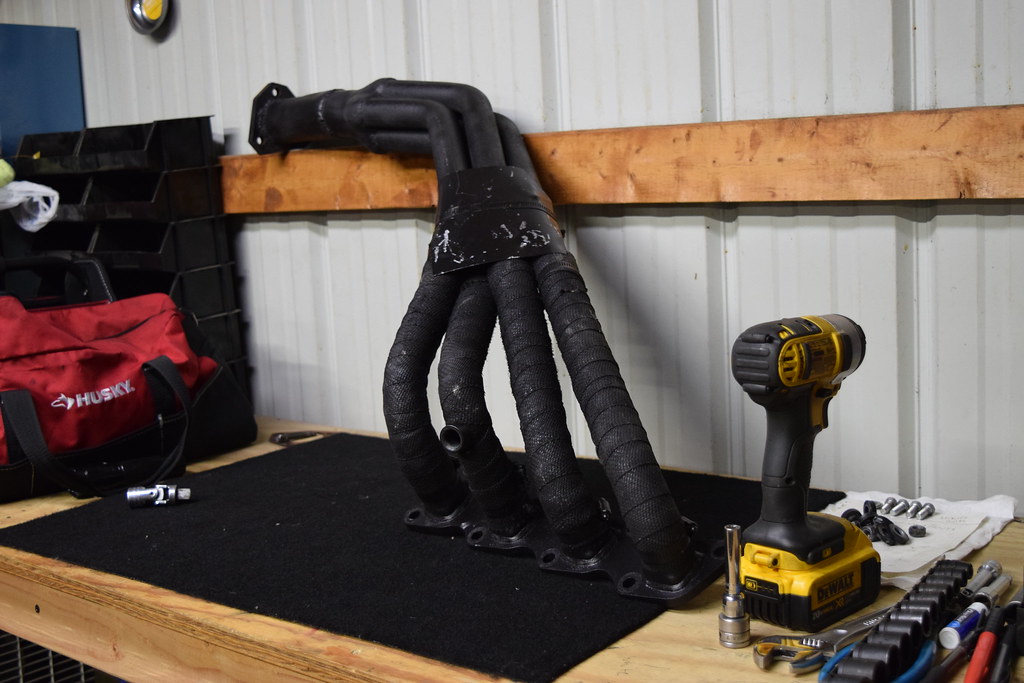 DSC_0181 by super_ok_s13, on Flickr DSC_0181 by super_ok_s13, on Flickrstarted by unwrapping the old one to re-use the wrap on the new one.  DSC_0182 by super_ok_s13, on Flickr DSC_0182 by super_ok_s13, on Flickr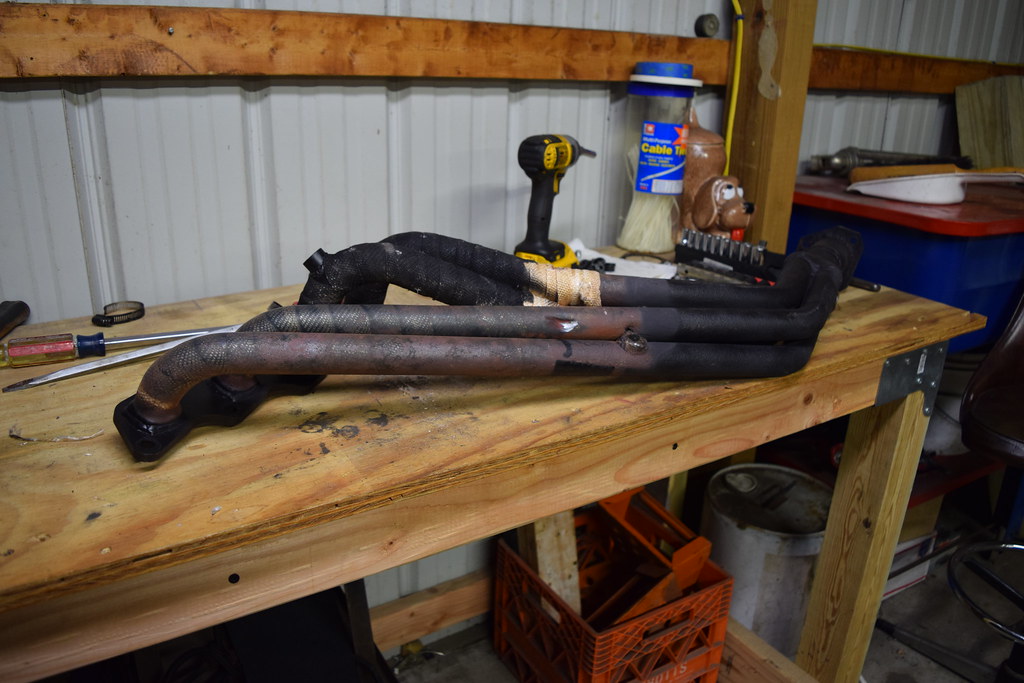 DSC_0184 by super_ok_s13, on Flickr DSC_0184 by super_ok_s13, on FlickrI got this off of another 240 friend who went turbo and scored it for an awesome price!!! 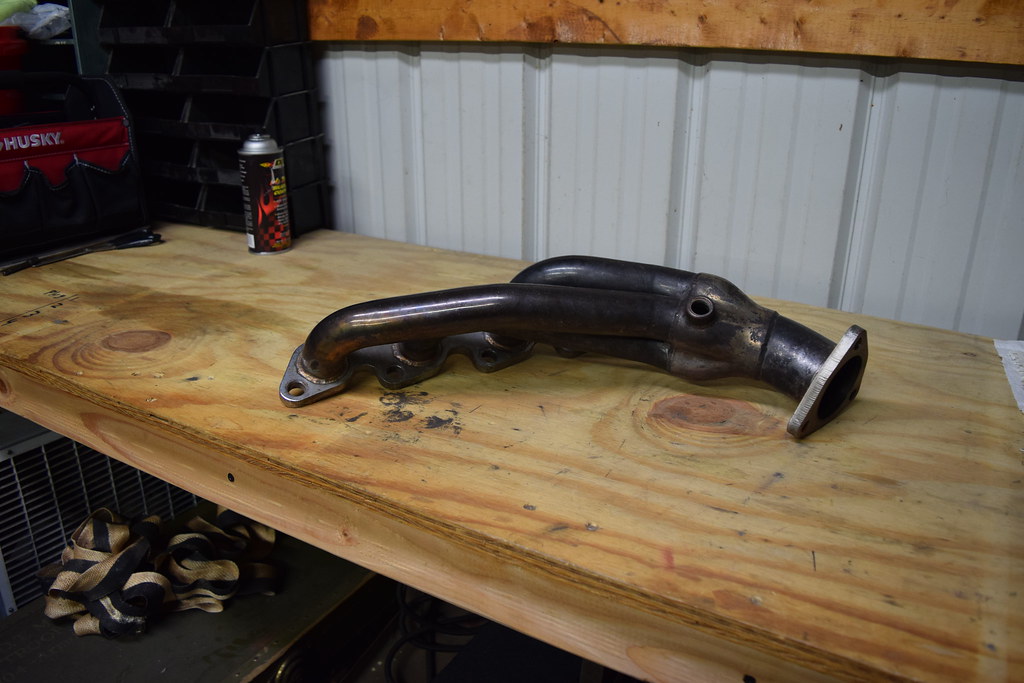 DSC_0186 by super_ok_s13, on Flickr DSC_0186 by super_ok_s13, on Flickr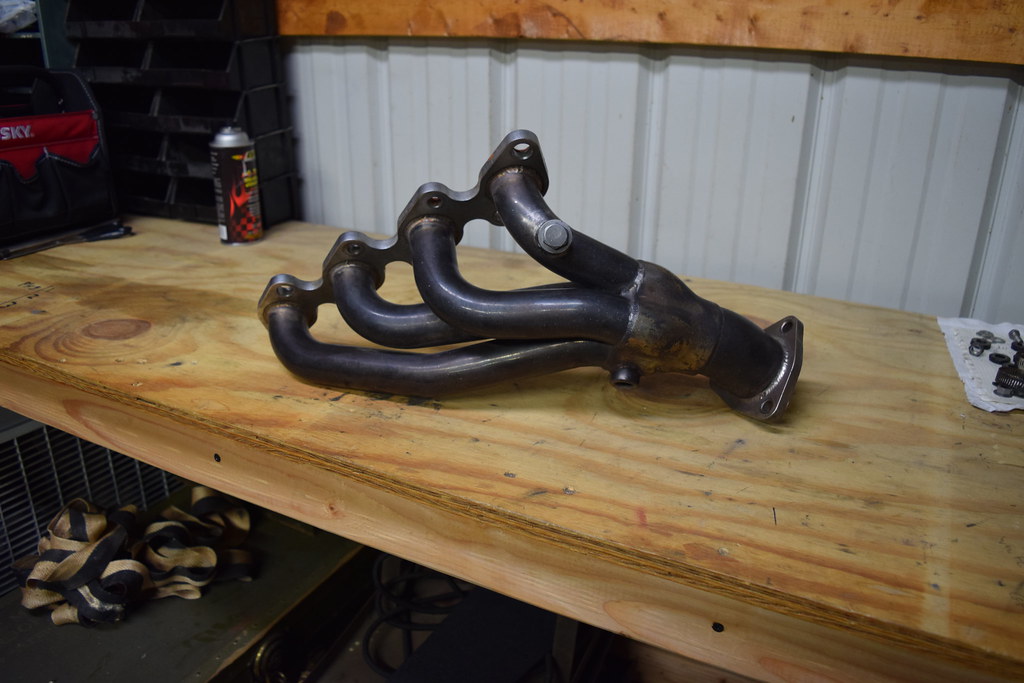 DSC_0187 by super_ok_s13, on Flickr DSC_0187 by super_ok_s13, on Flickrafter getting all the other wrap off I flipped the wrap over and went to town on the new one..  DSC_0189 by super_ok_s13, on Flickr DSC_0189 by super_ok_s13, on Flickr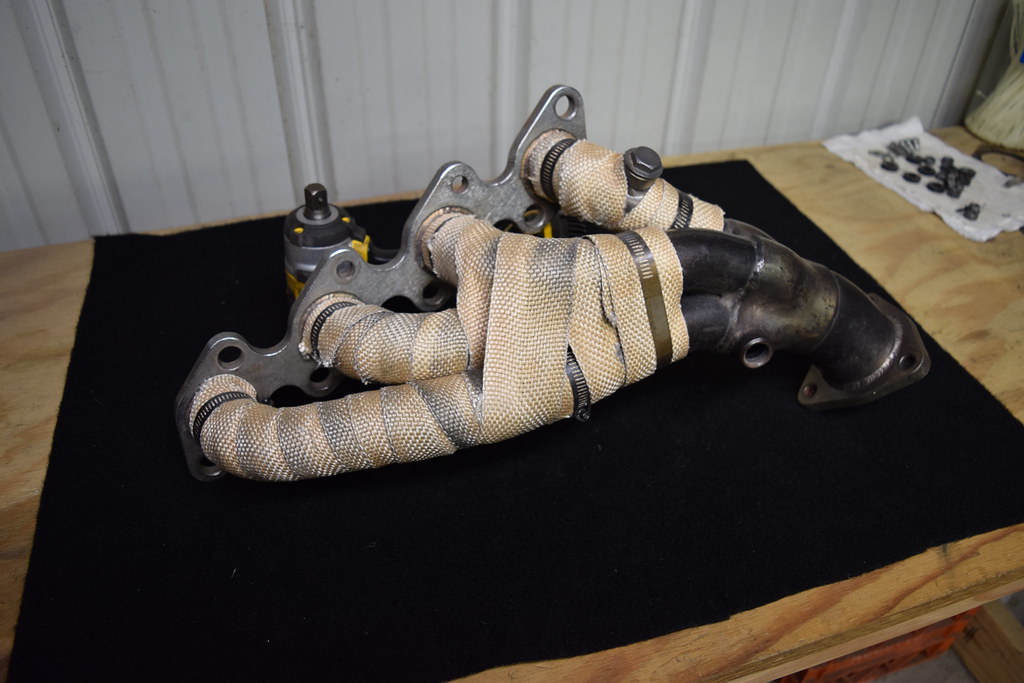 DSC_0190 by super_ok_s13, on Flickr DSC_0190 by super_ok_s13, on Flickr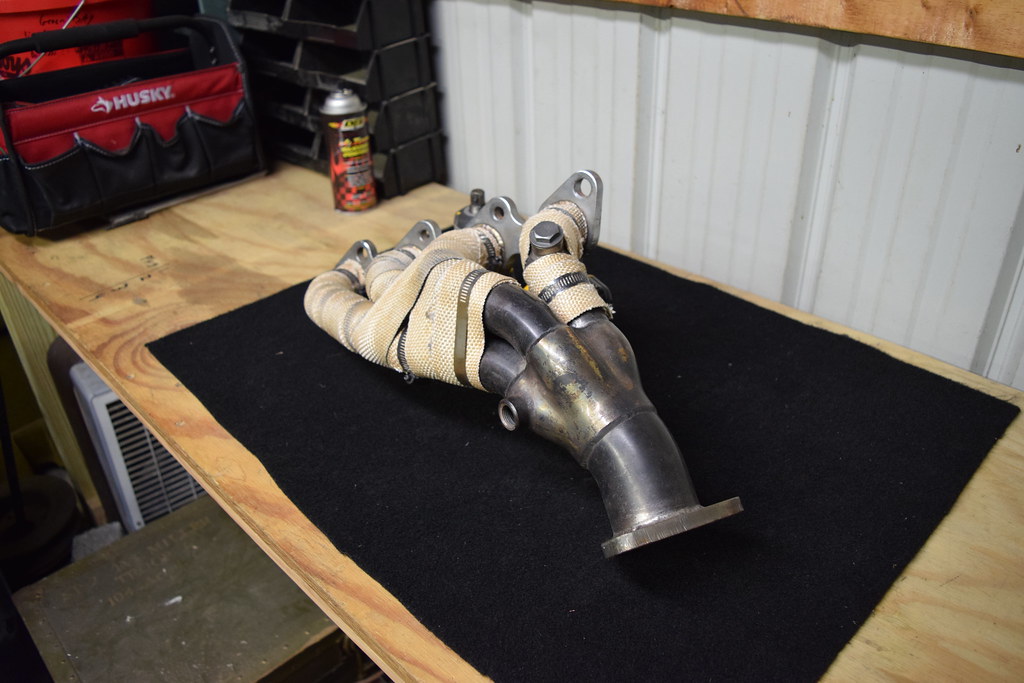 DSC_0191 by super_ok_s13, on Flickr DSC_0191 by super_ok_s13, on Flickrnext thing I had to do was spray it with the high heat silicone spray. 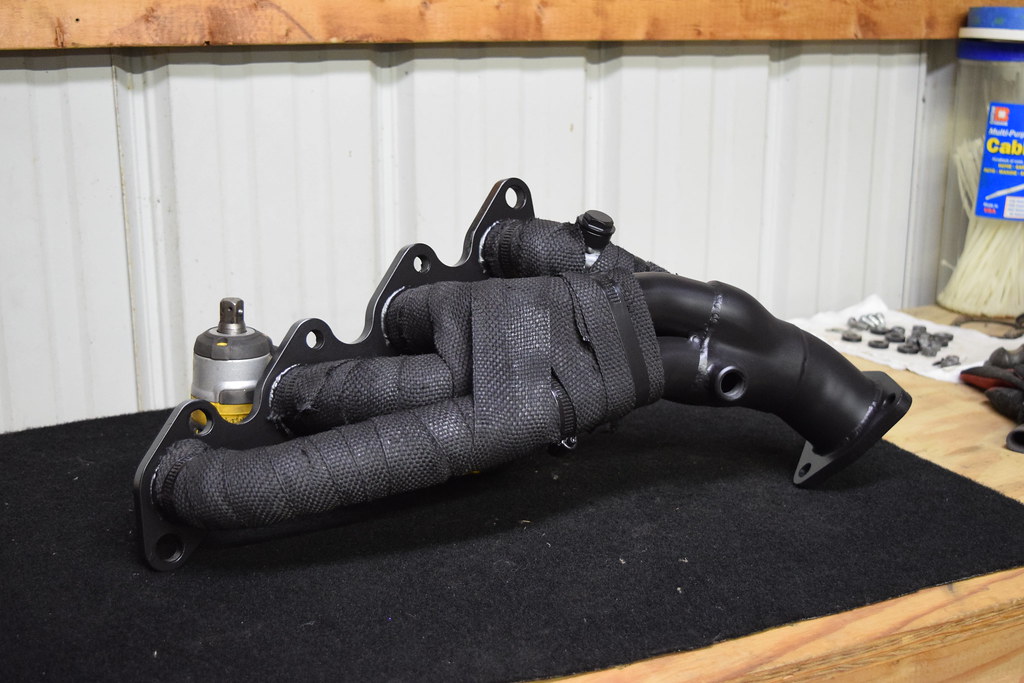 DSC_0203 by super_ok_s13, on Flickr DSC_0203 by super_ok_s13, on Flickr DSC_0200 by super_ok_s13, on Flickr DSC_0200 by super_ok_s13, on Flickr DSC_0204 by super_ok_s13, on Flickr DSC_0204 by super_ok_s13, on Flickrafter that I decided it was time to re-do the brake booster since the master cylinder was leaking only after a year of it being on.  DSC_0195 by super_ok_s13, on Flickr DSC_0195 by super_ok_s13, on Flickr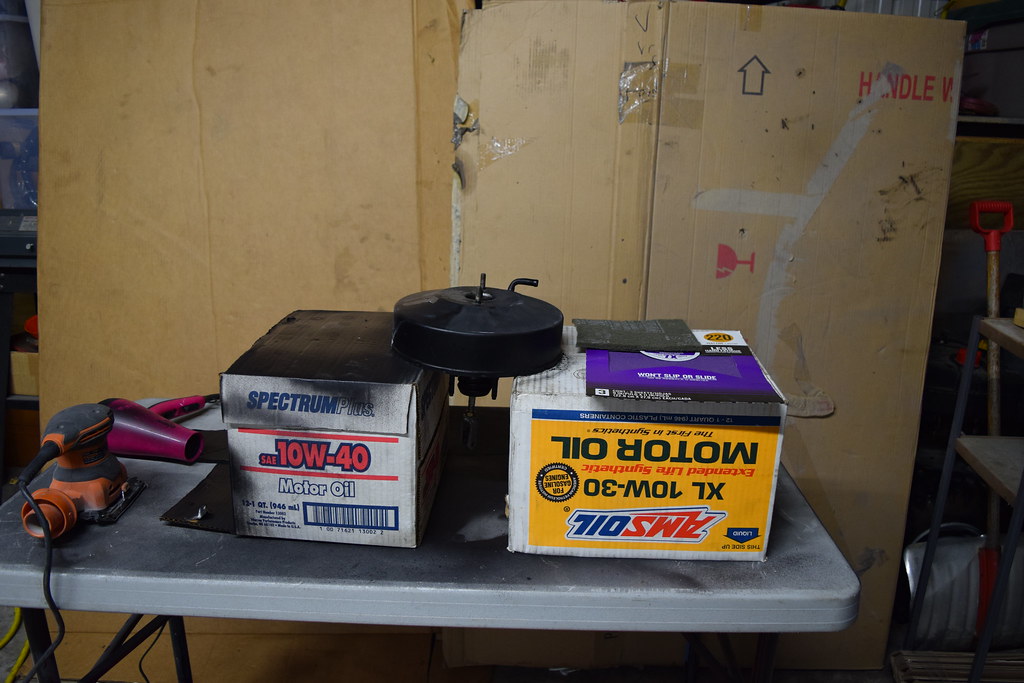 DSC_0192 by super_ok_s13, on Flickr DSC_0192 by super_ok_s13, on Flickrinstead of being low/satin oem gloss black I went with a high gloss black. didn't think it would look good but it turned out ok against the rest of the bay. 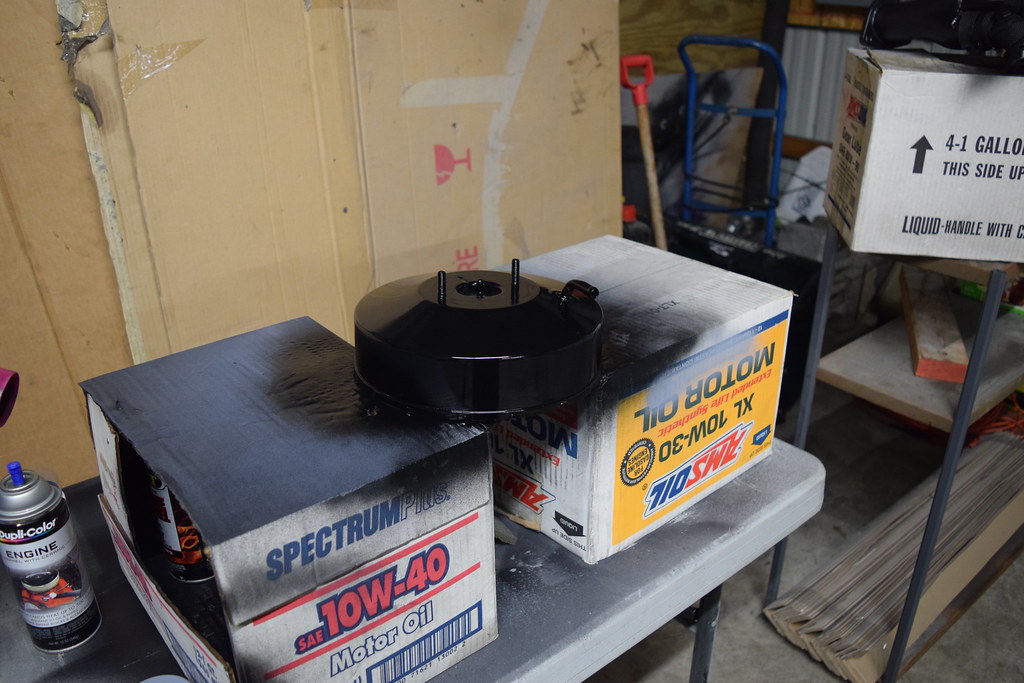 DSC_0196 by super_ok_s13, on Flickr DSC_0196 by super_ok_s13, on Flickr DSC_0199 by super_ok_s13, on Flickr DSC_0199 by super_ok_s13, on Flickrhere are some pictures of the bay from the other day I was cleaning out the garage..  DSC_0235 by super_ok_s13, on Flickr DSC_0235 by super_ok_s13, on Flickr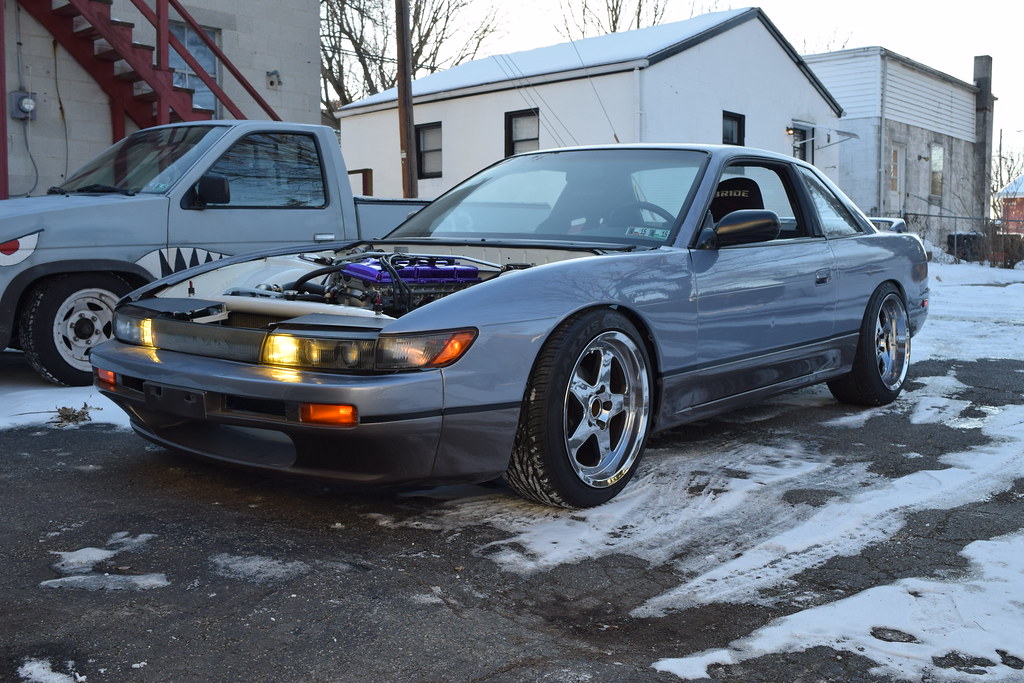 DSC_0241 by super_ok_s13, on Flickr DSC_0241 by super_ok_s13, on Flickr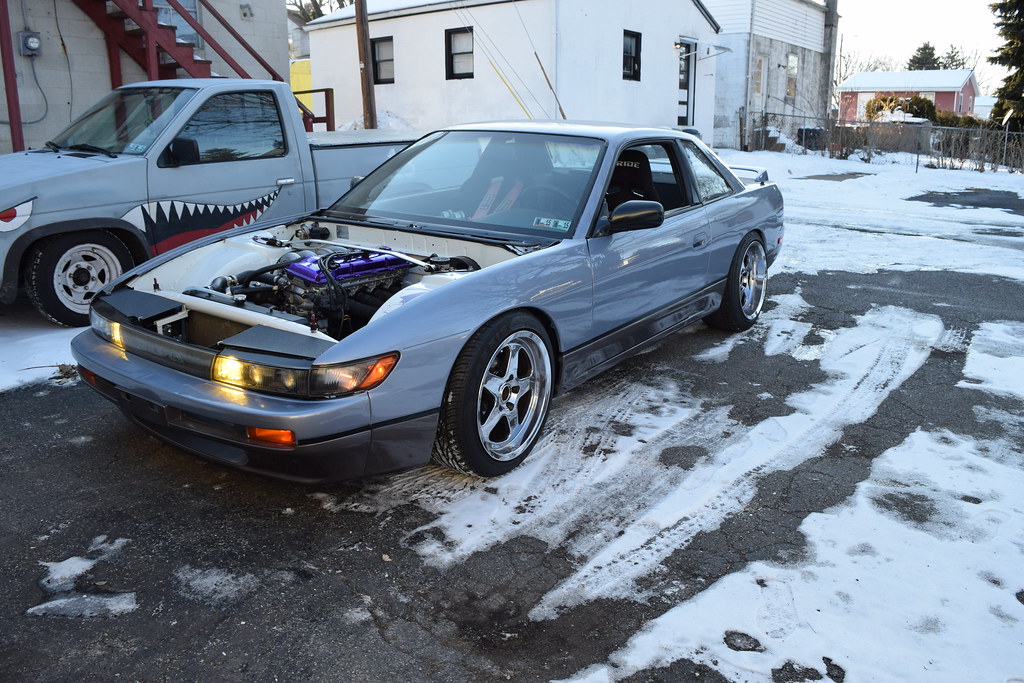 DSC_0240 by super_ok_s13, on Flickr DSC_0240 by super_ok_s13, on Flickr DSC_0238 by super_ok_s13, on Flickr DSC_0238 by super_ok_s13, on Flickr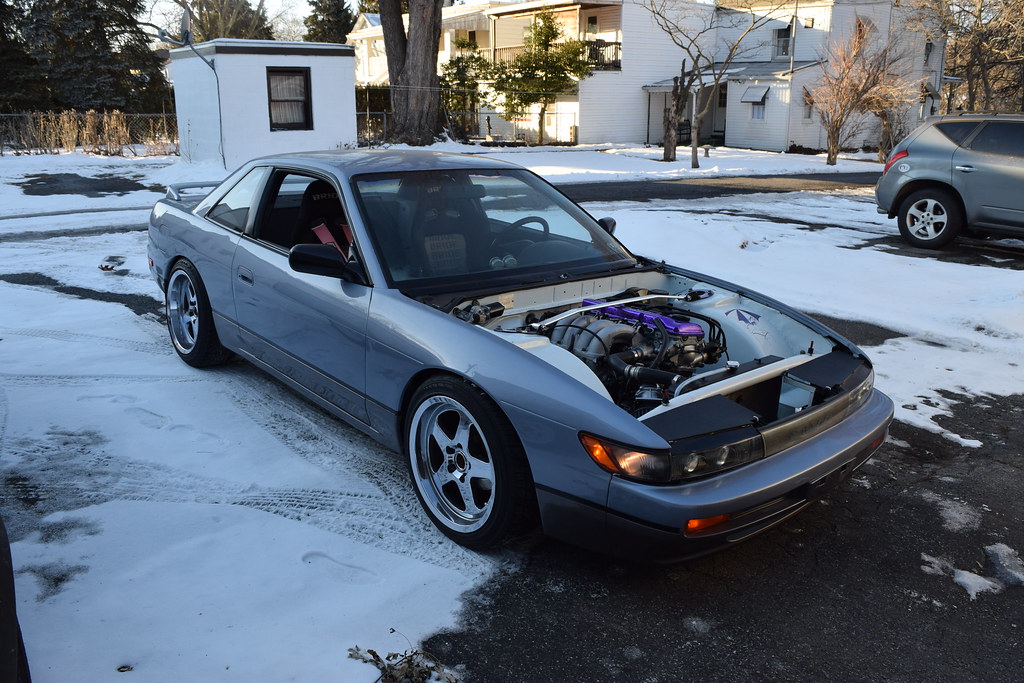 DSC_0231 by super_ok_s13, on Flickr DSC_0231 by super_ok_s13, on Flickr DSC_0232 by super_ok_s13, on Flickr DSC_0232 by super_ok_s13, on Flickri need to get stainless cap screws to replace the front cover bolts on the engine. that will clean it up some for sure. also need to do something with the grille inserts beside the turn signals. mine are broken. i have an idea but haven't had time to make them yet. |
|
|
|
|
| Bookmarks |
| Thread Tools | |
| Display Modes | |
|
|


 Linear Mode

