|
|||||||
| Tech Talk Technical Discussion About The Nissan 240SX and Nissan Z Cars |
 |
|
|
Thread Tools | Display Modes |
 02-17-2008, 03:36 AM
|
#1 |
|
Zilvia Addict
 Join Date: Jul 2004
Location: Northern NJ
Age: 40
Posts: 991
Trader Rating: (3)
  Feedback Score: 3 reviews
   |
How to: repair S14 hvac that doesn't light up
So I finally got tired of my S14 hvac that doesn't light up properly / lights up whenever it feels like it. This seems to be a problem with many 90's nissans. Both my S14s have had this issue and so did my G20. This guide may apply to other cars, but it is specifically for the S14.
Some people will find replacement bulbs, throw them in there and hope for the best. I have read up on this and seen mixed results with this process. I believe there is some kind of failure within the circuit board itself in many cases and the bulb is not the culprit. For this reason, I decided to wire in my own LEDs and power them independently of the circuit board. This way I could be sure they would always get the power they need. The results weren't as good as I would have liked and I will use this knowledge to try this process again when i get time. I will update the guide when I get better results.   Materials Used:
NOTE: not covered in this guide is disassembly and assembly of the hvac. I will take pictures next time I do it. Carefully analyze the HVAC and undo all visible screws / tabs (pawls?) that you can see. With some fiddling it should easily come apart. Remember or write down how you took it apart, I didn't do this and broke some stuff putting it back together - so be careful. I'm not responsible if you destroy your hvac in this process. Step 1  Solder the resistors to the positive leads on the LEDs. The positive lead is the longer one. Step 2  Solder a positive wire to the other end of the resistor. Solder a negative wire to the negative LED lead. Cover exposed metal with heatshrink. note I ran out of the correct size heatshrink when doing this project, so I used stuff that's a little too big in places. You shouldn't do that. Step 3    Hot glue the LEDs to the where the 3 lights were previously. You will notice that 5mm LEDs fit perfectly in the holes. You can see the positions of the LEDs in the third picture. Please note that I ran the wiring in those pictures towards the top of the circuit board. That is WRONG as you will not have clearance if you run them like that. You should run them towards the bottom.   In the above pictures I have rerouted the wiring so that it will fit once I close everything back up. Step 4  Splice all the positive wires. Splice all the negative wires. Add some extra wire to these splices so you can route them to a power source in the car later. Cover splices with electrical tape or heatshrink.  Testing the LEDs Step 5 Install hvac, and run wiring. You can run the positive wire to a red/blue wire behind you dash. This is the interior lighting circuit. Black should run to a ground point. Here are some pictures of my install. As you can see LEDs don't deliver as even a light spread as normal bulbs. On version two I may replace the right bottom LED with a standard 5mm bulb and see how I can power it. The lighting in this section (slider / ac button) is very uneven. The blue/red for temperature doesn't look good either. I will also consider replacing the right top LED (all the air direction buttons) with a wide angle LED since it ALMOST lights up everything well but not quite. The left LED seems to work well (fan speed settings)  lighting at dusk  lighting at night Its fairly close to the intended effect, but not quite what I was looking for. I will try again soon. If anyone has any suggestions I'm open to listen. Stay tuned for v2 when I find a day that I'm bored and decide to work on the hvac again! Excuse any grammatical errors / typos as its 5:30 am and I haven't gone to bed yet. I should really go to sleep soon  |

|

|
| Sponsored Links |
|
10-14-2008, 07:16 PM
|
#2 |
|
Zilvia Addict
Join Date: Jul 2004
Location: Northern NJ
Age: 40
Posts: 991
Trader Rating: (3)
Feedback Score: 3 reviews
|
Whoa, I forgot I made this thread... found it by accident while searching for something else.
Update from a post I made on another forum a long time ago: 1x 1500 mcd / 120* flat tipped white LED (a/c & temp) 1x 1200 mcd / 120* flat tipped red LED (directions) 1x 1000 mlm / 360* frosted red LED (fan speed)  You can compare the brightness to the stock buttons under the hvac. There is still a tiny hot spot on the "fan" icon on the hvac, but its not super noticeable in person, and I actually think it looks kinda cool. I am extremely satisfied with the results this time. |
|
|
|
|
10-14-2008, 09:12 PM
|
#3 |
|
Zilvia Junkie
 Join Date: Sep 2004
Location: east coast
Age: 43
Posts: 333
Trader Rating: (0)
 Feedback Score: 0 reviews
|
Much improved over the first attempt. Reminds me of being surprised that regular LED's didn't properly light up the light spreaders in my first S13's gauge cluster. I even tried bunching like 5 of them together in parallel, lulz
ah, youth |
|
|
|
|
02-20-2010, 08:30 PM
|
#6 | |
|
Leaky Injector
|
Quote:
 |
|
|
|
|
|
03-06-2010, 02:45 PM
|
#9 |
|
Leaky Injector
|
the bottom led works great (hot/cold light) but the top one has a noticable hot spot on the face/feet and the feet buttons. but im really not complaining that much, it's better than before when they didnt work at all. thanks for the write up.
|
|
|
|
|
03-06-2010, 06:02 PM
|
#11 |
|
Zilvia Addict
|
If you sand down the dome of the LED so it's flat it should disperse the light a lot more.. Sanding the exterior in general will help do the same thing.. Just make sure you don't sand to far that you hit the bond wire and/or the die..
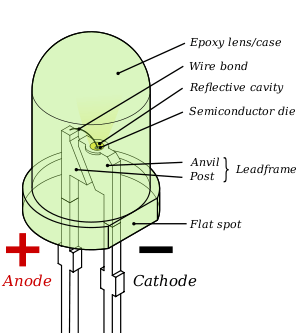 (picture to show what to avoid breaking) |
|
|
|
|
03-07-2010, 04:55 PM
|
#13 | |
|
Zilvia Addict
Join Date: Jul 2004
Location: Northern NJ
Age: 40
Posts: 991
Trader Rating: (3)
Feedback Score: 3 reviews
|
Quote:
|
|
|
|
|
|
03-07-2010, 05:15 PM
|
#14 |
|
Leaky Injector
|
it's probably the $1, $4 shipped resistors that i ordered off ebay because none of my local electronic stores had the resistor i needed, now that i think of it.
dammit lol. the 360 bulb looks damn good on the fan speed tho. thanks again for the specs. Last edited by afiser; 03-07-2010 at 09:35 PM.. |
|
|
|
|
03-09-2010, 01:21 PM
|
#15 |
|
Join Date: Aug 2006
Location: Houston
Age: 48
Posts: 40
Trader Rating: (0)
Feedback Score: 0 reviews
|
Recently did this by just using the power from the circuit board. As stated earlier by OP the board sometimes does not power the lights and replacing the bulb does not always work. I discovered upon doing my LED install that this was actually because the contacts had worn down on the board. My solution was not to provide separate power though ... I just used longer leads on the t5 LEDs that I installed and made sure they were making good contact. I also made sure the LED's worked before the AC controller was put back together. On a side note, I also used t10 super brights in the cluster. Had to install them from the front as they will not fit through the back of the board. Looks pretty damn good. Also, using the boards power and GOOD 12 volt LED's allows the dimmer feature to still function.
I am going to have to try that white LED on the hot/cold bar though ... that looks pretty damn good. Here's a pic of the cluster. 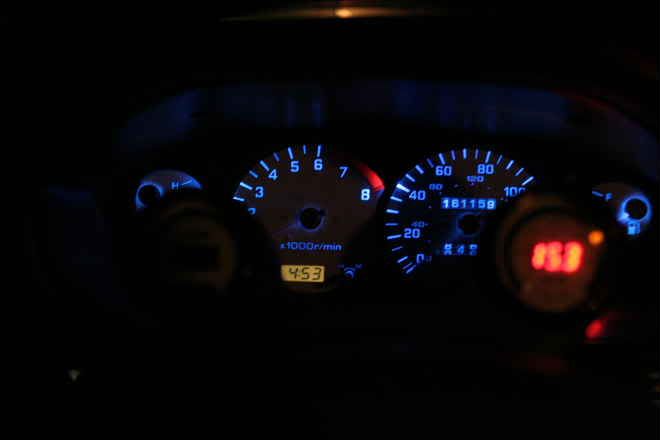 |
|
|
|
|
03-10-2010, 12:34 AM
|
#16 |
|
Post Whore!
 
|
You guys are still soldering those things in? Why not just get these>
http://www.superbrightleds.com/cgi-bin/store/index.cgi?action=DispPage&Page2Disp=%2Fspecs%2FNEO .htm The NEO3 bulbs are a direct replacement and the HP ones will look waay better. They also sell the HP cluster bulbs that actually look white.... not like that shitty blue pictured above. |
|
|
|
|
03-10-2010, 02:44 AM
|
#17 | |
|
Join Date: Aug 2006
Location: Houston
Age: 48
Posts: 40
Trader Rating: (0)
Feedback Score: 0 reviews
|
Quote:
__________________
 Rebuilding it one bolt at a time. Got any spare bolts? |
|
|
|
|
|
03-10-2010, 11:10 AM
|
#19 | |
|
Join Date: Aug 2006
Location: Houston
Age: 48
Posts: 40
Trader Rating: (0)
Feedback Score: 0 reviews
|
Quote:

__________________
Rebuilding it one bolt at a time. Got any spare bolts? |
|
|
|
|
|
03-10-2010, 11:43 AM
|
#20 | |
|
Zilvia Addict
|
Quote:
|
|
|
|
|
|
03-10-2010, 12:51 PM
|
#21 | |
|
Join Date: Aug 2006
Location: Houston
Age: 48
Posts: 40
Trader Rating: (0)
Feedback Score: 0 reviews
|
Quote:
__________________
Rebuilding it one bolt at a time. Got any spare bolts? |
|
|
|
|
|
03-10-2010, 09:15 PM
|
#22 | |
|
Post Whore!
|
Quote:
They do have data sheets for all their LEDs on their site. These are hands down the best LEDs I have had... and I've been through a few sets. 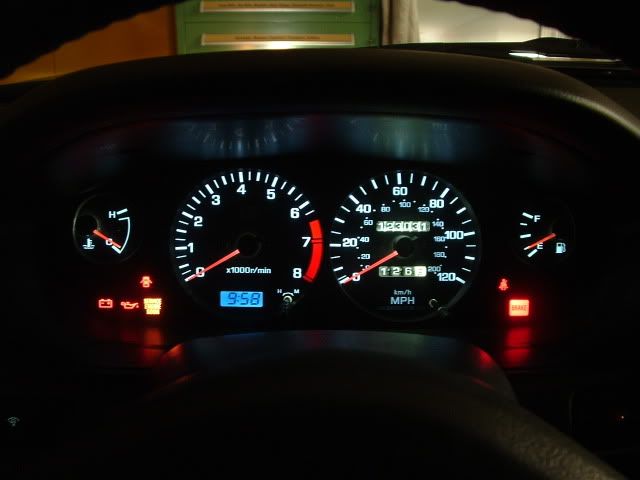 ^here is my cluster using superbrightleds. I just need to change out that clock bulb with another white one I have. 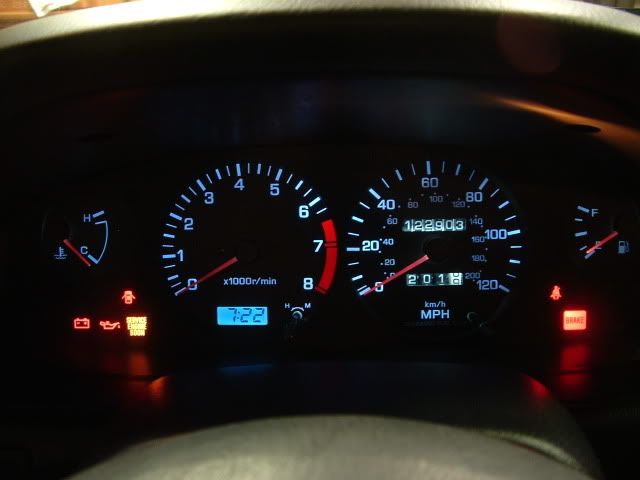 ^ebay LEDs. Sure don't look the same to me... |
|
|
|
|
|
03-11-2010, 09:41 PM
|
#23 | |
|
Zilvia Addict
|
Quote:
REAL data sheet for a QUALITY LED: http://cree.com/products/pdf/LEDlamp...SS&MSN&MSS.pdf Brief info on a no-name/ebay quality LED: 5mm LED RL5-W15120 Specifications Please tell me something I don't know about LEDs.. Because obviously I don't know what I'm talking about..  |
|
|
|
|
|
03-15-2010, 04:44 AM
|
#26 |
|
Post Whore!
|
http://www.superbrightleds.com/cgi-bin/store/index.cgi?action=DispPage&Page2Disp=%2Fspecs%2FWLE D-xHP5.htm
^these are the ones I have pictured above in white. You need 3 of them. |
|
|
|
|
11-16-2010, 05:12 PM
|
#27 |
|
Not that I want to walk into a flame war on my first post here, as I really like both setups, but I was wondering if both setups were dimmable, and if so was really interested in an actual link to the different LED's used.
|
|
|
|
|
|
11-16-2010, 06:37 PM
|
#28 |
|
Zilvia Addict
Join Date: Jul 2004
Location: Northern NJ
Age: 40
Posts: 991
Trader Rating: (3)
Feedback Score: 3 reviews
|
My car has been sitting in a garage for the last ~year so I can't really check its dimmability right now. iirc - it didn't dim very well, it went down and did a couple steps - but it wasn't in "sync" with the rest of the lights in the car.
|
|
|
|
|
11-17-2010, 11:23 AM
|
#29 |
|
Thanks for your quick response. The longer I stare at my cluster and different lights in my car, I consider if I want to go through the trouble. Great post and hope to see your car back on the road sometime.
|
|
|
|
|
|
02-28-2011, 06:51 PM
|
#30 | |
|
Super Moderator
 Join Date: Jul 2007
Location: over the river and through the woods
Age: 39
Posts: 7,160
Trader Rating: (29)
Feedback Score: 29 reviews
|
Quote:
I don't have any before pics, but take my word for it when I say all the bulbs were burnt out. 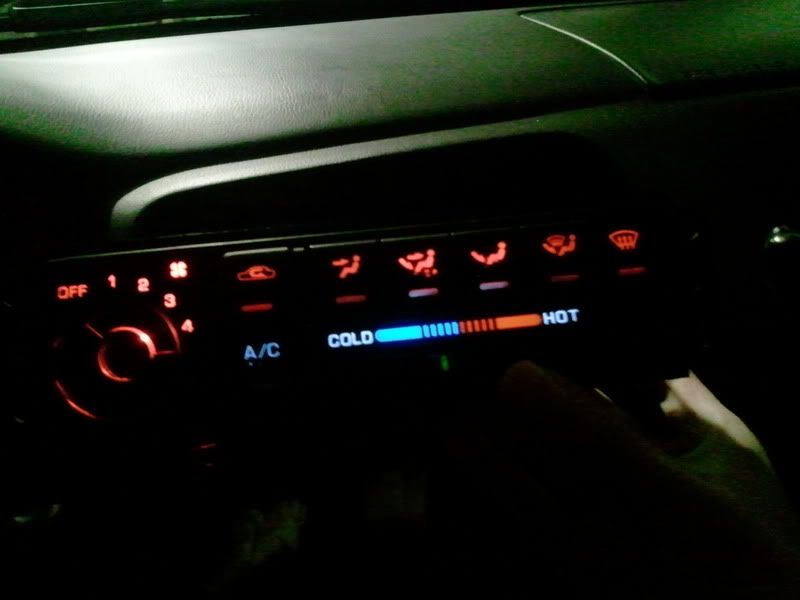 assembled. Cluster is using the WLED xHP5 bulbs. HVAC has NEOx-xHP 3mm  I would highly recommend paying the extra and getting the HP version of their bulbs. I bought their regular LEDs on my first attempt and it was VERY blotchy and not at bright...you can barely see the kilometers. 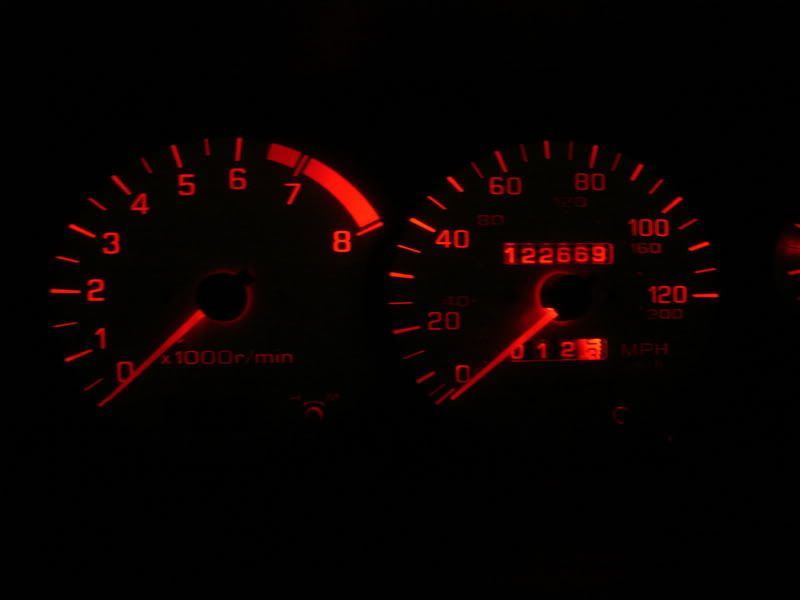 Thanks to the OP DaPCWiz for this thread. Hope this helps anybody in the future. |
|
|
|
|
|
| Bookmarks |
|
|


 Linear Mode

