|
|||||||
| Tech Talk Technical Discussion About The Nissan 240SX and Nissan Z Cars |
 |
|
|
Thread Tools | Display Modes |
 09-02-2008, 09:09 PM
|
#1 |
|
Post Whore!
 
Join Date: Dec 2006
Location: 717, PA
Age: 38
Posts: 3,324
Trader Rating: (6)
  Feedback Score: 6 reviews
 |
S13 SR Greddy intake manifold write up.
Ok guys, I've installed a few, and the first time I did it...we had very little information on how to do it. The instructions that Greddy gives you are decent, but the whole "not in english" thing can be a pain, especially when you're trying to figure out the right way to do it, based off pictures. I haven't found a 100% complete write up yet, so here we go.
S13 SR GREDDY MANIFOLD INSTALLATION: Getting Started: 1. Spend 15 hours polishing it (optional). 2. Let the car sit for a few hours, letting the fuel pressure drop down to a minimum. 3. disconnect the battery 4. I usually put vice grips on the fuel lines before I disconnect them, this helps stop fuel from flowing out of the lines when i take them off. If you have them, I'd do this when removing the fuel lines from the rail. 5. Drain the coolant. Stock OEM manifold removal: 5. Disconnect the following plugs on the wiring harness. CAS, TPS, Coolant temp sensor, 4 injector plugs (and the two grounds that bolt onto the last runner of the intake manifold) o2 sensor, knock sensor, Idle air control valve (both of these plugs are between the 3rd and 4th intake runners, bolted down to the OEM manifold, you can actually just unbolt the bracket that holds the plugs down anyways, it needs to come off) After you disconnect all of them, you should be able to move the harness out of your way. Also, disconnect the main ground wire from the manifold. Its held on by one bolt on the bottom half of the manifold, the surge tank. 6. Disconnect the throttle linkage. easy enough to do. 7. Disconnect the fuel rail. It should be held down by a few bolts, just make sure you dont lose the plastic spacers behind those bolts, or the rubber grommets the fuel rail goes into. Once the rail is off, just screw the bolts back in the OEM manifold with the spacers, so nothing is lost later on. 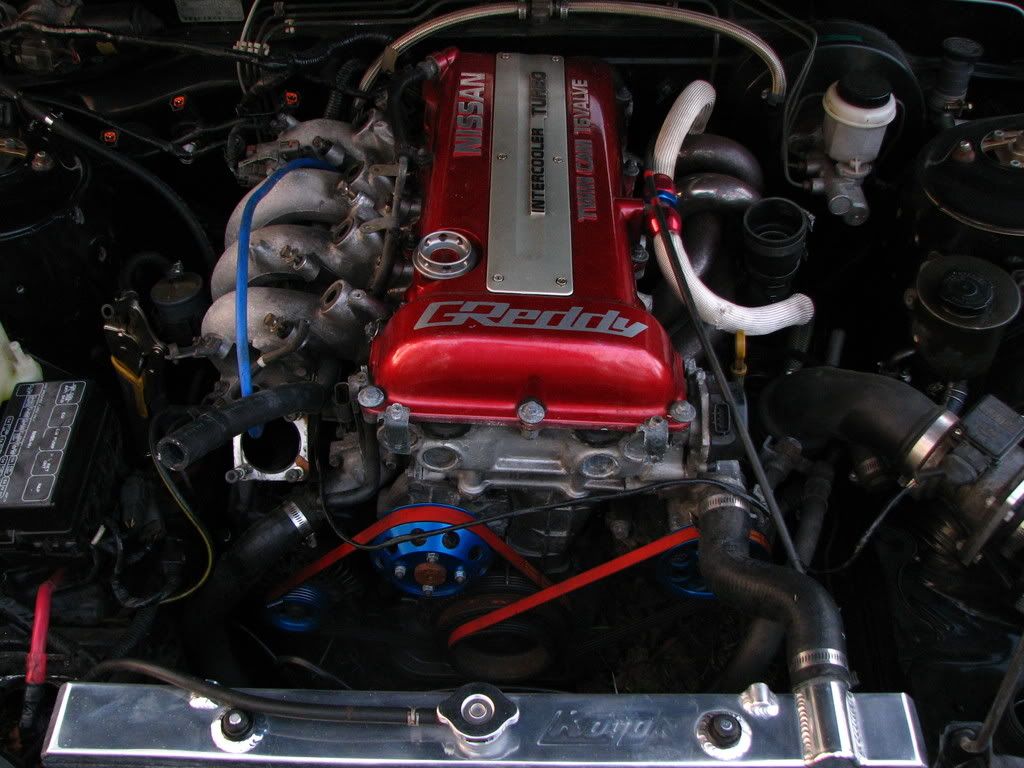 8. Removal of manifold. Its actually not that bad. There are 6 Bolts, and 2 studs with nuts at both ends, that hold the manifold to the head. Underneath is a different story. there are a few brackets that hold that sucker up that you'll need to take off, and you won't need them ever again, they just get in the way later on. You'll have a small pile of brackets that you'll never need again. Just use trial and error, if its not breaking free, try to figure out whats still holding it on. This takes a few minutes. 9. Coolant hoses. Once the manifold breaks free you'll notice that there are a few hoses that are still attached to the AICV (idle air control valve) and throttle body. flip the manifold on its side and disconnect the hoses from it (this is why you need to drain the coolant.) Also, if you haven't noticed yet, you'll need to disconnect the two coolant hoses running to the throttle body. 10. Plugging and new hoses: The two hoses that ran to the throttle body, need to be cut, and plugged up (greddy provides plugs for you, if you lose them, bolts will work). Just cut the hoses short, but leave enough room for the plug and a hose clamp to go on. The only thing these hoses do, it try and help out with cold starts in the mornings/night. If you're adding this manifold, its not because you want reliability. Next, follow greddy's directions with the AICV hoses. The bottom hose (when looking at the engine block) needs to be replaced with a longer one that wraps around the IACV (prob around 9-10") and the top hose needs to be replaced with a hose to go onto the other fitting on the IACV (around 8" iirc) IACV with the new hoses mocked up before bolted down to the manifold. (this is the way it will sit on the greddy manifold.) 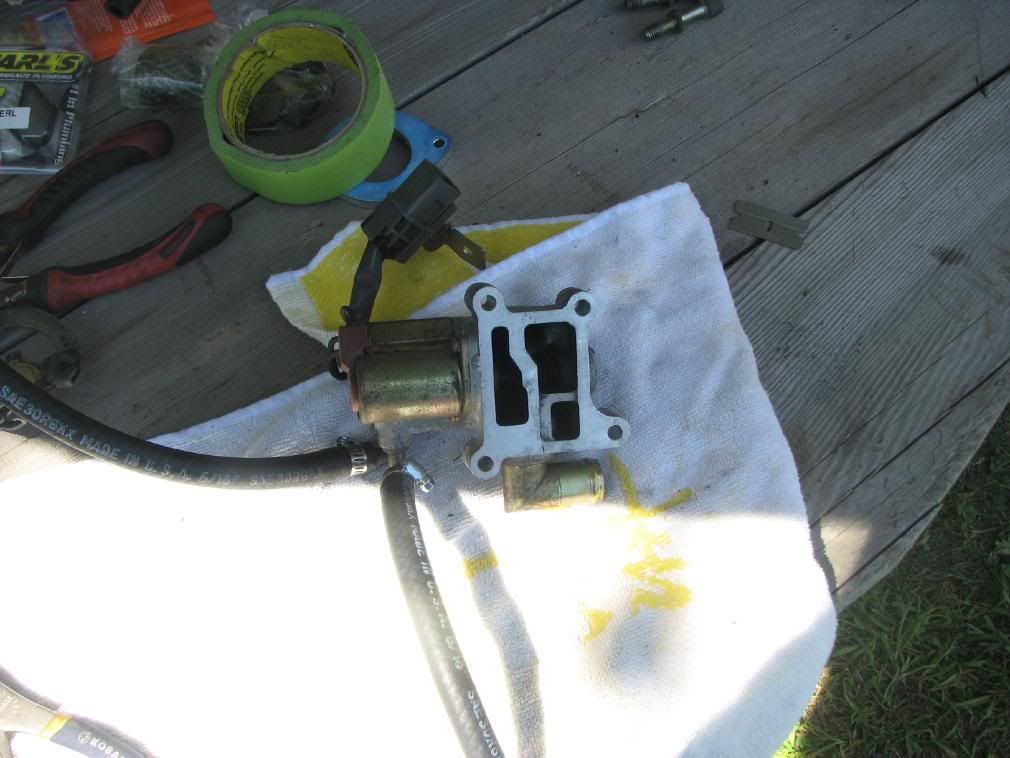 -Messing with the OEM manifold- A few things need to be removed from the stock SR manifold. •Throttle body w/ 4 allen head bolts. (try to save the gasket if you can, if not a ka one is the same size as the oem sr tb) •Throttle cable bracket w/studs. -stud removal- The best way to remove the studs is quite simple. (don't try to get them out with vice grips, you'll screw up the threads most of the time and its not worth messing it up.) After you remove the two 10mm nuts that hold on the bracket, screw one of the nuts on the stud all the way. Next take a washer from the bracket you just took off, and put it on over the nut. Continue by screwing the other nut over on top of the washer. The arrangement should be nut, washer, nut. using a 10mm socket, tighten down on the top nut until you notice the stud break free (it’ll move forward a little bit) Once this is done, take a 10mm open end wrench, and bring the stud out with the first nut you put on. The washer and top nut will keep the bottom nut from spinning off. After you have removed the stud, NOW you can use a pair of needle nose vice grips to grip onto the center part of the stud (part with no threads on it) to loosen the nut/washer arrangement you put together. •IACV (idle air control valve) You’ll need to separate the stock OEM manifold, and unbolt the runners from the surge tank to get to the four (4) bolts that hold the sensor on. Give it a good tug and it should come off the tank. If you can save the gasket, try to do so by scraping it off gently with a fresh razor blade. If you rip it, you’ll have to order a new one from Courtesyparts.com - Genuine Nissan Parts, Accessories, NISMO and Nissan Motorsports, as i haven’t found a USDM match. •brake booster vacuum fitting. Its a zink coated elbow fitting on the back of the surge tank Yar she is. 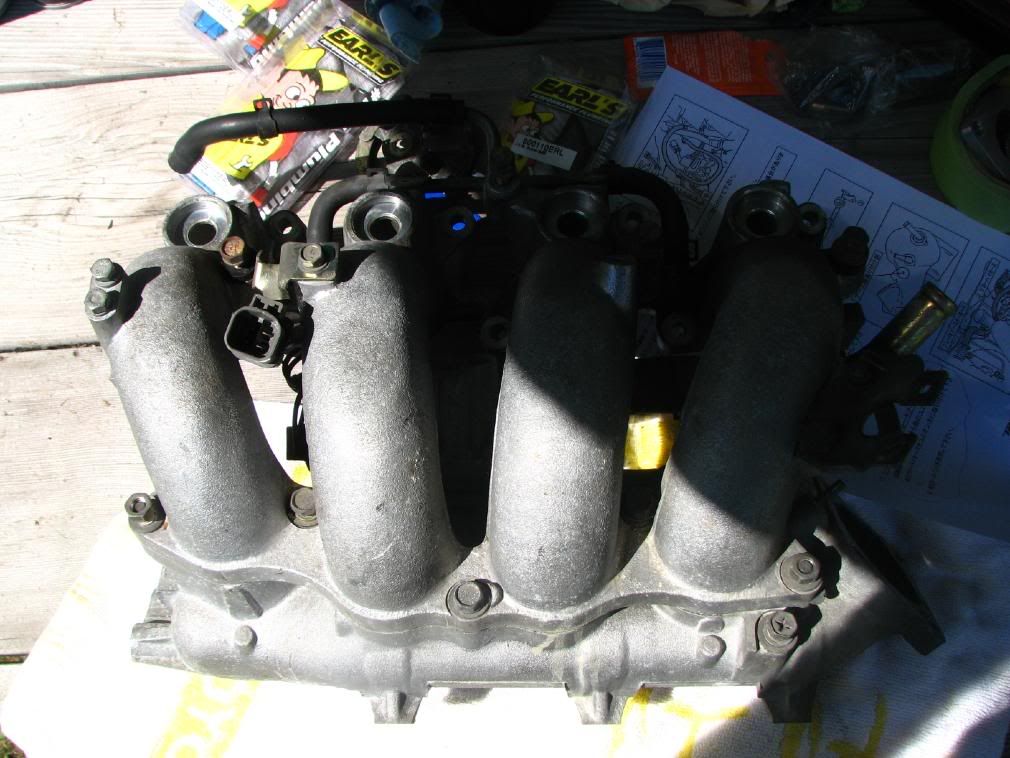 Separation of the runners and surge tank to get to the IACV 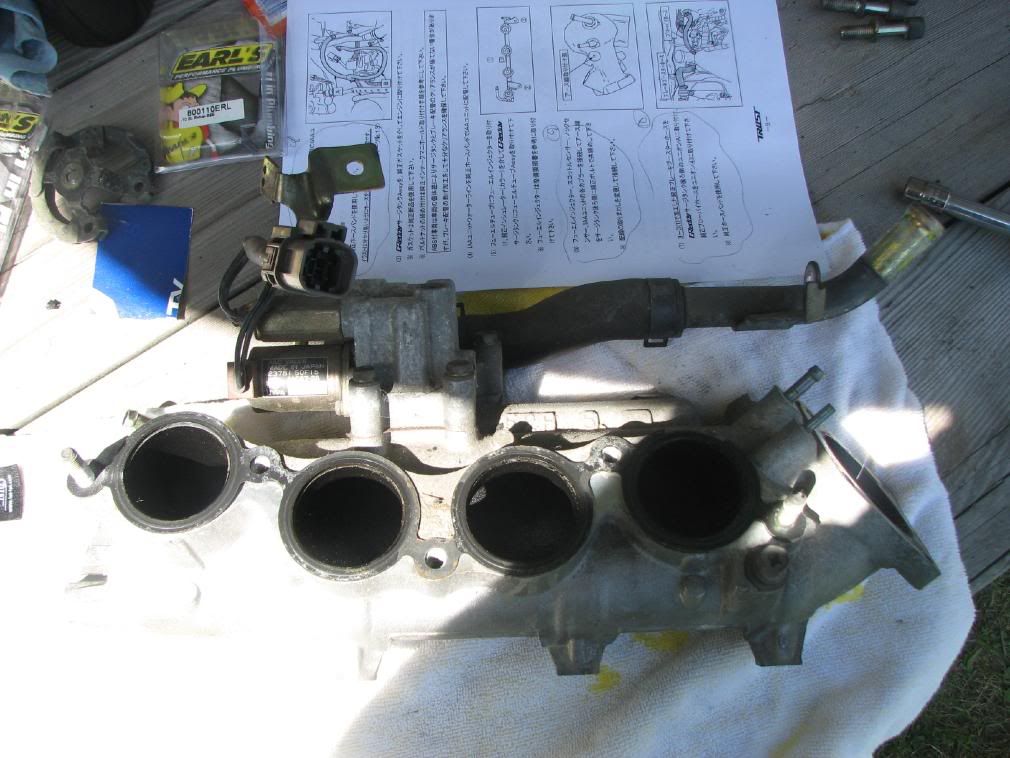 Installation of the Greddy manifold. 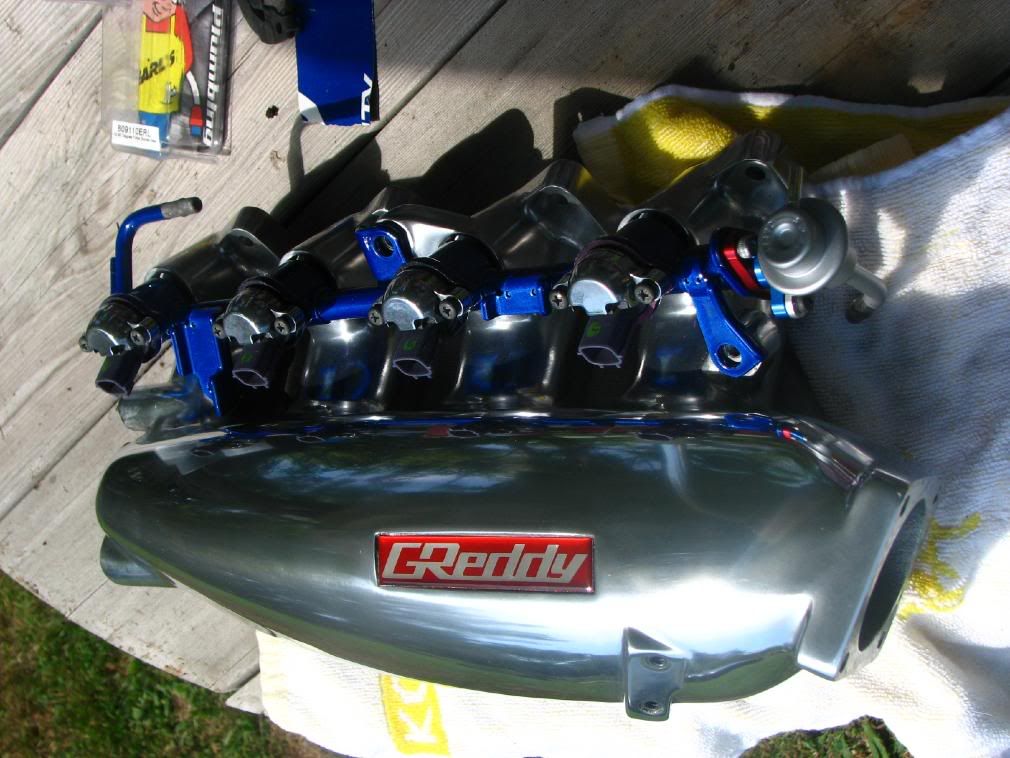 1. With the gasket, install the IACV on the bottom of the greddy manifold. 2. Screw in the two fittings in the back of the greddy manifold, the brake booster fitting from the OEM manifold, and the swivel fitting provided with the new manifold. You can use teflon tape with these two fittings if you’d like. 3. Screw in the 3 Allen head plugs in the bottom of the greddy manifold. These can be used as other vacuum ports, but for a normal setup, aren’t needed. 4. Bolt in the two Vacuum nipples at the front of the manifold. These screw in below the throttle body, small one is for the fpr signal, larger one for your blow off valve. 5. Clean the head of all gasket material, grease, etc. The cleaner the better. 6. Bolt down the greddy intake manifold. Isn’t it pretty? 7. Clamp down the hoses for the IACV (you can get to them pretty easily now, no?) Longer one goes on the front fitting, shorter hose on the rear fitting. 8. If you havent noticed by now...the hoses for the PCV valve and brake booster won’t work anymore. The PCV valve hose you can make pretty easily..just be creative. the stock hose for the brake booster vacuum fitting needs to be trimmed a bit (refer to greddy’s picture) or, just get some new hose and call it a day. 9. Install fuel rail. -rail prep- •Two brackets need to be cut/trimmed. the middle bottom one needs to be cut off completely, and the small tab on the back bottom one needs to be cut off. I used a small mini hack blade to do both and smoothed down the edges with a file. •The stock fpr won’t fit correctly like it did on the OEM manifold. You can either a) rig it up and have it look terrible and not care b) take pride in your work and do it right the first time. Greddy makes a fitting for ~$50 that allows you to clock the fpr at a 90º angle, fits nice and clean, no messy fuel lines or cut up fpr’s. 240SXMotoring - Nissan 240SX High Performance Parts and accessories at Competitive Prices has the fitting, not sure about any other places. Greddy FPR fitting. 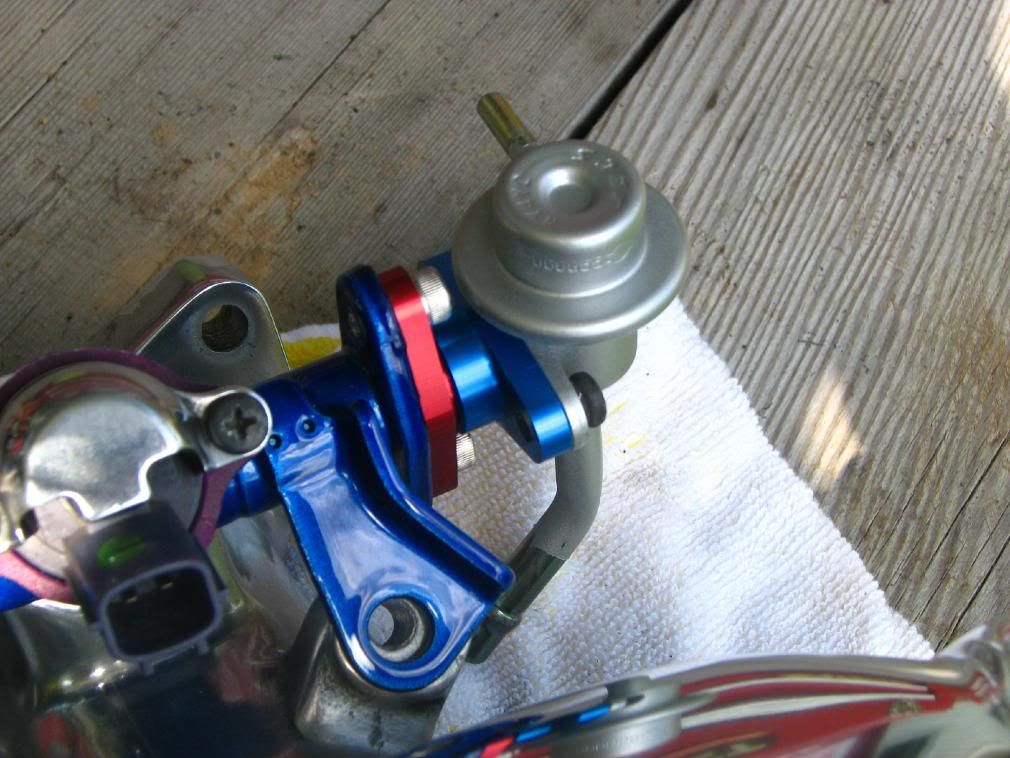 Now that all the prep for the rail is done, you can bolt it down, using the OEM rubber bushings, where the injectors meet the manifold. Make sure everything is snug when you bolt it all down. 10. Install the fuel lines. The feed line (one with the fuel filter) goes to the far end of the rail, near the 3rd and 4th runners, and the return line comes off the FPR. You’ll need roughly 2 feet of high pressure fuel line for the new feed line, remember to use fuel injection clamps only, don’t want any leaks now, do we? 11. Bolt down the throttle body w/gasket, and run the new intercooler piping. 12. You’ll need a little less than 2’ of 3/4” hose to connect the AICV to the intercooler piping, piece of cake. 13. You can now reconnect the throttle cable, using the OEM studs, and either, A) make your own cable bracket or, B) use the old bracket, but modify the throttle cable. Many people just make a new bracket, its much easier. If you decide to use the OEM bracket, you’ll need to use an S14SR throttle pulley, and also cut up the throttle cable a little bit. You need to cut part of the sheathing away (behind the thick rubber part, where the cable end comes out....BEHIND THAT) so the cable has more slack to it. If you decide to do this, do a little at a time until its just right. S13 SR throttle body, with the S14 SR pulley installed. (I cut my coolant inlet/outlet on the bottom of the tb off, makes it look much cleaner since I didn't use them anyways) 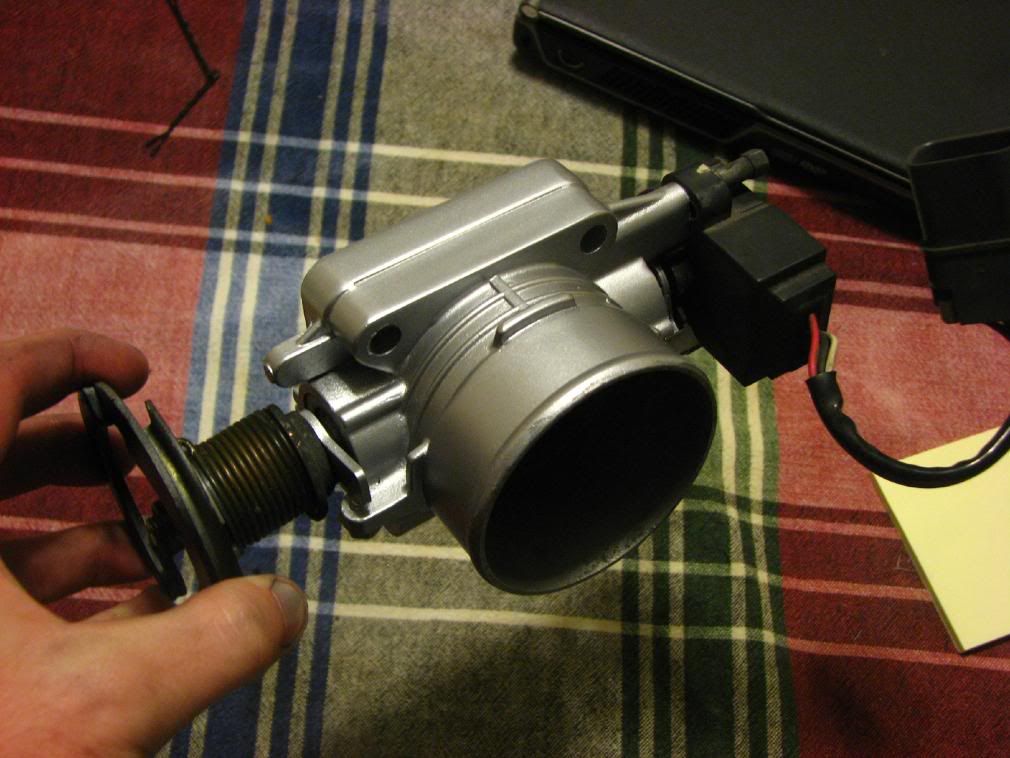 14. After this is done, reconnect all the wiring. The knock sensor, and AICV plugs don’t need to be on that bracket anymore, and can just be tucked under the manifold. Remember to connect the two grounds for the injectors, or you’ll be left scratching your head of why the car isn’t starting. Don’t forget the main ground for the engine, which can be bolted right underneath the throttle body. To clean up the wiring I lengthened the injector plugs on the harness, so they can come up between each runner, so you only see the plug. Came out great, I'm glad I took the time to do it. 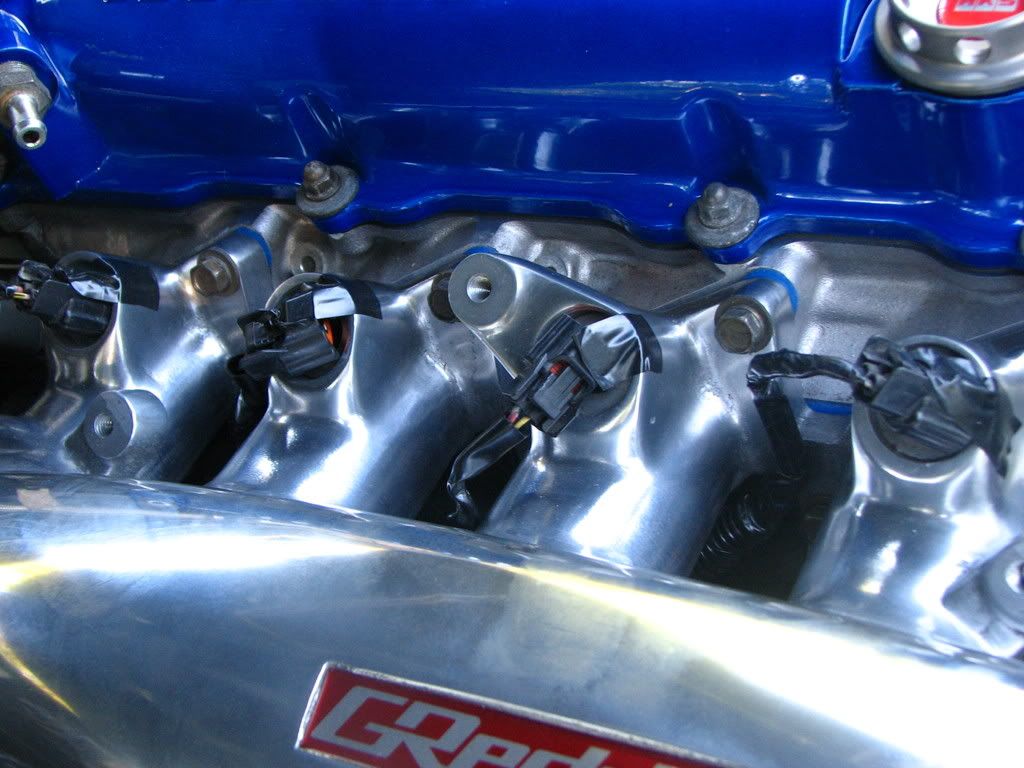 15. Fill the coolant system, bleed it out, make sure everything is secure and connected where it needs to be, and start her up! Buttoned up and ready to go  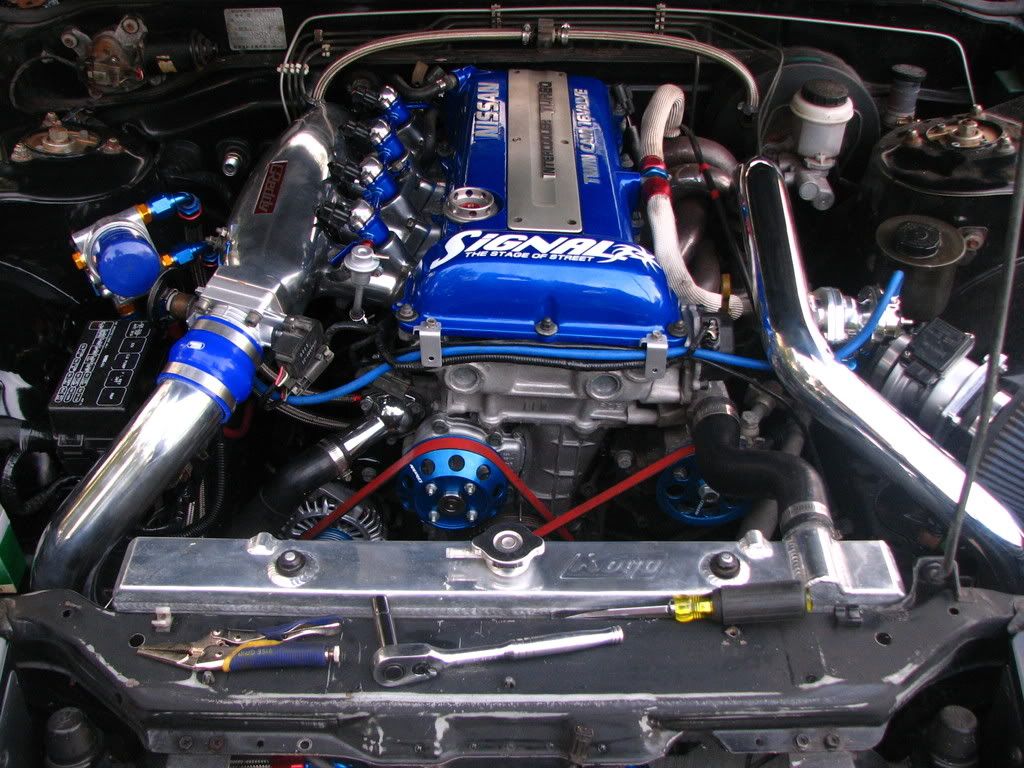 You’ll notice you’ll lose a little on the low end, but this manifold loves to perform above 5500 rpm, and really can make a difference for those of us who love top end power. Master Parts List: • Greddy manifold - shop around, find a good deal. • FPR fitting - 240SXMotoring - Nissan 240SX High Performance Parts and accessories at Competitive Prices • S14 SR Throttle Pulley - FRSport.com - Aftermarket Performance Parts • Intercooler piping - Courtesyparts.com - Genuine Nissan Parts, Accessories, NISMO and Nissan Motorsports **** If you're installing on a SOHC KA chassis, you'll need a DOHC throttle cable.**** If you have anything to add, by all means. let me know, and if I didn't cover it, I'll include it (I wrote this entire thing off memory) I'll be adding pics very soon.  -Jared
__________________

Last edited by burnsauto; 09-03-2008 at 06:44 PM.. |

|

|
| Sponsored Links |
|
09-03-2008, 06:01 PM
|
#3 | |
|
Post Whore!
Join Date: Dec 2006
Location: 717, PA
Age: 38
Posts: 3,324
Trader Rating: (6)
Feedback Score: 6 reviews
|
Quote:
__________________
|
|
|
|
|
|
09-03-2008, 06:13 PM
|
#5 |
|
Leaky Injector
|
Great write up!
If there are people that may want to take the Greddy manifold one step further by adding a Q45 throttle body, then you can do so with this piece.
Please P.M. me with inquiries. Thanks again for your much needed installation write up! Last edited by MachineTune; 08-09-2009 at 12:11 PM.. |
|
|
|
|
09-03-2008, 06:36 PM
|
#6 | ||
|
Post Whore!
 
Join Date: May 2006
Location: San Diego, CA
Posts: 9,135
Trader Rating: (19)
Feedback Score: 19 reviews
|
Quote:
Quote:
Great writeup, I'm really surprised there isn't already a few on Zilvia.
__________________
 Jordan Innovations has a new web site! www.JordanInnovations.com -- All your favorite FD Pro Drifters love it, trust me -- www.JordanInnovations.com |
||
|
|
|
|
09-03-2008, 06:42 PM
|
#7 | |
|
Post Whore!
Join Date: Dec 2006
Location: 717, PA
Age: 38
Posts: 3,324
Trader Rating: (6)
Feedback Score: 6 reviews
|
Quote:
and yes, you will lose a little on the low end...but the top end is great..the manifold really makes a difference. As far as a 90mm throttle body add on, I'd only suggest that for large turbo applications that are shooting for large HP numbers.
__________________
|
|
|
|
|
|
09-03-2008, 06:51 PM
|
#8 |
|
Nissanaholic!
 
Join Date: Oct 2006
Location: Philaburbia
Age: 46
Posts: 2,137
Trader Rating: (4)
Feedback Score: 4 reviews
|
what about that throttle linkage :P
rt-tuning fpr adapter... http://zilvia.net/f/advertiser-speci...-adaptors.html
__________________
 HREs on a S13 - check, 6262 - check, Girlfriend.... - nope |
|
|
|
|
09-03-2008, 06:54 PM
|
#9 | |
|
Post Whore!
Join Date: Dec 2006
Location: 717, PA
Age: 38
Posts: 3,324
Trader Rating: (6)
Feedback Score: 6 reviews
|
Quote:
with the S14SR pulley, and trimming some of the cables sheath (you can do this at the back near the firewall to get a cleaner look) it will work perfectly. Again, a custom bracket is much easier to do, I'm just a picky person...and love the punishment.
__________________
|
|
|
|
|
|
09-03-2008, 08:05 PM
|
#10 |
|
Nissanaholic!

Join Date: Mar 2007
Location: Ft. Lauderdale
Age: 37
Posts: 1,776
Trader Rating: (12)
Feedback Score: 12 reviews
|
Im diggin how u routed the injector harness under the manifold - thats sexy
i may have to try that - Yo could u show where u grounded those 2 cables near the injectors? also what size Vacuum hoses are u running? *newb question*
__________________

|
|
|
|
|
09-03-2008, 08:08 PM
|
#11 |
|
Post Whore!
Join Date: Dec 2006
Location: 717, PA
Age: 38
Posts: 3,324
Trader Rating: (6)
Feedback Score: 6 reviews
|
As far as grounding the injectors, there is a threaded hole already on the back of the greddy manifold, so they just bolt right onto that. As far as the vacuum sizes, its the same size hoses you'd use on the stock oem manifold for the fpr and bov. (im not sure about the sizes, I already had the hoses lying around)
__________________
|
|
|
|
|
09-03-2008, 08:24 PM
|
#15 | |
|
Nissanaholic!
Join Date: Mar 2007
Location: Ft. Lauderdale
Age: 37
Posts: 1,776
Trader Rating: (12)
Feedback Score: 12 reviews
|
Quote:
Thanks for the info again
__________________
|
|
|
|
|
|
09-03-2008, 08:44 PM
|
#16 |
|
Post Whore!

Join Date: Dec 2006
Location: Misawa, Japan
Posts: 6,815
Trader Rating: (8)
Feedback Score: 8 reviews
|
Damn Man you did a good job polishing it
If we still had Rep I'd give ya some lol
__________________
 後輪駆動車1番 後輪駆動車1番1989 Built SR GT2871R -363whp 1998 S14 W/RB25- 250ish (For Now) 1986 SR86 - 200ish 1990 R32 GTR - 320hp Don't Buy Engines from JDM-Online http://zilvia.net/f/businesses/207457-jdm-online.html Don't Buy XS-Power or SSAC Shit |
|
|
|
|
10-06-2008, 05:55 PM
|
#18 | |
|
Nissanaholic!
Join Date: Mar 2007
Location: Ft. Lauderdale
Age: 37
Posts: 1,776
Trader Rating: (12)
Feedback Score: 12 reviews
|
Quote:
__________________
|
|
|
|
|
|
07-18-2009, 11:13 AM
|
#19 |
|
Zilvia FREAK!
 Join Date: Sep 2005
Location: 50 miles west of chicago
Posts: 1,186
Trader Rating: (9)
  Feedback Score: 9 reviews
|
if i cut cable sheild...can i move the hollow bolt back to use the nuts for the oem bracket?
i guess im confused with what to actually do. can anyone poist pics of the custom bracket they made and also where they cut the sheild back? Thanks, Jay ps not to bring up an old post, but i need help |
|
|
|
|
07-21-2009, 08:23 PM
|
#20 |
|
Post Whore!
Join Date: Dec 2006
Location: 717, PA
Age: 38
Posts: 3,324
Trader Rating: (6)
Feedback Score: 6 reviews
|
to answer your question, I've tried this twice with two different cables, neither one gave me good results, so I'm in the process of designing a new bracket, which I'll be making a few for other zilvia members
(sorry to get back to you so late, i forgot all about this thread.)
__________________
|
|
|
|
|
07-22-2009, 07:10 AM
|
#21 |
|
Zilvia FREAK!
Join Date: Sep 2005
Location: 50 miles west of chicago
Posts: 1,186
Trader Rating: (9)
Feedback Score: 9 reviews
|
no problem. what i did was, pulled the shielding out of the crimped end, cut the sheidling off and then cut the metal banding that surrounds the cable. unwound all of that, and slid the hollow bolt to the spot where i cut it and forced the crimped end on to it and re-crimped. with that, i can use the oem bracket but its only held on with one bolt. if i use both bolts its at a terrible angle. oh, i had to spin the bracket 180 as well. i can take pics and point things out.
   oh, and if possible, i will need some help re-hooking up my vacuum lines. i have a great guide on how to do it with the stock setup, but i want to make sure i have them all correct with the new setup. |
|
|
|
|
07-27-2009, 01:12 AM
|
#22 |
|
Post Whore!
Join Date: Dec 2006
Location: 717, PA
Age: 38
Posts: 3,324
Trader Rating: (6)
Feedback Score: 6 reviews
|
no problem, the vacuum lines are actually pretty simple.
small one goes to the fpr (which you tap into that lines for a boost gauge with a T fitting) large one you can run directly to the bov, don't T anything off this one. nothing else is really required besides the WG on the intercooler piping. I'll start making brackets that work 100% with no modifications (I'll even powdercoat them fun colors if people want) soon.
__________________
|
|
|
|
|
07-27-2009, 06:06 AM
|
#23 |
|
Zilvia FREAK!
Join Date: Sep 2005
Location: 50 miles west of chicago
Posts: 1,186
Trader Rating: (9)
Feedback Score: 9 reviews
|
awesome thanks!
let me know when u have them made, i will buy one. u would think that with greddy making the manifold bolt up and all that, they would have accounted for the throttle cable. |
|
|
|
|
07-27-2009, 10:26 AM
|
#24 |
|
Zilvia.net Advertiser

Join Date: Dec 2005
Location: Fountain Valley, CA 92708
Posts: 1,856
Trader Rating: (16)
Feedback Score: 16 reviews
|
great write up! and a clean intall
__________________
FRSport.com || 18050 Newhope Street, Fountain Valley, CA 92708 (Map link) Store Hours: Mon - Fri: 8:00 AM - 6:00 PM PST [email protected] | 800-321-4747 | 714-515-4001 ext 146 FRSport.com Open Box Clearance Items FRSport.com Weekly Specials |
|
|
|
|
07-27-2009, 10:48 AM
|
#25 | |
|
Zilvia Addict
 
Join Date: Mar 2005
Location: Farmington/Flint, MI
Age: 36
Posts: 675
Trader Rating: (8)
Feedback Score: 8 reviews
|
Quote:
The Greddy Manifold should really only be used by people revving above 8000 RPM or are looking for a peak horsepower number as on a stock redline the delayed spool up and shortening of the usable powerband is inpractical and pointless. |
|
|
|
|
|
07-27-2009, 11:05 AM
|
#26 | |
|
Post Whore!
Join Date: Dec 2006
Location: 717, PA
Age: 38
Posts: 3,324
Trader Rating: (6)
Feedback Score: 6 reviews
|
Quote:
__________________
|
|
|
|
|
|
07-27-2009, 01:24 PM
|
#27 |
|
Post Whore!
Join Date: Dec 2006
Location: 717, PA
Age: 38
Posts: 3,324
Trader Rating: (6)
Feedback Score: 6 reviews
|
you can do things to counter balance the loss on the low end (which really isnt all that bad) and you have gains from 4500-5k on up.
to help the low end of things i picked up a tomei unequal length manifold to replace the shitty MR one, and paired that up with the tomei outlet, which really helps out spool time drastically compared to stock.
__________________
|
|
|
|
|
09-14-2009, 06:13 PM
|
#28 |
|
Zilvia FREAK!
Join Date: Sep 2005
Location: 50 miles west of chicago
Posts: 1,186
Trader Rating: (9)
Feedback Score: 9 reviews
|
can anyone proveide me with some info on the iacv hose routing... i bought my intake mani used and didnt get all the cool stuff from greddy so i have no clue if i have it all hooked up correctly
Jay |
|
|
|
|
10-04-2009, 07:18 PM
|
#29 |
|
Nissanaholic!

Join Date: Mar 2006
Location: Philadelphia suburbs
Age: 39
Posts: 2,347
Trader Rating: (7)
Feedback Score: 7 reviews
|
I just installed this today, except for the throttle cable.
Does the direction of coolant flow for the IACV matter? My gut tells me no, but just wanted to ask.
__________________
 Daily driven Last edited by jspaeth; 10-05-2009 at 12:34 PM.. |
|
|
|
|
| Bookmarks |
|
|


 Turn and Burn!


 Linear Mode

