|
|||||||
| Tech Talk Technical Discussion About The Nissan 240SX and Nissan Z Cars |
 |
|
|
Thread Tools | Display Modes |
 12-01-2012, 08:08 PM
|
#121 | |

|
Quote:
|
|

|

|
| Sponsored Links |
|
12-01-2012, 08:24 PM
|
#122 |
|
Zilvia Junkie
 
Join Date: Jun 2006
Location: East Coast
Age: 38
Posts: 585
Trader Rating: (20)
 Feedback Score: 20 reviews
|
Thanks guys, I am still very much into this project, and there are plenty more cool items to post. Until then, the only RB's I will be working on are the ones at work. Rolls Royce RB211
 |
|
|
|
|
12-04-2012, 08:20 PM
|
#124 |
|
the RB211 will be an extremely tight fit. plus the stance that the car would have from the weight of the turbine..
just saw this thread, saw that it started sometime earlier this year.. Kept looking at each page thinking this build has to be done, but now I know. If care is to be taken on a rare project like this, it takes time. |
|
|
|
|
|
08-04-2013, 08:27 PM
|
#126 |
|
Zilvia Junkie
Join Date: Jun 2006
Location: East Coast
Age: 38
Posts: 585
Trader Rating: (20)
Feedback Score: 20 reviews
|
Sorry guys, but this project has been delayed, and many of the high end parts have been sold. I still have the car and the built engine, however between moving into a new house and starting a new job, there has not been a lot of time to build. The RB25 S14 is complete however it still needs to be painted. Every nut an bolt of that car has been replaced, and it will likely be offered for sale shortly after its completion. It will be a huge loss for me, however it has needs to go to someone who going to drive it. Thanks for checking in man
|
|
|
|
|
08-20-2018, 05:44 PM
|
#129 |
|
Zilvia Junkie
Join Date: Jun 2006
Location: East Coast
Age: 38
Posts: 585
Trader Rating: (20)
Feedback Score: 20 reviews
|
Hello all, sorry I let this thread die, but I couldn't give the build the attention it needed. There is a lot of effort and sentimental value in this car, so I didn't want to continue until I had the focus and resources to complete it. Fortunately, I have been working on the car for the past few months, and actually am near completion. I will begin posting pictures of what I have been doing since we last left of in the thread. For those following, you may notice that the build has changed a bit, and will all come together in the end, as there is a theme. Thanks for staying interested, and I look forward to hearing what you think.
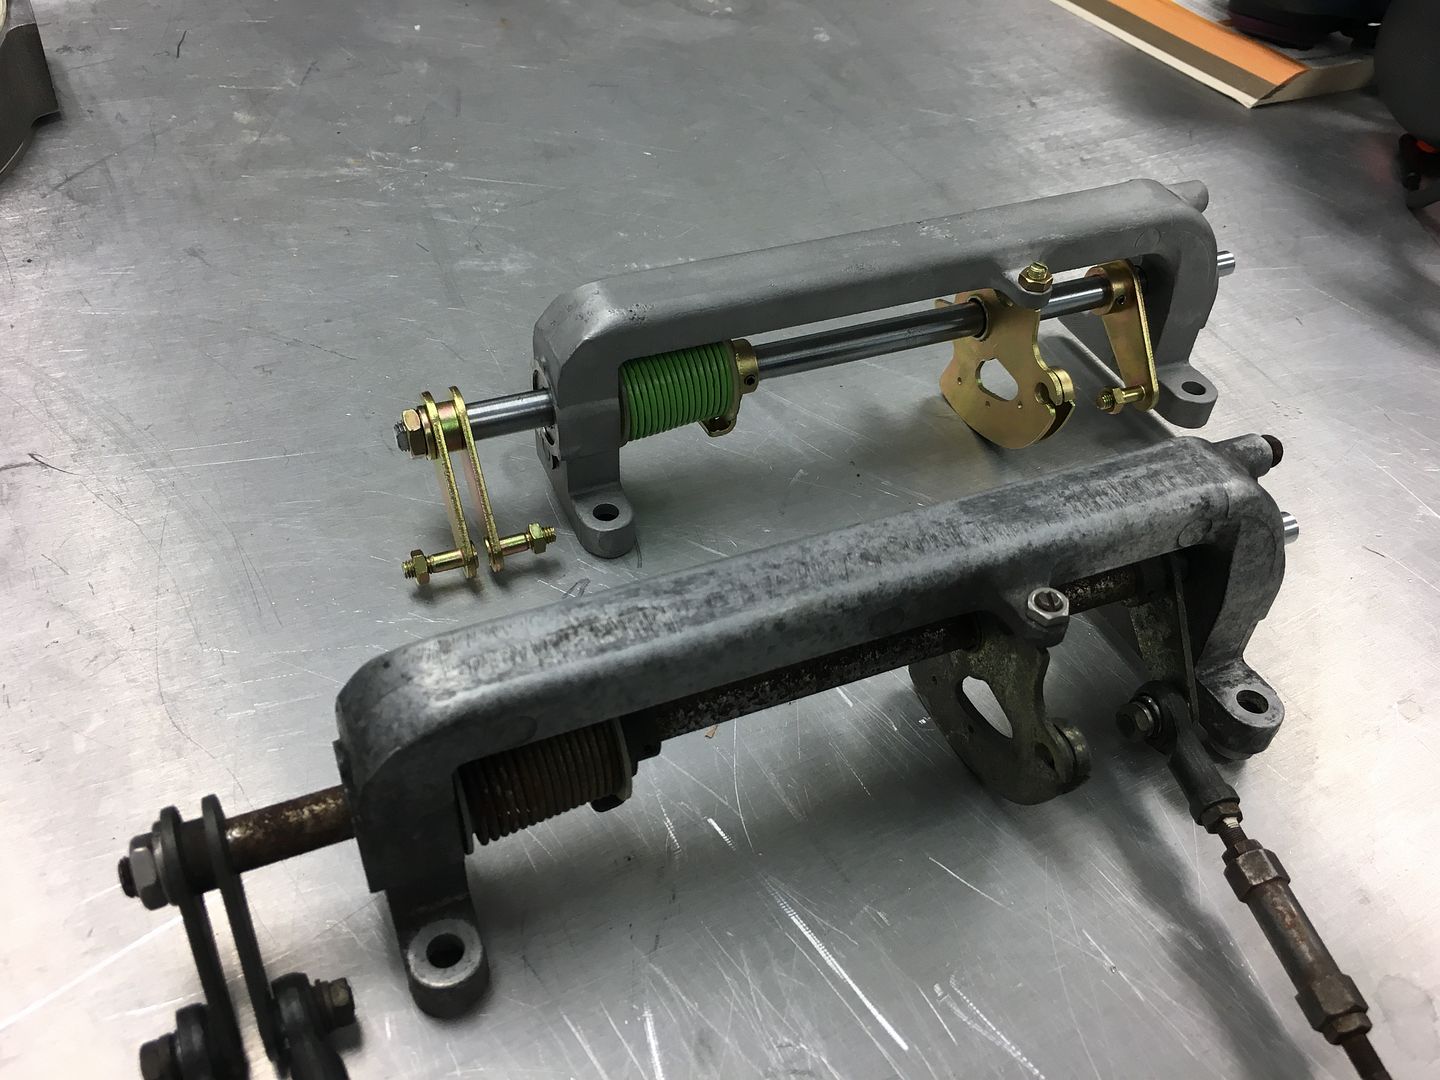
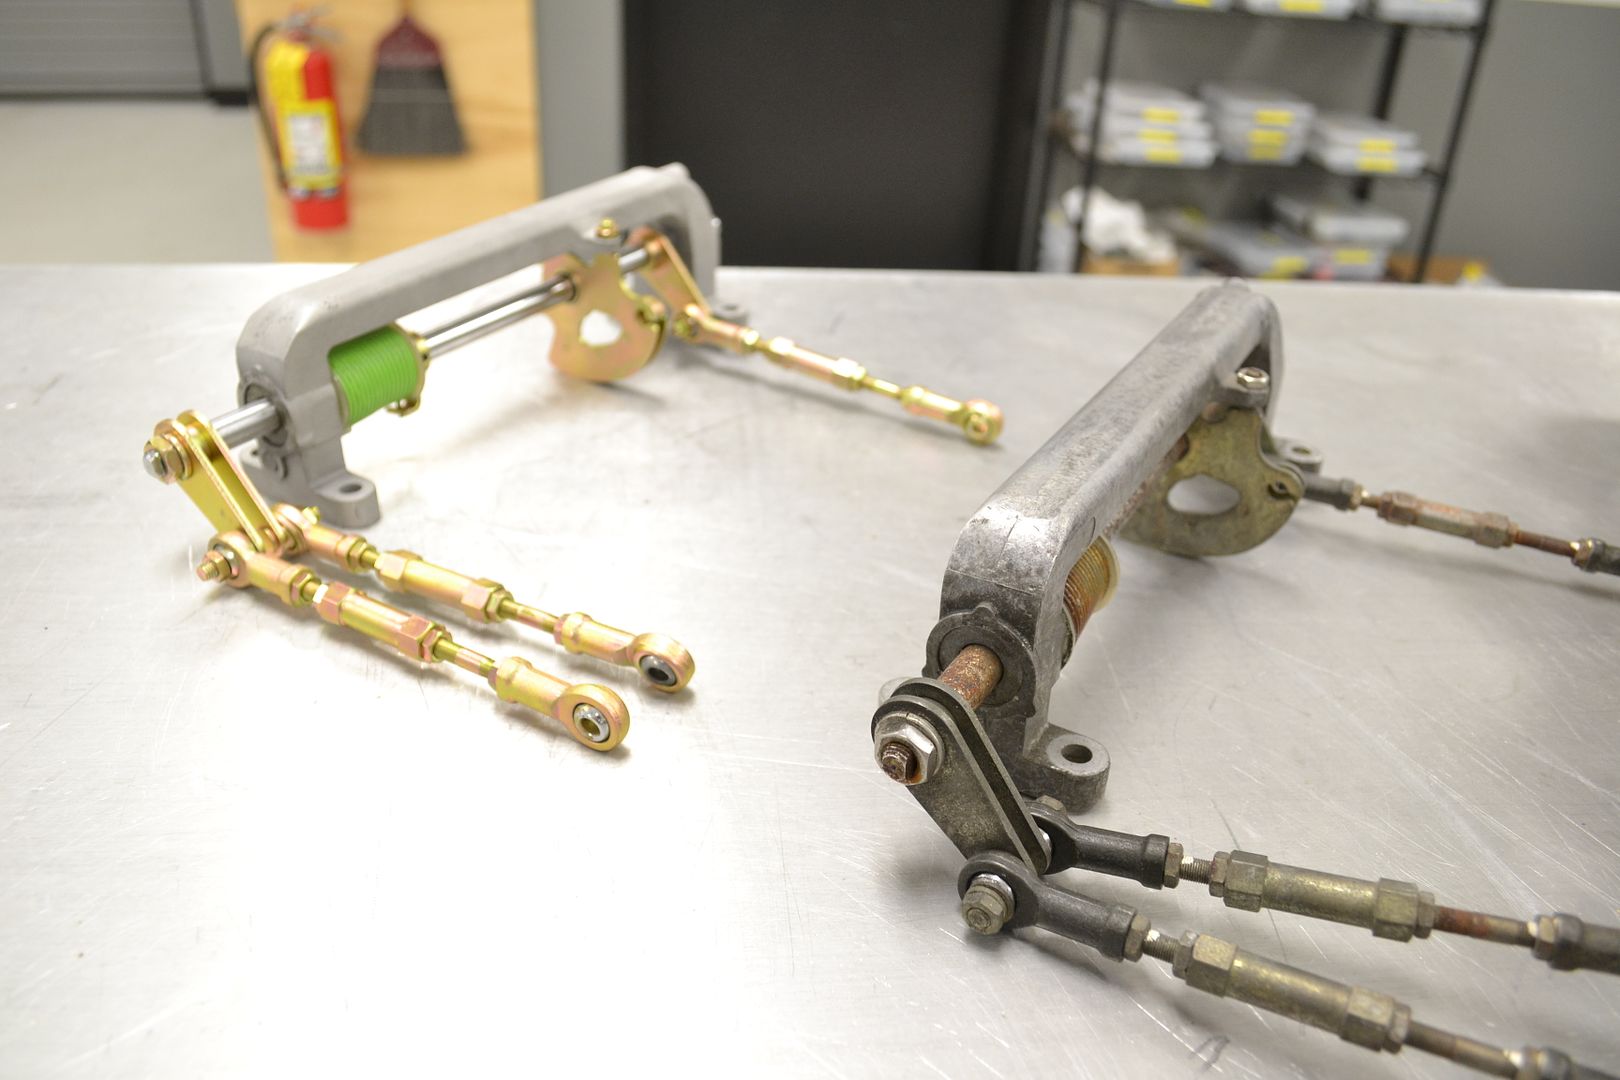
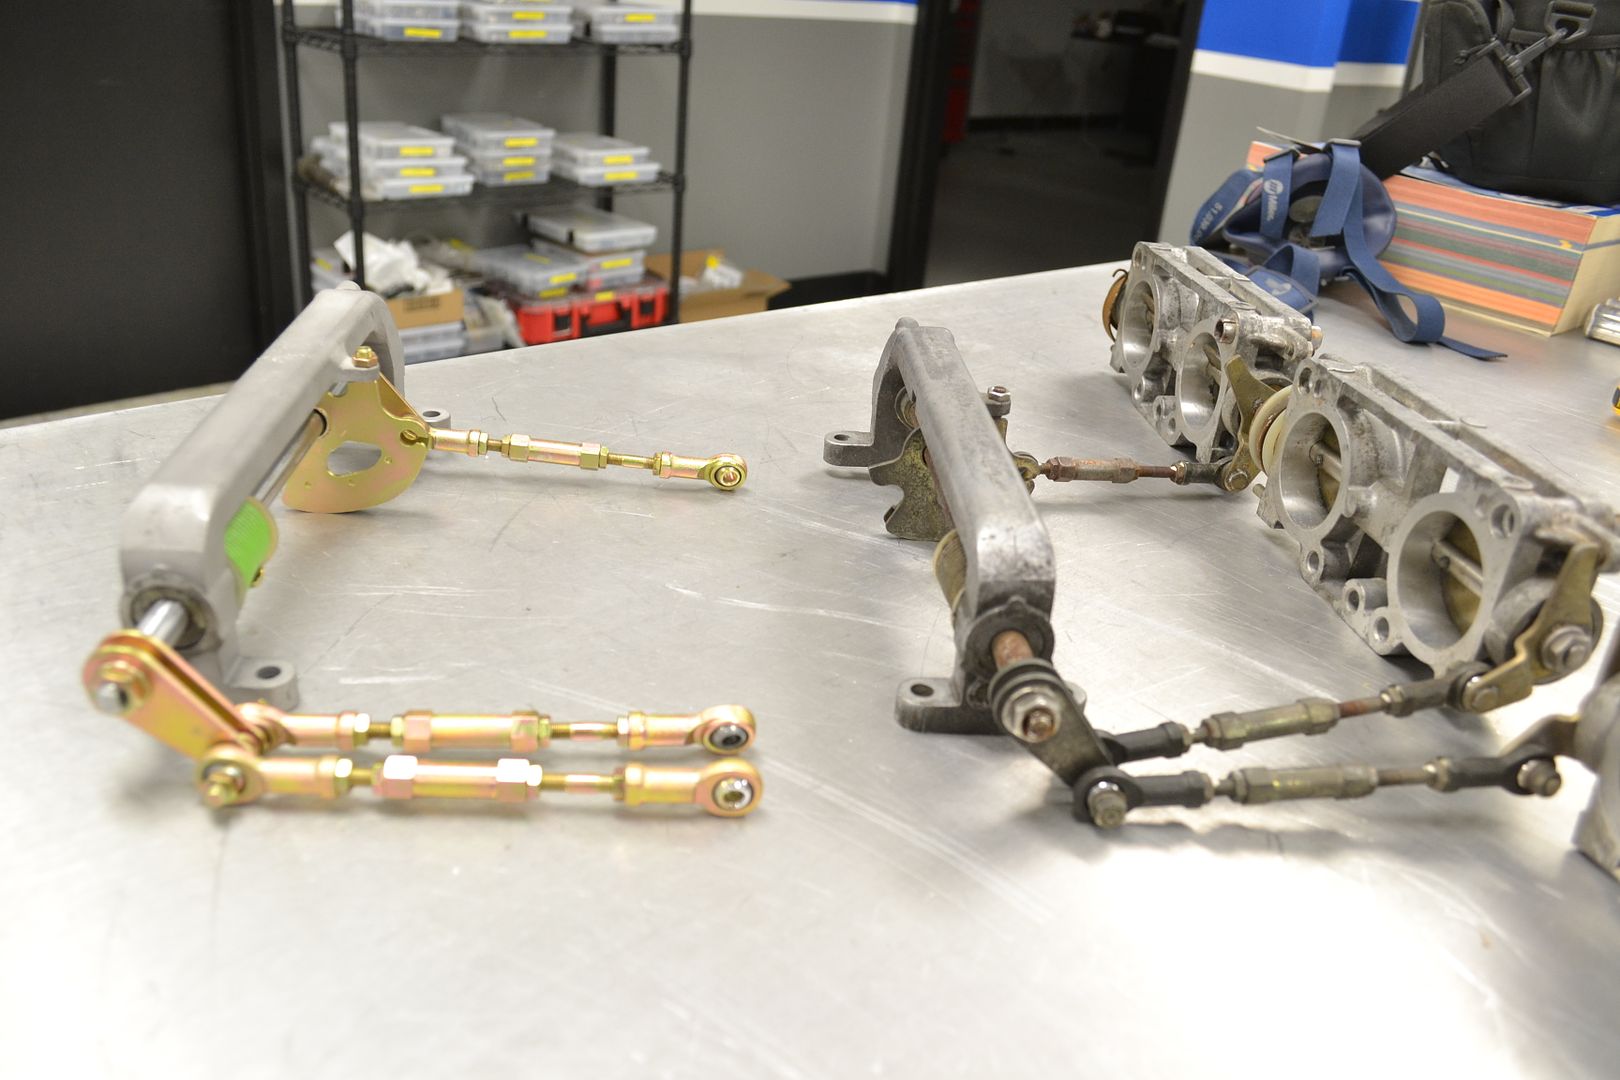
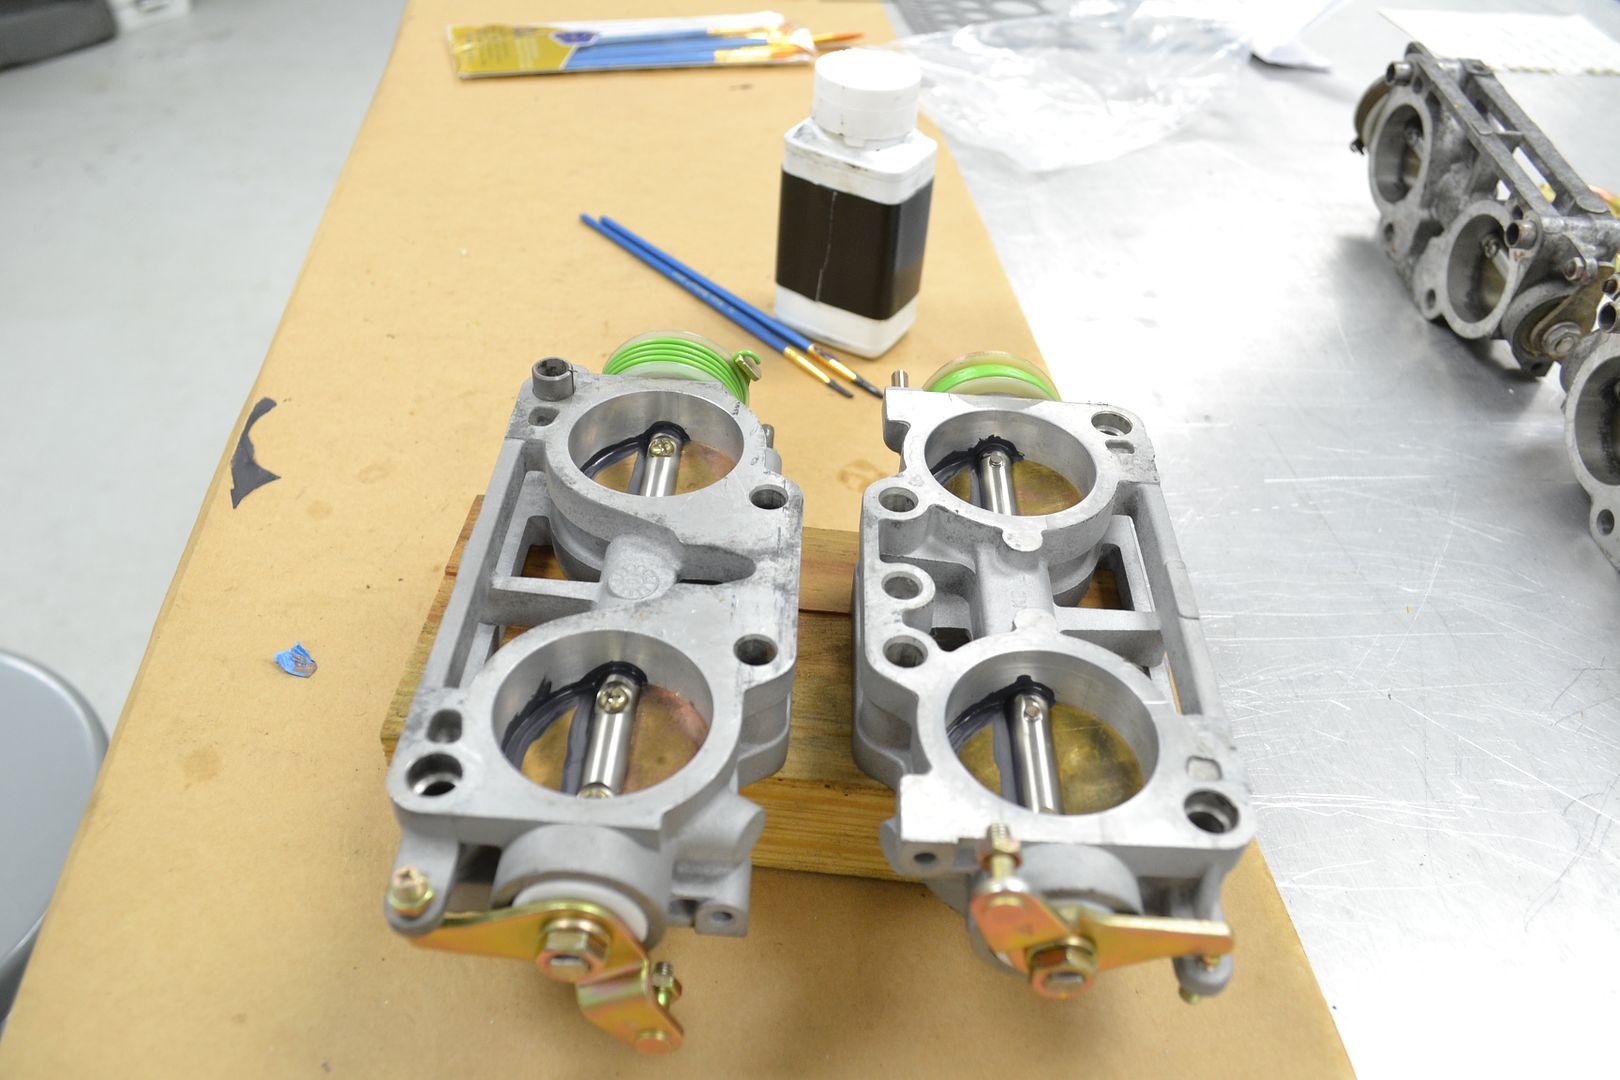
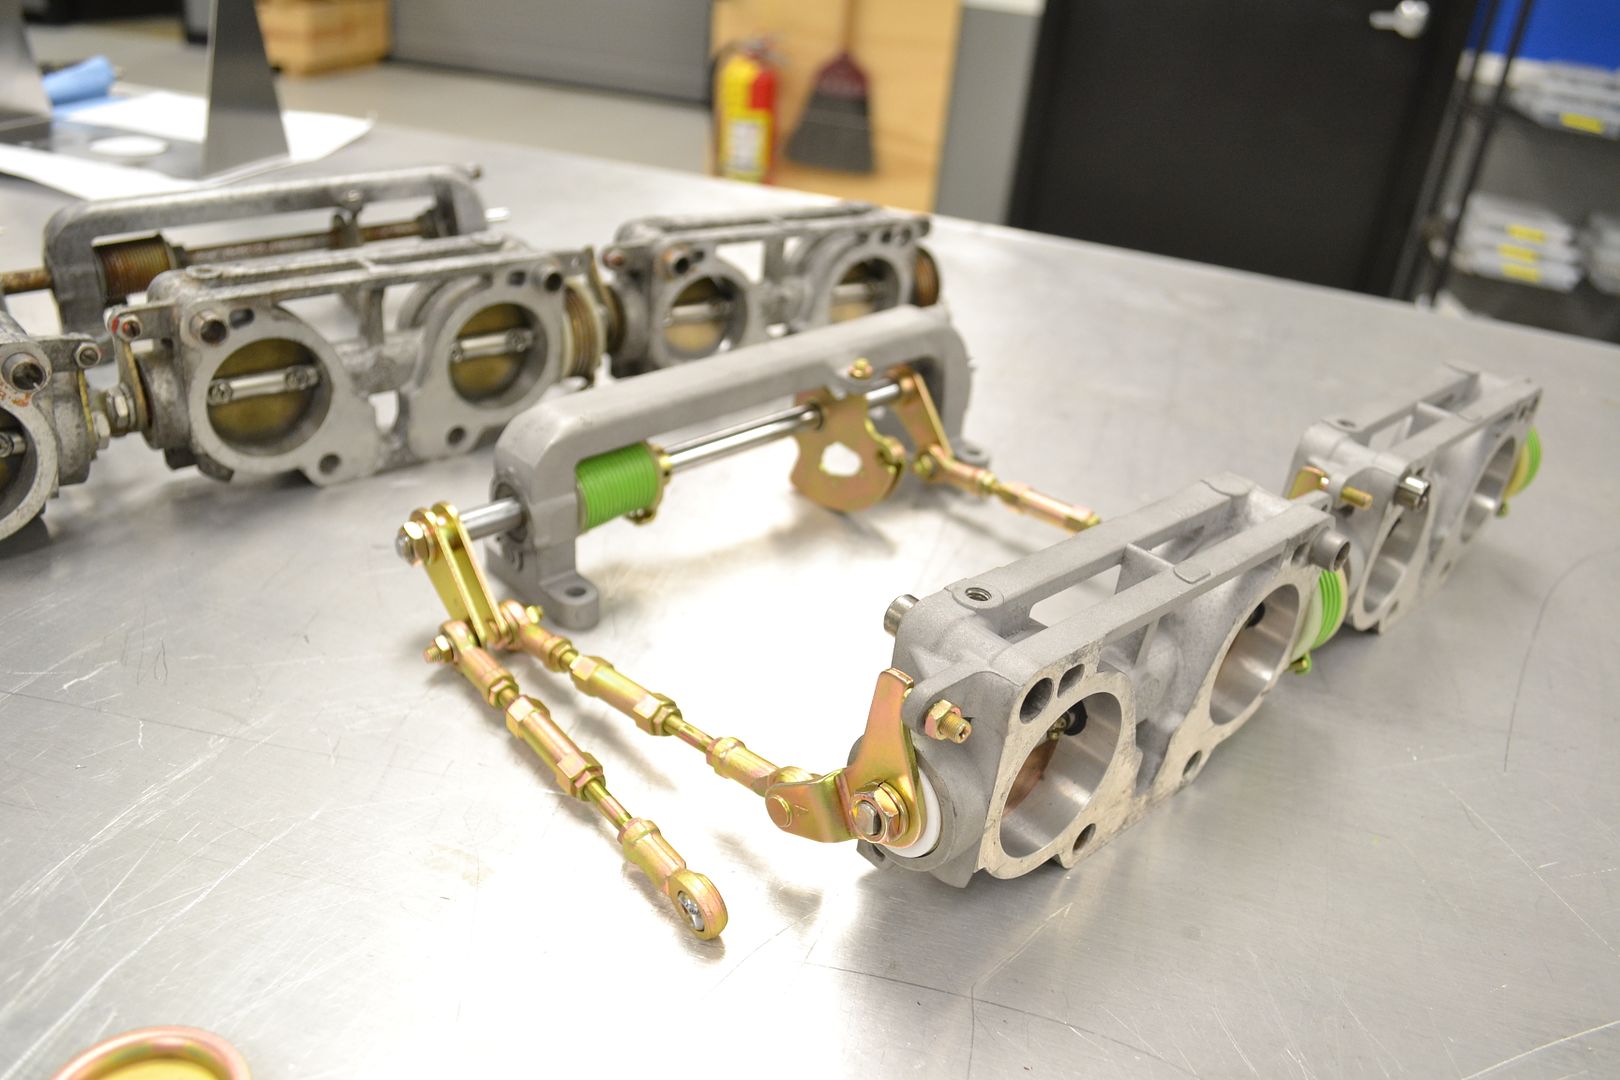
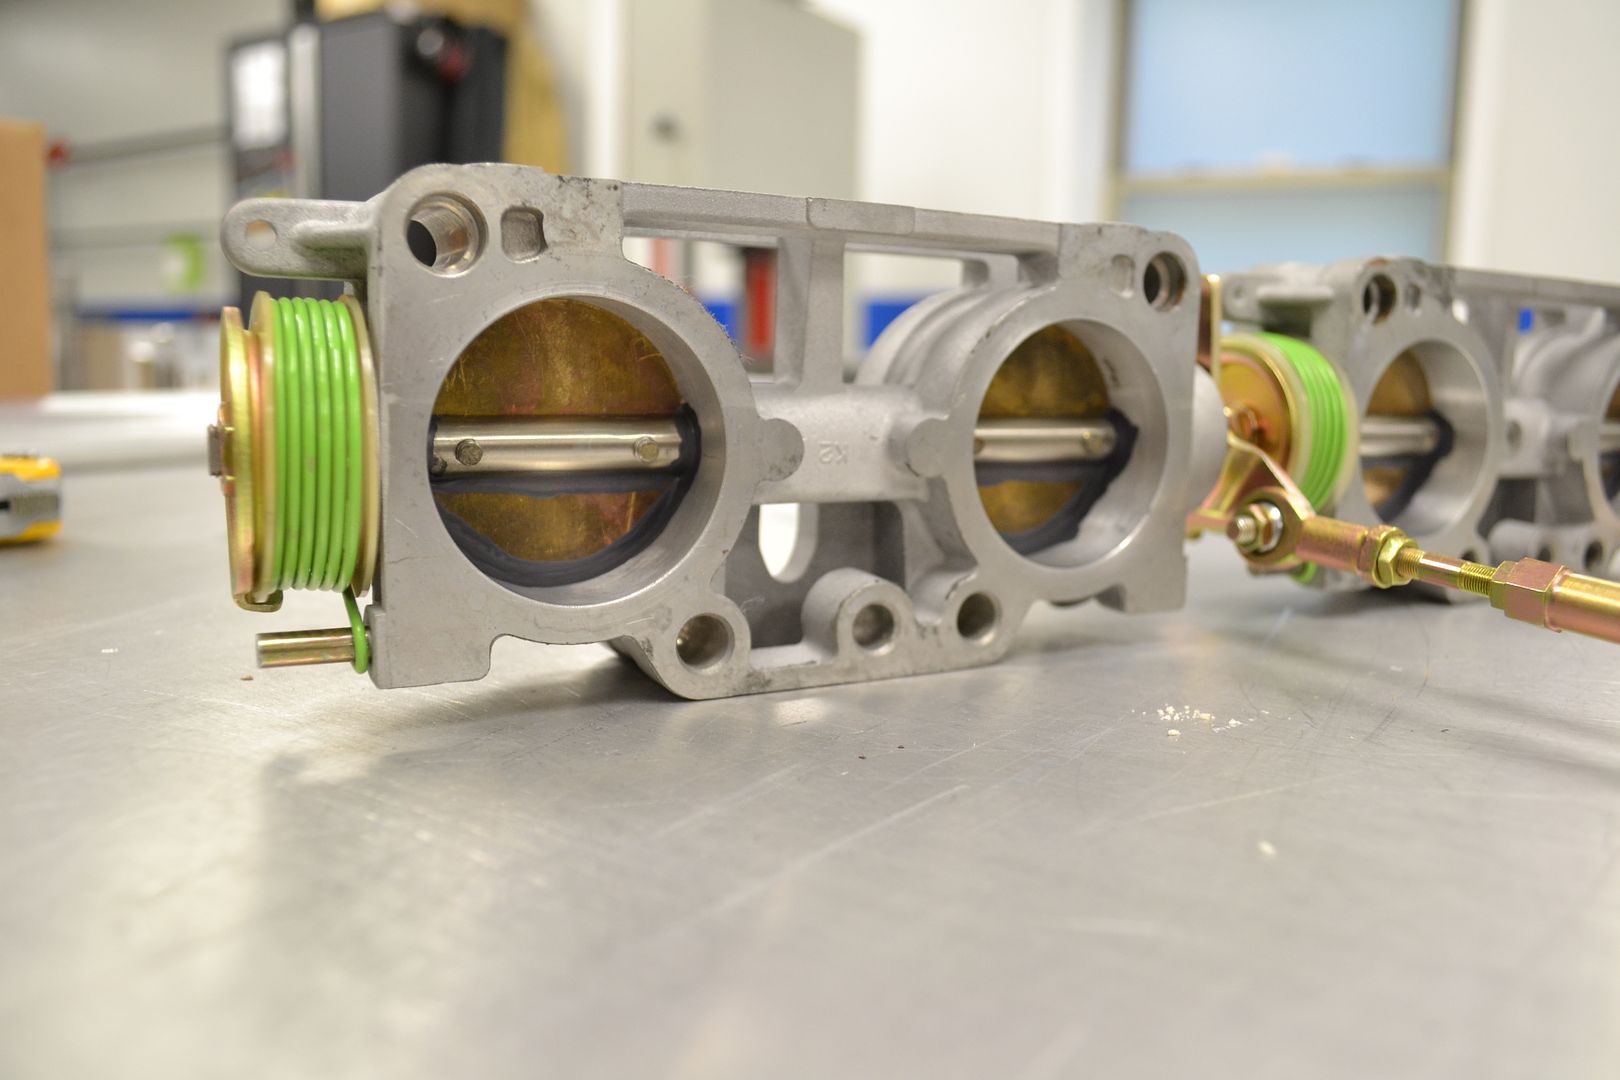
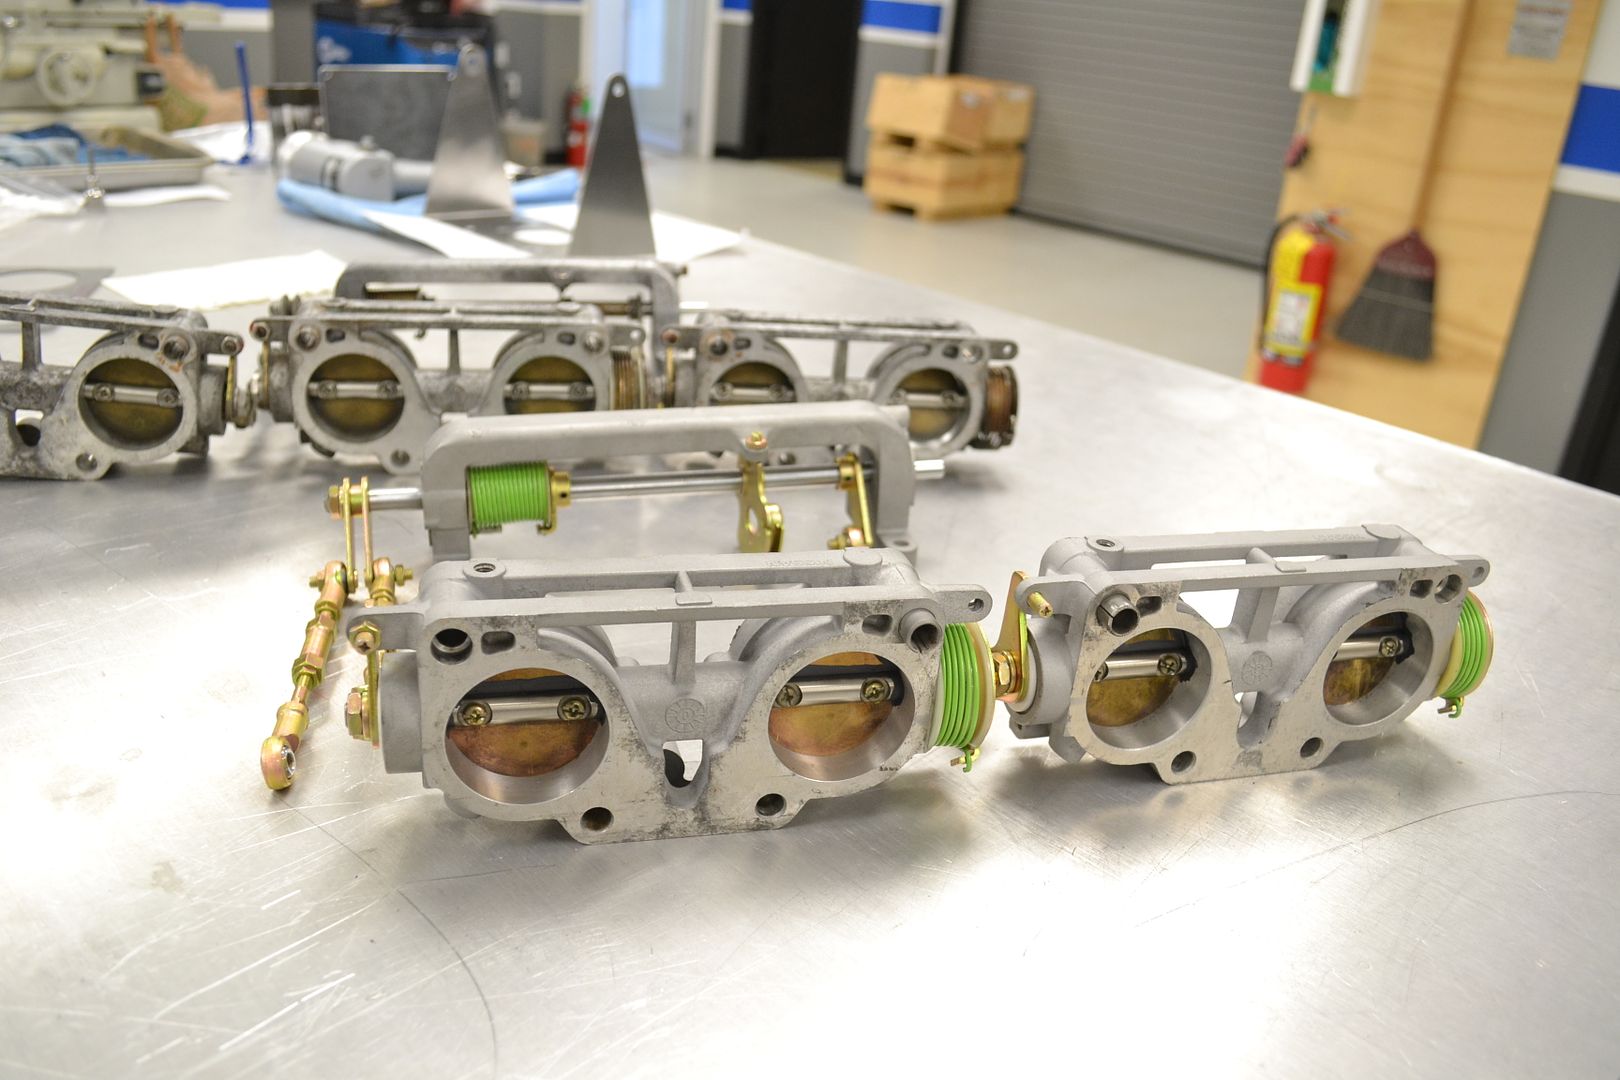
The OEM ITB's are now being retained, so they needed freshening up, which naturally turned into a pretty involved restoration. Luckily I have a few sets of these, so I chose the best set, and tore them down. I was warned not to do this, as many say they are never the same once cleaned, however I think that is mainly due to moly coating being removed. The housings were media blasted, all the brackets, hardware, linkages, esc were media blasted, walnut tumbled and sent to the plater for zinc and yellow chromate.  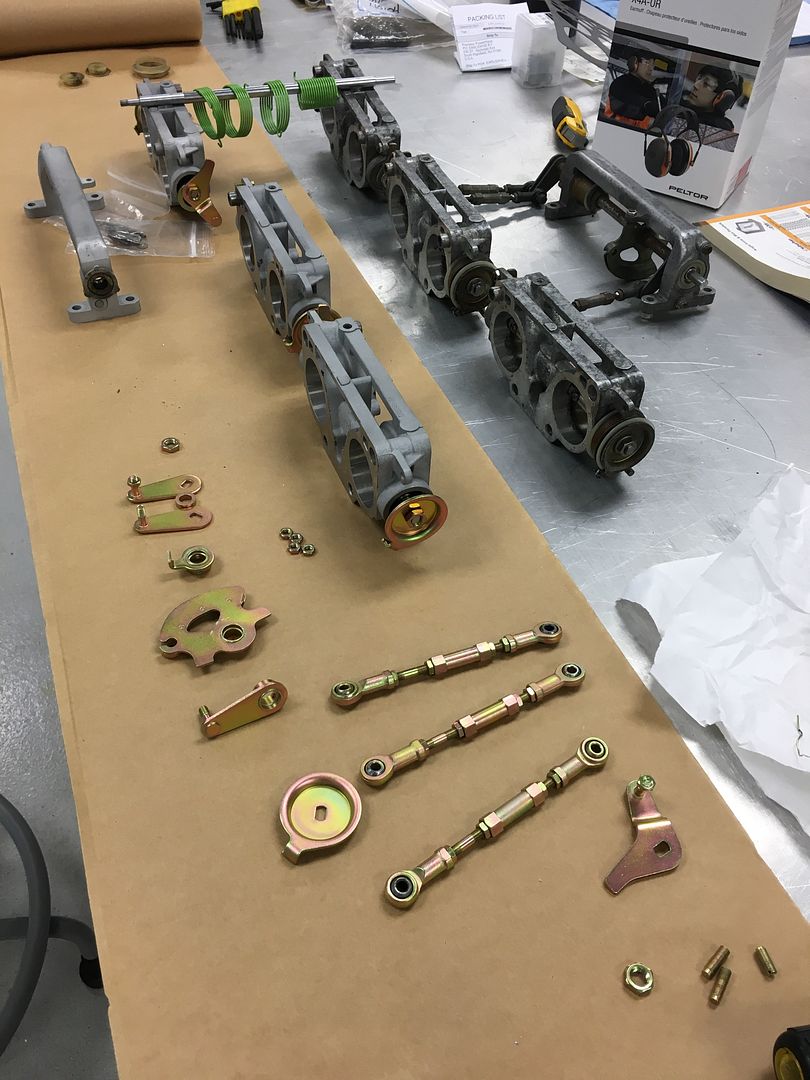 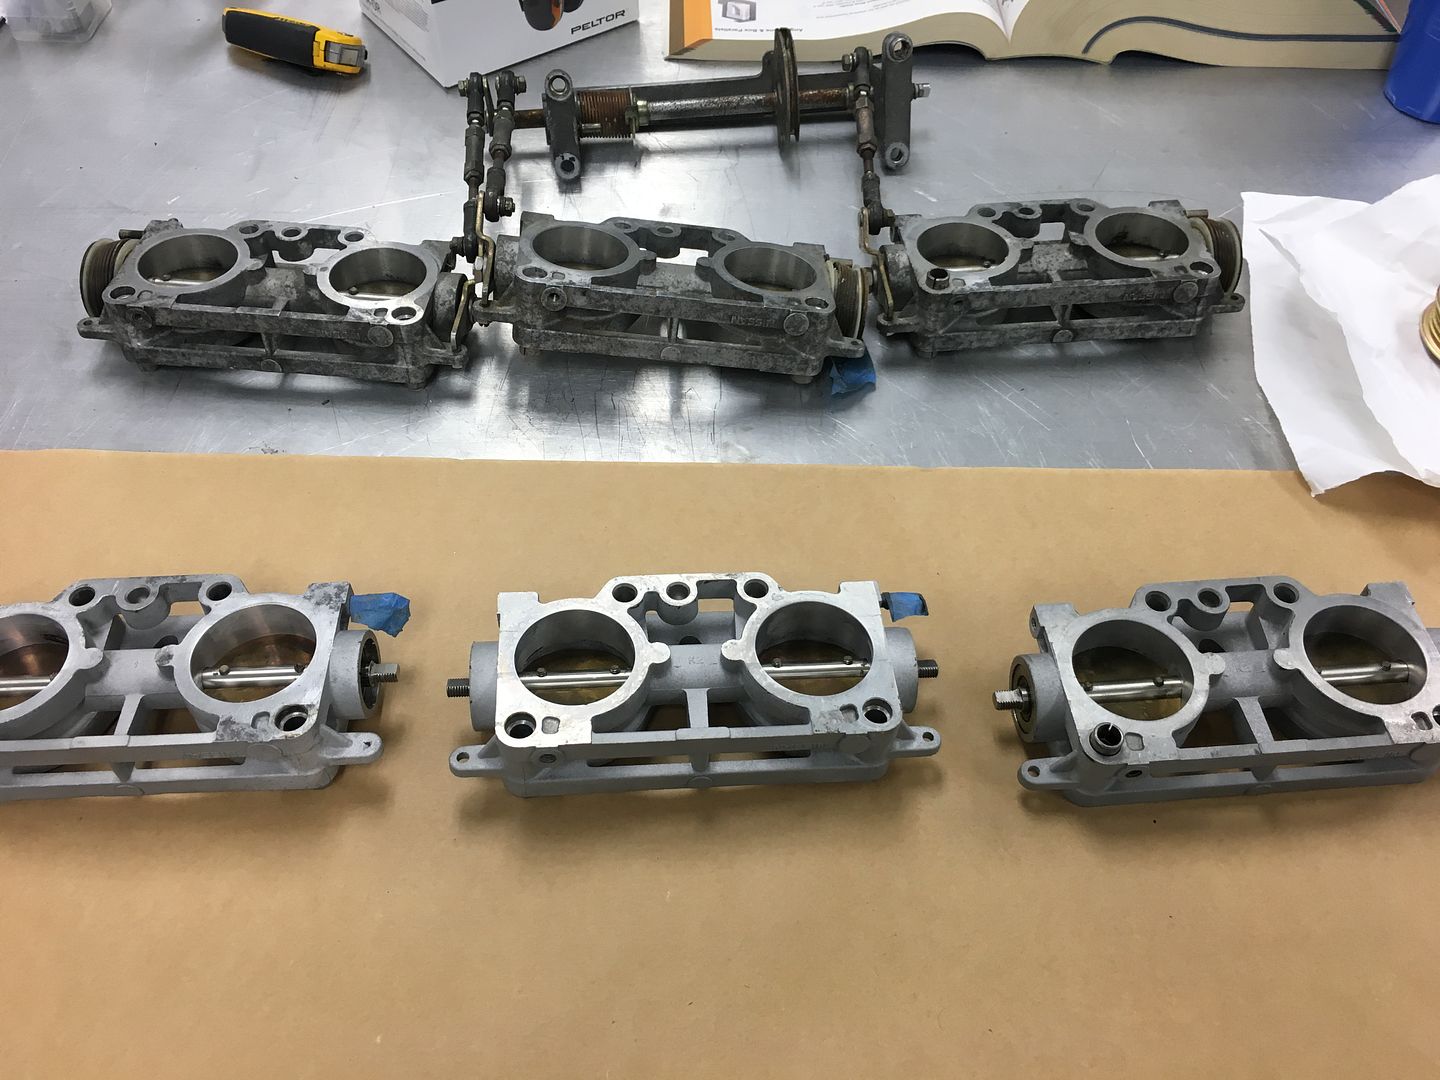 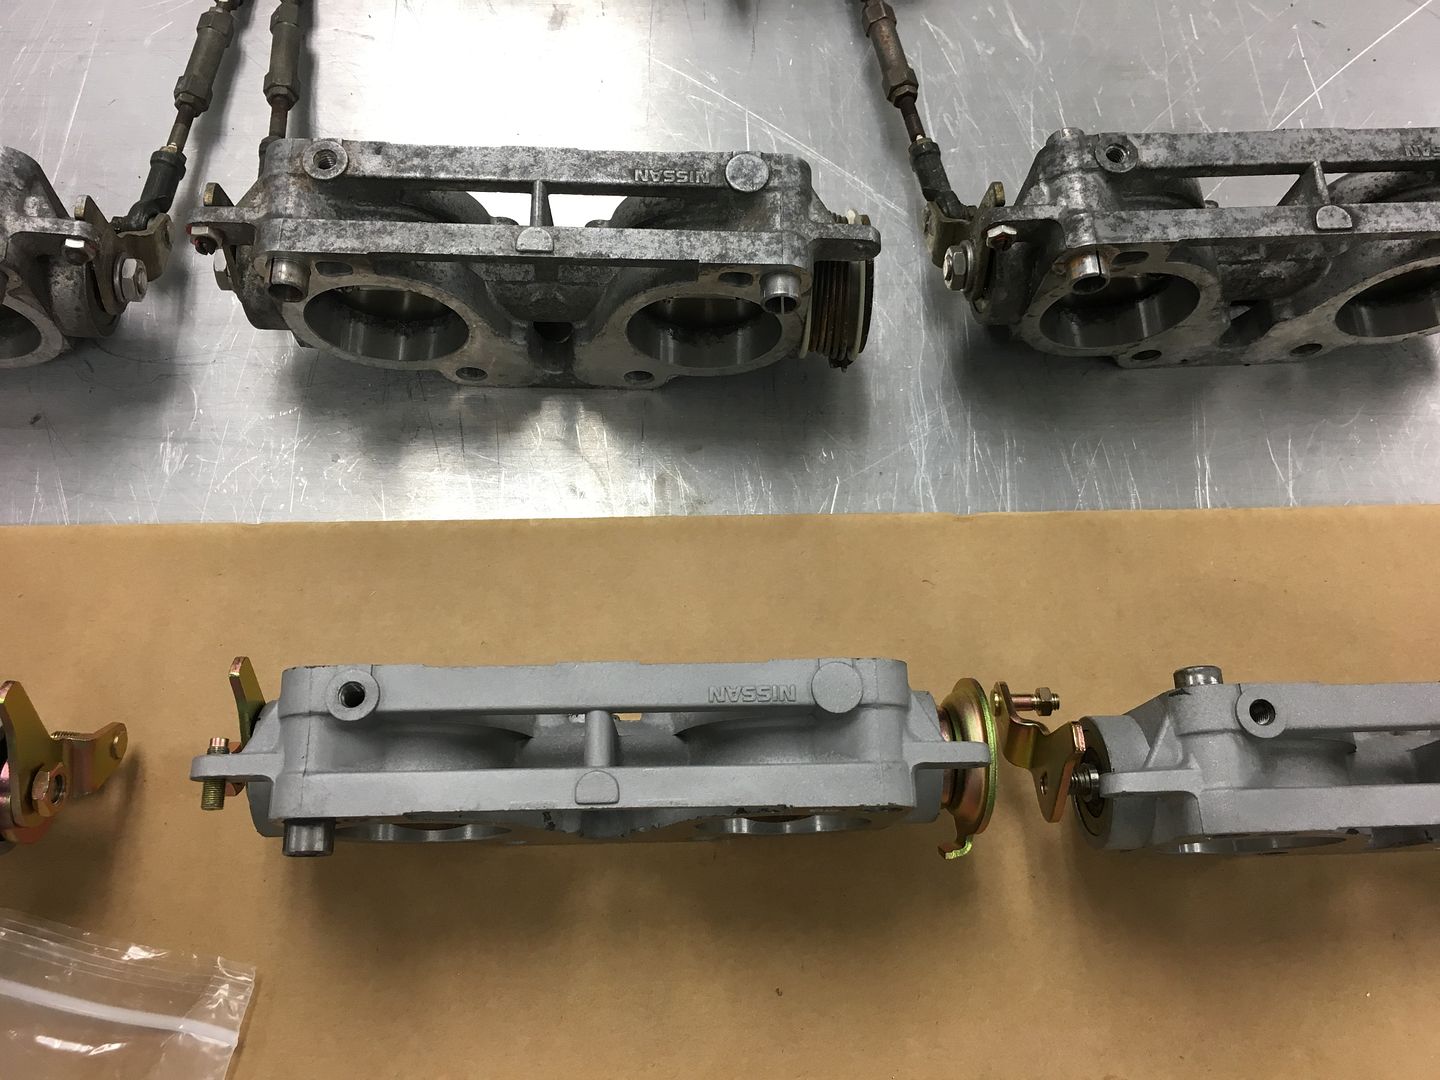 |
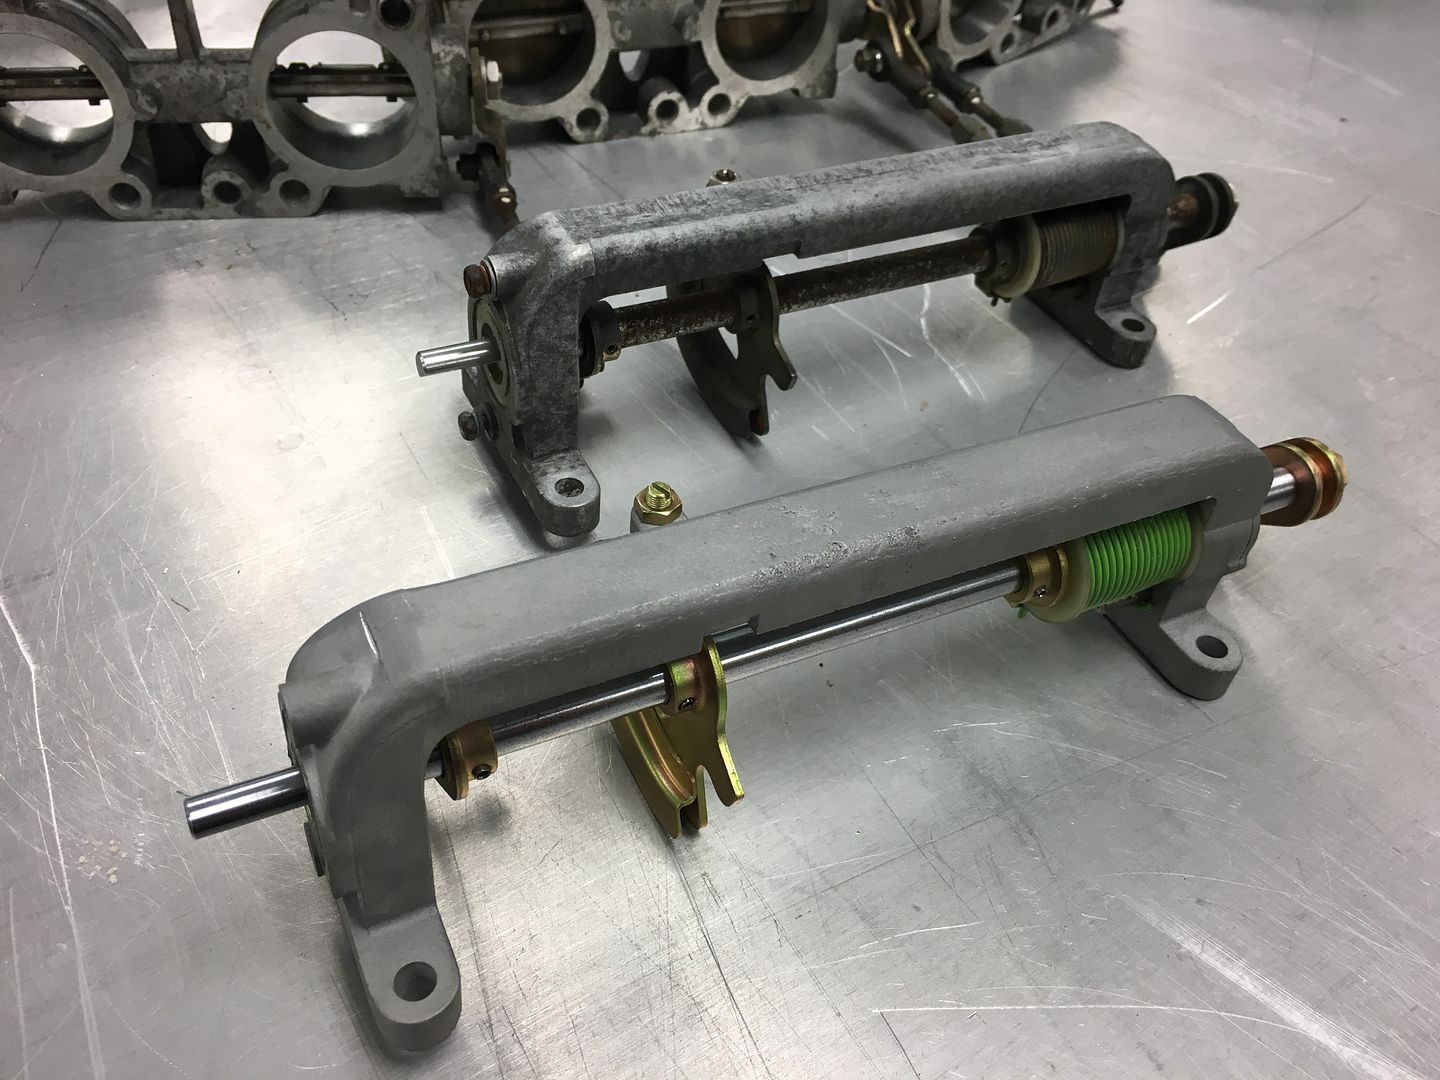
|
|
|
|
08-20-2018, 05:57 PM
|
#130 |
|
Zilvia Junkie
Join Date: Jun 2006
Location: East Coast
Age: 38
Posts: 585
Trader Rating: (20)
Feedback Score: 20 reviews
|
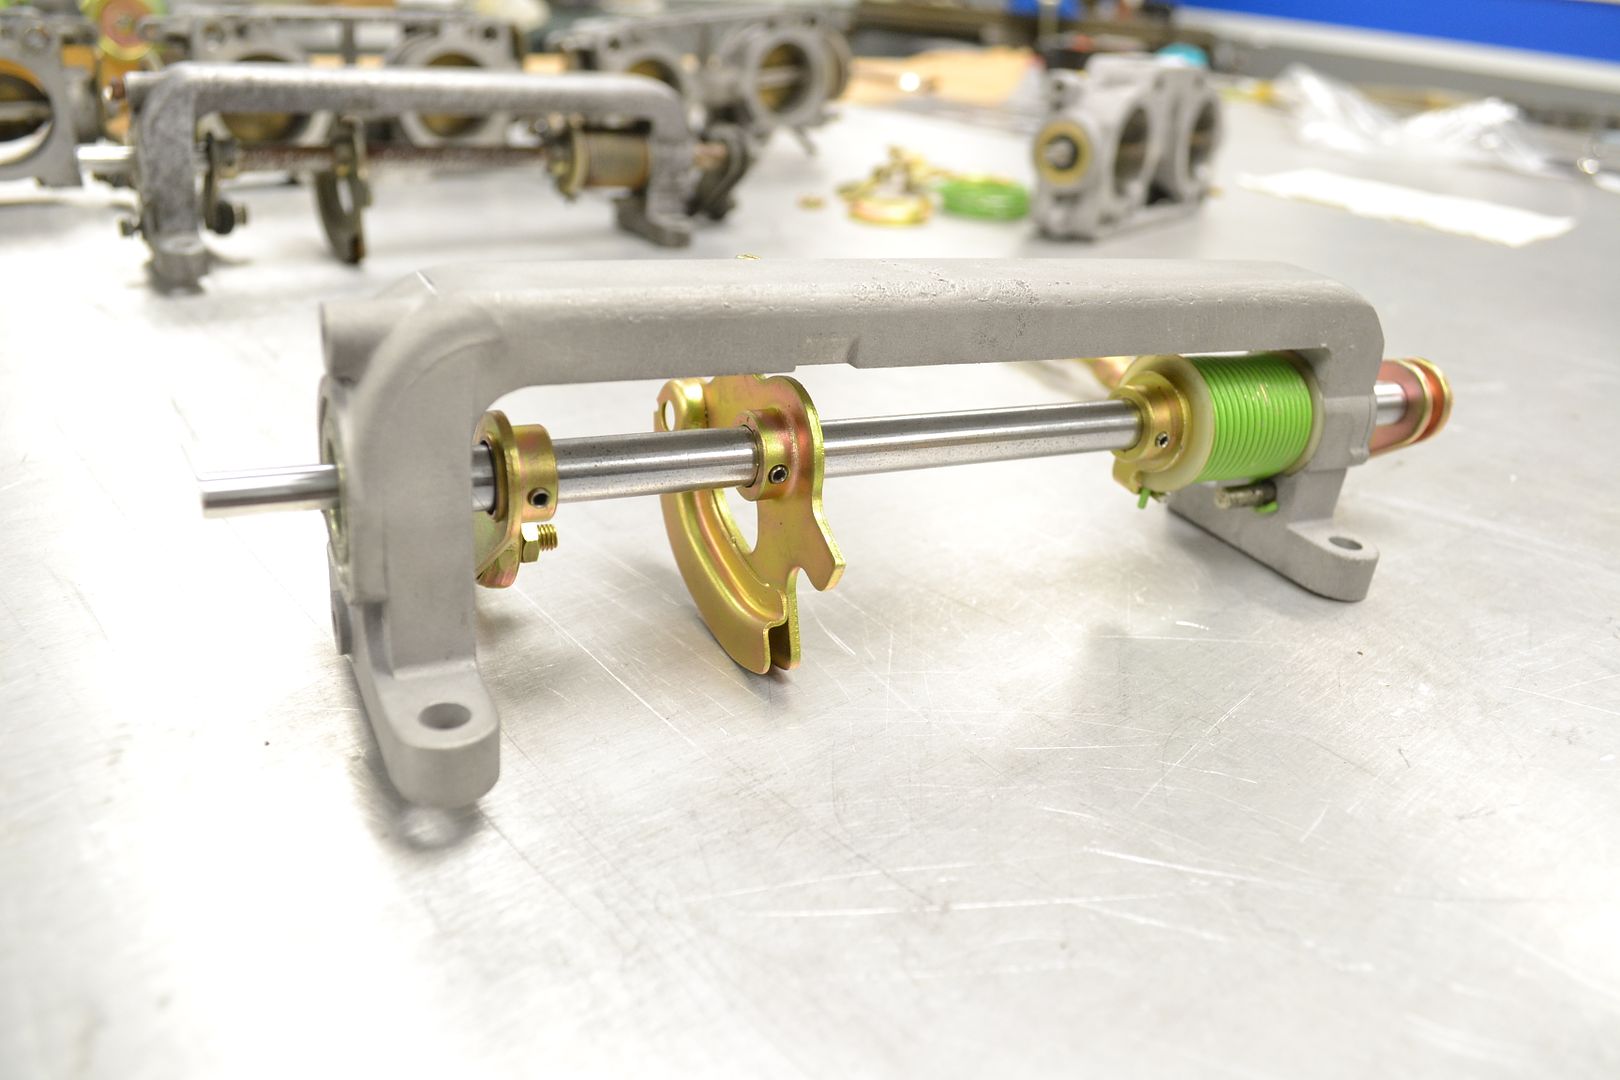
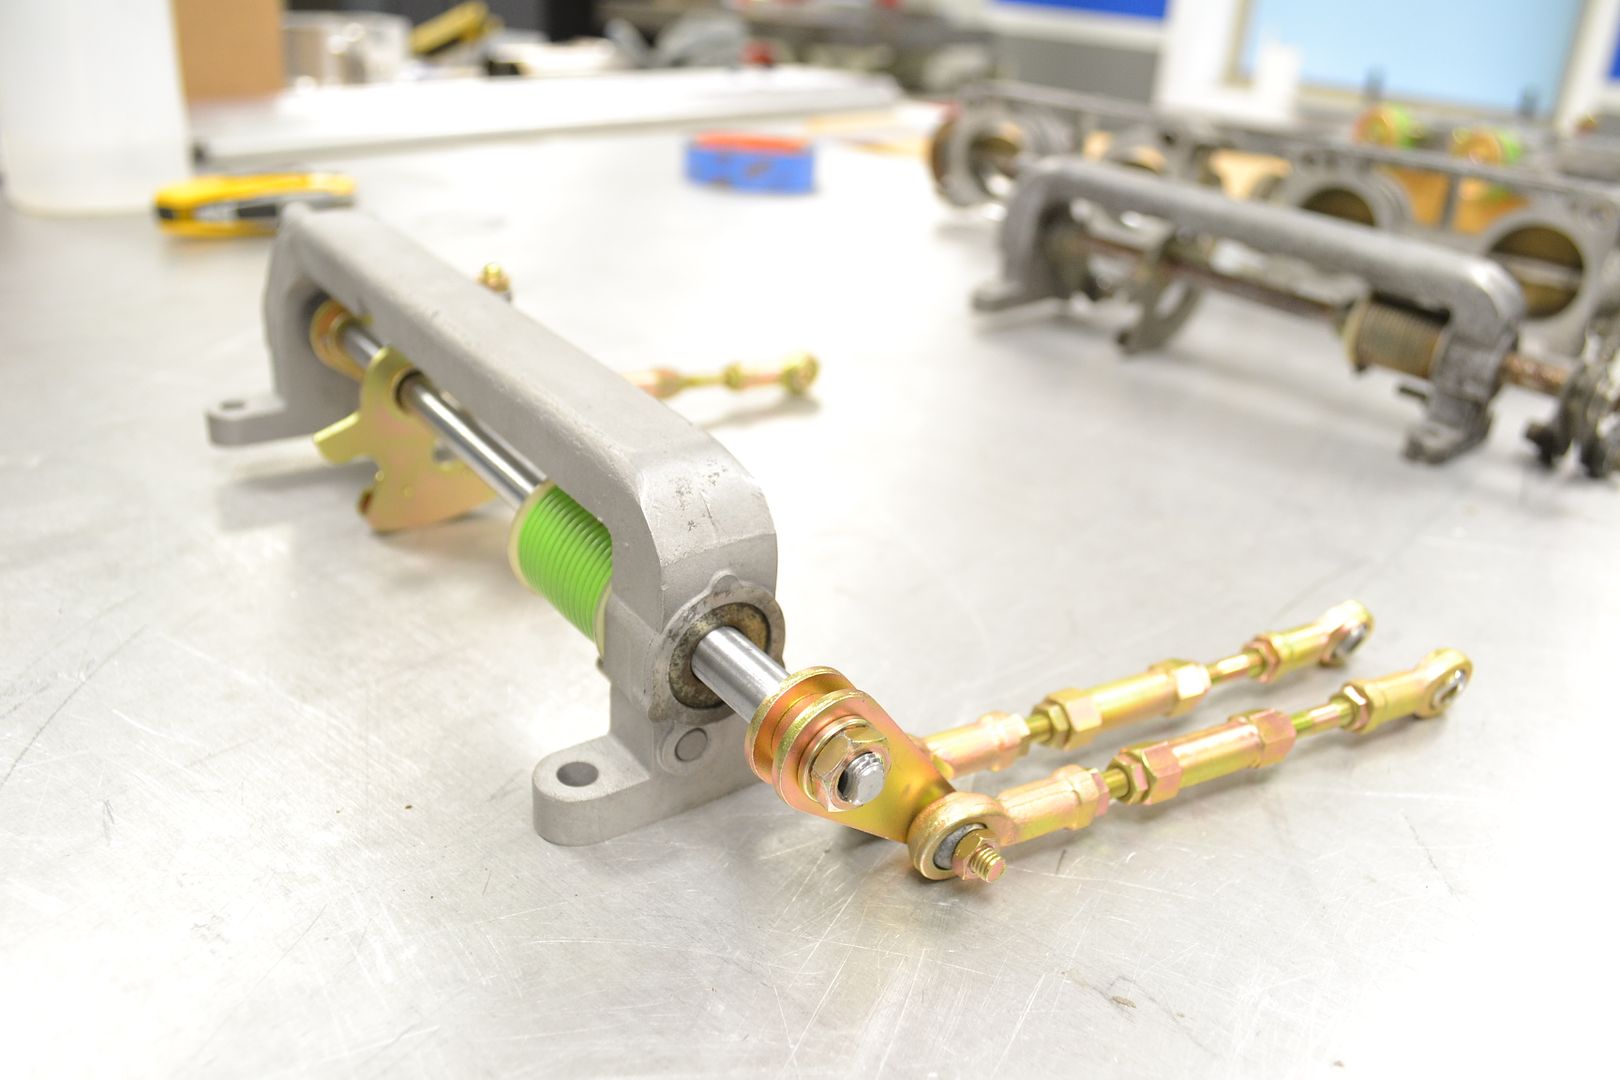
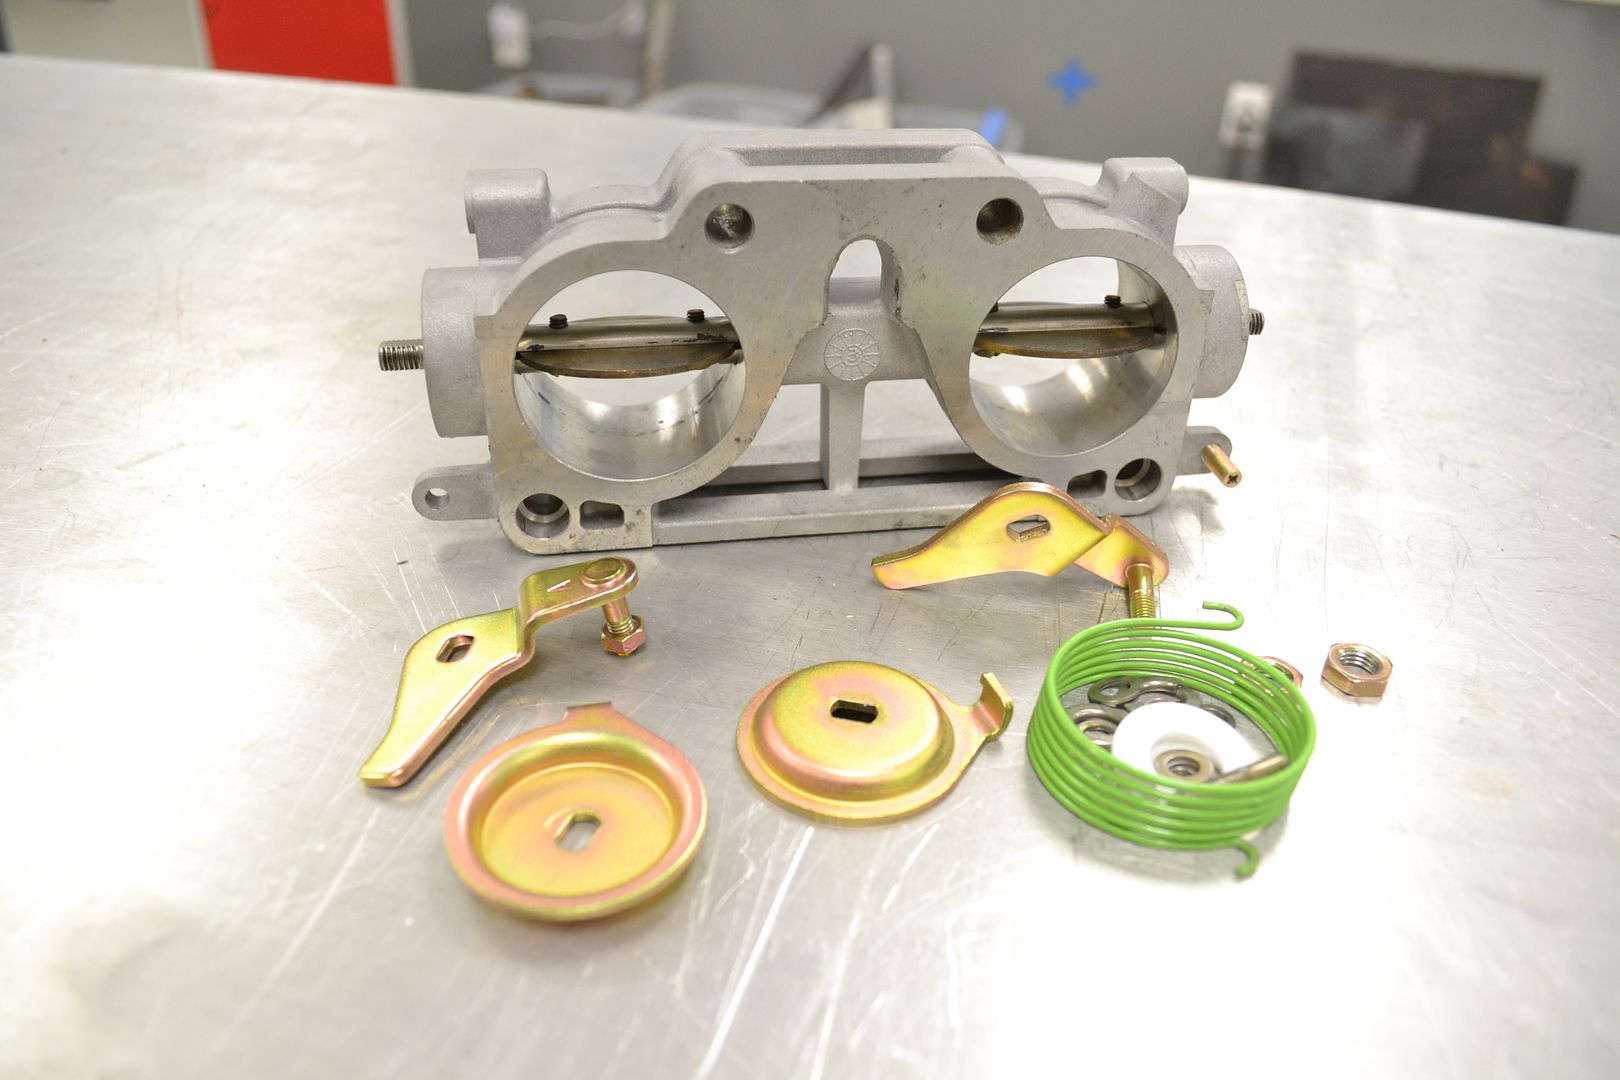
This piece was a bit complicated it get together with damaging or affecting the fresh plating. It has to be disassembled/assembled with a press, and given its shape, you have to get quite creative to get it done without damage. I had to make a few different adapters to get it done, but in the end, it came together very nicely.
      |
|
|
|
|
08-20-2018, 06:52 PM
|
#131 |
|
Zilvia Junkie
Join Date: Jun 2006
Location: East Coast
Age: 38
Posts: 585
Trader Rating: (20)
Feedback Score: 20 reviews
|
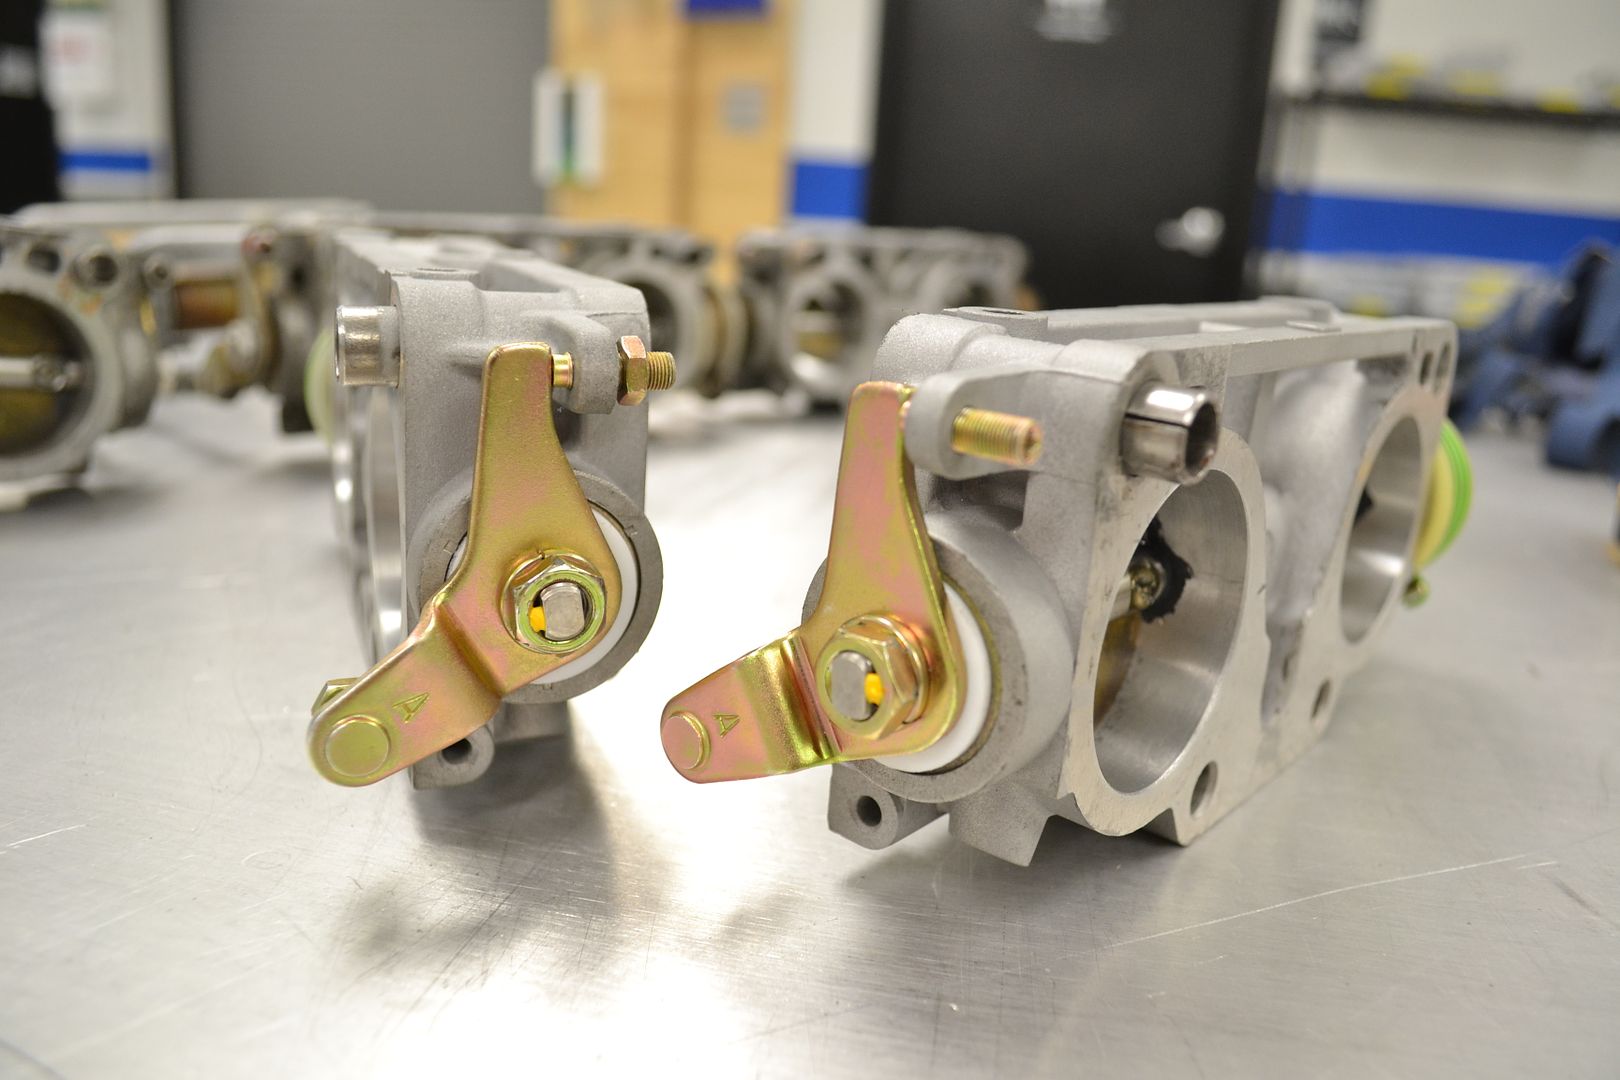
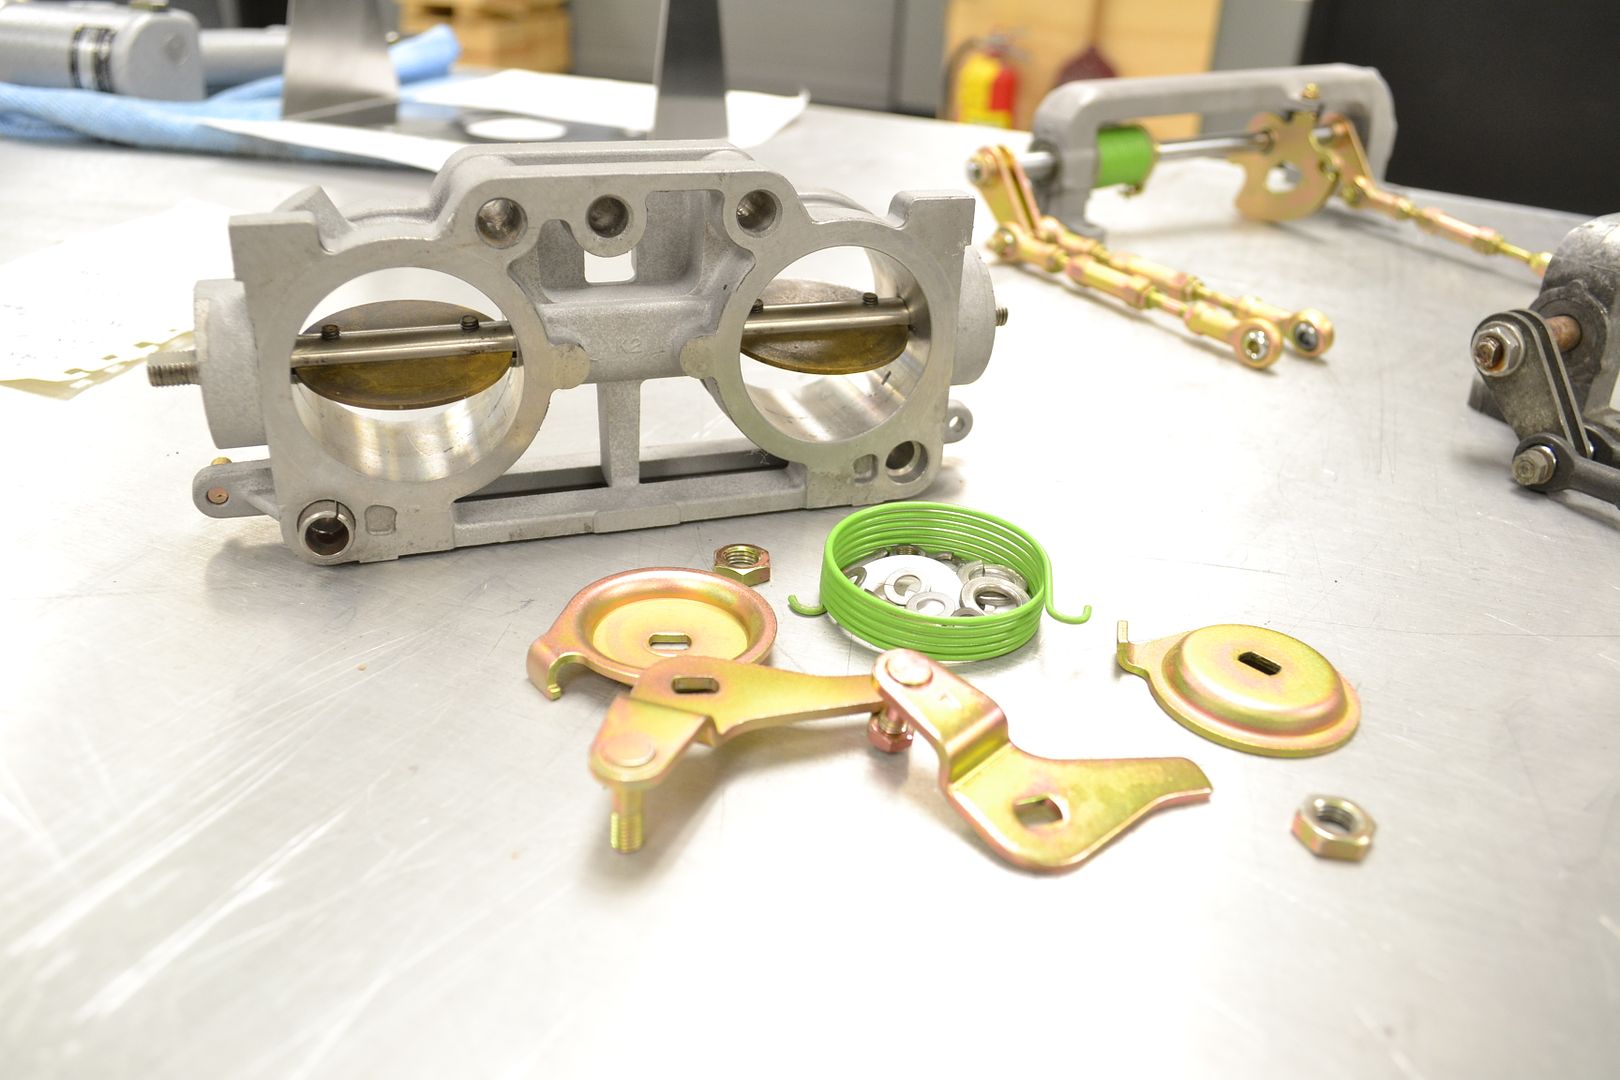
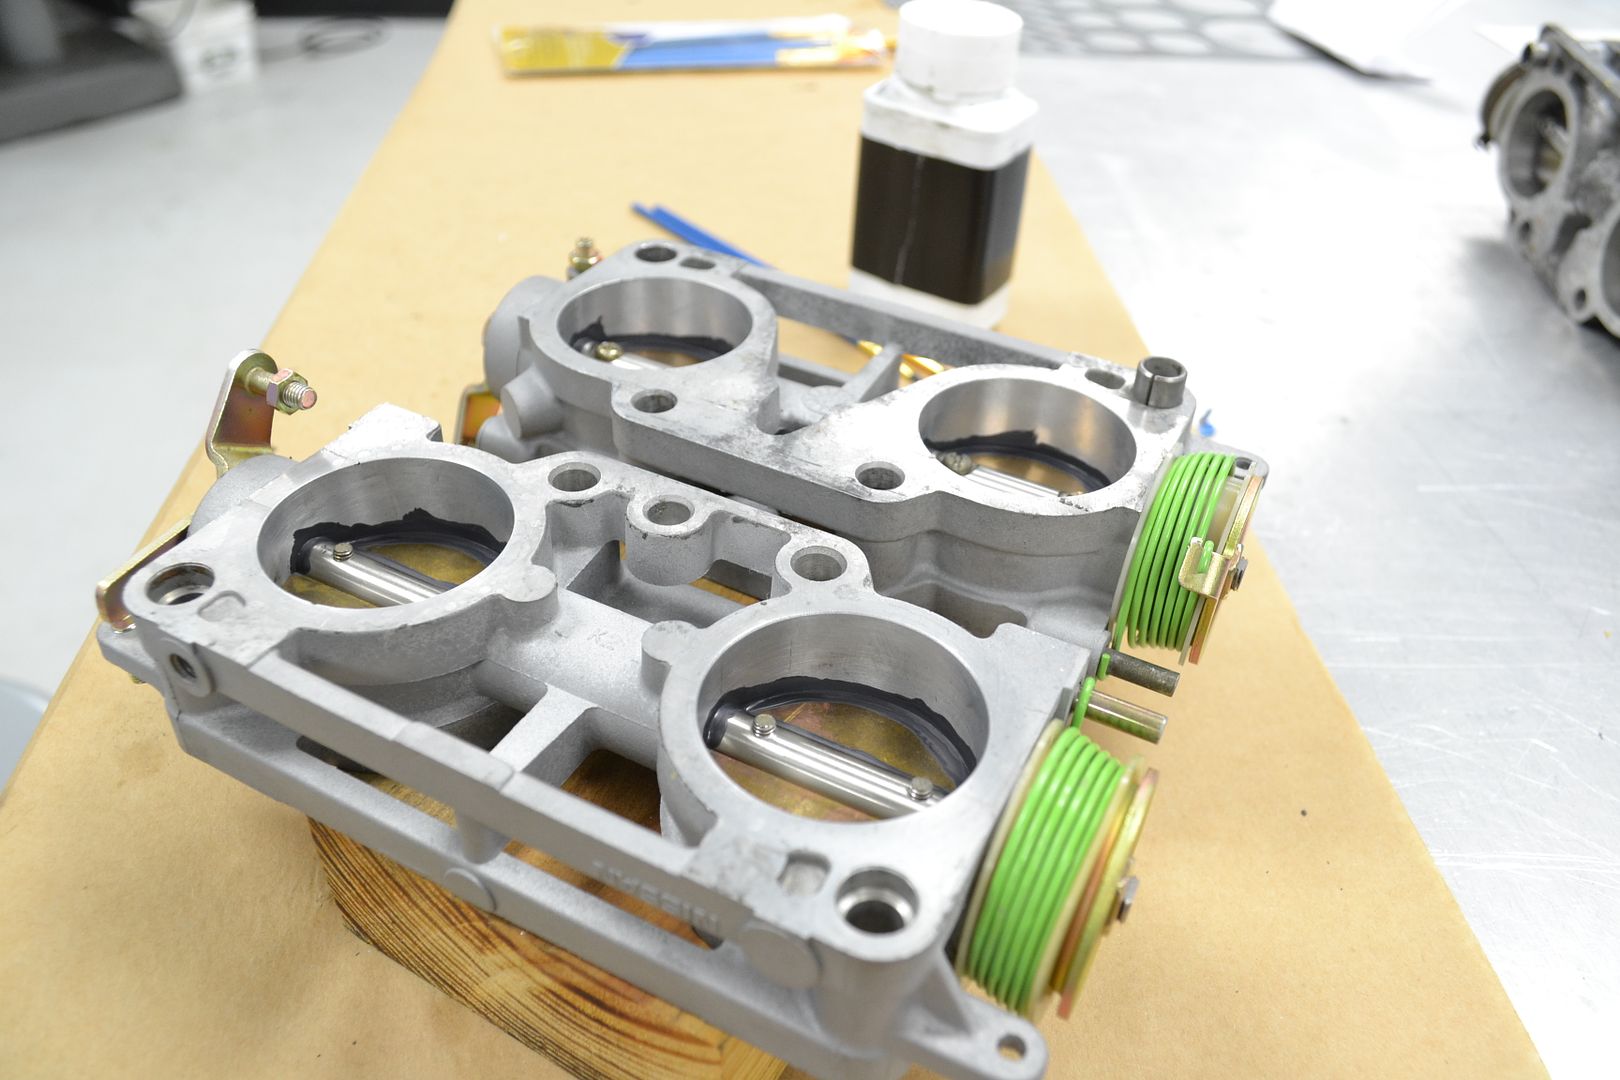
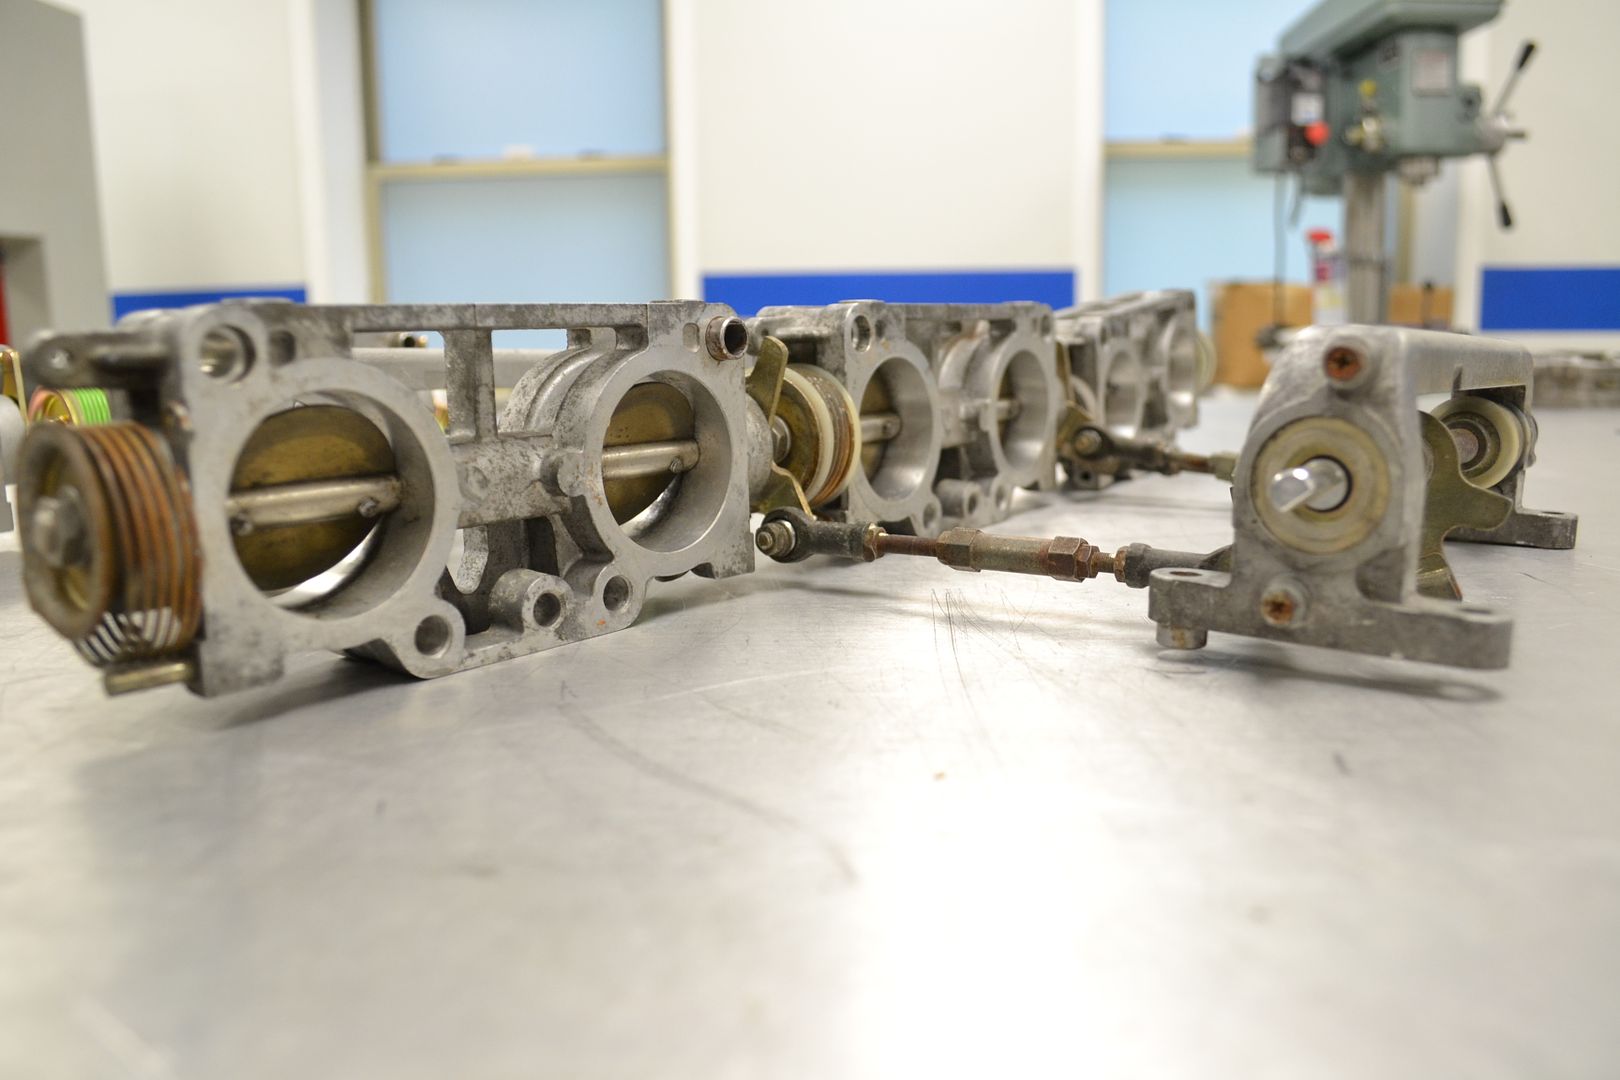
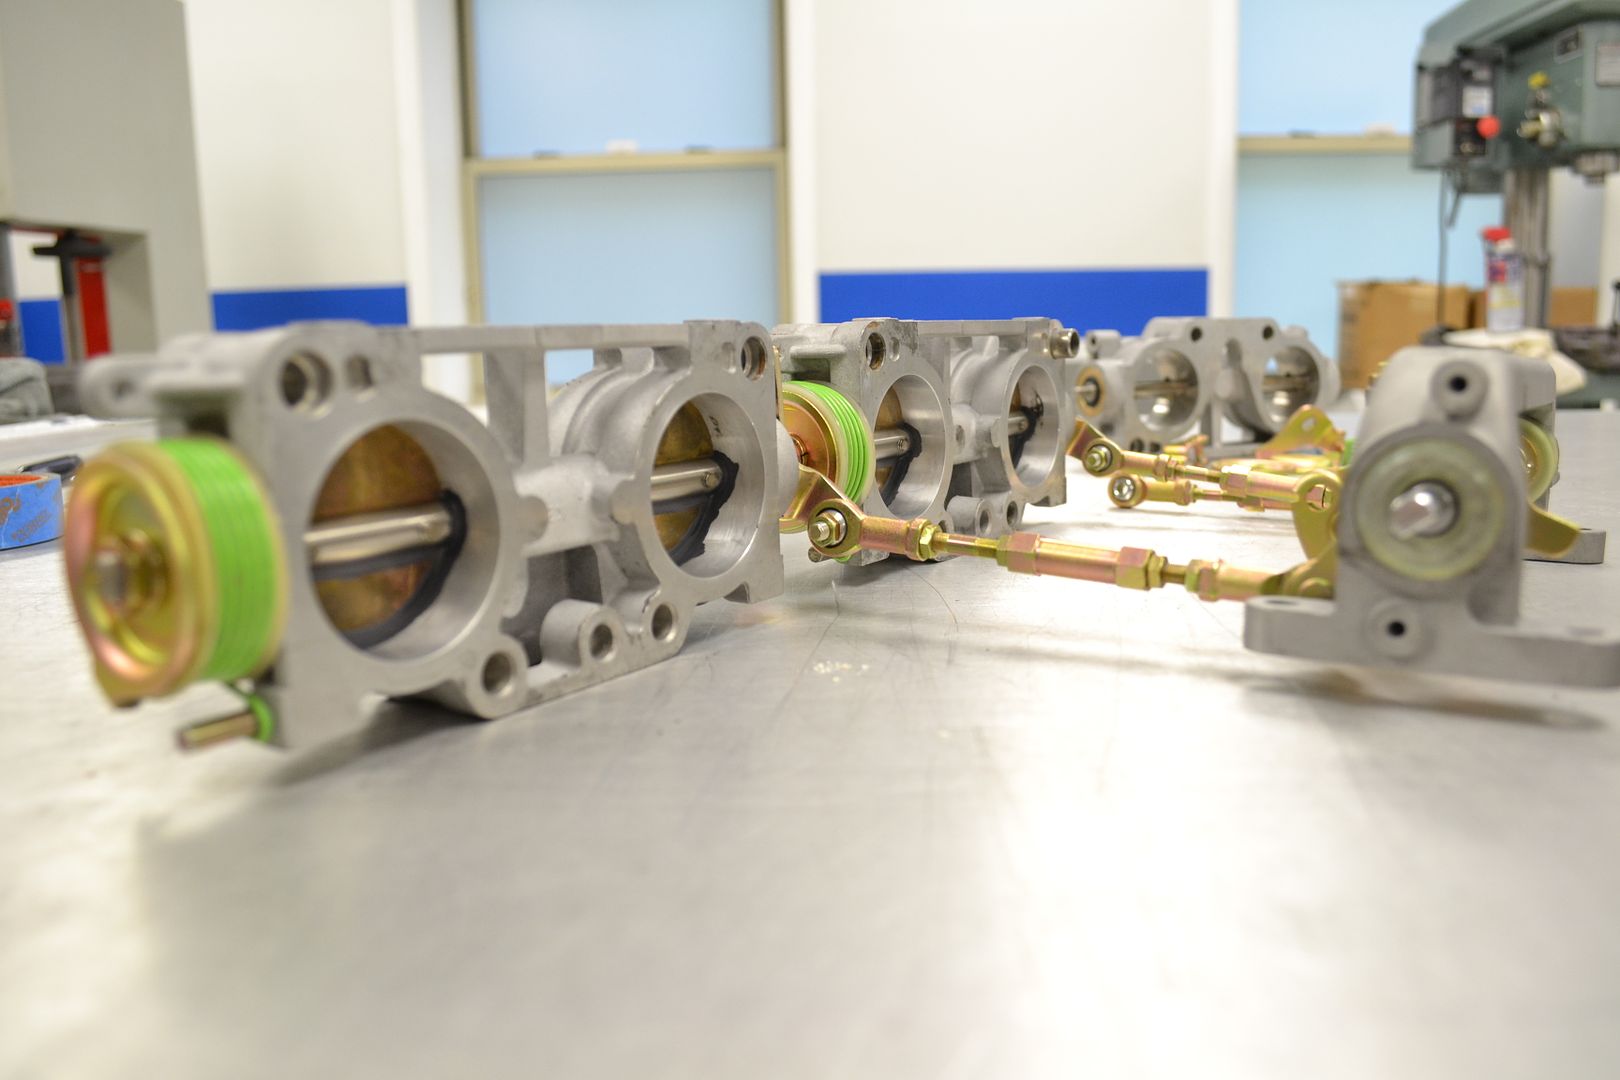
The housing were easier to get apart, but require a lot more prep work to be able to media blast, as there are cavities you definitely don't want glass bead in. Be very careful if your going to do this, as some these components are directional, and it can get very confusing if you don't have a second set to look at. There is no manual for this. The springs were media blasted and painted with an aviation paint we use frequently at work. It is resistant to almost anything a car can throw at it, aside from maybe brake fluid. The spring guides are very fragile, and are usually broken, but I was able to salvage enough for the engine. Luckily, because they are very thin and would hard to machine. The shaft seals were replaced, which were not easy to find, and per the suggestion of another member, machined Delrin washers were installed between the linkage and the seal. This helps to ensure that the seals do not back out under high boost. I couldn't find Nylon washers as the member suggested, so they had to be made. The Delrin has excellent properties for this purpose and puts almost no drag on the linkage as it actually isn't sandwiched in there, there is a tiny pit of play. I thought that was a very clever suggestion from that member, which I have never actually seen done. After they were assembled, the topic of the throttle coating needed to be addressed. This has been talked about before and it is said to be the source of a lot of high idle issues due to there being gaps around the throttle plates allowing too much air to bypass at idle. You can sometimes see this coating left over from the factory, but it is many times mistaken for carbon buildup, and cleaned off, thus creating the issue. The test is usually to hold it up to the light, and check for light bypassing the plate. After installation, I actually did not see a lot of light past the plates, however accumulatively, those slight gaps create a sizable bypass of air. The fix here is the apply an air dry moly coating, sometimes called Dry Film Lubricant. Tomei sells this stuff as "throttle coat", however it is nearly impossible to get from them, from my experience. Not big deal, as this is stuff is not new, and is available if you look. Fortunately, this is another hazardous substance we use at work. Its terrible stuff, likely why its so hard to ship. I am sure there are a number of ways to apply, but I can only comment on how I applied it. It gets brushed on and drys pretty fast. I applied it to both sides of the throttle plate, on the opposite sides of the plate rotation. This areas around the shaft where it enters the housing were coated too. Before it dried completely, I cracked the throttle a few time, allowing it to snap back pretty aggressively. This was to ensure the coating did not crack off in sections once its hard and brittle. The result is an overly restored, pretty to look at, set of ITB's, with little to no performance advantage. But, it was fun to do.
         |
|
|
|
|
08-21-2018, 09:49 PM
|
#133 |
|
Zilvia Junkie
Join Date: Jun 2006
Location: East Coast
Age: 38
Posts: 585
Trader Rating: (20)
Feedback Score: 20 reviews
|
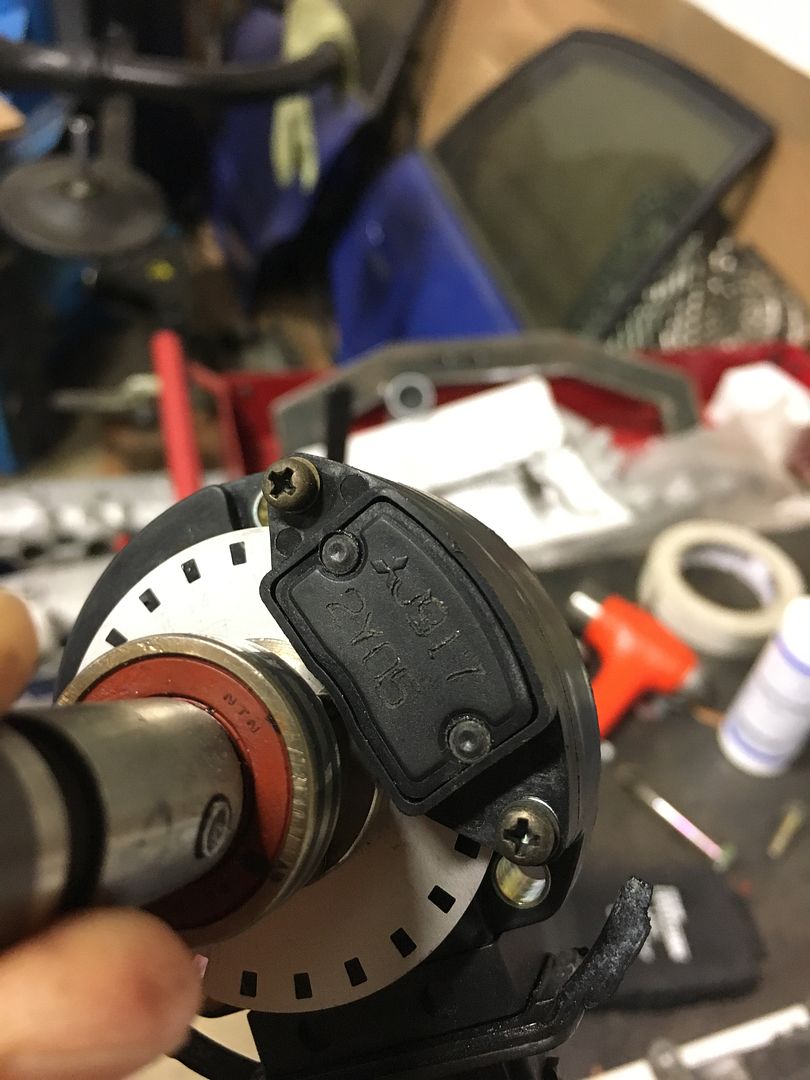
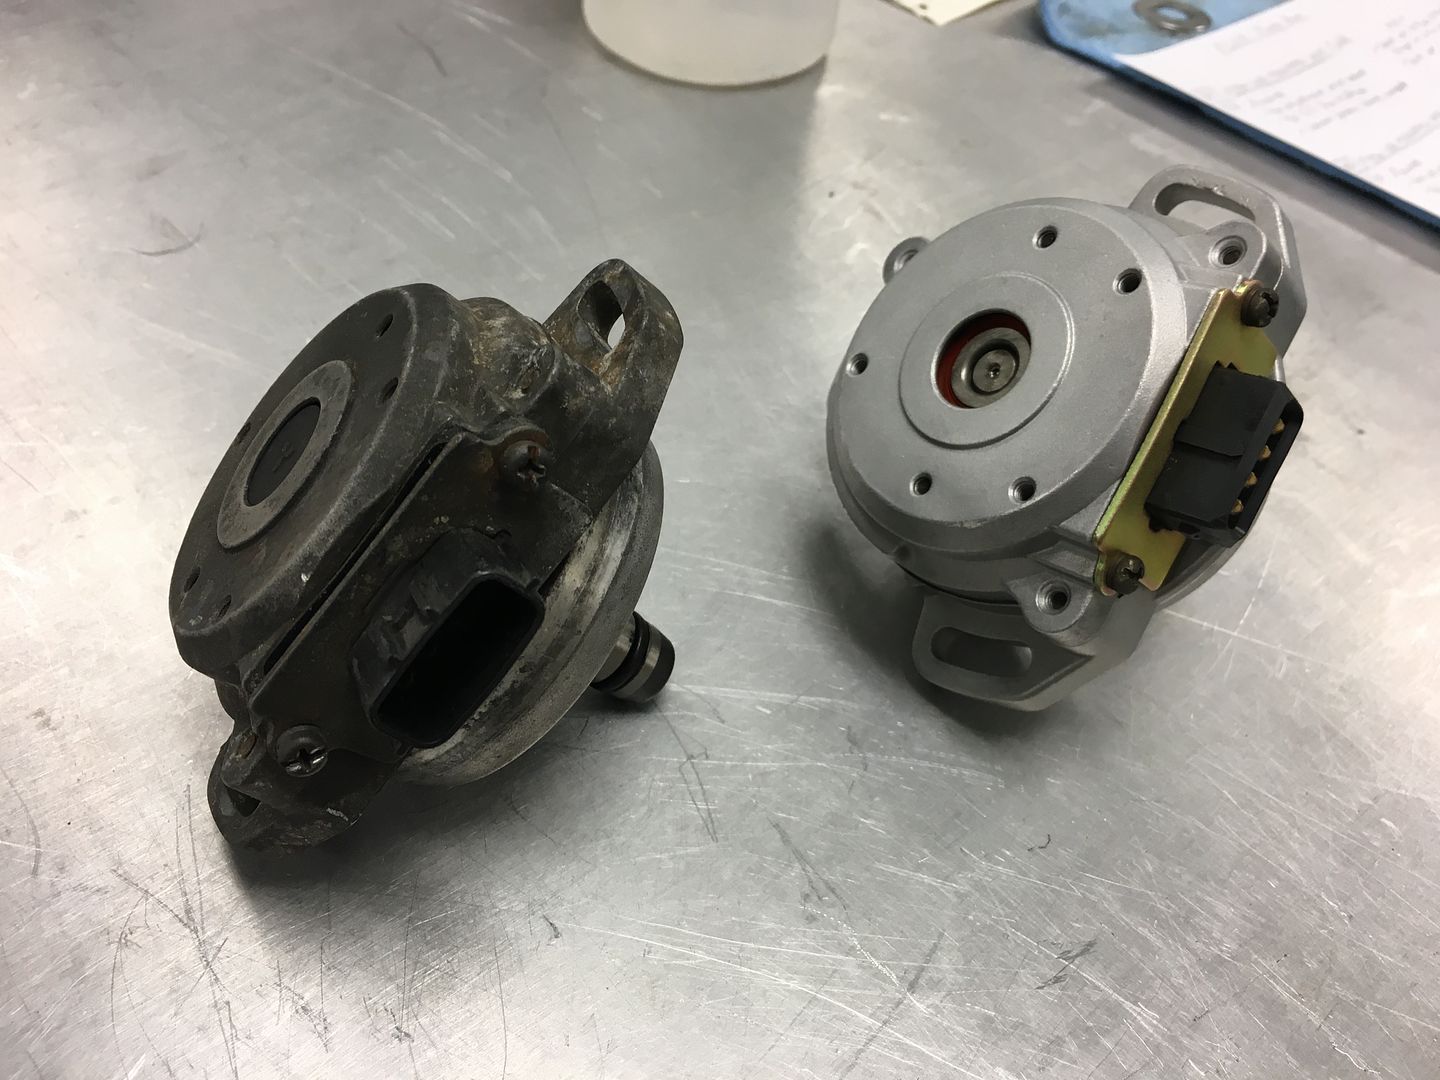
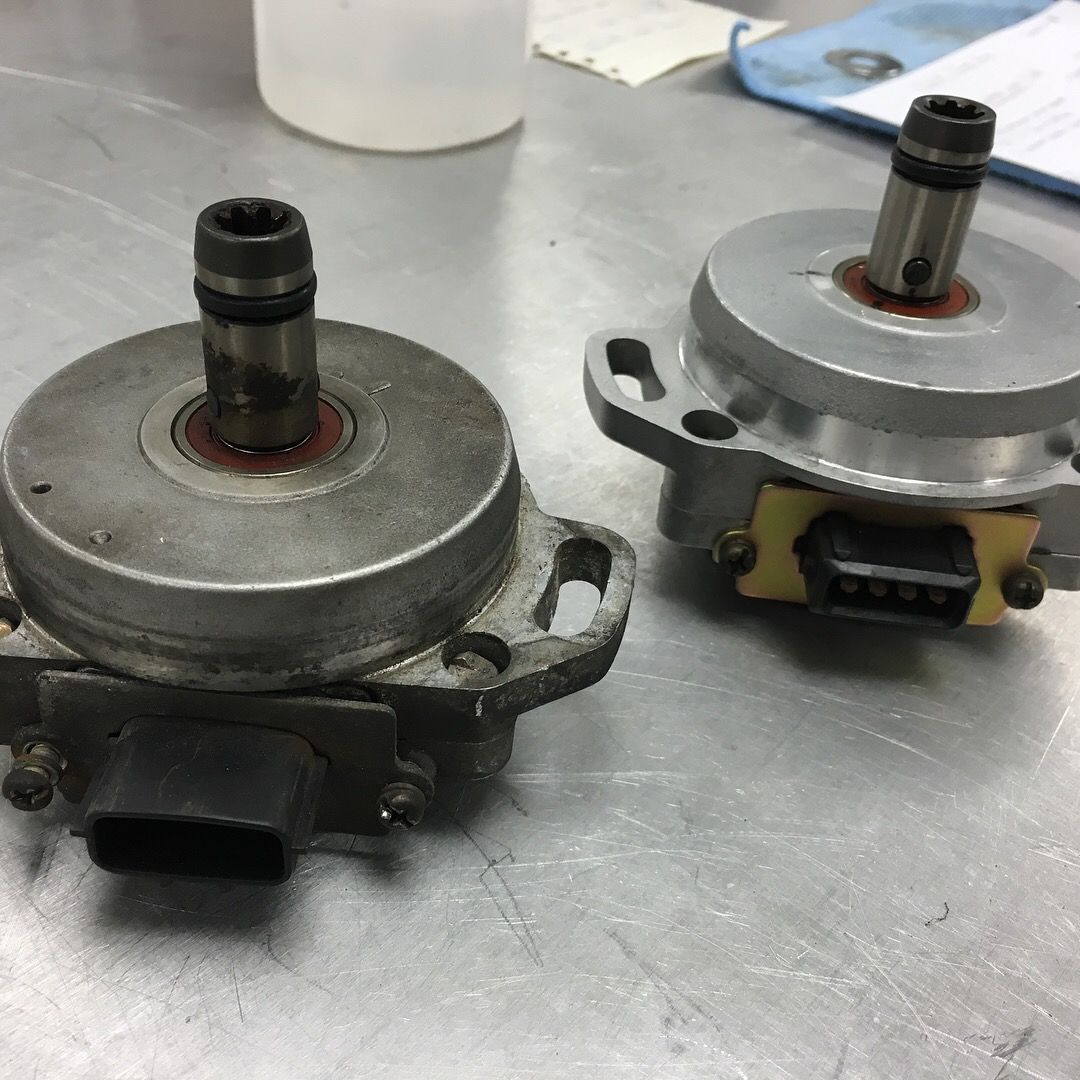
The factory CAS got the same attention as everything else, as it had seen better days. The unit needed to be disassembled in order to install a 24/1 AEM optical wheel, which made the cosmetic restoration fairly straight forward. You certainly do not want to media blast it while assembled, for obvious reasons, but removing the housing is fairly easy depending on which model sensor you have. The ones with tamper proof screw are a pain to deal with. Everything past separating the housings can get a bit tricky as its a fragile unit and it require force to disassemble to install the new wheel. Careful marking, proper placement in a vise/press, and patience, it can be done without too much issue. I can see it easily turning into a nightmare, as your constantly dancing around whether to use more or less force. I had to create a makeshift puller just to get the bearing off, and the solid pin holding the spline shaft on was very hard to remove. One thing which is almost unavoidable is that the seal that goes between the housings, will almost certainly be dried out and crack. I ended having to make a new gasket, as mine disintegrated. After installing the AEM wheel, the housing were media blasted, the unit was pressed back together in reverse order and the freshly plated guard was installed around the connector. The plastic Mitsubishi emblem in the center was very hard to remove without damaging. An anti corrosion coating was applied, which should prevent any further oxidation.
    |
|
|
|
|
08-23-2018, 05:43 PM
|
#137 |
|
Zilvia Junkie
Join Date: Jun 2006
Location: East Coast
Age: 38
Posts: 585
Trader Rating: (20)
Feedback Score: 20 reviews
|
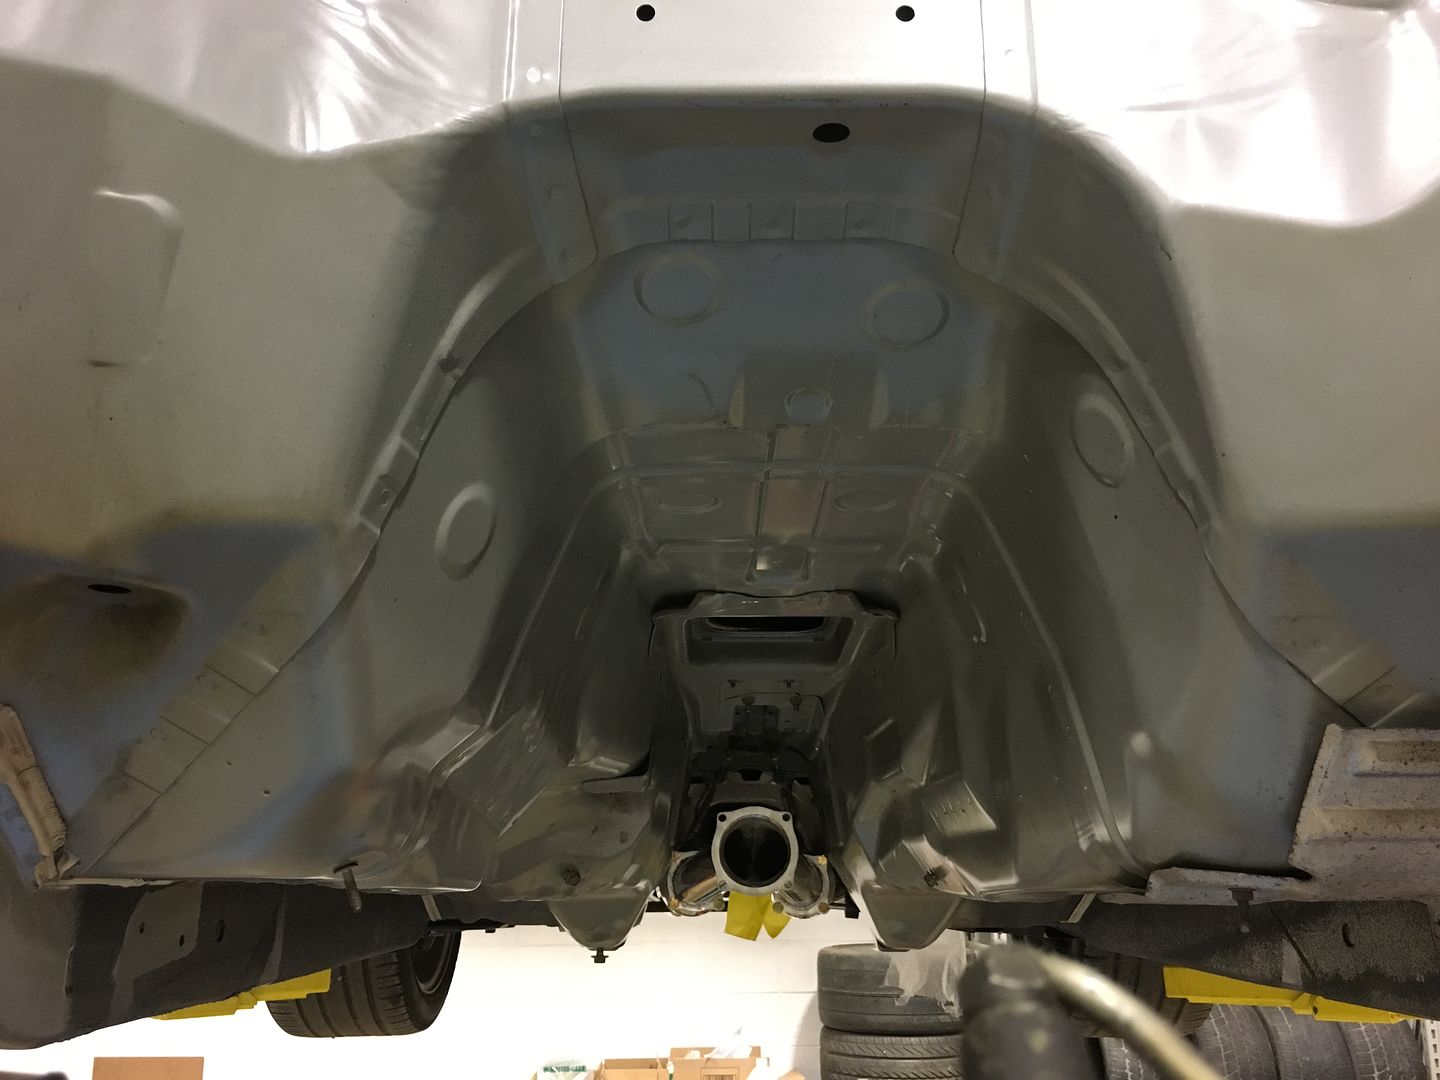
This was a lot of fun to make. The "head drain" block is something I got from Nitto years ago. I know there are a lot of opinions concerning head drains, their function, and how effective they are. My understanding of them is that they are not a drain, rather a path for air to escape the crankcase through the breather. All I hope is that it doesn't leak, as it is impossible to remove without moving the engine. The Nitto unit uses an existing freeze plug bore, and requires drilling and tapping holes in the head. I don't know if it was because I have a different bellhousing, but I could not find any 90 degree fitting that would work, so I used a rather large banjo fitting, which worked great. I then bent up some 5/8" aluminum tube, flared one end for -10 B-nut, then beaded the other end to accept a -10 hose. The -10 hose then terminates to a push lock 90 into the pan. Made a neat anti rotation bracket to secure the clamp for the tube, and applied heat sleeve. Clears the starter, so the starter can be moved forward and out fine.
Last edited by doyle4281; 09-15-2019 at 01:53 PM.. |
|
|
|
|
08-25-2018, 02:49 PM
|
#138 | |
|
Zilvia Junkie
Join Date: Jun 2006
Location: East Coast
Age: 38
Posts: 585
Trader Rating: (20)
Feedback Score: 20 reviews
|
Quote:
|
|
|
|
|
|
08-29-2018, 02:27 PM
|
#140 |
|
Zilvia Junkie
Join Date: Jun 2006
Location: East Coast
Age: 38
Posts: 585
Trader Rating: (20)
Feedback Score: 20 reviews
|
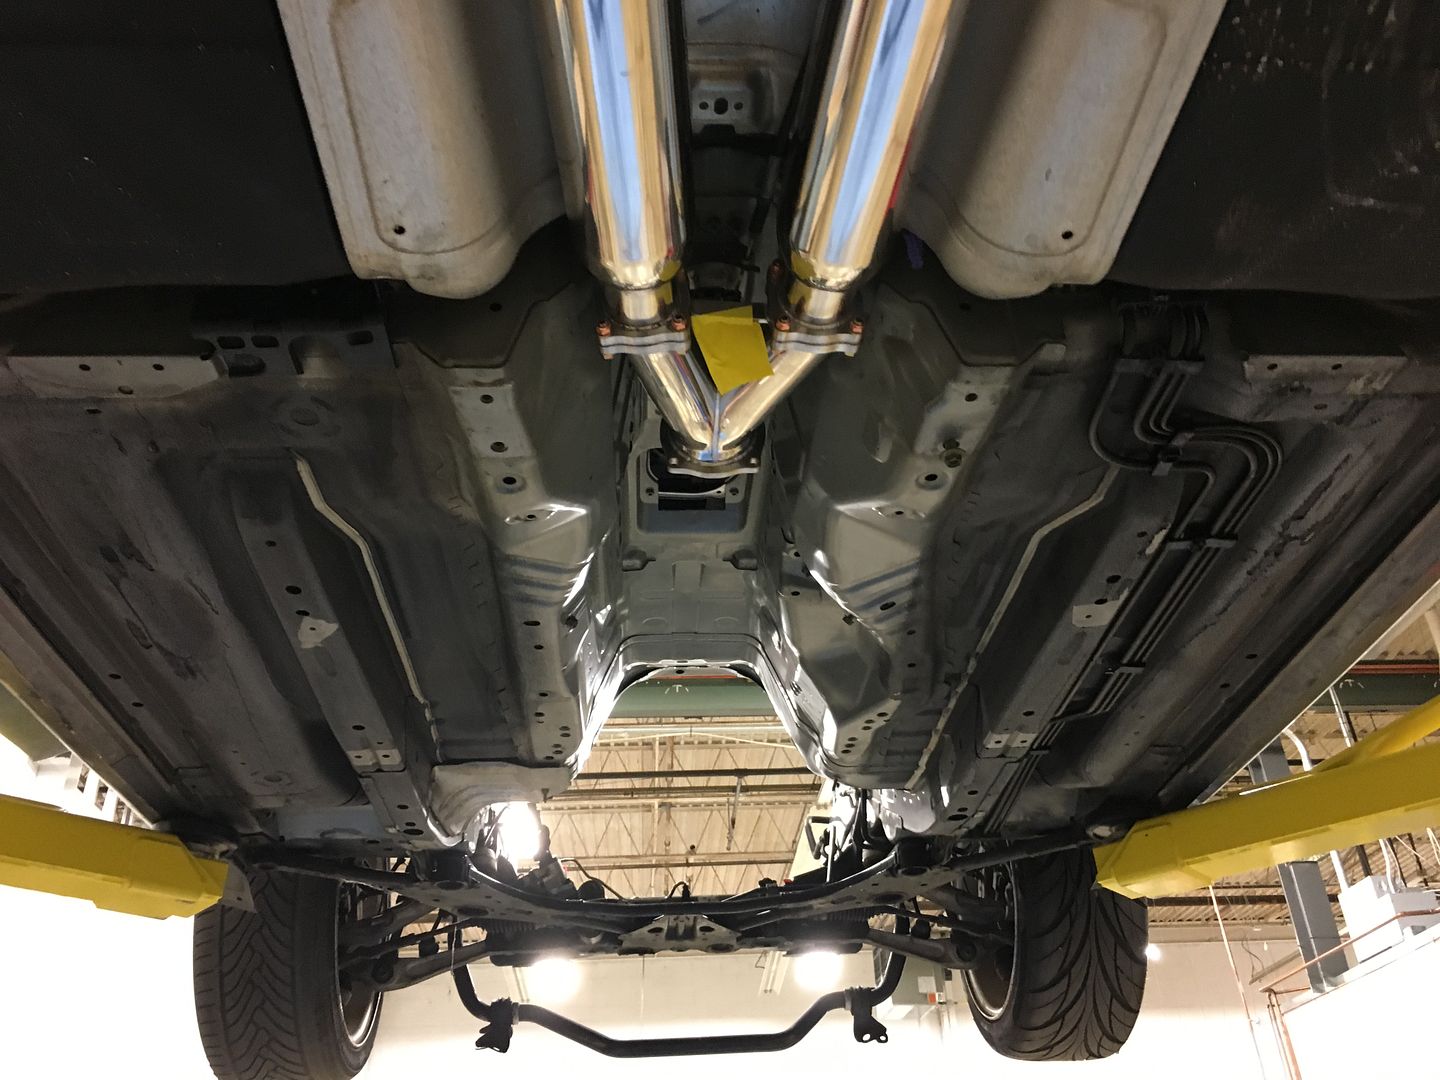
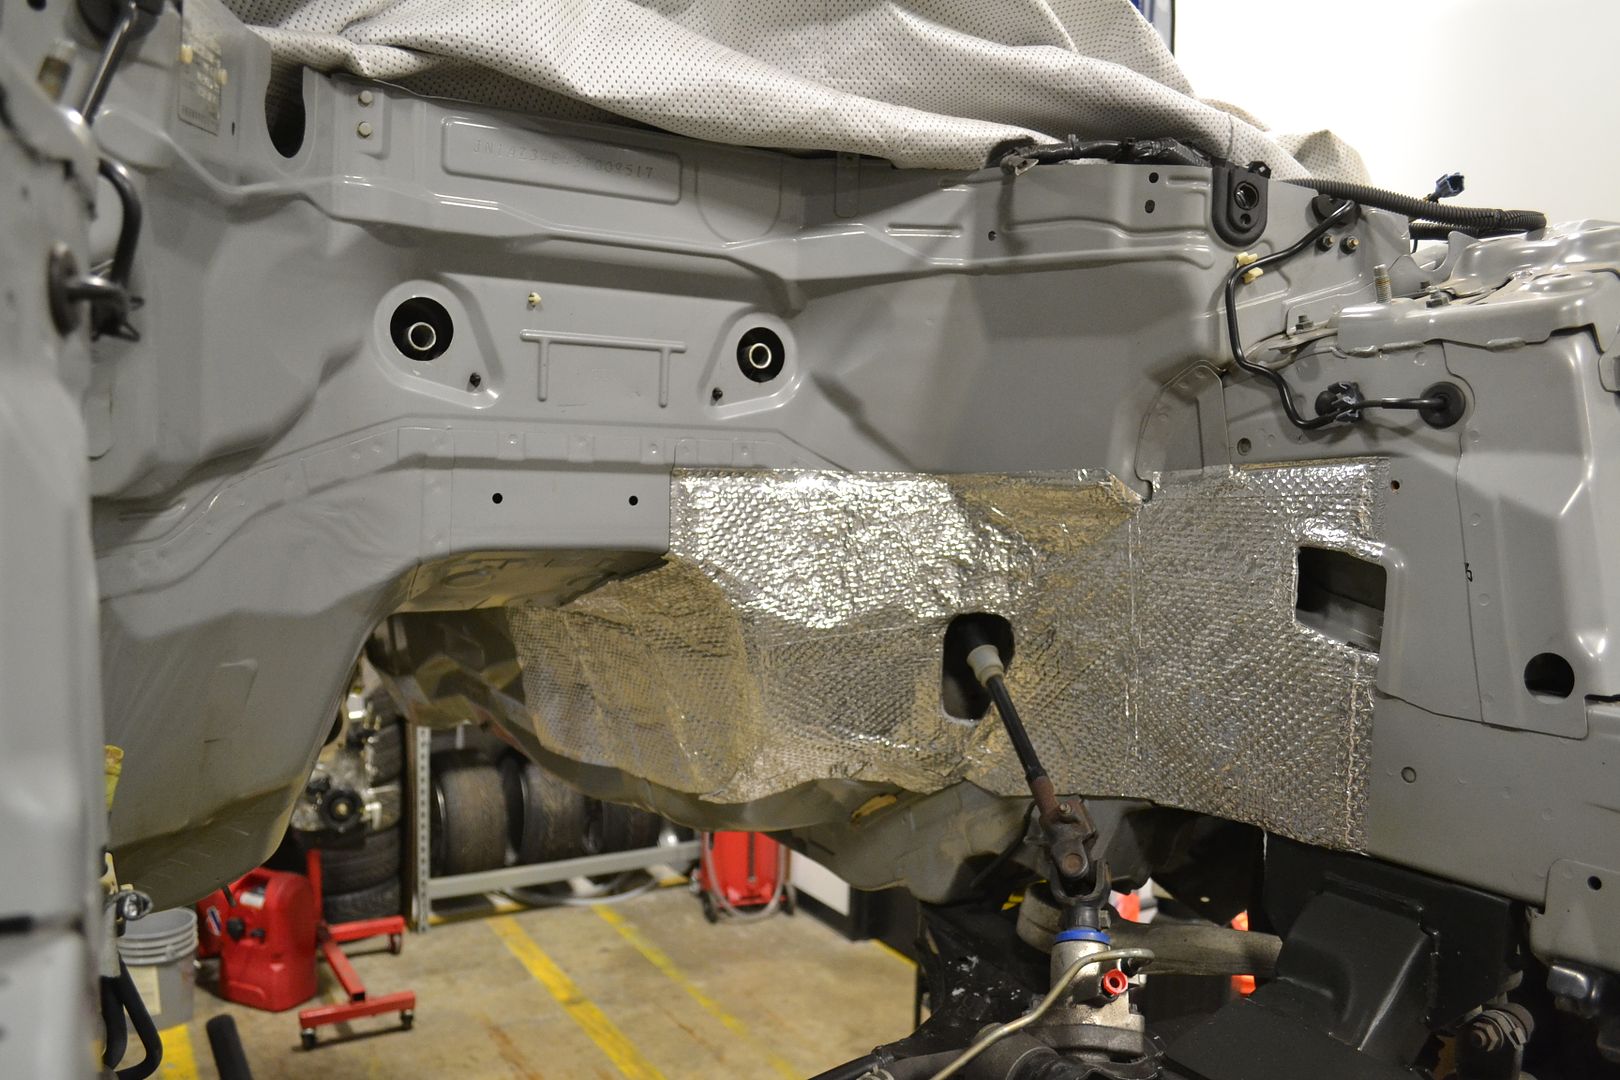
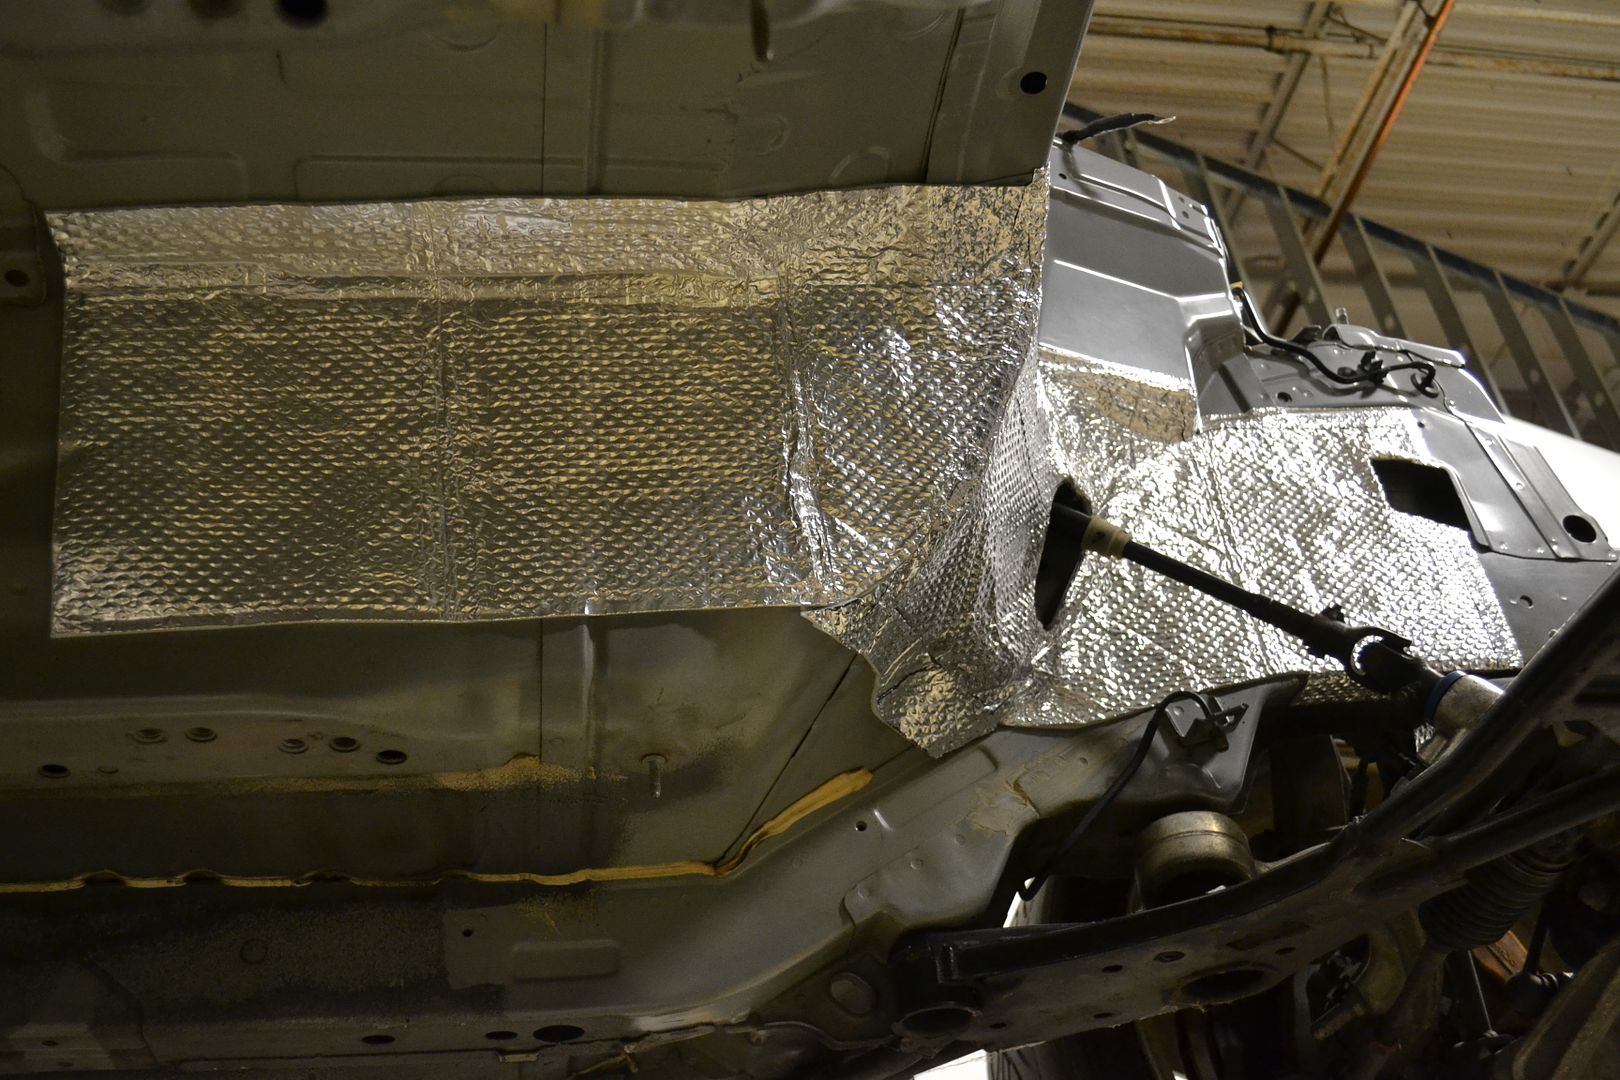
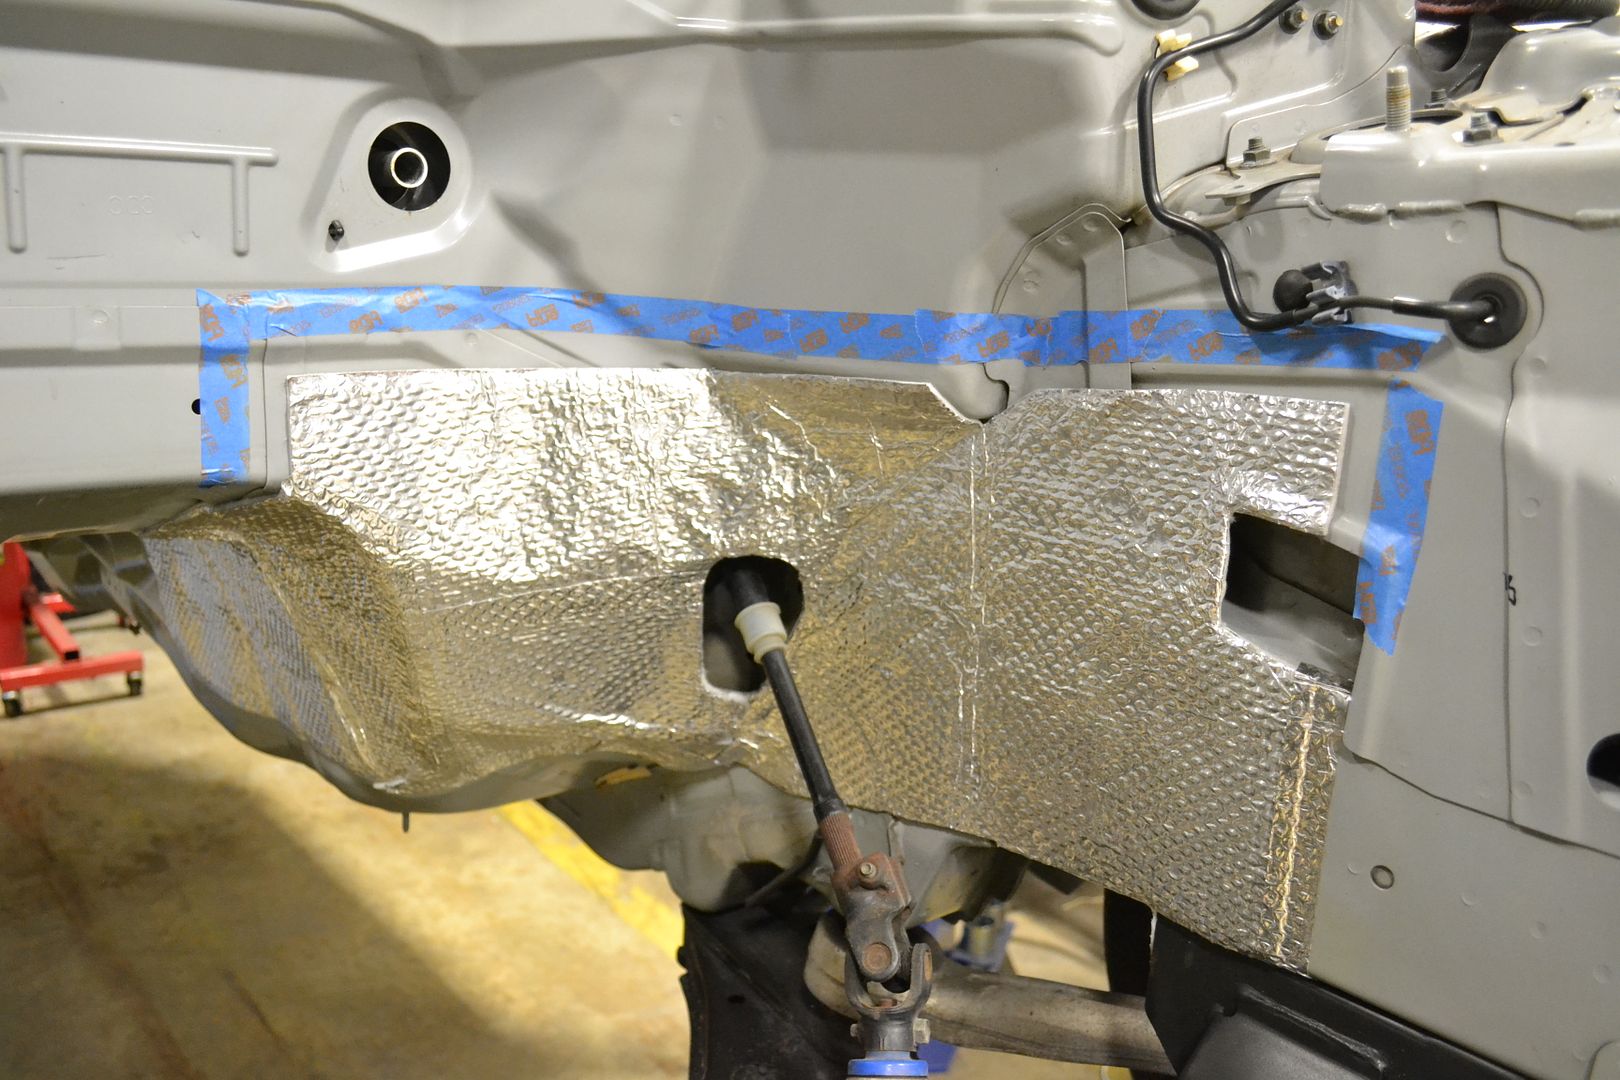
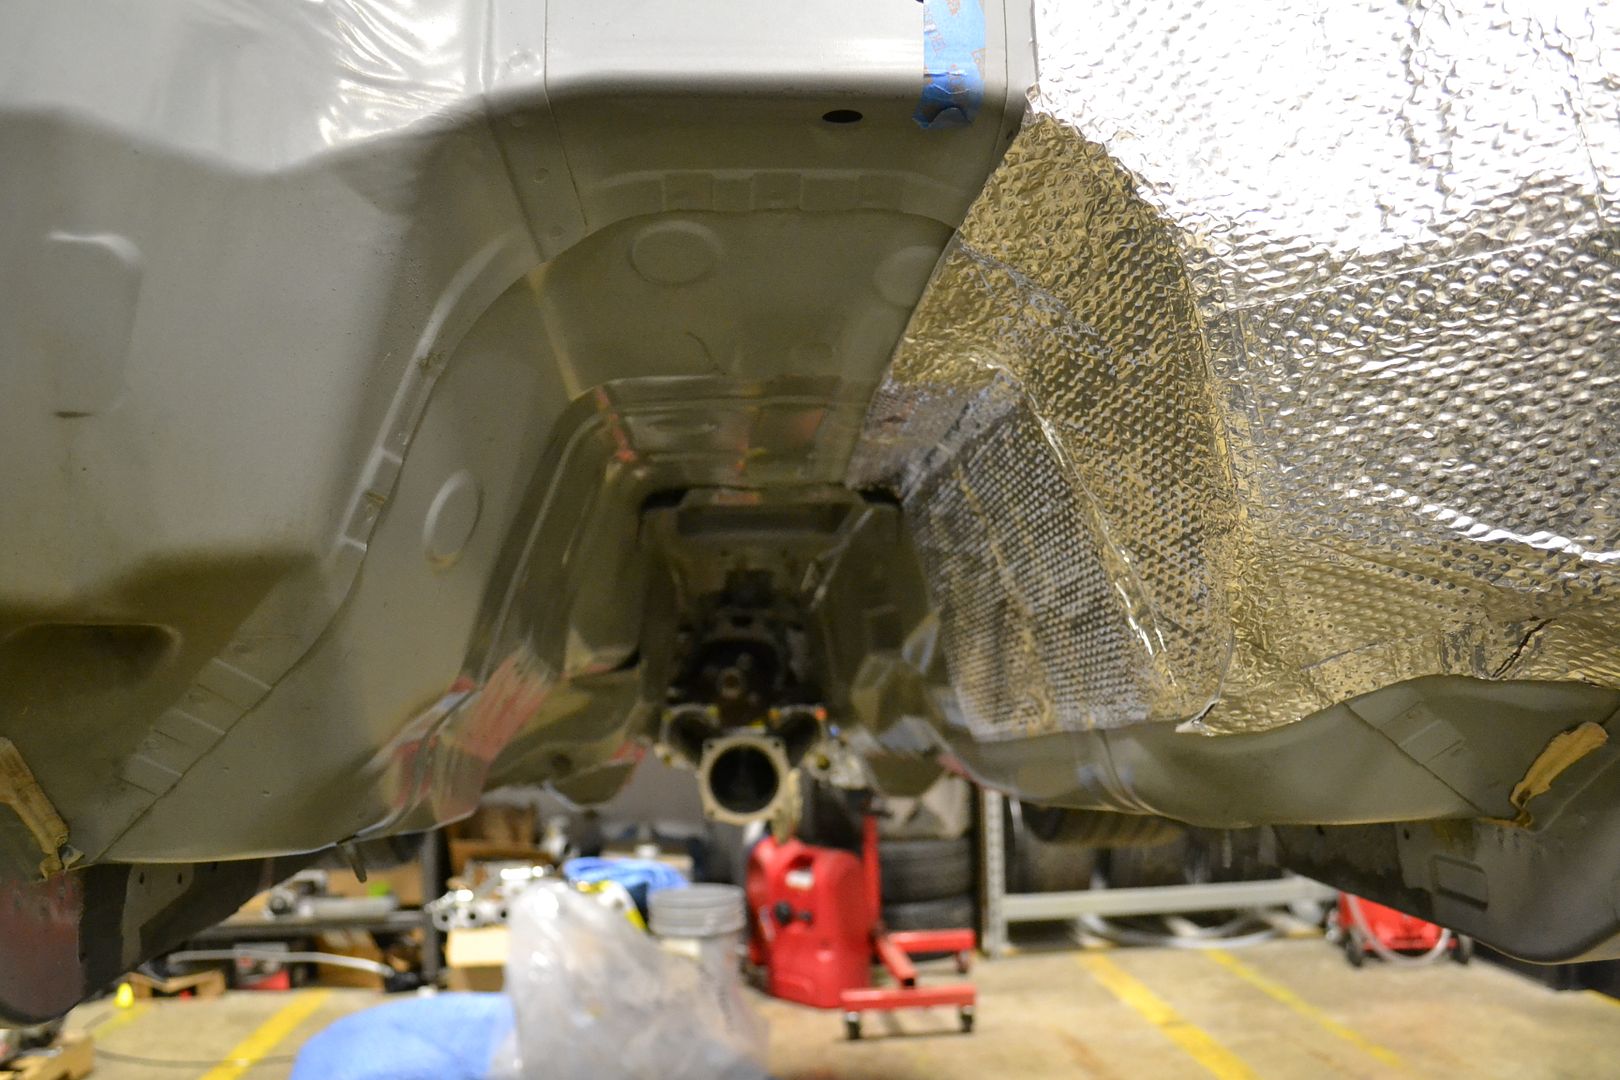
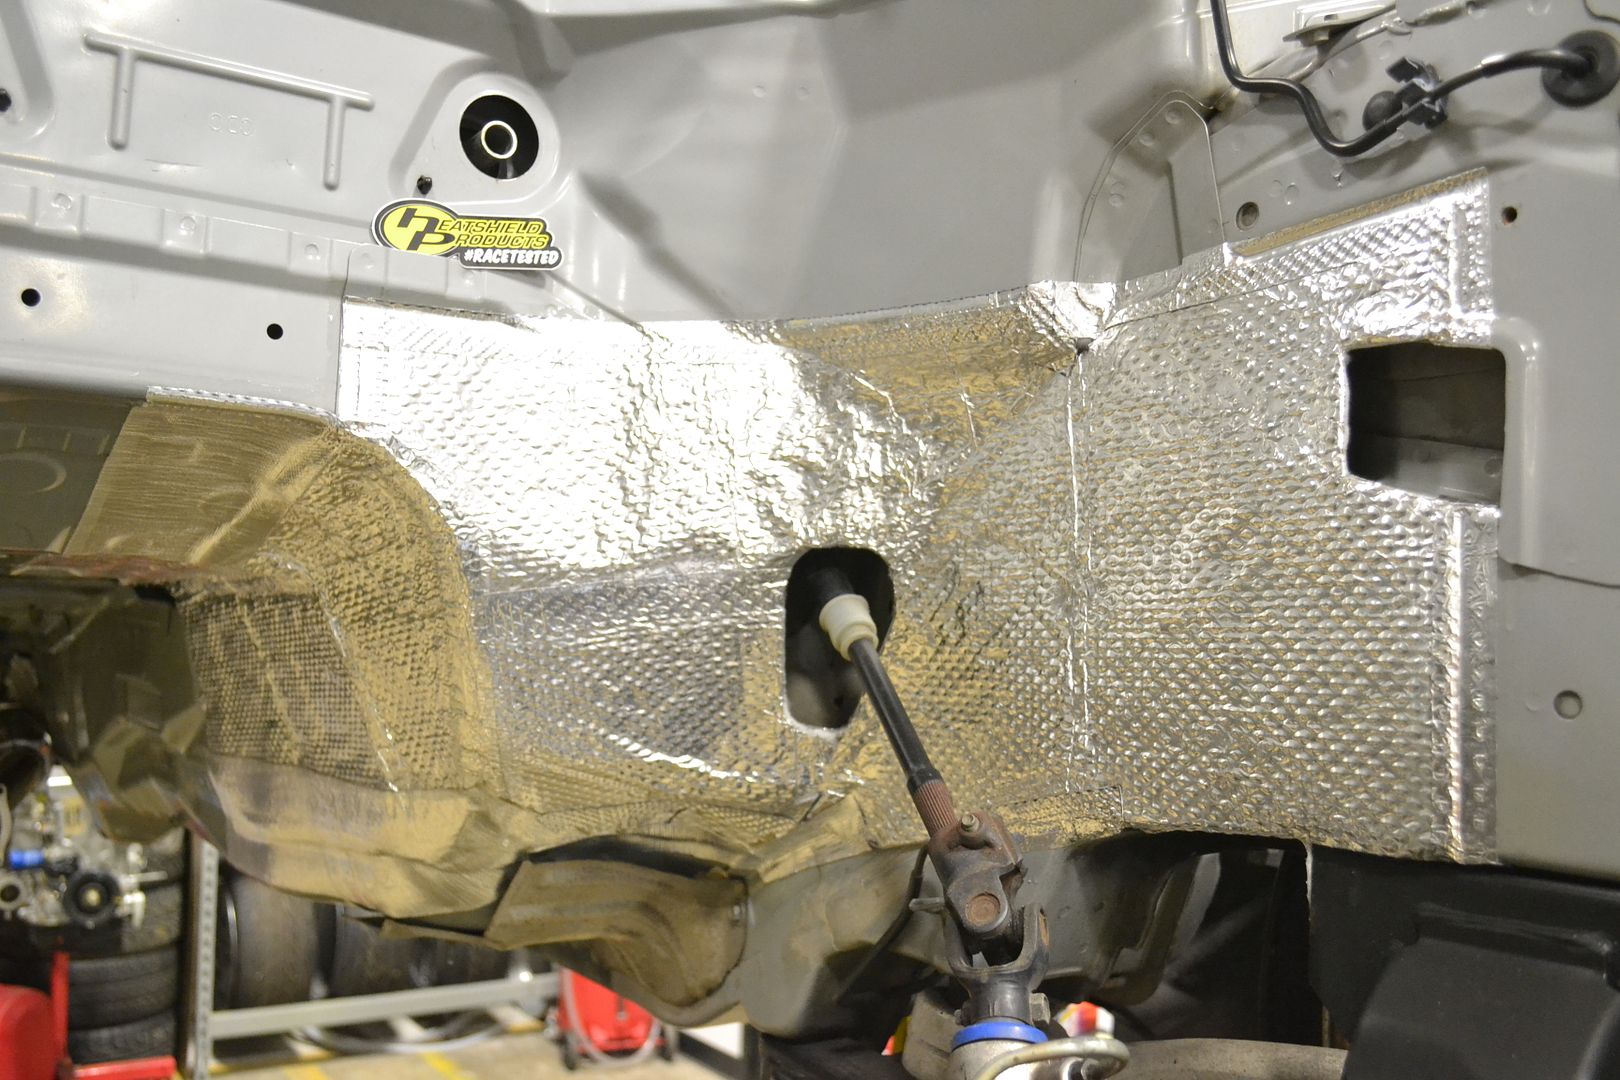
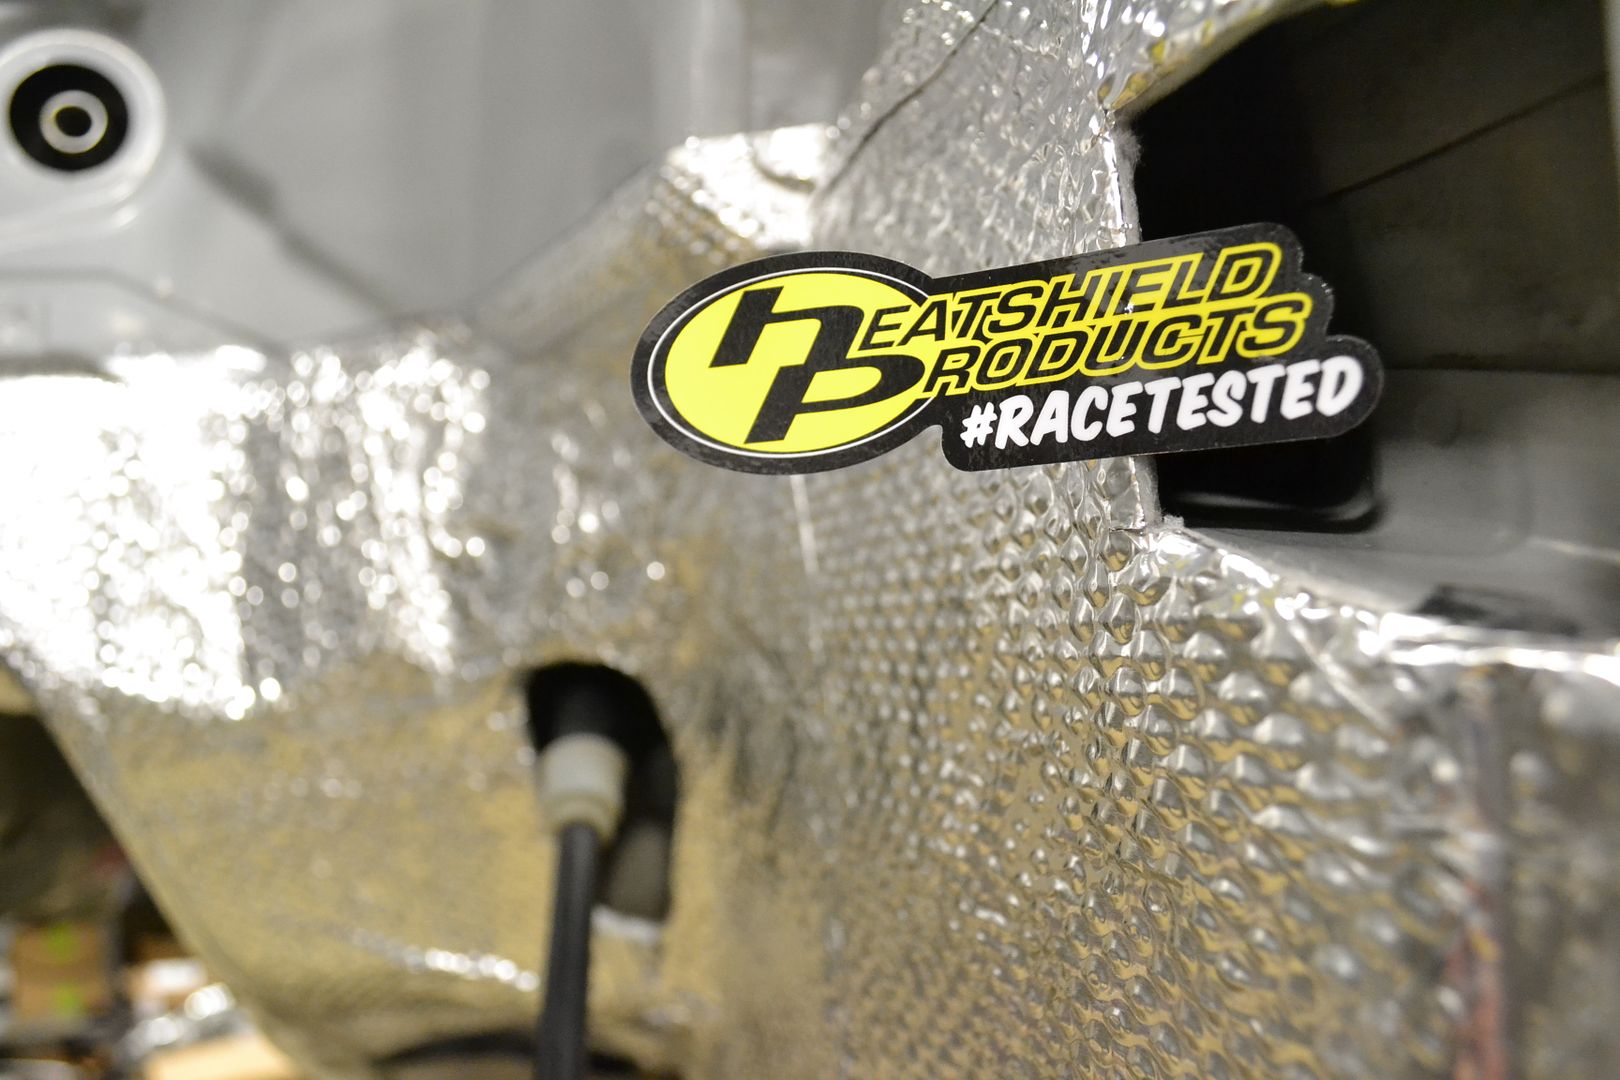
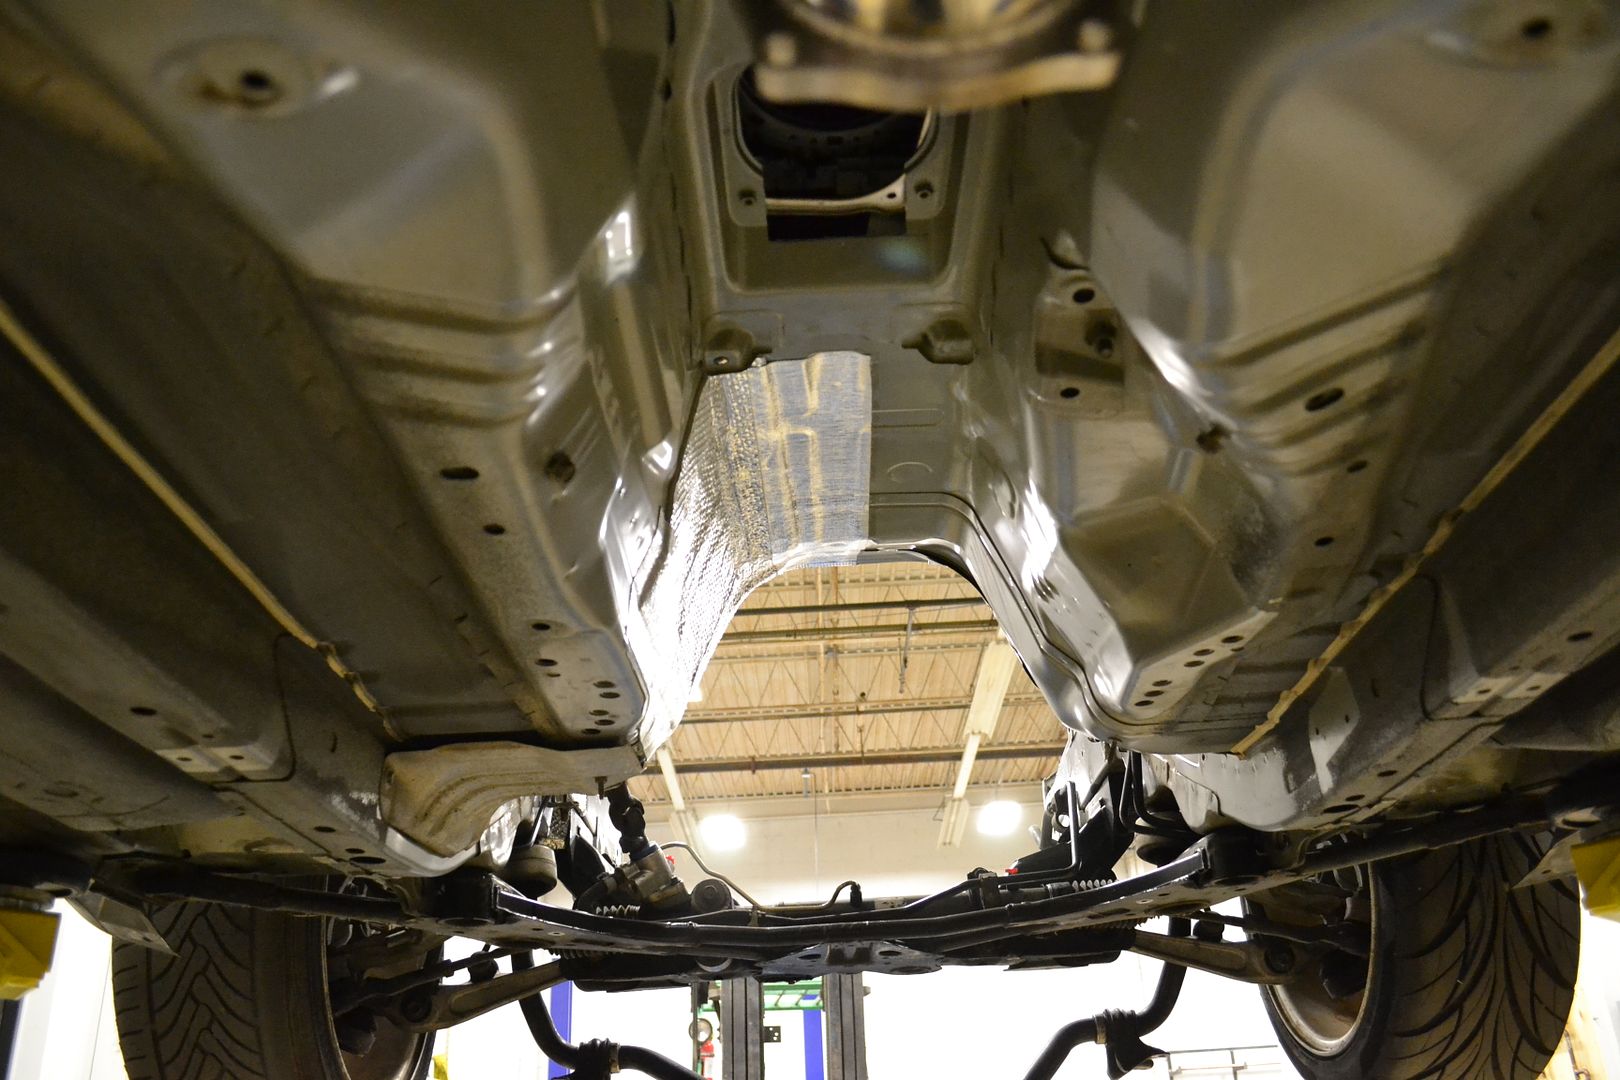
These are pics of the engine bay and trans tunnel, which I applied heat shielding products to. It appears to be a simple task, but it proved to be much more difficult than I had anticipated. The product is from HeatShield Products, and was rather expensive compared to other similar products. I anticipate it working quite well, as it is not the ordinary stick on foil tape. Rather, it is about an 1/8" thick fiberglass insulation clad in a dimpled foil. The adhesive was pretty good, however the backing is hard to remove and the adhesive backing is easy to separate from the insulation if your not careful. The car is very clean to begin with, but I used surface prep to be sure. I suggest making templates first, as it will not be able to be moved after it is down, and it is far too expensive to waste material. Getting around the steering shaft was tricky as I did not want to disconnect the steering shaft. I used an edging product around the perimeter to seal the edges, being that the fiberglass insulation is left exposed without it. At the end I used an aviation edge sealer to assist in everything staying down. It was helps decals not come off at 600 mph, so it should do the trick.
         |
|
|
|
|
08-29-2018, 02:33 PM
|
#141 |
|
Leaky Injector
 
Join Date: Mar 2012
Location: the Netherlands
Age: 33
Posts: 143
Trader Rating: (0)
 Feedback Score: 0 reviews
|
Jesus Christ dude, no half measures ay?
__________________
@dedirkjan |
|
|
|
|
08-29-2018, 10:18 PM
|
#143 | |
|
Zilvia Junkie
Join Date: Jun 2006
Location: East Coast
Age: 38
Posts: 585
Trader Rating: (20)
Feedback Score: 20 reviews
|
Quote:
|
|
|
|
|
|
09-04-2018, 01:56 PM
|
#144 |
|
Zilvia Junkie
Join Date: Jun 2006
Location: East Coast
Age: 38
Posts: 585
Trader Rating: (20)
Feedback Score: 20 reviews
|
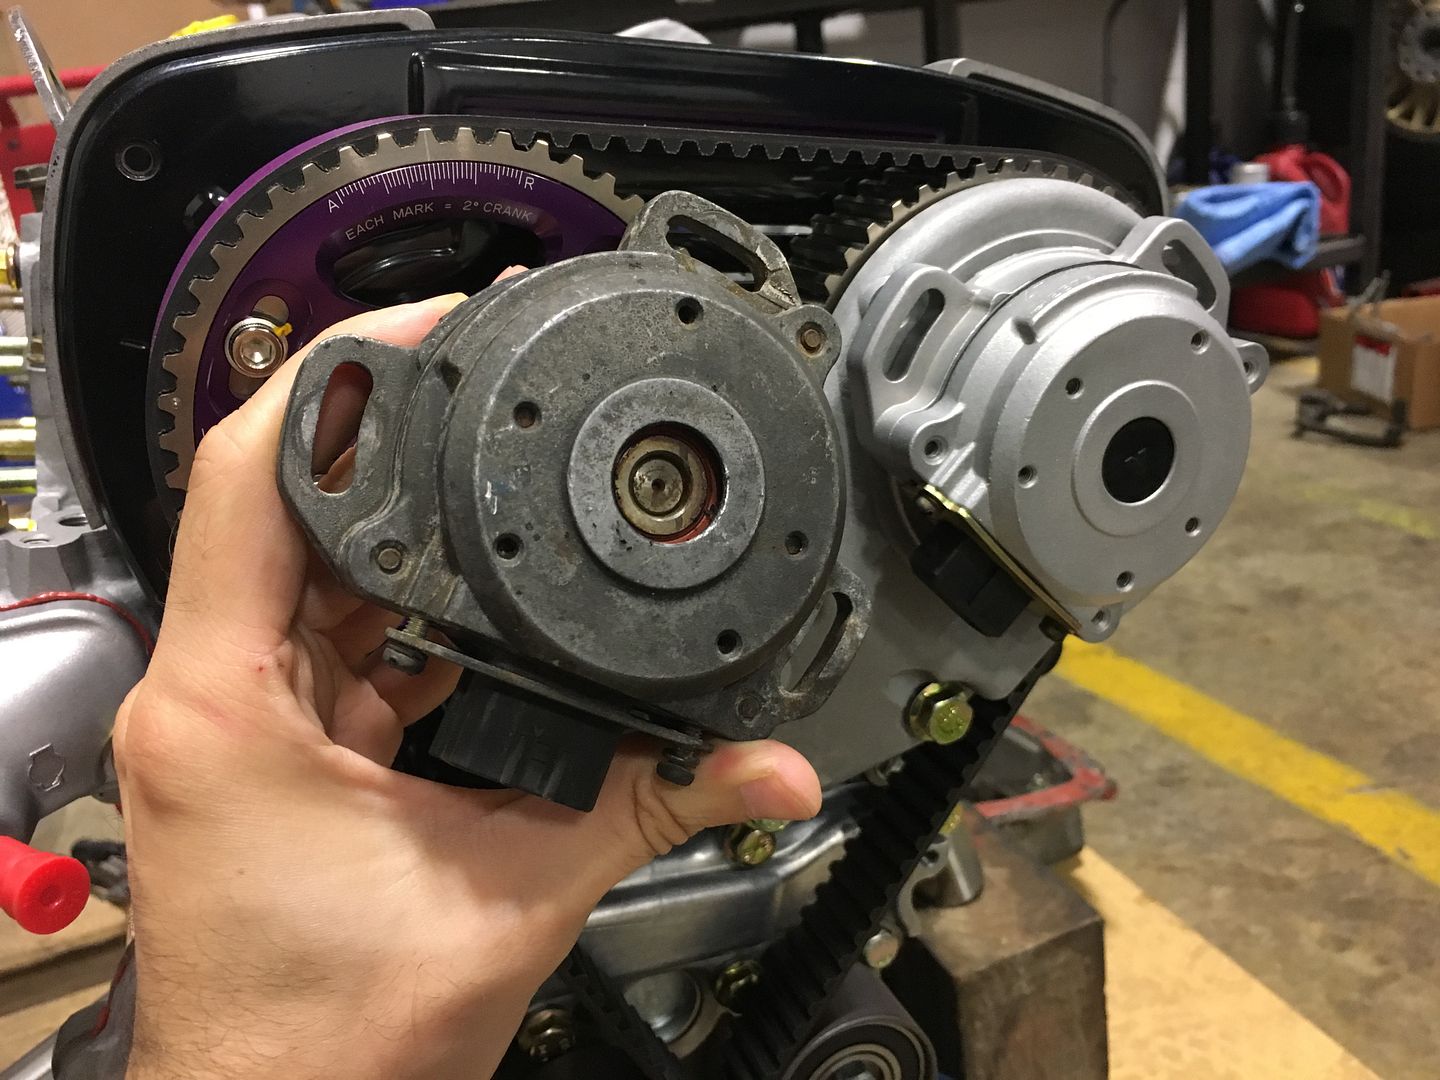
Here are some more pictures of the engine. More details of the specs pictures of the long block can be found earlier in the thread. Big thanks to Ricky at Raw Brokerage for always having what I need over the years. They have come a long way, and I think offer the most comprehensive and focused offering of RB parts available. I dont think these pics need much explanation, nothing out of the ordinary, JUN pump, HKS cam gears, new bolts, esc. The Ross damper is actually an RB25 part, only difference being is the offset for the power steering pump. Being a RWD car, the RB26 steering pump is not needed, and using the RB25 damper allows the use of the RB25 steering pump/bracket. The Ross damper has also been equipped with a 12 tooth wheel to facilitate the use a crank sensor. Nord-lock washers were used throughout the build, and for anyone unfamiliar with them, please look into them. There simply is no better locking washer available. I wish I could say cheap reassurance, but its unfortunately not the ca$e. More on that later.
Last edited by doyle4281; 09-15-2019 at 01:54 PM.. |
|
|
|
|
09-11-2018, 09:01 PM
|
#145 |
|
Nissanaholic!
 Join Date: Jan 2010
Location: location X
Posts: 1,815
Trader Rating: (10)
Feedback Score: 10 reviews
|
fucking eh!!!
__________________
http://www.240sxforums.com/forums/rb...ject-s-rb.html |
|
|
|
|
| Bookmarks |
|
|


 Going to make for an epic return


 Linear Mode

