|
|||||||
| Builds (and builds only) Got a build thread? It goes here, build threads anywhere else on the forum will be locked and never moved. |
 |
|
|
Thread Tools | Display Modes |
 10-09-2014, 02:32 AM
|
#1 |
|
Leaky Injector
|
SR20VET Kouki daily car that can do tracks well!
Ultimate sleeper project, black paint on everything!
 and will be looking rather stockish in the engine bay, the officials here has a no go for tuned cars, but somehow it'll pass like I've always been able to and will be looking rather stockish in the engine bay, the officials here has a no go for tuned cars, but somehow it'll pass like I've always been able to bit unusual setup, I'm not afraid of the unknown, or try new things, so these are some of the upcomming things that no-one does, and will suit me perfectly. Also, thread begins with what I did the past 3 years, and will be updated with what I'm doing now! although the last 4 months of this year isn't included ,just fitting turbo, mapping and stuff like that.AC on a SR20vet (because comfort!) P12 with dual selenoid VVL (doesn't really fit by default but modified )Flexfuel E85 petrol. Downmount twinscroll T3 Variable Exhaust based on MAP. cylinder adjustment based on EGT. Traction control (don't know when, but it will be mounted) Engine: MAXXECU for engine management. Bored to 86.5 vs 86 stock JE 9.0:1 Compression pistons. Manley H conrods STD stroke. Greddy style inlet manifold, 2 piece intake like stock S14, welded together with the lower portion of SR20VE. Stock crankshaft, balanced and machined 0.25 oversize Greddy style wing Oil pan. P12 SR20VE head gasket Uprated ARP Head studs. std dowel. Custom T3 twinscroll downmount exhaust (In progress) Custom DownPipe (in progress) 3" racecat (smog tests, pass like champ!) Dual 3" exhaust from cat and back ACT 6 Puck clutch Custom Water to Air intercooler. Denso IKH24 Sparks Walboro 450 fuel pump Oil filter relocator Powdercoated black Mocal oil thermostat 19 Row Oil cooler for Engine Oil. Driftworks Aluminium Radiator. Injector Dynamics 1000CC Injectors Mazworx Fuel Rail Garett GT3071R Turbocharger T3 Twinscroll. (Billet wheel) MaxxECU Engine Management Maxxecu Flexfuel sensor Maxxecu PWM Module for Waterpump Mazworx vvl relocator (modified for P12 head) Nissan Doubble VVL selenoid from P11 heads Ebay SR20 billet throttle body 70mm 20ve crank accessory pulley. EWP115 water pump. VW AC condenser cut and shortened for water IC. QSP fuel regulator Suspension n brakes. Tein Upper pillow ball adjustable camber plates for coilovers front. KW coilover variant 3 inox-line Nismo Tower strut brace. Driftworks Subframe locking collars (only bottom ones mounted to maintain some nvh quality) Driftworks Tension Rods Driftworks Toe rods Driftworks Traction Rods Driftworks Camber Arms Megan Racing Rear Subframe Brace. EBC Yellowstuff Pads in the front Feredo ST Pads in the rear. R34 GTT front Brake Calipers. 310 MM EBC Diamond Black Rotors Uprated Hardrace Subframe Bushings Uprated Hardrace Gearbox mount Uprated Hardrace Engine mount Uprated Rubber subframe bushings. Uprated Rubber Lower control arm bushing. Front and Rear. Megan Racing Roll Centre Adjusters (Lower ball bearings, adjustable) Megan Racing Bump steer Correctors (Tie rod ends, adjustable height) Opel/Vauxhall Astra electric Powersteering Car itself:  Engine compartment as I recieved it:  White face dials and chrome rings to make it look sportier.  Some cosmetic things have been added to the interior  Some suspension arms and collars:  Start of the new engine  Radiator - Black of course.  received a stock bottom end like this...  rebuild the engine bottom end with forged conrods, refurbished crankshaft. and JE 9.0:1 compression 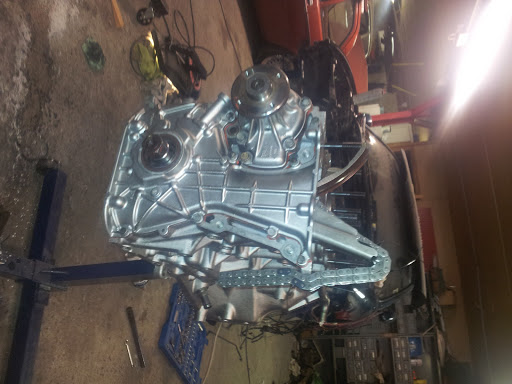   full assembly with a dummy head:  New seats, Recaro reclining alcantara/leather (pair) Need to fabricate stock S13 seat brackets to make them fit.  Engine complete(some odds n ends still not attached)  Done rust repair too, had some of that... 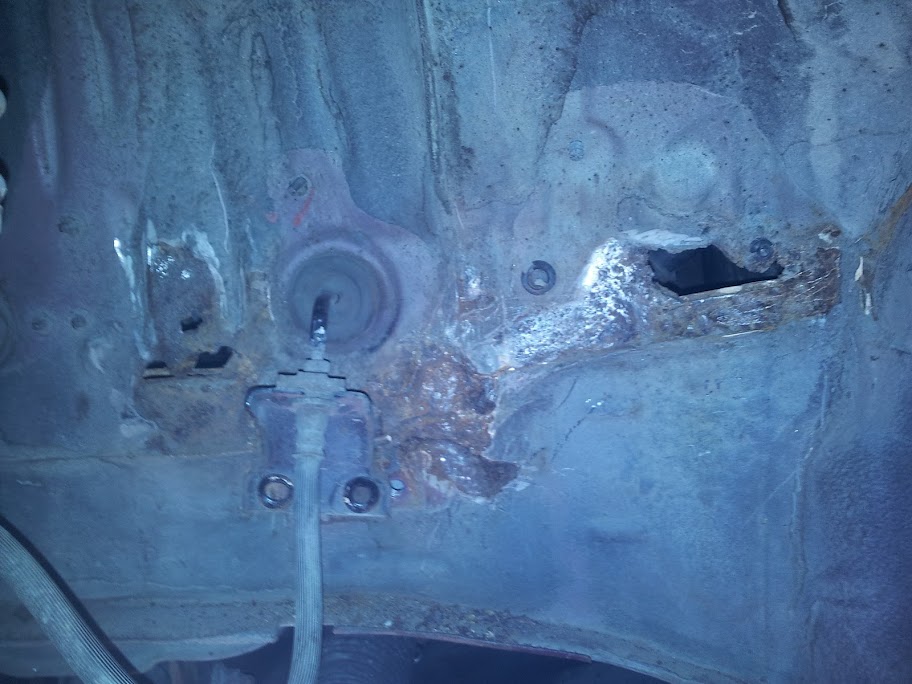 The repair job done previously.  What it looked like inside..  Some grinding and such:  Up for some welding at Fronius, Yes it's inside their shop, not workshop but the actual store!  Great selection of welding machines!  MIG Welding in progress: 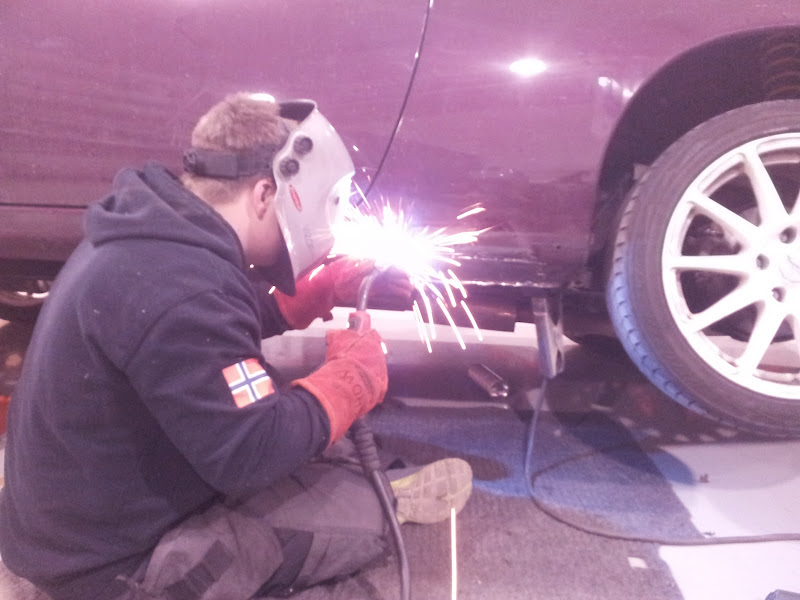 Here's a picture from last summer of my car on the KW's (lowered):  R34 GTT Caliper/disc upgrade with Yellowstuff pads  Powder coating:  Voila!   And this is how you fix your engine!  me and my mates (600whp kadett 78C) in the garage: 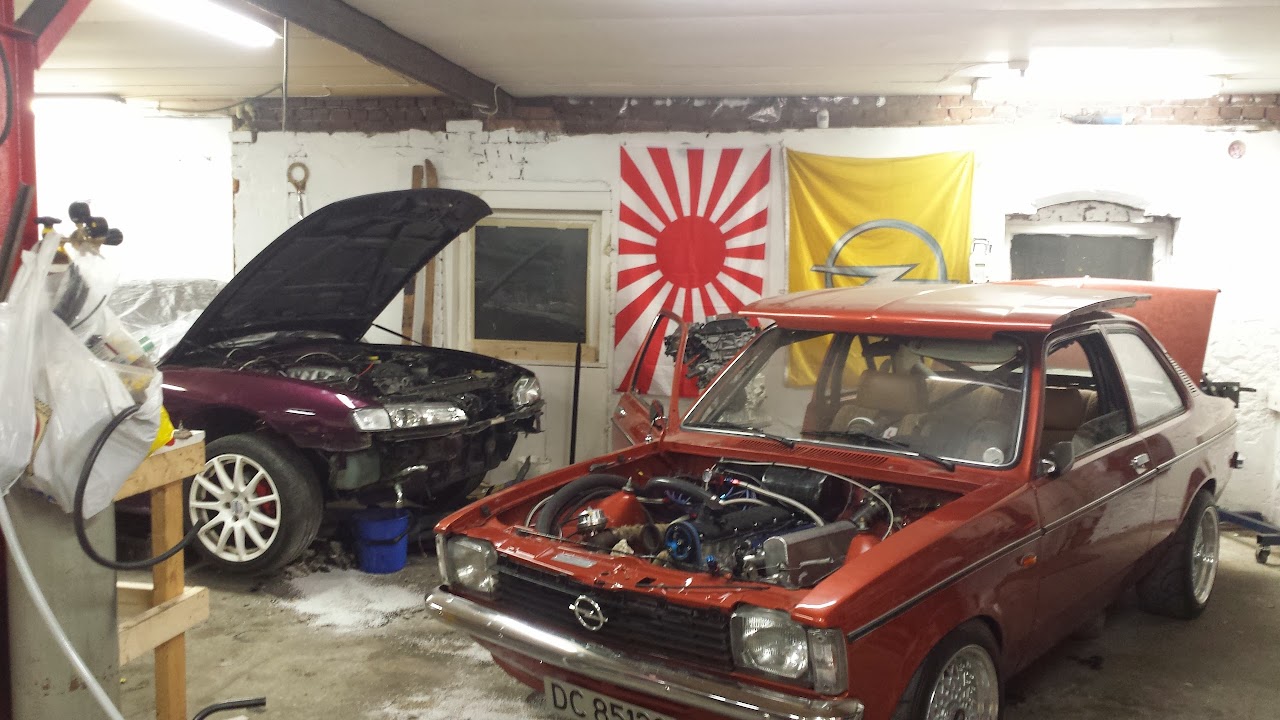 TEIN Pillowballs for the KW's  Engine with the stock turbo, right before the install:  engine installed  I did alot of crap that I'm not gonna put in here because, obsolute. anyways, it ended up looking like this:  It did work well on the trackdays i was on, just a bit soft anti roll bar that will be needed to address, also I managed to flip the bonnit over the roof.. joy, so full bodywork needed too! 
__________________
OakHeart Racing Last edited by Road2Perfection; 04-13-2015 at 01:38 AM.. Reason: updated specs at the beginning :) |

|

|
| Sponsored Links |
|
10-09-2014, 07:08 AM
|
#2 |
|
Leaky Injector
|
SR20VET start
So i'm gonna stick with the block of my previous engine and internals, I'll stick with the VE cam gears and chain!
won't adjust any overlap on the cams, this is a daily remember, but I'll get decent power anyways! Since it's a blacktop block I had to block off a bit more than usual ve swaps, and since I'm using the chain off the VE I need to CUT off 5 MM from the belt pulley instead of adding! Anyways, lets get to it: Took out the engine  (Right one, left one is what was in my car when i bought it) and I just had to wait on the customs to get my engine! A week later and it arrived with our new table for our couch corner (ve engine is in the back)  Quickly began to disassemble the whole engine, and it looked worn on the outside but the inside was aaaalll good!  Took apart my stock engine, and wasn't suprised about some findings in cylinder one, one spark plug from NGK wasn't happy in my previous engine and went into pieces. but there wasn't too much damage and not much machining is needed (woohoo)  Started stealing parts from the VE engine and putting them on the S14 block. Chain guides, chain crank drive, and the chain itself. 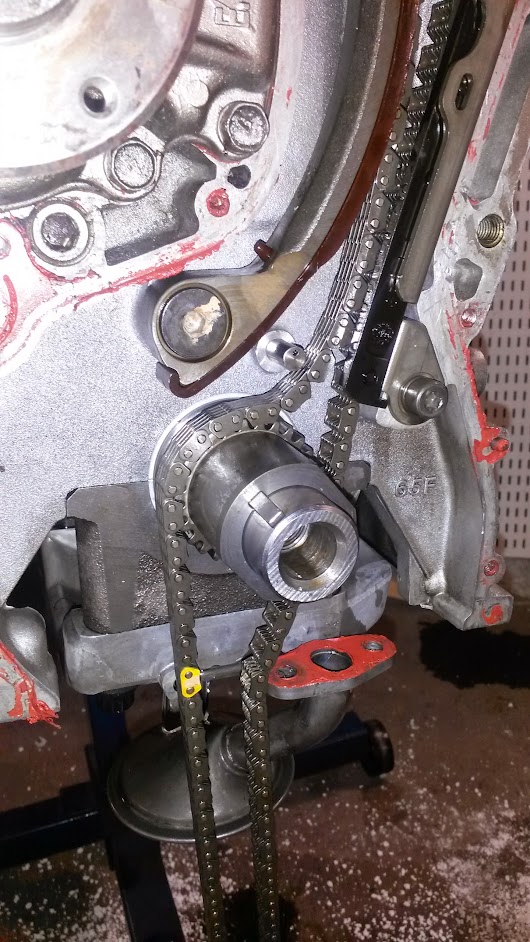 Next up, headwork, plugging oil ports and so on, I wanted double VVL instead of single as the P12 head orginally has, so I bought a relocator kit, unsure if this would work, but if there is a will you will get it to work. took the stock gasket over the relocator, marked up the oil hole that the P12 has and P11 not (actually just moved a bit) Bored that hole up with 6 MM bore. Found out you could bore straight through the port that's marked with "left" and hit the side of the 6MM hole previously made and then manually by hand remove some material from where they join. Then plug the hole from mazworx and use the new one, all fine!  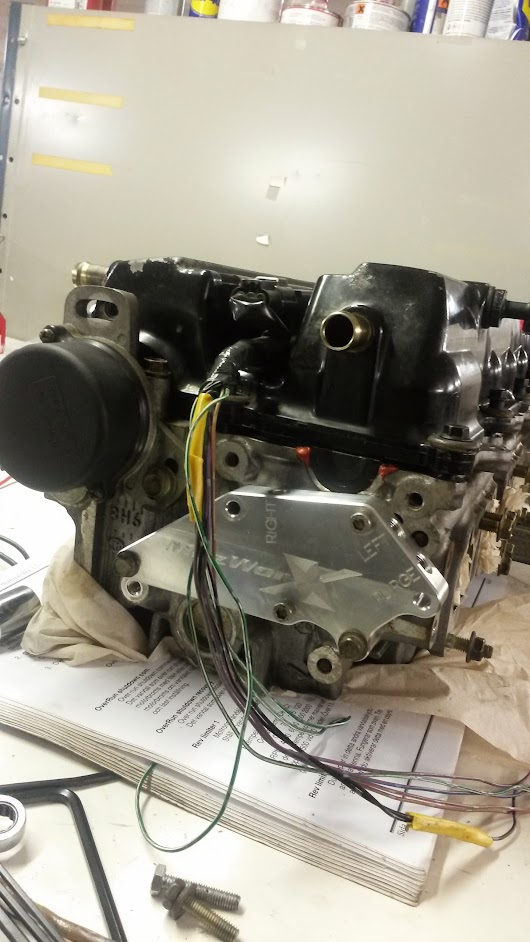  Then there was the block and all the damn oil holes. VVT blockoff using a tig welder 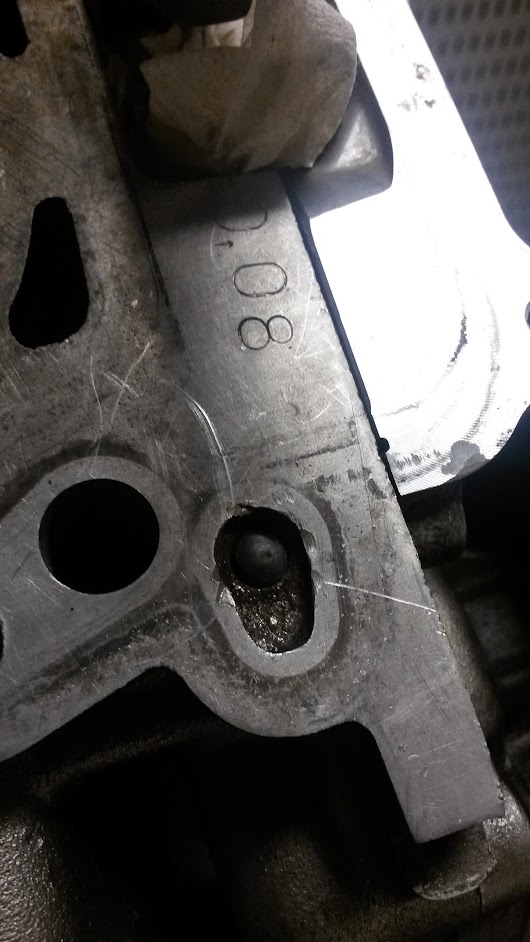 The stock P12 head had a oil restrictor for the Chain tensioner oil passage, not quite sure if it's needed, but we thought Nissan had a reason, so we did too! a bolt with a hole drilled through, 2.8mm is the stock, we did 3MM, better than the stock 6MM hole  and the mazworx plug in the rear of the block (oil drain) that doesn't line up.  we also have plugged off the notorious hole in the head, no photo of that tho :P so far, so good
__________________
OakHeart Racing Last edited by Road2Perfection; 10-09-2014 at 09:21 AM.. |
|
|
|
|
10-10-2014, 05:48 PM
|
#3 |
|
Leaky Injector
|
Another day and more progress
Since the turbo is too small I thought we might aswell try some billet love for the old pulsesplit T3 GT3071R
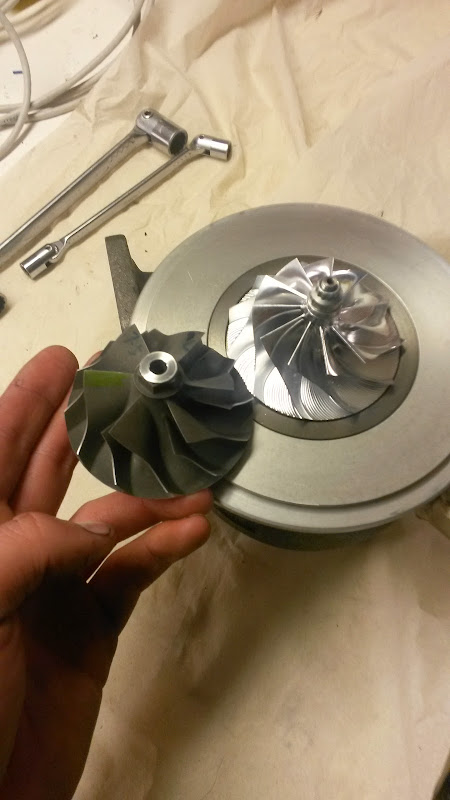 Hopefully it'll give me some decent power So, since the cylinder 1 had some damage I had to hone it up, done that today and cleaned up the entire engine as a result. All stripped again. 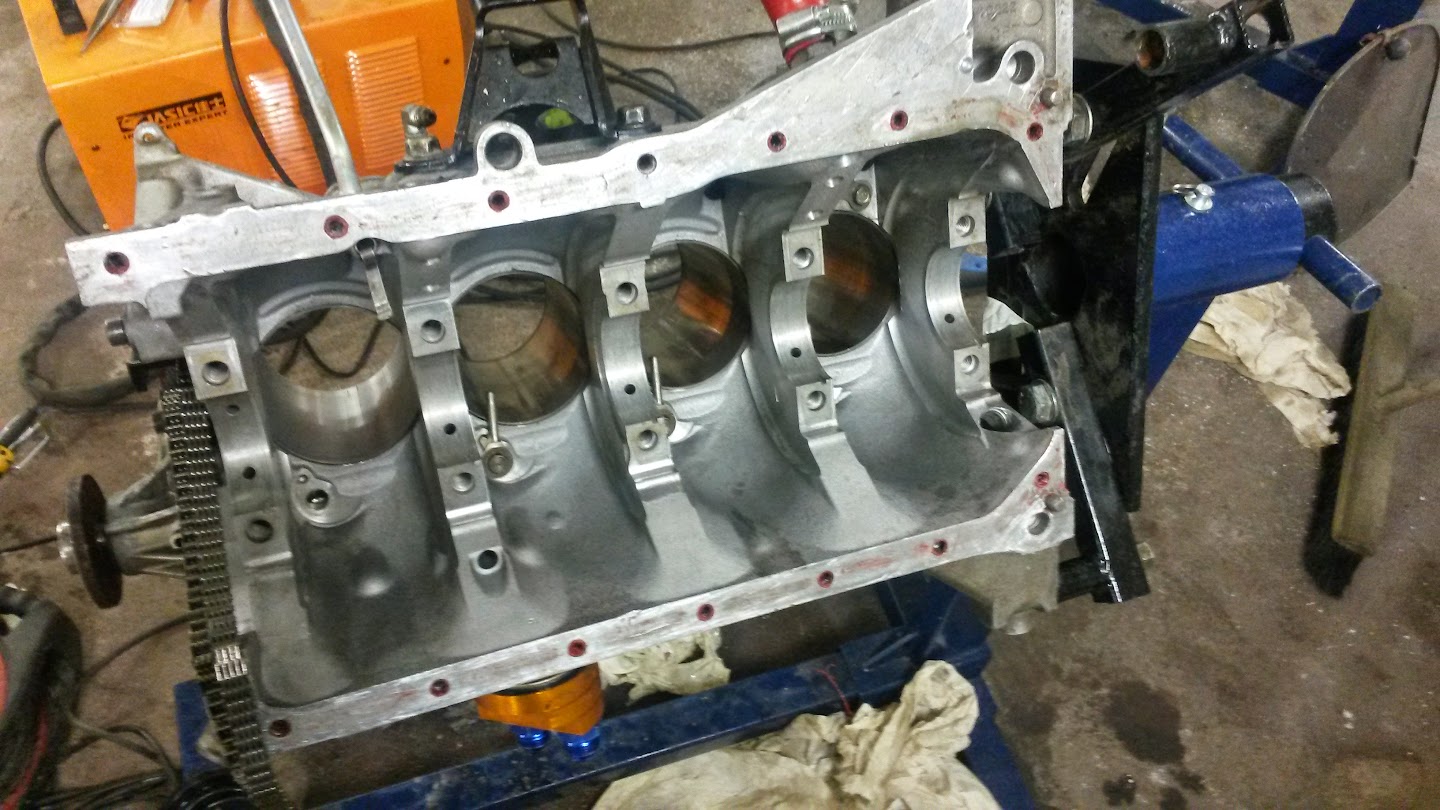 Since I cannot hone and take photos at the same time I didn't do so :P ARP's installed as well as thrust bearings.  Conrods and crank all together, just missing the final torque on the squirter, didn't have the pipe at the garage so left off the oil scraper until that's done  Next up is the Valve clearance check using play doh, I also got to check the timing chain if it'll really work, and voila!  don't have any results, but there is always the next day, I spun it around a few times on low cam (2 revs to check TDC and cams lined up, right first time at 1 am! then I just got the rocker arm started on the high cam by pressing it in with my finger (locks it until cam rev is complete )and yeah, I don't have any VE specific pistons, if this works I'll post the custom piston specs from JE Pistons. By this time I was too tired to continue, so took on the rocker cover and snapped a photo and locked up.  plan is to have intake side ready by next week
__________________
OakHeart Racing Last edited by Road2Perfection; 10-10-2014 at 06:31 PM.. Reason: Correcting VE specific cams to pistons :) |
|
|
|
|
10-11-2014, 12:36 AM
|
#4 |
|
Zilvia Addict
 Join Date: Oct 2007
Location: Montreal , Canada
Age: 37
Posts: 817
Trader Rating: (1)
  Feedback Score: 1 reviews
|
I never knew about that type of timing chaine in the p12 engine
If i ever break or need to change my chain ill go that route
__________________
AV FABRICATION Built thread sr20vet s14 http://zilvia.net/f/showthread.php?t=535574 |
|
|
|
|
10-11-2014, 06:22 PM
|
#7 | |
|
Leaky Injector
|
Quote:
the bodywork is a mess at the moment, sticking my nose up behind Porsches on the track brought up alot of crap and messed up my bumper, my hood went over the roof, and general usage have made it quite tired.But first, engine, then engine bay, then electrical (ecu) I'm rewiring everything anyways, was at track today, so not a long day at the garage, but I did manage to check piston clearance, the angle of the valve pockets isn't 100% right but it does work nicely. So here is the piston details from JE, I do doubt they work with the N1 cams with higher lift, or oversized pistons, just so you know! Click this! for JE piston details. So here got got it mounted with a new MLS headgasket and you can see the well used pistons, they are now in the 4th engine build and still holding strong!!!  The head was threaded up with 1/8 BSP and mounted a T cross, this will also feed the VVL selenoid. I will be running 4 AN oil lines. You can also see the plug in the head in this photo  Sorry sorry for the bad photo, but what I've done is install a T-split for the 1/8 plug for the oil pressure sender, mount it downwards (yes it clears engine mount) and AN4 up to feed the oil port we threaded and the VVL selenoid.  Welded on a AN plug for the crankcase oilbreather.  we started to take measurements on how we should be able to get long runners so it's good on the streets, I plan on using S14 intake as I've said I think, we will use the stock lower end and cut it, take the s14 lower end and cut it about the same, weld them together and use this china greddy style intake.  And with china comes great quality Tbh. I don't care, I grinded it away and now it's all good  and here we have the line of engines in the garage, and as you see I'm missing the sump and oil pump, I think I should be able to install that tomorrow 
__________________
OakHeart Racing |
|
|
|
|
|
10-12-2014, 04:12 PM
|
#8 |
|
Leaky Injector
|
Instead of writing my ass off on they keyboard, I made a short video
Sometimes I may use wrong words and so on, English is not my main language! :P http://youtu.be/tiBTKEZyj3Y Ordered a bunch of AN lines and so on for the engine build, missing the AN4 lines, I'm going stealth so black Nylon, steel braided AN hoses with black fittings all the way!! Got the engine a bit more done too  I also created first revision of the wiring diagram, I'm missing the E-throttle for the time being, but it's nice to have everything planned out ahead, as much of this build is!  ECU Tuning program can be downloaded here: Maxxecu Mtune Latest current Basemap can be downloaded from Google Drive for those who are curious, Most settings are set up already. (Trigger/cam is running 24+1 wheel) Google Docs ECU Map Link.
__________________
OakHeart Racing Last edited by Road2Perfection; 10-14-2014 at 02:09 AM.. |
|
|
|
|
10-13-2014, 03:09 PM
|
#10 | |
|
Leaky Injector
|
Quote:
It shouldn't be long before the engine is actually 100% complete.  I've turned my head towards the engine bay right now. Got this wiring harness out  Also started cutting off the throttle body flange, so we should see fabrication start of that soon.  Here we have the stock P12, 370Z 350Z amongst others throttle body, a Drive by wire, so no steel wire to the throttle pedal anymore!  The drive by wire is very good, because you can actually make it progressive and easy on the streets with low throttle and have a great feel to them, as well as limiting the maximum amount of throttle that can be given during overheating and so on In general for ME who loves to tune ecu's, this is something I see no drawback with, apart from needing to use the accelerator pedal to rev it, no manual throttle body rev  Maybe the next update will be on Friday or Saturday or a week from now
__________________
OakHeart Racing |
|
|
|
|
|
10-16-2014, 02:21 AM
|
#12 |
|
Zilvia Addict
Join Date: Oct 2007
Location: Montreal , Canada
Age: 37
Posts: 817
Trader Rating: (1)
Feedback Score: 1 reviews
|
Im also going dbw to on my ve ! I dont have a cruze controle unit on my car so this will be an easier and cleaner option , good for the drifting i wana do (anti lag system)
Im planning to go 90mm ls1 or maybe 80mm from a dodge aem infiniti for the ecu or the new haltech elite if i win the lotory hahahah
__________________
AV FABRICATION Built thread sr20vet s14 http://zilvia.net/f/showthread.php?t=535574 |
|
|
|
|
10-16-2014, 04:26 AM
|
#13 | |
|
Leaky Injector
|
Quote:
My list of ecu's you should buy today: AEM Infinity Maxxecu Haltech. Btw, go for 80 MM, we run 76mm on pretty much everything from 400 to 800 whp builds and provide the best throttle feel, 90 MM is pretty much a drag purpose throttle body! or old tech V8's I went for the 76MM as it's cheap as hell and fits my budget perfectly, I'm trying to buy a house on my own whilst building this car, challenge is gearbox, no idea how long a set of s14 gearboxes can last! Running slicks so timeattack and not drifting so not too much abuse on the gearbox while using the s14's. and over antilagg, go for a Borg Warner EFR turbo (7670) twinscroll and you should see some serious spool on a VE engine and 600+ whp. I almost took a plane to UK from Norway just to buy a EFR7670 lol Edit: This is why drive by wire is awesome, progressive throttle! and adjust whatever you really want, so larger throttlebodies are easier to live with on DBW thankfully 
__________________
OakHeart Racing Last edited by Road2Perfection; 10-16-2014 at 05:47 AM.. |
|
|
|
|
|
10-19-2014, 03:29 PM
|
#14 |
|
Leaky Injector
|
Sunday evening update :)
So today I started on some of the front suspension bits, stiffening the car up slightly by making a nismo power brace.
Worn mig welder and it being a mig welder makes the result less than pretty, but it welds   sorry for the foggy pictures, alot of welding, grinding, we were 3 people using the angle grinder on shift, you guys can check out the other build through the FB link in my signature! (kaddet 78C 512 Whp)Also a ton of wiring have been done! Bit tight with the K-Type connectors to the ecu!   Wiring is also in the engine bay now!  Thinking I should be able to connect the ECU and get tach, AC, and all those non engine features tested this week as well as completing the inlet manifold with the runners and all.  Changed the CAS disc to a 24+1, just because I've had less issues with them!  Also, the Maxxecu have bluetooth support for android, so I can watch all the values of sensors and such on my phone 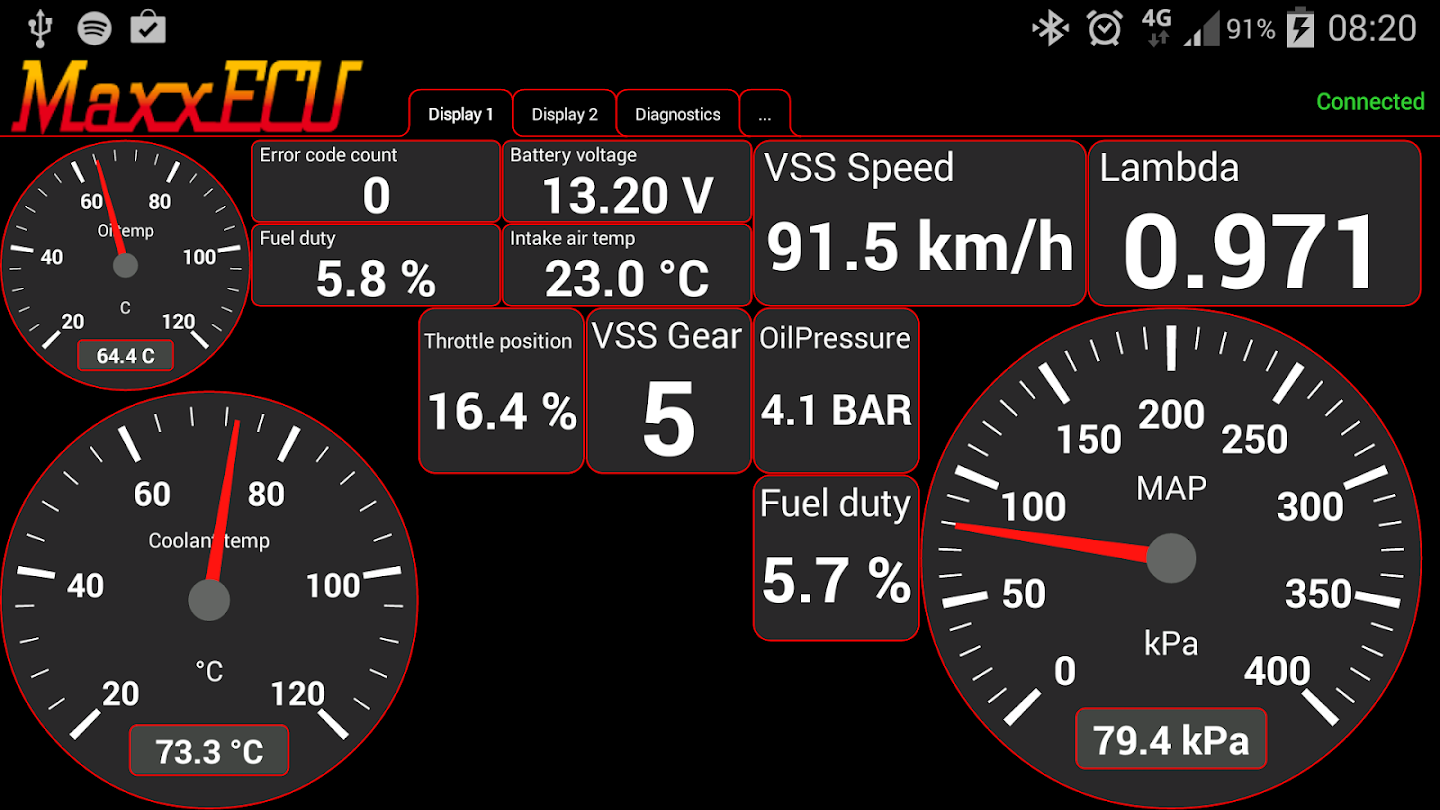 lets see how far I can get at the end of this week
__________________
OakHeart Racing Last edited by Road2Perfection; 10-20-2014 at 01:52 AM.. |
|
|
|
|
10-29-2014, 03:16 AM
|
#15 |
|
Leaky Injector
|
Work work and few delays but back on it!
my tight time schedule doesn't always go as planned mostly because of my job sometimes requiring more time than a anticipated if someone did something they did not anticipate would fail :P
But back on it! I've stripped most of the engine bay, sanding and priming and sorting it a bit out. It won't have a show finish, but definately better than what's stock, and to maintain a low profile I'll paint it with black with a hint of metallic. 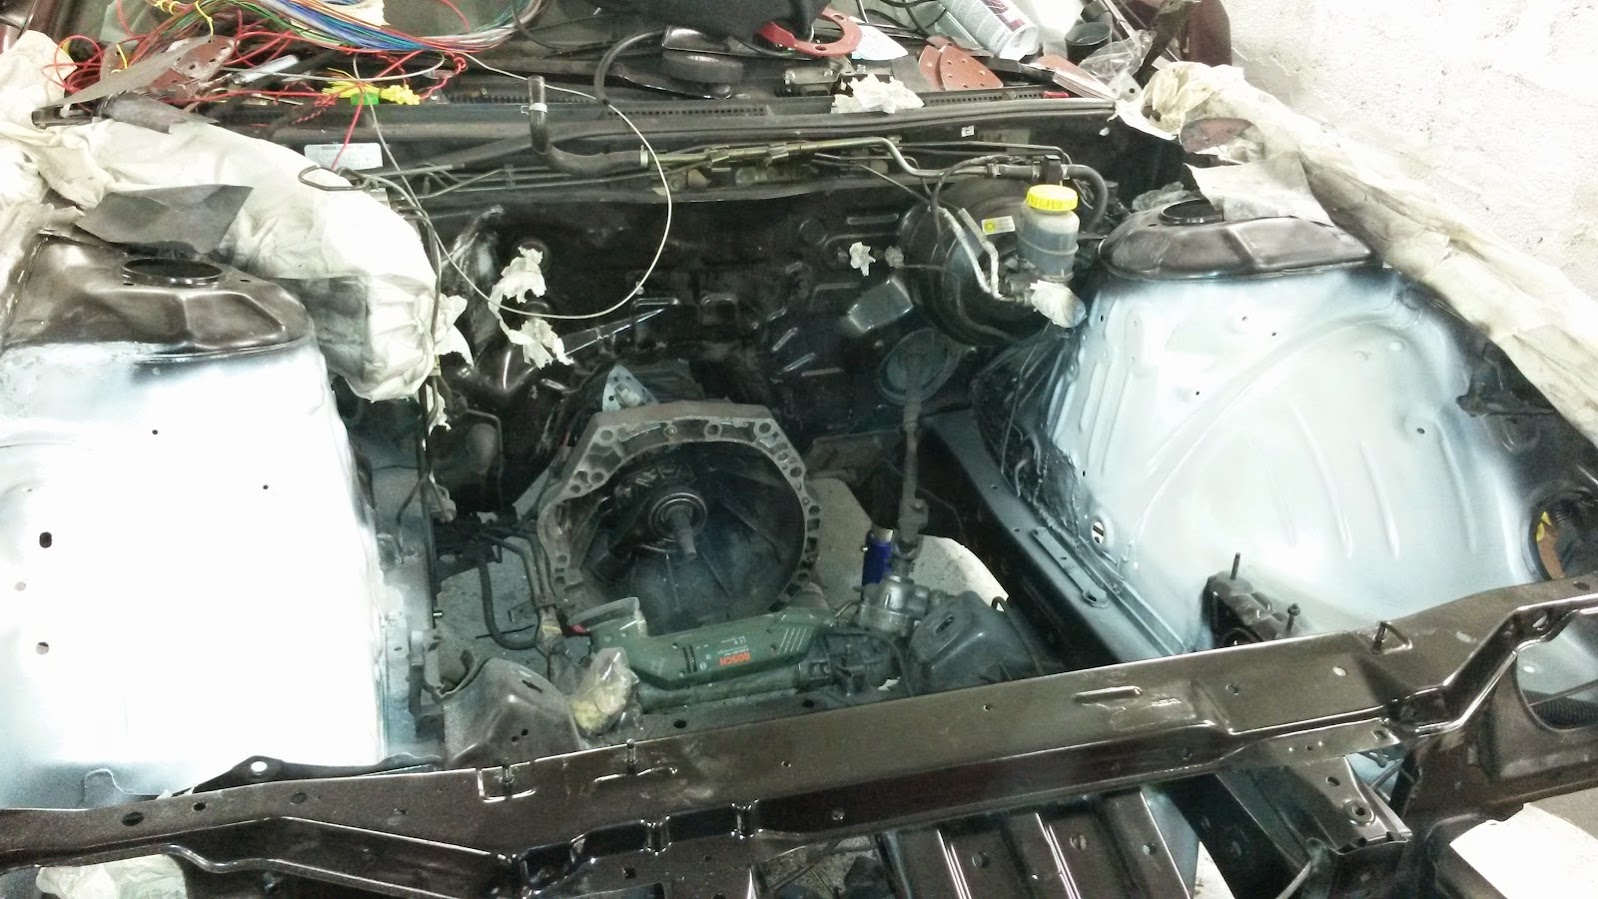 And yes, you can see some rust repair there... done whilst everything was in the engine bay (JoY!) it's not pretty but it does work, it's not a show car! so I've used a bit of time on that and it will take a lot more of my time, but hopefully soon done, soooo boring! Also, there have been a lot of thoughts back and forth on a few different subjects. Crank accessory pulley, water pump pulley, brackets and so on. With VE chain drive you need to shorten a sr20det main pulley by 5mills instead of spacing it 5 mills. With VE accessory pulley you need to remake the water pump pulley, but again you will get the cooling issues during high rpm. EWP115 water pumps are really not that expensive so that's the route i'm going with VE pulley. It has a few benefits, the pulley for the crank is lighter. The AC, Alternator and PS pump brackets are far lighter, they are all made of aluminium instead of cast iron, I think it's about 10 kg total weight savings for it all. Also I eliminate a accessory belt all together, I do get the odd wiring work for both the PS pump and Alternator but that's easy and I can make PS pump hoses myself. So I'll block off the stock waterpump, run a EWP115 PWM Modulated by the ECU  I've forgotten to take photos of the wiring harness inside the car as it's now done and tidy, but I'll try to remember that today. We'll cut the pieces for intake ready for welding today (so long overdue!) Another issue have been throttle pedal, how to solve it. I've been looking at the wrong approach, instead of buying a new pedal and getting that to fit, I could instead just get two tps's and weld the piece to the stock throttle pedal, bore two holes and mount it quick n easy (will look ghetto, but it'll work!) in Drive By Wire you need a backup sensor, so all pedals have two tps alike sensors doing the same thing. So I'll find some cheap tps's with a metal centerpiece so I can weld it
__________________
OakHeart Racing |
|
|
|
|
10-29-2014, 08:08 AM
|
#16 | |
|
Nissanaholic!
 
Join Date: Aug 2013
Location: Denver
Age: 40
Posts: 2,052
Trader Rating: (14)
Feedback Score: 14 reviews
|
Quote:

__________________
S13 Vert | SR | PE1420 | 5-Speed | 15x9.5 - 0 | 
|
|
|
|
|
|
11-02-2014, 08:49 AM
|
#17 | |
|
Leaky Injector
|
Quote:
Anyways, the inlet will be a bit more work than I expected, but there is no change in plans Gotten it cut and as you can see from the picture it looks a bit like a roller coaster, to prevent any bad flow we'll fill in tons at the bottom, use JB Weld at the top and port it so it's smooth. 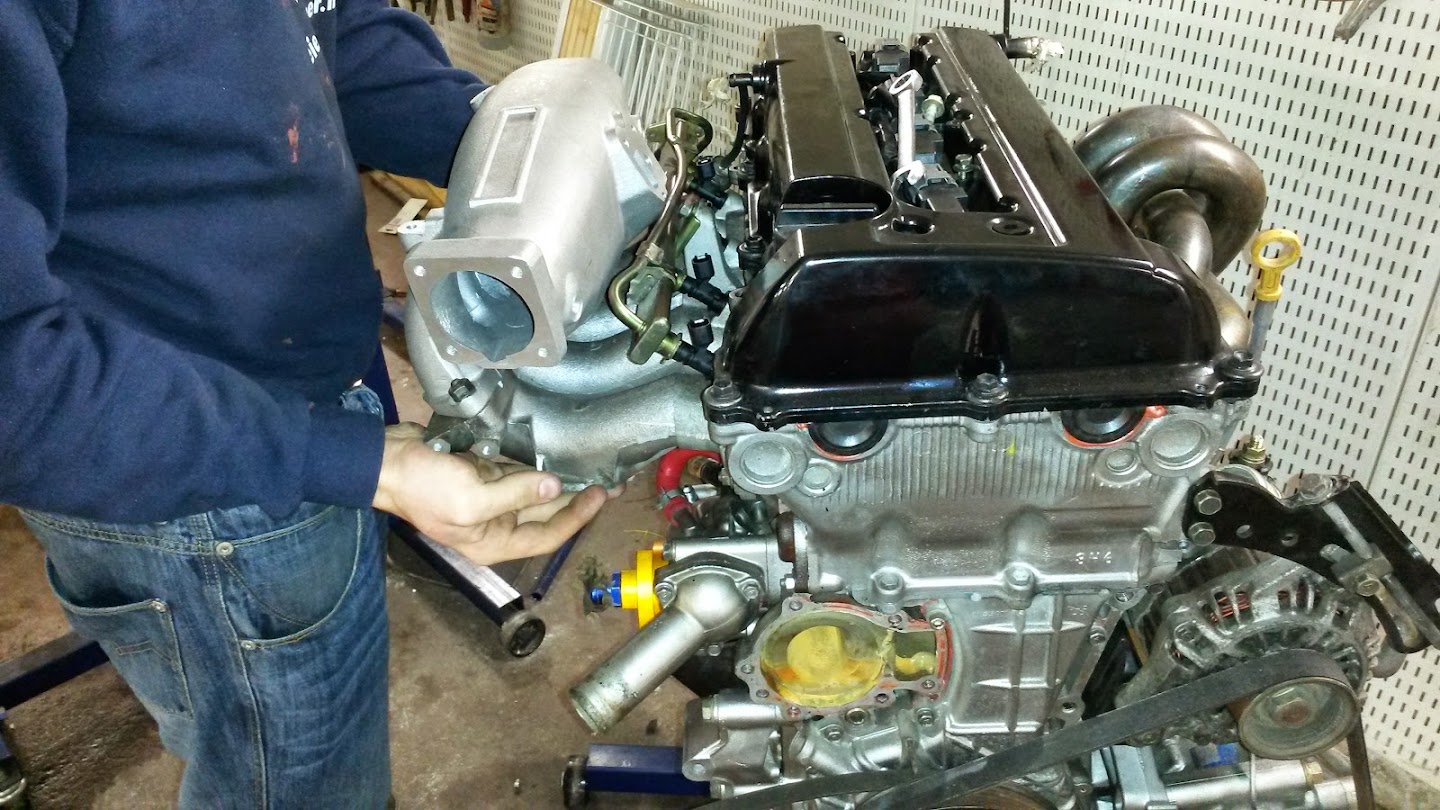 Also, some more parts have been ordered, the Module for DbW In-Line ethanol fuel sensor and a Walbro 450 Lph fuel pump the DbW module will communicate through Canbus. 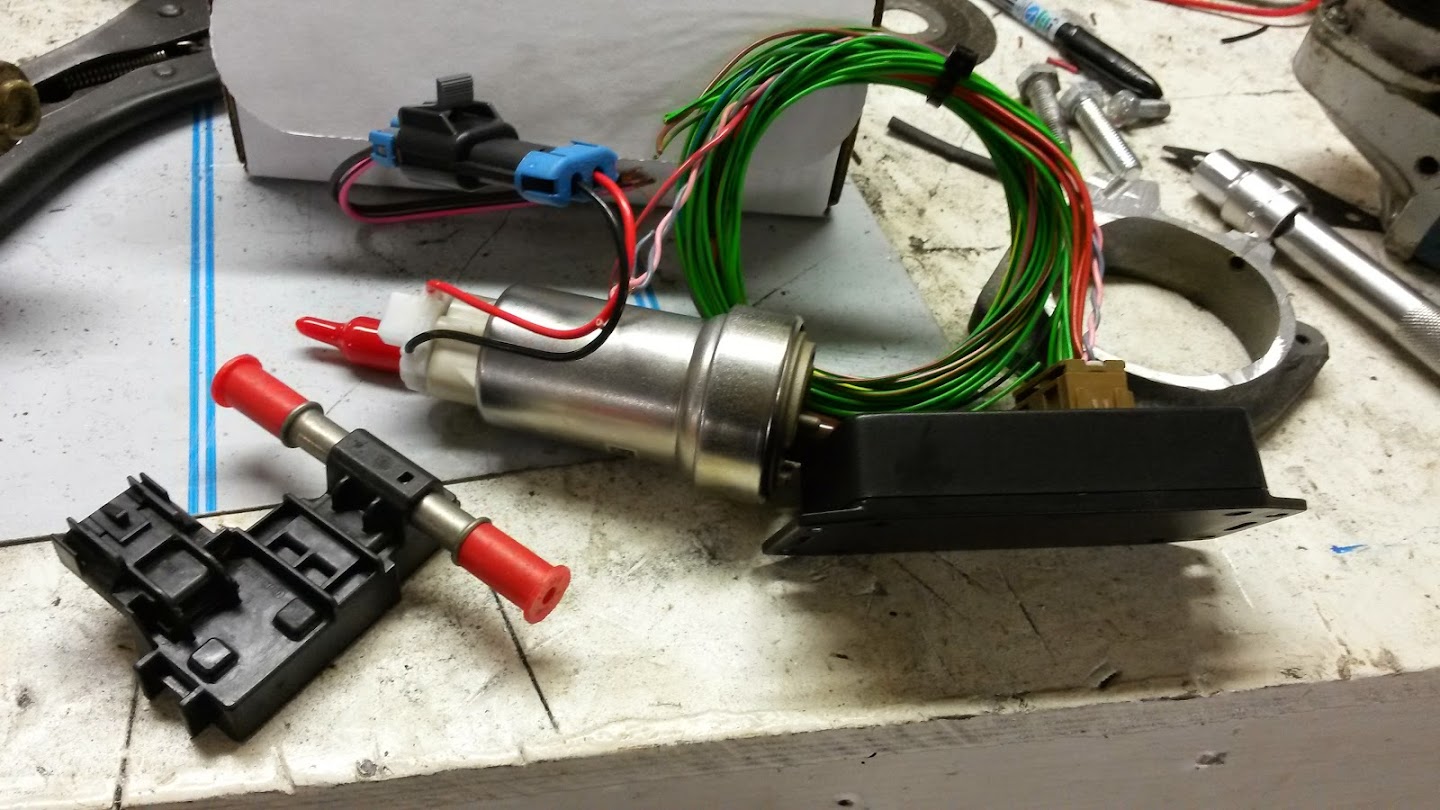 For connectors I'm pairing most stuff up in pairs of 8 for easy disconnect so the engine can be lifted out quickly or in case I change injectors and need a new injector wiring loom, sensors etc etc..  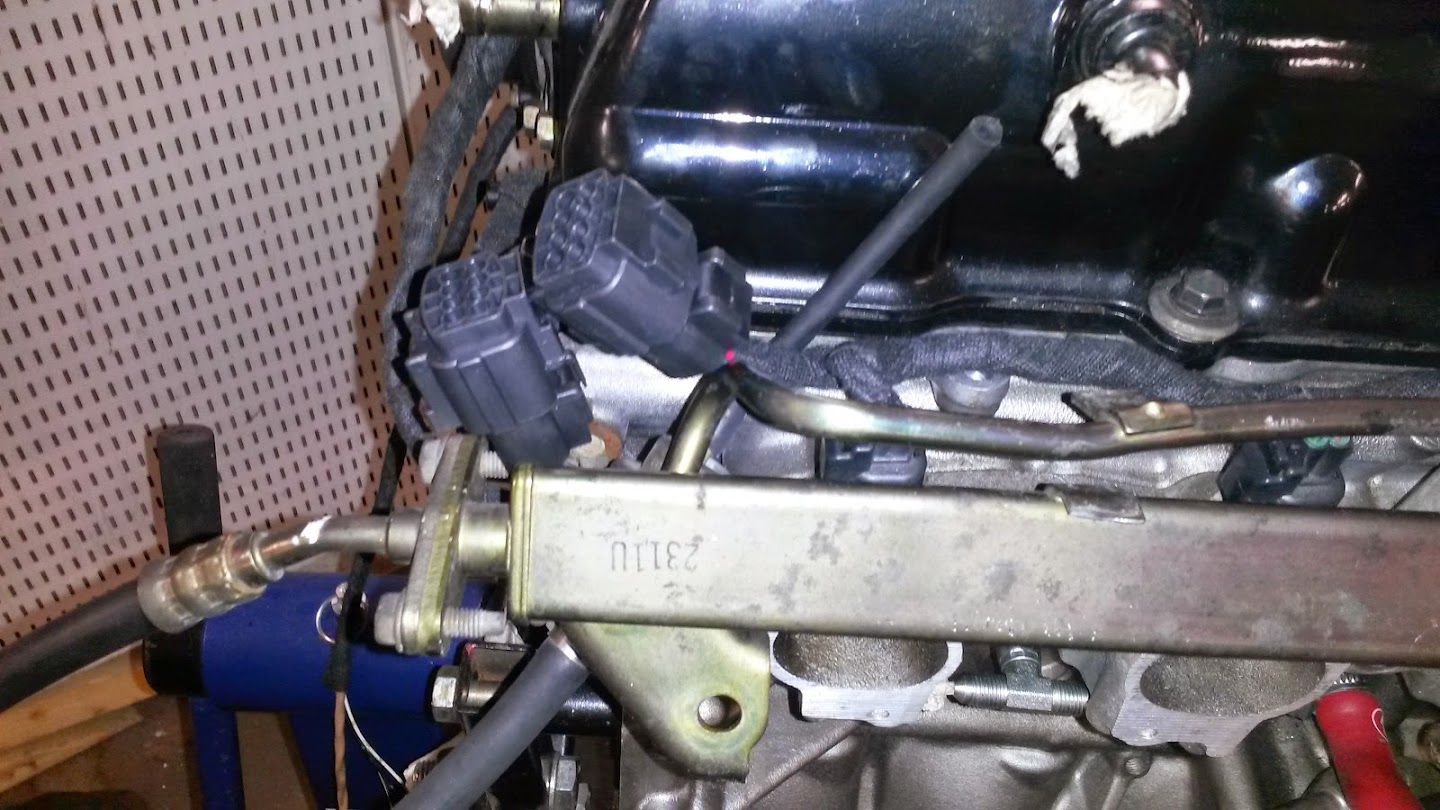 and the eternal struggle with the Mig Welder. Closing the fast idle Throttle body water outlet (hot side)  And this is why all welds suck horsecock.. good to get some new fresh parts on it :P  Currently just waiting for some response from maxxecu on the wiring of nissan DBW parts as it haven't been done before, maybe they need to make a new firmware for the maxxecu ;P they got great support so it'll be sorted I'm sure
__________________
OakHeart Racing |
|
|
|
|
|
11-11-2014, 02:43 PM
|
#18 |
|
Leaky Injector
|
some new progress :)
So time for some more progress updates
Engine bay takes forever because the nissan hardcoat IS REALLY HARD! but it's soon done, thank god!  I must say the paint looks really nice! (behind the ABS unit and so on it's not painted and is really not seen. so I don't bother !) Gotten rid of that stupid oil relocator, don't understand them, but I had to have it to get space for the oil thermostat before, so I've replaced it by using a sandwich plate for the sensors. Also I've begun finding a position and method to get a non VE powersteering pump onto the engine as the VE pump was broken.  Also managed to get some nice welds done, at the fronius demo room (yet again!)  The result is a stockish looking intake system that should work nicely (officers should have a bit of a hard time seeing it's actually modified, that's the thought, time will tell) 
__________________
OakHeart Racing |
|
|
|
|
12-06-2014, 04:39 PM
|
#19 |
|
Leaky Injector
|
A long time, some progress, setbacks and finally rushing towards real progress again
A long time, some progress, setbacks and finally rushing towards real progress again.
First of, deviations from the plan: Drive By Wire will not be supported on current Maxxecu, or they are stopping the manufacturing of the e-throttle module unfortunately, meaning back to the stoneage  anyways, we couldn't let us be halted by such thing, so we had to try to get it to work.. because I like to go into something not many do, the result was partially a failure, but it seemed promising at first https://www.youtube.com/watch?v=UY3Sjdjd01s See the youtube link for demonstration, it's simply pwm modulation against a duty table with X and Y axis where Pedal position is Y and X is Throttle position. Didn't work fail free and I could not add any failsafes, I got it far better than in the video, but I used alot of time to test it and occasionally it had some unwanted behavior due to no Z axis and conditions + frequency of pwm was too low, so that was the set back :P fixes required: AC Line didn't want to be behind the engine in the usual manner, so need to fix it. Intake doesn't clear bonnit, lower engine by modifying engine mounts. Progress By now it's obvious that the engine is in! Sorry for this horrible photo!  Intake Plenum (upper part): Welding of flange was nice n easy, but a lot of grinding of material was needed to increase the size to 70 mm, not much science to the tool and how to do it, we left material towards the cyl #1 to decrease air speed and starvation of air for Cyl #1  , and since the flange wasn't exactly round because it was cut off the VE intake we filled in with epoxy 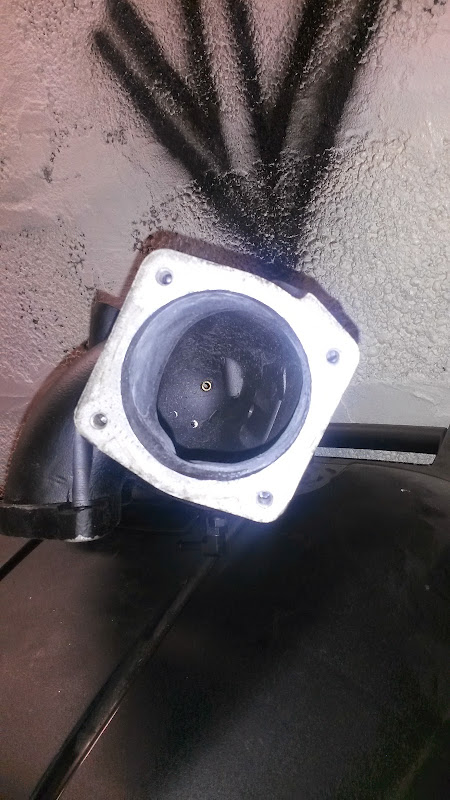 VVL Relocator: Cut off the part that didn't fit the relocator bit from the selenoid part and begun making a bracket by using hydraulic pipe, 2 flat pieces of medal and cut them to size. measured up and made holes, two for the head, two for the relocator and positioned it and mig point welded it where it were going to sit.  Quite pleased with how neat it fits into the engine bay. Fully welded the bracket, painted it and got some Hydraulic connectors that fit AN4, installed them, we will pressure fit the connectors soon so the round cylinders around the hoses will be considerably smaller. This is cheap! prolly about 20 usd worth of hoses, connectors all in all! And it's less prone to cause any leaks than any AN aluminium hose connectors, fragola and all the big brands got nothing on the real pressure fits! (weight is a con tho) For you budget guys, this is the way to go!   most likely another update with finished work but haven't taken any photos of them yet, wiring harness, lower intake part (runners) Throttle body etc in next update, hopefully start up 14th of december!
__________________
OakHeart Racing |
|
|
|
|
12-27-2014, 05:38 PM
|
#20 |
|
Leaky Injector
|
Little Christmas update :)
So, a lot have happened, not been good to take photos or post, so catching up a bit.
So we got a few turbo's balanced with new billet wheels, and managed to get a good collection gathered on the workshop table  Also, to sort out the intake runners, we used some epoxy alike thing, filled alot, this in the middle of the filling, and then grinding it to get the desired shape.  Also, overnight parts from japan doesn't exist, some meme said that somewhere, but from china, sure! Ebay, 6 usd shipping Lol!  This was the throttle body, 70mm yet again, but not dbw Powder coated as usual  Fuel rail with QSP fuel pressure regulator, the pressure sensor will be replaced to a smaller unit.  Forge style resirculating valve also purchased for cheap, don't have antisurge and my ballbearings didn't like it, so on it'll go. yet again powder coated :P  Modified the engine mounts ever so slightly, also fitted some universal engine bushings to lower the engine to make everything clear  Now it's sitting Low! just need to lower the gearbox mount slightly to tilt the engine backwards to give oil pan more clearance  Also installed a whiteline anti roll bar, and that one also requires a tad modification to it's bracket.. very close to the AC compressor!  Flexfuel sensor and fuelrail on lower intake part. 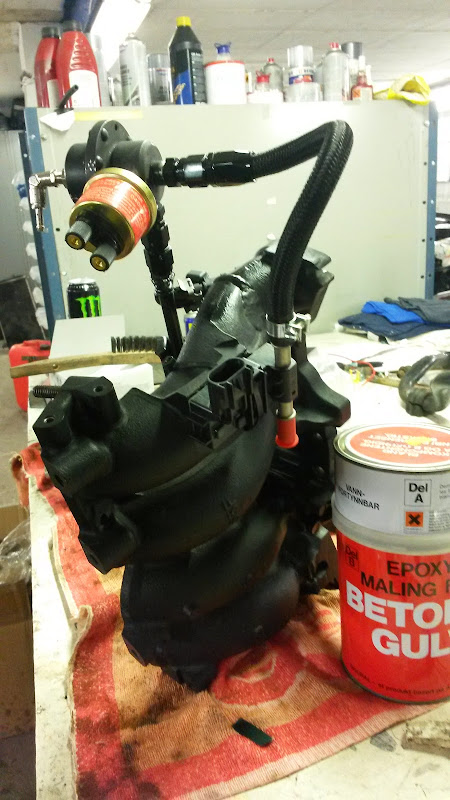 Heater hoses and lower intake mani permanently installed, all wiring except fuel pressure, and ethanol is installed.  A bit weird build I must say myself :P
__________________
OakHeart Racing |
|
|
|
|
12-31-2014, 01:59 AM
|
#22 | |
|
Leaky Injector
|
Quote:
we're a bit in a dispute with turbo manifold on how to mount it, it will be bottom mount, and it will be made so I can later upgrade to a Borg Warner EFR turbo. I can't say I'm impressed with garrett. I don't get any money from selling it, so on it goes, boost till it dies and then; EFR 7670 next up, as this engine requires a larger turbine wheel, and the compressor side isn't too half bad as it is, the current turbo was selected for SR20det and not VET :P other struggle is Powersteering line. Everything else is pretty much sorted, waiting on a friend to source me a AC condenser so I can install the cooling system
__________________
OakHeart Racing |
|
|
|
|
|
01-15-2015, 01:22 AM
|
#23 |
|
Zilvia FREAK!
 |
Awesome thread.. I'm actually in the process in building something similar. We share the same idea with using S14 SR intake manifold since I'm going after the Clean OE look, just different on the approach. I do have some questions if its not too much trouble.
- Since you're already using P12 head with single VVL solenoid which is perfect for RWD in my opinion for firewall clearance why switch to double solenoid. I have met with tuners and other VVL turbo guys and most of them I know of just switch the cams at the same time. Is there really a significant gain into being able to trigger it separately? - Also I noticed the setup of P12 Head, S14 SR RWD Block. Why use the FWD accesories? wouldn't it be simpler perhaps to run with the existing RWD accessories ALT,PS and AC. Particularly since it places your PS pump on the other side which means longer hoses to go to the other side? - Last.. I'm curious about the T-Fitting on the VE head. I understand the need for the VVL blocks to be able to switch to double solenoid. But wouldn't it be redundant to even feed oil to the head since it will essentially hit a dead end thru the block off plates? Appreciate your reply as I learn more about this conversion. Thanks! |
|
|
|
|
01-15-2015, 04:09 AM
|
#24 | |
|
Leaky Injector
|
Quote:
with the T split I won't have to remove the head, be afraid of metal inside the engine from threading, inserting anything, just block off one path on the T piece and install single if no benefit is found Other than that None. I've never seen any certain results on this, so it's because I'm curious, nothing but that these new accessories was so new they are in mint condition. 2ndly, I wanted the stock timing gear because I have no intention to adjust the cams (adjustable cam gears) and changing cam gears cost money, and my chains I currently have are worn, my other SR20det required some, so instead of buying stuff I just installed them, additional items I've bought for the swap is: Relocator, one oil drain block from mazworx. Everything is either from the broken SR20det or Sr20vet. Somehow money is something I keep.. not using a lot of after the purchase of the VE head, as I'm trying to save a lot of money for a house So in essence, I wanted new ac pump, and not buy cam gears, that meant either Removing 5mm off the stock sr20det pulley (which is broken...) or using the VE, tried VE, works like a charm bolt on with AC and alternator, just not water pump and powersteering which are converted to non sr20 specific. Powersteering is sorted in a little different way. It's something first a friend did on a Alfa romeo click the link for speedhunters cover of it, it uses a vauxhall astra powersteering pump, meaning shorter hoses, not a separate reservoir and price: 10 bucks! they work perfectly as I've later talked with other people who use them for rally, track, daily and drifting PS. I don't think the AC compressor from sr20det would work with the engine lowering, I think it sticks even further forward just FYI if you want to keep it.
__________________
OakHeart Racing |
|
|
|
|
|
04-08-2015, 04:20 PM
|
#25 |
|
Leaky Injector
|
Some updates :)
went the easy was with powersteering, bought a Vauxhall astra electric pump, made fittings and placed it on one of the wingsides:
 Filler lid is where the stock IC pipe goes, so easy to fill up Also, made a waterpump blockoff plate by the famous CAD Design (Cardboard esign) a angle grinder, used the ve block to make it, it somehow had a bolthole extra but it does fit  Body work, well, there is a lot of it, and tons of it. had a hood fly over the roof so everything is done now   roof, jeesus.  it's all done thankfully but to actually make a post I'll make it short, antenna hole is welded and covered, there was 3 dents on drivers side, a ton of passenger side and 50% of the roof ! :O anyways, on we go here. Exhaust manifold, here it's tight! sleeper means downmount, I'll be able to tell the officer it's stock in the end hopefully In the design phase  Final spot welding:  and finally welded up without wastegate outlets ( still needs to be done!)   Because wastegates isn't going to fit on the top, they'll be mounted down low with the downpipe, so i'll have 2x 38mm tial wastegates with 38mm piping going up, this is super tight, but it actually fits, and it will still be easier to replace turbo than a stock setup    and the intercooler is a air water type powder coated.  engine lives and start happily I'll try to get some updates in as I get time.. I should have gone to bed to not oversleep, but felt like giving a update for once!
__________________
OakHeart Racing |
|
|
|
|
04-09-2015, 09:28 AM
|
#26 |
|
Zilvia FREAK!
|
Nice I'm going to go the same route with my VET build. Low mount borgwarner s300sx fmw. How wicked is the bend for the intake with the turbo low like that?
__________________
 95 240sx RB20 415whp 91 Nx2000 VVL yo |
|
|
|
|
04-12-2015, 09:31 AM
|
#27 | |
|
Leaky Injector
|
Quote:
I think about similar air2water intercooler setup. May I ask you, how did you secure the intercooler in front of engine? |
|
|
|
|
|
04-12-2015, 10:42 AM
|
#28 | ||
|
Leaky Injector
|
Quote:
If you do not have a AC, you have tons of space, I' considering moving to an electric AC pump in the future, but not now. A Cobra style 4-3" clears everything just about, with a little deforming by the AC/altenator, nothing to worry about anyways. Quote:
Ohh well, it's quite easy. I'm in the progress of making it, but short story long. You can make alu tubes and weld and make it really really tight (Since everything is mounted to the engine and nothing to the chassis) that way there is no need to have brackets as it's held 100% securely just by IC tubes, labor intensive tho. I use quite a lot of silicone and easy way there so I need mounts. I got a Male Male 3/8 to AN10 connector, between the IC and the male male connector I place a plate and tighten it properly, weld a stick over the the AC belt adjuster and welded on a nut there, voila bracket on one side. I'll take some photos soon Currently not quite sure where to run the braket on the intake side yet, currently removing all the panels I can for paint, so haven't gotten that far yet.
__________________
OakHeart Racing |
||
|
|
|
|
04-24-2015, 06:50 PM
|
#30 | |
|
Leaky Injector
|
Quote:
It's very easy, I don't have powersteering where the VE's got it, or altenator for DET RWD It's also fitted rather loosely as I was powder coating them right after, but when coated it's not easy to see what's been done. It doesn't have any movement whatsoever, and can be very close to the pulleys in front as it won't move anywhere Anyways. Alternator bracket to IC.  Block to IC (Intake side)  Top view  it's simply rod and nuts welded together. There are two holes you can use if you use the same AC location and bracket as I do, but the DET may have it too. I can take a look on the DET I have laying around Another update, manifold with twin external wastegates and all!   
__________________
OakHeart Racing |
|
|
|
|
|
| Bookmarks |
|
|


 Linear Mode

