|
|||||||
| Builds (and builds only) Got a build thread? It goes here, build threads anywhere else on the forum will be locked and never moved. |
 |
|
|
Thread Tools | Display Modes |
 04-07-2013, 01:27 AM
|
#92 |
|
Nissanaholic!
 
Join Date: Jun 2007
Location: Kathleen, GA
Age: 52
Posts: 1,956
Trader Rating: (0)
 Feedback Score: 0 reviews
|
^^Thanks for the kind words and for stopping by to check this out!
VERY minor progress... Went in with a plan, only ended up getting the fender harnesses secured back up & the PS reservoir in. 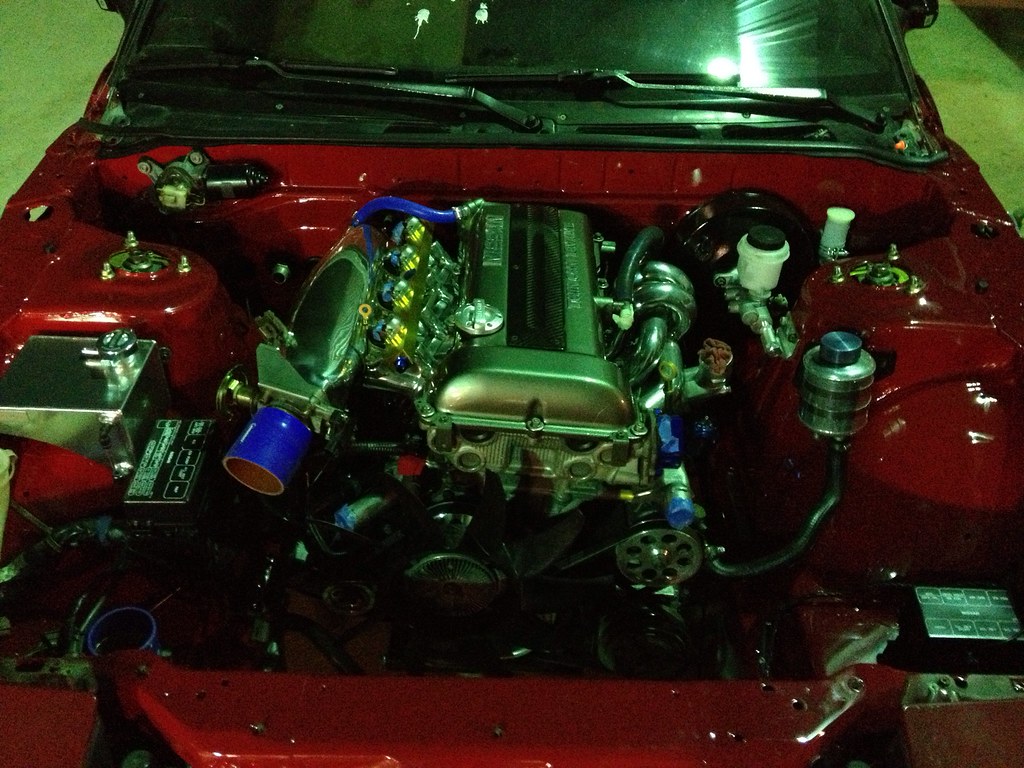  Oh well, still a step forward  Separate and mildly related, I bought another piece of carbon for her (I'm a sucker for CF)... 
__________________

Last edited by Mikester; 04-07-2013 at 02:59 AM.. |

|

|
|
04-10-2013, 07:09 AM
|
#93 |
|
Nissanaholic!
Join Date: Jun 2007
Location: Kathleen, GA
Age: 52
Posts: 1,956
Trader Rating: (0)
Feedback Score: 0 reviews
|
AC condenser & lines went in like a champ! Just need to see if I can relocate the filter/drier a bit to the right so It won't interfere with the fan shroud.
  Started early stages of laying the main harness 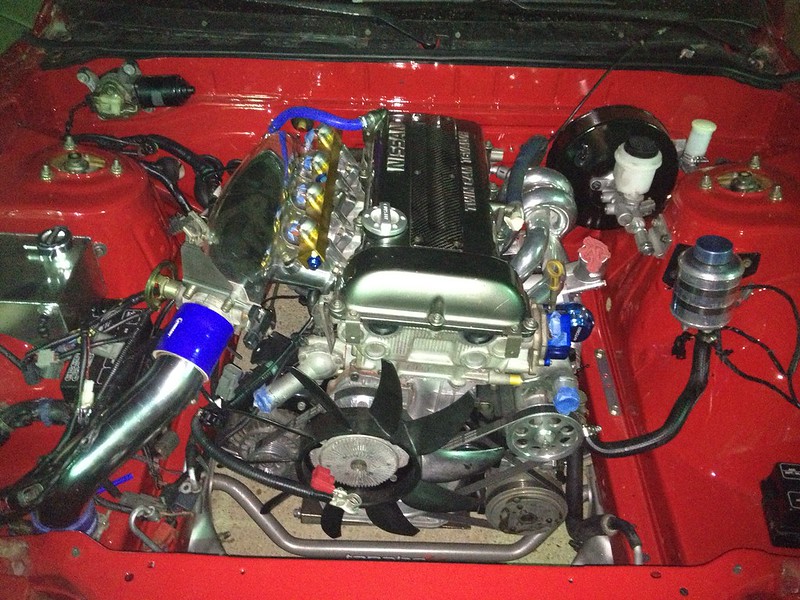 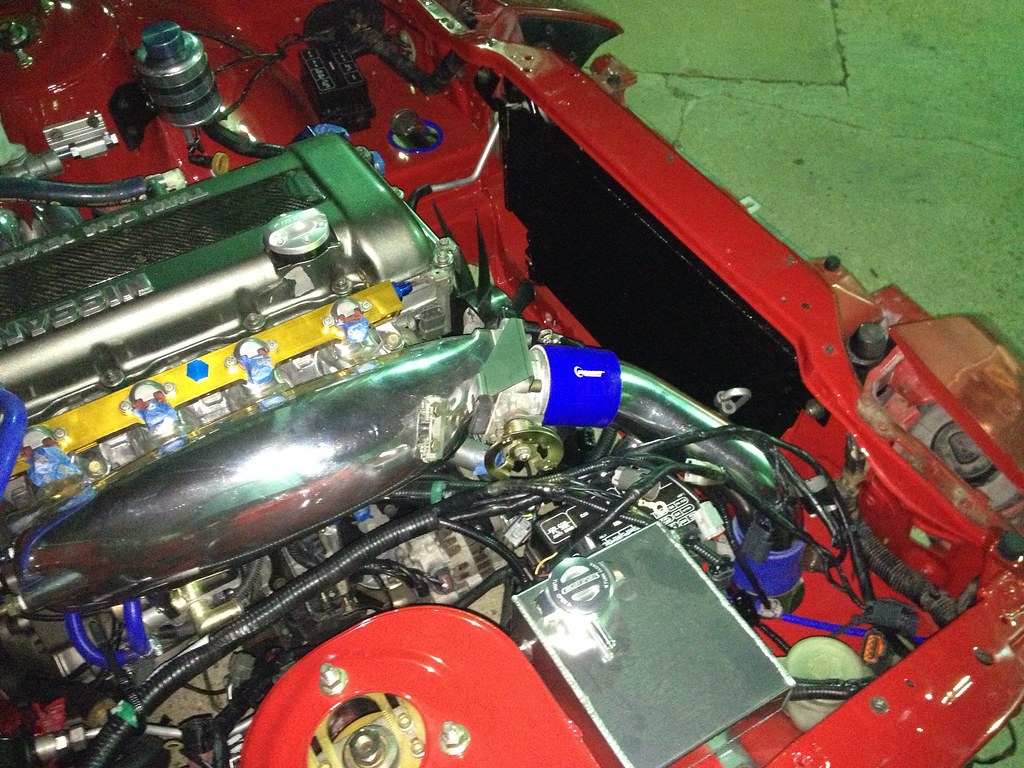 Also decided to relocate the washer reservoir to the other side of the car, and use the space & hole for the oil cooler block/lines.
__________________
|
|
|
|
|
04-10-2013, 01:14 PM
|
#95 | |
|
Zilvia Addict
 
|
Quote:
 I have an even lighter and cheaper version of one of these; I take it out of my car when I don't need it. 
__________________
* S14SR22 * 9.0 c/r * GT3071R * |
|
|
|
|
|
04-11-2013, 06:23 AM
|
#97 | |
|
Nissanaholic!
Join Date: Jun 2007
Location: Kathleen, GA
Age: 52
Posts: 1,956
Trader Rating: (0)
Feedback Score: 0 reviews
|
Quote:
 Thanks for the insight Brad! Good thing saving weight is not a concern 
__________________
|
|
|
|
|
|
04-11-2013, 02:47 PM
|
#98 |
|
Nissanaholic!
Join Date: Jun 2007
Location: Kathleen, GA
Age: 52
Posts: 1,956
Trader Rating: (0)
Feedback Score: 0 reviews
|
Well, pretty impressed. Only 2 days from the time I ordered it, I found my shiny new PS line in a box outside my front door:
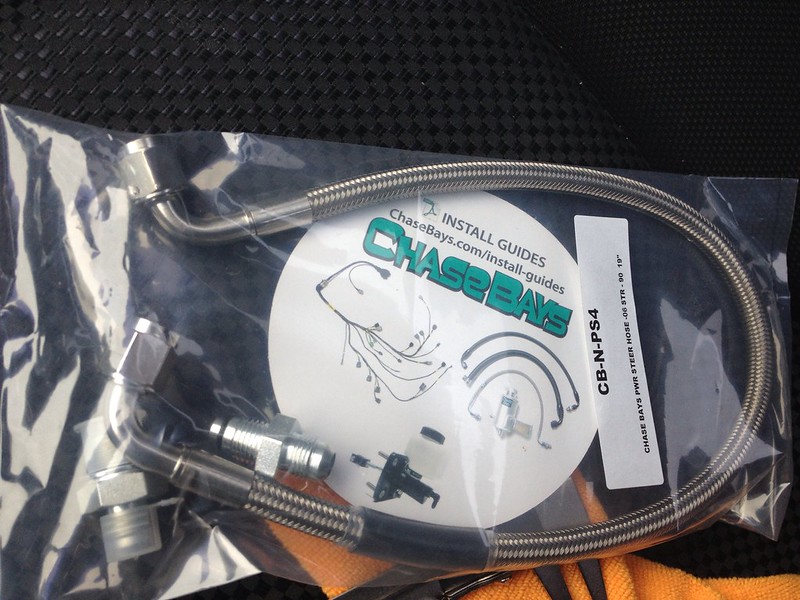 Not sure who the guy was that I talked to on the phone, but he was mega-cool. Wasn't expecting this until next week This next thing is either going to be brilliant, or a complete fucking disaster. Andy is a lot smarter than me and advised against it, but I am going to try it out anyways... My own method to line up the heater hose ports where we cut them under the intake, and the ports on the firewall: Mikester home-made HOME DEPOT heater hoses: - 5ft of blue PEX hose ($2.98) - 4ea 90* 3/4" PEX elbows ($8.80) - PEX crimp-on clamps (Free, just checked receipt, she forgot to charge me  ) )- PEX crimp tool ($24.76) - Military discount (-$3.65) TOTAL WITH TAX: $35.68 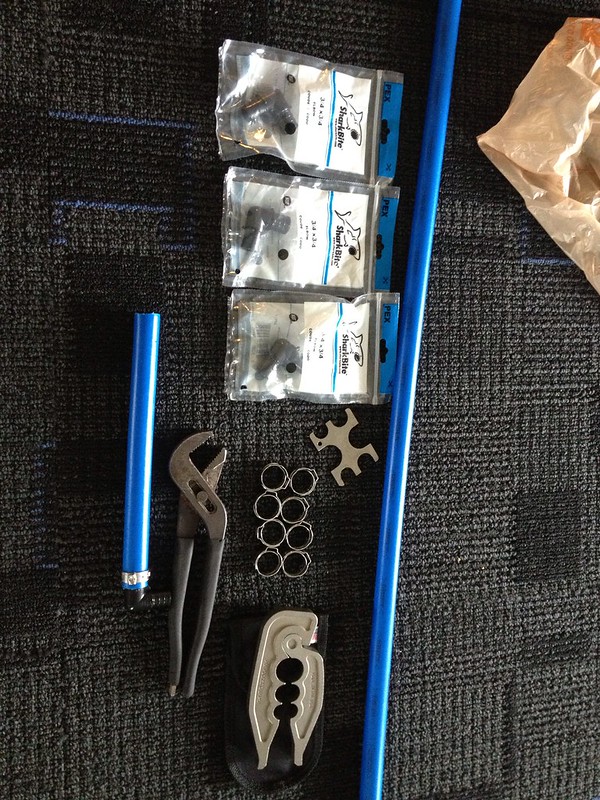 My original plan involved some type of metal or maybe PVC. I decided that I don't want to wait to have even more stuff welded, and that PVC may become brittle and snap due to heating/cooling and engine torque... This PEX stuff is pretty badass... It comes on a roll, can be bent (with some effort) however you need it- and the crimp-on clamps are gnarly as hell! Aside from being sturdy and flexible, this is what sold me on giving it a try: 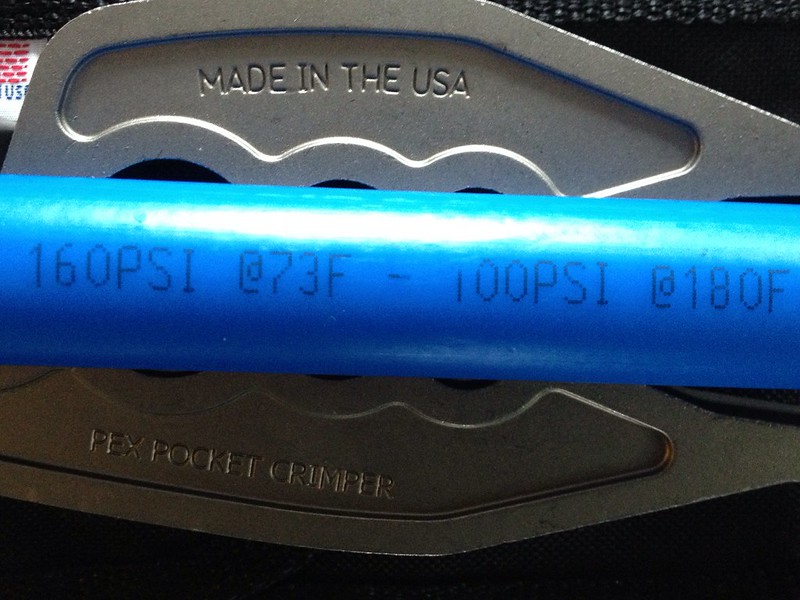 Considering that my average temp is 64C & I have NEVER seen my water temp go above 74C (162F)... not to mention my rad cap opens WELL before 100psi, I am confident that it should work nicely. 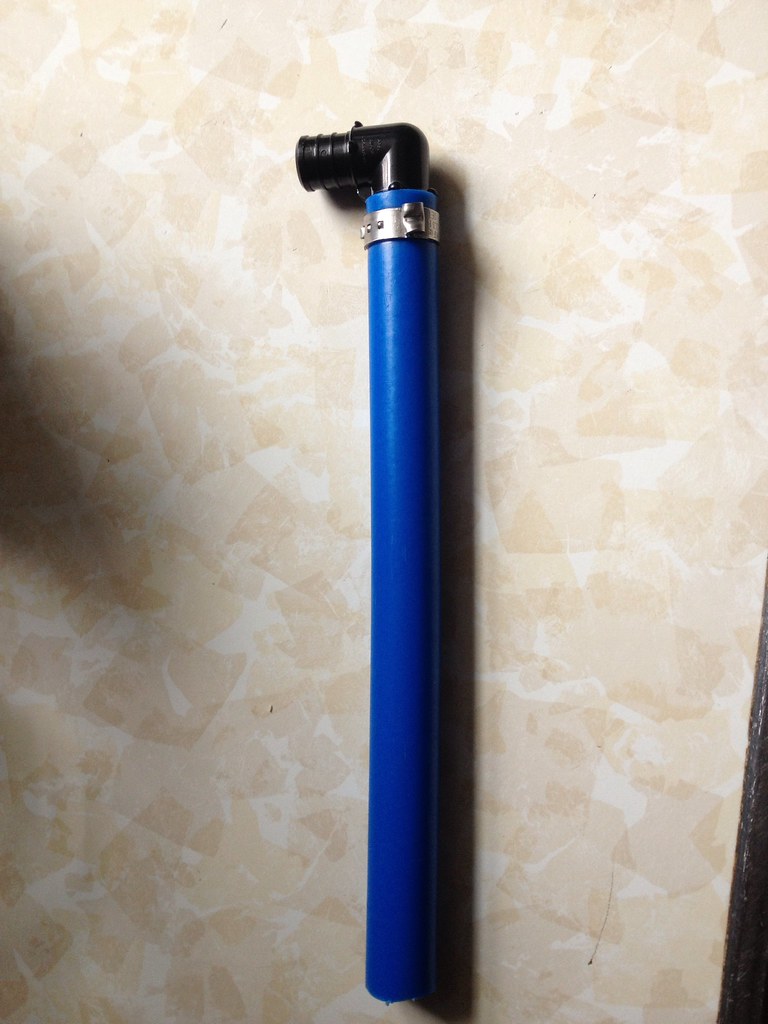 I leak checked it, and it held 120psi... Then dropped it in boiling water, pulled it out & tweaked on it a bit (didn't budge a bit in the clamp)... and leak-check it again- STILL fine at 200+ degrees. Of course checking it in a relatively controlled environment vs. checking it under operational duty are 2 different animals... But STILL, I am convinced this should work. If anything, I think the weak link will be the lengths of hose I will need to use as couplings (3/4" 4-ply silicone). Guess we'll see. Will definitely post a thread about this if it works. Was gonna go work the car tonight but Andy had some family biz to attend to. Updates maybe tomorrow or Saturday. Cheers~
__________________
Last edited by Mikester; 04-11-2013 at 09:17 PM.. |
|
|
|
|
04-12-2013, 02:31 PM
|
#99 |
|
Nissanaholic!
Join Date: Jun 2007
Location: Kathleen, GA
Age: 52
Posts: 1,956
Trader Rating: (0)
Feedback Score: 0 reviews
|
Not so much of an update... Just couldn't resist posting a pic of the new hat rack:
 It's gorgeous! Wasn't expecting something this good for the price.
__________________
|
|
|
|
|
04-13-2013, 09:40 PM
|
#100 |
|
Nissanaholic!
Join Date: Jun 2007
Location: Kathleen, GA
Age: 52
Posts: 1,956
Trader Rating: (0)
Feedback Score: 0 reviews
|
Today's progress.
Installed slave cyl, clutch & brake lines... 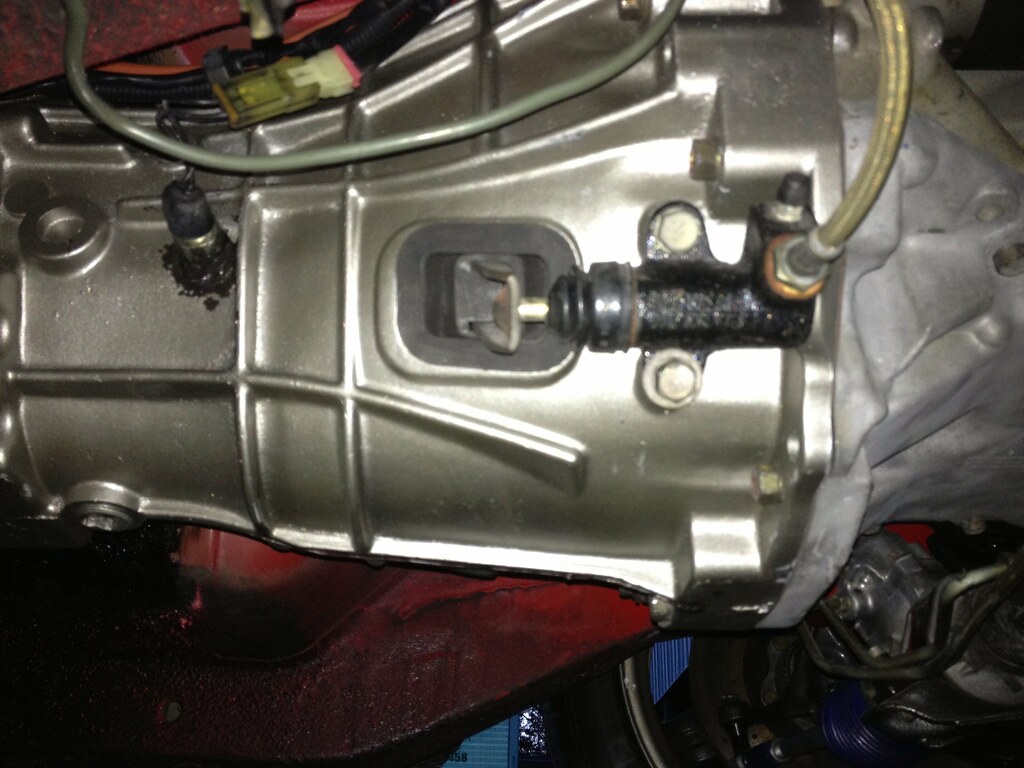 Please excuse the JB Weld- Sorta stripped that sensor... cranked it too tight lol 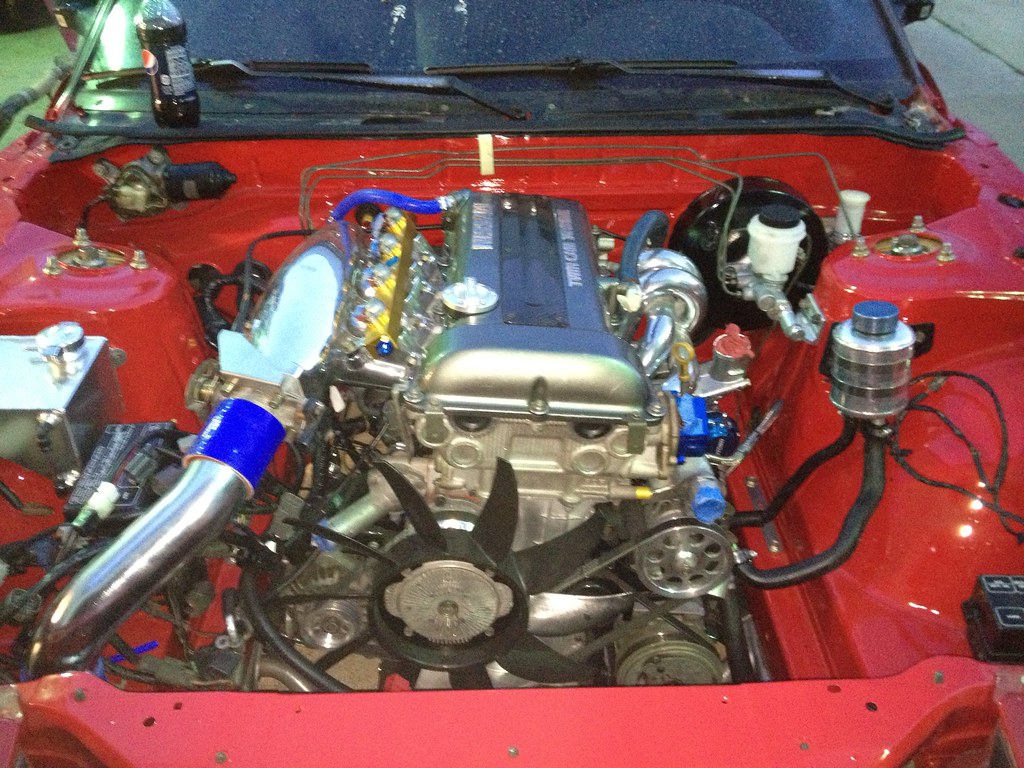 ^^Need to spend some time straightening out the lines on the firewall & installing some aftermarket separators... The misalignment drives me effing NUTS!!! Added to the neverending list. Power steering lines all cleaned up & back in... 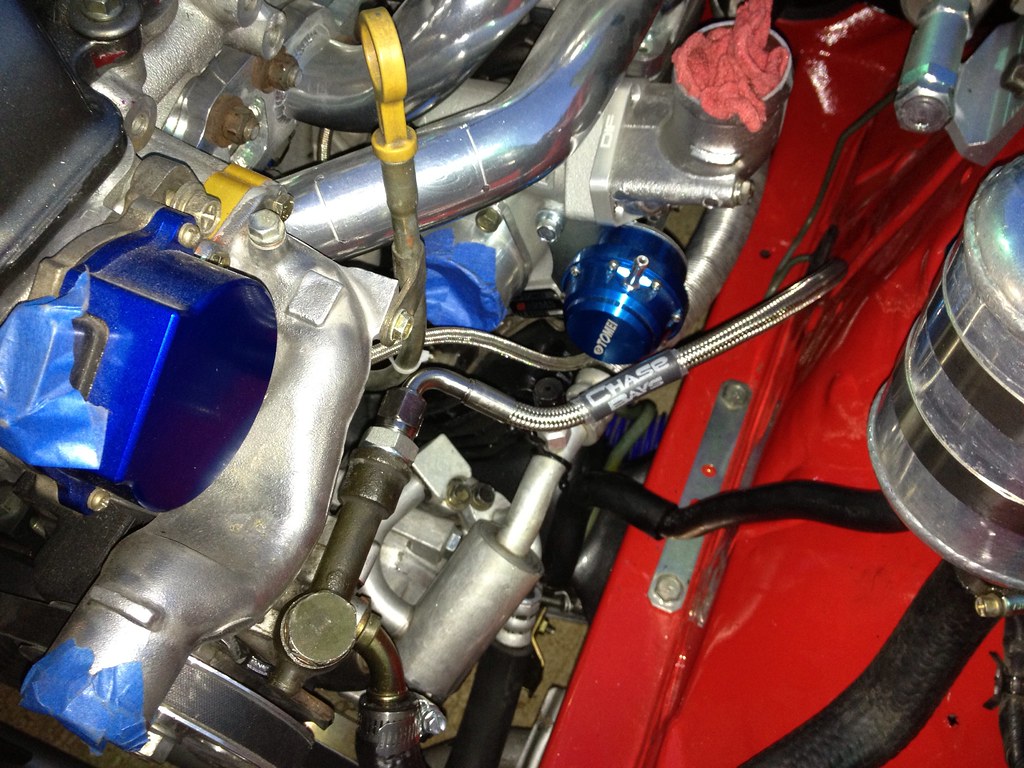 Will adjust the new high press line once I see exactly how the turbine inlet & hot pipe are gonna sit. Also spent some time revisiting that Excessive throttle cable bracket with the S13 pulley back in. It works, but it's very sloppy. It needs to be about 1" - 1.5" closer to the throttle body. The way it goes in, there is no way to adjust out the slack in the cable: 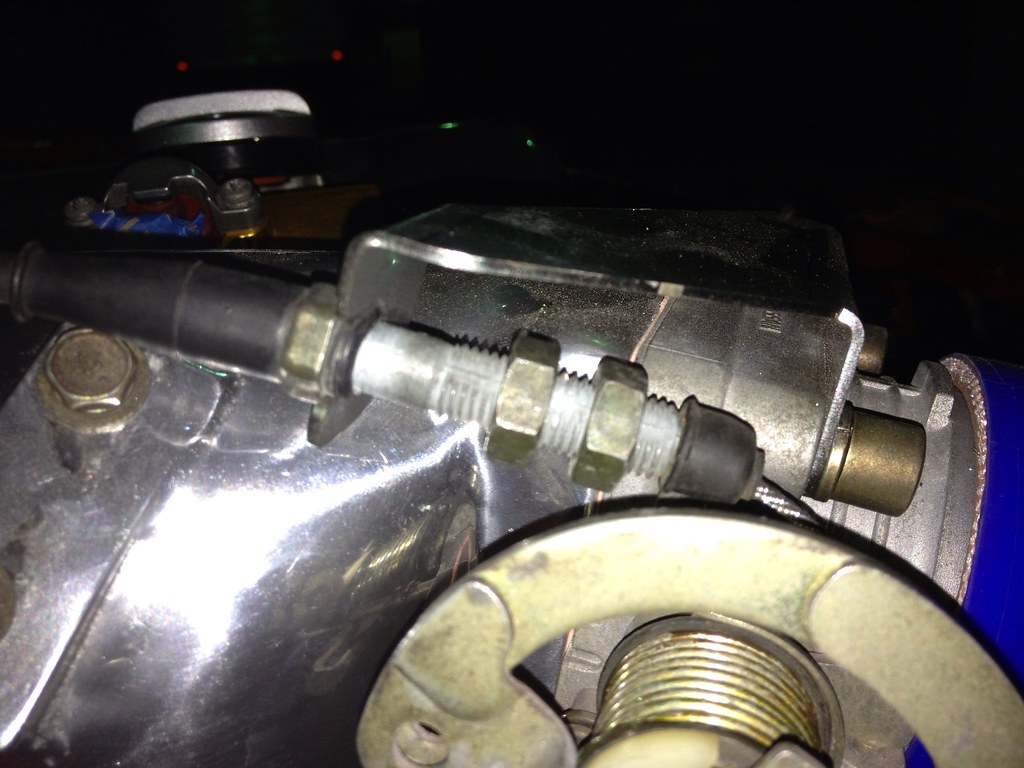 Which not only leaves it un-adjustable... but also incredibly "not secure" in the bracket; and ultimately results in this: 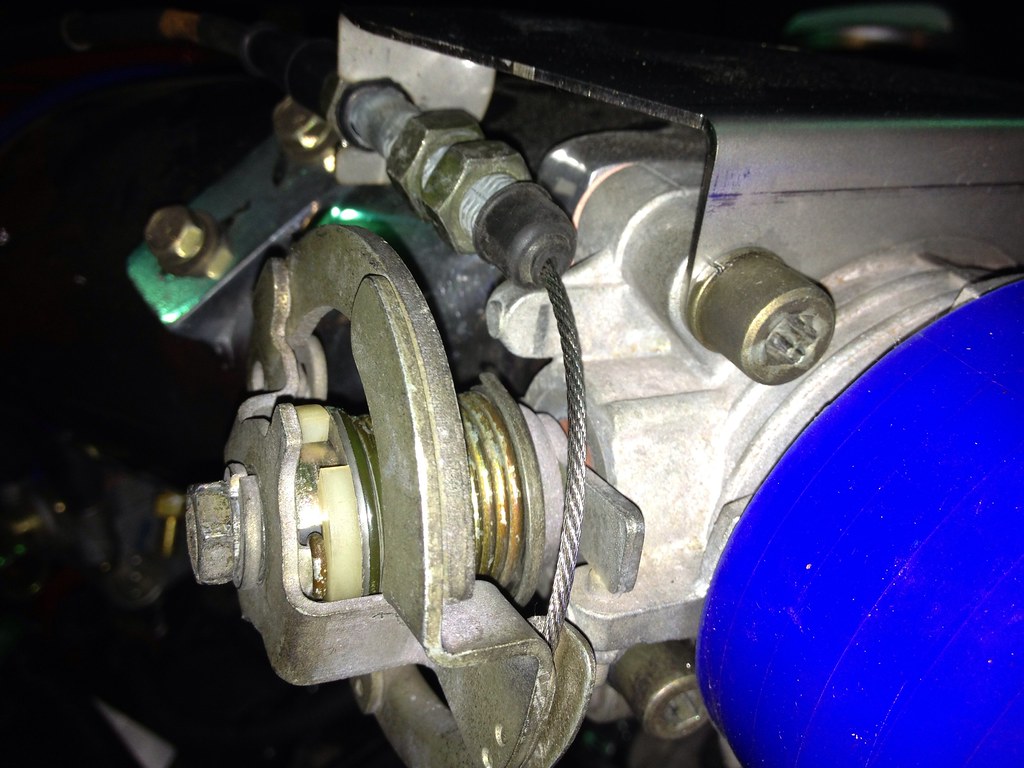 ^^ No bueno. Gonna talk to Excessive and see if they either A have a known fix for this, or B maybe sent me a bracket that wasn't made to specs. Well, the good news is that she's ready for PS, brake & clutch fluids. Andy's gonna mount the oil cooler & make the bracket for the filter block- Then she should FINALLY be ready to come back to my garage for power-on checks & finishing touches 
__________________
|
|
|
|
|
04-15-2013, 04:06 PM
|
#101 |
|
Nissanaholic!
Join Date: Jun 2007
Location: Kathleen, GA
Age: 52
Posts: 1,956
Trader Rating: (0)
Feedback Score: 0 reviews
|
Minor update... Talked to Xcessive- they were HELLA cool! There was a different series bracket I needed that is shorter and will hold the jamb nuts perfectly: Online Store - Xcessive Manufacturing
Gotta send this one back and they're gonna switch it out for me. I'm happy
__________________
|
|
|
|
|
04-17-2013, 09:26 PM
|
#102 |
|
Nissanaholic!
Join Date: Jun 2007
Location: Kathleen, GA
Age: 52
Posts: 1,956
Trader Rating: (0)
Feedback Score: 0 reviews
|
Tonight, slowly started sorting out the harness while Kate filled the clutch & brake MC's up w/RBF 600.
Got as far as this (becauseoldslowguy): 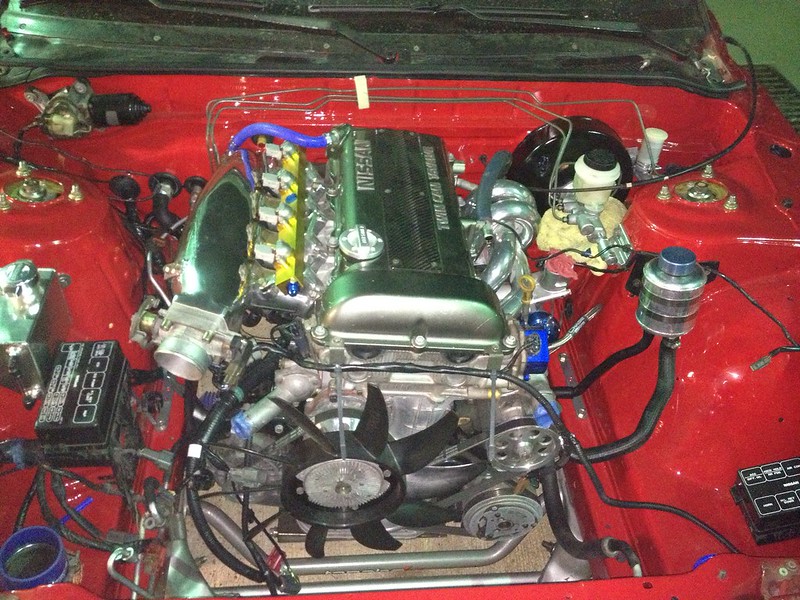 Yuri (WS guy) hooked me up with extra wire length at the injectors so I could do this, which I love: 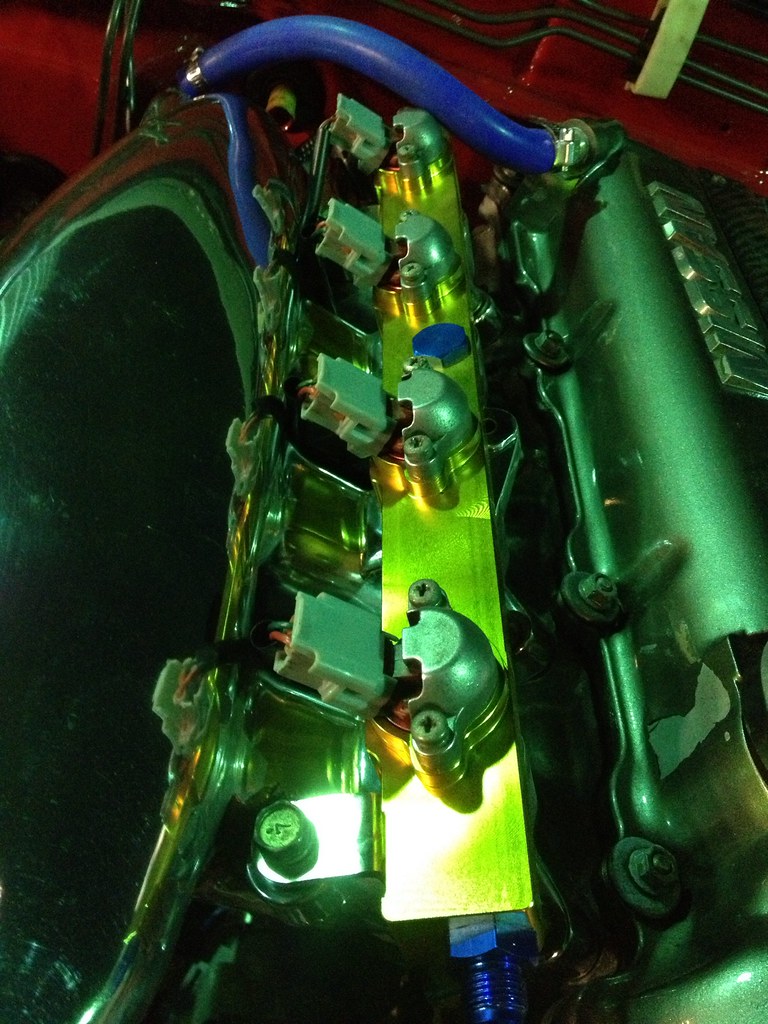 Took gratuitous nighttime shot 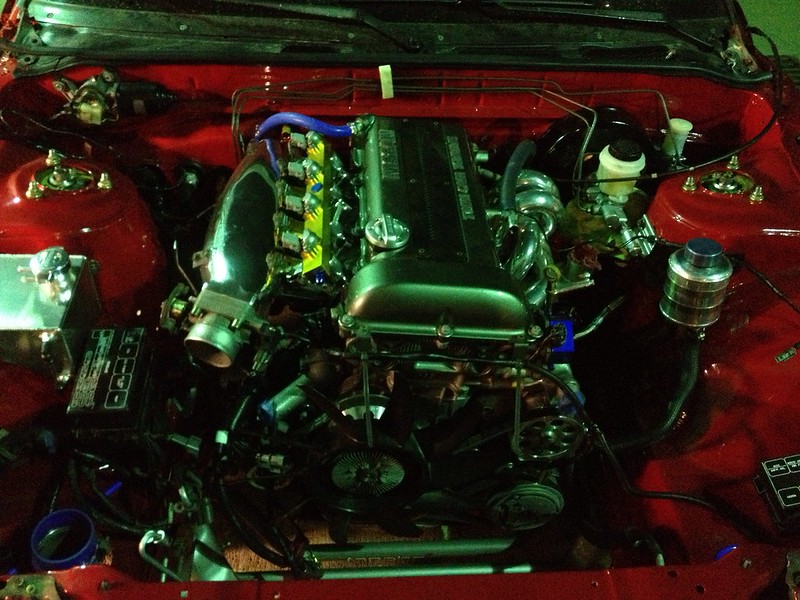 ^^Not liking the dust & fingerprints all over everything lol. Came across some fitment issues involving the suction pipe & the PS line. Need to take it to Nocturnal for some shaving & TIG-work; then to St. Louis Polishing & all will be well. Also, due to pipe length, my BA heater hose idea didn't pan out. Had I known then what I know now, I totally would have cut the pipes under the intake about 1.5 - 2" shorter. Oh well, gonna save that one for Adrenaline to sort out. Gott have an angle cut out & bead rolled on my hot side FMIC pipe- not fitting hot pipe. Then will need to mess with the fuel stuff & radiator/shroud to see how/where we can relocate the filter/drier. Basically a bunch of little shit left- got a list on my iPhone to keep track. Not looking forward to battery relocation. I'm sure I can do it... but hope to come across a good writeup so I can do it clean & legit. Inching toward the dyno
__________________
|
|
|
|
|
04-19-2013, 07:19 PM
|
#105 |
|
Zilvia Junkie
 Join Date: Jul 2011
Location: oceanside, CA.
Posts: 538
Trader Rating: (4)
 Feedback Score: 4 reviews
|
Once you figure out which power distribution block you want to use and where you want to locate it, your battery relocation should be pretty straight forward. That and where and how you want to mount your battery. Here is how mine turned out and it's annoying everytime I drop something between the box and tail light. It doesn't happen often but when it does, out comes my magnet on a stick. It doesn't help that this box is a bit bigger than neccesary either.

__________________
 in any situation....thou shalt blaze in any situation....thou shalt blaze
|
|
|
|
|
04-19-2013, 08:01 PM
|
#106 | |
|
Nissanaholic!
Join Date: Jun 2007
Location: Kathleen, GA
Age: 52
Posts: 1,956
Trader Rating: (0)
Feedback Score: 0 reviews
|
Quote:
__________________
|
|
|
|
|
|
04-20-2013, 09:06 AM
|
#107 |
|
Post Whore!
 |
I'm personally not a huge fan of hideous boxes for the battery. It's a pain in the ass to find a good mounting location and they are just so damn bulky. Grab a sealed battery so you don't have to use any of that battery box nonsense. It's not like you are going to have the truck popped at car shows to show it off anyway.
The S13 has very few places to mount the battery in the trunk and most of the time I see them mounted in the middle of the back seat on the deck, directly over the axle or slightly off to the passenger side to compensate for driver's weight. Make sure you use a 100am breaker, 75amp will pop if you try to start the car multiple times in a row. Run the 4gauge wire on the inside of the car as well and put it as far away from any speaker wires or antenna, otherwise you'll get that damn stereo whine. Broadfield may have more tips for you as well as he does stereos and a lot of high end audio stuff requires additional batteries.
__________________
*My SR20VET* Does your VTC gear rattle in your S14/15 SR? PM me. |
|
|
|
|
04-20-2013, 07:11 PM
|
#109 | ||
|
Nissanaholic!
Join Date: Jun 2007
Location: Kathleen, GA
Age: 52
Posts: 1,956
Trader Rating: (0)
Feedback Score: 0 reviews
|
Quote:
Will definitely take that to heart when I tear into the battery reloc... Except for the part about the battery box lol... I got the Summit kit already; so I'm gonna use it. Since I don't drift and compensating for driver's weight isn't really a concern, I left a spot on the left side of the trunk area sound deadener-free where it's gonna go. Not exactly sure how I intend to do it; but power & ground distribution blocks are coming to mind... Whatever it is, I HAVE to do it clean... and will definitely keep the power away from my stereo & other wiring =) Quote:
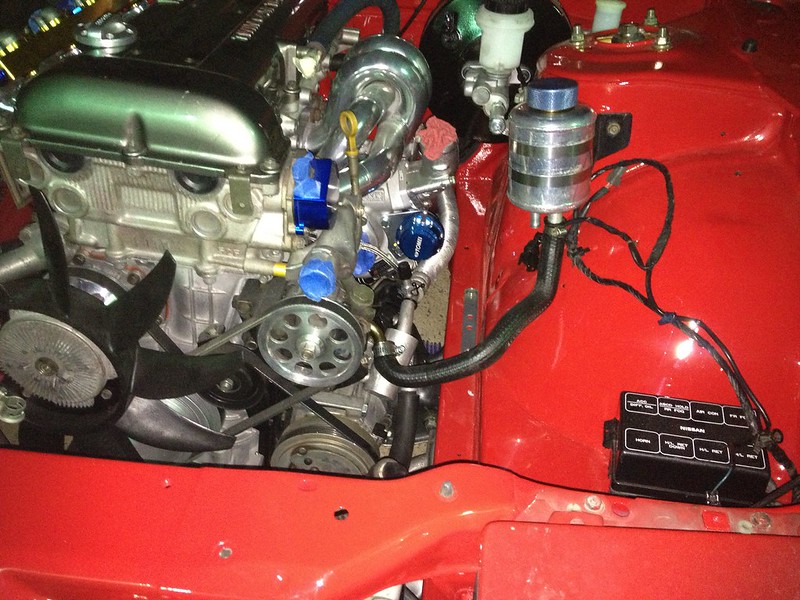
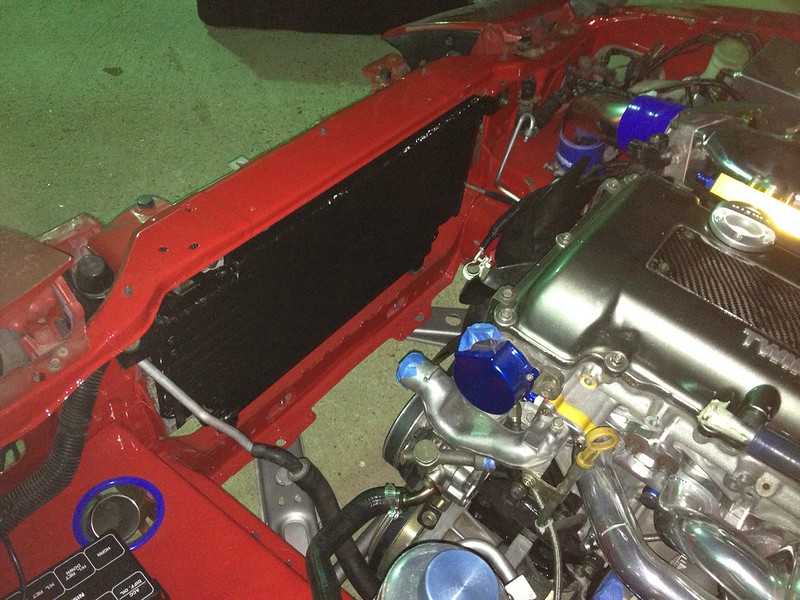
I like drag, backroading/road course & street... The Hipermax's are a very nice balance. Forgiving on the street... Not too hard to launch, and very responsive to steering input... and AMAZING on the highways- I assume by your username your a drifter... Pretty sure you would like them... but for a full-duty track car, I don't know enough about drifting to recommend them to ya. WELLLL Well, continued sorting out the rat's nest of wiring... Got the Splitfire system all in and most of it figured out. Starting to look a bit closer to the picture in my head:  Gonna secure the booster line under the firewall lip; and hopefully the MC heat shield will cover the rest. Still some werk to do for sure... Need to sort out the grounds, mount the filter/drier away from the fan shroud and a bunch of other small odds/ends... Speaking of the fan shroud, it's not as shiny as the one I rocked in the 180... but it's about as "factory" as it gets  Radiator has to come back out to mount the condenser fan & get to the oil block fittings... but the good news is that it dropped in easy-peasy past the slightly smaller GKtech fan with room to spare Hoping to do some more to her tomorrow... but school is effing KILLING ME atm 
__________________
|
||
|
|
|
|
04-22-2013, 10:13 AM
|
#111 |
|
Nissanaholic!
Join Date: Jun 2007
Location: Kathleen, GA
Age: 52
Posts: 1,956
Trader Rating: (0)
Feedback Score: 0 reviews
|
^^Thank you, and I will. In the meantime, if you haven't; you should give jr_ss' VET build a look... absolutely INSANE with simple 'less is more' sleeper look to it.
__________________
|
|
|
|
|
04-23-2013, 04:13 PM
|
#112 |
|
Nissanaholic!
Join Date: Jun 2007
Location: Kathleen, GA
Age: 52
Posts: 1,956
Trader Rating: (0)
Feedback Score: 0 reviews
|
Minor update... Got my turbine inlet pipe back from Nocturnal- had the 2 small bungs and one big one TIG'd shut, and a 5/8" (-10AN) bung installed where the catch can line will go Omar & co. do great work!
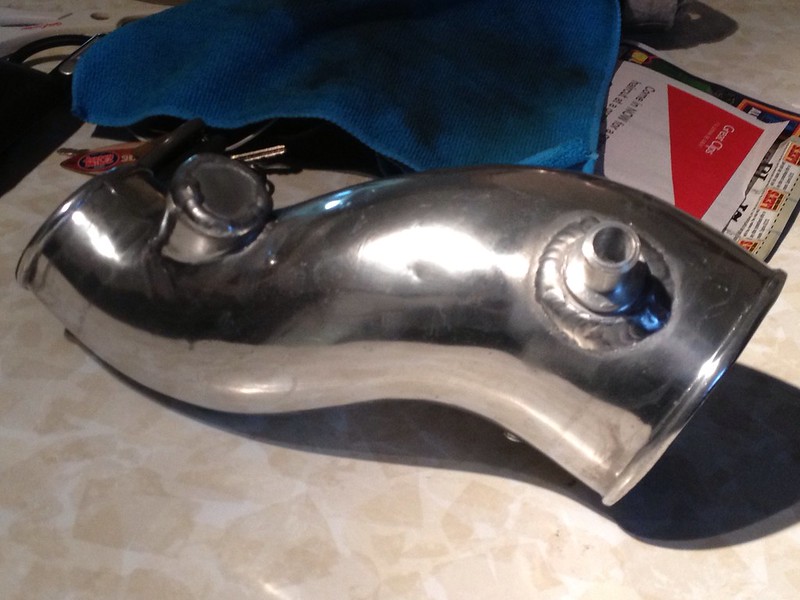 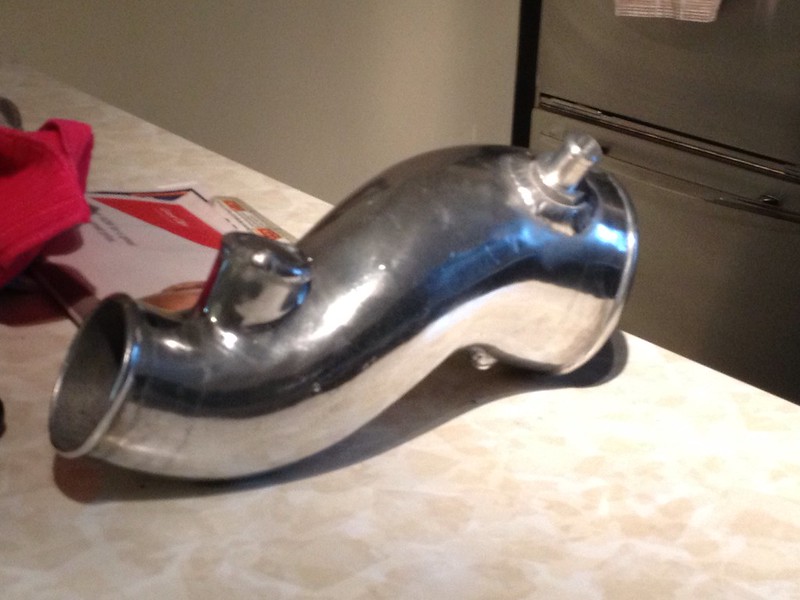 In case you are wondering why I didn't just have the whole big bung shaved & welded smooth, it's a cast-aluminum pipe and doing it any other way would have been detrimental to the inside of the casting. The best part is that my fitment problem with the Chase Bays PS line is solved
__________________
|
|
|
|
|
05-03-2013, 10:25 AM
|
#113 |
|
Nissanaholic!
Join Date: Jun 2007
Location: Kathleen, GA
Age: 52
Posts: 1,956
Trader Rating: (0)
Feedback Score: 0 reviews
|
School coming to a close; finally able to do some stuff...
Got the heater hoses & behind the block/head semi-squared away: 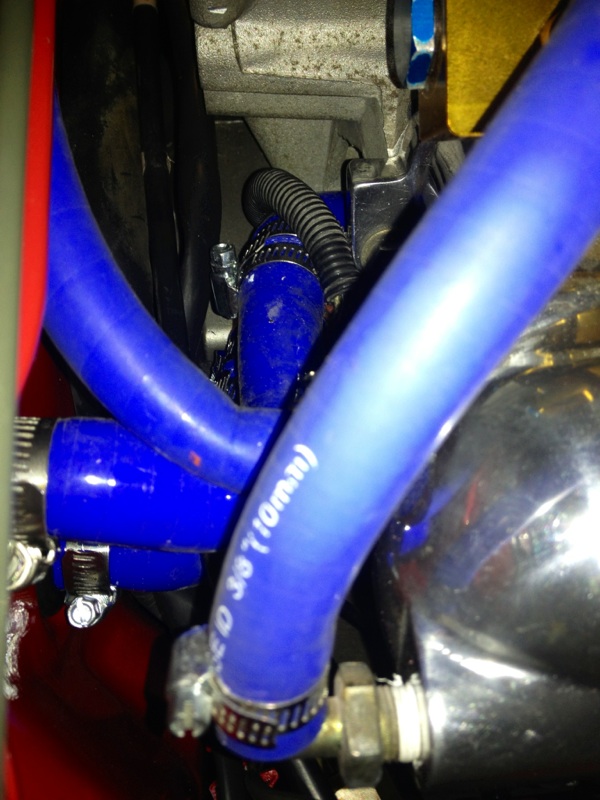 Given how 'busy' it is in that area now, I had to relocate the feed to the center of the rail... A bit bummed seeing as how I just put in an order at Summit yesterday; only to now need a 135* -AN elbow for this location. FAIL. 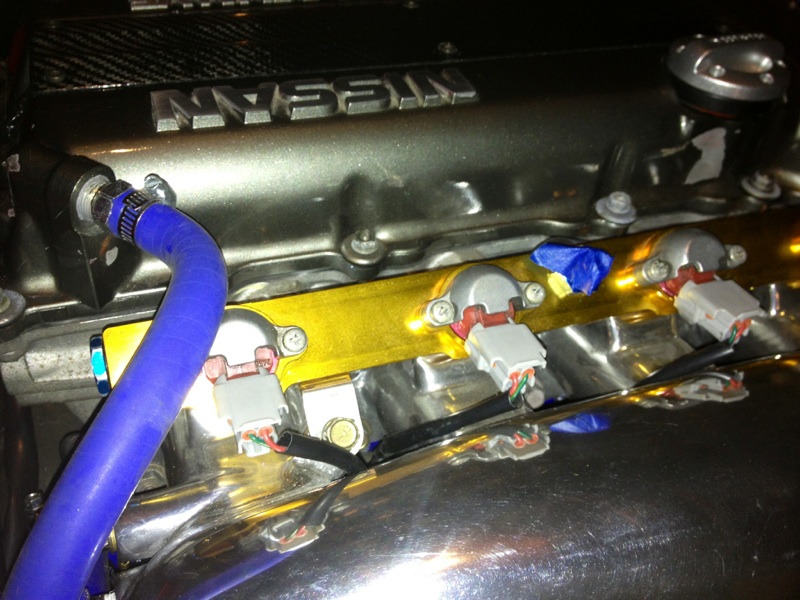 Good news is this will actually be a bit more conducive to where I plan to mount the filter & regulator. Got the hot-side IC piping ready to roll- had the cutting/welding done... Everything seems like it fits now  Also mounted the catch can just to get a feel for how it will need to be plumbed. Also mounted the catch can just to get a feel for how it will need to be plumbed.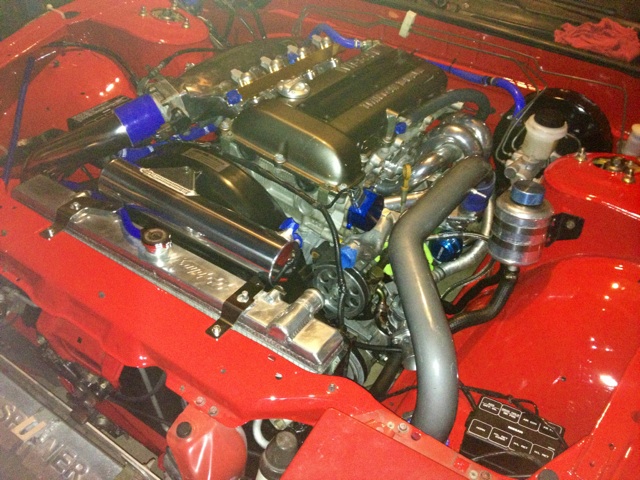 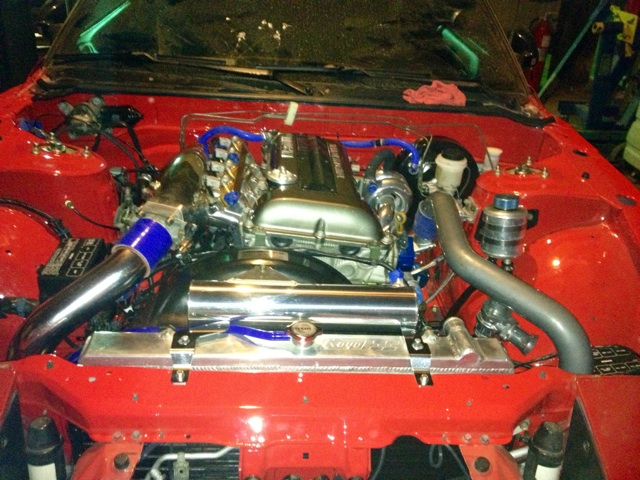 Messed with a bunch of other little odds/ends in the midst of it... Took some "put-together' notes so my old ass won't forget lol Funny- the 'to-do' list is getting shorter, but I had forgotten how all the little piddly finishing up stuff takes up so much damn time. Of course, once the ass-pain of getting those heater hoses in was over with, the rest seemed to go pretty quick. Gettin' there~
__________________
|
|
|
|
|
05-06-2013, 11:47 AM
|
#115 |
|
Zilvia Addict
|
I like everything!
except for the blue hoses and couplers. (I can't stand blue in a red bay) And I know what you mean about the piddly crap stuff taking forever, I just installed a DIF steering linkage bushing and that took like 2 hours. I used your write up on DriftSTL too.
__________________
* S14SR22 * 9.0 c/r * GT3071R * |
|
|
|
|
05-06-2013, 08:58 PM
|
#116 |
|
Post Whore!

Join Date: Dec 2004
Location: Poconos, PA
Age: 39
Posts: 8,030
Trader Rating: (58)
 Feedback Score: 58 reviews
 |
This thing is gonna be burnin the tires in no time!
__________________
 Want Air Conditioning in your SR20 Swapped car? Check out www.sr20acbrackets.com for more information! Quest Alternator Conversions for SR20! Check my Group Buy! Tired of lousy internal gates? Go external wastegate with one of my manifolds, Check out my group buy |
|
|
|
|
05-08-2013, 09:32 AM
|
#117 | |||
|
Nissanaholic!
Join Date: Jun 2007
Location: Kathleen, GA
Age: 52
Posts: 1,956
Trader Rating: (0)
Feedback Score: 0 reviews
|
Quote:
Quote:
Awesome- Pretty sure I stole it from nico and cited it accordingly Quote:
///////////////////////////////////////////////// Was able to get a few hrs in last night... - Mounted 'overkill condenser fan, wires will tuck nicely underneath. - Located filter/drier clear of the fan shroud - Andy worked the oil cooler/filter block dilemma... He is designing some pretty ingenius bracketing for that, the filter/drier, fuel filter & FPR - Xcessive Series-2 throtlle cable bracket worked perfectly- top of intake mani stays nice & clear, which I LOVE! - Driver's side just about completely together, misjudged the amount of space I had to work with- should have had the bung welded onto the inlet about 45* lower... Will probably have to stick to flex line instead of the -10AN I ordered for it. No biggie- still looks okay I suppose. Can always change up later. Inlet clears everything it used to interfere with perfectly now that it is shaved down... WIN! - 120* fuel feed did not clear between rail and surge tank- good news is that it clears the heater hoses nicely so I can stick to the original plan to feed from the rear & return from the front - Starting to look like my baby again~ Pics:  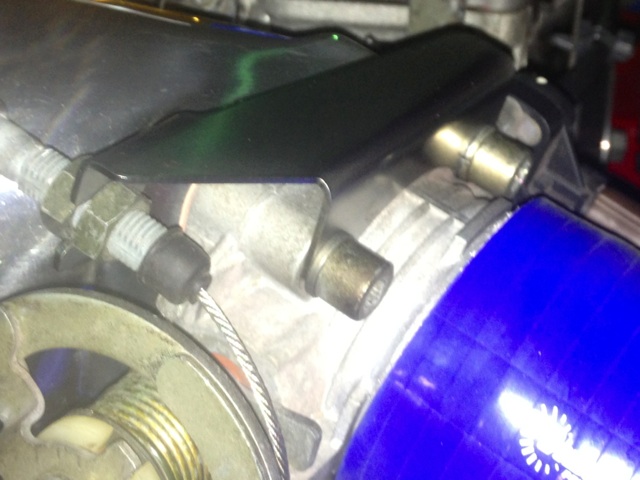 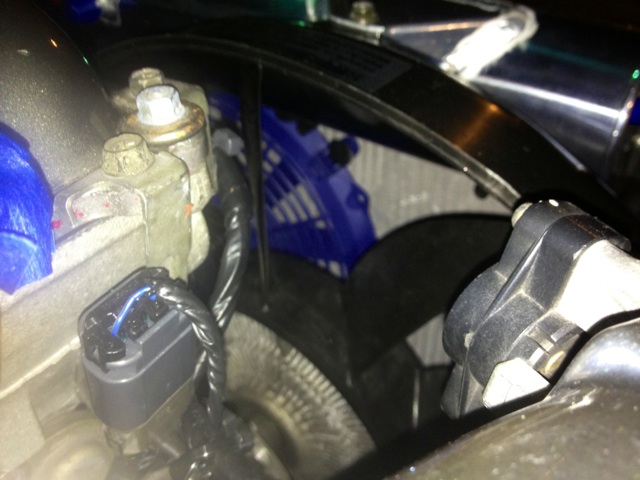 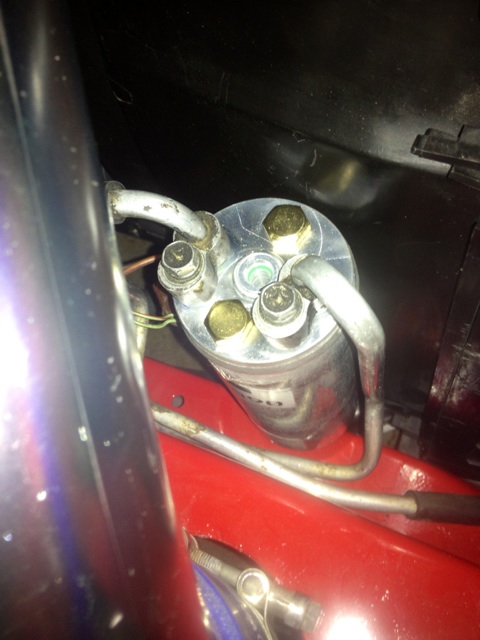 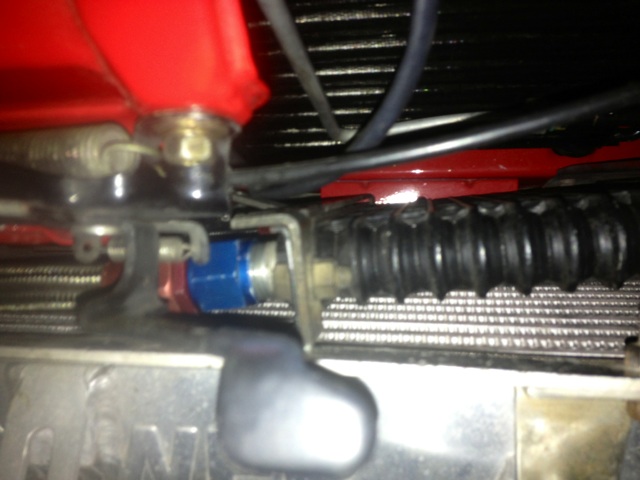 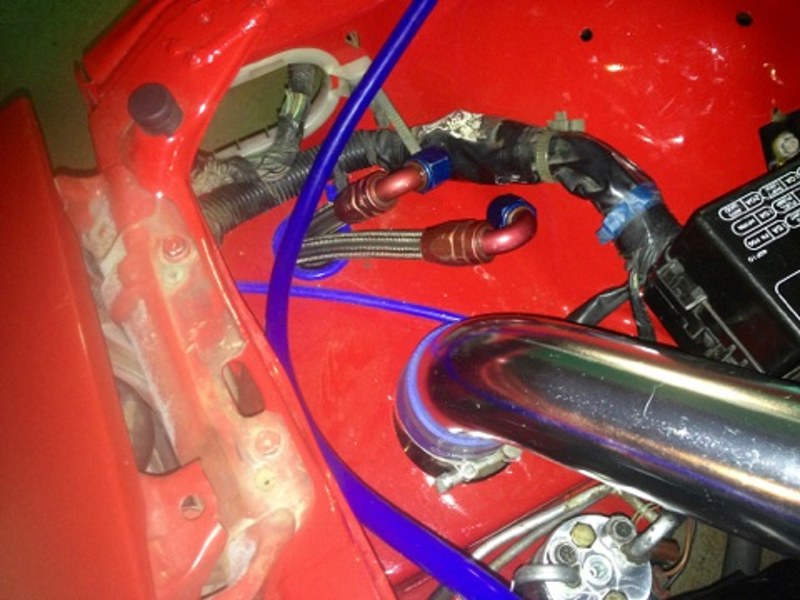  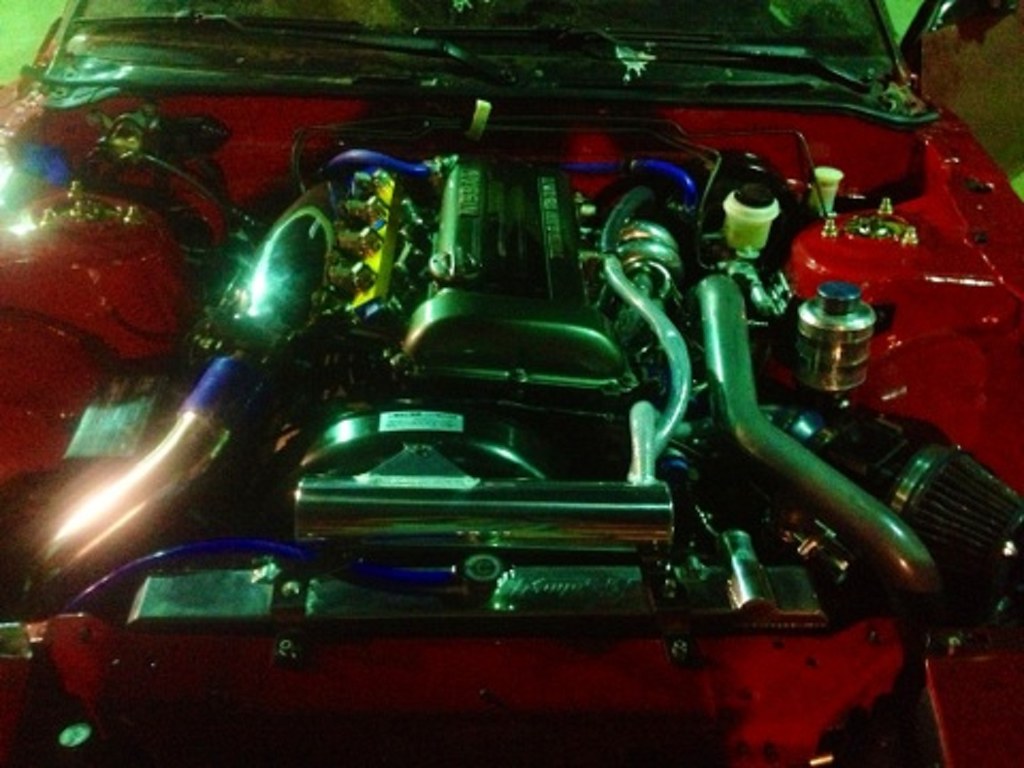 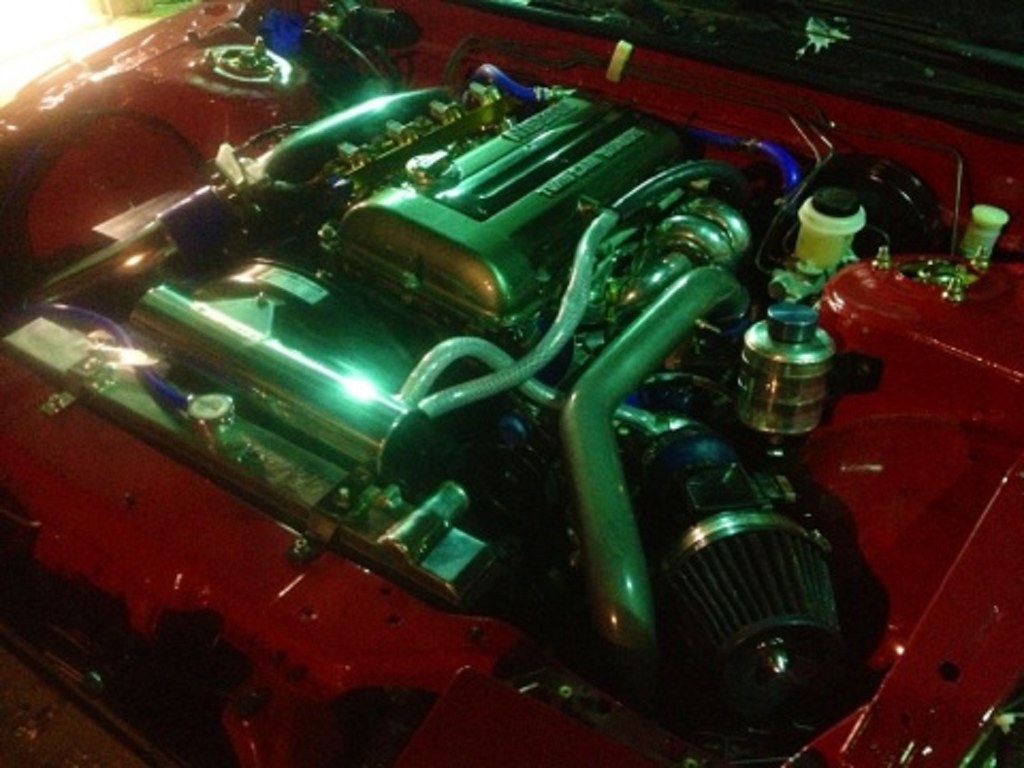 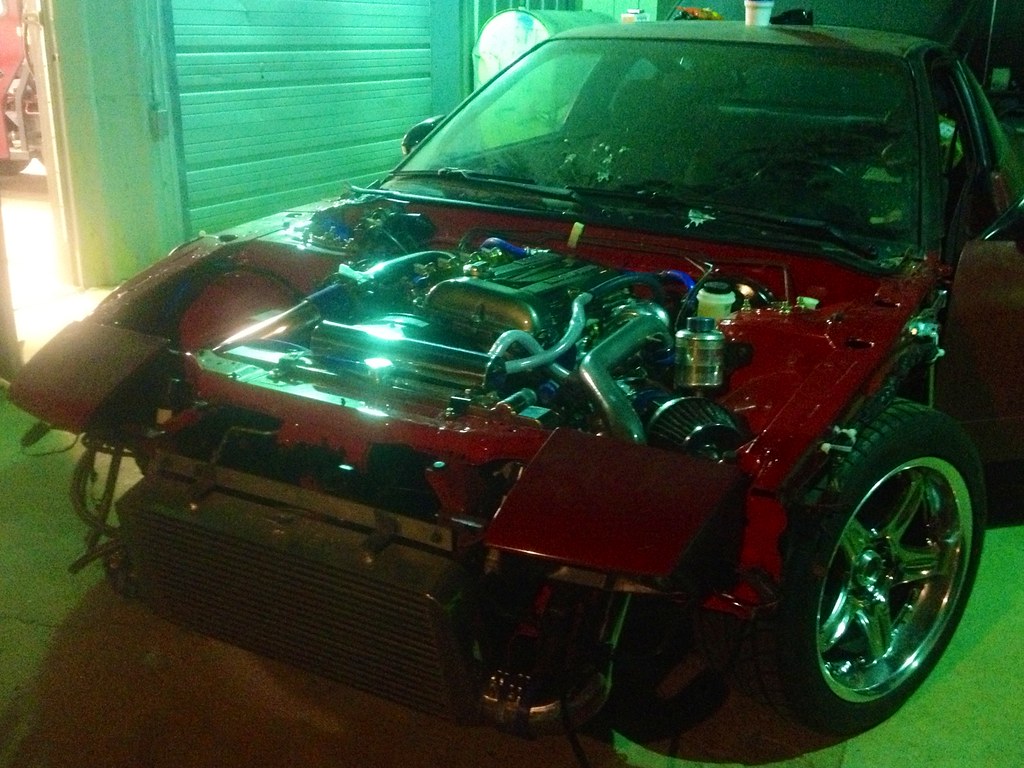 Hoping to have her rolling under her own power in the next 3-4 weeks depending on how much time I will have. My kids get here next month for summer- really would like to have this phase wrapped up by then... NTM run her down the 1/4mi while the weather is good
__________________
|
|||
|
|
|
|
05-25-2013, 01:55 AM
|
#120 |
|
Nissanaholic!
Join Date: Jun 2007
Location: Kathleen, GA
Age: 52
Posts: 1,956
Trader Rating: (0)
Feedback Score: 0 reviews
|
Finally some progress!
Trailered the car back to my house last night... Worked on it on/off all day today!!! First... Check out thread brackets Andy is making me for my filter block, FPR & fuel filter: 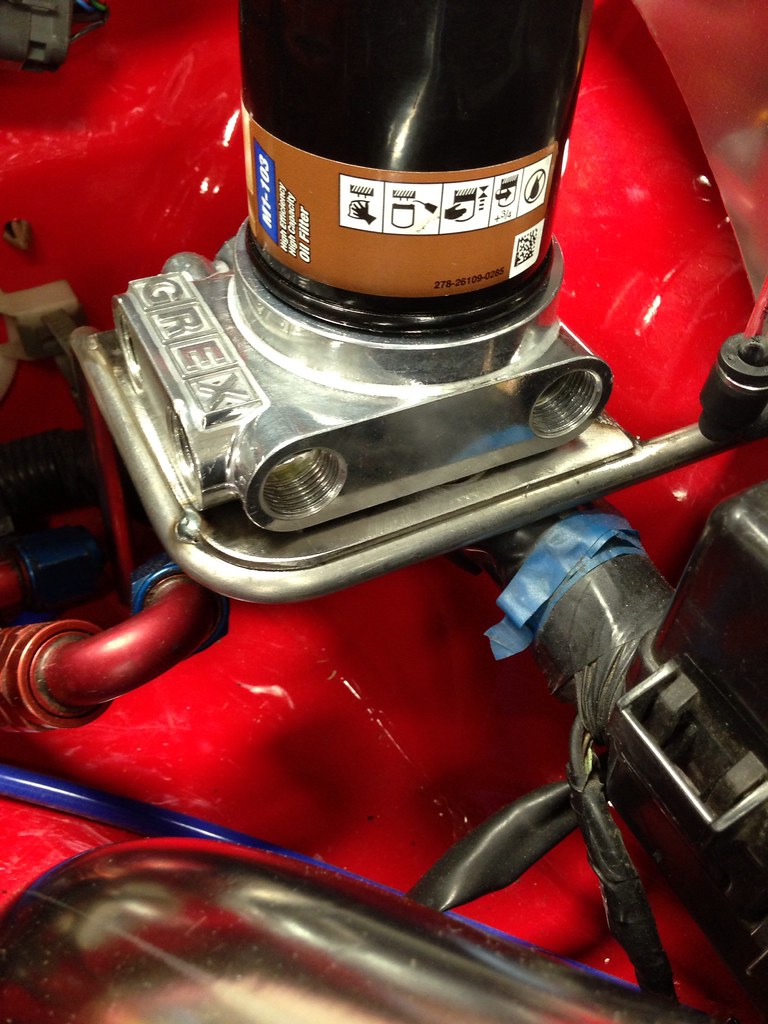 He still has to finish welding them up & I need to have them powder coated; but they are pretty BA!!! Installed the battery box in the trunk. Pretty happy with the turnout: 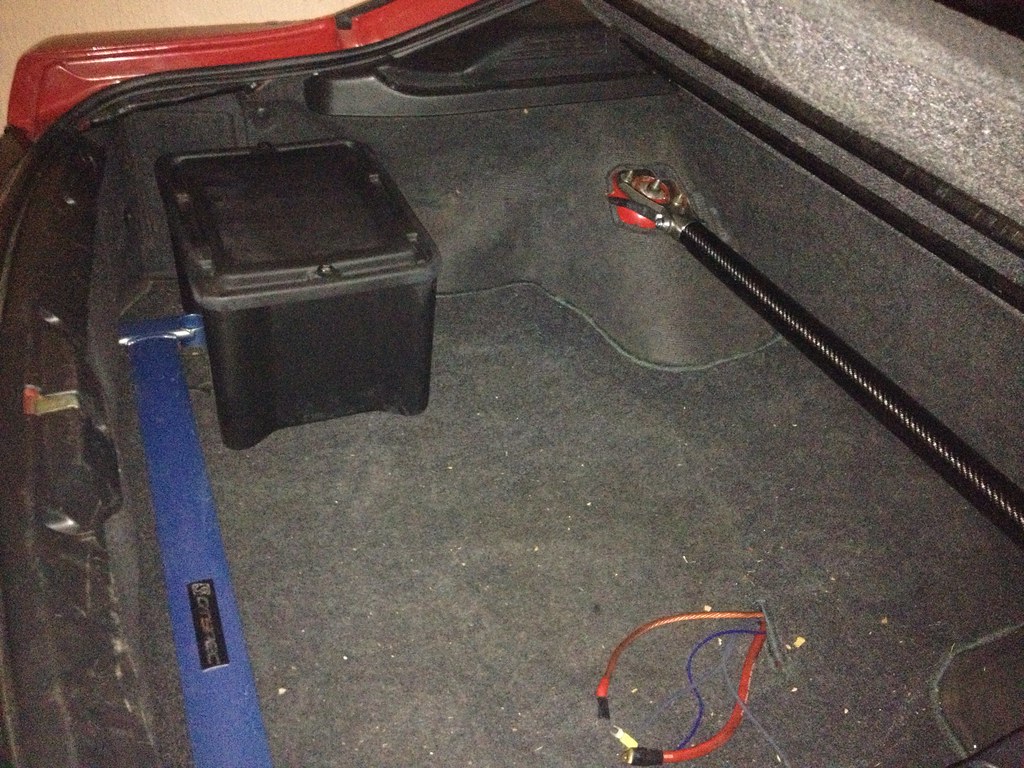 I still wonder if 0.2 ohms is acceptable resistance for ground... was the best I could get no matter where I tried; so I am pretty sure it's gonna be okay... but asked in tech just in case. Put in the vacuum manifold for the BOV, boost controller & link: 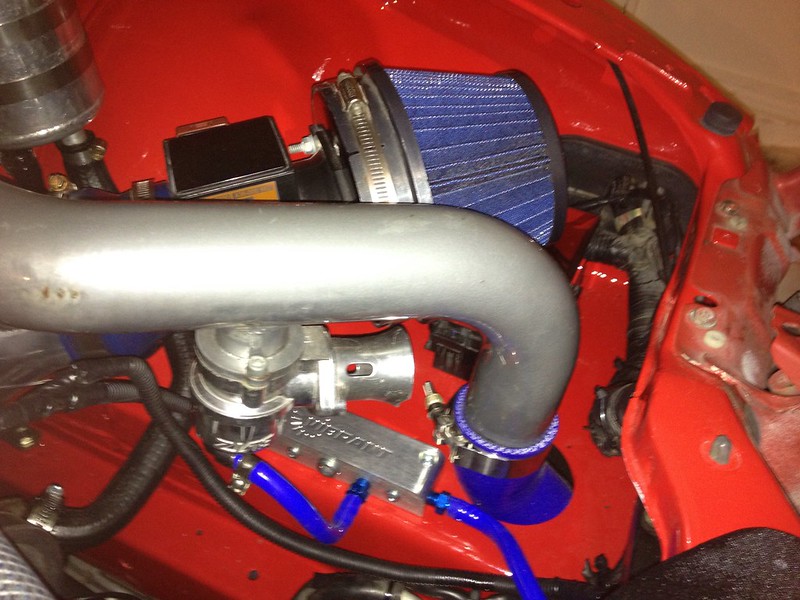 I don't like vacuum lines crossing the bay, so I stashed the input between the condenser & intercooler... Installed the MC heat shield... test fitted the tower brace to make sure it would clear... It does!!! 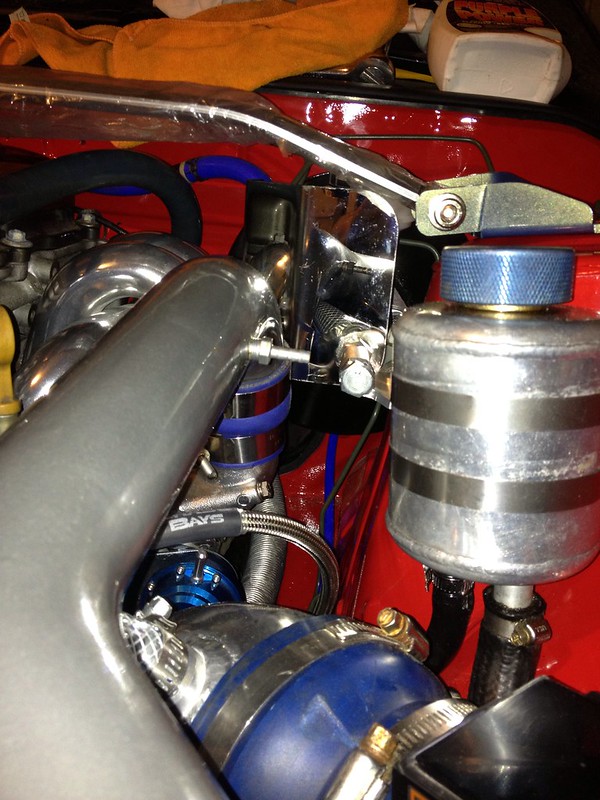 ...although it still needed a hole for the stopper: 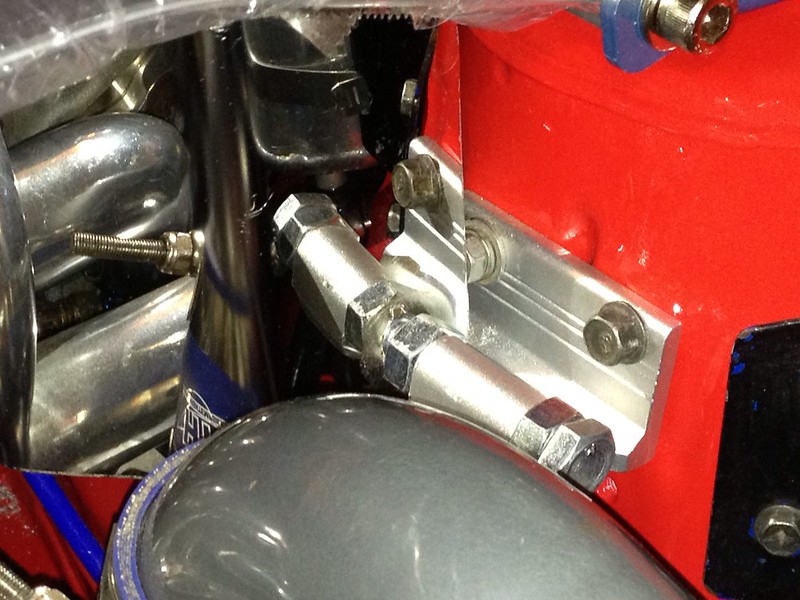 Pretty much done with the driver's side of the bay... Just need to mount the boost control solenoid & run the lines to it... 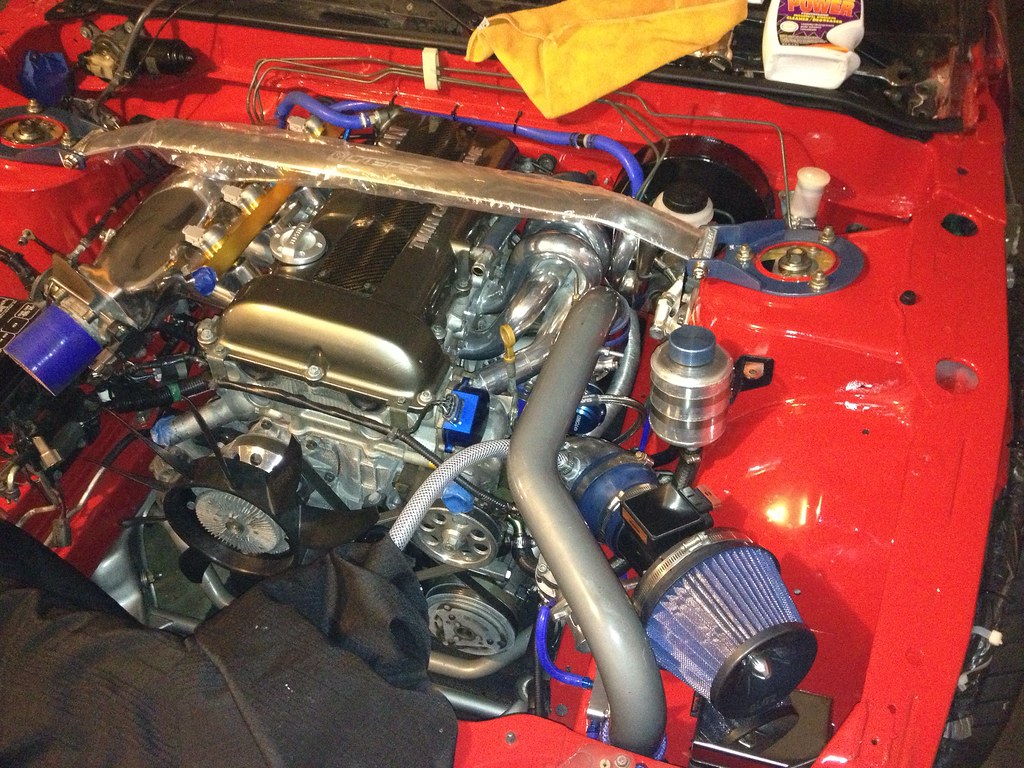 Tomorrow's main plan is to finish the battery relocation; and a few small odds/ends. Happy to be back at it!!!
__________________
|
|
|
|
|
| Bookmarks |
|
|


 Linear Mode

