|
|||||||
| Builds (and builds only) Got a build thread? It goes here, build threads anywhere else on the forum will be locked and never moved. |
 |
|
|
Thread Tools | Display Modes |
 02-18-2013, 09:03 PM
|
#1 |
|
Leaky Injector
 
|
1989 180sx CA18DET Build -Izento-
Hey, thought I would duplicate my CA thread from my local forum to Zilvia.
Ok, so this is a little late to start my build thread, since I have done so much already, but here goes. We'll start from the beginning.I got my license in July 08. I worked 2 jobs throughout summer after I graduated from high school. I was a stocker at Wal-Mart and a sign boy at Jiffy Lube. I wanted nothing more than just to own a car and be able to drift. I was first trying to save up all my money for a MR2 2nd gen, but eventually let that go seeing as it was too expensive. Then I finally settled for a 240sx in Sept 08. Bought the car knowing nothing at all about cars except the ones good for drifting, lol. Anyways, enough with my bio, here is what I have done. Megan Street Coilovers HKS SSQV BOV KAAZ 2 Way Diff (such a long story to install, lol) ST Sway bars with poly bushings Nismo Powerbrace SPL Tension Rods v2 EBC Green Pads Megan Rear Strut Bar Spec Stage 2 Clutch (Has yet to go in. Bought it late and finished my motor swap before I got the clutch) CA18det swap in Nov 09. Had some trouble with the wiring harness so I had to take it to UP.   I Bought these with my tax return in 2010   And to top it all off, some tires that wish they never lived!  Ok, so decided to wake up early and get my cams put in before I go to a drift event. Got the Cam cover off  "Engine"uity at its finest  Old cams in place  Tomei cam!!!  While putting back on the valve covers, there is a little breather pipe that goes on it on the back. God that thing was a bastard to get on!  Like nothing ever happened  Ok, so....the intake valve cover gasket was cracked and oil was leaking out. So now I am going to put the broken gasket back on, then get some liquid gasket sealer and let that do the job till I can order one later, cause I know they won't have that ish in stock, lol. And the parts center already closed today  ......(couple days later) My new gasket, well.....half of it is. Turns out, Shucks, Pep Boys and Nissan don't have any pulsar gaskets, so went to UP garage and they had the exhaust side gasket. Well, we decided to cut my old gasket a little and cut up the new exhaust gasket to make it fit in the intake side. Added a little silicone at where the old and new gasket met, and viola.  Got my TRE fuel pump today Going to attempt the install tomorrow morning. Saw a couple of write ups floating around the internet and looks really easy to install. Even have some solder to make those connections last! And yes, I went TRE only because of the solid warranty they offer, not because of price or gets rid of the high pitch whine (I wouldn't have a 2way if I cared about annoying noises, lol). I haven't heard anything bad about them so far. I'll let everyone know how it's holding up in about a year ^.^   Very easy. Didn't take very long either. Amazing how technology has advanced so much that smaller things are usually more powerful, lol. Alright, so I am resurrecting this from the dead here. Anyways, I got a daily driver finally (97' 200sx!), so now I won't have to drive this car around anymore and I can finally start tearing it apart more often. Got my hands on some scrilla so I decided to buy some Glowshift gauges.  Terrible picture, I know, lol. Anyways, nice packaging and shipping took kind of a while, but what do you expect from New Jersey?  Install was somewhat simple. Boost gauge is first, oil pressure second and oil temp for nearest to the dash. My boost gauge wasn't reading at all at first and the color button was also stuck! I was pretty pissed, so called up Glowshift customer service to return it for another one, and the guy gave me a tip to turn the gauge lens a little so the button sits straight. Worked perfect! Also fixed the boost line so now it reads correctly. Overall, quality brand ^.^ I haven't hooked up the oil temp or pressure since I don't have a sanwhich plate so, that's my next purchase. On Saturday, decided to attempt a Spec Stage 2 clutch install with my buddy Sam.  Only pic of the install unfortunately....Ok, so taking everything off took less than 2 hrs. Forgot the rear main seal, so had to go pick one up from Doug at UP. Got back, figured out he gave me a KA seal, so had to go back and get the correct one. Definitely took some time out of my day and a little bit angry at Doug, but whatever, not a man to hold grudges. Anyways, did the seal in like 5 min, installed a new throw-out bearing and pilot bearing (Spec supplied them with kit). After that, everything turned to hell! Getting the bellhousing on was a bi*ch!!! Took us forever and then it wouldn't go in all the way to mate up to the block. Took forever to attach it to the block as well. But overall, got it finished up and now I just need to break in the clutch properly before I go on track very soon! Put an oil sandwich plate for Glowshift on. Have heard a lot of mixed review about it, saying it holds perfectly or it leaks like a mofo. In my case, I used some thread locker that's suppose to keep in liquids. Worked like a charm, though I didn't try to put on the plate without it first. Oil pressure seems to read accurately and oil temp reads very accurately. Also, forgot all my wire pathing, so it took some time to test the wires and figure out which one went to temp or pressure, lol. That's why it's a good idea to finish a wiring project when you start it. Learning experience. Resurrection! Got another tax return, haha. Also, working two jobs now, so might see some more parts towards the project. This time, decided I need some proper tools. Bought a alum. jack, deep and short metric sockets, and other misc stuff. Also, got deals from someone on here, got a oil cooler w/ greddy relocation for super cheap. Stay tuned for the install. Next is purchasing a FMIC, maybe a SR t25 and a boost controller within a week or two. Something along those lines. I should be able to take advantage of my cams with those upgrades.  Got out there today and made some progress. These lines were a bitch to twist and turn. I'm glad they aren't hard lines, but I thought braided lines would be more flexible than this, haha. So this is the location the cooler will be going into. Definitely a prime spot, receiving under-draft air (barely but still some) and not interfering with any other cooling mechanisms, yet still from harm by the tire.  Here is what it looked like when I took out the washer res. I figure, since I don't daily this car, I won't need it anyways.  The cooler fit in quite snug. I even got to use the bar which held up the old washer res. Had to drill a hole in the fin (of course not the actually cooler itself) of the oil cooler to mount it correctly since the 2 sides where they put the holes were inadequate for my application.  Here is a shot of my hoses going up the battery tray (yeah, I know, hella rusted right? lol). This is definitely working out better than I thought, but I am concerned when I place the battery back in. If my battery doesn't fit, I know a miata one will, which I am going to have to get anyways once I get my FMIC.  Tomorrow I might have time to mess with the oil filter location and figure out where I can drill holes and what not. Faster than I expected.  Now to figure out which diagram I use on the greddy instruction manual. Oh, also, got the oil filter mounted, but now I ran into the problem I knew I would......my old autolite battery wont fit, lol. Time to get that miata battery a little sooner than expected. Got the oil filter placement set up. For some reason, when I ran the car, my oil pressure was reading 100 psi at cold start, which was kind of shocking, but not too crazy, since before it was like 90 or something. Then, at warm idle it was at 70 psi. Called up Doug, he said "WTF? Way too high, check the pressure gauge or maybe your plumbing is off". So, went back and started to think, maybe I put too much oil in. I put in 1 more quart to compensate for the lines and the oil cooler, so I dumped some out, and now the oil pressure is at 40 psi at idle and I figure, once it goes to hot temp, it should be at about 30 psi, but I will try to take some more oil out later.  I know, a lot of wires and shit everywhere. Already working on fixing that. Also, picked up a battery from a place called Dyno Batteries in Seattle. They pretty much make any battery you could ever need. I got mine with 300cca (or something, he didn't tell me how much it had, I just asked it has to have that minimum) and it's pretty close to Miata size, for $85. Mazda dealerships and carquest wanted $120. Anyways, it barely fits between the 2 hoses of the oil cooler. I had to angle it diagonally a little. I hope my IC piping will fit! We'll see on Tuesday. Got my oversized intercooler today.  Tomorrow, going to try and get my bumper off, SMIC and see if my bov pipe will fit in place of the IC piping that came with this kit. Looks like it will, but everyone always knows you run into something when it comes to cars. Mock up pic with bumper hanging. Of course, I had to cut the inside air ducts of the bumper so it could fit. Oh, I also took out the AC fan, seeing as how I don't have AC anyways. Tomorrow I will be up and at it with buying some small piping from shucks or something. I gotta get this thing running by this week so I can put my Profec in, start testing, do some practice runs, make sure everything runs correctly and go to PGP on the 12th.  So, got all the piping done. Had to buy some small pipes to fit on the cold side. Got the bumper back on and the intercooler raised a little higher. Still need to put another bracket on one side. Took it for a test drive though, and damn! Definitely pulls a little harder, or at least it feels like it, dunno, haven't driven it in a while, lol. Forgot to take pics so forgive me! I'll get to it tomorrow when I realign my bumper and fender (its pissing me off).  My missle as she sits.  Minor update. I got another E-brake hooked up (mine was broken and only worked on one side). I can't wait to see how it feels to initiate with an e-brake. She still lives!......kind of. Picked up a SR T25 (I figured out this was blown after talking with the mechanic at UP Garage, so I got shafted with that deal. Sometimes people sell parts in falsely stated conditions....)  Apparently, they call the CA turbo a T24, hahaha. Checked the internet and comparing the a/r CA: a/r .48 SR: a/r .64 Now I see why it's an upgrade. Anyways, this will be installed when I take my car to U.P. I ----ed up my timing belt trying to replace it, ended up bending some valves, so I'm just gonna let the pros handle this one. That's what I get for trying to learn, although learn improperly apparently. Updates to come. Got the car back on Sat. Water pump replaced, coolant line reconfiguration, head gasket, valves, new turbo gaskets, and new Gates timing belt. These are the nasty coolant lines they took out. They were definitely about to burst.   I'm back! You thought the CA was dead huh? Hahaha. Got a new BoV. My other one was slacking and staying open at idle. Damn that snap ring is a bitch! Anyways, got that on and then at I was messing with my throttle under the hood, I noticed a fuel leak at one of the rubber hoses (that's what that fuel smell was! Always thought it was my shitty BoV). Anyways, got the hose fixed, got new spark plugs, changed diff fluid, very productive day. Keep checking up for the turbo upgrade. Thinking of going Isis R3871 or s15 turbo. I've heard good reviews of the R3871, so it's definitely not out of the question for $500. Stay tuned in more than one way  So, change of plans. I got a super good deal and decided to pick this up instead of a turbo  I'm getting this shipped to me, so hopefully it doesn't get ----ed. Anyways, now to get injectors and a turbo and I should be set for I'm thinking 225-240hp (plus, I don't think that I can get higher than that anyways without other things). I want a mild tune at first and then go bigger tune after a much needed exhaust upgrade and Accusump. More info later guys. I got the EMS today! Now to get a cable and throw the stock tune on there. I've been reading a lot on the AEMPro program and I've gathered how to tune some simple stuff like rev limiter. I'll be changing my rev limit and figuring out how to wire another switch to tune the 2nd rev limiter profile. I've also figured out I don't need a map sensor just yet, so that's a relief. I'll be purchasing the boost solenoid soon and in the mean time I have been reading up on how to tune the boost controller through the EMS. As a side note, I rerouted all of my gauge wires so they are off the battery terminal. I never knew how to wire things into ignition until now. Engine bay looks a lot better near the battery side. More updates about the EMS install later.   I did notice the extremely rich AFR levels. Now, I don't know if this is contributed to stock ecu mapping, dirty 02 sensor (it's a stock old one, I've never changed it since receiving the engine) or some other problem. 4.4 is insanely rich if my thinking is correct (Higher afr means leaner, lower afr means richer right?). I didn't understand the engine load either, so I dunno why that's red. From other videos I have seen, the engine load is usually a negative number. Also did some cutting for my cold pipe side. I've never used a hacksaw before, so I broke a blade because I guess I was twisting it a little while cutting. Anyways, my cold pipe side looks a lot better than my last jimmy rigged setup, so less likely for leaks. So, all is needed now is a fixing my afr, new turbo, injectors, boost solenoid and tune. Then shortly after will be AFR gauge. It'll be a while for all those items since I am going on a trip to North Carolina, but I will be taking pictures of my friend's sweet FD3S.  Well, despite the setback of having all my tools stolen and boost controller, I have purchased new tools, tool box, injectors and turbo lines. I realized I am almost running my injectors to the max. 220 hp is the max for CA injectors and with my mods, I think I am running close to 200, which means my duty cycle is around 90%! I never knew the conversion of injectors to hp rating, nor did I even know duty cycle existed until last night's research. (Later learned that I could run the CA up to about 250 hp on stock injectors, as someone else....the only other person in my area with a CA, did run 250 whp). So far, my plan is to install the turbo (whenever I get enough funds to purchase), break it in, then save for a sorely needed tune and get that all tuned at once. My car should be running slightly lean when I install that new turbo, so it will only be ran for break-in period. More pictures of the products when I receive them. The loot is here! 770cc injectors, turbo ss lines, tools and toolbox. Black Friday deals were pretty good. Now I await the funds for my turbo.  Back in business.  Now I have 2 solenoids, so if one ever goes bad, I have a back up one. My turbo has already been ordered and I'm awaiting it's arrival. I also have a Power FC w/commander coming. Everything is coming together. All I need is a Z32 maf and I am set for tuning in February. I'll leave the turbo specs as a surprise for you guys until I receive the package. Turbo is here! ISIS RS3871.   And best of all, I sold my AEM EMS for a Power FC.  This Power FC is actually an S14 Zenki model, but with minor rewiring, it will work for the CA. I personally wont be doing the rewire, so I wont have information about that, but just know, that me and my main shop (UP Garage) will make it possible! 2.5" downpipe, specific for CA. I don't think I'll be getting an 02 housing, so now all that is left is to put everything in!  I'll be sanding down the pipe, painting it with some high temp silver, getting my headers off, sand blasting it and coloring the same silver. Here is where the update has stopped. This car has been a work in progress for a long time and still has a long way to go. I'm waiting for it to heat up a bit here in Washington so I don't have to work in the cold. Oh, and the only picture I have of my car drifting, this was after the Poncam upgrade. Since then, the fender has been fixed, still haven't got new rims though.  Got some work done today. I took off most of the exhaust manifold bolts except 2, which are the ones closest to the firewall on the bottom. I took off 4 of the O2 elbow, and the one that I cant get to requires me to take off the manifold so that I can move it away from the block and fit a wrench. I took off the coolant line which was blocking my way on wrenching an exhaust manifold bolt, so I'm letting that drain and will continue on my next day off. One thing I am particularly concerned about is how to hook up the new coolant lines, since they go into the back of the block, how the hell am I suppose to get back there? Not too concerned since I can still use the stock ones. So, got to the last two bolts next to the firewall on the bottom of the manifold. I couldn't have done it without my main man.  This is a comparison shot of my T25 vs Isis RS3871  So....I totally forgot that I needed a T28 oil drain, so let the waiting game begin. I'll also be getting a 5 bolt outlet gasket while I'm at it. Oh, and I traced down the coolant line, yeah, that doesn't look so hard to fit on, I'm just wondering if the braided line will reach O_O Bought some essentials for the swap. I didn't know so many things were needed when getting a T28!  So now the turbo is on the manifold, the manifold is partly bolted onto the head, but then I realized one of the exhaust mani gaskets is on backwards......Fuck! So now I have to take it off again and flip that gasket. The hard thing about all of this is 2 studs came out with the nut attached, so it's very hard to put the exhaust manifold on while juggling the studs and slipping the gasket on at the same time. Anyways, more progress to come tomorrow since I finally have a couple of days off. And I still don't have a way to get my stock intake on, so I have to run to the store eventually during all this...again. Sucks not having a mentor to prevent the screw ups.  So I had to cut the T28 drain pipe because it was getting in the way of the steering rack. This was somewhat annoying that it didn't work stock, but whatever. The boost really kicks in at 4k and goes all the way to redline! And let's just say that I haven't been scared of my own car in a long time  Also repositioned my hot pipe, power steering res and refilled it with lucas ps fluid. More to come when I get the downpipe attached and car tuned with PFC. |

|

|
| Sponsored Links |
|
03-02-2013, 05:49 PM
|
#2 |
|
Leaky Injector
|
I had some spare time and decided to spray my heat shield. Took a while since I wanted to run the turbo without the shield to see if there were leaks. Something small but looks a lot better. Tomorrow comes the boost controller and Monday is the down pipe attachment. Found a good welder.
 |
|
|
|
|
03-04-2013, 07:32 PM
|
#4 |
|
Leaky Injector
|
So, took the car to an exhaust shop today and got the 2.5" down pipe on, sounds slightly more hoarse, but not very noticeable, the car is still somewhat quiet when compared to modified cars.
These velcro pads are pretty damn useful and stick very well to the plastic material inside and metal in the engine bay.  Also installed my Greddy Profec B! I must say, it was a little more routing of shit than I thought, but I got it all worked through, tested it with the low boost setting and got it set to about 11 psi and holy damn! The car is really fast now. I didn't set the high boost setting, I'll leave that for the dyno.  More news after I take the car to the tuner this Friday and get my Z32, Power FC and injectors installed. |
|
|
|
|
04-20-2013, 10:57 PM
|
#5 |
|
Leaky Injector
|
Good news is I got the Power FC wired up and installed with the injectors and Z32 MAF. The base tune was set.
The bad news, while on the dyno a rod bearing came loose, but luckily it was caught early. Now for a rebuild and get it back on the dyno. More to come in May. Last edited by Izento; 11-26-2013 at 06:38 PM.. |
|
|
|
|
05-19-2013, 11:39 PM
|
#7 | |
|
Leaky Injector
|
Quote:
|
|
|
|
|
|
06-15-2013, 01:23 AM
|
#8 |
|
Leaky Injector
|
More progress!
I got a racing oil filter from Canton Racing, got the oil bypass welded, so all oil is going through the filter. I also put on a NRG magnetic drain plug. Ran the engine through with a change of oil, refilled with new oil and then got some extra magnets in the oil pan and ran the engine again. I don't have the knowledge or space to do internal work, so currently the car sits at UP Garage, getting torn apart at the bottom end and bearings replaced. I'll have to wait for a tune later down the road as I am starting school this fall. More to come with the status of the car at the shop. |
|
|
|
|
06-24-2013, 01:19 AM
|
#9 |
|
Leaky Injector
|
Here's my crank. Rod bearing #4 is scored.
 So, now the simple job of rod bearings has turned into taking the engine out and grinding the crank. The car is currently getting this process done, crank has yet to come out but engine is being prepped for removal. This s*** is costing way more than I thought it would -_- More to come later. |
|
|
|
|
11-23-2013, 10:08 PM
|
#10 |
|
Leaky Injector
|
So, I got my car back a little while ago! Fresh bearings and running well. I also bought a couple of things while waiting.
It's hard to see the metal shavings in some of these pics, but once you spot how much it is (especially the 3rd pic, a whole bunch of copper), you'll realize that this filter saved my motor. I highly recommend Canton.    Brembo blank replacements for the rear and EBC green pads to go with it. Maybe now I can lock up the E brake   Basecoat AH3 paint.  |
|
|
|
|
11-23-2013, 10:09 PM
|
#11 |
|
Leaky Injector
|
Here is my lip that I painted. I used 100 and 150 grit sand paper, then 1 coat of primer, 1 coat of paint and 1 coat of gloss. Came out pretty good and not too deep or too shiny, so it can match with my 20 year old oem paint.
 |
|
|
|
|
11-23-2013, 10:10 PM
|
#12 |
|
Leaky Injector
|
Bought a new OLED commander (I tried rewiring the commander I had, but it looks like it's for the wrong ecu or something). Also bought a Prosport oil pressure gauge.
So far, the car is very close to having its tune done, but it broke down today cause of a dead fuel pump (turned out to be a popped fuel pump fuse. TRE pump is still running strong after 3 years of non-daily driving use) -_- Will have more news next week when I get it up and running again.   Last edited by Izento; 11-26-2013 at 06:41 PM.. |
|
|
|
|
11-23-2013, 10:11 PM
|
#13 |
|
Leaky Injector
|
The results are in! A little less than I expected, but I'm still shocked when I step on the pedal, lol.
Pon Cams Godspeed FMIC Z32 MAF Stock internals Isis RS3871 at 15 psi Stock manifold 2.5" downpipe & exhaust 225 whp / 205 tq Mustang Dyno  |
|
|
|
|
11-23-2013, 11:51 PM
|
#14 |
|
Join Date: Feb 2010
Location: Temple, GA
Age: 42
Posts: 31
Trader Rating: (0)
 Feedback Score: 0 reviews
|
Nice and informative thread!
If you end up looking for more power or have issues with the bottom end I have a built short block just waiting to go into something like this. Slightly higher compression so could definitely help the power numbers. I know it seems silly now but just throwing it out there. |
|
|
|
|
06-16-2014, 11:10 PM
|
#18 |
|
Leaky Injector
|
I caved in and got a Catco 3" cat. I noticed that Enjuku sells them with the flanges for $150, but I'm just going to get flanges welded onto a universal one for cheaper. I'm also debating on getting the Isis MBSE dual tip exhaust. I want something more low key than a single tip canister, as I touge more than anything, but I want something that still performs at the track. I was thinking Apexi N1 as well, but I would need to find one used, as they are too expensive new. I also got some subframe spacers ordered, as I am tired of the rear shuddering when I burn out or whenever it's wet. More news to come. I'll get you guys picks of my old exhaust vs new.
Aluminum subframe spacers came in. No more wheel hop! I'll be installing these when I do my exhaust. Oh, also, I decided on the Isis MBSE 3" exhaust, I'll still get pics for you guys.  Got my 3" Catco Cat. Part #6907 if anyone is looking to buy one of these. This thing is massive! There is no way I even had close to 3 inch piping on my exhaust. It might even have been 2.25. I'll try and get a tape measure when I pull it.   Got my exhaust today. Sadly, none of the exhaust shops around my area have exhaust flanges....how the hell does an exhaust shop not have flanges?! Anyways, ordered some through the internet and waiting patiently on their arrival. I also got my old exhaust off to check all my diameters for the proper flange sizes. My old exhaust has some terrible kinks in it that reduce the pipe to 2" along with the muffler exit which is less than 2". I'll get pics of that later.   I finally got my DIF 2.5" and 3" flanges welded to the cat! Costed me a total of about $115 compared to the $160+ I would need to spend on Enjuku and still get a 2.5" flange welded on one end.   Weld quality isn't too bad. He definitely didn't dress them but I don't really care as no one will see it anyway. Now to install everything tomorrow. More pics to come. And yes, I'm going to get pics of that terrible old exhaust :P So, my cat flanges needed to be clocked and shortened I guess -_- So now I have sent it back to the exhaust shop to get that done for cheap. This is my first time create my own exhaust bolt on configuration, so I suppose it's a learning lesson to measure before I assume things will fit. Oh and for the bread and butter, here is my old exhaust bends.     You see that damn kink?! That must be pressing my exhaust to 1" and then my muffler is about an inch and half, possibly 2". Maybe this constricted me alot, maybe it didn't, but it definitely doesn't look good. Now I'm having problems with mounting. I got the whole exhaust bolted after I got my cat flange clocked and rewelded, but the hangers are in a slightly different place, so I need to get longer bolts to attach my exhaust polyurethane hangers. Pics of the mounting and ground clearance to come. |
|
|
|
|
06-16-2014, 11:12 PM
|
#19 |
|
Leaky Injector
|
Damn, forgot to post the updates with the exhaust.
Anyways, I got the exhaust mounted up. Turns out it was best to cut the exhaust about 1 inch shorter and reweld it together. I also got an additional hanger welded on there and chopped another hanger as well as my tow hook. It turns out I did in fact have to take it to an exhaust shop to get the welding done -_- but only $100 poorer now. I am still having an exhaust leak pre-cat, but I'm not too worried about it as it's not obnoxiously loud. As far as performance, I don't really notice improvement on turbo lag, but at least I don't have to worry anymore about upgrading the exhaust. I'll get pics soon.    I've been busy with school lately but on my spare time I've been doing some cosmetics here and there. My interior was s*** and spray painted red on the door cups, handles, speaker grills and silver on the bottom random s*** holder thing, I tried to fix that by just doing black. Doesn't look fantastic, but a lot better than before.  Then I finally got some wheels. The condition was s*** on one wheel with curb rash. There were only 2 tires that were in good condition, luckily it wasn't on the curb rash rim. Dr31 17x7 +40   So I decided to sand the lip down and get rid of most of the rash. I didn't want to sand too far down, so I couldn't get rid of the deeper gouges.    Then I was on the hunt for bronze Work Cai looking spray paint. I bought 2 different kinds of spray cans before I found the correct color.  If anyone is interested, the color code is HWP105. The color is slightly darker than the actual bronze on these Dr31, so I sprayed the whole outer rim edge to blend it better.  Here's the finished product.  |
|
|
|
|
06-16-2014, 11:12 PM
|
#20 |
|
Leaky Injector
|
Also got some Muteki titanium colored lugs.
 It's about time that I had done some cosmetics to my car. I finally got around to spraying my trunk. I'm still using the spray cans from Automotive Touchup and it came out decent. Here's the before:   I had to move this project to my batcave. Do you guys like my new newspaper bodykit?   This is after gloss has been applied  A close-up  All-in-all, there are some scratches in the paint from me re-sanding the primer and doing a terrible job :/ But I had to hurry up since I couldn't stay in the batcave forever. The color turned out darker than the rest of the car, but then again, I think once I wash all the body panels it will appear a little bit lighter (it was hard to tell with all the paint dust everywhere). |
|
|
|
|
01-01-2015, 06:25 PM
|
#21 |
|
Leaky Injector
|
I haven't updated this in a while, so figure I'd show some love to Zilvia.
I just finished piecing together my battery relocation kit, using a Maroso battery box (to make it track legal, even though I don't think Evergreen cares, but it's AutoX legal). I'll get pics of the install, should be pretty fun and quick to do. My battery is already a bit on the small side (comparable to a Miata battery), so we'll see if extending it weakens my crank or anything. I ended up using 2 gauge from Home Depot (not as many threads as welding/audio wire), so we'll see if that also effects the crank. I also picked up a 150 AMP circuit breaker instead of a fuse. My wiring is rated to 120 amps or something, so I don't really know if the wires reaching to 150 AMPs and the circuit breaker cutting connection at that time will save my wires, but I don't think 30 more amps would melt this wire, then again, I have extremely limited experience with electrical stuff. Any input is appreciated. Finally got around to putting the relocation in. The only problem is the battery is too tall -_- so the cover wont fit. I'll get a new, shorter battery later, but I've already tested it out and it starts without a problem! I fit it through the ecu grommet and piped it down underneath the carpet.  I then used a bolt to connect the starter wire with the ecu wires and long relocation wire.  Here's a picture of where the battery used to sit. As you can see, it's basically floating in mid air and the only thing keeping it falling through the hole is my intercooler piping is too big to allow the battery to fall through  Here's the new spot.  This is with the lid on. As you can see, the battery is too tall. Also, you can see the circuit breaker at the bottom of the picture which is used on my positive cable. It's rated at 150 AMPs, so it should save my wire from bursting into flames...hopefully.  This is the stud that I'm going to use as my ground. Already tested it and it works perfectly, I just have to enlarge the whole on my negative battery cable to accept the stud size.  All that's left for me to do is rearrange the stud that is holding the battery down, as I drilled a hole which went into the frame rail, so I can't reach in there and place a nut on it, doh! So now I have to drill another hole (my drill sucks and pretty much has enough battery life for 2 strong drill holes, so I used it up for the day, having to wait until tomorrow). Almost done! ---Aug 26, 2014--- So, took my car to the shop today. I'm getting a retune, my headlights fixed (they wont go down, I think my turn signal tree is burnt or something, should be a simple fix), and have them double check my battery relocation. I had a problem with the stud that I connected the ground to, as sometimes when I pressed the brakes, my volts would go from 14v to 13.6 and also my stereo would cut out when I pressed the brakes . I reconnected the ground to the spare tire mounting point, as every online relocation says to place it there. My volts went from 14v to 13.8 when I press the brakes occasionally, so I think that fixed it. Now I have a problem with cold starts and even occasionally just running when warmed up, as my car would start stumbling and want to die. I dunno what it is since it started happening a little while after relocating the battery, so I have no idea what it could be, but I have the shop looking into that as well. Hopefully it's nothing major. We'll see the verdict once the shop calls me back. Hoping for the best and to make some extra power. ---Aug 31, 2014---  243 whp, 224tq. So the exhaust netted me almost 20 hp. Now the turbo is at 17 psi. I had a problem with the battery relocation. No write up told me that you have to keep the engine grounded. As for the headlights, I guess I had a corroded wire in my harness and they had to track it down and go into the dash to fix it. I never would have figured that out, lol. Everything is running good now though and I'm satisfied with the new fast. --- Oct 14, 2014---  My only pic of the shifter bushing install, but I got the nylon bushing out and cracked part of it trying to take it off! That thing was pretty snug on there, so I don't think I even needed to change it. But I got the brass bushing on there and it feels a little more solid while in gear, but other than that, I don't notice any difference. --- Dec, 26 2014--- Small update: I've been having trouble with detonation knock and so far, I have received a total of 4 tunes (albeit one of them was after my exhaust rework) and I am still getting knock. This has lead my tuner to believe that it isn't related to the tune, but may be related to part of my fuel system. I would agree since he's tuned it a ton and the knocking hasn't quit. I've since retired my car until I receive my fuel pump through the mail. Another reason why I'm replacing the pump is because I was blowing fuel pump fuses occasionally (usually full throttle, high rpm situations). I had upped the fuse to a 15 amp since I am running a 255 lph which should require more amps and that stopped me from popping fuses, but thinking back on it, maybe my pump is just getting weak (which also may be related to the weird fuel priming sound that it sometimes has when turning on the ignition to the ON position). What makes me believe it isn't the pump is only by the fact that the pump has only had about a year of daily driving on it and 3 years of weekend warrior type driving. But aside from that, I suppose there are more negatives than positives in this evaluation, which spurted me to purchase a new pump (not too expensive anyways). I also think my baffle inside the fuel tank has come loose (I later learned after checking inside the tank that it is indeed an outer baffle that has come loose. From what I've heard, nissan zip ties this, but either way, I'm zip tying it as well), since I hear a little racket in there. I'll have a look when I replace the pump. I'm so ready to just enjoy my car -_- Side Update: My rims got curbbed again -_- awhile ago; someone tried to run me off the road and quite literally did, smashing me into a jersey barrier, but luckily I steered correctly and only got my rims scrapped (which they paid for). I used that money for a retune and I was going to buy some spare DR-31 rims (my same rims) but they don't make 4 lug anymore, so I decided to finally resand them and paint them. Same process as before, only this time more annoying since I had already done it before, lol. |
|
|
|
|
12-16-2015, 09:17 PM
|
#22 |
|
Leaky Injector
|
Carbon-ferro Hawk HPS brake pads, Stoptech slotted rotors, Q45 calipers, and unpictured, Wilwood 570 brake fluid. All that's left is to get the bolt pins for one caliper, sliding rubber boots on the pins and redrill rotors to 4 lug.
 |
|
|
|
|
12-16-2015, 09:17 PM
|
#23 |
|
Leaky Injector
|
A warning for anyone doing this brake swap, make sure you have a quote from a machine shop about redrilling brake rotors. Here's the problems I am running into.
- One of the used brake calipers I bought has a stripped bolt hole. Shopped around to see how much it would cost to retap the hole ($80). Now I have to buy a remanned caliper since it's cheaper.... - I thought getting these rotors drilled would be a simple task. I give someone my old rotor, they drill on top of it onto the new rotor to get the 4 lug pattern. Well, not only do some machine shops not feel comfortable doing it, so they refused service. I ended up getting a hold of 2 machine shops to take up the job, but they wanted $150!!!!..UGHHHHH!!!! I'm not f**king paying you $300 an hour to do a 30 minute job, which it would take 30 minutes if I was drinking a beer, hitting on some girl and writing an epic poem. So, remember, if you want to do this swap, make sure there's a machine shop willing to do it around your neighborhood and secondly, make sure the price is reasonable. I finally got a shop to quote me for $80 over the phone, which even still I'm quite bitter about, but it's one of the only options I have that is viable. Last edited by Izento; 12-23-2017 at 01:52 AM.. |
|
|
|
|
12-16-2015, 09:19 PM
|
#24 |
|
Leaky Injector
|
Finally got finished. All in all, it's a worthy upgrade, but I highly improved everything from brake pads, to rotors, to calipers, so my stopping is fantastic. I accidentally put the left rotor on the right side, so I gotta fix that, lol.
 Update July 01, 2015 So currently, I am going to take the car to a welding shop to get my O2 sensor installed for the wideband. I'm trying to figure out if my car is actually running lean on boost, because my PFC says that it's getting knock, so I'm just doing this as a precautionary step. I'll give an update as to how the process goes. I also bought a fuel pressure gauge, din gauge pocket holder, fireproof suit, new visor for my helmet and fireproof gloves. More updates to come |
|
|
|
|
12-16-2015, 09:20 PM
|
#25 |
|
Leaky Injector
|
Sep 18, 2015
Here's the pic of the gauges installed. Just need to clean the outside a bit. Fuel pressure seems good, although I'm having some weird hesitation (occasionally) when accelerating and hitting a block once boost starts to build, which I have good reason to believe is related to fuel, since I had a fire which destroyed my old fuel pump assembly (long story). AFRs are s***, need to talk to my tuner. The car is staying put until these gremlins can be solved.  Update Oct 11,2015 I went to the junkyard and picked up some parts. I replaced the fuel assembly and it seemed to fix my hesitation under boost problem. I also replaced the fuel pump, but I'm sure that my old pump was good, since the problem only came up when I replaced the fuel assembly before (so basically someone sold me a s*** fuel assembly). This also fixed my fuel level gauge fluctuation.  This little piece is connected to a breather line on the fuel tank, which connects over to the charcoal canister. I ended up losing mine when I broke my axle and the axle smacked some stuff around underneath. I believe this item is called the fuel tank check valve. This part is responsible for transporting extra gas fumes from the gas tank, into the charcoal canister to be cleaned and then returned to the intake manifold. Going further with this idea, I don't think this is related to my lean issues, it's just more of a QoL (quality of life) part, since people eliminate their charcoal canister with no issues, most people just run this line into the open air. I'm just tired of the gas smell in my car when my tank is near full (as the gas is then closer to that breather valve, which the fumes works up through the access panel in the trunk and into the cabin), lol.  More to come later, as now, since all the other issues related to my lean equation have been eliminated, I can take it to the shop and get it taken care of without them charging me an arm & leg with getting the parts themselves and spending time hunting problems I already knew existed. |
|
|
|
|
12-16-2015, 09:21 PM
|
#26 |
|
Leaky Injector
|
New Tein tie rod inners and outers w/ spacers are here along with Megan Racing silicone dust boots. I don't ever want to deal with ripped boots again, so this should cover it!
 I've never done a tie rod install before, but I've done my research and it seems quite straightforward. I was first a little daunted to tackle this since it looks like a very delicate piece of equipment to work on, but after looking at other install guides, it doesn't look difficult at all! As a side note, I was going to get SPL outers, as they have bump steer adjustment and also have a nice teflon coating, so that you don't ever have to worry about the join failing. I then noticed that the other part which I just purchased, the GKTech roll center correction kit comes with bumpsteer correction and it gives the car a s*** ton more angle, so there really isn't any need for the SPL outers other than the teflon coating. The SPL outers cost about $250 whereas the Tein tie rod combo costs $225, so I say I made the wisest choice. The GKTech part is on backorder, but I'll install everything at once. (these pictures aren't mine, but it gives me an idea on how to install this part)  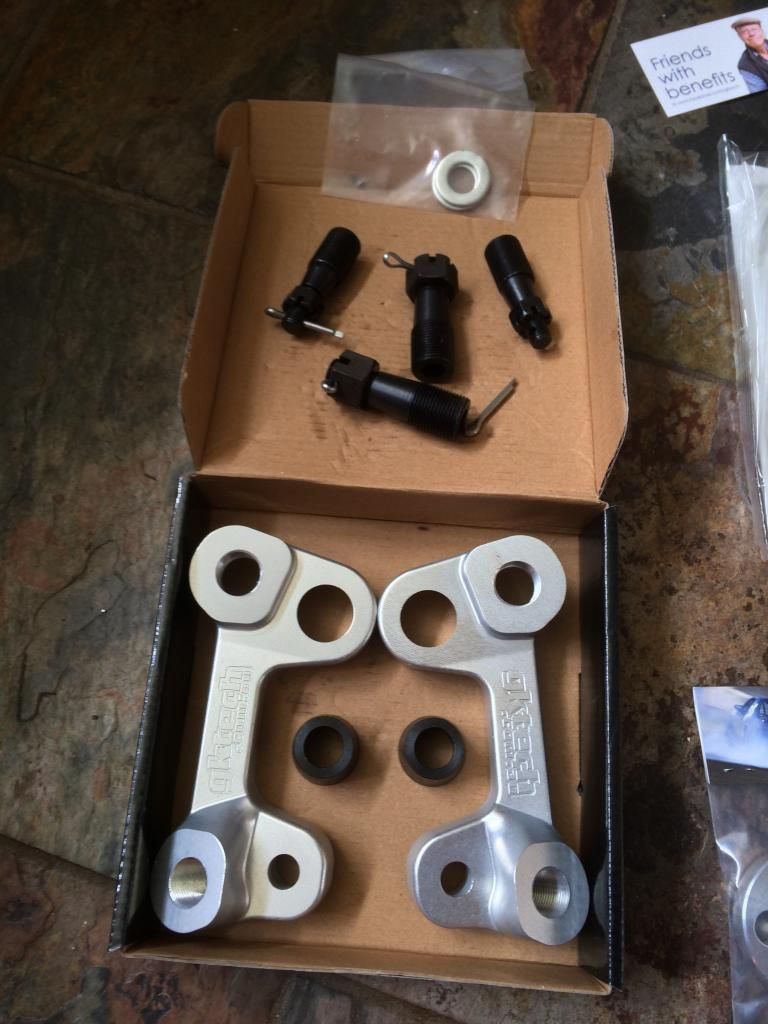 I also bought new Hella headlights. I previously had Ebay headlights (from previous owners terrible decision) and they were giving my old eyes trouble seeing at night when I went to touge on desolate roads. The only time I could really see well was with the brights on. The light focus on the Ebay lights were terrible and I knew that the Hella headlights would be a nice major upgrade. I was on the fence between Hella, Raybrig, or another brand called Trucklite (which are LED and super f**king nice). I decided all the others were too expensive and I have other things to spend my money on.  In other news, I got my car back from the shop and I guess my timing was just too high, possibly from the CAS. I'm still wondering how accurate this is, since usually the CAS only messes up if you f*** with it or the cams, which I haven't. Now though, I was out a couple nights ago, testing out my new headlights and went to about 6k rpms, spinning tires in the wet, when suddenly after I backed off, my car was sputtering. I thought I might have popped a vacuum hoes, but then I smelled coolant, uh oh. I pull over, shut the car off, as I see a little steam near the headlights. Pop the hood and see my turbo area steaming a little. I've seen the turbo do this if I do a hard shutoff without cooling down, so I don't know if that area is actually my problem, but I didn't have a clear idea of what actually was causing the leak, as it was raining outside. I got the car towed back home and have yet to touch it again. I'll give more news on what the actual problem is, but I'm hoping it's a combo of vacuum and coolant hose somewhere popping. Let's pray it's not the headgasket, cause then I'm building this motherf***er with pistons, new turbo, new clutch and wpc coatings. |
|
|
|
|
12-16-2015, 09:23 PM
|
#27 |
|
Leaky Injector
|
Update Nov 05, 2015
GKtech Roll Center Correction Kit is here! So it comes with 4 large removable studs, some washers and 4 lock nuts. I think I'm starting to get an idea of how to do this. More importantly though, I figure out if my car is working properly tomorrow, lol.  Update Nov 08, 2015 Yup, headgasket. Water is contaminating the oil, as is evident from the drops coming from the engine and the milky consistency under the oil cap and on the camshaft and it's definitely cylinder 4, as there is water slightly coming out of the exhaust manifold from that area, then into the turbo and out the downpipe. All of my intercooler piping is intact and seems like my vacuum pipes are on tight too, so there's no explaining the hesitation other than the headgasket. Looks like I'm coming back with a ridiculous beast earlier than expected. So now, as far as waiting to rebuild, will the water in my head/block f*** anything up seriously? I would imagine that rust would build over time, but since I'm getting the block honed/bored, would it really matter? I just want to know how much time I have to rebuild this in the best manner possible. Update Nov 10, 2015 Honestly, it was from all the det that I didn't get remedied early on, trying to figure out if it was really det or not until I wired up the wideband. I know I could put another HG on and call it good, but if it's already half way torn down, might as well get all the s*** I want done to the bottom end. My list so far for this rebuild: WPC treament (piston rings, rod bearings) supertech pistons gt2871r turbo headgasket arp rod bolts Act 6 puck clutch (375 or something torque) I've come to realize that the CA sucks with a journal bearing, the motor is entirely too small to have one when you keep going up in turbo size. Meth injection will come later after I want more power. Maybe in the summer. |
|
|
|
|
12-16-2015, 09:24 PM
|
#28 |
|
Leaky Injector
|
 As for the turbo, it's 48 trim, 64 A/R. I went with the .64 A/R for quicker spool. Although I would have preferred the 56 trim, as it does flow more (btw, I learned how to read a compressor map after looking up all these turbos, what trim does and how A/R effects a turbo), I couldn't pass the price up on this turbo, as it is used. Now, for the story of buying a used turbo, I AM COMPLETELY AGAINST BUYING USED TURBOS. I thought that the only way I would ever buy a used turbo is from a friend (I barely have car friends though). This turbo was rebuilt and he provided receipts of the rebuild from ATP and pictures. There wasn't a better opportunity for me to buy a used turbo than this, so I jumped on it, brushing aside the negative of the trim. Shaft play is excellent and a brand-new feel, blades look nice and all bolt holes are intact. My goal for this car is a touge beast, and I think this turbo will cover it. |
|
|
|
|
12-16-2015, 09:25 PM
|
#29 |
|
Leaky Injector
|
Update Dec 08, 2015
 New pistons and rings came in! I also found an engine builder. A couple of people on my local forum recommended this place near my apartment called Autosport Seattle. I called them and asked various questions about their equipment, tolerances and basic practices. They provided good information, better than what I received from a very popular shop I called earlier in the day. I decided to check out Autosport Seattle in person and I wasn't very impressed by the environment. The lobby was a mess, with books and parts lying around. I then got to talk to one of the machinists and he was immediately familiar with the SR20. I told him my engine was a little different, being that it's an iron block, not aluminum. I guess he's also the builder of Walker Wilkerson's motor and is used by another reputable shop for all their machine work. I think this is the place for my motor! |
|
|
|
|
12-16-2015, 09:25 PM
|
#30 |
|
Leaky Injector
|
Update Dec 15, 2015
ARP Rod Bolts Act 6 Puck Clutch Exhaust Manifold Gaskets (I've reason to believe that my current gasket is leaking because when I blew the headgasket, water was coming out of the exhaust manifold gasket area. Just cheap insurance for now) ATP GT28 Oil Fitting  |
|
|
|
|
| Bookmarks |
|
|


 Linear Mode

