|
|||||||
| Home | Rules & Guidelines | Register | Member Rides | FAQ | Members List | Social Groups | Calendar | Mark Forums Read |
| Builds (and builds only) Got a build thread? It goes here, build threads anywhere else on the forum will be locked and never moved. |
 |
|
|
Thread Tools | Display Modes |
 02-22-2016, 07:31 PM
|
#1 |
|
Zilvia Junkie
 |
1999 E36 M3 RB26dett project
Hello fellow members. I am starting this thread to share and document my experience i have had and will have with this project of mine. After many other project cars in my past such as a Lotus Elise, Lotus Exige, Dodge viper, and Noble M400, I wanted to get my hands back on something that i could be a little more involved in. I enjoy tinkering and modifying cars of mine, and had the want to start a project that was unique and more challenging than the typical.
I'm sure its safe to say that a lot of people on here have the same love and desire to own an authentic GTR at some point in out lives. I decided to look around at the different options to swap an RB26, but as said before, didnt want to take the typical route of swapping an s13/s14/datsun cars. While on this search, I stumbled across a group named Dryden Motorsports that made a mount kit for the European E36 chassis and the RB26dett motor set. I picked up this kit first and then started my search of the perfect donor car for a new heart. Before too long, I came across a 1999 M3 in Nashville Tennessee that i felt like I could not pass up. Alot of people said that spending the extra money to get a true M3 would be a waste of money as the sedan or more basic coupes could be had for a fraction of the price. This car just spoke to me though as it had little modifications and made a perfect blank canvas to start my journey. Without further a due, here is a couple pictures of the car as it was when i bought it and drove it back home to Kentucky.... I dont have many pictures of how it started, but you get the idea...     I also had the RB26 motor set shipped to me along with the mount kit and custom sump sitting and waiting for me when i got home with the car. here is a quick shot just for record as well.....  As i started I started to plan out my plan of action, I first convinced myself that I just wanted to freshen up the motor with oem parts and run the stock twins at stock boost. Then of course the modifying bug bit me. I convinced myself that I may as well go balls out and do as much as I can, and should ever want to while the motor was out. After considering all options and contacting many different shops to handle the build of the longblock, I decided to trust the guys at Raw Brokerage with the build. I sent them my long block along with a mess of goods to include: Wiseco Forged pistons, Manley H-beam, ACL rod/main bearings, ARP rod bolts, ARP main studs, ARP head studs, Nitto crank extended crank collar, N1 oil pump, OEM water pump, Tomei MLS headgasket, Tomei Oil restrictor, Greddy timing belt and new tensioner/idler. Along with this I sent a complete OEM gasket set. They worked their magic and did all the machine work to include the stage one short block, and the Stage one cylinder head. They bolted the long block back together to torque spec and i received this piece of art back on a pallet via UPS....         and here is the motor after i got to work installing the intake plenum back on, along with having the oem manifold sand blasted to a clean cast look....  I will leave this post with a quick shot of the mounts that i received from Dryden Motorsports   I will continue to update this thread with my endeavors..... Last edited by dcreech0; 02-25-2016 at 08:35 PM.. |

|

|
| Sponsored Links |
|
02-25-2016, 08:05 PM
|
#2 |
|
Zilvia Junkie
|
From here i was very quick to start pulling the BMW's drivetrain and came out with this.....
  I also took this time to mate up my Spec stage 3 clutch the Raw Brokerage provided me. I also took my RB25det Transmission to a local shop here and had the dis-assemble and inspect. I was very relieved to hear that all was good to go internally. they actually told me they were quite surprised on how clean it was inside. I will also attach a picture of the first time I mated the tranny to the motor....    more later..... thanks for viewing - - - Updated - - - sooooooo, on my first attempt on placing the motor into its new home, I learned a few things that may need some minor tweaking. So when i mentioned earlier that i was planning a minor build, this eventually turned into this built motor idea, so of course we need more boost correct? lol. I decided to pick up a set of Greddy T517z's off an R32 in Australia. Man were these thing beautiful.... not to mention they have a $3000 plus price tag new......   not all good things can be true though. I soon found out that these turbos would not work. First issue was that the mounts I planned on using was made for the oem size turbos and not a larger frame like the Greddy units. Once I tried to install the mounts, I found they came in contact with the exhaust housing and does not allows the mount arms to mount to the motor.... sad times.  so back to the drawing board in the forced induction side of things......... I decided it may be time to consider going to a large single - - - Updated - - - While cleaning up my tears on the turbo issues, I decided to make my first test run of installing the motor/tranny and moving forward from there. After the first attempt to install, It was not easy by any means. for some reason I could not get any of the holes to line up to where i was comfortable. I eventually decided to ditch the rubber mounts that came with the Dryden kit and source my own. I think that another member on this forum doing an RB25 swap had the same issues and correct the issue himself, so i decided to follow suit. I found myself be be highly resourceful and made a set of 240sx poly mounts made by Circuit Sport work perfectly.  i will also use this post to explain how i made the power steering and the cooler work with this swap. I decided to use a Chasebays power steering reservoir, Earl's pwer steering braided lines, and found the perfect cooler made by Derale that mounted in the OEM location and had -6an fittings. I also had to use a couple an adaptors on the steering rack as well, but was very happy with the outcome....    - - - Updated - - - my next puzzle that I decided to tackle was going to be the radiator issue. The OEM BMW radiator caused its own set of issues. First issue was going to be the inlet was on the incorrect side for the RB motor. The second issue was how the OEM radiator mounted left ZERO clearance with the PS pump. They physically touched. From here, I knew that i would going to have to be resourceful on picking a radiator and tuck it under the radiator support. I decided to take a Mishimoto unit from an S14 and making my own brackets. I had to grind down the frame horns, and trim up the radiator support a little, but came out with this. I will attempt to get a picture soon of the clearance this game me and update this post   |
|
|
|
|
02-25-2016, 08:28 PM
|
#3 |
|
Zilvia Junkie
|
Next up was to decide what route I was going to take with the forced induction department. I decided that going to a larger single may be the way to go to utilize the space I have and to take full advantage of the motor that I have built from top to bottom to handle a fair amount of boost.
For the manifold, I turned to the guys over at DOC RACE to churn out a beautiful manifold for me. These pieces really are works of art. They hand weld all of their units and hand port them before shipping them out to customers. I decided to go with a single scroll with a Tial MVR wastegate flange. On a side note, I found a good deal on a Tial MVR and Tial blow off valve. I emailed back and forth with Tial and confirmed they were authentic. On to some pictures.      for the turbo, after much debate and searching I decided to settle on a brand new Precision 6766 with the posted H cover. I was surprised on how massive this thing was when i first held it in person..... I will put up a picture of the turbo by my daughter for reference. LOL  The intercooler, I decided to choose the Treadstone TR1235. I read many good things about this unit, and it actually is a very stout unit for the money. Very well built. The end tanks even have a baffle to divert air evenly throughout the core....   Fueling..... So far I have collected parts to include a Sard billet fuel rail, Injector Dynamics 1000cc injectors, Aeromotive adjustable fuel pressure regulator, and a Fuelab pressure gauge.... I am still debating on what route to take with the fuel pumps. I plan on making custom stainless steel braided lines. Here are some pictures.....     |
|
|
|
|
02-25-2016, 08:33 PM
|
#4 |
|
Zilvia Junkie
|
Last couple updates for you all. I took some time to get the turbo mounted where it is going to be. Man will it be a tight squeeze, but i think I can make it work. I am leaning towards purchasing the Chase Bays ABS delete, and maybe the booster delete from them as well to make more room for the downpipe.
I also spent some time finding a solution to mounting the oil cooler. I knew i was going to put it in the kidney bean grills, and ended up just bolting it down to the bumper beam. I will post a picture to explain. I'm not sure of how to route the lines though as it is a tight fit in there. The whole oil cooler set up consists of Earls spin on adapter, Earls Billet remote filter mount, Earls remote oil thermostat, and a Mocal 10 row oil cooler.   I also found a local group here to me that does some nice work. I will let the pictures speak for themselves on the before and after...     I also received a nice package from Wiring Specialties. They are also a nice group of guys that do good work...  |
|
|
|
|
02-26-2016, 07:27 AM
|
#5 |
|
Zilvia Junkie
|
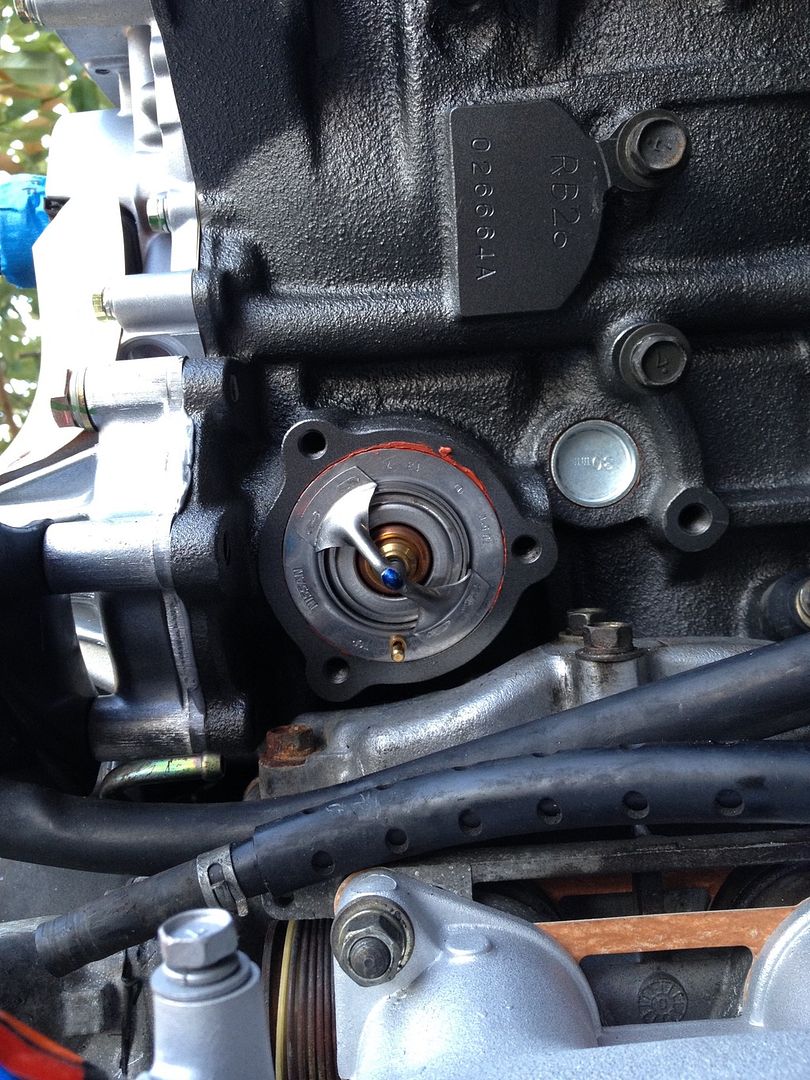
Hello again friends. Just a small update. Had time lastnight to fit the new valve cover gaskets, new half moon seals in the rear of the heads, and clean up the pcv baffles a little bit. I loosely placed the covers back on the head and stood back to take a glance.
 |
|
|
|
|
02-26-2016, 09:00 AM
|
#7 | |
|
Zilvia Junkie
|
Quote:
|
|
|
|
|
|
02-26-2016, 09:12 AM
|
#9 |
|
Nissanaholic!
 Join Date: Apr 2003
Location: Austin, TX
Age: 39
Posts: 2,183
Trader Rating: (33)
 Feedback Score: 33 reviews
|
Hell no dude that is a bad ass build. I love the rarity of the swap and i love the chassis and motor/trans setup separate from each other....together it is the tits.
|
|
|
|
|
02-26-2016, 09:19 AM
|
#10 | |
|
Zilvia Junkie
|
Quote:
 |
|
|
|
|
|
02-26-2016, 10:28 AM
|
#12 |
|
Zilvia FREAK!
 
|
Mad props for doing something different!
|
|
|
|
|
02-26-2016, 10:59 AM
|
#14 | |
|
Zilvia Addict
 
|
Quote:
 |
|
|
|
|
|
02-28-2016, 07:19 AM
|
#22 |
|
Nissanaholic!
Join Date: Jan 2010
Location: location X
Posts: 1,815
Trader Rating: (10)
Feedback Score: 10 reviews
|
good shit. finish this build and sell the car to me.
__________________
http://www.240sxforums.com/forums/rb...ject-s-rb.html |
|
|
|
|
02-28-2016, 10:06 PM
|
#23 |
|
Zilvia Junkie
|
Ok, I had just a little time to work on the car this weekend. I decided to tackle the oil cooler issue. I listed in a previous thread the parts I was planning on using, but had spent that last week or so deciding where to mount the remote filter mount and where to mount the remote thermostat block. I bought most of the goods from Summit Racing, and chose the brand of Vibrant racing for the fitting and hoses. After dealing with these and Fragola, I would have to say that the Fragola was easier to assemble. After mounting the filter mount, I had to go find a filter that was a good fit for it. I brought the Earls part with me to walmart and tried many different filters, but ended up going with the K&N PS1002. I know that i will have to drop the oil and change this filter after running the motor for the first time. Anyway, On to a couple pictures. The black lines are a little tough to see, but I think you will get the point....
        I also spent just a little time trying a location for the FPR and ran my first line from the rail. I ran out of daylight and had to stop before making any more progress....  |
|
|
|
|
03-01-2016, 08:10 AM
|
#24 |
|
Zilvia Junkie
|
Hello again all. Just a small update. Not a whole lot to report. I ordered a Fuelab fuel filter lastnight and I should be able to make very good progress and getting the fuel lines finished up.
I spent some more time lastnight getting the ID1000's sitting in the rail/manifold how I would like them. Man it hard to explain in words, but the rubber grommets on the feet of the injectors are so hard to get into the motor. Anyway, after I got them all in and I carefully dropped the fuel rail over the injectors, I noticed a problem. Not a huge problem, but still has me in a small pickle. The rail spacers that came from Sard are too small for the height of the injectors.  I will have to see about getting some new spacers machined. I will have to see about getting some new spacers machined.  |
|
|
|
|
03-01-2016, 08:51 AM
|
#25 |
|
Post Whore!
 |
No big deal. Go to home depot and purchase a set aluminum rod and cut down. Or, they do sell specific lengths of aluminum (or if you so please, nylon, which work just as well) spacers. Just measure up, run over, and $5 later you are all set!
Had to do the same for every single aftermarket rail I bought as injectors lengths vary so much between manufacturers (and just the simple fact every single manufacturer makes several different lengths to begin with). Good work so far! |
|
|
|
|
03-03-2016, 06:10 AM
|
#27 | |
|
Zilvia Junkie
|
Quote:
|
|
|
|
|
|
03-03-2016, 10:43 AM
|
#28 | |
|
Premium Member
 
Join Date: Jun 2003
Location: torrance, ca
Age: 42
Posts: 12,684
Trader Rating: (130)
 Feedback Score: 130 reviews
 |
very cool build! i dig it.
__________________
 http://outslidersandsmokeproduce.blogspot.com/ Quote:
|
|
|
|
|
|
03-04-2016, 04:24 PM
|
#30 |
|
Zilvia FREAK!
|
I'm having the same issue with my rail as well. I did not think about home depot having aluminum rod. Easy fix and great idea. I was going to use washers but that's better.
__________________

|
|
|
|
|
| Bookmarks |
| Thread Tools | |
| Display Modes | |
|
|


 Linear Mode

